
Every real snowflake has six sides, and that one fact makes drawing one much easier than it looks. Once three straight lines cross in the middle, the page already tells you where all six arms go. In this lesson I'll show you how to draw a snowflake step by step, from a plain guide circle to an icy blue crystal with branching arms, pointed tips and two tiny flakes drifting beside it. The trick: draw each detail six times before moving on.
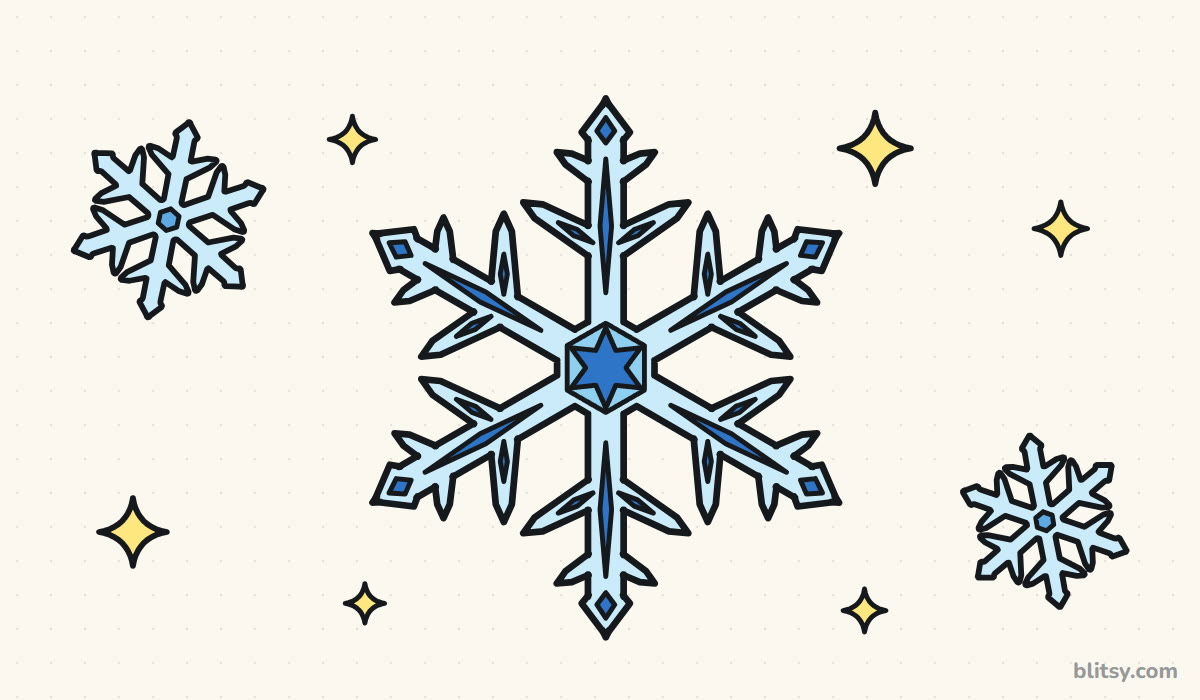
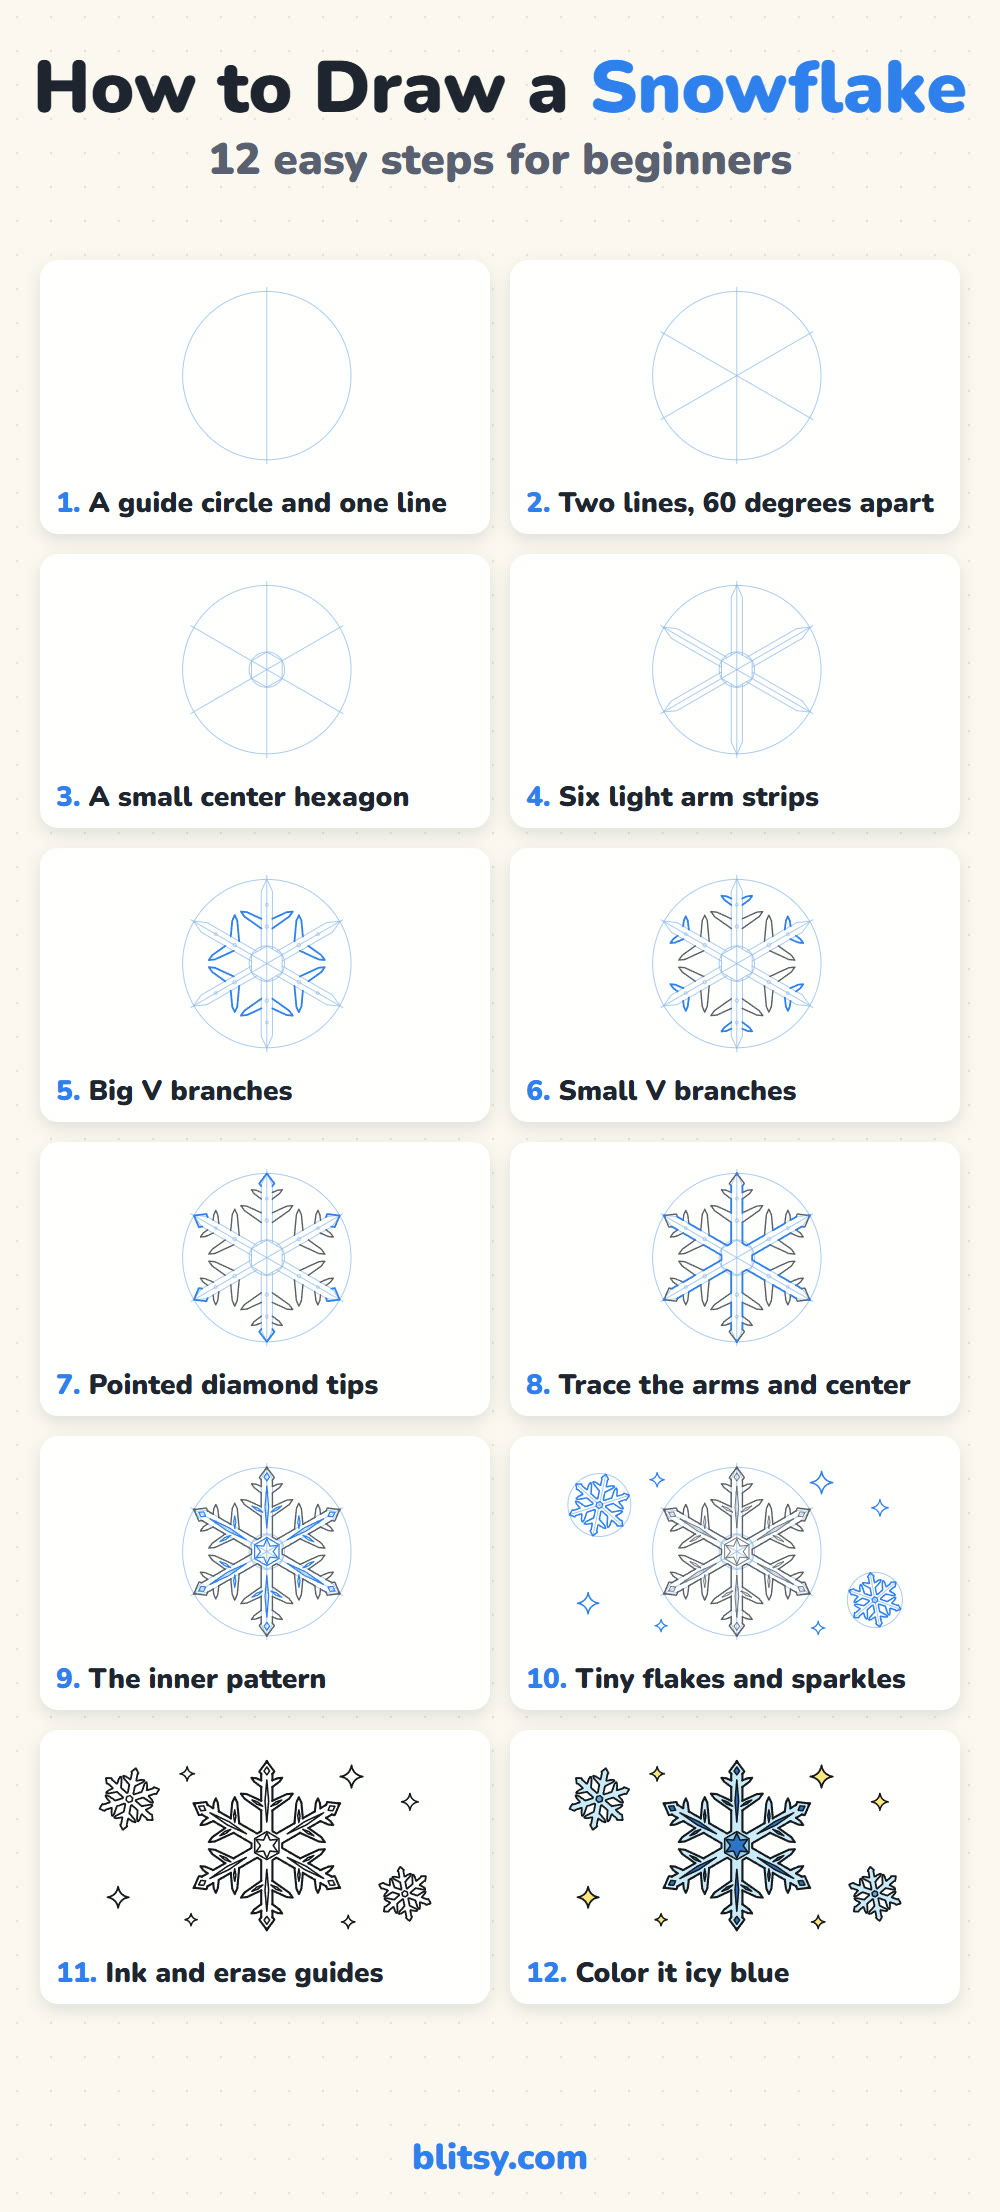
In every step picture, the blue lines are the new ones to copy and the gray lines are already done. Faint light blue lines are guides you'll erase at the end.
Quick overview
⏱️ Time: about 30 minutes, coloring included
🎯 Level: easy, fine for kids from about 7 with a ruler
✏️ Steps: 12
❄️ You'll draw: a six-pointed snowflake plus two tiny ones
Ruler, Pencil and Blues for Crisp Ice Crystals
- A pencil you can press lightly (HB works well)
- A ruler for the three guide lines
- A soft eraser
- A black marker or fineliner for the final outline
- Colored pencils in light blue, sky blue, dark blue and light yellow
- White paper, or light gray paper if you want the ice to glow
A ruler really helps here, because a snowflake shows every wobble in a straight line.
How to Draw a Snowflake Step by Step
Step 1: Draw a guide circle and one straight line
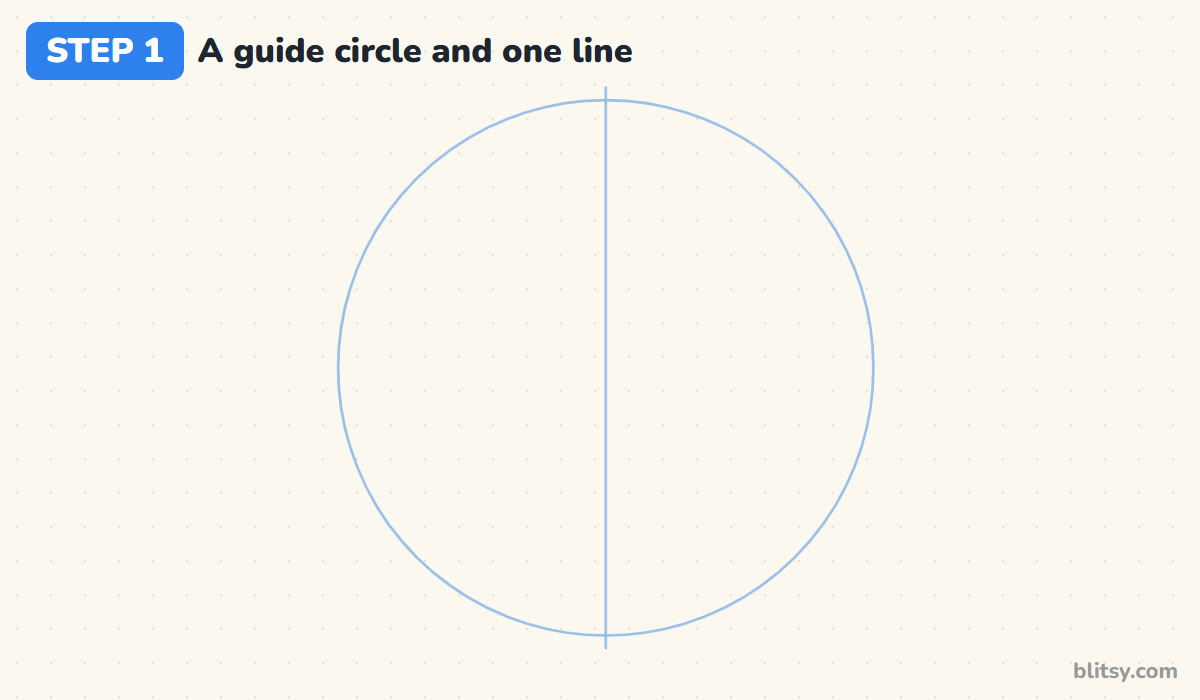
Draw a big light circle in the middle of your paper. It sets how far each arm will reach, so all six end up the same length. Then rule one straight line from top to bottom right through the center, running a little past the circle on both ends.
💡 Tip: Trace around a cup or a roll of tape if your freehand circles come out lumpy.
Step 2: Add two more lines, 60 degrees apart
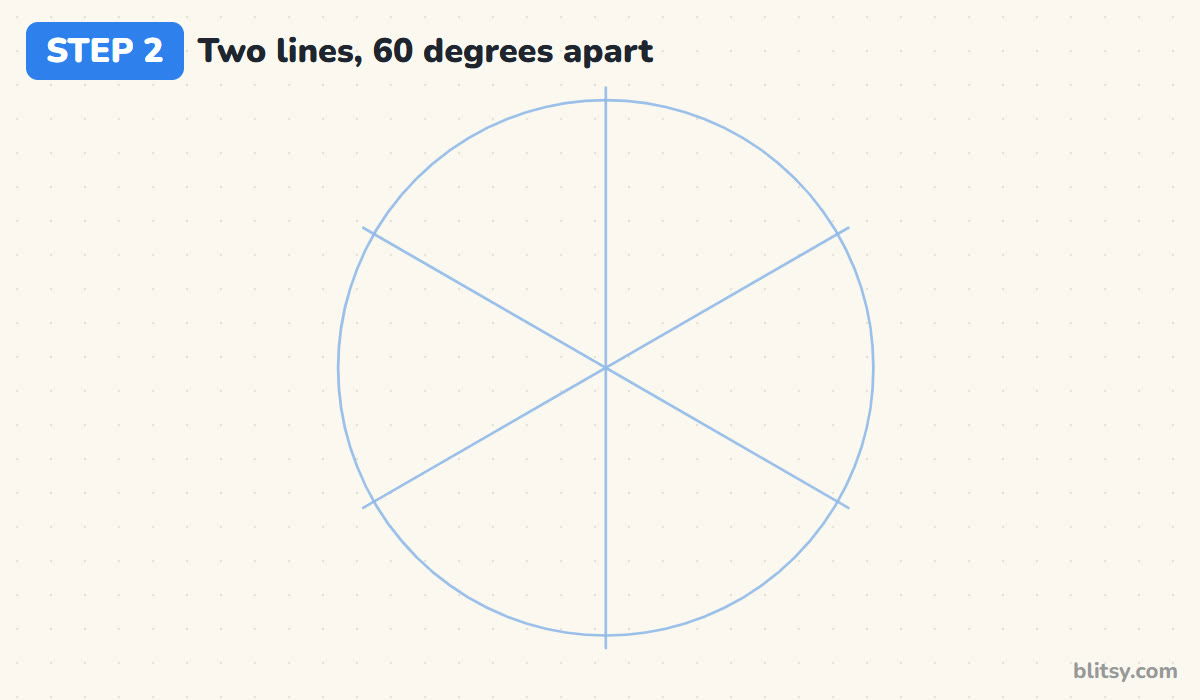
Now rule two more lines through the same center point, slanting so all three lines split the circle into six equal slices, like a pizza cut three times. Each line sits 60 degrees from its neighbors. Snowflakes grow six arms because ice crystals have six sides, and these lines show exactly where the arms go.
💡 Tip: Check the slices by eye: if one looks fatter than the others, nudge that line before you go on.
Step 3: Draw a small hexagon in the center

Around the center point, draw a small circle about one fifth as wide as the big one. Inside it, connect the six spots where the guide lines cross the little circle with straight lines. You get a hexagon whose corners point along the guides, which is where the arms will grow from.
💡 Tip: Keep the hexagon small. A big middle squeezes the arms and makes the flake look like a wheel.




Step 4: Sketch six light arm strips
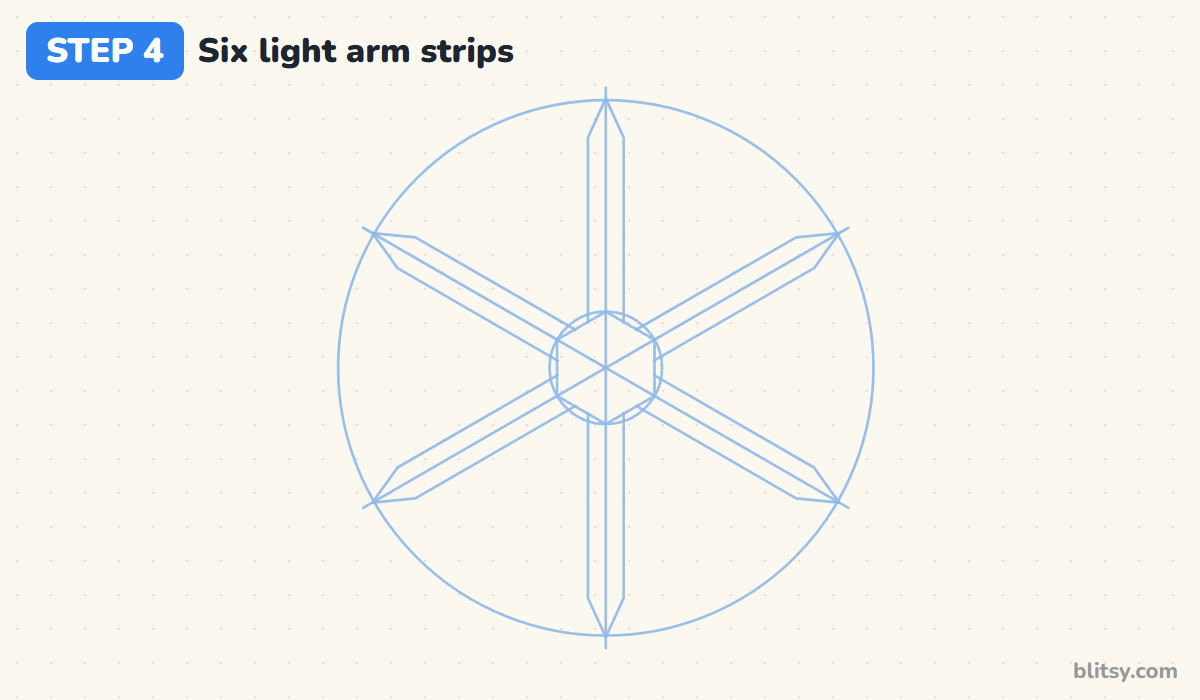
Along every guide line, draw a narrow strip from the hexagon out to the big circle, ending in a point. Keep these light, since only parts of them stay. I treat each strip as two parallel lines hugging the guide, about a finger width apart, and I draw all six at the same width.
💡 Tip: Turn the paper as you go so you are always drawing the strip straight up, away from you.
Step 5: Add the big V branches
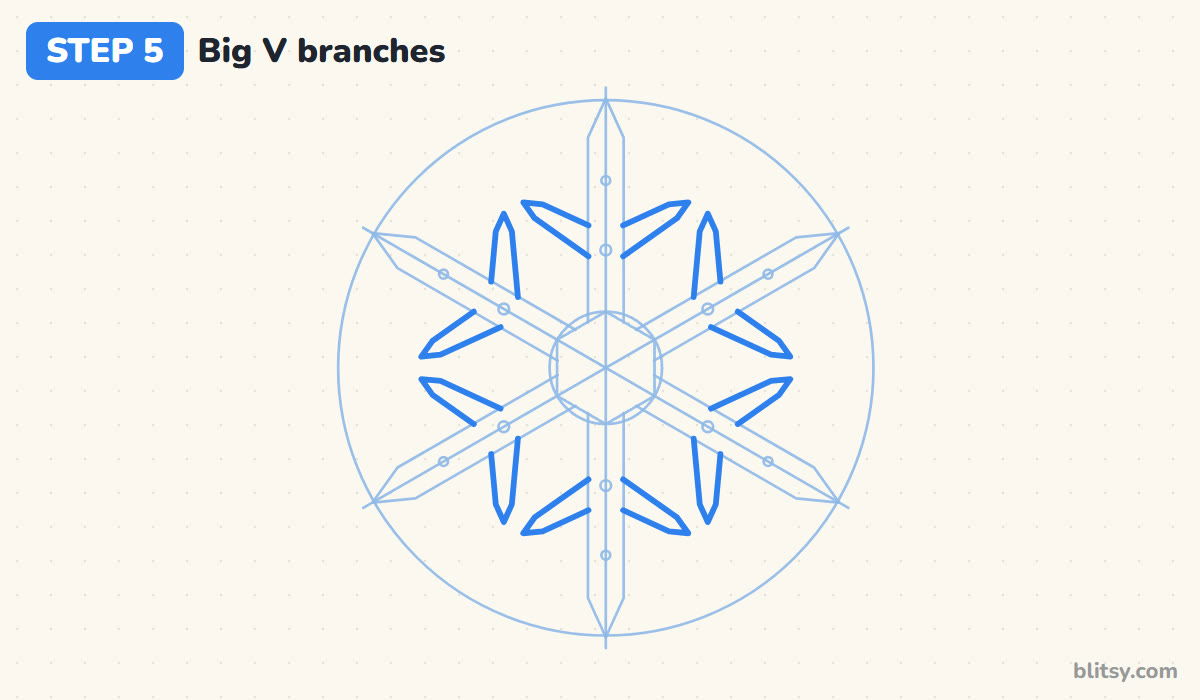
Mark a dot on each arm a bit less than halfway out. From each dot, draw two tapered branches angling outward, one on each side, so each arm gets a V. Each branch runs parallel to the next arm over, which is why the flake looks so tidy.
💡 Tip: Draw the same branch on all six arms before starting the other side. Repeating one move six times keeps them even.
Step 6: Add small V branches near the ends
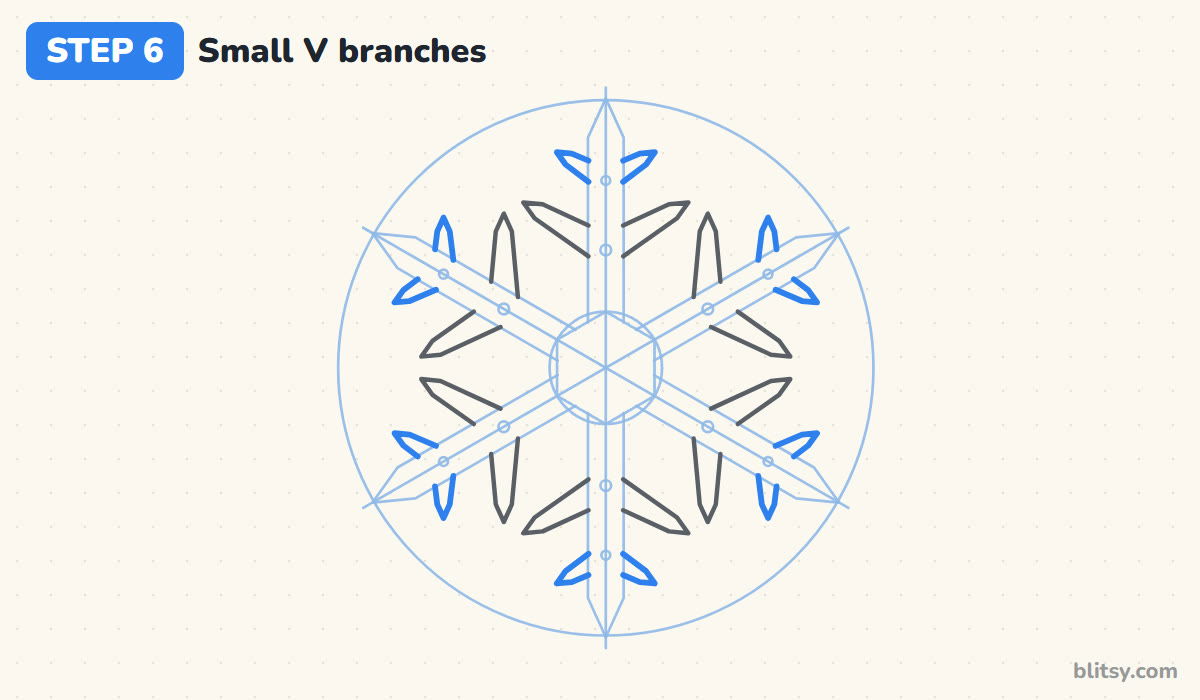
Further out, about two thirds of the way along each arm, add a second, smaller pair of branches at the same angle. These should be roughly half as long as the first ones. Small ones near the tip and big ones near the middle is the pattern that makes the arm look like a little frosted tree.
💡 Tip: If you run out of patience, skip this pair. A flake with one V per arm still reads fine.
Step 7: Give every arm a diamond tip
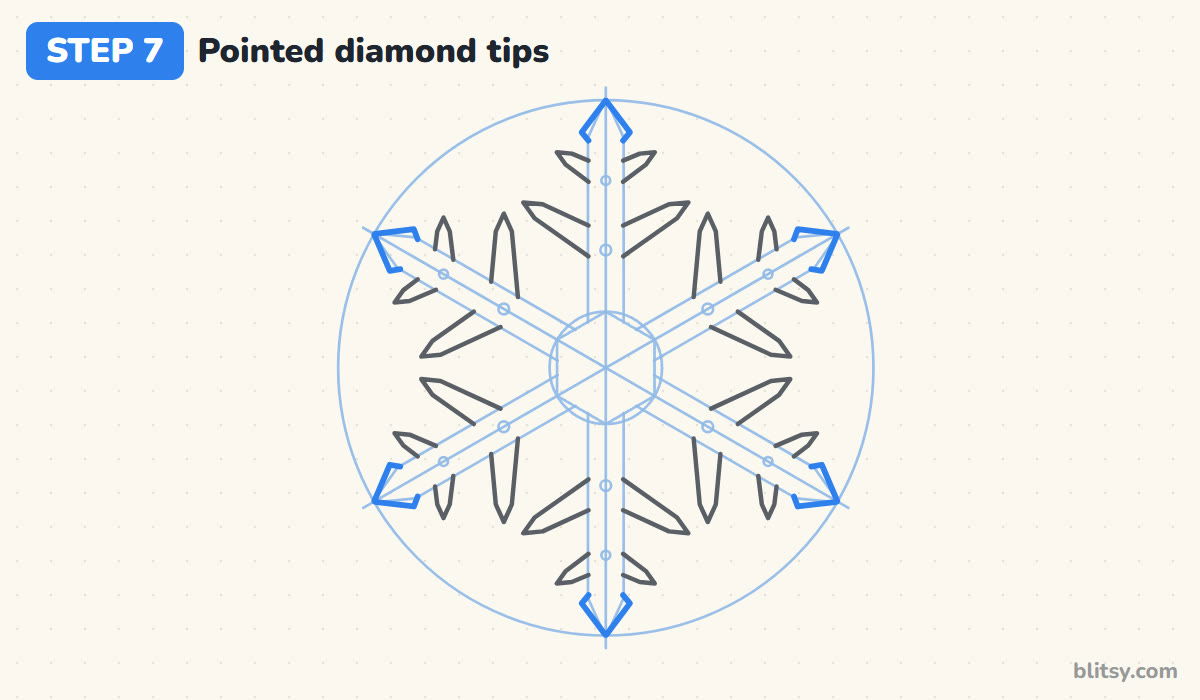
At the end of each arm, draw a diamond shape that is a bit wider than the arm itself, with its front point touching the big guide circle. The diamond gives the snowflake its crisp, crystal look. Only draw the edges that stick out past the arm strip.
💡 Tip: All six diamond points should land right on the guide circle. That is how you know the arms are equal.


Step 8: Trace the arms and the center
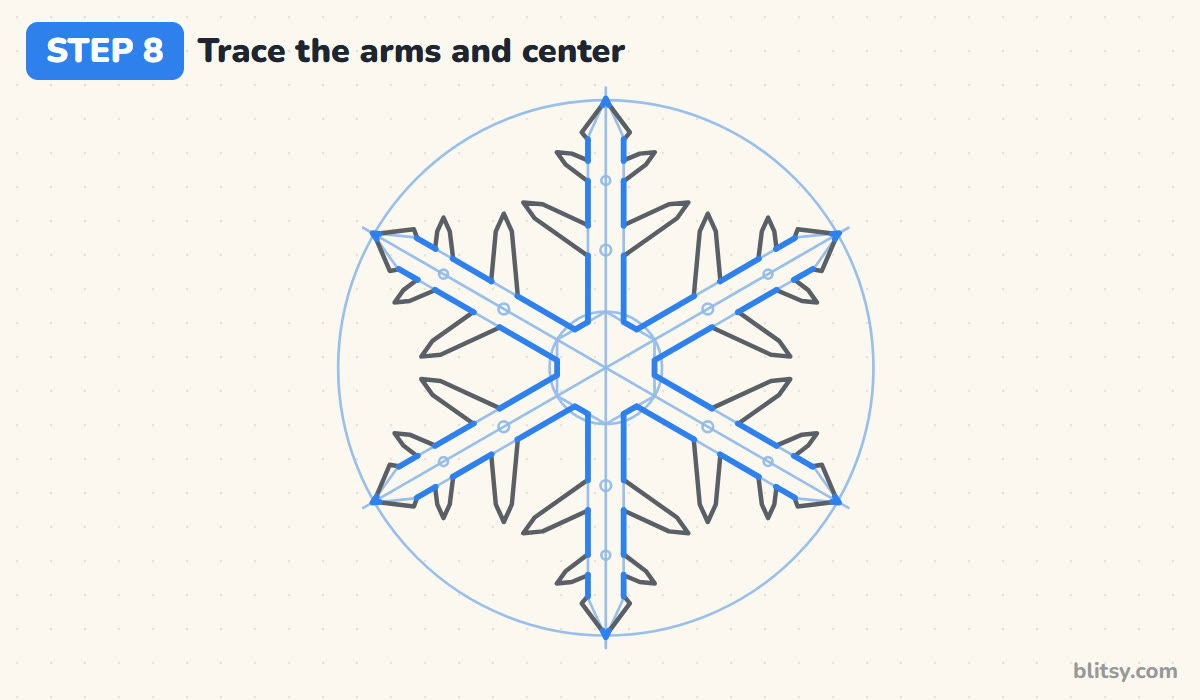
Now firm up the arm strips, but only the parts between the branches, so each arm becomes one smooth outline that flows into its spikes. Do the same with the hexagon edges between the arms. Most beginners trace the whole strip and end up with lines cutting across the bottom of every branch, so stop wherever a branch begins.
💡 Tip: Press harder on this pass so you can tell the keeper lines apart from the guides.
Step 9: Draw the inner pattern
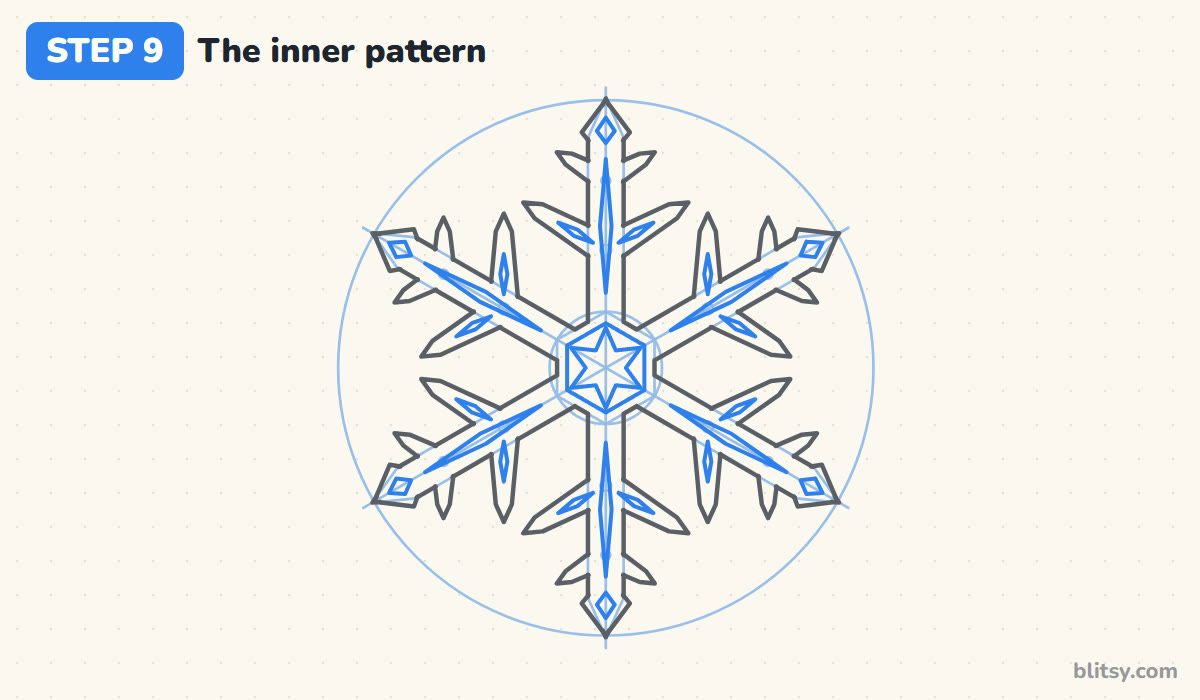
Inside the hexagon, draw a second, slightly smaller hexagon and a small six-pointed star in the middle. Then draw a long thin diamond down every arm, a slim one inside each big branch and a tiny diamond inside each tip. These get the dark blue later and make the flake look like carved ice.
💡 Tip: Make the inner shapes thin. Fat ones swallow the light blue and the arms turn muddy.
Step 10: Add two tiny snowflakes and sparkles
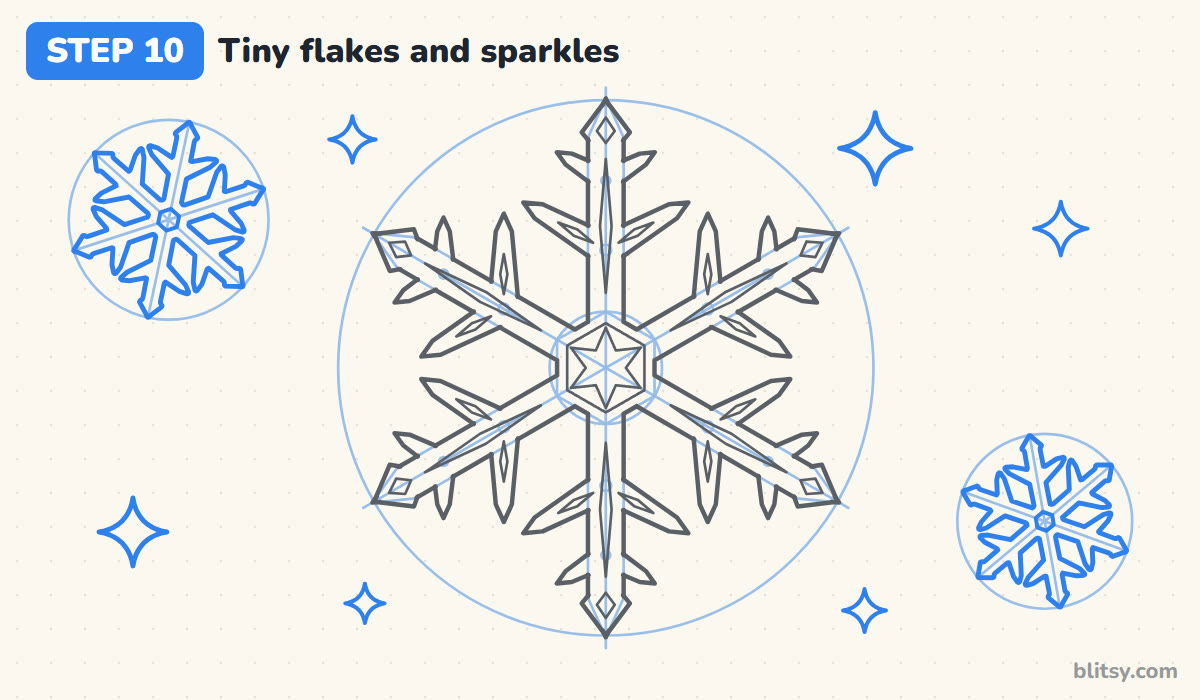
Off to the sides, draw two small snowflakes the same way in miniature: a circle, three crossing lines, six arms with one V each and a small hexagon center. Tilt them slightly so they look like they are drifting. Then add a handful of four-point sparkles in the empty corners, a couple bigger and the rest small.
💡 Tip: Keep the tiny flakes simple. They are there for company, not to compete with the big one.
Step 11: Ink the outlines and erase the guides
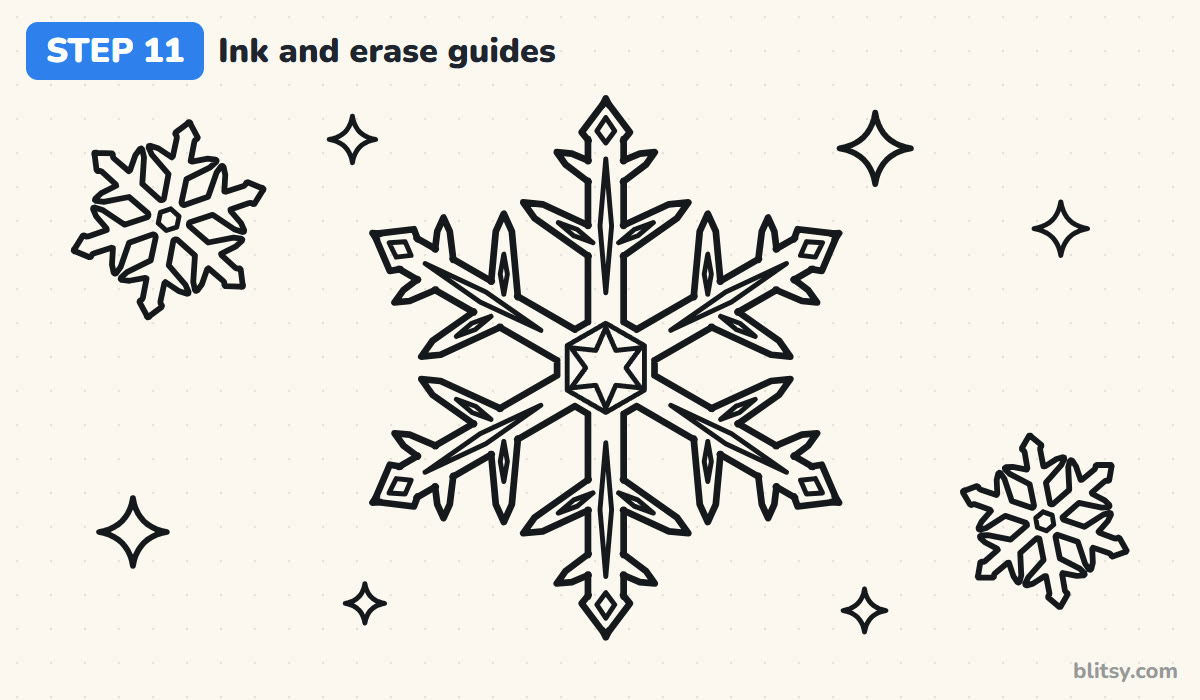
Go over every keeper line with a black marker. I ink the big flake first, one arm at a time, rotating the paper, then the inner pattern with a lighter touch. After the ink dries, erase the circle, the three guide lines and the leftover strip lines until only the clean crystal remains.
💡 Tip: Wait a full minute before erasing. Marker smudges are the hardest thing to fix on a white snowflake.

Step 12: Color it icy blue
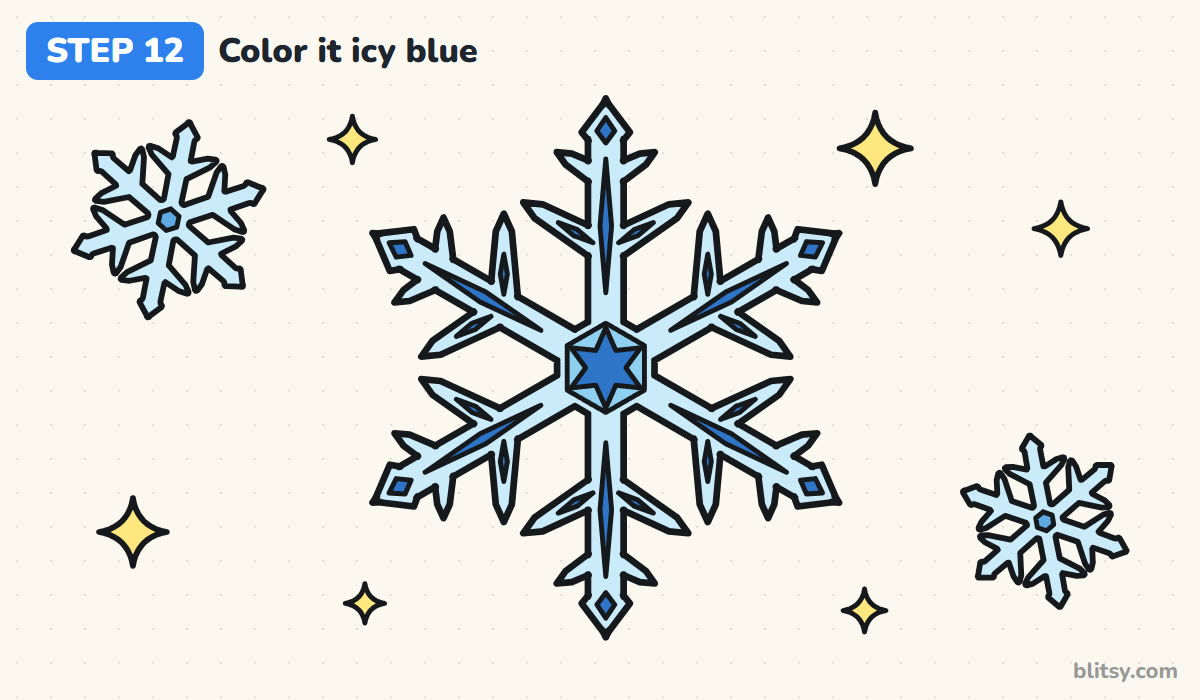
Fill the big snowflake and the two small ones with light blue, keeping your strokes soft so the ice looks pale. Use sky blue for the hexagon ring, dark blue for the center star, the arm diamonds and the tip diamonds, and medium blue for the tiny flakes' centers. Light yellow sparkles finish it off.
💡 Tip: Leave a few thin white gaps in the light blue. They look like glints of light on real ice.
Lopsided Snowflakes and How to Fix Them
- Eight arms instead of six. Two lines crossing make four arms and it is tempting to add a cross for eight. Real snowflakes always have six, so use three lines.
- Arms of different lengths. Freehand arms drift. Let the guide circle decide where every tip stops.
- Branches at random angles. If one V is wide and the next is narrow, the flake looks broken. Keep every branch parallel to the arm next door.
- Tracing the whole arm strip. Lines crossing the base of each branch make the arms look chopped. Trace only between the branches.
- Coloring everything dark. Dark blue all over hides the pattern. Keep most of the flake pale and save dark blue for the thin inner shapes.
Snowflake Designs You Can Invent Yourself
Once the six-way grid is on the page, you can design a brand new snowflake every time. Swap the V branches for little circles, give the arms three pairs of spikes instead of two, or round the tips into teardrops. Younger kids can stop after the arms and the big V branches and still have a proper snowflake. For a frosty friend to stand under your snowfall, try this snowman drawing tutorial. If you liked working with guide circles and spokes, the star drawing step by step uses the same idea with five points, and the mandala drawing lesson takes symmetry even further.
Free Snowflake Coloring Page and Step Guide PDF
The free snowflake coloring page has a colored model at the top, a small key that matches each color to its part, and a large outline to color underneath. The step-by-step PDF guide holds all 12 steps with pictures and tips, handy for a quiet winter afternoon away from the screen. Both print on Letter or A4.
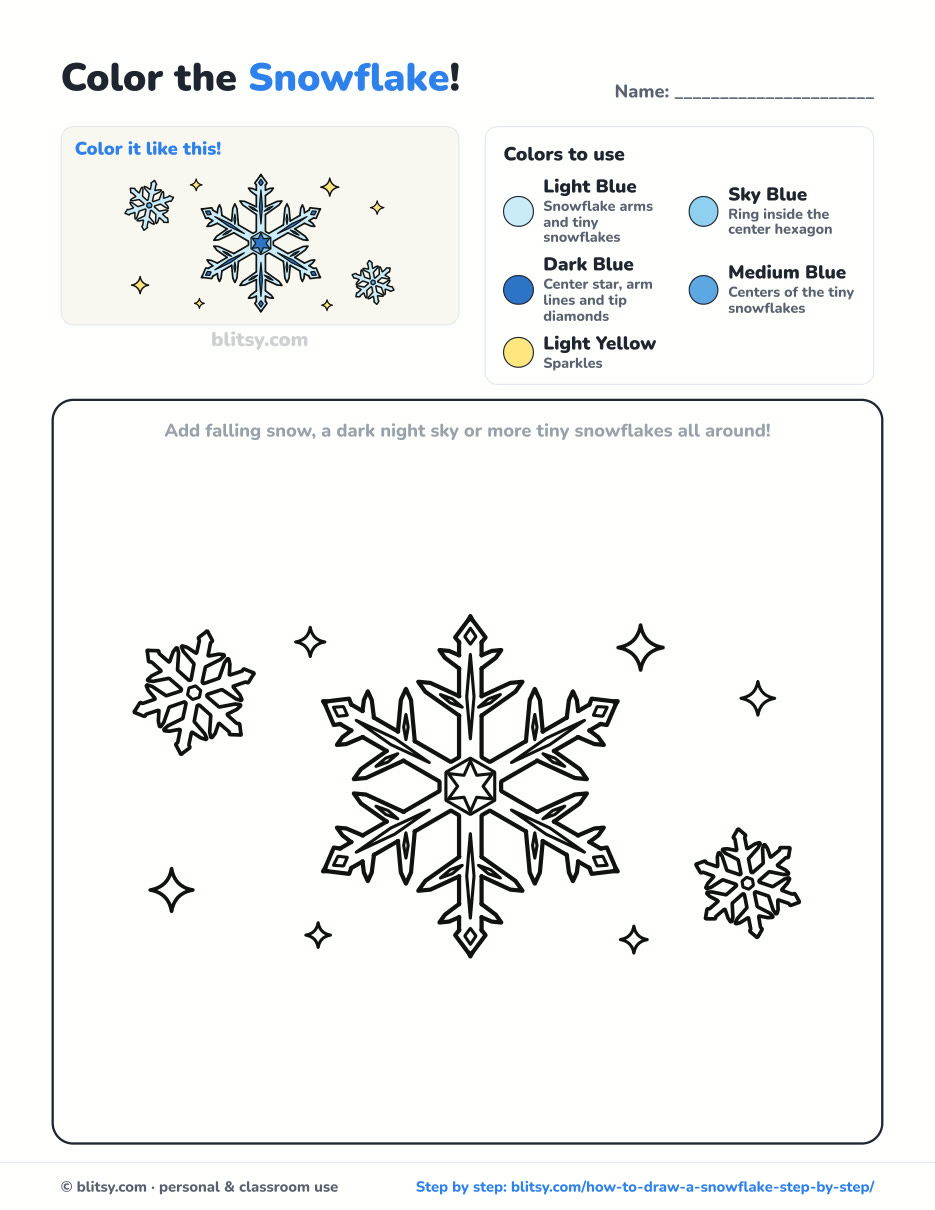
Black outlines with a colored example and the color names at the top. Ready to print and color.
⬇️ Download Coloring PageEvery step picture with its instructions and tips, to keep beside your paper while you draw.
⬇️ Download Drawing Guide📱 On a phone? Tap a download button, then open the file and choose Share → Save to Files or Print. On a computer, the PDF opens or saves straight to your Downloads folder.
Snowflake Steps on One Pinnable Page
More Wintry Drawings to Pair with Your Snowflake
Each one is a full step-by-step tutorial with a picture for every stage, so you can build a whole snowy scene.
- Snowman Drawing: A classic snowman in a black top hat and a striped scarf starts as three light circles in this snowman drawing tutorial.
- Star Drawing: Build a perfectly even five-point star on two guide circles, then shade it like a gem, in this star drawing step by step lesson.
- Mandala Drawing: Grow a colorful eight-part mandala one ring at a time with this mandala drawing tutorial.
- Penguin Drawing: A friendly cartoon penguin grows from one egg shape in this how to draw a penguin step by step guide.
- Polar Bear Drawing: A chubby polar bear sits on a cracked ice floe in this polar bear drawing tutorial.
Snowflake Drawing Questions from Kids and Parents
How many points does a snowflake have?
Six. Ice crystals form in a six-sided pattern, so a snowflake drawing should have six arms, built on three lines crossing in the middle.
What is the easiest way to draw a snowflake for kids?
Rule three crossing lines through one dot, then add a small V on each of the six lines. That alone looks like a snowflake. The diamond tips and inner pattern are extras.
How do you make a snowflake drawing symmetrical?
Use a guide circle so all arms end at the same distance, and draw each detail six times in a row, turning the paper after every arm.
What colors should I use for a snowflake?
Light blue for the body, a darker blue for the inner lines, and white or pale yellow for sparkles. On dark paper, a white gel pen looks great too.
No two snowflakes are alike, so once you have this one down, try inventing a second with your own branches. ❄️✏️
Related posts:
 How to Draw a Car Step by Step (Easy Drawing for Beginners)
 How to Draw a Whale Step by Step (Easy for Beginners)
 How to Draw an Arctic Fox Step by Step (Easy for Beginners)
 How to Draw a Chicken Step by Step (Easy for Beginners)
 How to Draw a Snowman Step by Step (Easy for Beginners)
 How to Draw an Airplane Step by Step (Easy Jet for Beginners)
 How to Draw a Mouse Step by Step (Easy for Beginners)
 How to Draw a T-Rex Step by Step (Easy for Beginners)
 How to Draw a Pig Step by Step (Easy for Beginners)
 How to Draw a Minion Step by Step (Easy for Beginners)
 How to Draw a Yorkie Step by Step (Easy for Beginners)
 How to Draw a Notebook Step by Step (Easy for Beginners)

