
Big dragon, small drawing. Charizard looks complicated with those wings and that fiery tail, yet the chibi version is mostly ovals plus one curvy line. Here you'll learn how to draw charizard step by step, from two pencil guides to an orange dragon standing on stubby feet with a grin on his face. This is my simple fan-art version for practice, not official Pokémon art, so feel free to change it as you go.
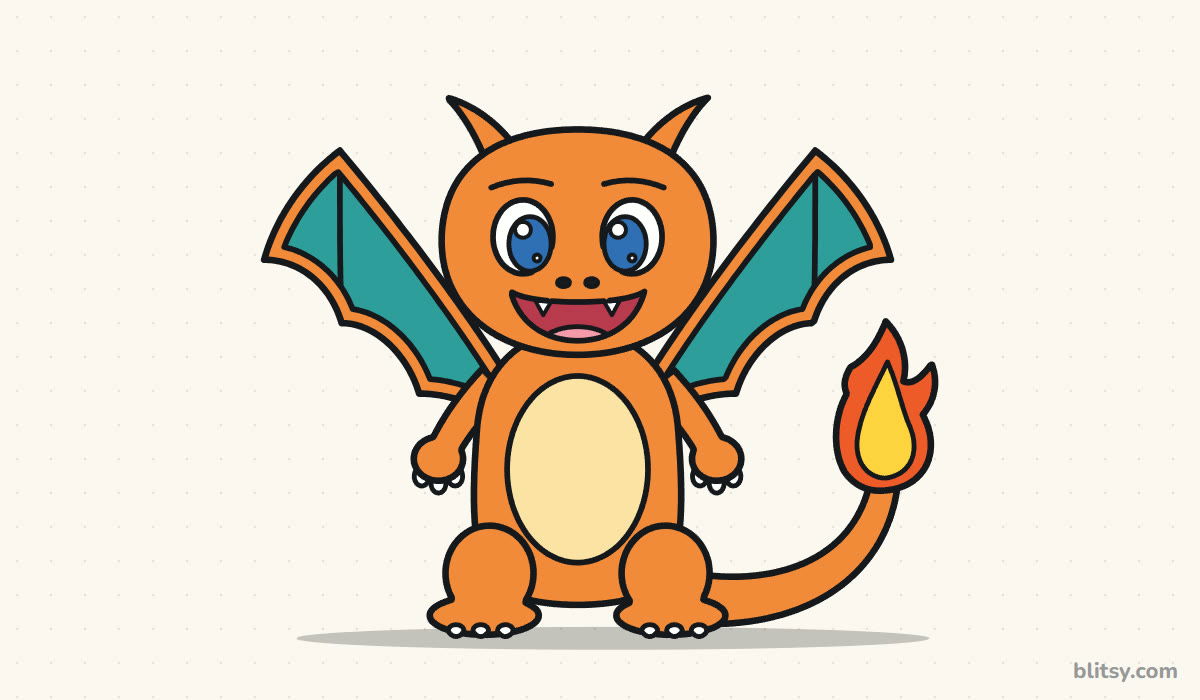
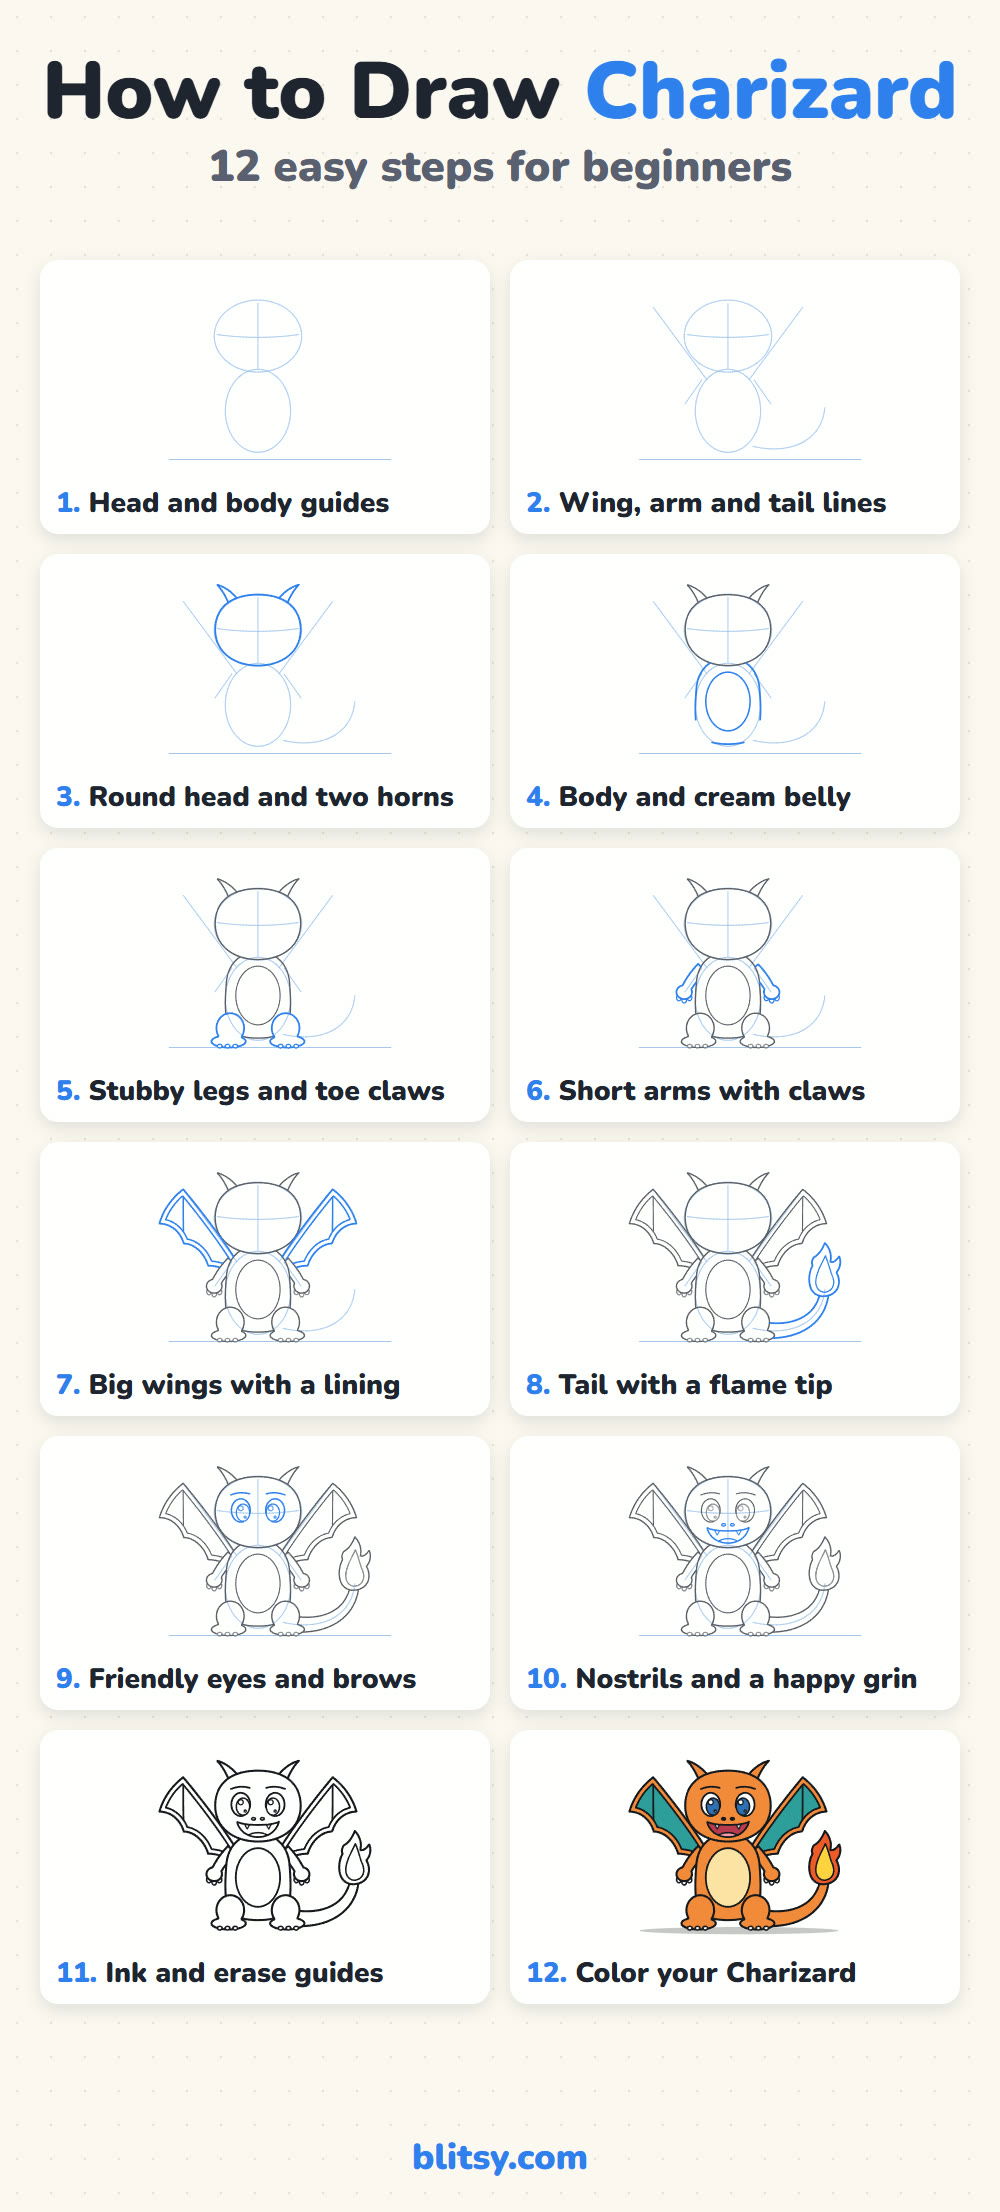
Watch the colors in the step pictures: blue lines are new, gray lines come from earlier steps. Copy the blue lines only, compare, then keep going.
Quick overview
⏱️ Time: about 40 minutes with coloring
🎯 Level: easy to medium, good for kids from about 8 up
✏️ Steps: 12
🔥 You'll draw: a chibi Charizard standing with open wings
Supplies for a Fire Dragon Sketch
- A soft pencil you can press lightly (HB or 2B)
- A good eraser
- A black marker or fineliner for the final outline
- Colored pencils, markers or crayons: orange, cream, teal, red orange, yellow and blue
- Plain white paper, turned sideways
Sideways paper matters here, because the wings and the tail need room on both sides.
How to Draw Charizard Step by Step
Step 1: Draw the head and body guides
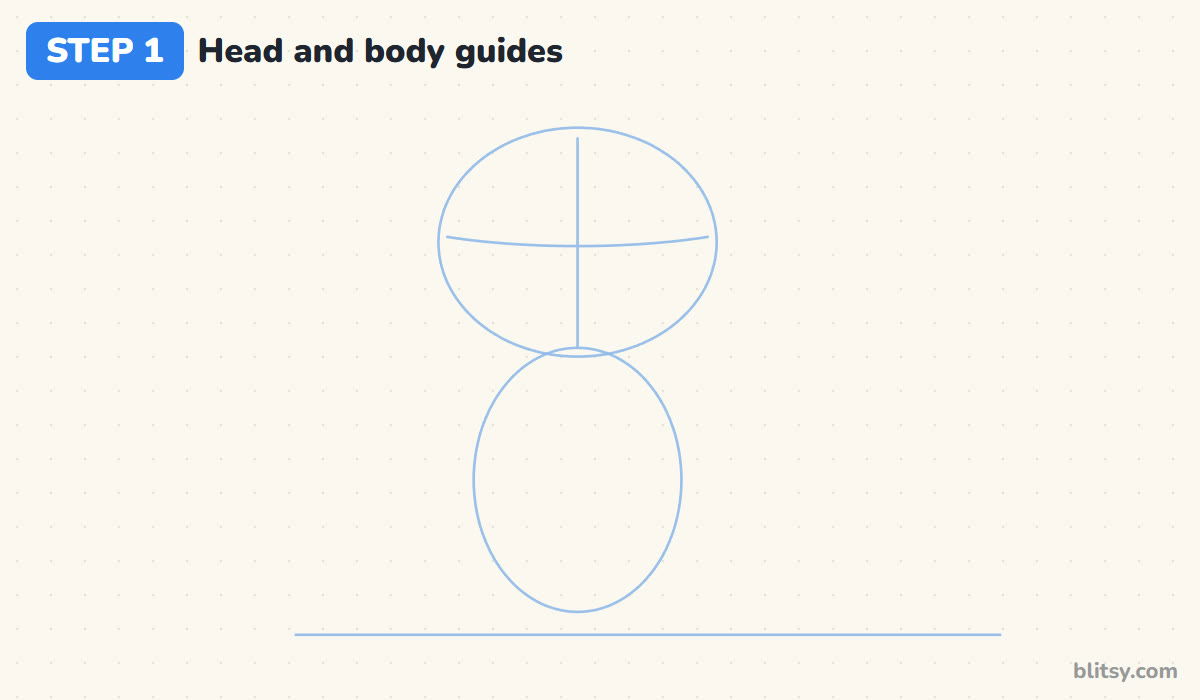
Start with a light ground line near the bottom of the page. Above the middle, draw a wide oval for the head. Under it, draw a taller oval for the body that touches the head and almost reaches the ground. Add a vertical line down the head and a gentle curve across it, a little below halfway, where the eyes will go.
💡 Tip: In chibi style the head is about as big as the body. If your head oval looks small, make it wider now.
Step 2: Add wing, arm and tail lines
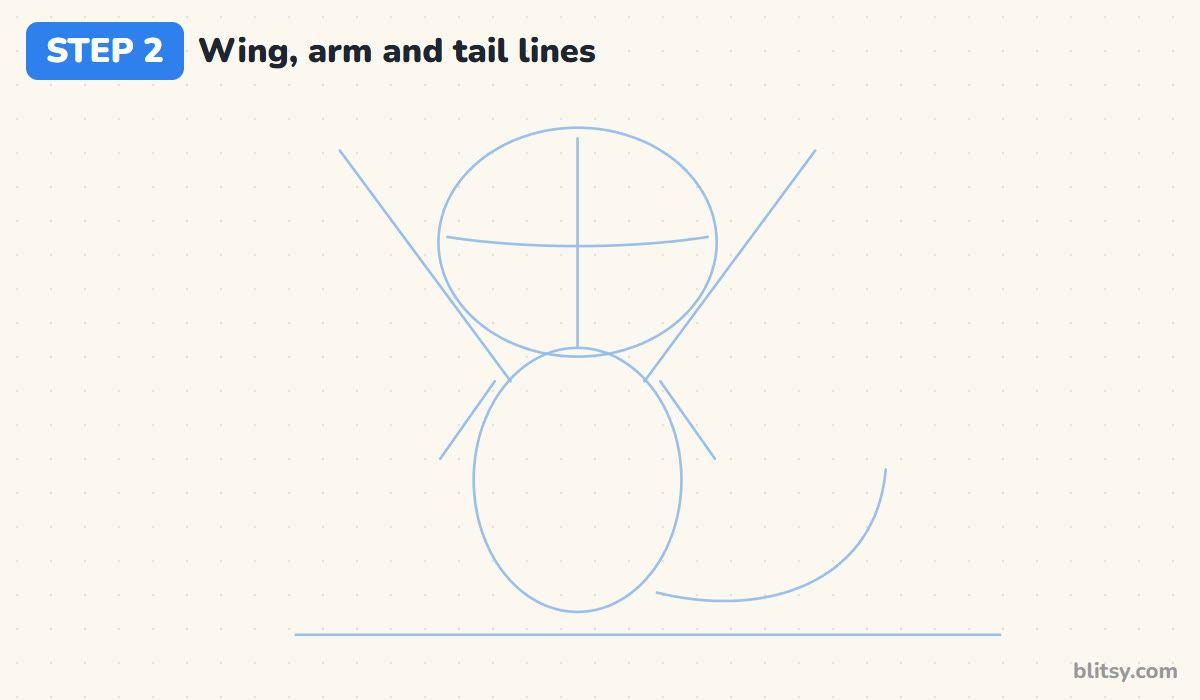
From each shoulder, draw a long straight line slanting up and out past the head. That's the top bone of each wing. Below them, add two short slanted lines for the arms. Then sweep one curved line from the right side of the body along the ground and up, like a hook. The tail will follow it.
💡 Tip: Make both wing lines lean at the same angle. Hold the paper at arm's length to check.
Step 3: Outline a round head with two horns
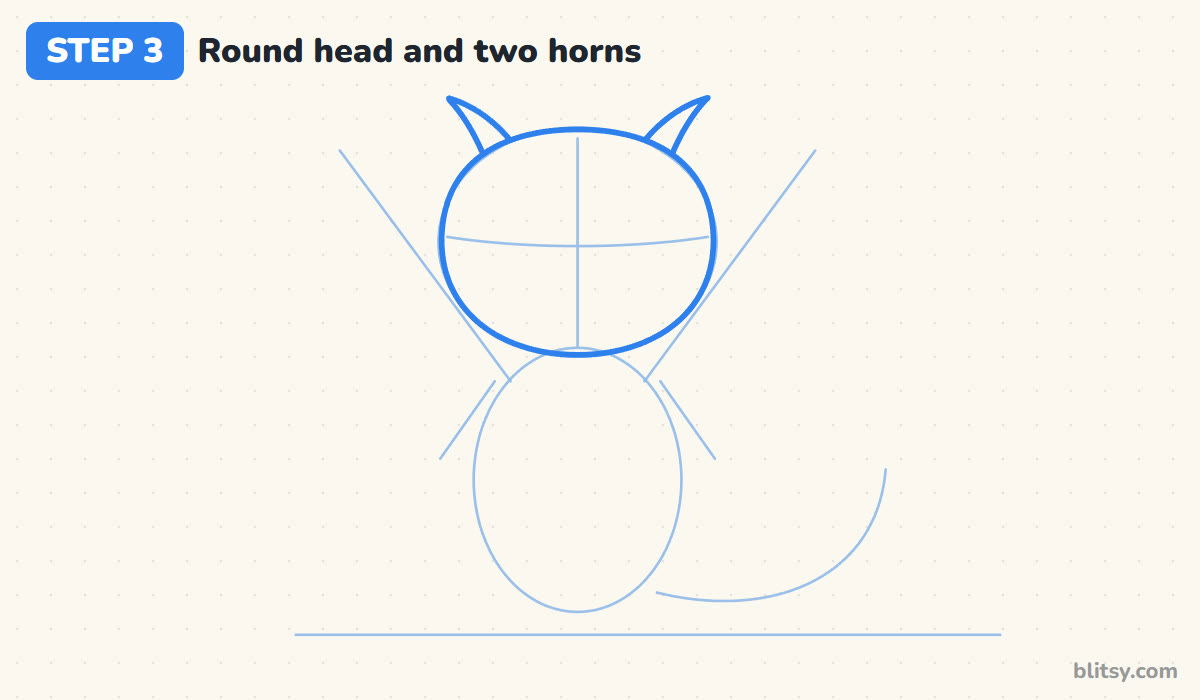
Trace the head oval with a firmer line, letting the cheeks bulge a little at the bottom so the face looks full. On top, toward the back on each side, add a horn: a narrow curved point that leans outward. Stop each horn where it meets the head.
💡 Tip: Keep the horns slim and pointy. Wide triangles turn into cat ears very quickly.



Step 4: Draw the body and the cream belly
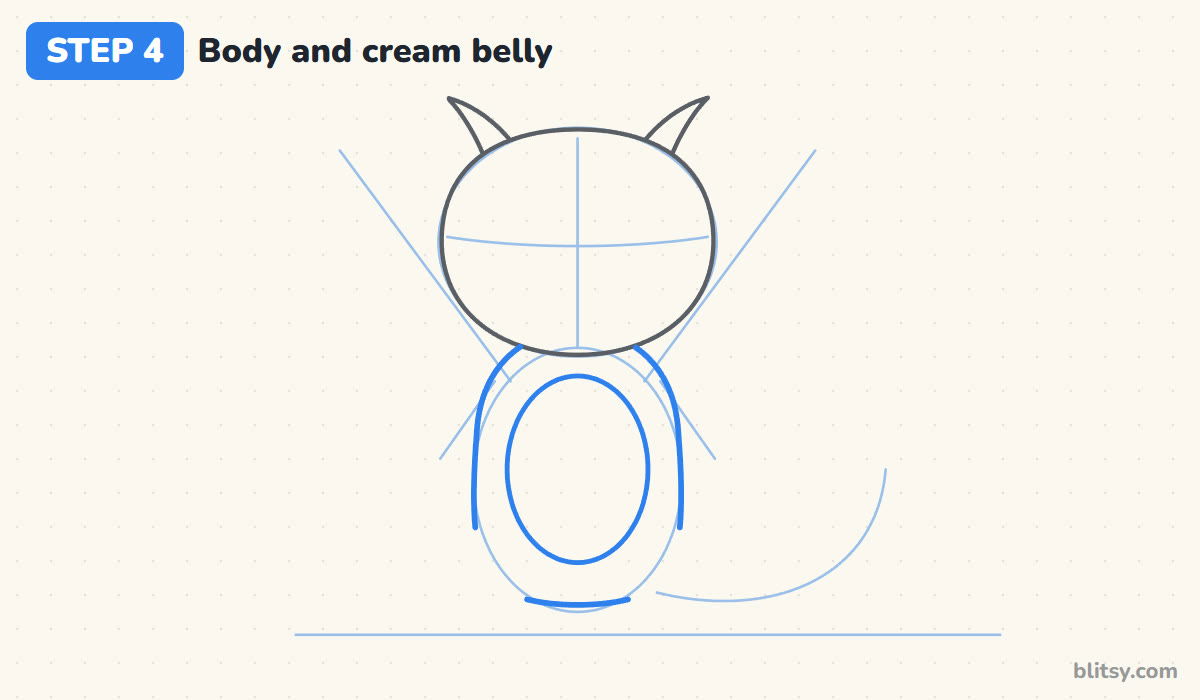
Follow the body oval to make a soft pear shape: narrow under the chin and wider near the bottom. Leave small gaps low on both sides, since the legs will cover those spots. Inside, draw a tall oval for the belly. I keep a finger of space between the belly and the body line so the orange shows around it.
💡 Tip: A belly that touches the sides looks like a bib. Leave that orange border.
Step 5: Add stubby legs and toe claws
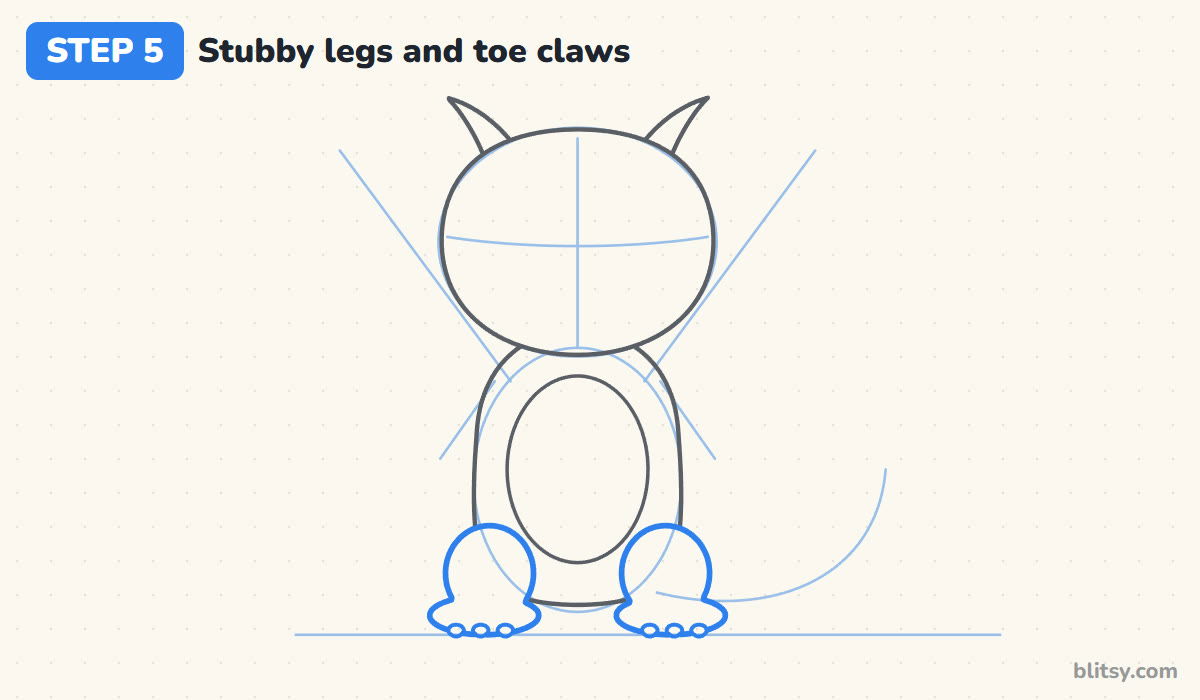
At the bottom corners of the body, draw two round thighs. Below each one, a flat oval foot rests on the ground line and pokes forward. Along the front of each foot, add three small rounded claws in a row. Short, chunky legs are a big part of the cute chibi look.
💡 Tip: Rest the feet right on the ground line, and the dragon will look steady instead of floating.
Step 6: Draw short arms with little claws
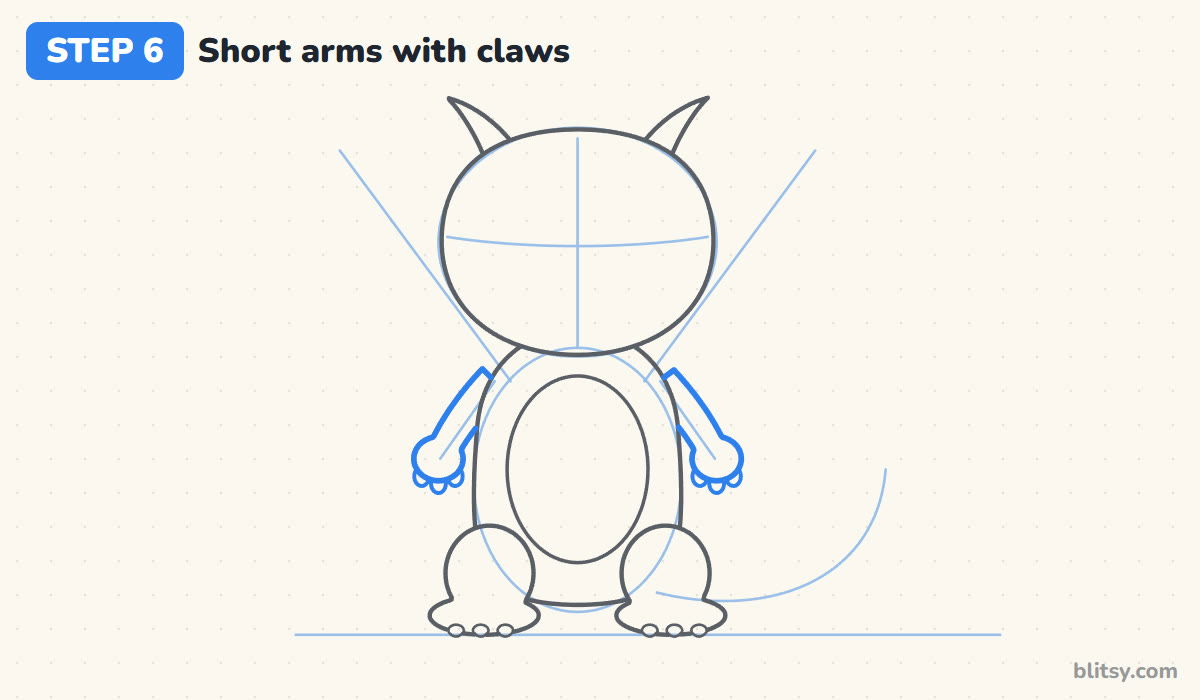
Each arm starts behind the top of the body and slants down and out along its guide. Give it real width, about as thick as a finger on the page, and finish it with a round mitten hand. Three tiny bumps under each hand are the claws.
💡 Tip: Draw the arm's top edge first, then the bottom edge. Matching widths come easier that way.
Step 7: Draw big wings with a teal lining
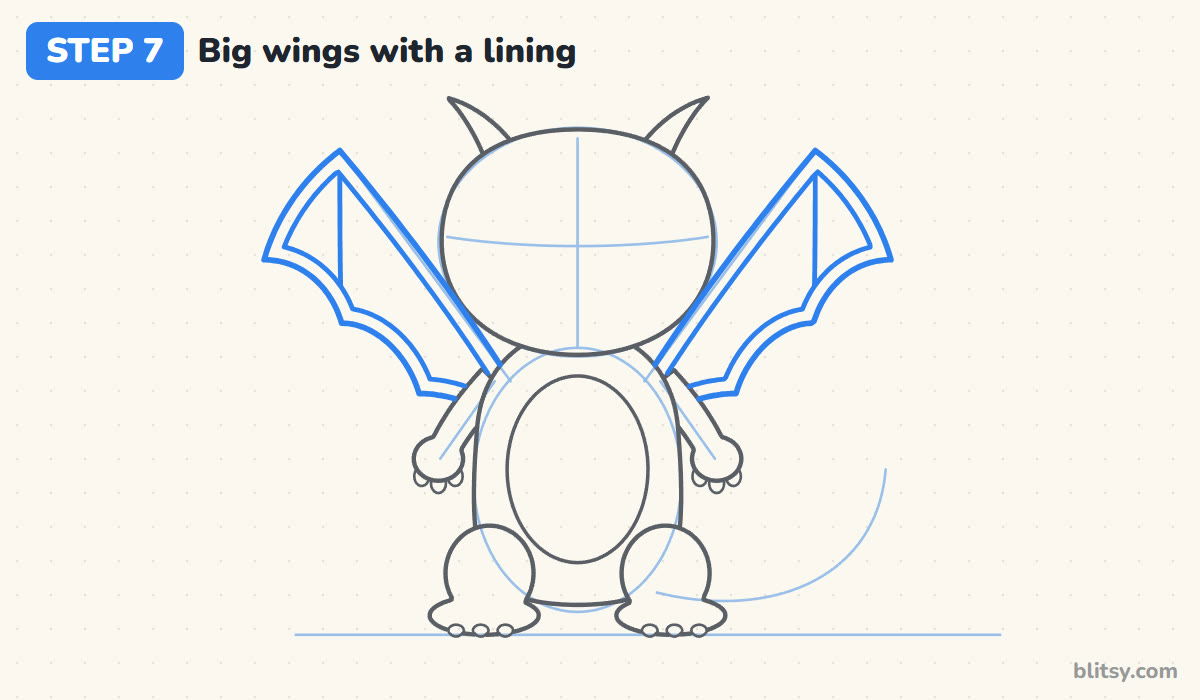
Along each wing guide, draw the top edge up to a point above the shoulder. From that point, come down the outside, then make two scooped curves back toward the body, like the bottom of a bat wing. Draw a second line just inside the whole wing for the lining. One line from the top point down to the first scoop shows the wing bone.
💡 Tip: Turn your paper so you always pull the pencil toward you on the scoops.




Step 8: Add the tail with a flame tip
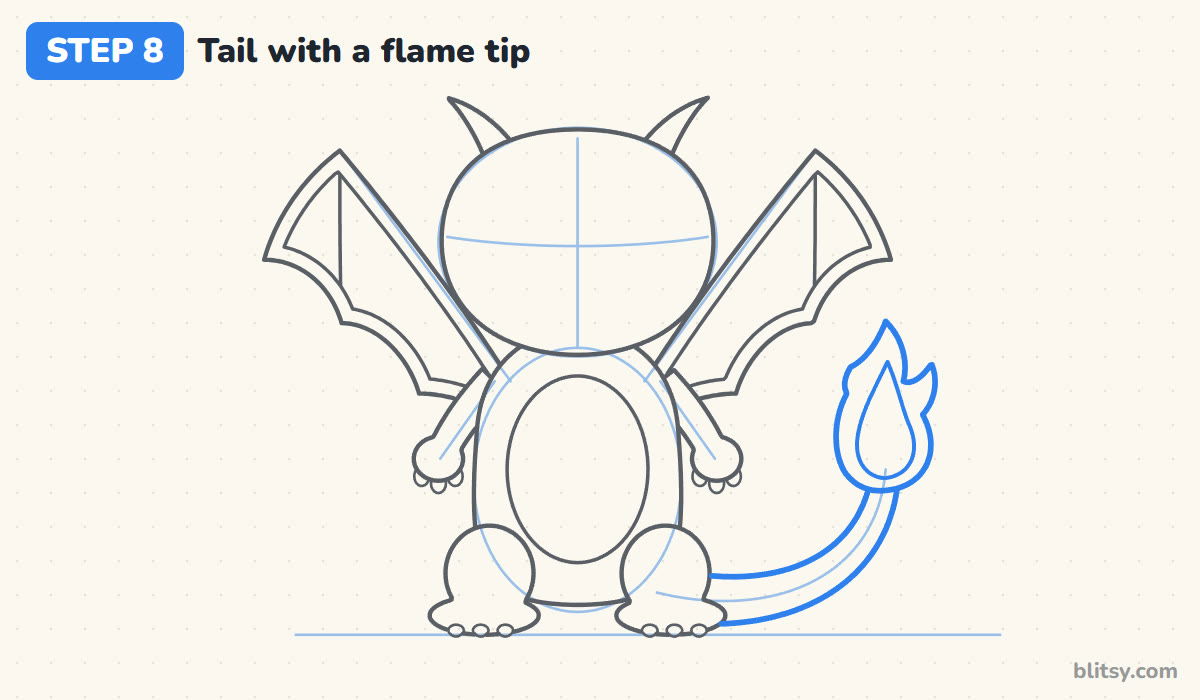
Draw the tail as two lines along the hook guide, wide where it leaves the body and thinner toward the end. At the tip, draw a flame: a teardrop with a pointed top and a small flick on each side. Inside it, add a smaller teardrop for the hot yellow center. Leave out any tail line that would run behind the leg.
💡 Tip: Draw the flame a little larger than the hand. A tiny flame gets lost once it's colored.
Step 9: Draw friendly eyes and brows
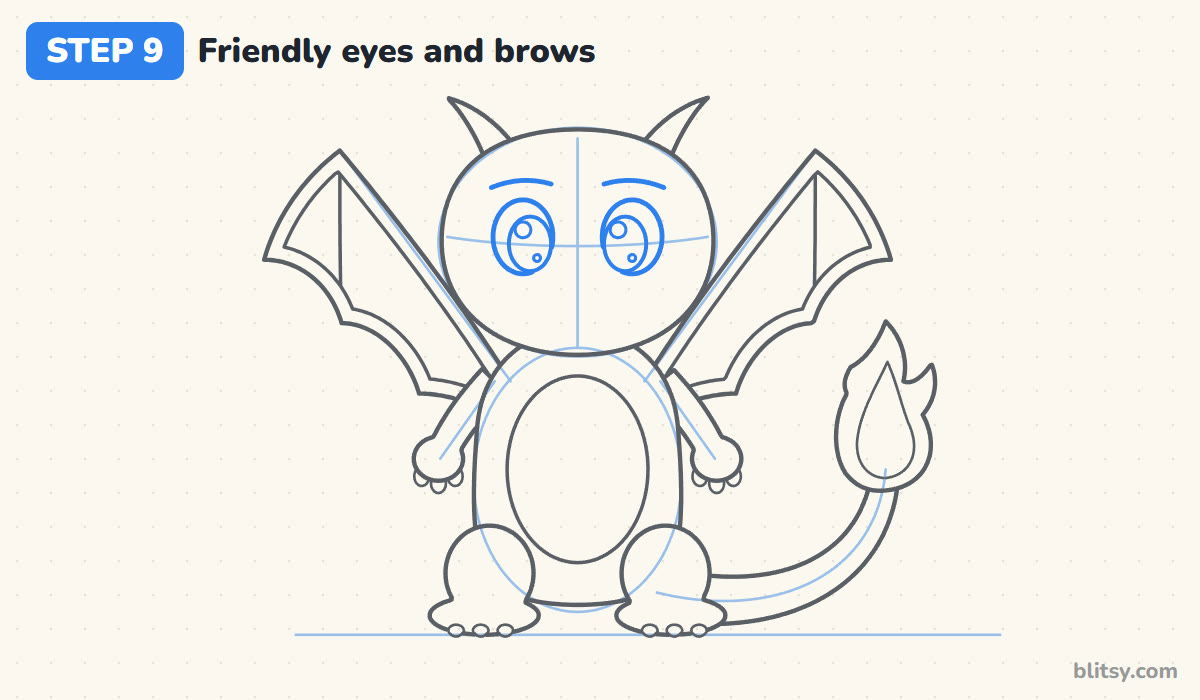
Sit two big ovals on the curved guide line, one each side of the center. Inside each, draw a smaller oval for the iris, nudged a bit toward the middle of the face. Add a round shine at the top and a tiny dot lower down. Curved brows above the eyes keep the expression happy rather than fierce.
💡 Tip: Put the shine in the same corner of both eyes, or Charizard will look cross-eyed.
Step 10: Add nostrils and a happy grin
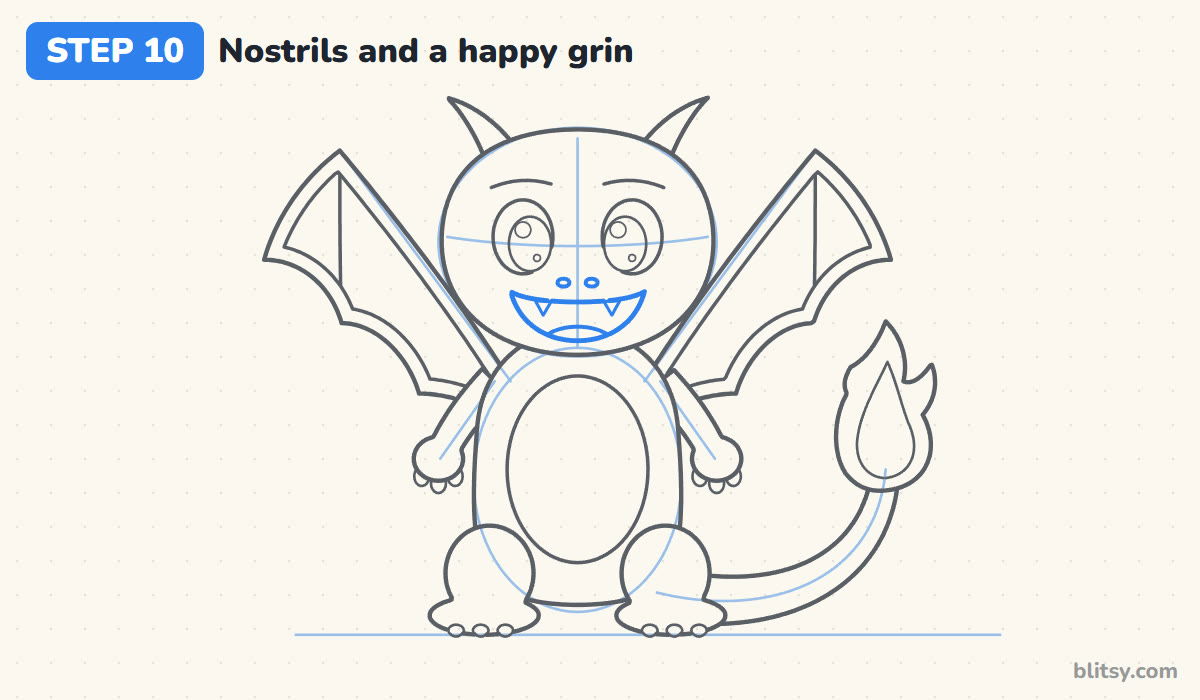
Two small ovals just under the eyes make the nostrils. Below them, draw a wide open mouth: a nearly straight top line and a round curve underneath. Add two little fangs hanging from the top line near the corners, then a curved tongue line at the bottom of the mouth.
💡 Tip: Keep the fangs small. Tiny fangs look playful, while long ones look scary.
Step 11: Ink the lines and erase the guides
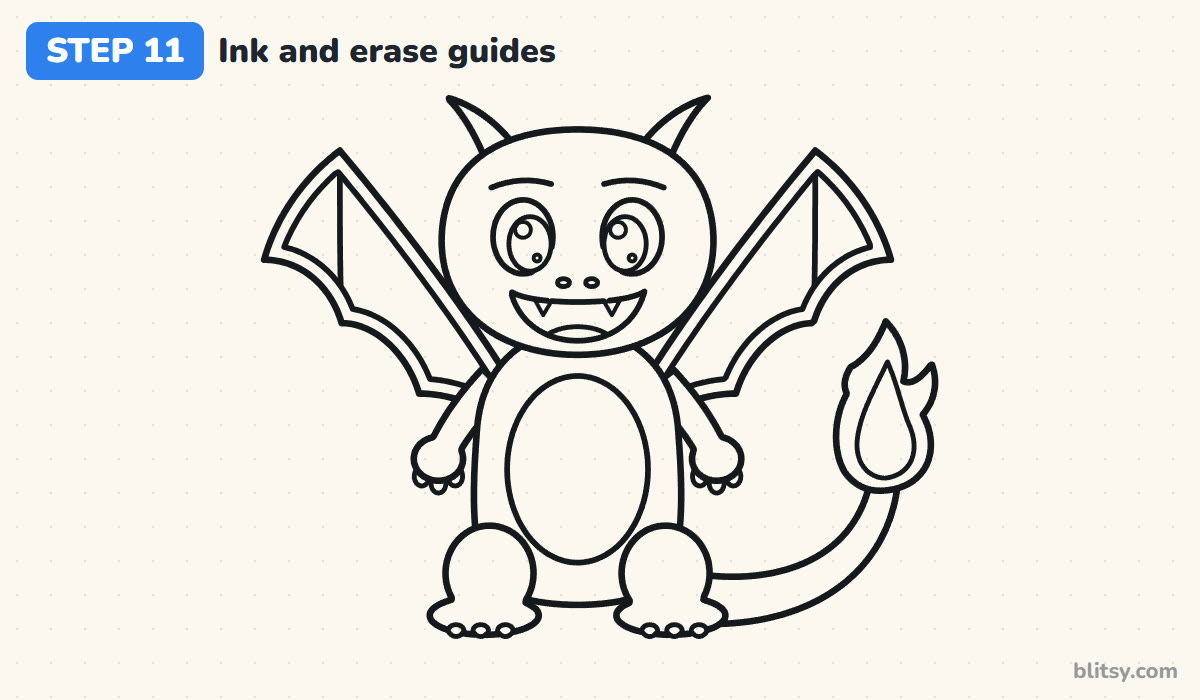
Go over every keeper line with a black marker. I like starting with the face, because that's where a shaky line shows most, and I finish with the wings and tail. Wait until the ink is dry, then erase all the pencil guides. You should be left with a clean outline.
💡 Tip: Lift the marker at every scoop and claw instead of going round in one stroke.


Step 12: Color your Charizard
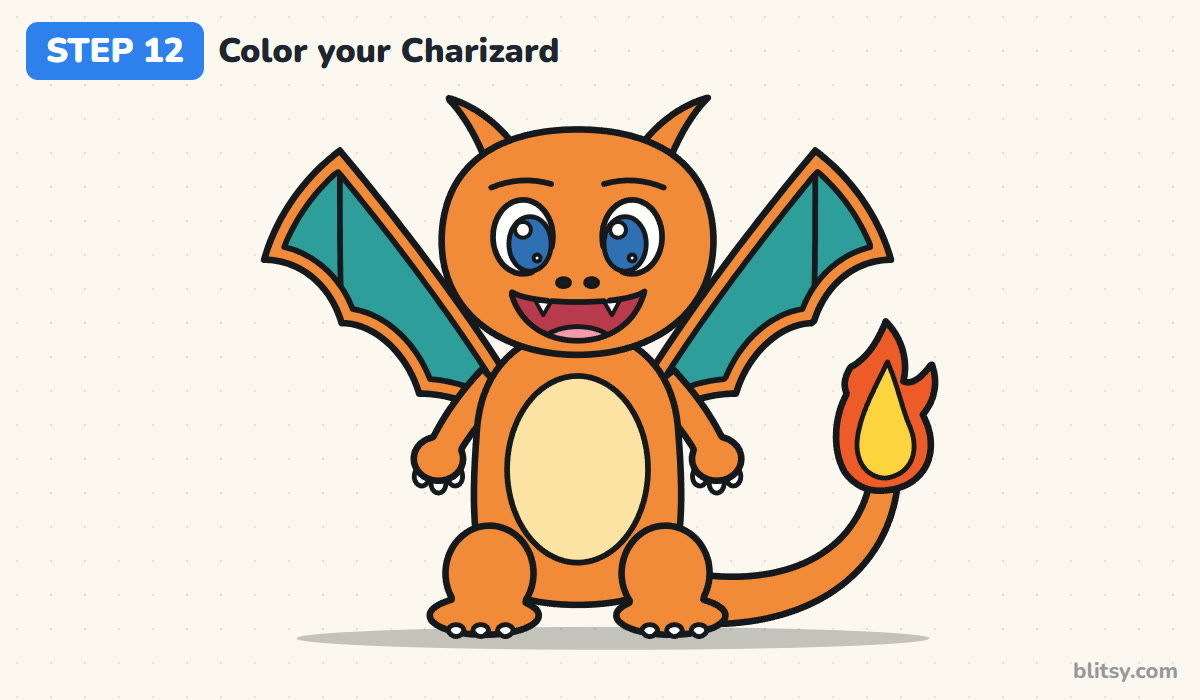
Orange covers the head and horns, the arms and legs, the tail and the outer frame of the wings. Fill the belly with cream and the inside of the wings with teal. The flame is red orange outside and yellow in the middle. Color the eyes blue but keep the shine white, the mouth red with a pink tongue, and leave all the claws and fangs white.
💡 Tip: Color the teal lining in strokes that run from the top point down, the way the wing stretches.
Where Charizard Drawings Start to Wobble
- Wings that are too small. Little wings make him look like a lizard. Let the tips rise above the shoulders, nearly to the horns.
- Horns that look like ears. Make them narrow and curved, set toward the back of the head.
- One wing bigger than the other. Draw both wing top lines first and compare them before adding the scoops.
- Forgetting the flame. Without the burning tip the tail could belong to any dragon. Draw it bold.
- A belly that fills the body. Keep the cream oval smaller so a band of orange frames it.
Charizard Variations Worth Trying
Once the standing pose feels easy, try him with his wings folded down, or add a puff of smoke from his nostrils. Some kids like to color a black and dark gray version, and that works fine too because the shape stays the same. Smaller kids can skip the wing lining and color each wing in one color. If you'd like another Pokémon in the same simple style, start with this Pikachu drawing step by step tutorial. For a non-Pokémon dragon, the dragon drawing tutorial uses a similar body-and-wings build, and these Pokémon coloring pages are handy for a rainy afternoon.
Free Charizard Coloring Page and Step Guide
The free Charizard coloring page has a colored example at the top and a key that matches each color to its part, with a big outline below to fill in. The step-by-step PDF guide holds all 12 steps with pictures and tips, so you can draw without a screen nearby. Both print on Letter or A4 paper.
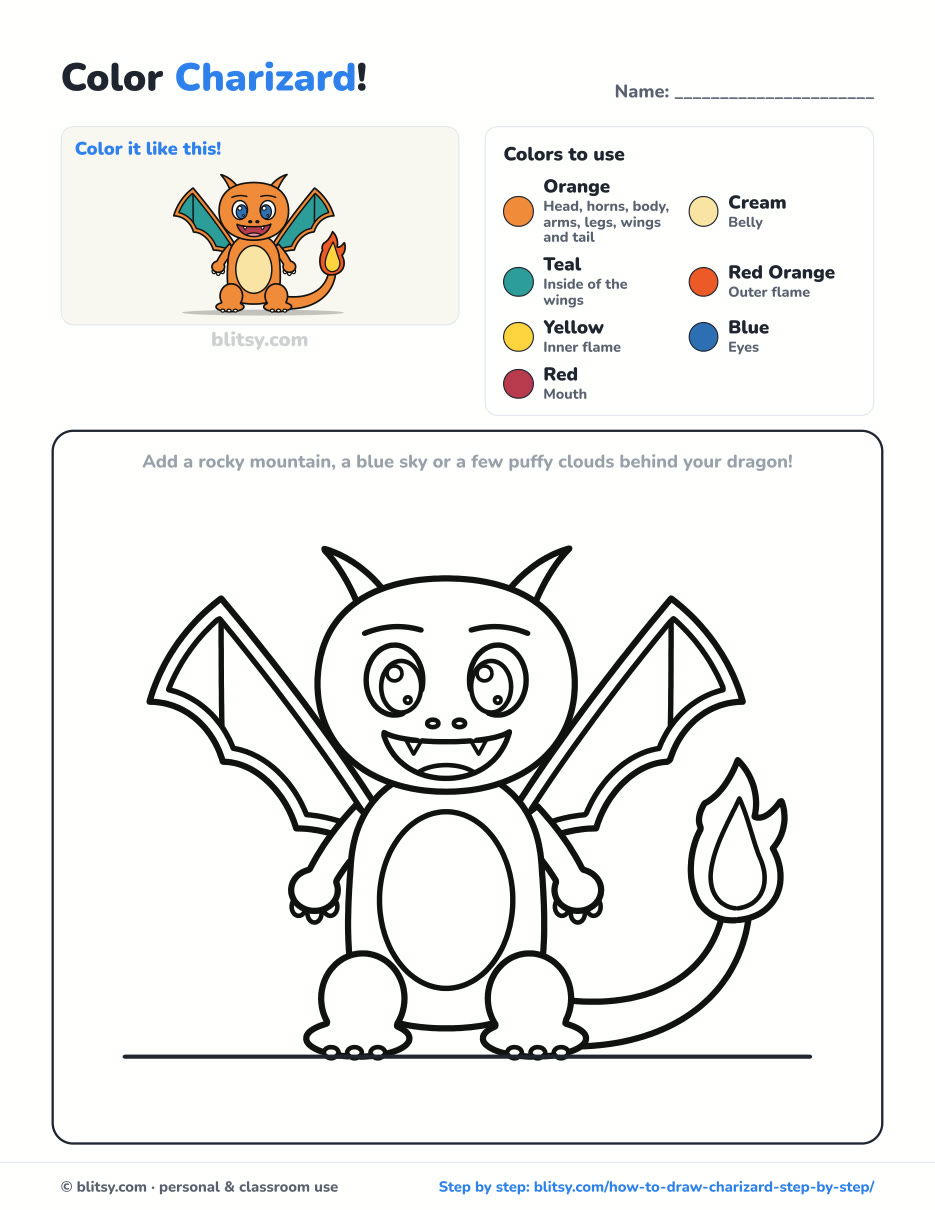
Black outlines with a colored example and the color names at the top. Ready to print and color.
⬇️ Download Coloring PageEvery step picture with its instructions and tips, to keep beside your paper while you draw.
⬇️ Download Drawing Guide📱 On a phone? Tap a download button, then open the file and choose Share → Save to Files or Print. On a computer, the PDF opens or saves straight to your Downloads folder.
Keep the Charizard Steps Handy
More Dragons and Characters to Try
Each of these is a full step-by-step lesson with a picture for every stage, just like this one.
- Pikachu Drawing: Draw the yellow electric mouse with red cheeks and a lightning bolt tail in this how to draw Pikachu step by step lesson.
- Dragon Drawing: A friendly green dragon with wings and spikes grows from a few simple shapes in this dragon drawing tutorial.
- Dragon Head Drawing: Build a dragon head with horns and frills from a plain circle with this dragon head drawing step by step guide.
- Phoenix Drawing: Another fiery creature, a bird with flame-colored feathers, fills this phoenix drawing tutorial.
- Chibi Drawing: Learn the big-head, small-body proportions used here with this chibi drawing step by step lesson.
Charizard Drawing Questions Kids Ask
Is Charizard hard to draw?
The full detailed version takes practice, but this chibi version is built from ovals and a few curves. Most kids find the wings the hardest part, so take those slowly.
What colors do you need for Charizard?
Orange for the body, cream for the belly, teal for the inside of the wings, red orange and yellow for the flame, plus blue for the eyes and red for the mouth.
How do you draw Charizard's wings easily?
Start with one straight slanted line from each shoulder. Come down the outside from its top point, then make two scooped curves back to the body. Add a second line inside for the lining.
How long does it take to draw Charizard?
About 25 minutes for the outline and another 15 for coloring. Younger kids may want to split it into two sessions.
Grab some orange, light up that tail and show off your new fire dragon. 🔥✏️
Related posts:
 How to Draw Mario Step by Step (Easy Chibi Version)
 How to Draw Goku Step by Step (Easy Chibi Version)
 How to Draw Freddy Krueger Step by Step (Cute Chibi Version)
 How to Draw Darth Vader Step by Step (Easy Chibi Version)
 How to Draw Mickey Mouse Step by Step (Easy Cute Version)
 How to Draw Wonder Woman Step by Step (Chibi for Kids)
 How to Draw Iron Man Step by Step (Easy Chibi for Kids)
 How to Draw Ariana Grande Step by Step (Cute Chibi Fan Art)
 How to Draw the Joker Step by Step (Easy Chibi for Beginners)
 How to Draw a Ninja Step by Step (Easy Chibi Ninja for Kids)
 How to Draw Batman Step by Step (Easy Chibi for Kids)
 How to Draw Toothless Step by Step (Easy Chibi Dragon)

