
The pilgrim hat looks fancy, but it's really just three ovals and a couple of squares. Get the ovals right and the hat almost draws itself. This lesson shows you how to draw a pilgrim hat step by step, seen a little from above so the brim spreads out wide and you can spot the flat top. It's a handy drawing to have in your pocket around Thanksgiving, though a good hat drawing works any month of the year.
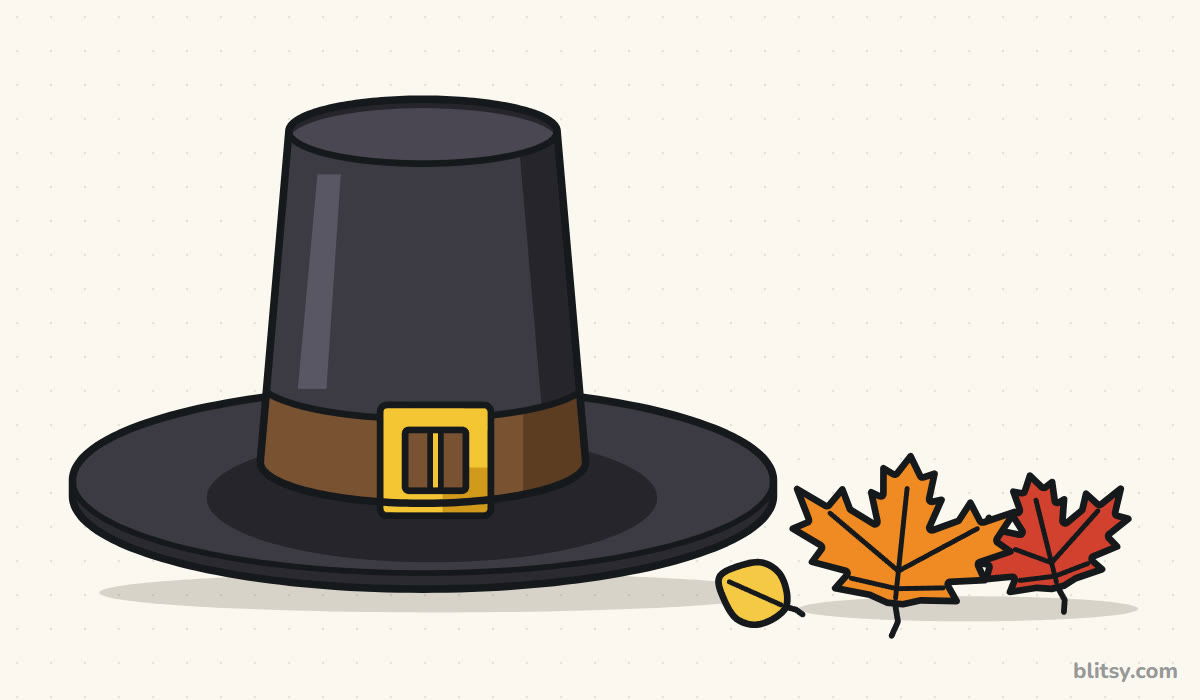
Watch for the color blue: it marks the fresh lines of that step, while gray lines are ones you already drew.
Quick overview
⏱️ Time: about 25 to 30 minutes, coloring included
🎯 Level: easy, fine for kids from about 6 up
✏️ Steps: 11
🎩 You'll draw: a black pilgrim hat with a gold buckle and three autumn leaves
Pilgrim Hat Supplies on One Small Tray
- A pencil you can press very lightly
- A soft eraser
- A black marker or fineliner for the final lines
- Crayons or colored pencils: black, dark gray, brown, yellow, orange and red
- A sheet of plain paper turned sideways
A black crayon covers big areas faster than a black pencil, so grab one if you have it.
How to Draw a Pilgrim Hat Step by Step
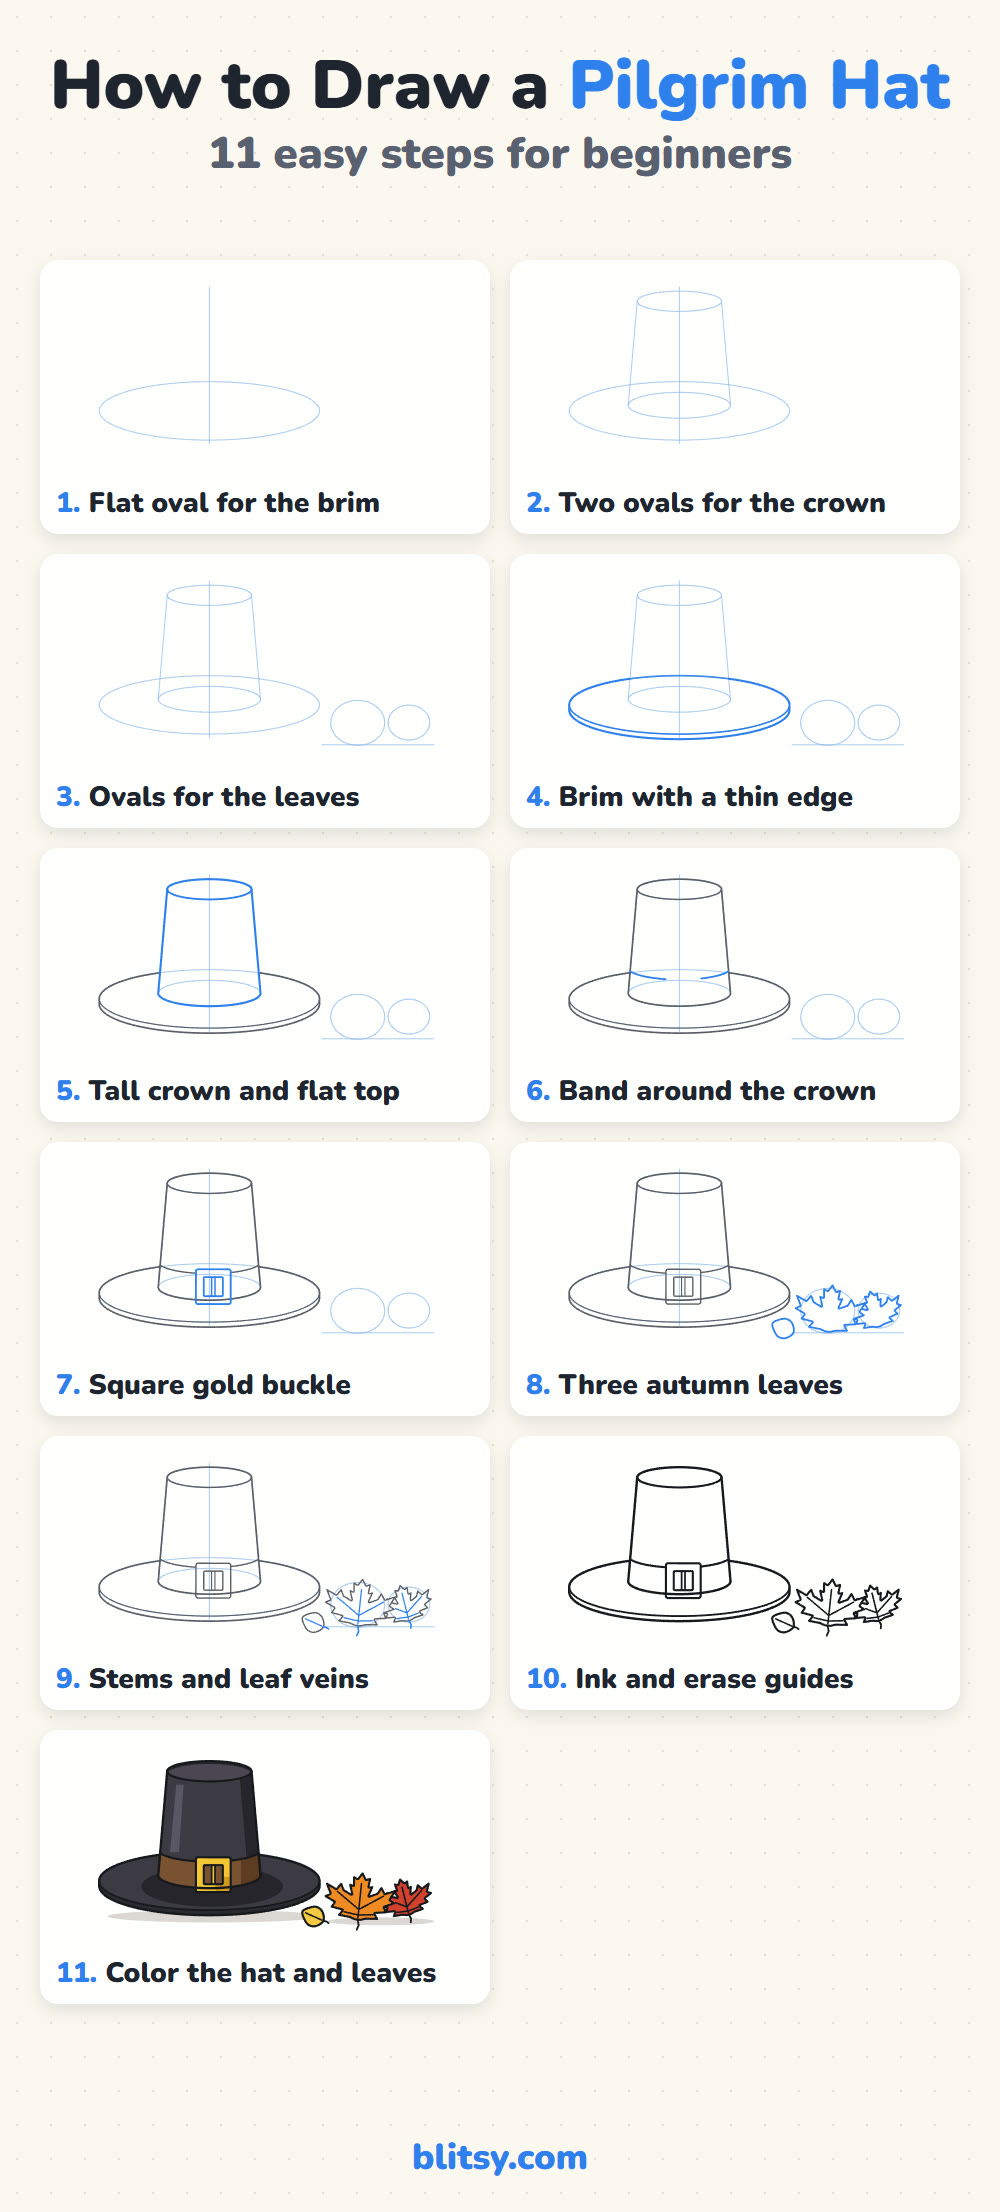
Step 1: Draw a flat oval for the brim
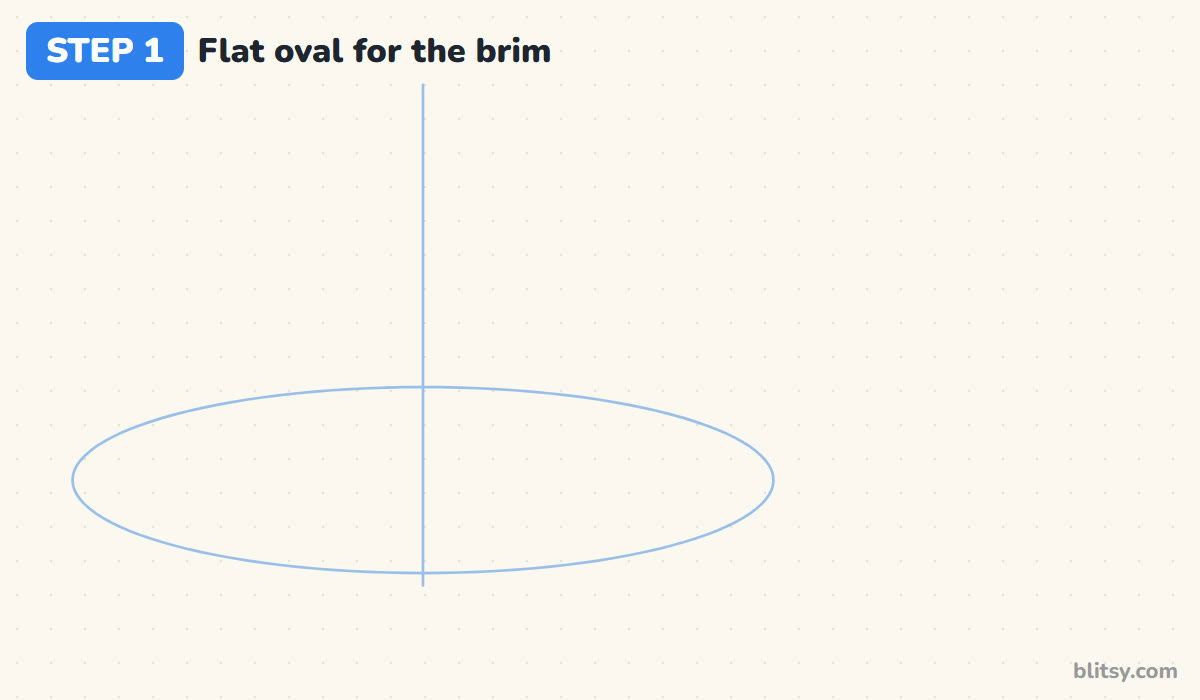
Draw a wide, flat oval a little below the middle of the page, leaving space on the right for the leaves. Add a light line straight down through its center to keep the crown and buckle centered later. I make the oval about four times wider than it is tall, because we're seeing a flat brim from only slightly above.
💡 Tip: Draw the oval in two halves, top curve first, then the bottom. Matching two curves is easier than one big loop.
Step 2: Add two ovals for the crown
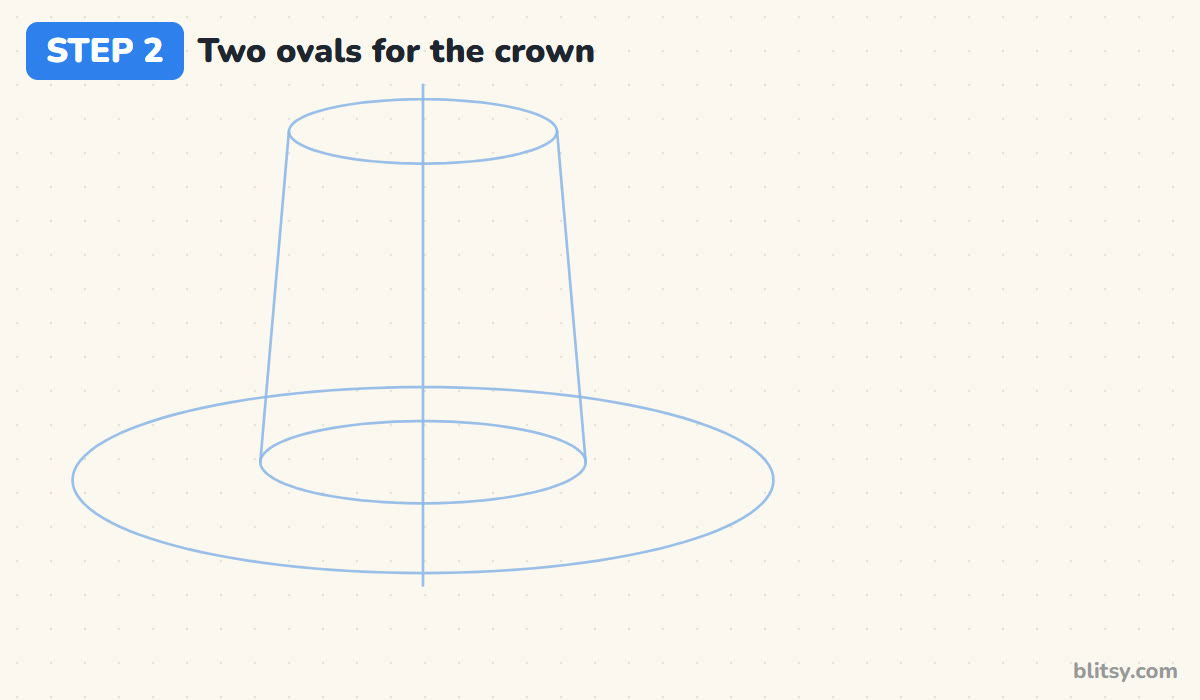
Inside the brim oval, draw a smaller oval about half as wide, sitting a bit higher than the brim's center. High above it, draw a slightly smaller oval for the flat top. Join the ends with two lines that lean in a little as they go up. That gentle lean gives the pilgrim hat its tapered shape.
💡 Tip: Make the crown roughly as tall as the brim is half wide. A short crown starts to look like a top hat or a bowler.
Step 3: Sketch ovals for the leaves
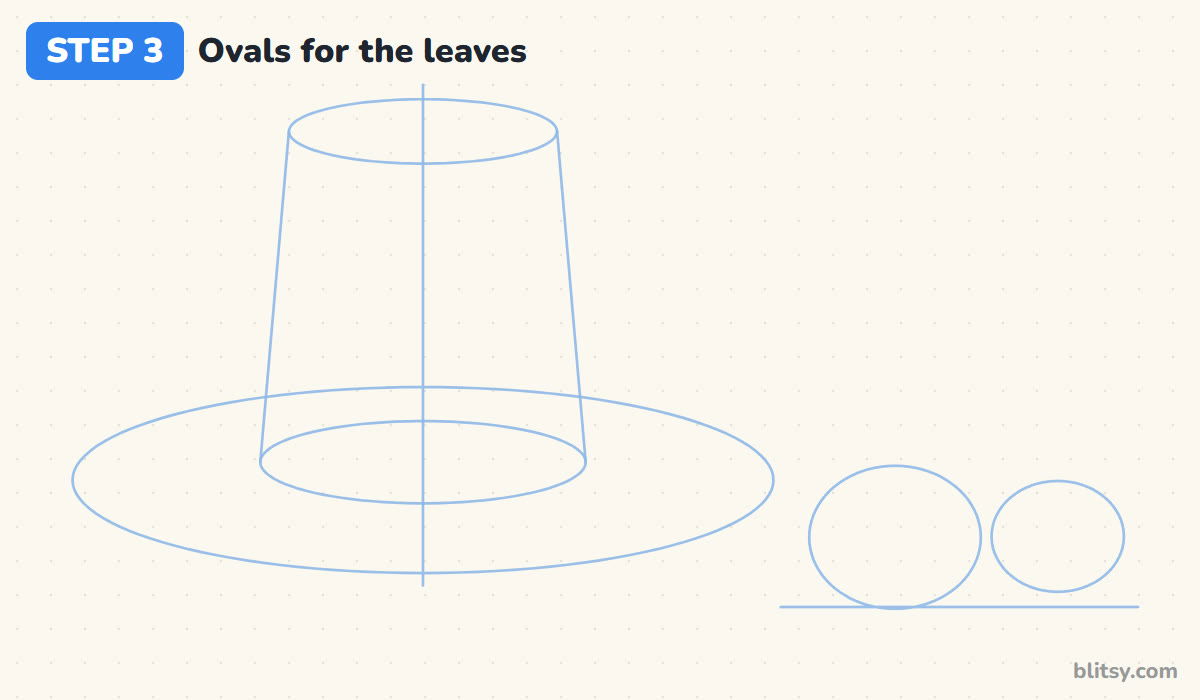
To the right of the hat, sketch two light ovals for the maple leaves, the left one a little bigger, plus a ground line under them. They're only placeholders, and they stop the leaves from growing big enough to crowd the brim.
💡 Tip: Leave a small gap between the brim and the first oval so the two shapes don't merge.



Step 4: Draw the brim with a thin edge
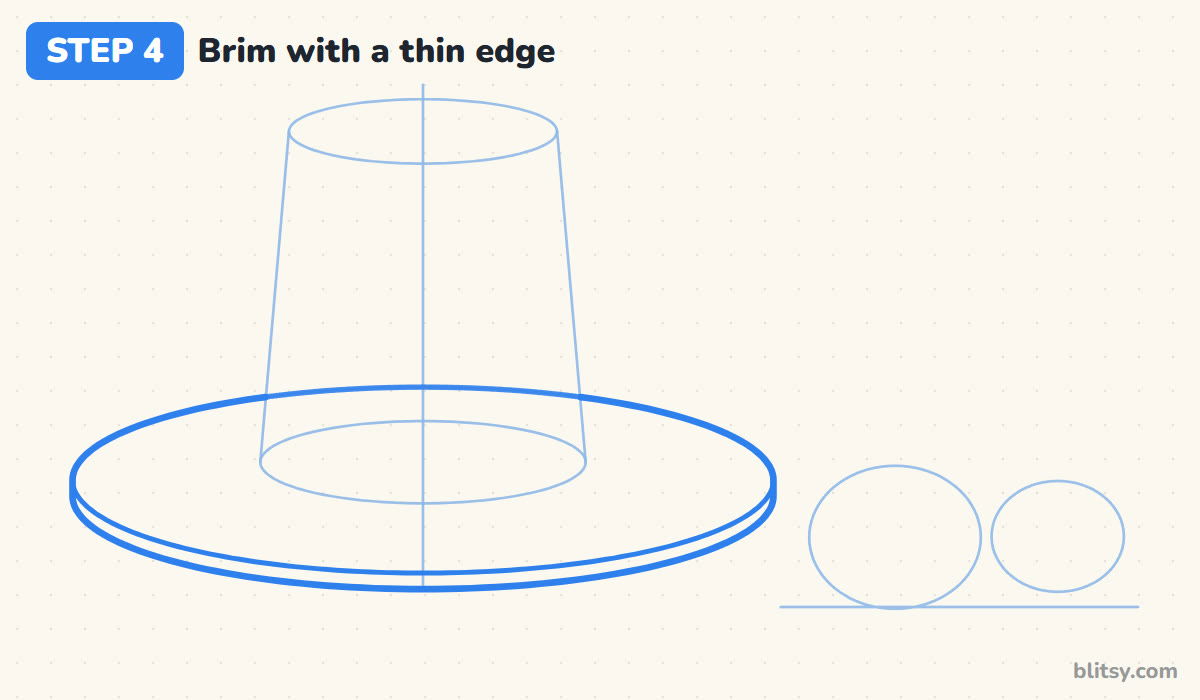
Trace the brim oval with a firmer line. Then draw a second curve just under its front half, following the same bend. That narrow strip is the brim's thickness, and in my experience it's the detail that turns a flat ring into a real felt brim. The back part behind the crown gets erased in the next step.
💡 Tip: Keep the edge strip thin, about the width of your pencil tip pressed sideways. A thick edge makes the brim look like a plate.
Step 5: Outline the tall crown and flat top
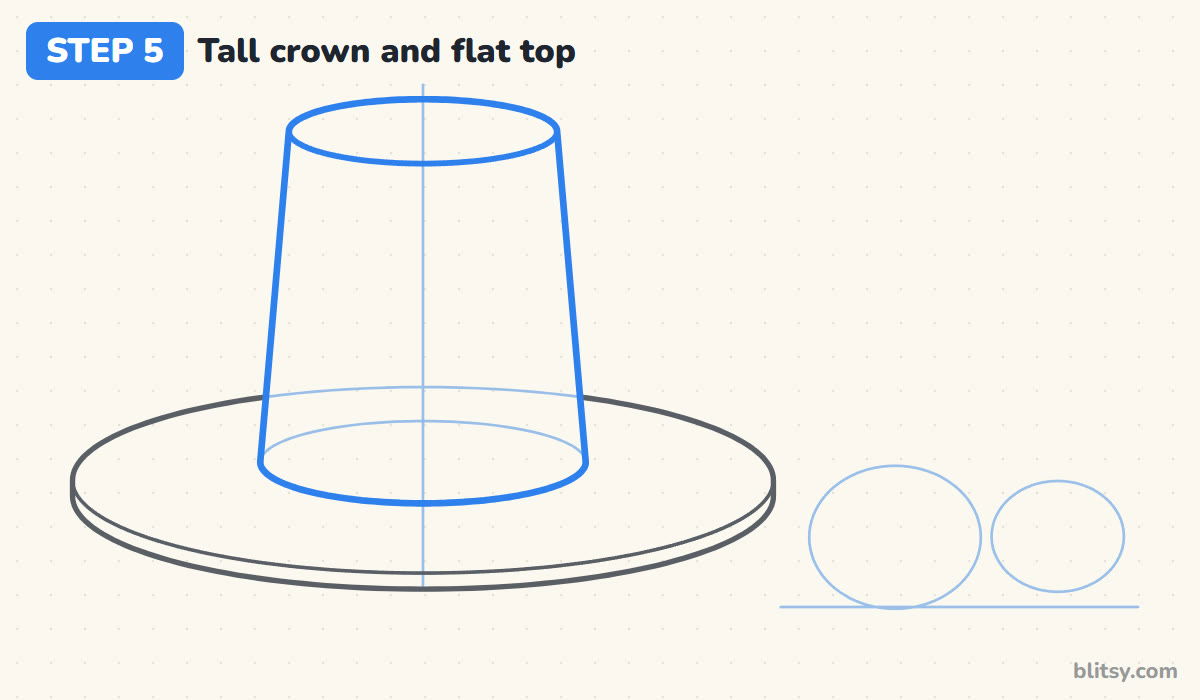
Erase the piece of brim line inside the crown area. Go over the two slanted sides and the front curve of the base oval with firm lines, then trace the whole top oval. Because we look from a little above, the full top shows, while only the front half of the bottom curve does.
💡 Tip: Check that the two sides lean in by the same amount. If one is steeper, the hat looks like it's tipping over.
Step 6: Add the band around the crown
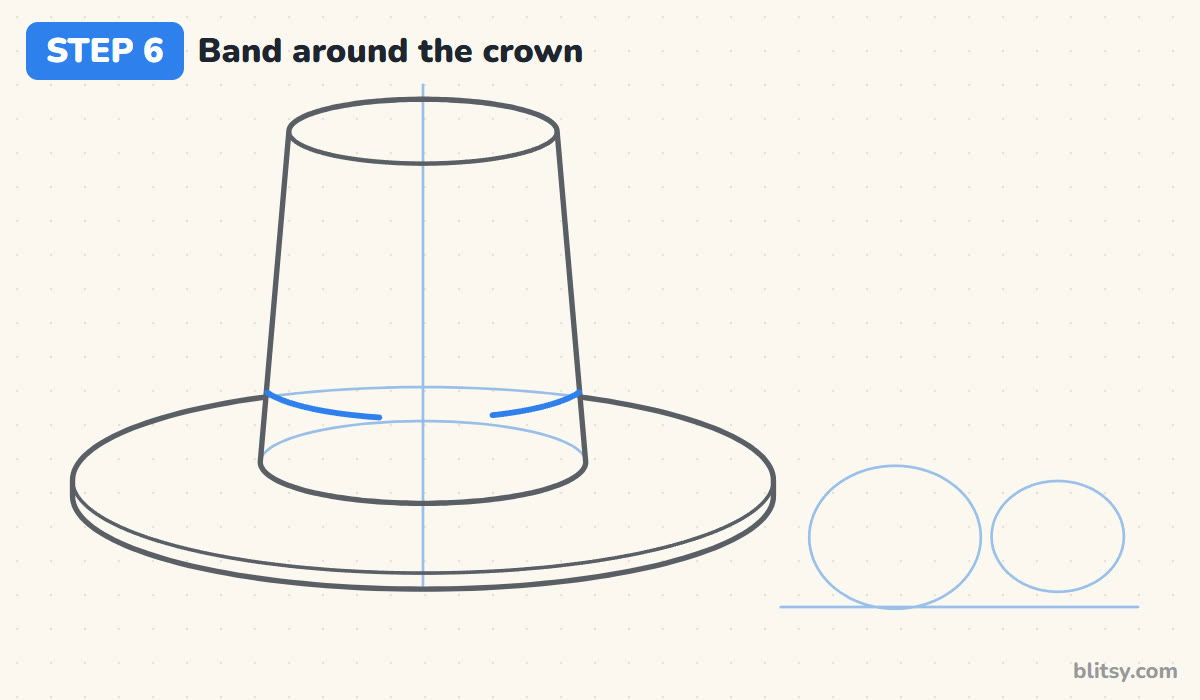
A short way above the bottom of the crown, draw a curve that bends down in the middle exactly like the crown's base curve. The space between the two curves is the hatband. I leave a gap in the middle of the top line, since the buckle will sit there and cover it.
💡 Tip: Make the band about a quarter of the crown's height. Thinner bands get lost once the hat is colored black.
Step 7: Draw the square gold buckle
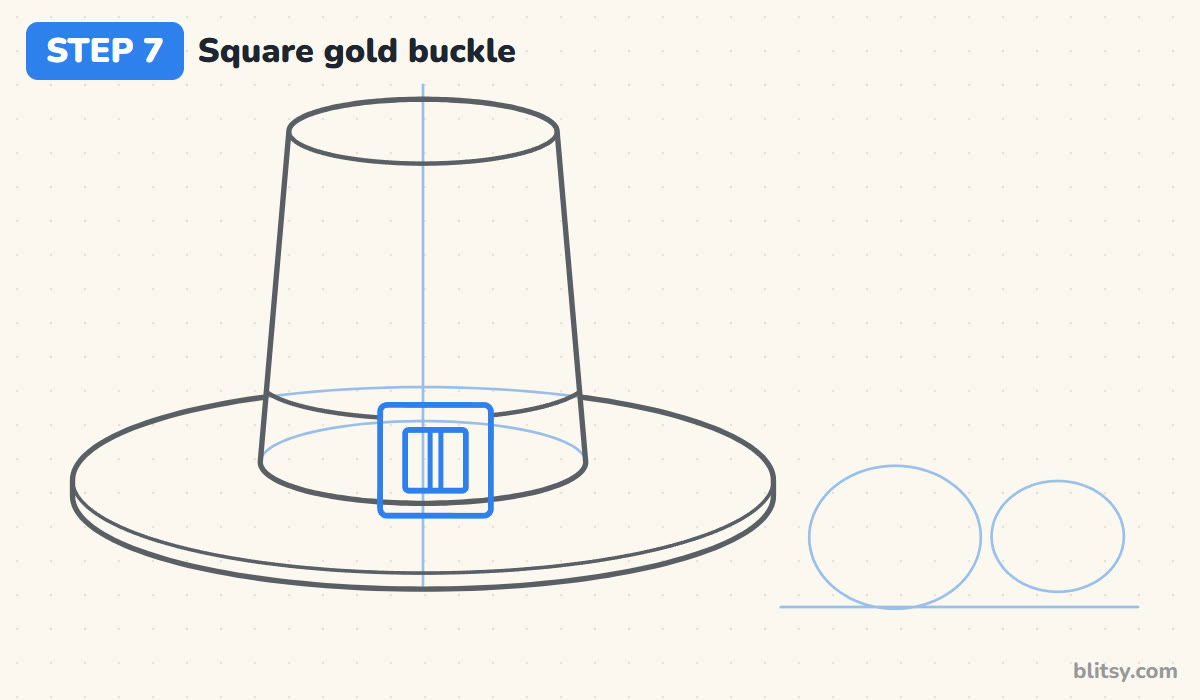
On the center line, draw a square with softly rounded corners that sticks out a little above and below the band. Inside it, draw a smaller square for the hole, then a narrow bar down its middle. Big and square is the look that says pilgrim right away.
💡 Tip: Draw the inner square first as four dots, one near each corner, then join them. It keeps the frame the same width on every side.

Step 8: Draw three autumn leaves
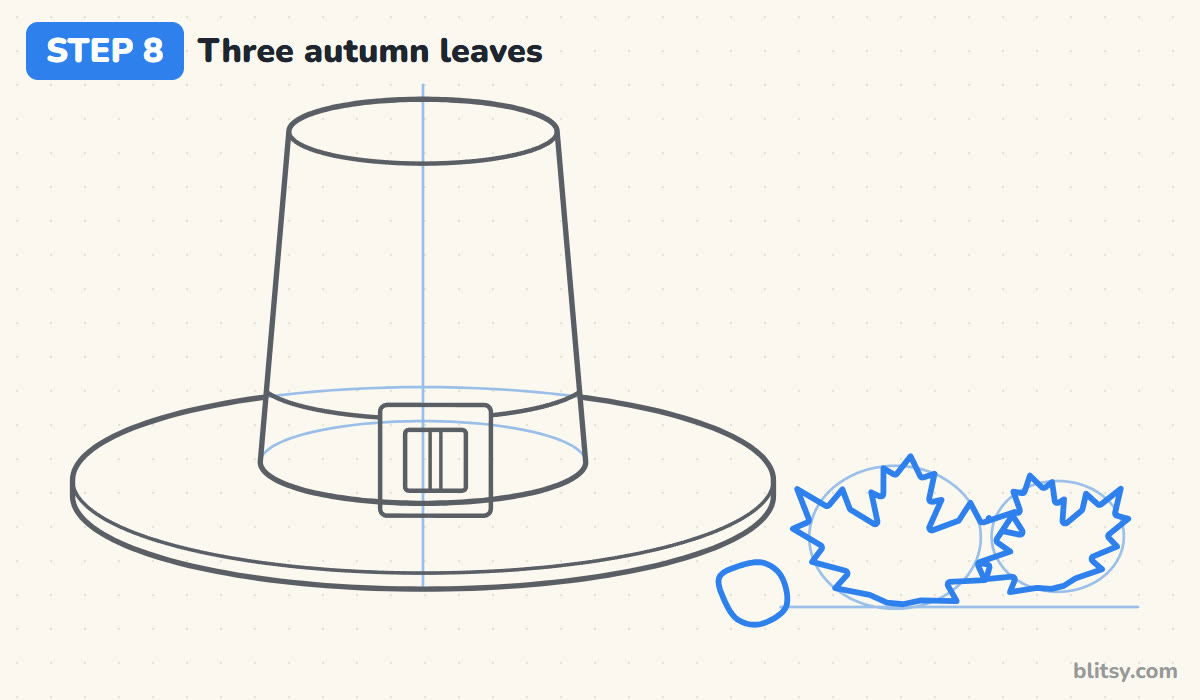
Inside each leaf oval, draw a maple leaf: one big pointed lobe at the top, a lobe on each side and two small ones near the bottom, with little zigzag teeth along the edges. The right leaf tucks slightly behind the left one, so stop its line where they meet. Then add a small rounded leaf near the brim.
💡 Tip: Don't make the teeth perfectly even. Real maple leaves are a bit ragged, and the uneven edge looks more natural.
Step 9: Add stems and leaf veins
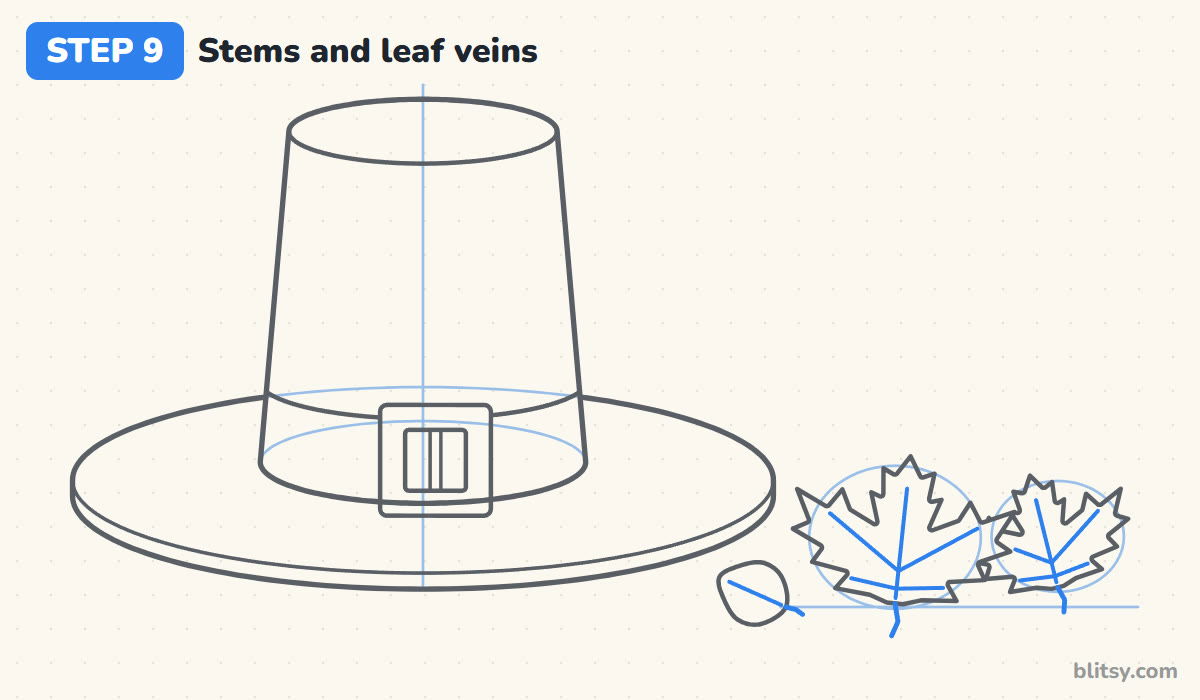
Give each leaf a short stem poking out of the bottom. Then draw a line from the stem to the top tip, and a few thinner lines out toward the side lobes. On the small leaf, one center vein is enough. Veins should start at the stem, which is why I draw that first.
💡 Tip: Stop each vein before it touches the leaf edge. Lines that run all the way out make the leaf look cut into pieces.
Step 10: Ink the lines and erase the guides
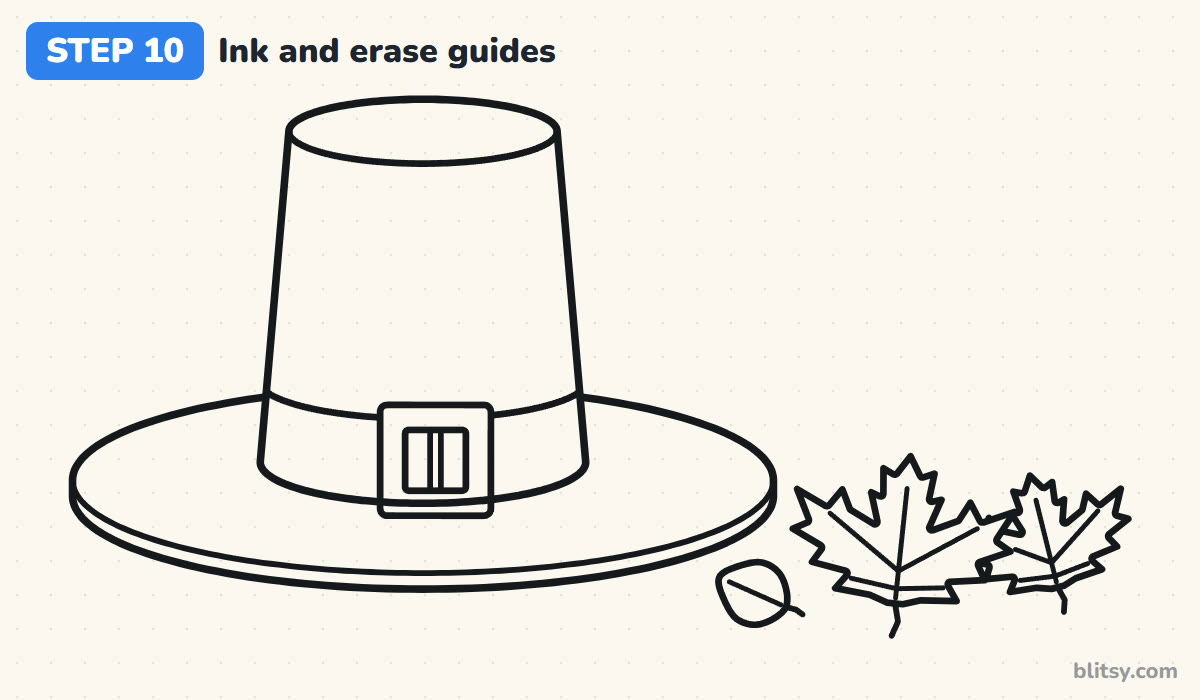
Go over every keeper line with a black marker or fineliner. Let the ink dry for a minute, then erase the center line, the leaf ovals, the ground line and any sketch marks. I slow down most on the long brim curves, since wobbles show there.
💡 Tip: Turn the paper so your hand pulls the marker toward you on the long curves. Pulling is steadier than pushing.
Step 11: Color the hat and leaves
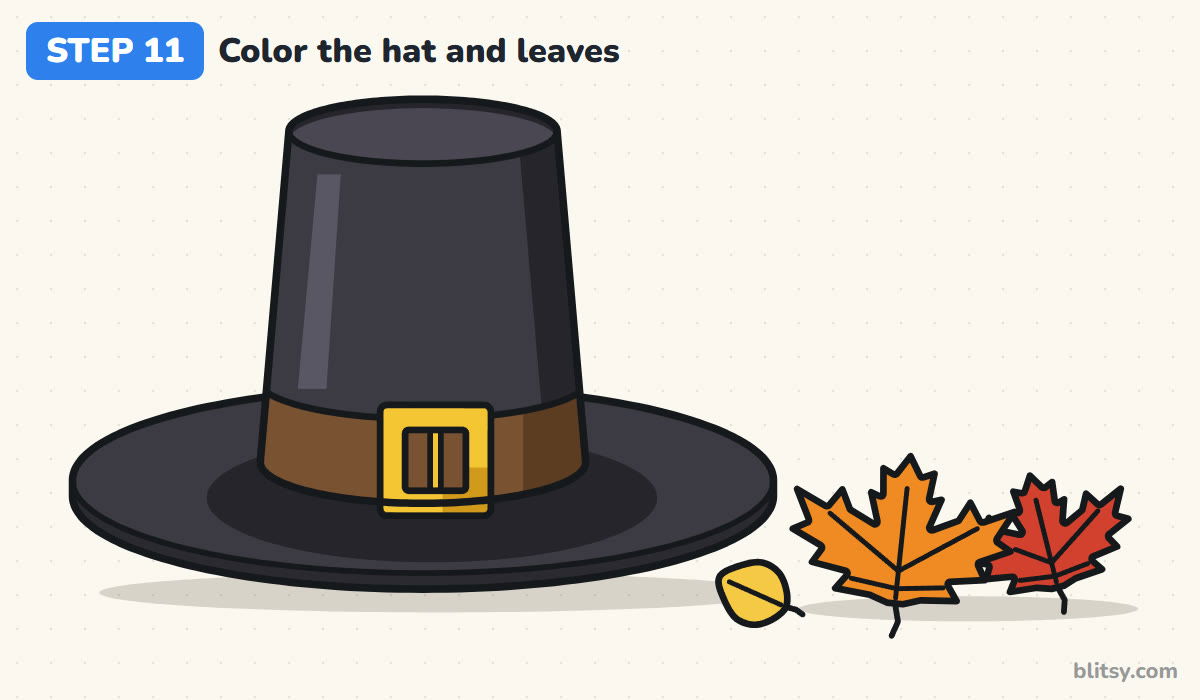
Color the crown and brim black, leaving a thin pale stripe on the left of the crown as a shine. Add dark gray on the right side of the crown and in a ring on the brim around its base, the shadow the crown throws. Make the band brown and the buckle yellow, then finish the leaves in orange, red and golden yellow.
💡 Tip: Color the black parts lightly at first, then press harder. Heavy black crayon from the start can smudge over the buckle.

Where Tall Hat Drawings Tip Over
- The brim oval is too round. A round brim makes it look like you're staring down into the hat. Keep it about four times as wide as it is tall.
- The crown sides lean out instead of in. A crown that widens at the top looks like a bucket. The top oval should be a little smaller than the base oval.
- The band curves the wrong way. If the band bends upward in the middle, the hat suddenly looks seen from below. Copy the bend of the crown's bottom edge.
- The buckle is tiny. A small buckle disappears on a black hat. Let it stick out past the band a little at the top and bottom.
- Everything is colored the same flat black. Without the gray shadows and the pale shine, the hat turns into a silhouette. Save a few lighter spots.
Pilgrim Hat Twists for Cards and Crafts
I like to swap the brown band for black and keep only the gold buckle, the way many old storybook pictures show it. A small turkey feather tucked in the band is fun too. Younger kids can skip the brim's thin edge and the leaf veins, and the hat still reads clearly. For another hat built on an oval brim, try the cowboy hat drawing tutorial, and for something to set beside your pilgrim hat, the pumpkin drawing step by step lesson fits right in. The fall leaves drawing tutorial goes deeper into maple leaves.
Free Pilgrim Hat Coloring Page and Step PDF
The free pilgrim hat coloring page shows the finished, colored hat at the top as a model, a color key that matches each crayon to a part, and a large outline to color underneath. The step-by-step PDF guide holds all 11 steps with pictures and tips, so you can draw from paper instead of a screen. Both print on Letter or A4.
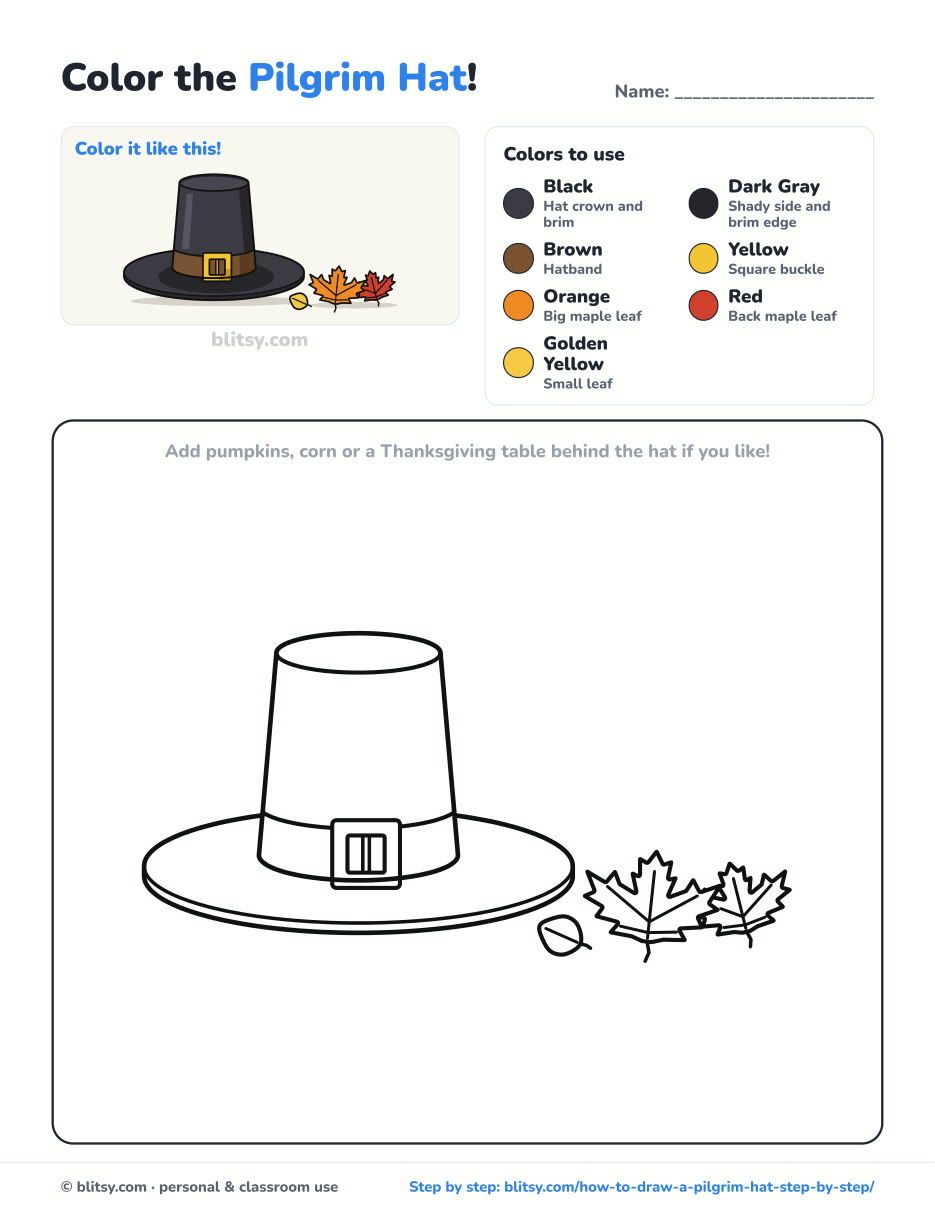
Black outlines with a colored example and the color names at the top. Ready to print and color.
⬇️ Download Coloring PageEvery step picture with its instructions and tips, to keep beside your paper while you draw.
⬇️ Download Drawing Guide📱 On a phone? Tap a download button, then open the file and choose Share → Save to Files or Print. On a computer, the PDF opens or saves straight to your Downloads folder.
Stash All Eleven Hat Steps on Pinterest
More Fall and Hat Tutorials to Try Next
Each of these is a full step-by-step lesson with a picture for every stage, so you can keep practicing with the same method.
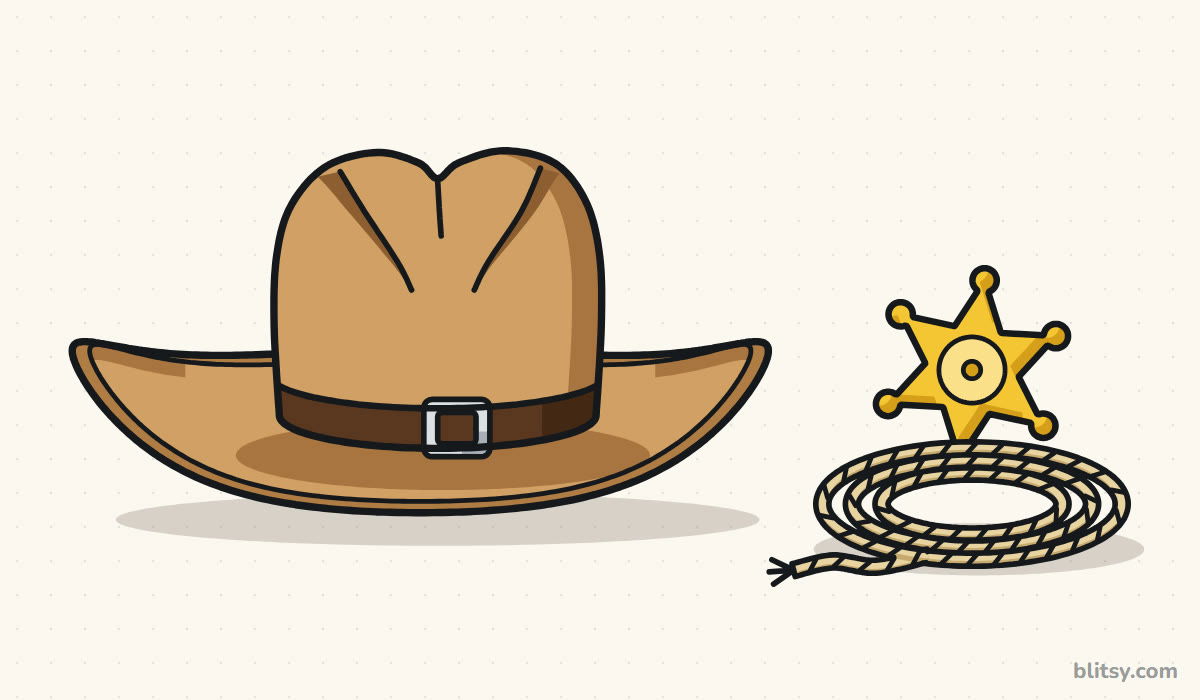
- Cowboy Hat Drawing: A tan felt cowboy hat with a curled brim and a pinched crown sits beside a lasso and a star badge in this how to draw a cowboy hat tutorial.
- Pumpkin Drawing: Three round pumpkins on a strip of hay are built from curved slices in this pumpkin drawing step by step lesson.
- Fall Leaf Drawing: A red and gold maple leaf grows from one dot and five guide lines in this fall leaf drawing tutorial.
- Scarecrow Drawing: A smiling scarecrow on his wooden post, with straw everywhere and a crow friend, fills this how to draw a scarecrow lesson.
- Witch Drawing: A friendly little witch rides her broom across a full moon in this witch drawing step by step guide.
Answers About Drawing Pilgrim Hats
What is the easiest way to draw a pilgrim hat?
Draw a wide flat oval for the brim, then a smaller oval inside it and another one higher up for the top. Join the two crown ovals with slanted lines, add a band and a square buckle, and you're done.
What shape is a pilgrim hat?
It's a tall crown that gets a little narrower toward its flat top, sitting on a wide flat brim. In a drawing, that means ovals for the brim and top and two slanted lines for the sides.
What colors is a pilgrim hat?
Usually black or very dark gray, with a band in brown or black and a gold or yellow buckle. Using dark gray for the shadows keeps the shape easy to see.
How do you draw a buckle on a hat?
Draw a square with rounded corners over the band, a smaller square inside it, and a thin bar down the middle of the hole. Make it a bit taller than the band so it stands out.
Three ovals and a square are all it takes, so pull out a pencil and let your pilgrim hat take a seat beside the leaves. 🍂✏️
Related posts:
 How to Draw Luffy Step by Step (Easy Straw Hat Guide)
 How to Draw a Cowboy Hat Step by Step (Easy Western Sketch)
 How to Draw a Car Step by Step (Easy Drawing for Beginners)
 How to Draw a Rocket Step by Step (Easy Blast-Off Drawing)
 How to Draw Rocks Step by Step (Easy Boulder Drawing)
 How to Draw Flames Step by Step (Easy Campfire Drawing)
 How to Draw a Scarecrow Step by Step (Easy Fall Drawing)
 Oil Pastel Drawing Step by Step (Easy Sunset for Beginners)
 Summer Drawing Step by Step (Easy Beach Scene for Beginners)
 Halloween Drawing Step by Step (Cute Haunted House for Kids)
 Realistic Drawing Step by Step (Shade a Shiny Apple)
 Love Drawing Step by Step: Two Hugging Bears (Easy)

