
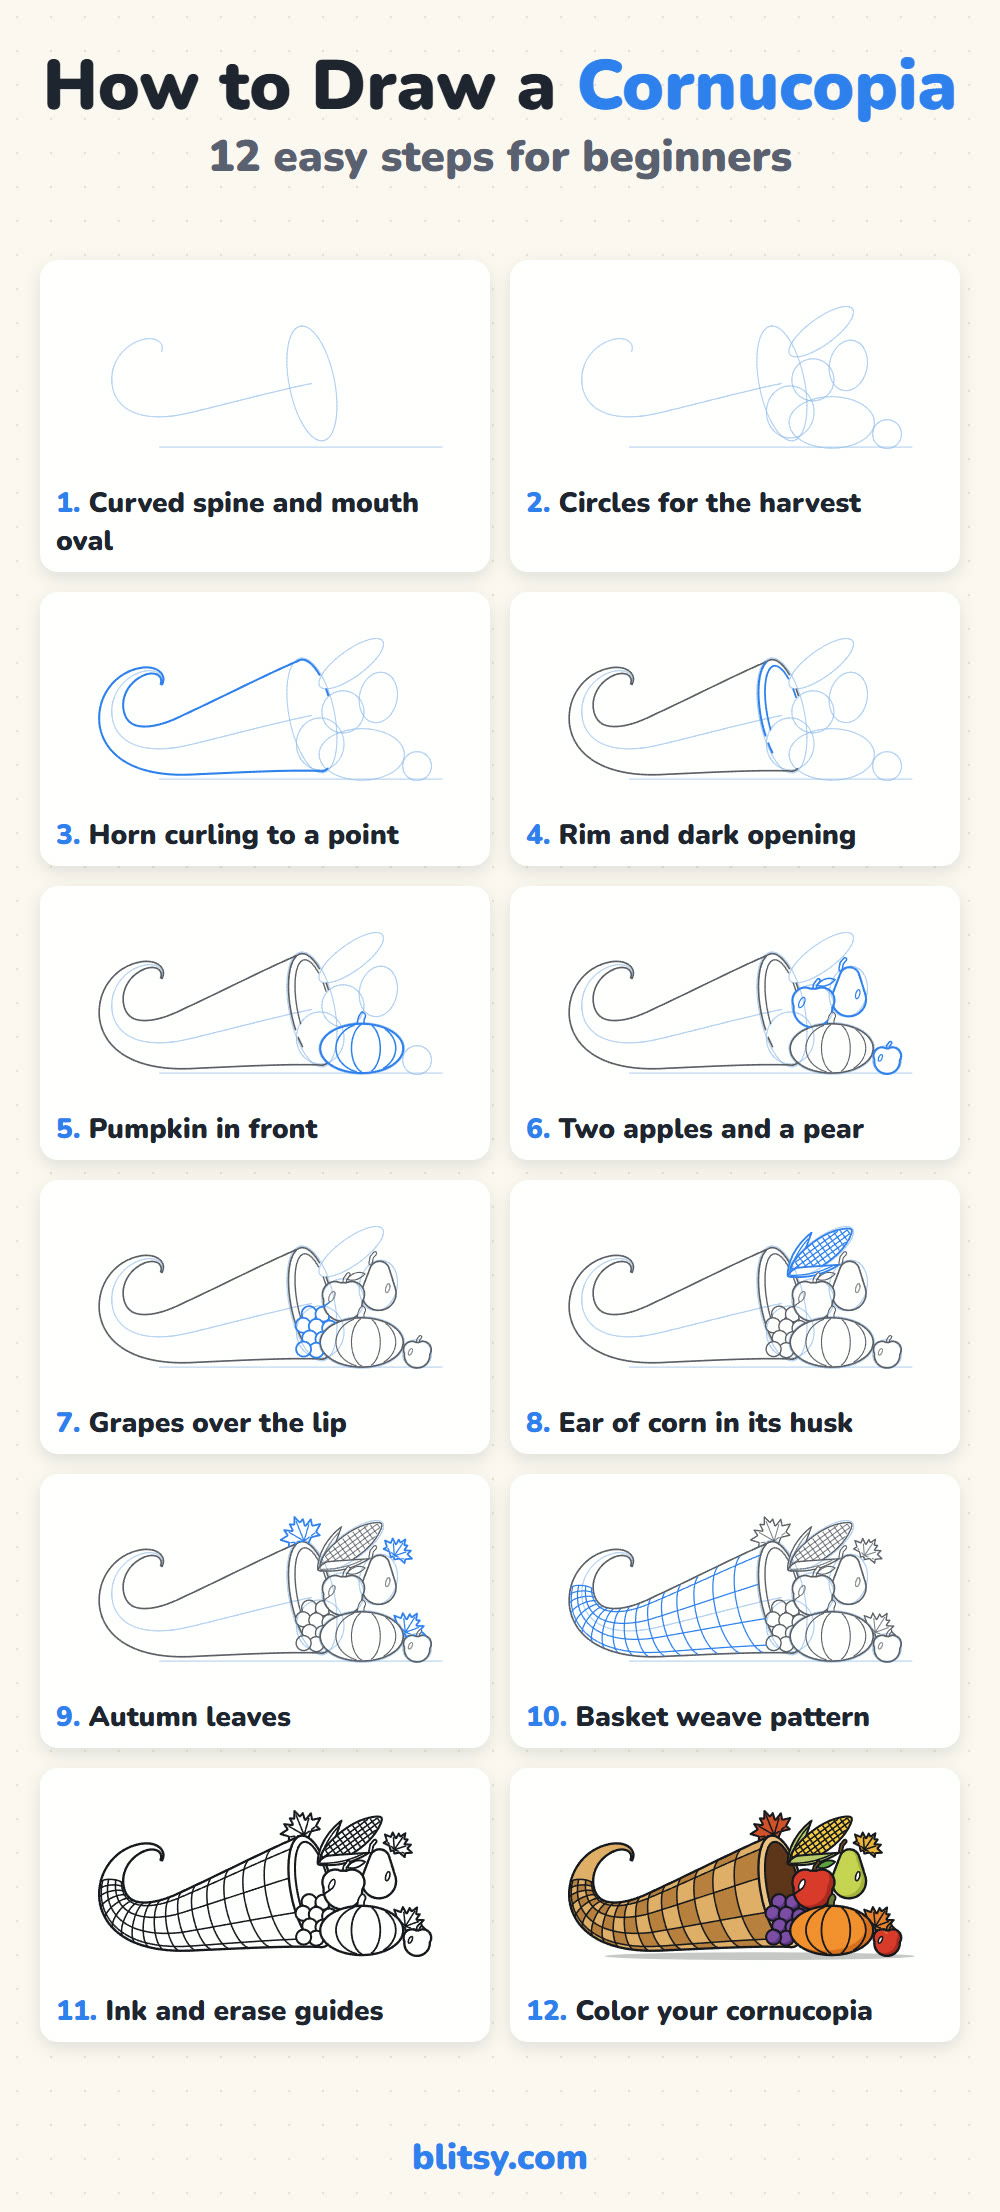
A cornucopia looks busy, yet it starts as one curved line and one tall oval. Here I'll walk you through how to draw a cornucopia step by step, from that first light curve to a woven horn with the harvest spilling out of it. It's the classic Thanksgiving centerpiece, and it fits any autumn picture too.
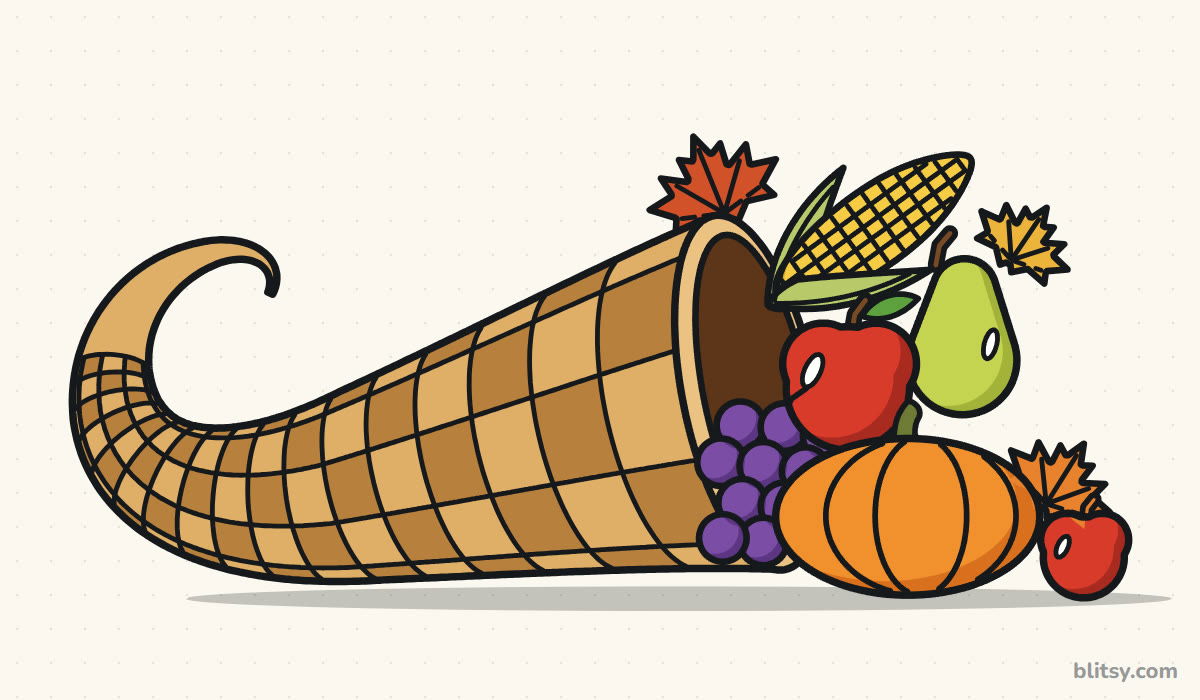
Fresh wicker and fruit lines show up in blue. Gray lines are already on your paper, and pale blue helpers get erased in step 11.
Quick overview
⏱️ Time: about 40 to 50 minutes with coloring
🎯 Level: easy to medium, good for kids from about 7 up
✏️ Steps: 12
🧺 You'll draw: a woven wicker horn on its side, overflowing with the fall harvest
Supplies for a Harvest Horn Sketch
- A soft pencil (HB or 2B) for light guide lines
- A clean eraser
- A black marker or fineliner for the final lines
- Colored pencils or crayons in two browns plus the bright fall colors
- Plain paper, turned sideways
The horn is long and low, so a sideways page gives the curly tip and the fruit pile room on both ends.
How to Draw a Cornucopia Step by Step
Step 1: Sketch the curved spine and the mouth oval
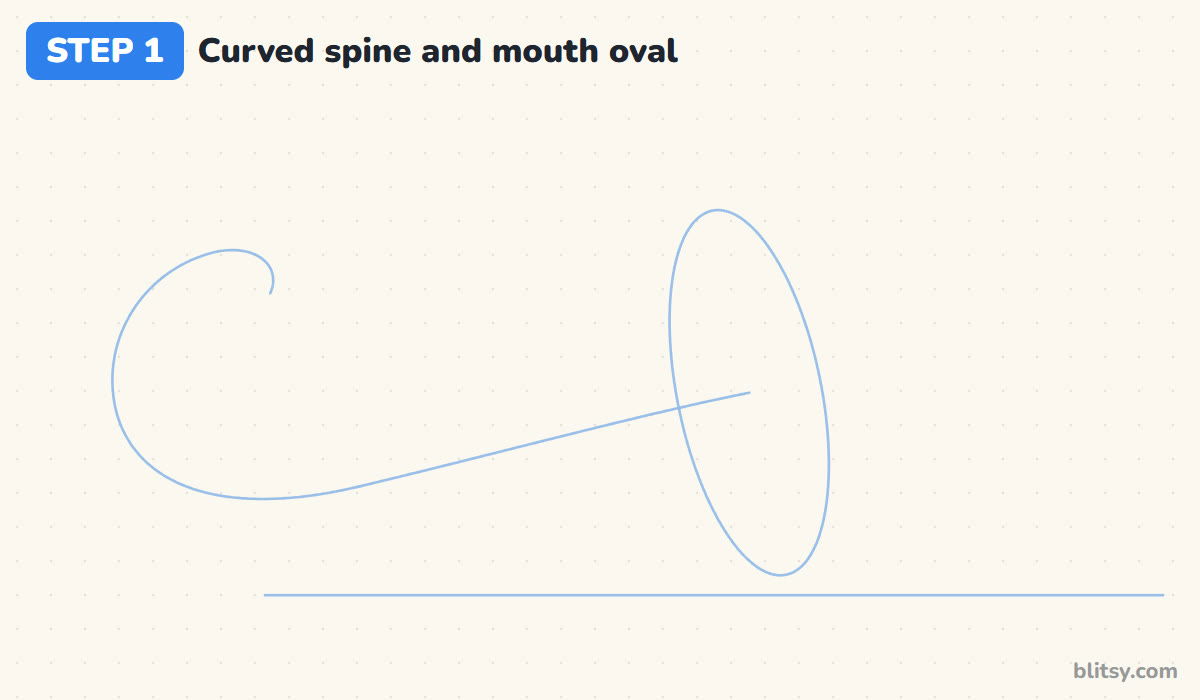
Press lightly for this whole step. Draw a ground line near the bottom of the page. Then draw the spine of the horn: a gently sloping line running left that curls up and over like the top of a question mark. At its right end, draw a tall, narrow oval that leans back a little. That's the open mouth of the basket.
💡 Tip: Keep the oval about twice as tall as it is wide. A round circle makes the horn look like a tube.
Step 2: Add circles where the harvest goes
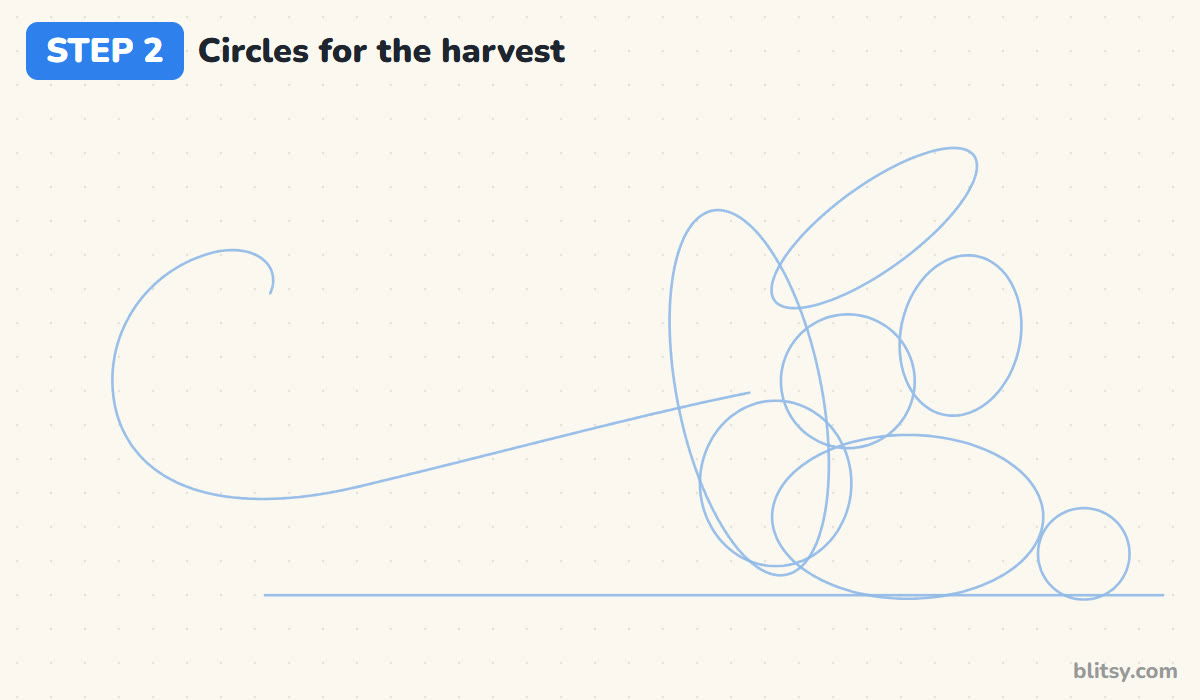
Plan the pile before you draw any fruit. Put a wide, flat oval on the ground in front of the mouth for the pumpkin, a circle above it for an apple, a taller oval to its right for a pear, and a small circle at the far right for a second apple. Add a long slanted oval for the corn and a soft oval on the lower lip for the grapes.
💡 Tip: Let the guide shapes overlap each other. Fruit in a real pile always hides part of its neighbors.
Step 3: Draw the horn curling to a point
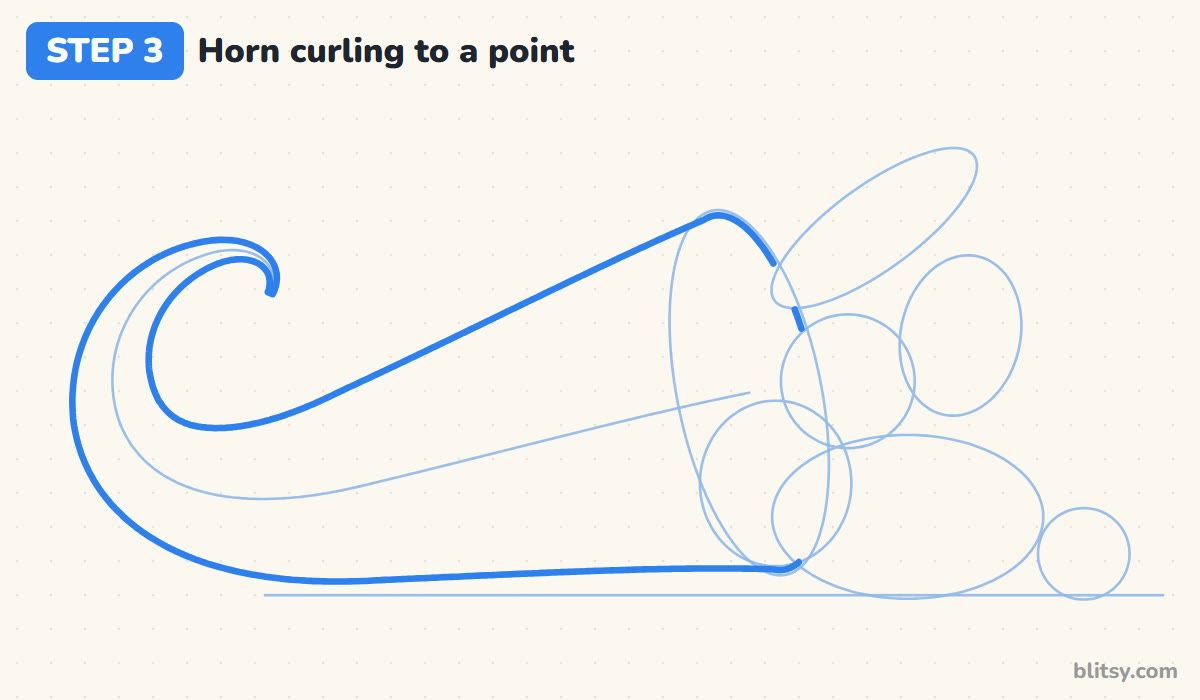
Using the spine as your middle, draw the top and bottom edges of the horn. They start at the ends of the oval, get closer together as they travel left, then wrap around the curl and meet in a small rounded point. The bottom edge rests almost flat on the ground. Stop wherever a line runs into a fruit guide.
💡 Tip: Draw the outer edge of the curl first, then the inner one. The gap between them should shrink smoothly.




Step 4: Outline the rim and the dark opening
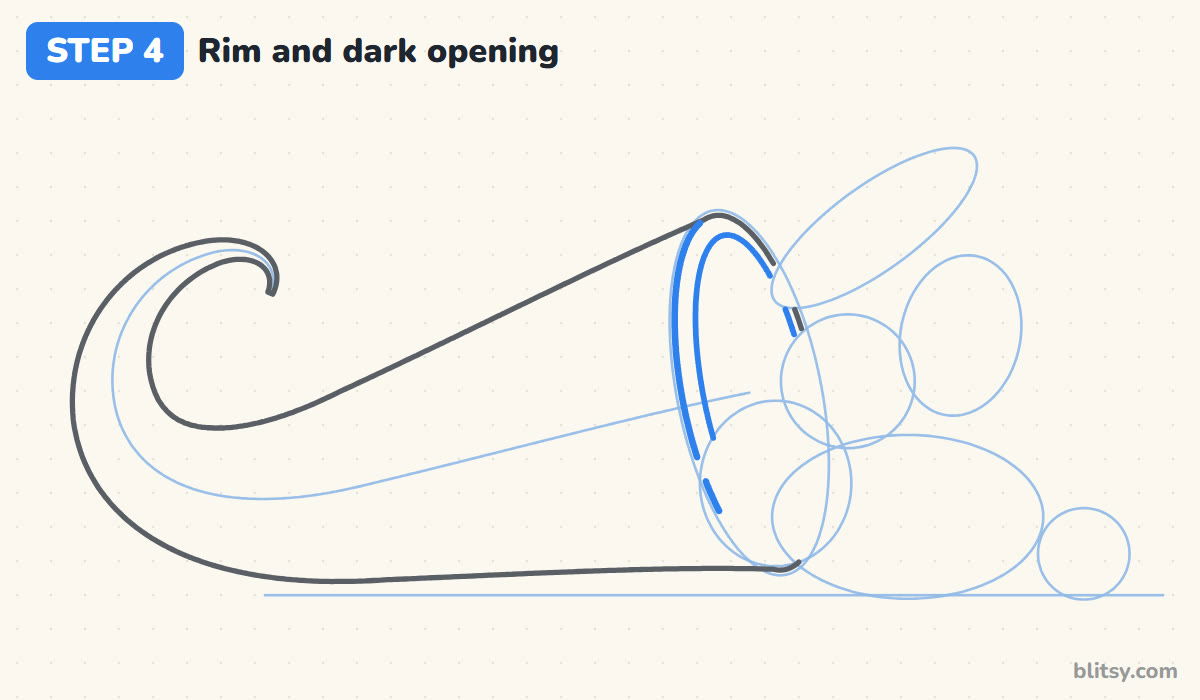
Go over the mouth oval with a firm line, then draw a slightly smaller oval just inside it. The thin band between them is the rim, and the inner oval is the hollow you can see into. I keep the band a little wider on the left, because that side of the opening faces us.
💡 Tip: Skip the parts of both ovals that sit behind the apple and grapes. Short gaps are fine here.
Step 5: Draw the pumpkin in front
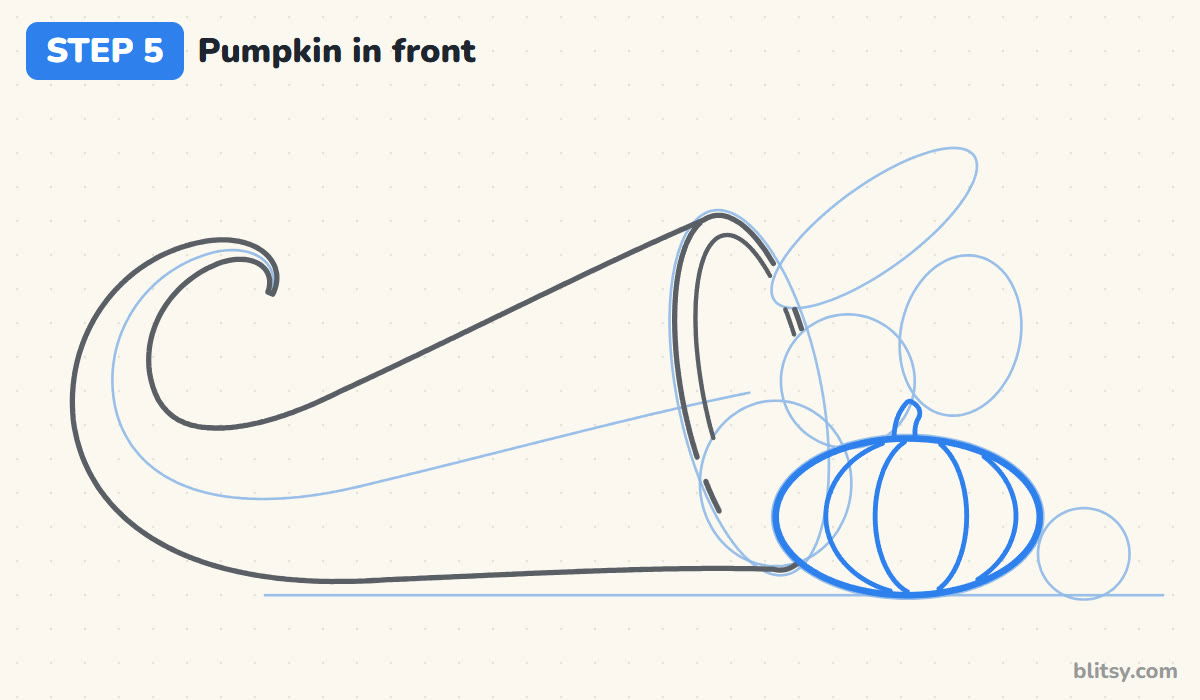
The pumpkin is the front of the pile, so it gets drawn whole. Trace the wide oval on the ground, then add two pairs of curved ribs inside it: a narrow pair near the middle and a wider pair near the sides. A short, thick stem sticks up from the top and leans slightly.
💡 Tip: Start every rib at the stem and end it at the bottom center. That's what makes the pumpkin look round instead of striped.
Step 6: Shape two apples and a pear
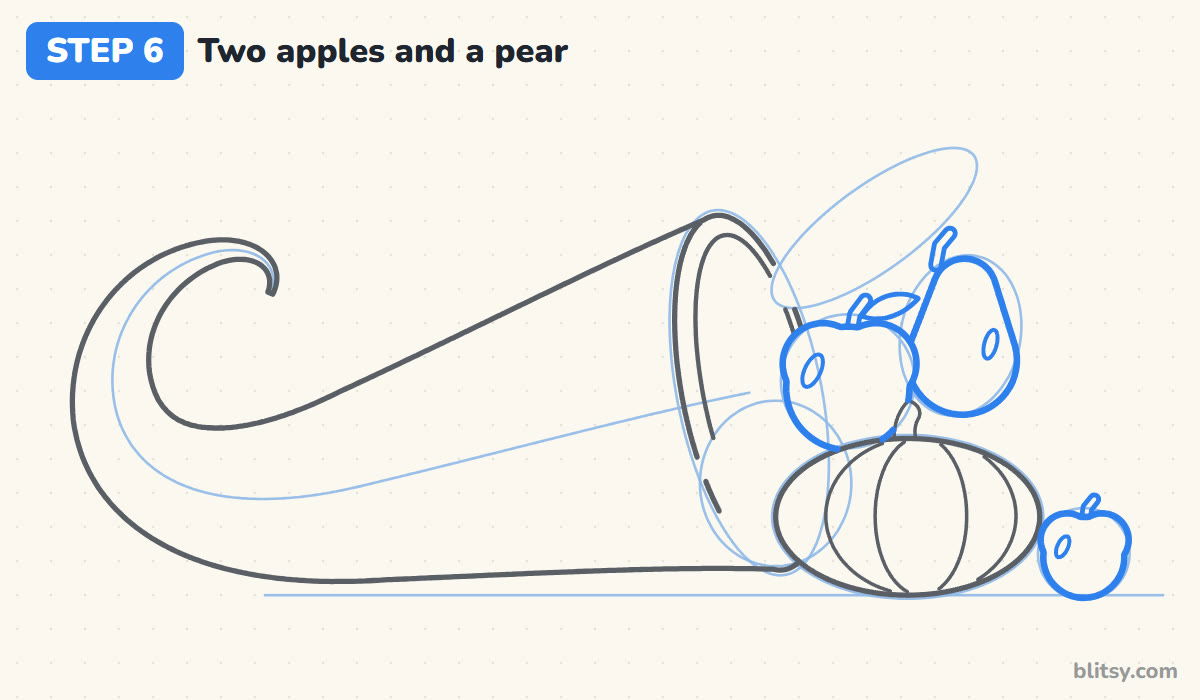
Turn the circle above the pumpkin into an apple with a small dip at the top, a stem and a little leaf. Do the same for the small apple on the right. Behind the big apple, draw the pear: a round bottom with a narrower top, leaning slightly right. Add an oval shine on each fruit.
💡 Tip: Put every shine on the same side, the upper left here. Mixed shines make the light look confused.
Step 7: Hang a bunch of grapes over the lip
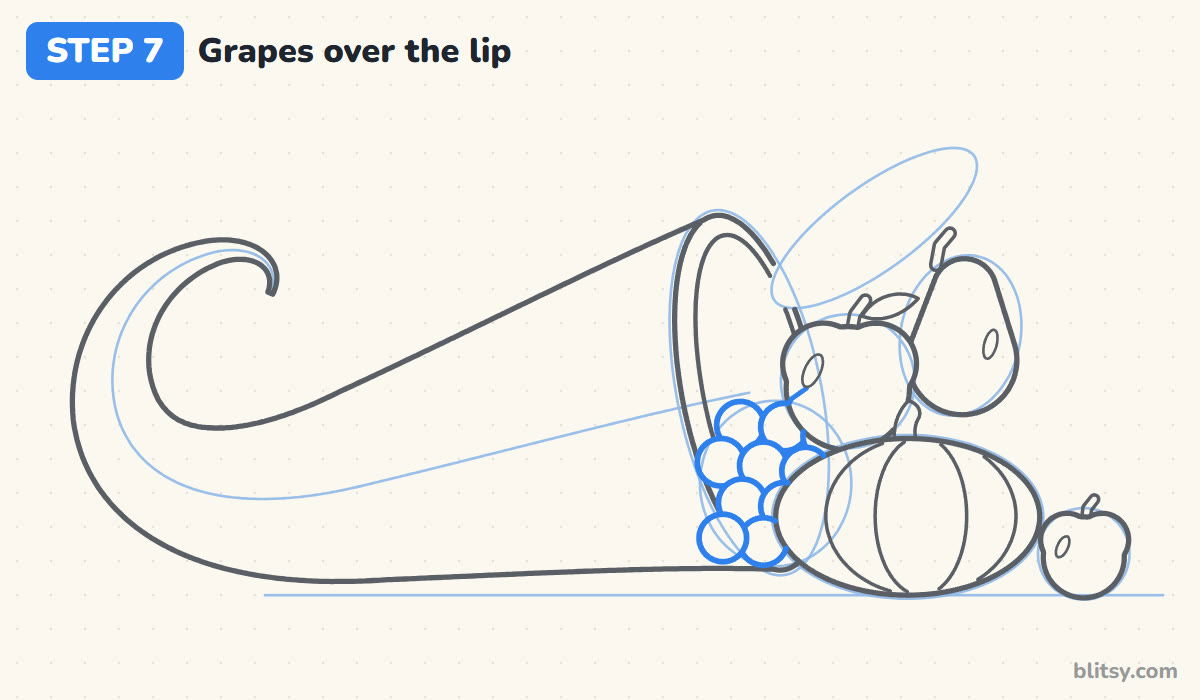
Fill the grape oval with about ten small circles, stacked in rows that get narrower toward the bottom. The top row sits on the rim and the bunch spills down toward the ground. Draw the front grapes whole first, then only the visible edges of the ones behind.
💡 Tip: Make all the grapes roughly the same size. One giant grape looks like a plum got lost in the bunch.




Step 8: Draw an ear of corn in its husk
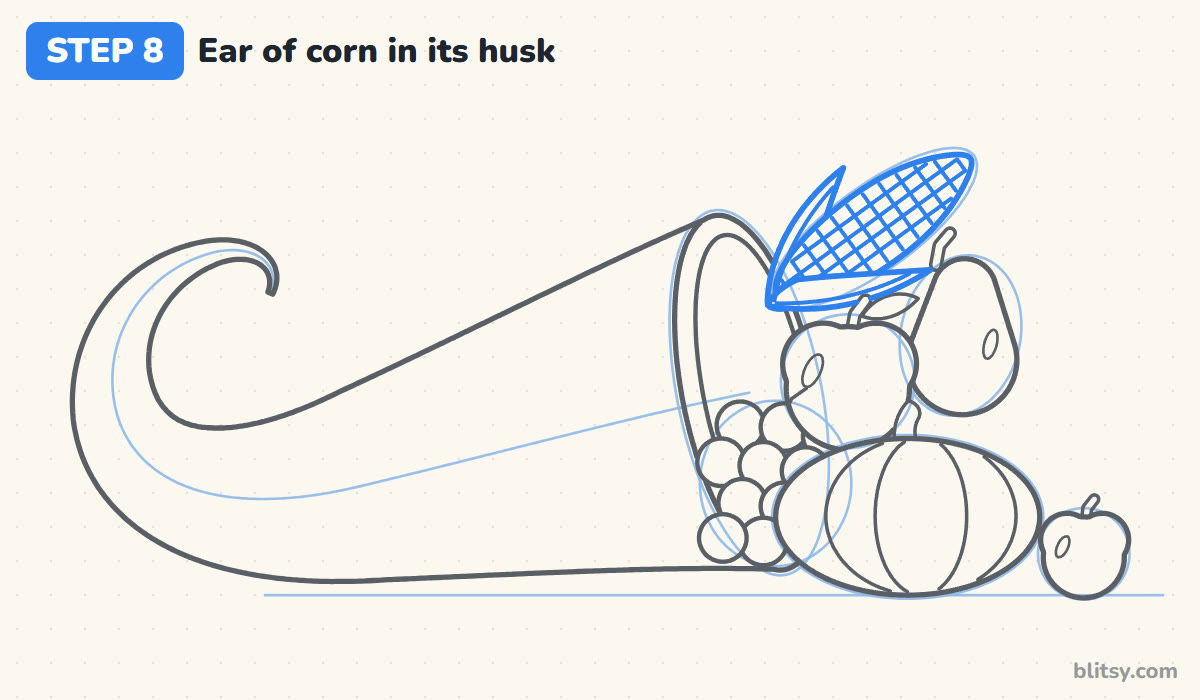
Inside the slanted oval, draw the cob with a rounded tip pointing up and to the right. Two husk leaves peel back from its base, one above and one below, each with a line down the middle. Fill the cob with a grid of kernels.
💡 Tip: The kernel lines don't need to be perfectly even. Slightly wobbly rows look more like real corn.
Step 9: Tuck in a few autumn leaves
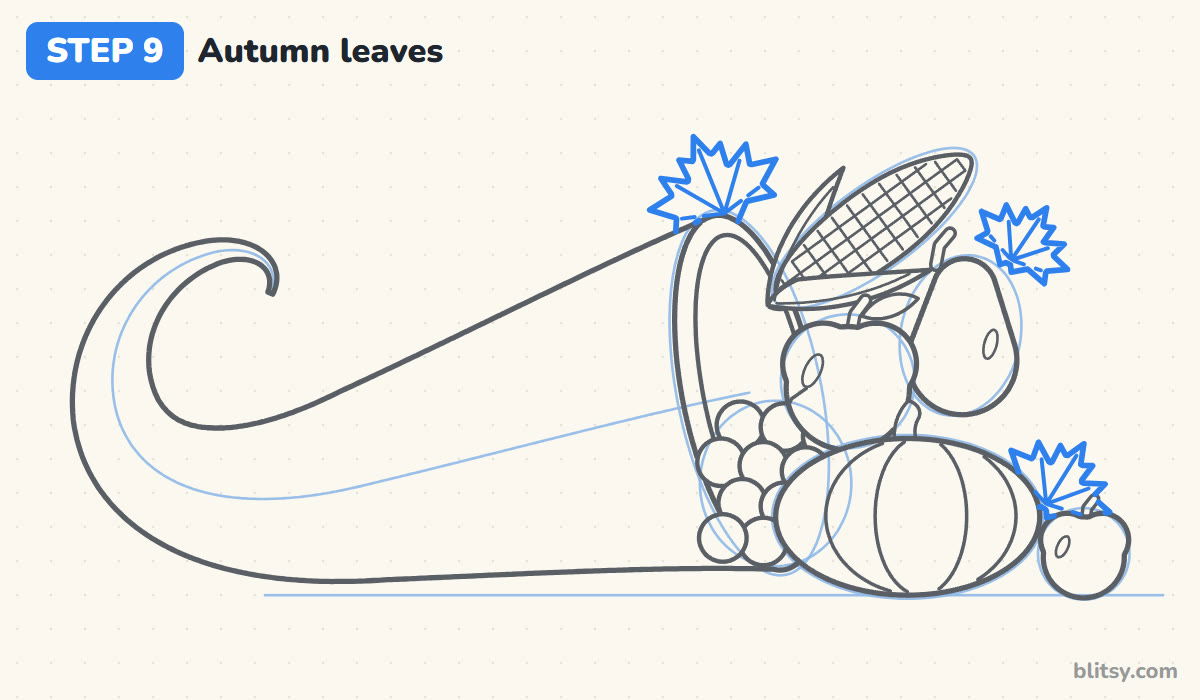
Maple leaves fill the gaps. Draw one peeking up behind the rim, one behind the pear, and one between the pumpkin and the small apple. Each has three big pointed lobes on top and two smaller side lobes, plus a few vein lines.
💡 Tip: Draw only the part of each leaf that sticks out. Tucked-in leaves make the pile look full and cozy.
Step 10: Add the basket weave pattern
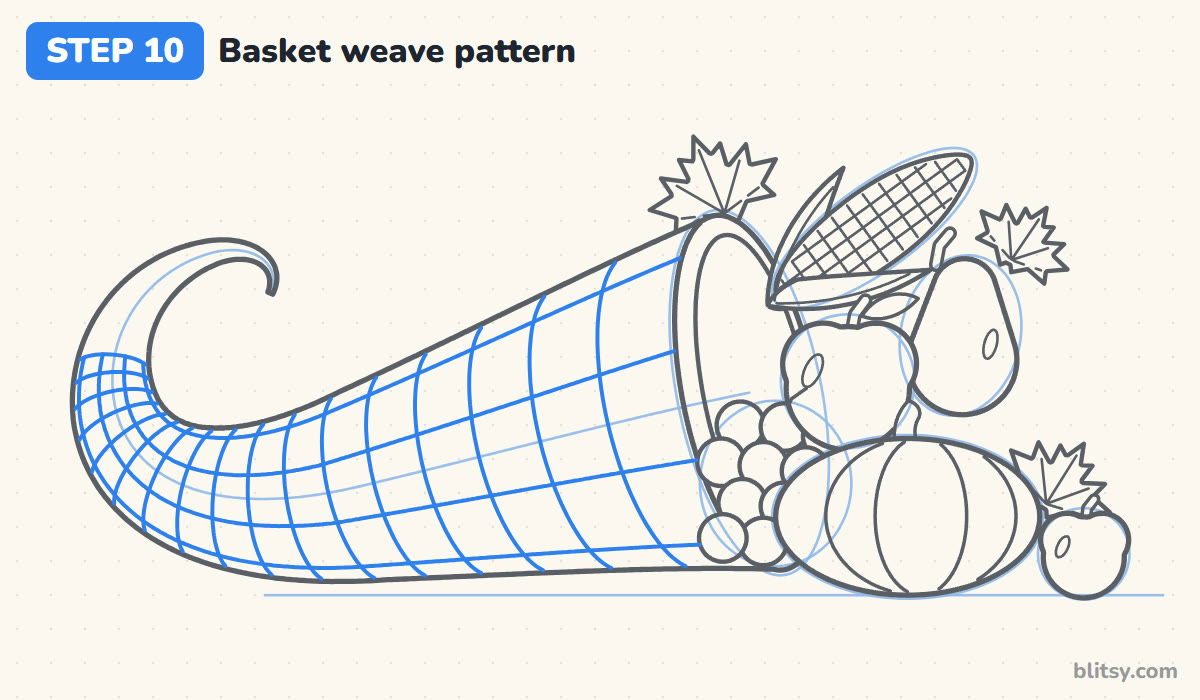
This step turns a plain horn into wicker. Draw bands across the horn, each curving the same way as the left side of the mouth, spaced wide near the opening and closer as the horn narrows. Then run four long strands along the horn, following its curve, so they cross every band and make a grid of little boxes.
💡 Tip: Younger kids can draw just the bands and skip the long strands. It still reads as a basket.
Step 11: Ink the drawing and erase the guides
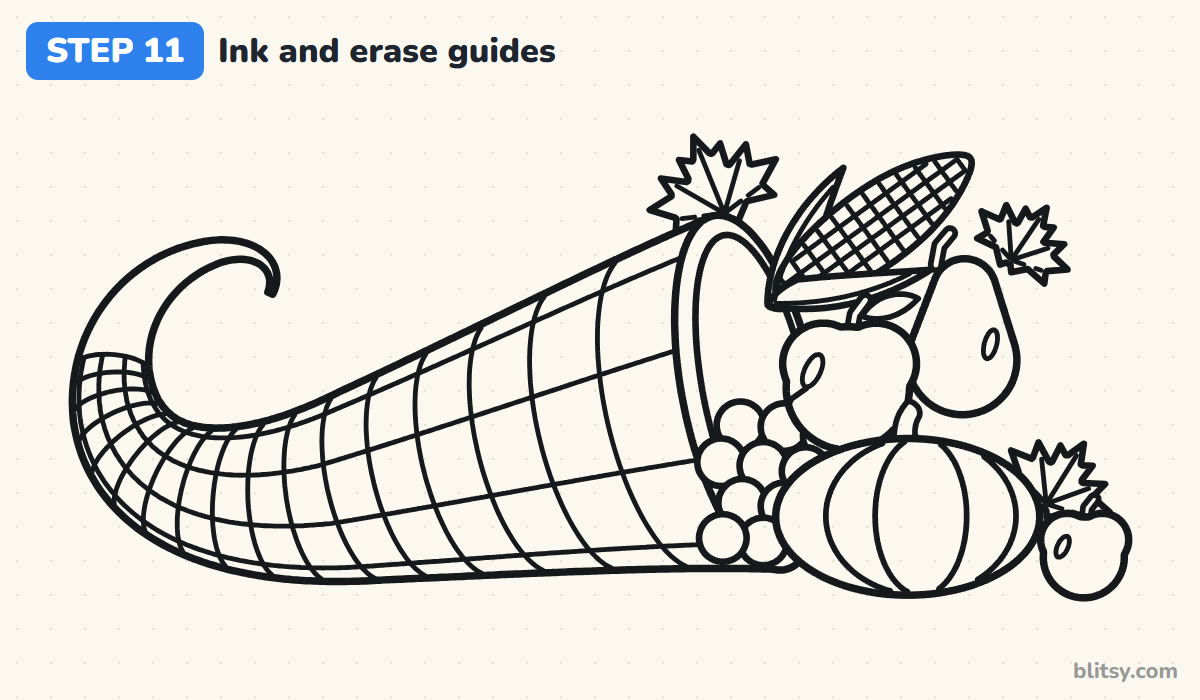
Trace all your keeper lines with the black marker. I ink the fruit first while my hand is fresh, and the weave last because it has the most lines. Leave the guides alone, and once the ink is completely dry, erase them.
💡 Tip: Turn the paper as you ink the curl so you can pull each stroke toward you in one smooth move.


Step 12: Color your cornucopia
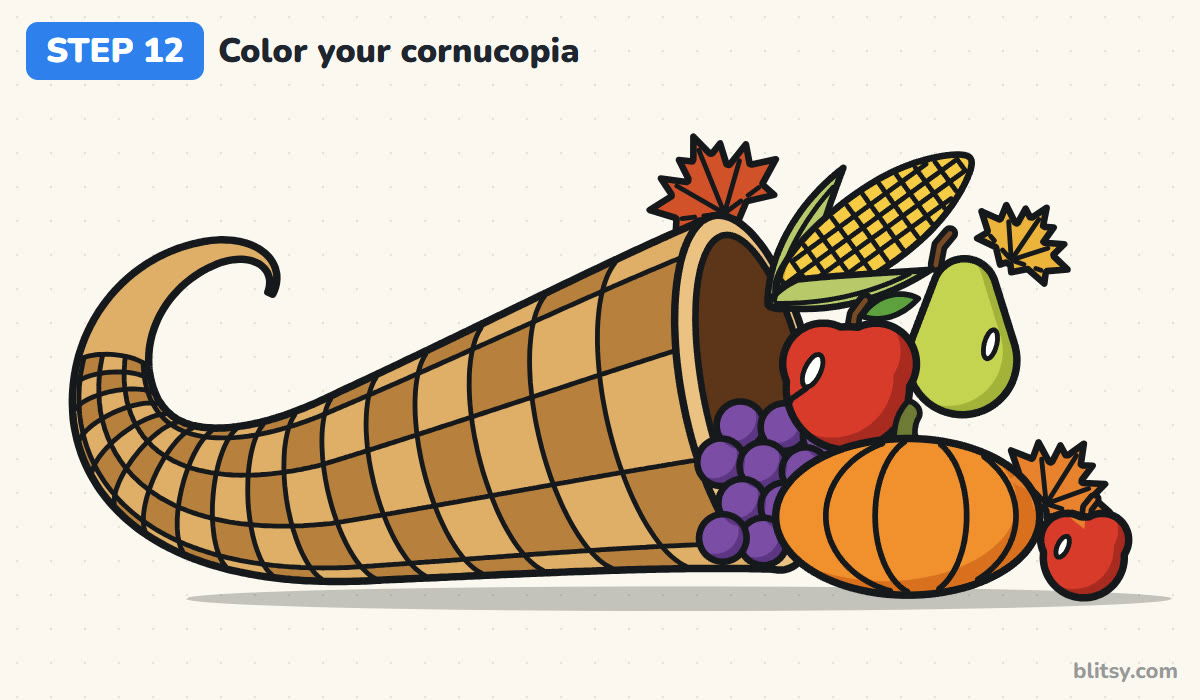
Color the horn tan, then color every other box of the weave a darker brown, like a checkerboard. The opening is dark brown and the rim stays pale. Make the pumpkin orange, the apples red, the grapes purple and the pear yellow green. Corn gets yellow kernels with pale green husks, and each leaf can be its own warm color.
💡 Tip: Add a slightly darker shade on the side of each fruit away from the shine. It makes the whole pile look round.
Where Horn of Plenty Drawings Go Wrong
- A horn that looks like an ice cream cone. A straight, pointy cone reads as a snack. Bend the spine and curl the tip up into a hook, and it becomes a cornucopia.
- A round mouth. A circle at the open end flattens everything. A tall, narrow oval shows the opening at an angle and gives the basket depth.
- Fruit floating beside the horn. The harvest should overlap the rim and spill onto the ground, each piece touching or hiding part of another.
- Weave lines running straight up and down. Straight bands make the horn look flat. Curve every band like the side of the mouth so the basket looks round.
- Coloring every weave box the same. One flat tan hides all that pattern work. Two browns in a checkerboard is what makes it look woven.
Filling Your Cornucopia Your Way
You don't have to copy my harvest exactly. Swap the pear for a small gourd, or let a few nuts roll out onto the table. For a Thanksgiving card, write a word of thanks in the space above the horn. If the pumpkin was your favorite part, my pumpkin drawing step by step lesson shows three pumpkins on a bed of hay. You can practice a shiny red apple with the apple drawing tutorial, and the fall leaves drawing tutorial has more leaf shapes to tuck around the pile.
Free Cornucopia Coloring Page and Step Guide
The free cornucopia coloring page has a colored horn to copy from, a color key and a large outline with room for a tablecloth or background. The step-by-step PDF guide holds all 12 steps with pictures and tips, handy for a classroom or a Thanksgiving kids' table. Both print on Letter or A4 paper.
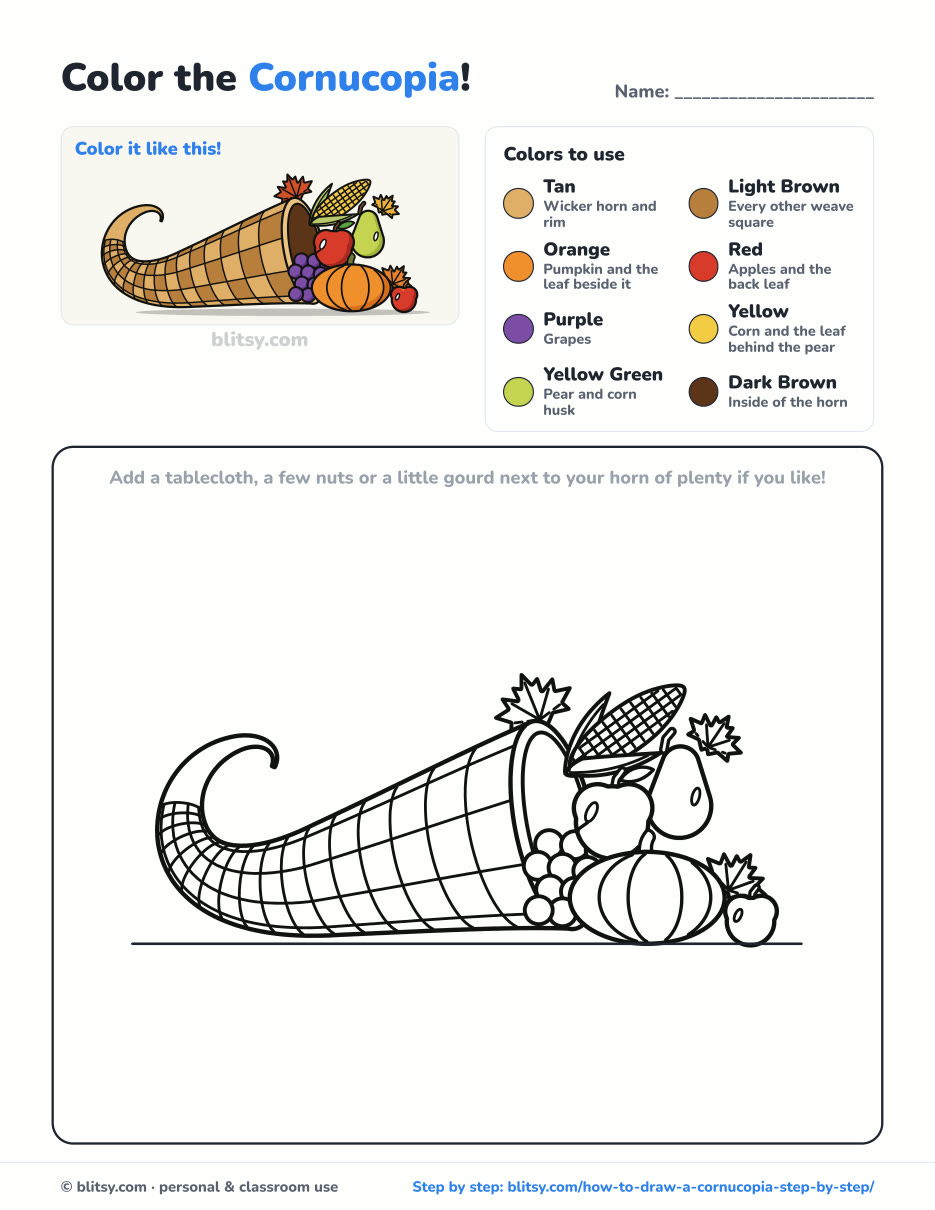
Black outlines with a colored example and the color names at the top. Ready to print and color.
⬇️ Download Coloring PageEvery step picture with its instructions and tips, to keep beside your paper while you draw.
⬇️ Download Drawing Guide📱 On a phone? Tap a download button, then open the file and choose Share → Save to Files or Print. On a computer, the PDF opens or saves straight to your Downloads folder.
Pin the Harvest Horn Steps
More Fall Fruit and Harvest Drawings
Each lesson below has a picture for every step and a free coloring page at the end, just like this one.
- Pumpkin Drawing: A big ribbed pumpkin, a tall one and a tiny white one sit on hay in this pumpkin drawing step by step lesson.
- Apple Drawing: Draw one shiny red apple with a stem and leaf in this apple drawing tutorial.
- Fall Leaves Drawing: A red and gold maple leaf drifts down beside an acorn in this fall leaves drawing tutorial.
- Fruit Drawing: A blue bowl holds an apple, an orange, a pear, grapes and a banana in this fruit bowl drawing step by step guide.
- Strawberry Drawing: Practice seeds and a leafy top with this strawberry drawing tutorial.
Cornucopia Drawing Questions Kids Ask
What is the easiest way to draw a cornucopia?
Draw a curved horn that gets thinner and curls up at one end, with a tall oval for the opening. Pile a few simple fruits in and around it. Young kids can draw the weave as a few curved bands.
What goes in a cornucopia drawing?
Anything from the fall harvest works: pumpkins, apples, pears, grapes, corn, gourds or squash, plus a few autumn leaves. Pick four or five that are easy to tell apart by shape and color.
Why is a cornucopia a symbol of Thanksgiving?
The horn of plenty stands for a good harvest and having more than enough food, so it shows up on Thanksgiving tables and in autumn decorations.
How do you draw a basket weave pattern on a cornucopia?
Draw curved bands across the horn, then a few long strands along it, so they make a grid. Color every other box a darker brown, like a checkerboard, and the pattern looks woven.
Fill that horn to overflowing, color the weave box by box, and it's ready to sit in the middle of your Thanksgiving table. 🍂✏️
Related posts:
 How to Draw a Whale Step by Step (Easy for Beginners)
 How to Draw Lungs Step by Step (Easy Science Diagram)
 How to Draw a Pineapple Step by Step (Easy Crown and Slice)
 How to Draw Iron Man Step by Step (Easy Chibi for Kids)
 How to Draw a Dress Step by Step (Easy Party Dress)
 How to Draw a Chicken Step by Step (Easy for Beginners)
 How to Draw a UFO Step by Step (Cute Alien Saucer)
 How to Draw Flames Step by Step (Easy Campfire Drawing)
 How to Draw a Moon Step by Step (Sleepy Crescent + Phases)
 How to Draw a Sunflower Step by Step (Big and Bright)
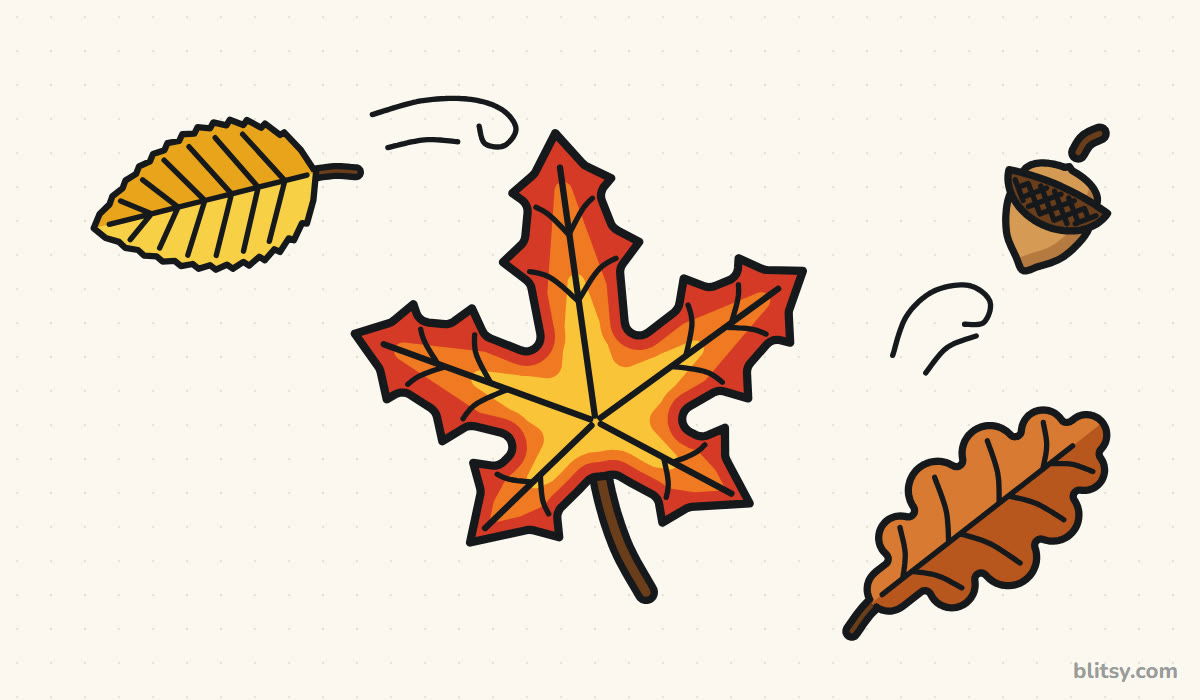 How to Draw a Fall Leaf Step by Step (Maple, Oak and Birch)
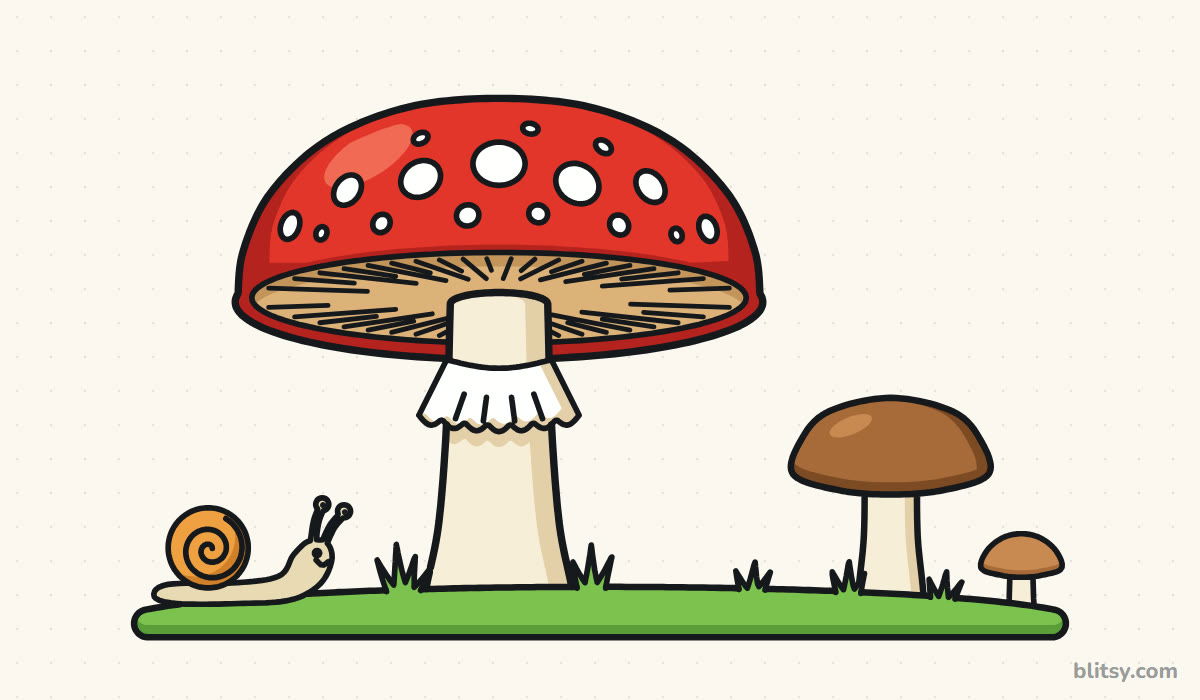 How to Draw a Mushroom Step by Step (Easy Storybook Toadstool)

