
Keys look fiddly, but the old ones are mostly circles and rectangles lined up along one straight line. That line does a lot of work for you. This lesson shows how to draw a key step by step: a fancy gold skeleton key like the ones in storybooks, and a small modern house key hanging on a ring underneath it. If you can draw a circle and a long box, you can draw both.
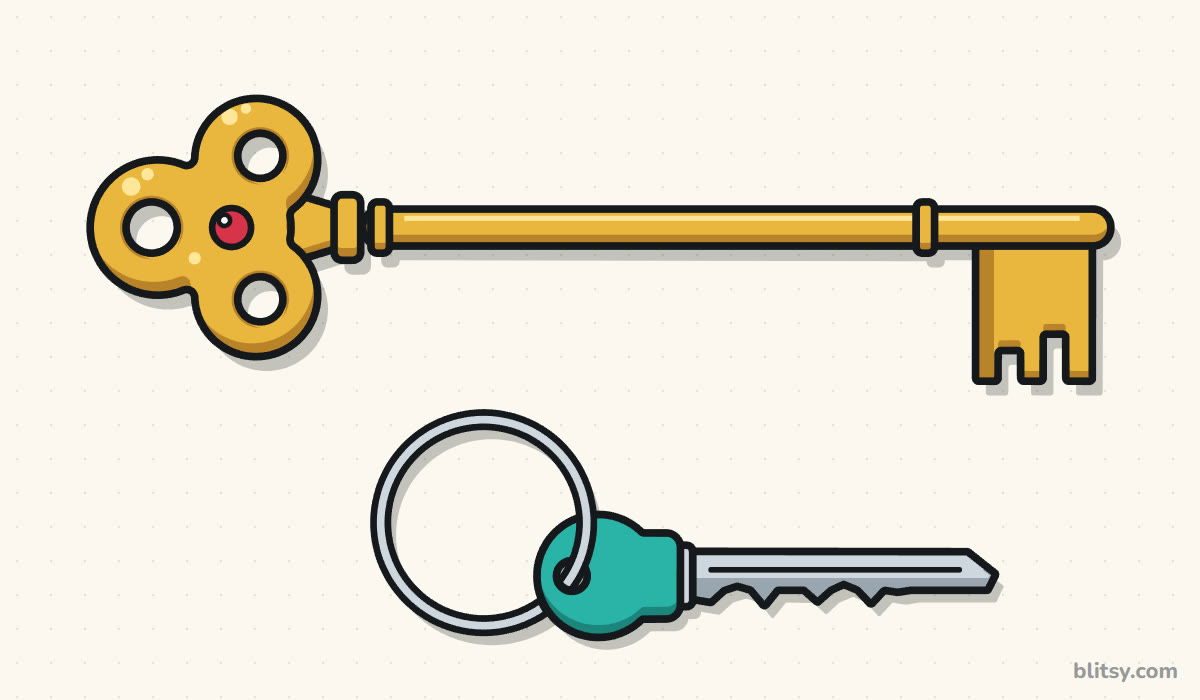
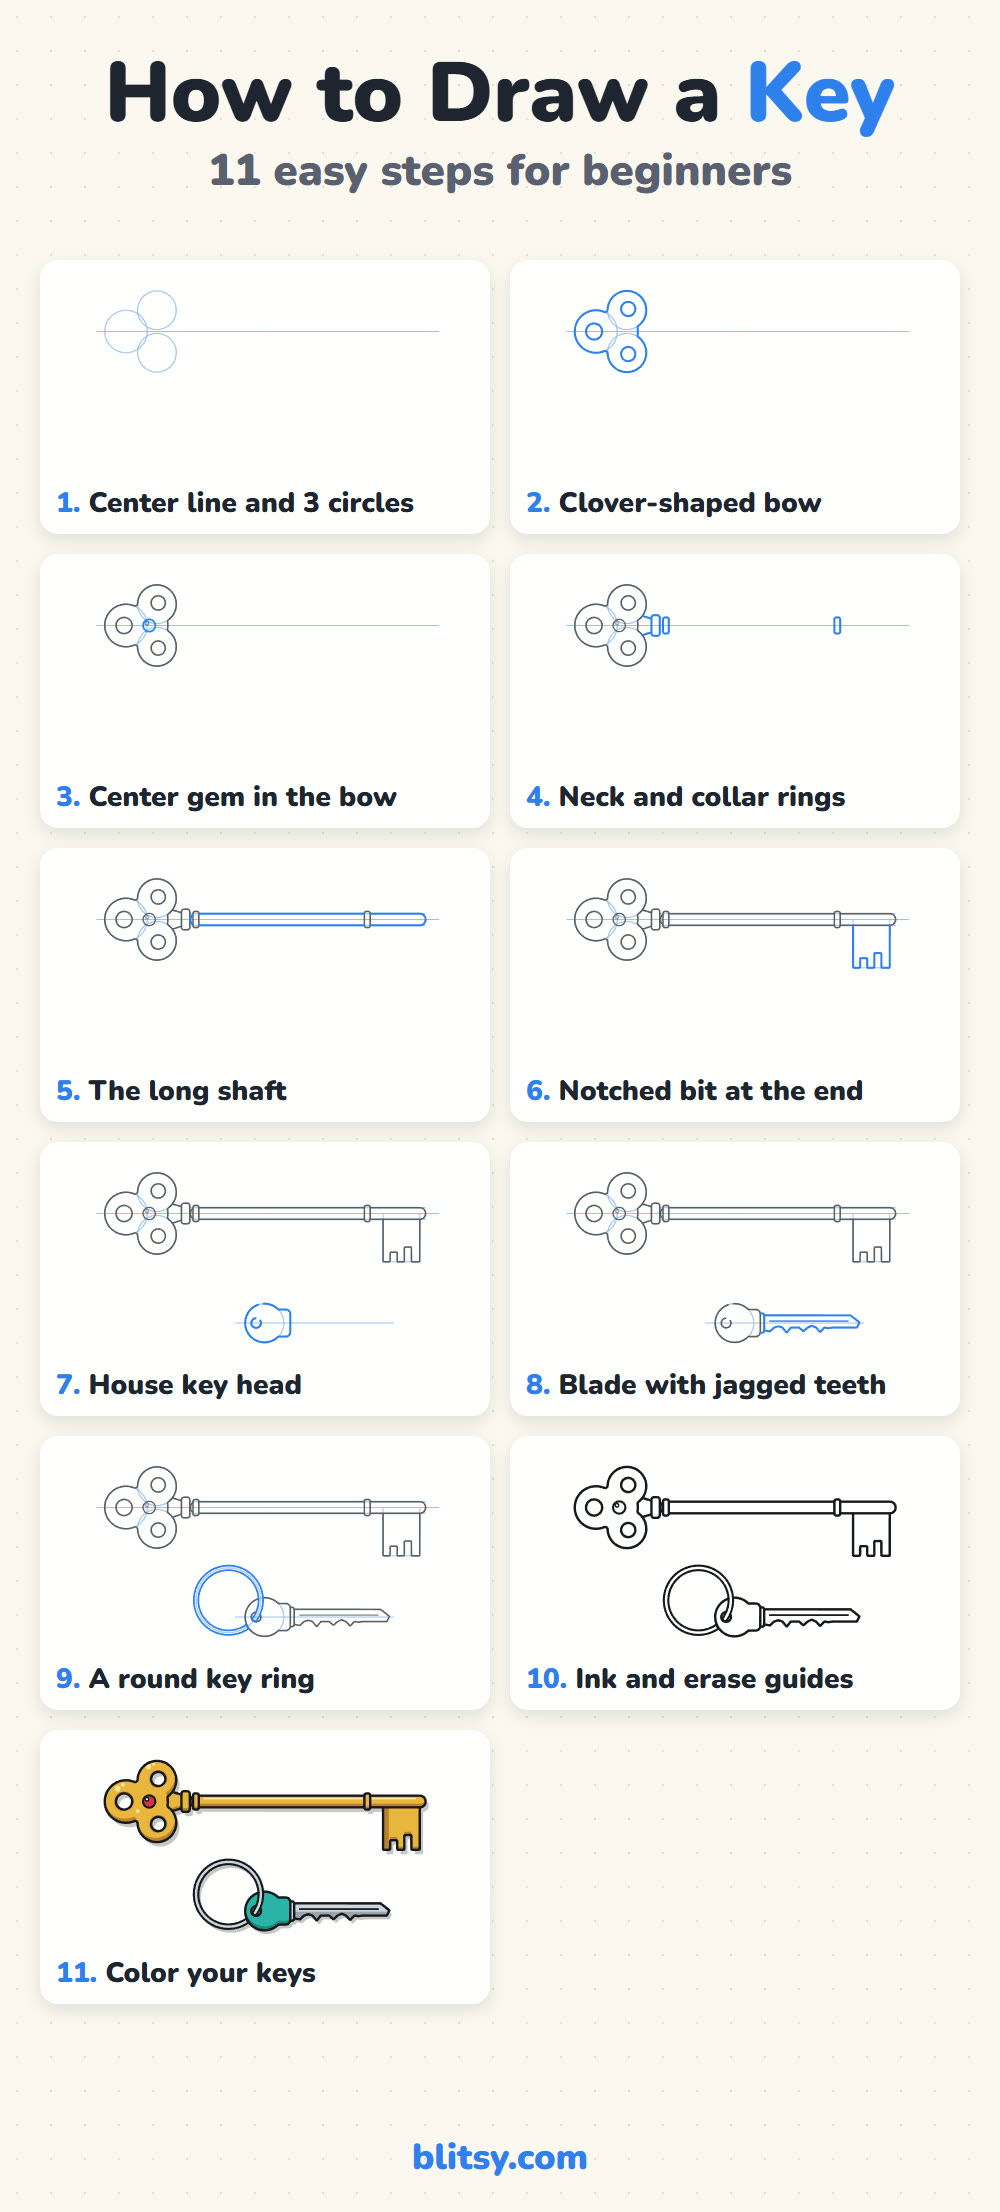
Each step adds a few new lines, and those are colored blue. Gray lines are from earlier steps. Copy only the blue part, compare it with the picture, then go to the next one.
Quick overview
⏱️ Time: about 25 to 30 minutes, coloring included
🎯 Level: easy, fine for kids around 6 and up
✏️ Steps: 11
🔑 You'll draw: a gold skeleton key and a house key on a ring
Supplies for a Shiny Gold Key
- A pencil that draws light lines (HB works well)
- A soft eraser
- A ruler, if you like straight shafts (optional)
- A black marker or fineliner for the outline
- Colored pencils or crayons: yellow, a darker gold or ochre, teal, light gray and a little red
- Plain white paper, turned sideways
The skeleton key is long and thin, so landscape paper gives the shaft enough room to stay straight.
How to Draw a Key Step by Step
Step 1: Draw a center line and three circles
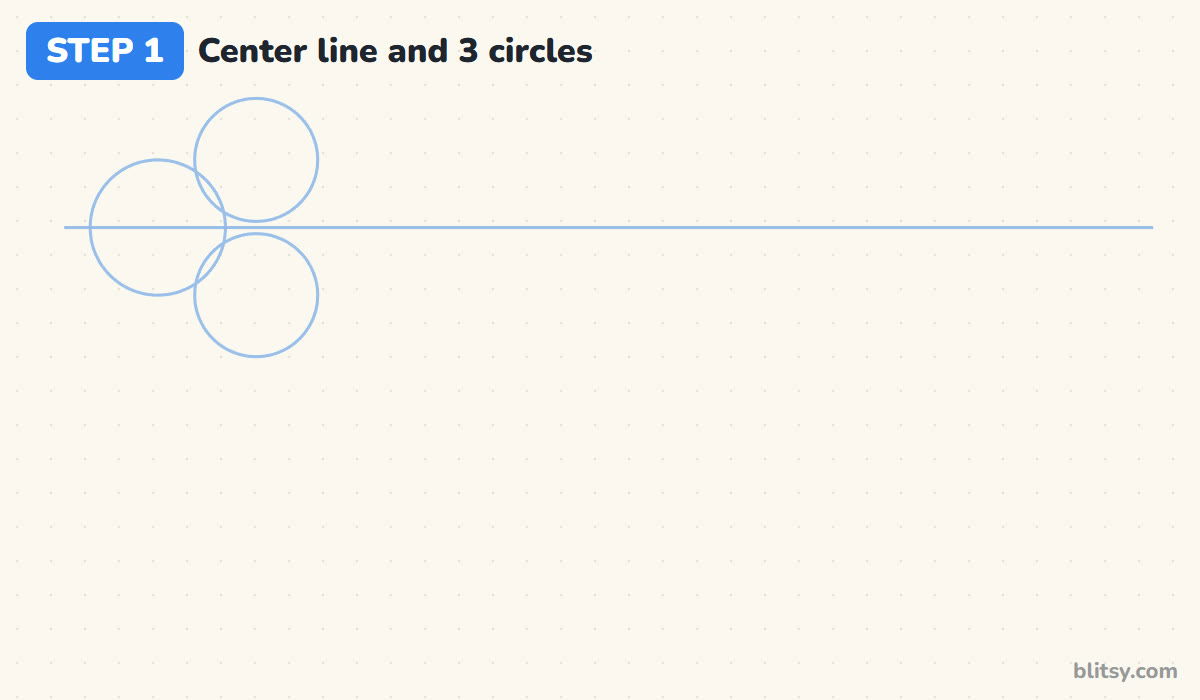
Run one light, straight line across the upper part of the page, almost from edge to edge. I always start keys this way, because every part lines up on it later. Near the left end, put three circles that touch: one sitting on the line, one above and one below, both slightly to its right.
💡 Tip: The top and bottom circles should be the same size. Measure them with your eye against the line before you go on.
Step 2: Turn the circles into a clover-shaped bow
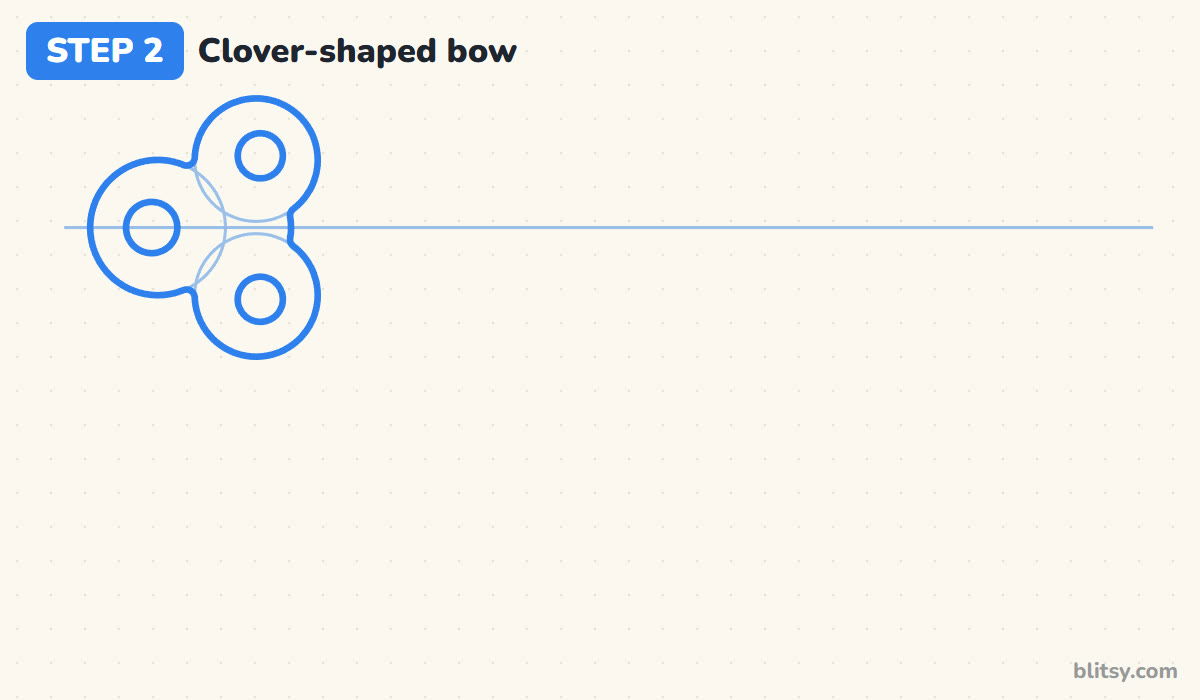
The bow is the part your fingers hold. Trace around the outside of the three circles in one smooth, wavy line, rounding off the dips where they meet. Then draw a smaller round hole inside each lobe. I keep the holes fairly big, because tiny holes make the bow look heavy and dull.
💡 Tip: Draw the outside line slowly and let it bulge a little past the guide circles. It ends up looking softer and fuller.
Step 3: Add a gem in the middle
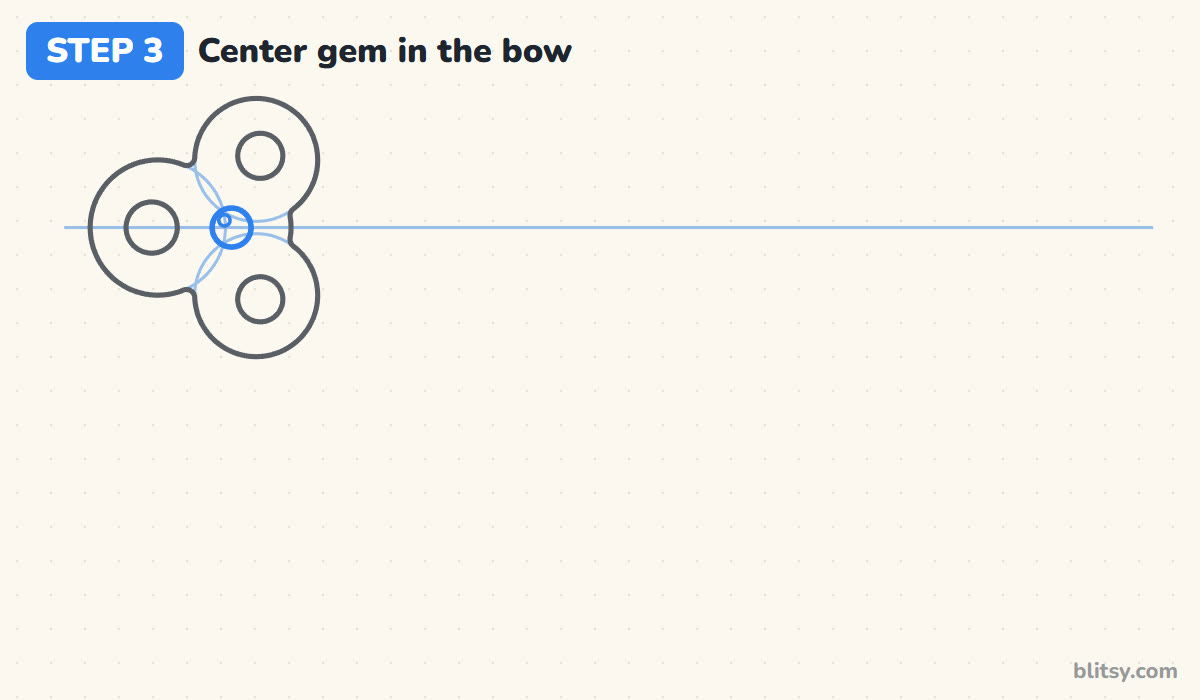
Right where the three lobes meet, on the center line, draw a small circle for a gem. Add a tiny circle inside it near the top left. That little dot becomes the shine later, and it's what makes the gem look round instead of flat.
💡 Tip: Keep the gem smaller than the holes, or it starts to compete with them.




Step 4: Draw the neck and the collar rings
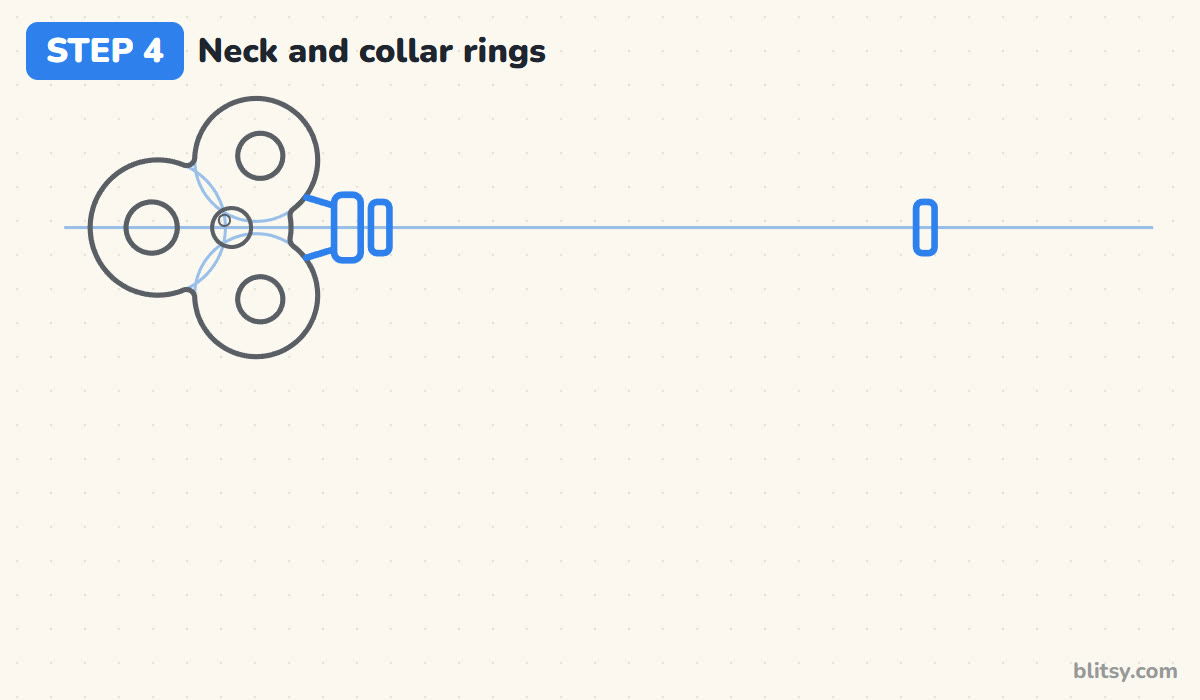
Where the bow ends on the right, draw a short neck that gets narrower as it leaves the bow. Right after it, add two upright rounded bars, a taller one and a shorter one. These collars are what make the key look old and fancy. Far along the line toward the right, add one more small collar where the shaft will end near the bit.
💡 Tip: Center every collar on the line so half of it sits above and half below.
Step 5: Draw the long shaft
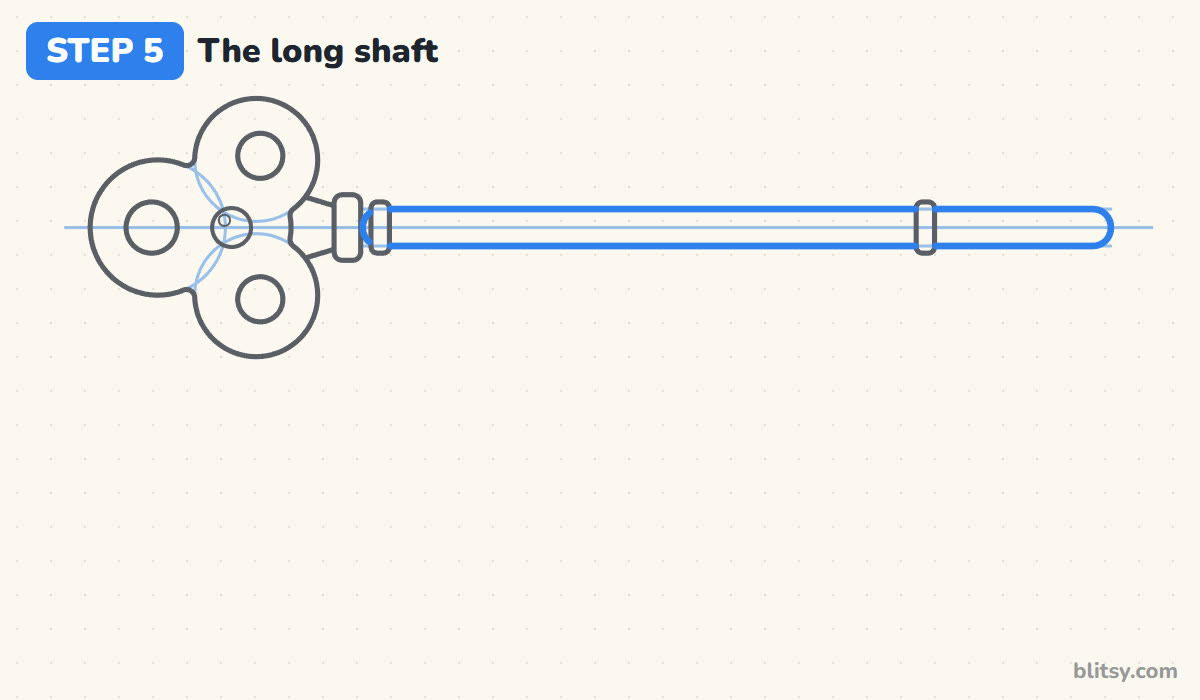
Sketch two light lines parallel to the center line, one just above and one just below it. Connect them from the collars on the left all the way to the right end, and round off the tip. The shaft runs behind the far collar, so stop the lines where the collar starts and pick them up again on the other side.
💡 Tip: I use a ruler here every time. A wobbly shaft is the first thing people notice on a key.
Step 6: Add the notched bit at the end
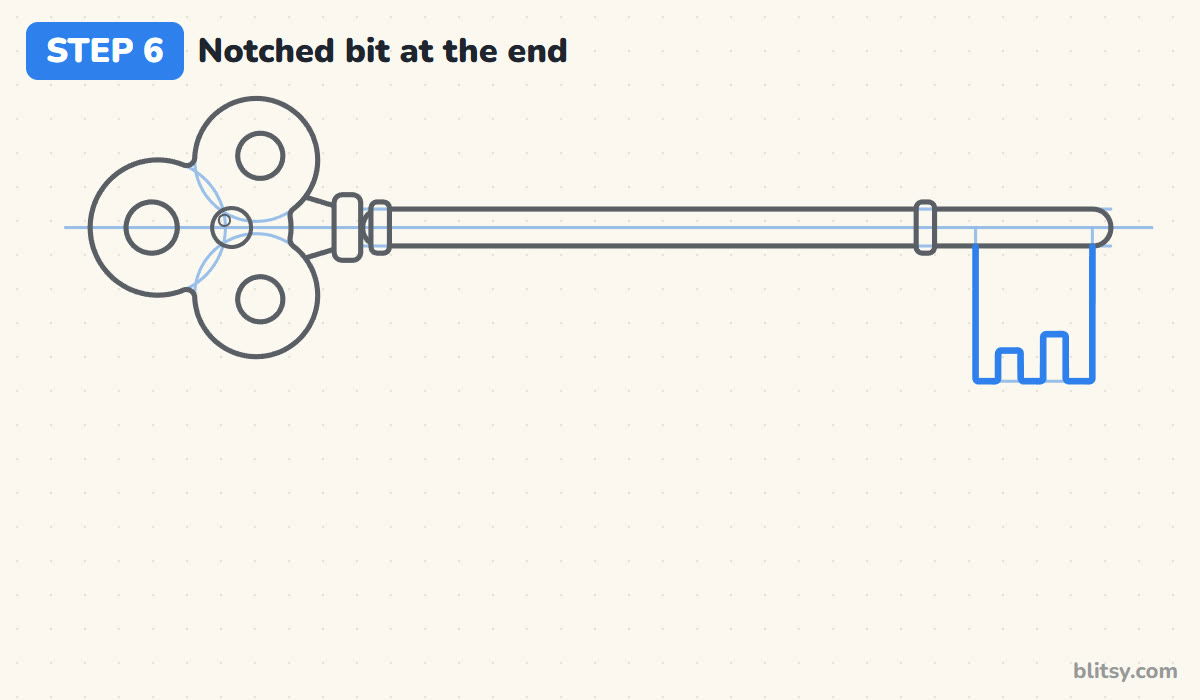
The bit is the part that turns the lock. Hanging down from the right end of the shaft, draw a tall rectangle. Then cut two square notches into its bottom edge so it looks like a short comb with three teeth. Different notch sizes are fine, and real old keys all have their own pattern.
💡 Tip: Make the bit a little narrower than the bow is tall. Too big and the key looks top-heavy on the wrong end.
Step 7: Start the house key with its head
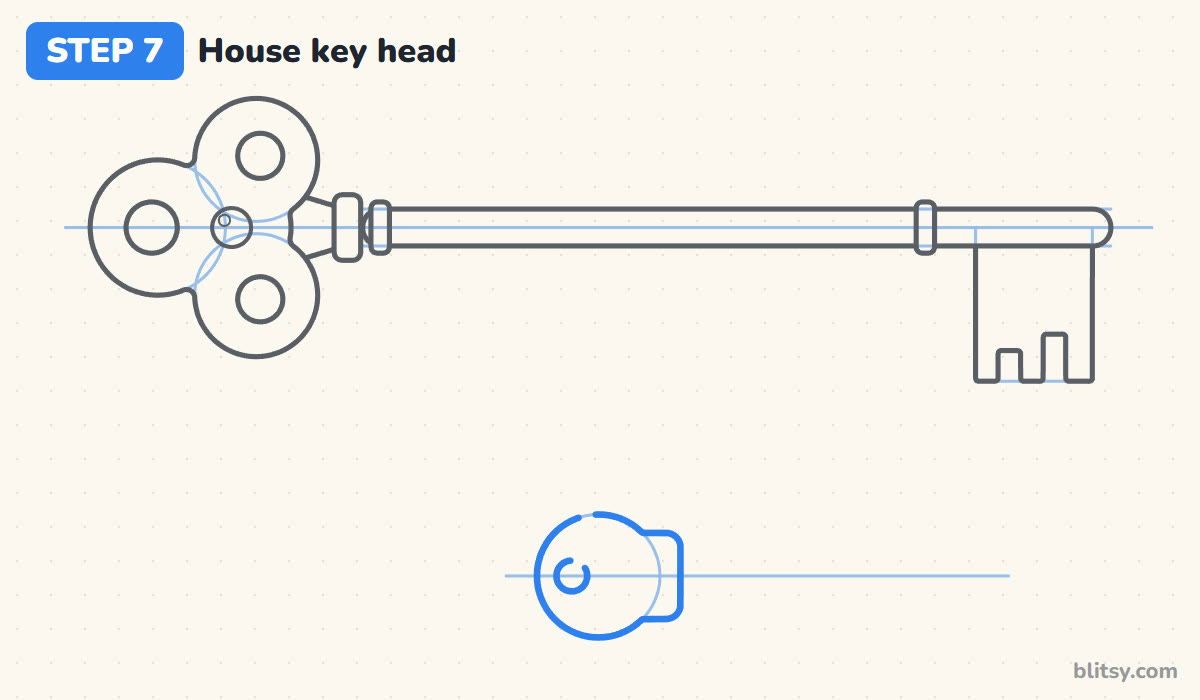
Now the second key. I like adding it because it shows how different an everyday key looks. Below the big one and a bit to the right, draw another light line. On its left end, sketch a circle, then turn it into a round head with a short squared-off side on the right, like a ball pushed into a box. Draw a small hole near the left edge. The key ring will go through it.
💡 Tip: Keep this head small. The house key should look clearly smaller than the skeleton key.




Step 8: Draw the blade with jagged teeth
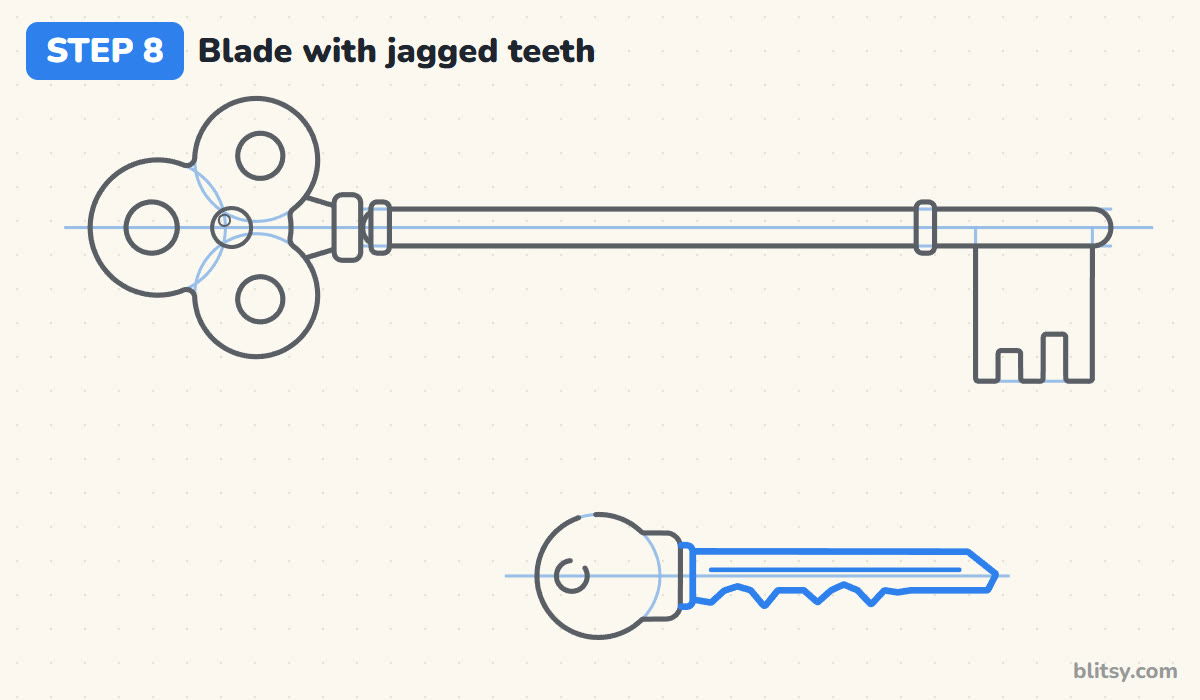
Add a narrow shoulder bar right after the head. From there, draw a long thin blade out to the right with a pointed tip. The top edge stays straight, and the bottom edge zigzags up and down to make the teeth. Finish with one thin groove line running along the middle of the blade.
💡 Tip: Make the teeth uneven on purpose. Neat matching teeth look like a saw, not a key.
Step 9: Hang it on a round key ring
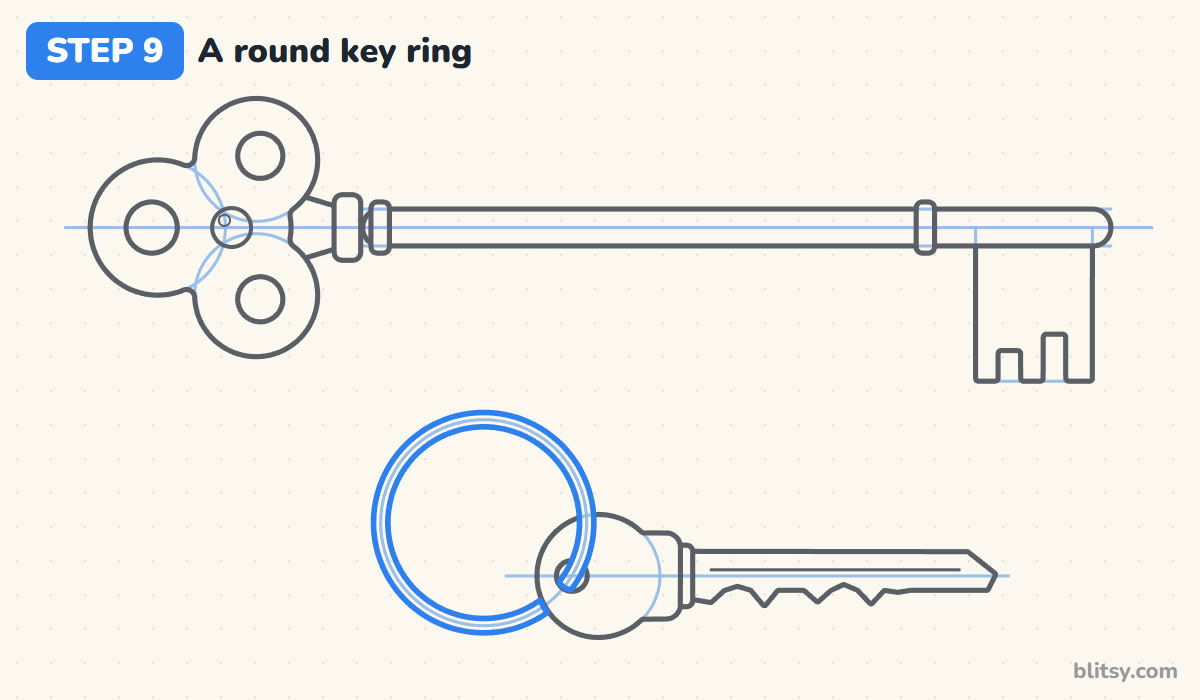
Draw a big circle to the left of the house key so its edge passes through the little hole. Then trace it with a double line to give the ring some thickness. Where the ring goes behind the key head, erase that part, so it looks like it truly loops through the hole.
💡 Tip: The over and under trick is easy to miss. Check that the ring disappears behind the head on one side only.
Step 10: Ink the keys and erase the guides
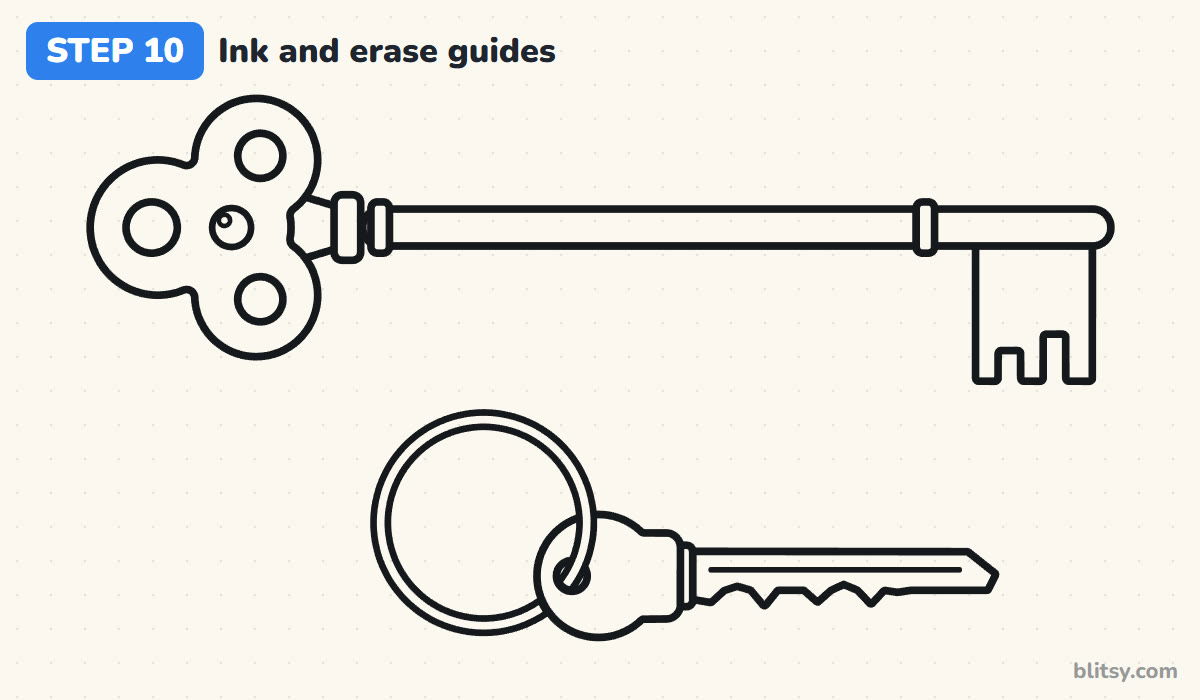
Go over every keeper line with a black marker. I do the bow and the bit first, since curves and corners need the steadiest hand. Leave the guide circles and the center lines alone. When the ink is dry, erase all the pencil, and the drawing suddenly looks clean and finished.
💡 Tip: Wait a full minute before erasing. Marker smears more than you'd expect on smooth paper.
Step 11: Color your keys
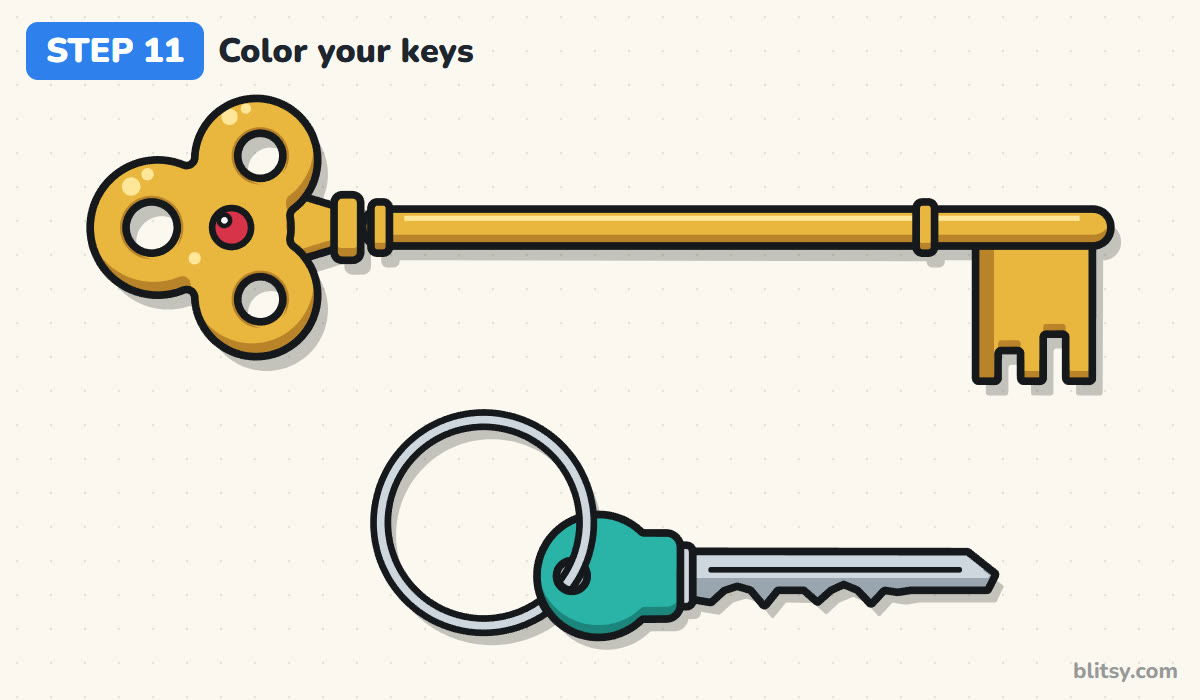
Color the whole skeleton key golden yellow. Go over its lower edges and the inside rims of the holes with a darker gold, and leave a thin pale strip along the top of the shaft for shine. The gem is red with a white dot. For the house key, use teal on the head and light gray on the blade and ring, with a slightly darker gray along the teeth.
💡 Tip: Shading only the bottom edges is the whole trick for metal. Light seems to hit from above, so the key looks shiny.




Why Key Drawings End Up Looking Bent
- Skipping the center line. Without it, the bow, collars and bit drift up or down and the key looks broken. Draw the line first and keep everything centered on it.
- A wobbly shaft. One bump in a long straight line shows right away. I use a ruler, or draw the line in a few short, careful pieces.
- Holes that are too small. Tiny holes make the bow look like a solid blob. Give each lobe a hole about half its size.
- A bit with no notches. A plain rectangle reads as a flag, not a key. Two square notches fix it instantly.
- Coloring metal flat. One even yellow looks like cardboard. Add a darker edge underneath and a light strip on top.
Fancy, Spooky or Magic: Your Own Key Designs
The bow is where you can play. Swap the clover for a heart, a star or a crown, or give it a swirly outline for a fairy-tale look. Make the whole key silver and add a tag for a haunted house key, or color it rainbow and call it magic. Younger kids can skip the house key and the collars and still end up with a great skeleton key. A key needs something to open, so try this door drawing tutorial for an arched cottage door with iron hinges next. If you want a heart-shaped bow, the how to draw a heart step by step lesson shows how to get both sides even, and the house drawing tutorial draws a home for your house key to open.
Free Key Coloring Page and Printable Steps
The free key coloring page has the colored keys at the top as a guide, a small key that matches each color to its part, and a big outline below to color. The step-by-step PDF guide puts all 11 steps with pictures and tips on paper, so you can draw without a screen. Both fit Letter and A4.
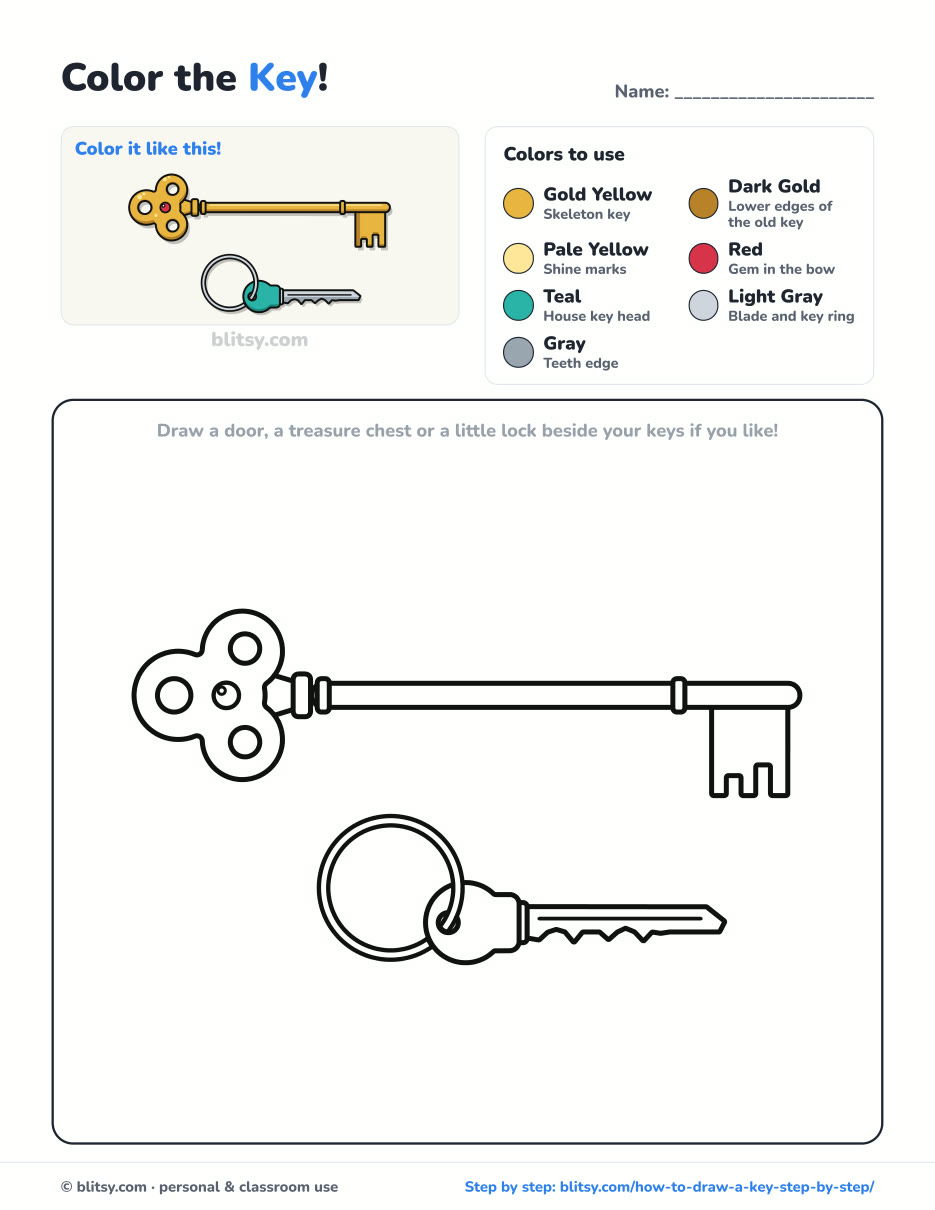
Black outlines with a colored example and the color names at the top. Ready to print and color.
⬇️ Download Coloring PageEvery step picture with its instructions and tips, to keep beside your paper while you draw.
⬇️ Download Drawing Guide📱 On a phone? Tap a download button, then open the file and choose Share → Save to Files or Print. On a computer, the PDF opens or saves straight to your Downloads folder.
Keep the Key Steps on Your Pinterest Board
Doors, Hearts and Other Drawings That Go With Keys
Each lesson below has a picture for every step, just like this key, so you can keep practicing the same way.
- Door Drawing: An arched teal cottage door with wooden planks, iron hinges and a round window, in this how to draw a door step by step lesson.
- Heart Drawing: Build an even, glossy heart from two circles and a V with this heart drawing tutorial.
- House Drawing: A cozy two-story house with a chimney and a porch, drawn from one simple box in this house drawing tutorial.
- Castle Drawing: Purple cone roofs, battlements and a drawbridge make a fairy-tale castle in this castle drawing step by step guide.
- Sword Drawing: A knight's longsword with a gold crossguard and a red gem, drawn on one tilted line in this sword drawing tutorial.
Key Drawing Questions From Beginners
What is the easiest way to draw a key?
I always draw a straight line first. Put a circle or clover shape on one end for the bow, a long thin shaft along the line, and a small notched rectangle at the other end.
How do you draw an old-fashioned skeleton key?
Use a big decorative bow with holes, one or two collar rings near it, a long round shaft and a bit with square notches hanging off the end.
How do you make a drawn key look like gold?
Color it yellow, shade the lower edges with a darker gold or light brown, and leave a thin white or pale yellow strip along the top as shine.
How long does it take to draw a key?
About 25 to 30 minutes with coloring. The skeleton key alone takes around 15.
Draw the straight line first and the rest of the key lines up behind it, so grab a pencil and make yours. 🔑✏️
Related posts:
 How to Draw a Skeleton Step by Step (Easy and Friendly)
 How to Draw a Skeleton Hand Step by Step (Easy Spooky Bones)
 How to Draw a Whale Step by Step (Easy for Beginners)
 How to Draw Lungs Step by Step (Easy Science Diagram)
 How to Draw a Pineapple Step by Step (Easy Crown and Slice)
 How to Draw Iron Man Step by Step (Easy Chibi for Kids)
 How to Draw a Dress Step by Step (Easy Party Dress)
 How to Draw a Chicken Step by Step (Easy for Beginners)
 How to Draw a UFO Step by Step (Cute Alien Saucer)
 How to Draw Flames Step by Step (Easy Campfire Drawing)
 How to Draw a Moon Step by Step (Sleepy Crescent + Phases)
 How to Draw a Sunflower Step by Step (Big and Bright)

