
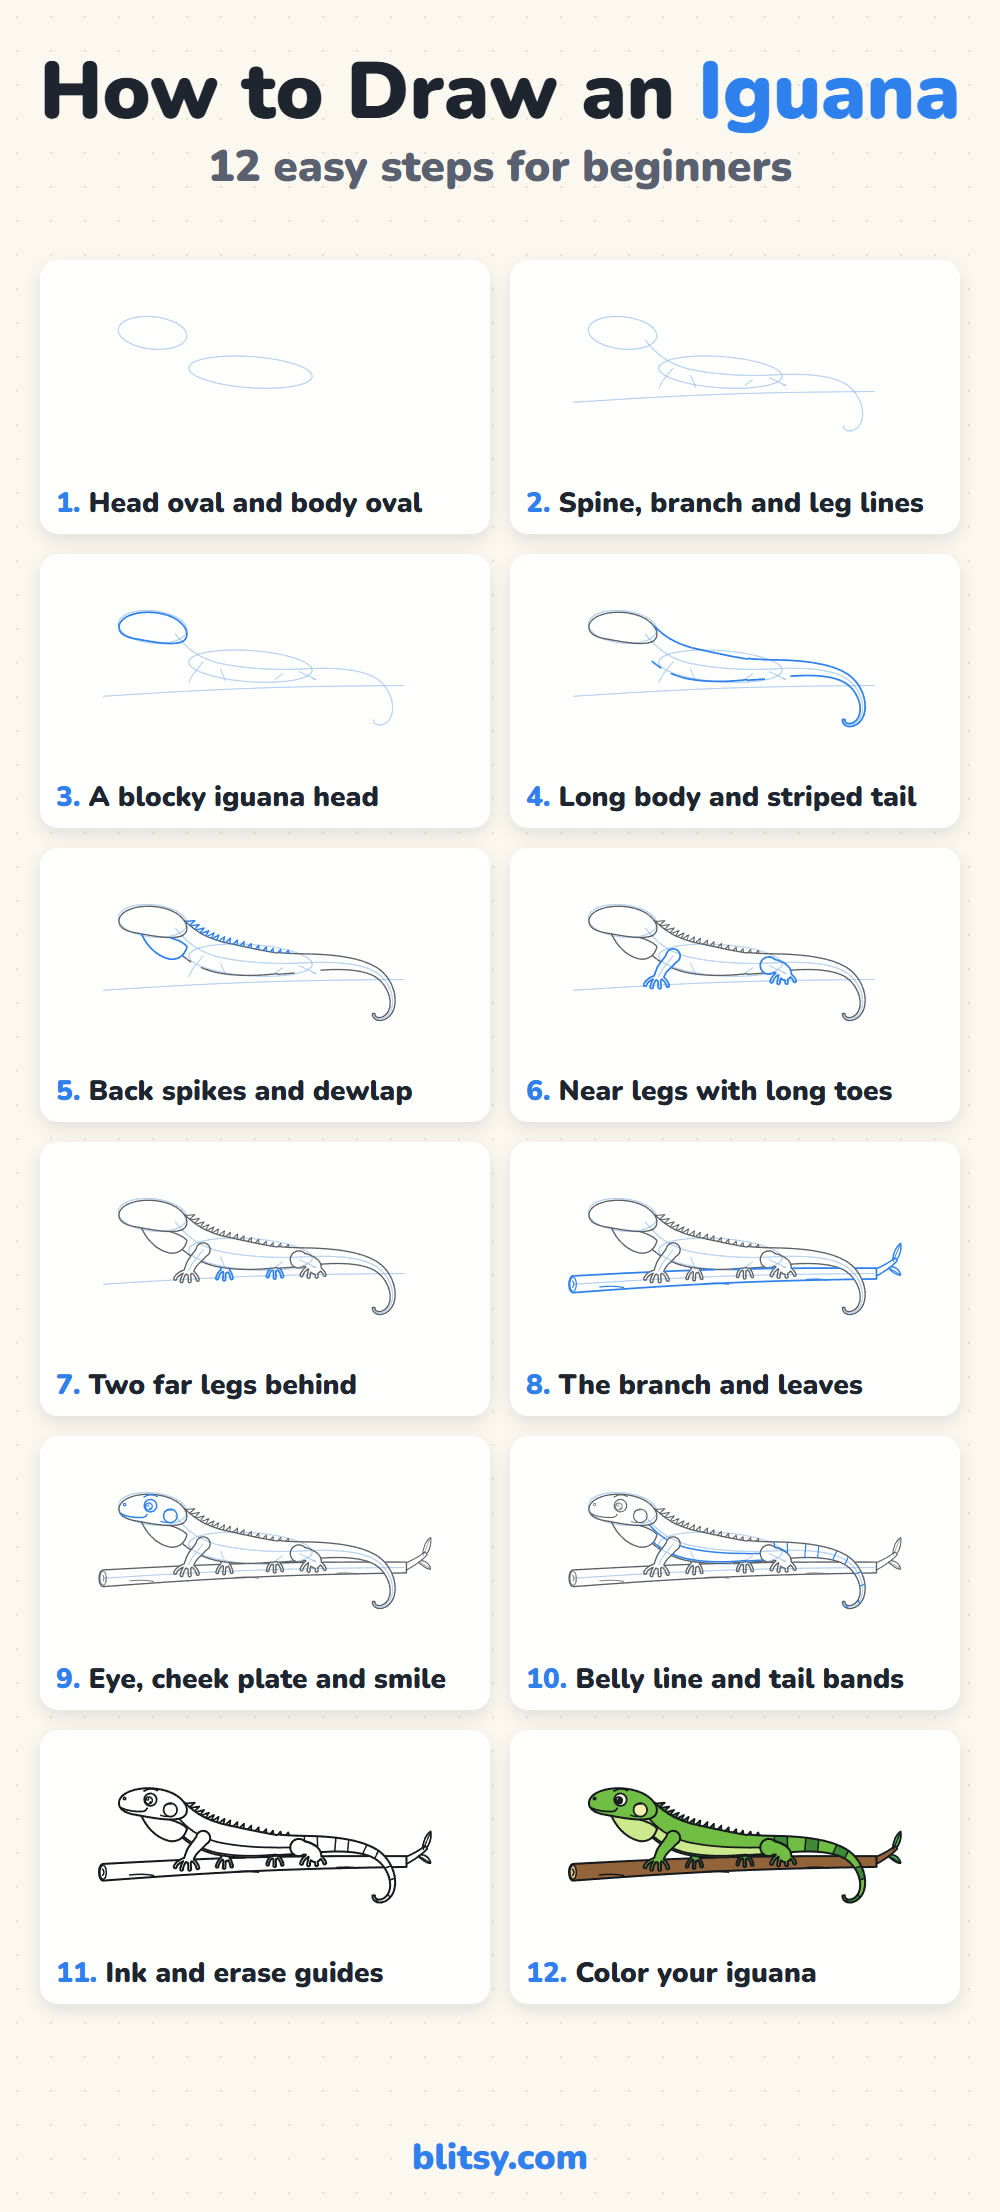
An iguana is really a lizard with a few extra features: a row of spikes down its back, a flap of skin under its chin and a round plate on its cheek. Those three details are what people recognize, so they get their own steps here. This lesson shows you how to draw an iguana step by step, from two light ovals to a green iguana relaxing on a branch. It works for kids and adult beginners alike.
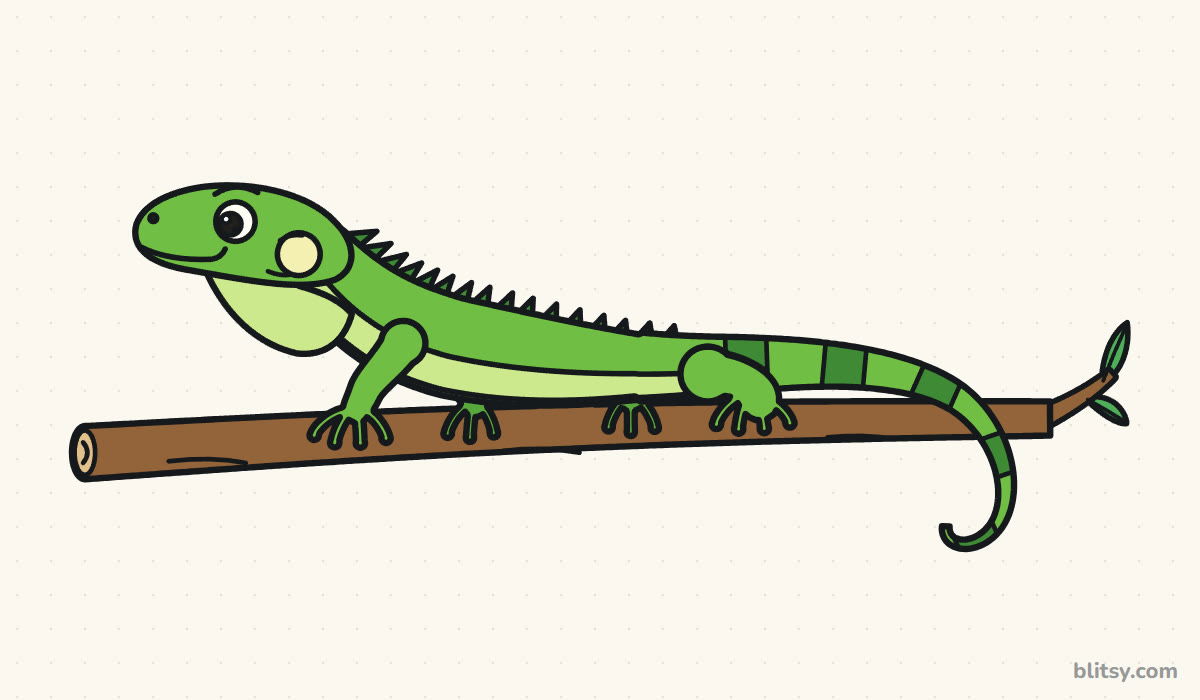
Iguana parts arrive one at a time: the newest lines are blue, the older ones fade to gray. Copy the blue part, check it against the picture, then move on.
Quick overview
⏱️ Time: about 35 minutes with coloring
🎯 Level: easy, good for kids from about 7
✏️ Steps: 12
🦎 You'll draw: a side-view cartoon iguana on a branch
Iguana Sketching Supplies
- A pencil you can press very lightly for the guide shapes
- A clean eraser
- A black marker or fineliner for the final lines
- Colored pencils or markers in bright green, dark green, light green, pale yellow and brown
- Plain paper turned sideways (landscape)
The tail drapes over the right end of the branch, so begin the head about a thumb's width from the left edge of the page.
How to Draw an Iguana Step by Step
Step 1: Sketch a head oval and a long body oval
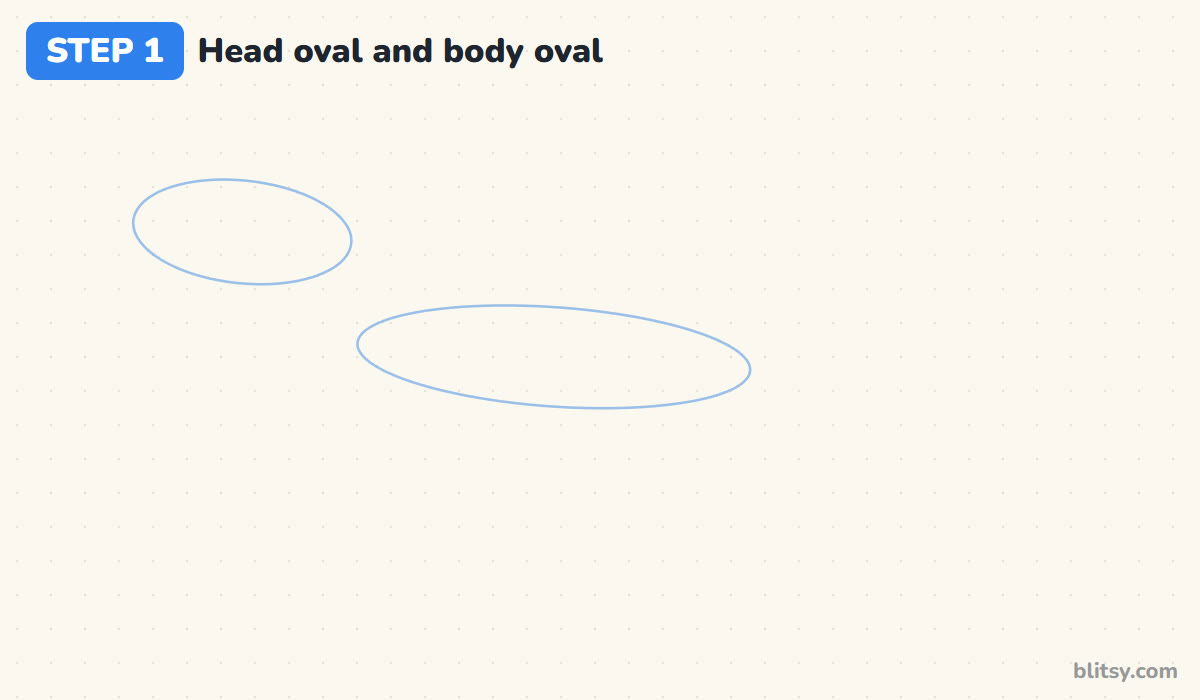
Up near the top left, draw a flattened oval for the head. Below it and to the right, add a much longer, thinner oval for the body, roughly twice the head's length. Leave a small gap between them, because a neck goes there. I press so lightly here that I can barely see my own lines.
💡 Tip: If the body oval comes out round like an egg, stretch it. Iguanas are long and low, not plump.
Step 2: Add the spine curve, branch line and leg lines
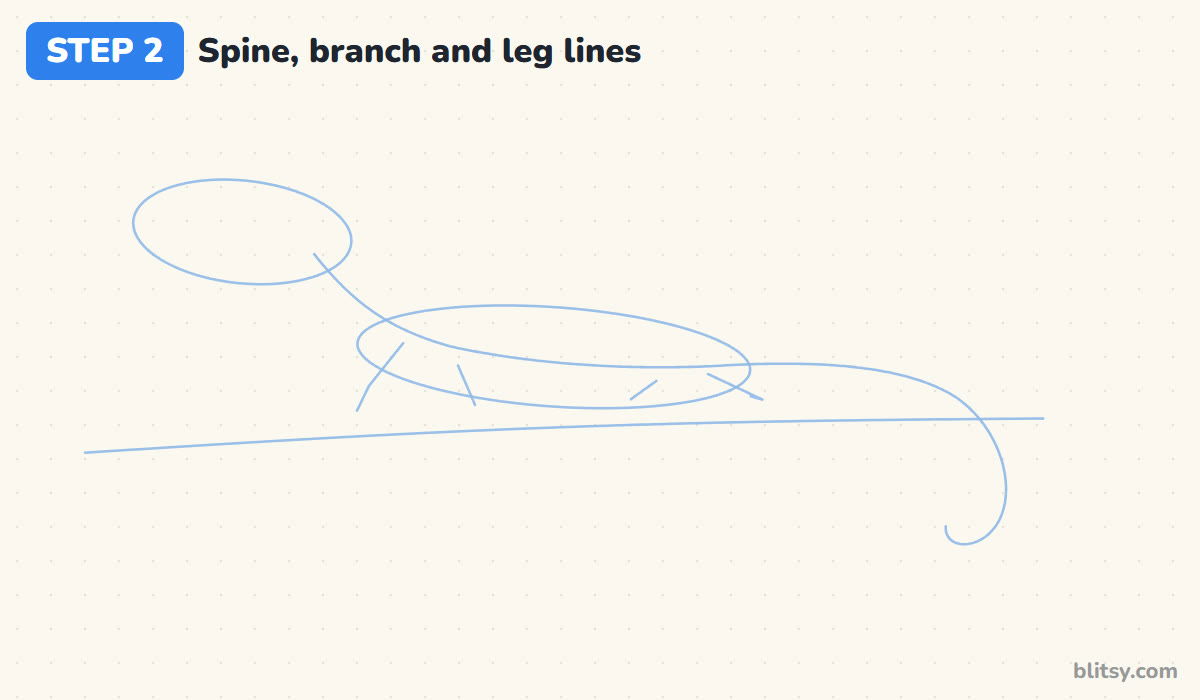
Draw one smooth curve from the back of the head, through the body oval, then off to the right where it bends down and ends in a small hook. That curve is the neck, back and tail in one. Under the body, sketch a long, nearly straight line for the branch. Add four short bent lines for the legs.
💡 Tip: Tilt the branch line very slightly so the right end sits higher. A perfectly flat branch looks stiff.
Step 3: Draw the blocky head
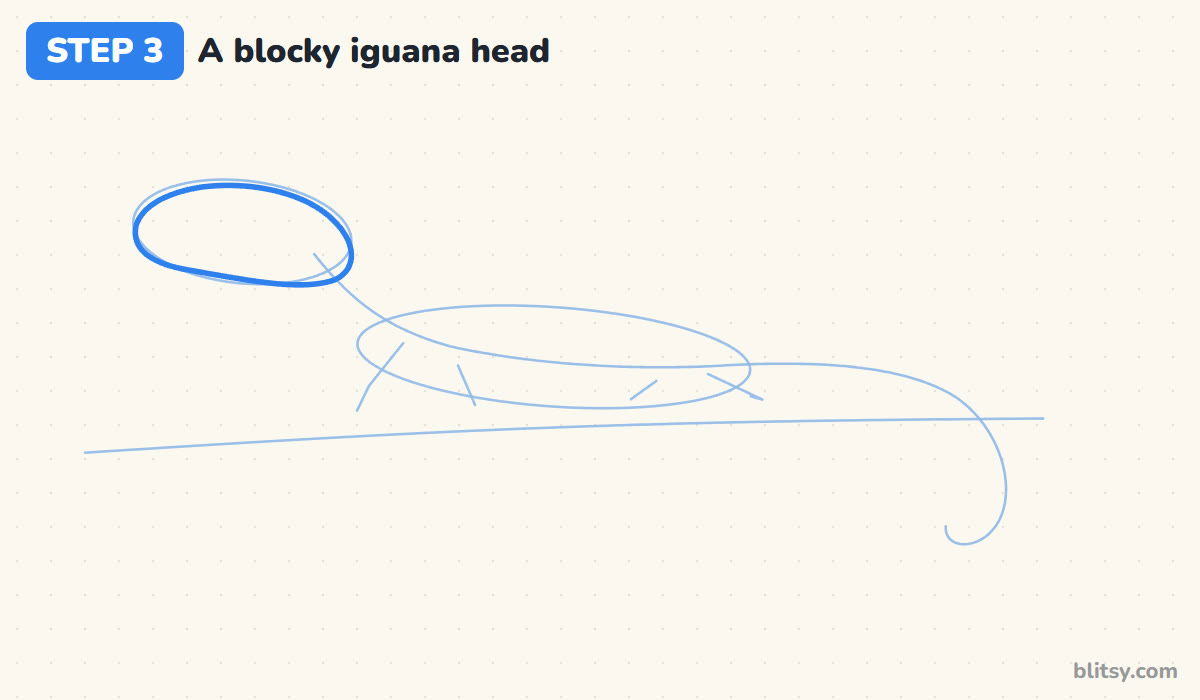
Trace over the head oval, but square it off. Keep the top fairly flat, round the snout at the front, and run the jaw line back along the bottom. I deliberately make an iguana's head boxier than a gecko's, since that chunky shape is the first thing that tells people what animal this is.
💡 Tip: Keep the snout blunt. Once it gets long and pointy, the head starts to look like a crocodile.




Step 4: Outline the long body and tail
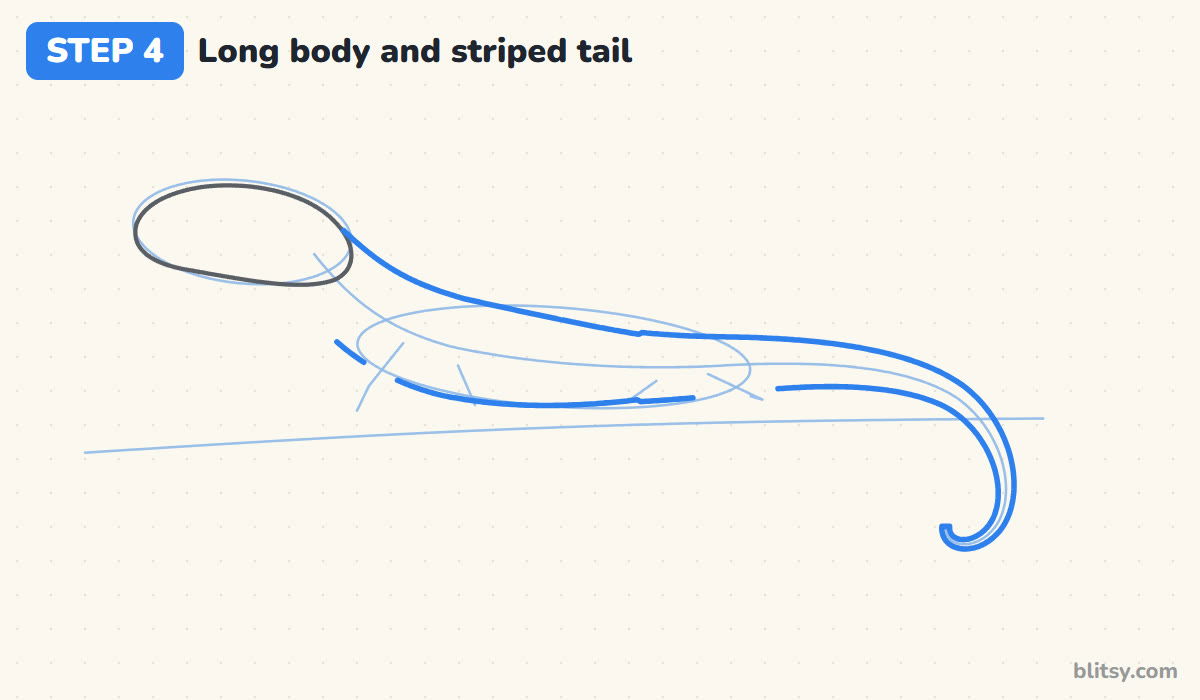
Starting at the back of the head, draw a line along the top of your spine curve and another along the bottom. They start a neck's width apart, widen over the belly, then slowly squeeze together down the tail until they meet at the hook. Leave the gaps under the body open for now. The legs will fill them.
💡 Tip: An iguana's tail is longer than its body. If yours ends before the branch does, extend the curve.
Step 5: Add the back spikes and the dewlap
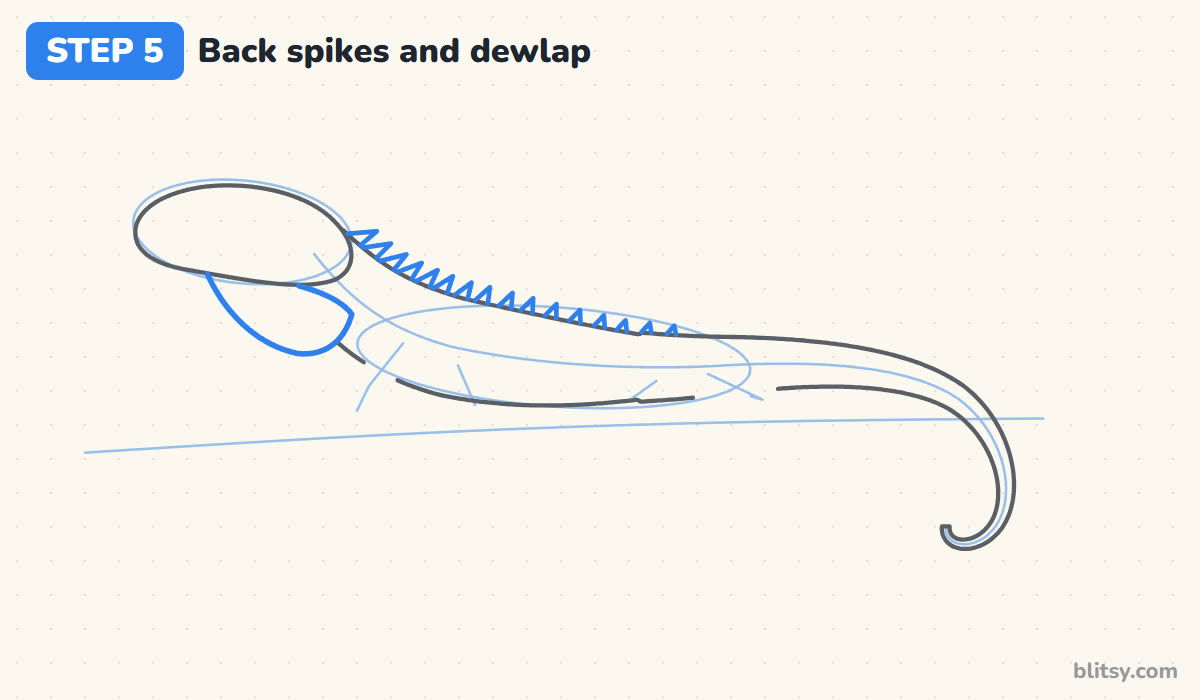
Along the top of the neck and back, draw a row of small triangles, tallest just behind the head and getting shorter toward the hips. I lean each one slightly backward so the iguana looks relaxed. Then hang a rounded flap of skin under the chin and throat: that's the dewlap.
💡 Tip: Space the spikes evenly but don't measure them. Small differences in size look more natural.
Step 6: Draw the two near legs with long toes
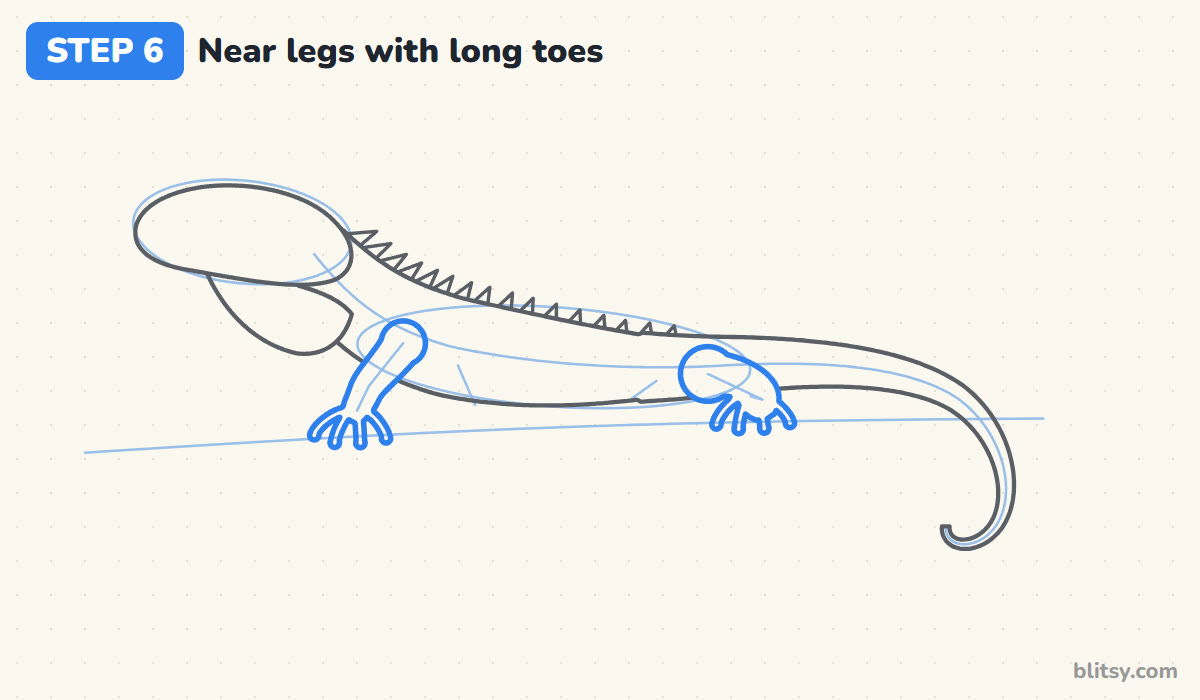
These legs are closest to you, so they overlap the body. The front leg drops from a rounded shoulder and bends at the elbow; the back leg starts with a big round thigh near the hips. At the bottom of each, draw long thin toes that curl down over the front of the branch. Those curled toes show the iguana is holding on.
💡 Tip: Draw each toe as a single smooth curve with a rounded end, never a stick with a sharp point.
Step 7: Add the two far legs
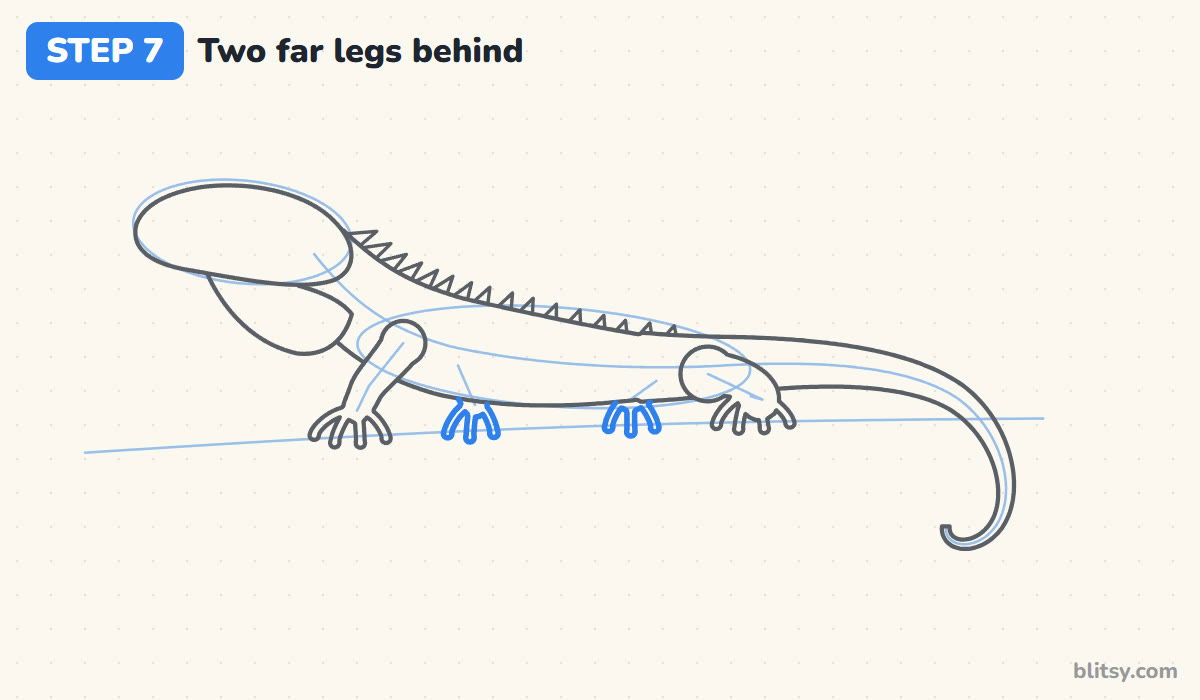
Between the near legs, draw two slimmer legs that start behind the belly line. Only the lower part shows, plus three toes on each foot gripping the branch. Hiding their tops behind the body gives the drawing depth.
💡 Tip: Stop each far leg exactly at the belly line. If you draw over the body, it looks like the iguana has six legs stuck on the front.


Step 8: Draw the branch and two leaves
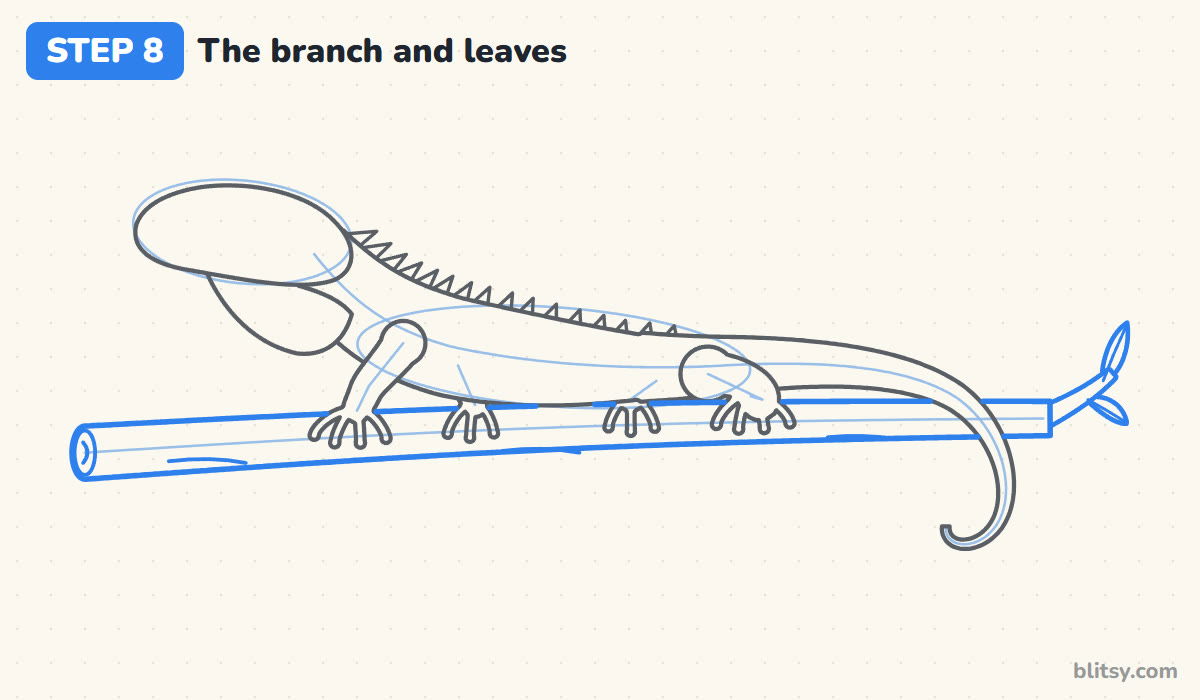
Go over the branch guide with two firm lines, a little thicker on the left and thinner toward the right. Close the left end with a small oval for the cut wood and add a curved ring inside it. Add a thin twig with two leaves on the right.
💡 Tip: Draw the branch lines only up to the legs and tail, not through them. That keeps the toes in front.
Step 9: Add the eye, cheek plate and smile
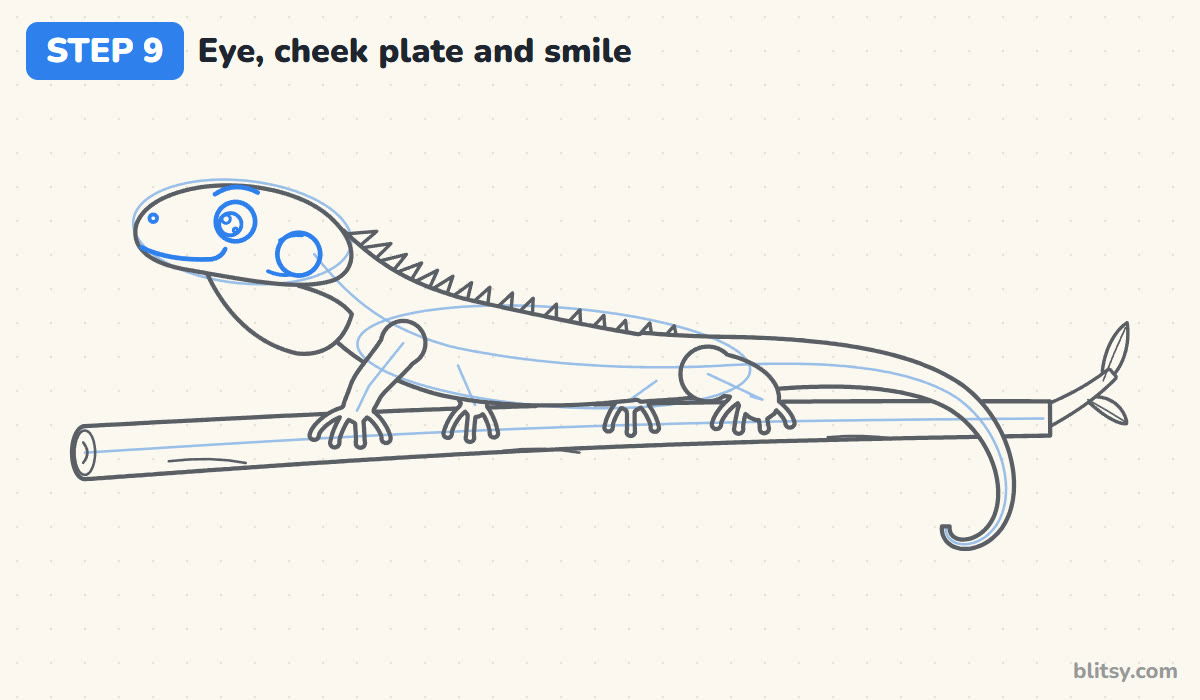
Draw a round eye near the top of the head with a dark pupil and a white shine dot, then a soft arched line above it like a raised eyebrow. Behind the eye, low on the cheek, draw a large circle. Real green iguanas have a big round scale there, and I never leave it out. Finish with a dot for the nostril and a long, gentle smile along the jaw.
💡 Tip: Keep the line above the eye curved upward in the middle. A slanted line makes the iguana look grumpy.
Step 10: Draw the belly line and tail bands
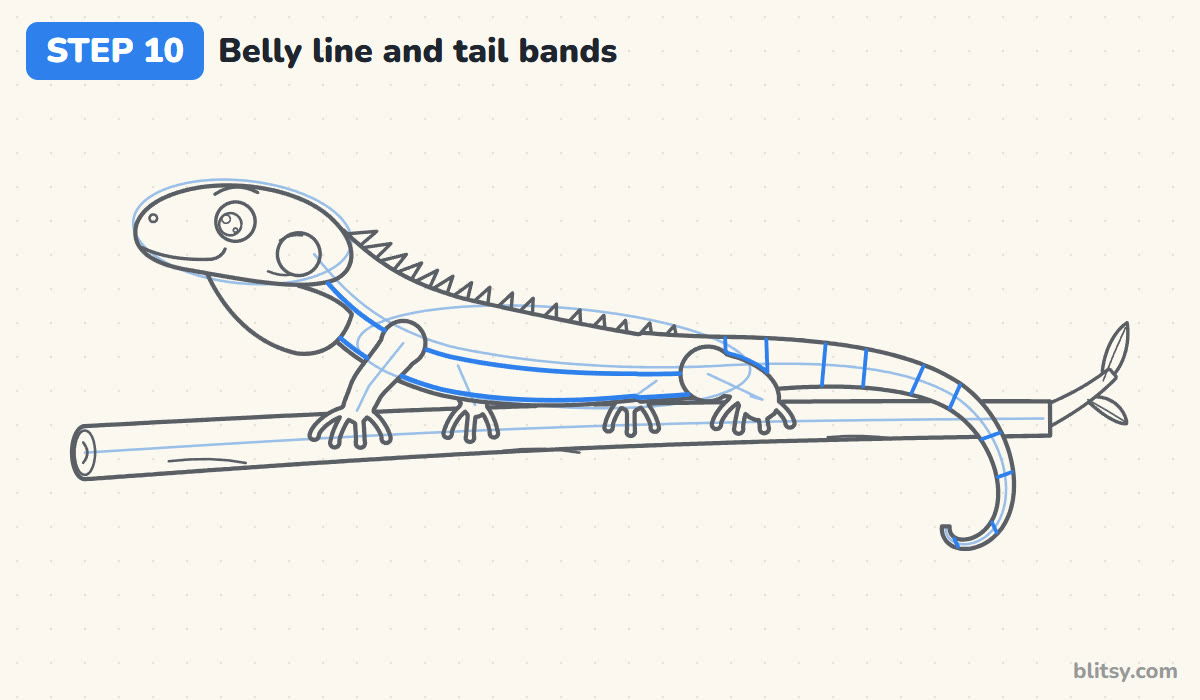
Inside the body, draw a line parallel to the bottom edge, from the neck back to the hips, for the lighter belly. Then wrap five wide bands around the tail, leaving green gaps between them. I keep them wide, because many thin stripes start to look like a zebra pattern.
💡 Tip: Let each band follow the curve of the tail so it looks wrapped around, not pasted on flat.
Step 11: Ink the lines and erase the guides
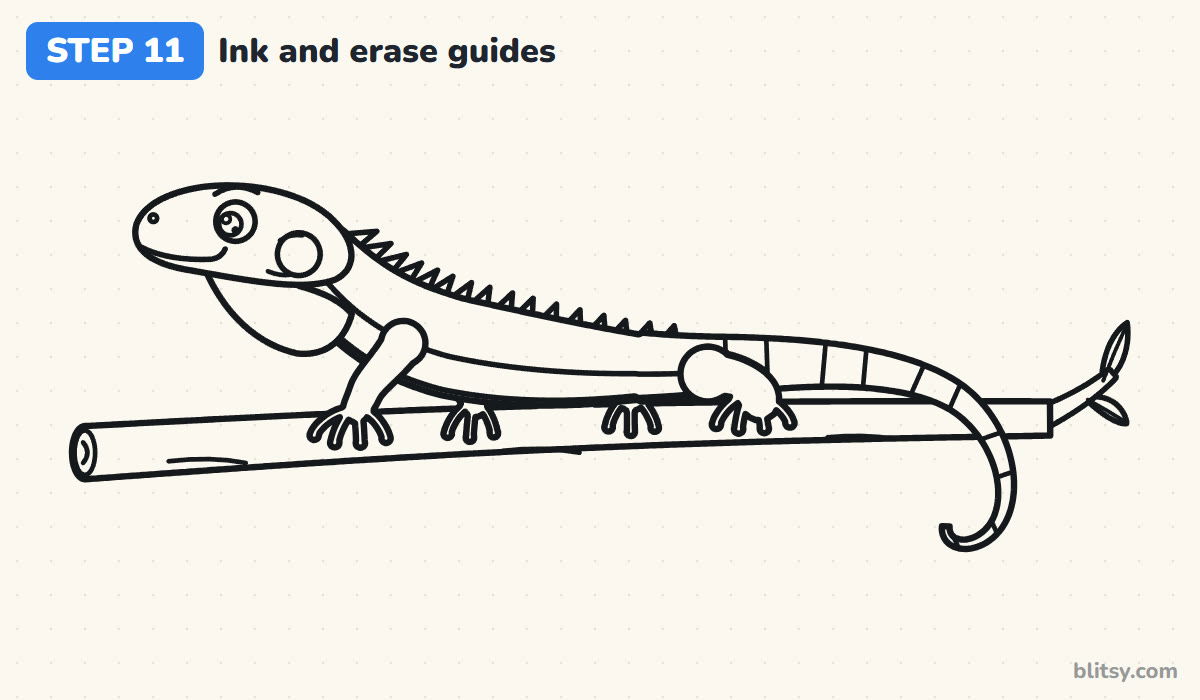
Trace every keeper line with a black marker or fineliner. Wait a minute for the ink to dry, then erase the ovals, the spine curve and the leg lines. Most beginners rush this and smudge the ink.
💡 Tip: Ink the head and spikes first while your hand is fresh, and the long branch lines last.


Step 12: Color your iguana
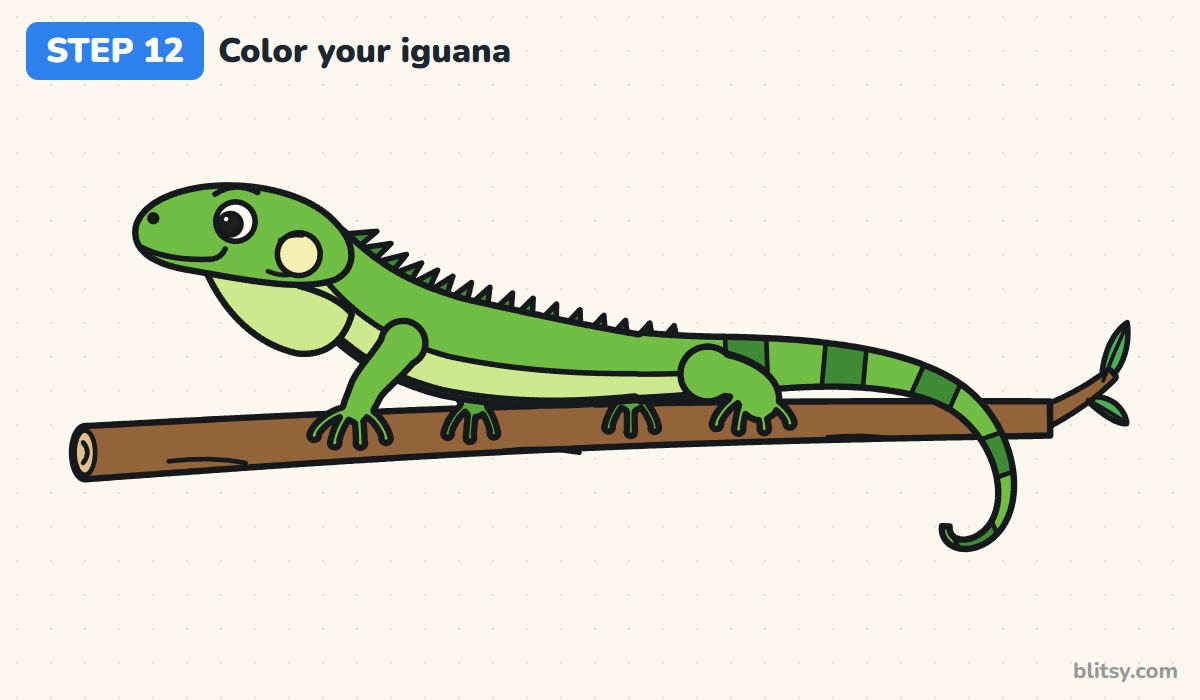
Color the head, body and near legs bright green and the far legs a slightly darker green. Dark green goes on the spikes and tail bands, light green on the belly and dewlap, pale yellow on the cheek plate. The branch is brown with a tan cut end, and the leaves get a fresh leaf green.
💡 Tip: Color the body in long strokes that follow the curve of the back. It hides pencil marks much better than scribbling.
Iguana Slip-Ups and Simple Fixes
- The head is round like a frog's. Flatten the top and square off the back of the jaw. An iguana's head is chunky and a little boxy.
- The spikes are all the same height. Make them biggest behind the head and let them shrink toward the hips. Even sizes look like a saw blade.
- The dewlap is missing or tiny. Draw it big enough to see from across the room. It's half of what makes an iguana look like an iguana.
- The feet stand on top of the branch like table legs. Let the toes curl down over the front edge so the iguana grips the branch.
- The tail stops short. Keep it longer than the whole body and taper it to a thin tip.
Remix Your Iguana
Once you know the shape, try a few changes. Color him orange or blue-gray like some island iguanas, or put a hibiscus flower in front of his nose. Younger kids can skip the far legs and the tail bands and still end up with a clear iguana. If the long, low body was fun, the same idea works on a much bigger reptile in this alligator drawing step by step. For more practice with long curves, try this snake drawing tutorial, and if those back spikes made you think of something bigger, this dragon drawing lesson is a natural next step.
Iguana Coloring Page and Step Guide to Print
The free iguana coloring page shows the finished color example on top, a small key telling you which color goes where, and a big outline to color below. The step-by-step PDF guide holds all 12 steps with their pictures and tips. Both print fine on Letter or A4 paper.
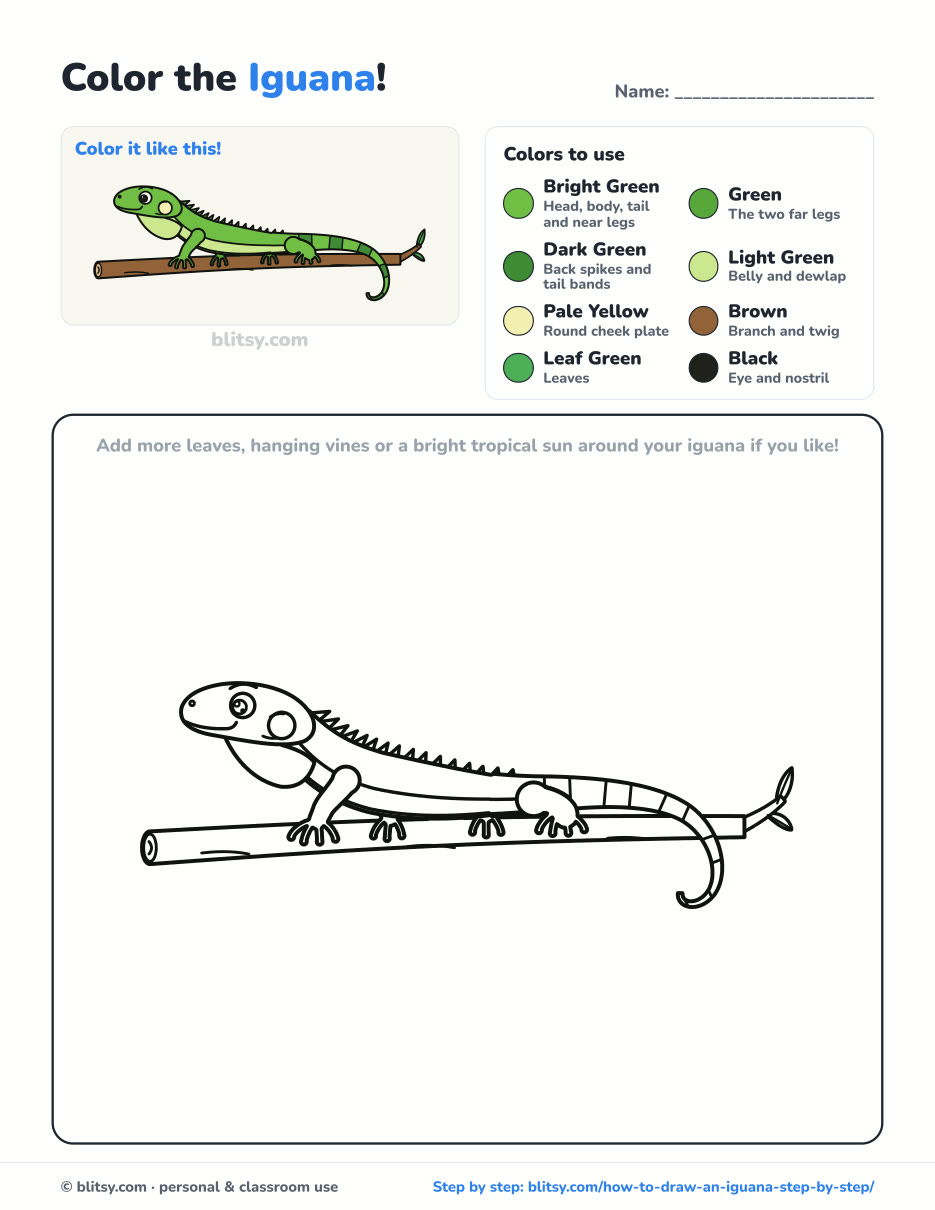
Black outlines with a colored example and the color names at the top. Ready to print and color.
⬇️ Download Coloring PageEvery step picture with its instructions and tips, to keep beside your paper while you draw.
⬇️ Download Drawing Guide📱 On a phone? Tap a download button, then open the file and choose Share → Save to Files or Print. On a computer, the PDF opens or saves straight to your Downloads folder.
Iguana Steps for Your Pinterest Board
Reptile Tutorials to Try After This One
Every link below is a full tutorial with one picture per step, so the method you just used carries straight over.
- Alligator Drawing: A smiling cartoon alligator walks along in side view, built from two ovals and a tail curve, in this how to draw an alligator lesson.
- Snake Drawing: Turn one flowing line into a friendly green snake with a loop in its body using this snake drawing step by step guide.
- Turtle Drawing: A smiling turtle with a patterned shell starts from a single oval in this turtle drawing tutorial.
- Dragon Drawing: Spikes, wings and a curling tail come together in this how to draw a dragon lesson.
- Frog Drawing: Big eyes and folded legs make a cheerful frog in this frog drawing step by step tutorial.
Iguana Drawing Questions, Answered
What is the easiest way to draw an iguana?
Start with a flat oval for the head, a long oval for the body and one curve for the spine and tail. Draw the outline around those guides, then add the spikes, dewlap and legs. The guides keep the proportions right.
How do you draw an iguana for kids?
Stick to big simple shapes: a boxy head, a long body, triangles on the back and a long tail. Kids can leave out the far legs, the bands and the leaves and it still clearly reads as an iguana.
What is the circle on an iguana's cheek?
It's a large round scale below the ear area that green iguanas have. In a drawing it's simply a circle on the cheek, and it helps tell an iguana apart from other lizards.
What colors do you need to color an iguana?
Bright green for the body, dark green for the spikes and tail bands, light green for the belly and dewlap, and pale yellow for the cheek plate. Brown works for the branch.
Hang your iguana up somewhere sunny. He'd like that.
Related posts:
 How to Draw a Car Step by Step (Easy Drawing for Beginners)
 How to Draw a Whale Step by Step (Easy for Beginners)
 How to Draw an Arctic Fox Step by Step (Easy for Beginners)
 How to Draw a Chicken Step by Step (Easy for Beginners)
 How to Draw a Snowman Step by Step (Easy for Beginners)
 How to Draw an Airplane Step by Step (Easy Jet for Beginners)
 How to Draw a Mouse Step by Step (Easy for Beginners)
 How to Draw a T-Rex Step by Step (Easy for Beginners)
 How to Draw a Pig Step by Step (Easy for Beginners)
 How to Draw a Minion Step by Step (Easy for Beginners)
 How to Draw a Yorkie Step by Step (Easy for Beginners)
 How to Draw a Notebook Step by Step (Easy for Beginners)

