
A plain rectangle with a dot for a handle is a door, sure, but it doesn't make anyone want to knock. Here you'll learn how to draw a door step by step that looks like it belongs to a storybook cottage, with a rounded top, wooden planks and a little round window glowing from inside. Nearly every part is a circle or a straight line, so it's easier than it looks.
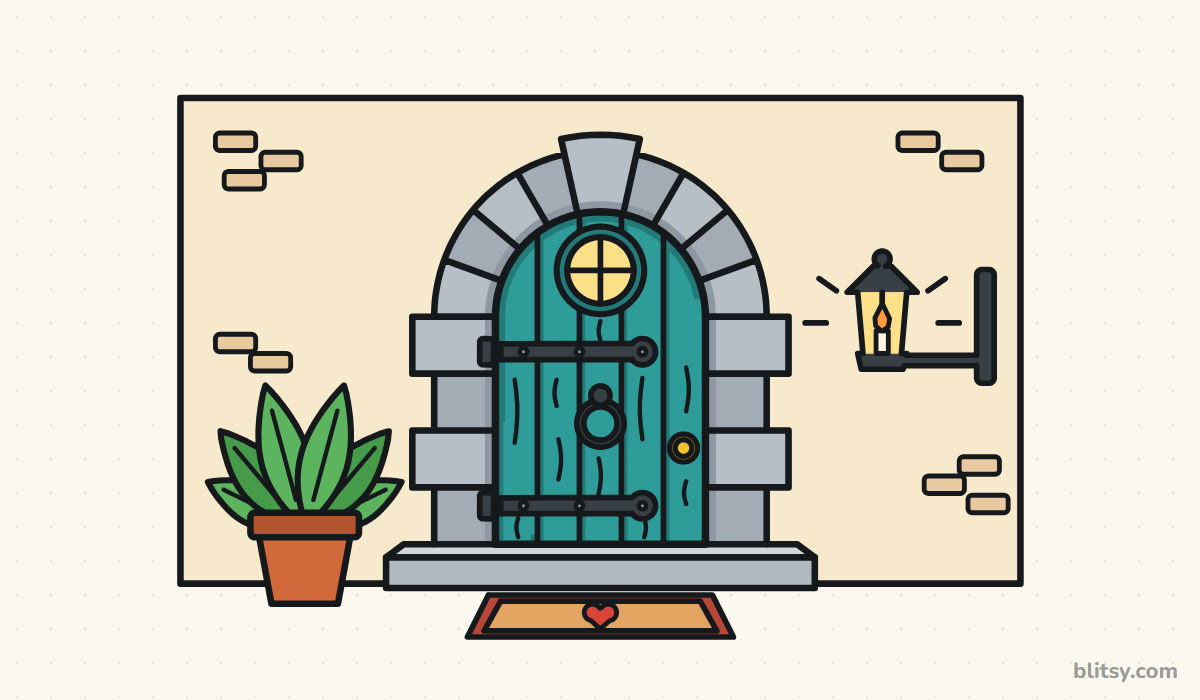
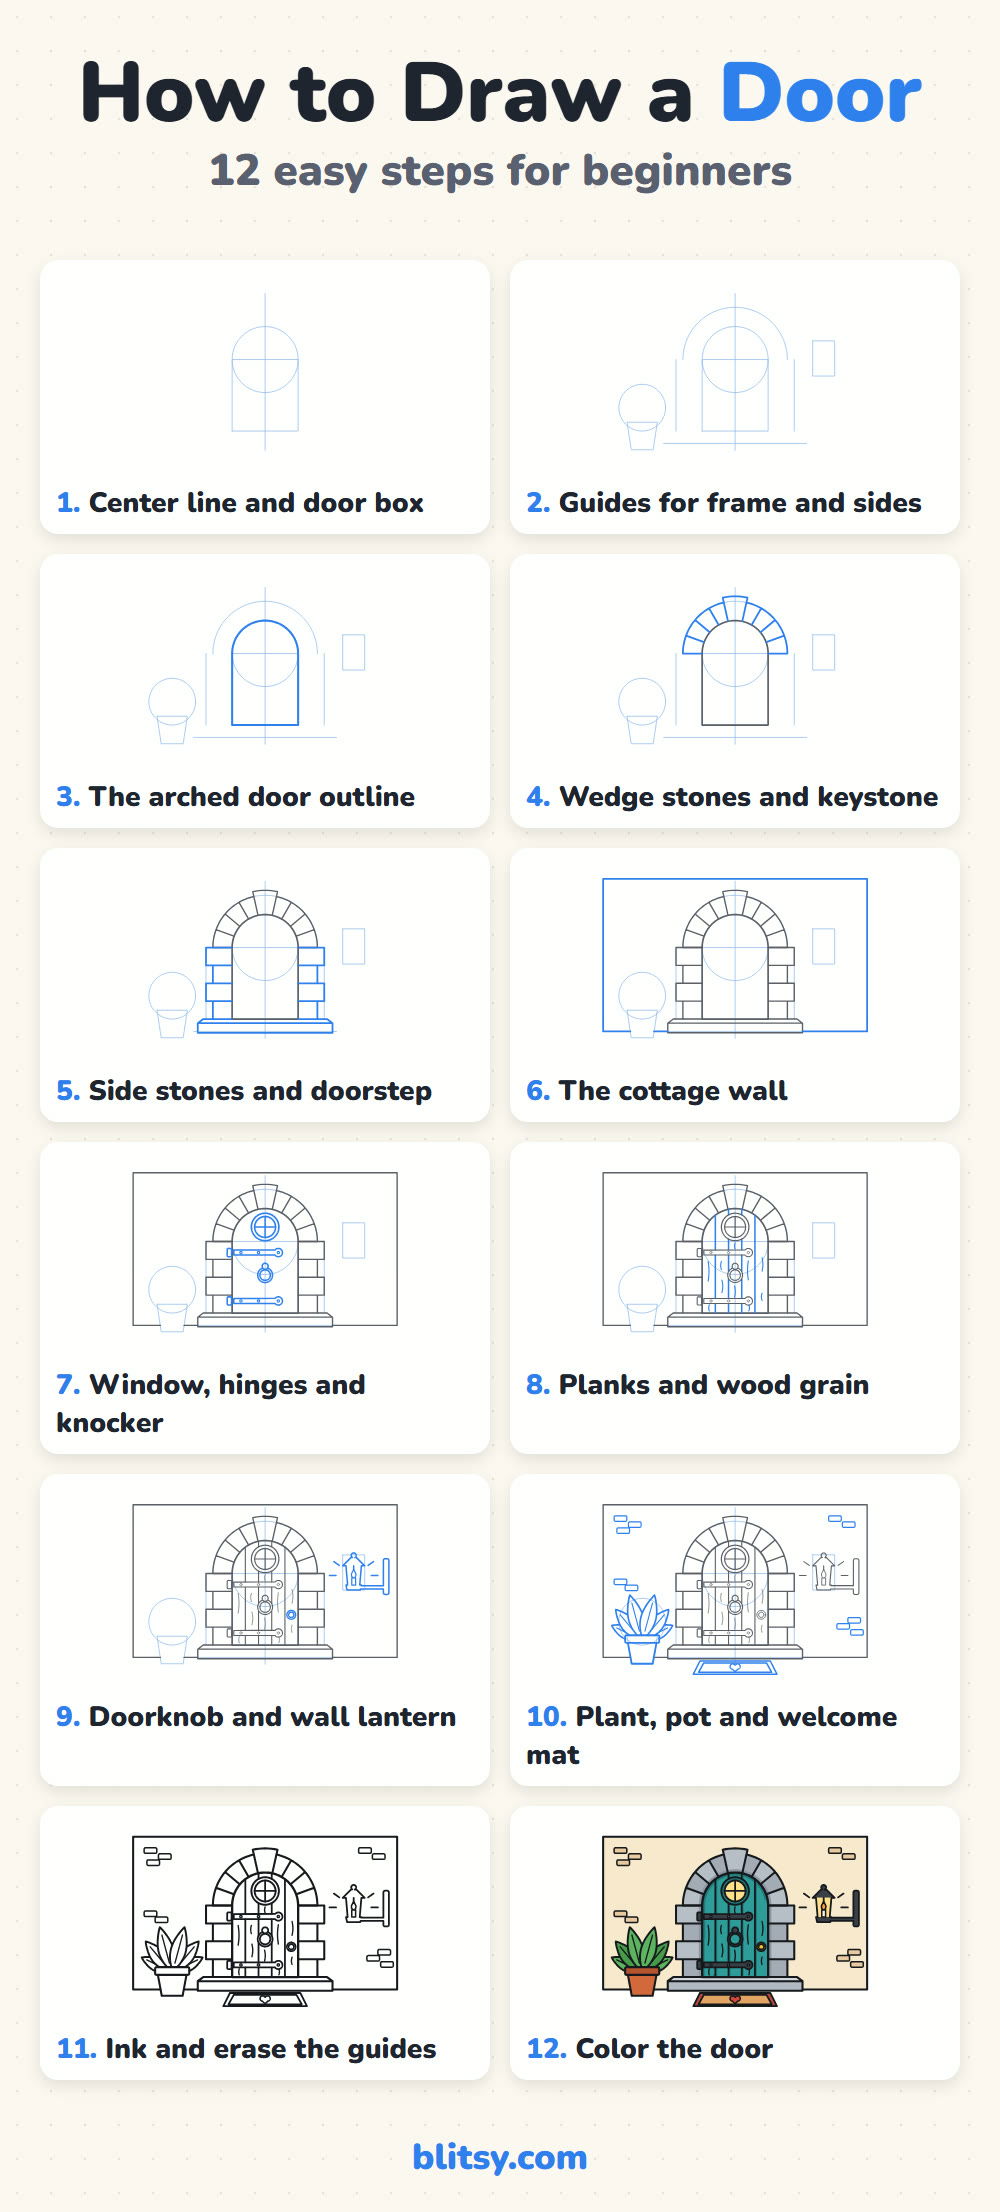
Door pictures below show the new lines of each step in blue, with earlier work in gray. Keep the pale helper lines faint, because step 11 erases them.
Quick overview
⏱️ Time: about 40 minutes, coloring included
🎯 Level: easy to medium, good for kids from about 7
✏️ Steps: 12
🚪 You'll draw: an arched cottage door in a stone frame, with a lantern, a potted plant and a welcome mat
Supplies for a Storybook Cottage Door
- A pencil (HB works well)
- A soft eraser
- A ruler for the door sides and the wall
- Something round to trace, such as a cup or a roll of tape, if you like a neat arch
- A black fineliner or thin marker
- Colored pencils or markers: teal, gray, black, yellow, cream, green, orange and red
- A sheet of printer paper turned sideways
Freehand arches are fine too; a slightly wobbly one only makes the cottage look older.
How to Draw a Door Step by Step
Step 1: Draw a center line and the door box
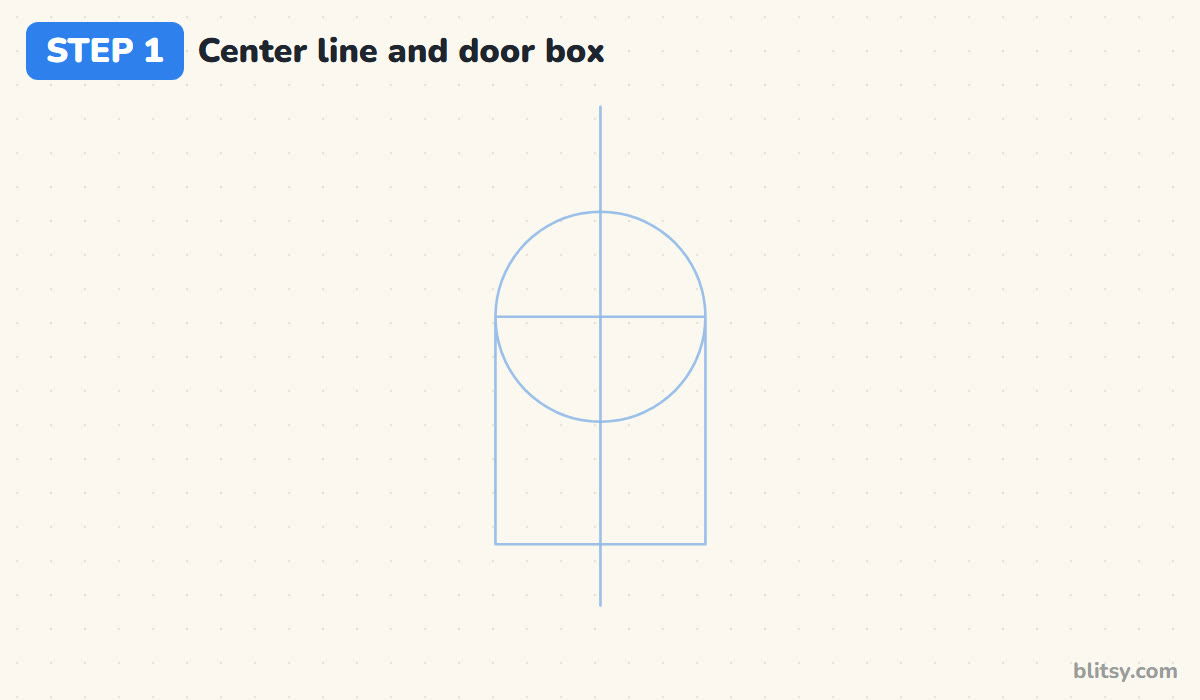
Start with a light vertical line down the middle of your paper; everything mirrors around it. Across it, draw a rectangle a bit taller than it is wide, in the lower half of the page. Then put a circle on top, as wide as the box, with its middle on the box's top edge.
💡 Tip: Press so lightly that you can barely see the line; you'll erase all of it later.
Step 2: Sketch guides for the frame, lantern and plant
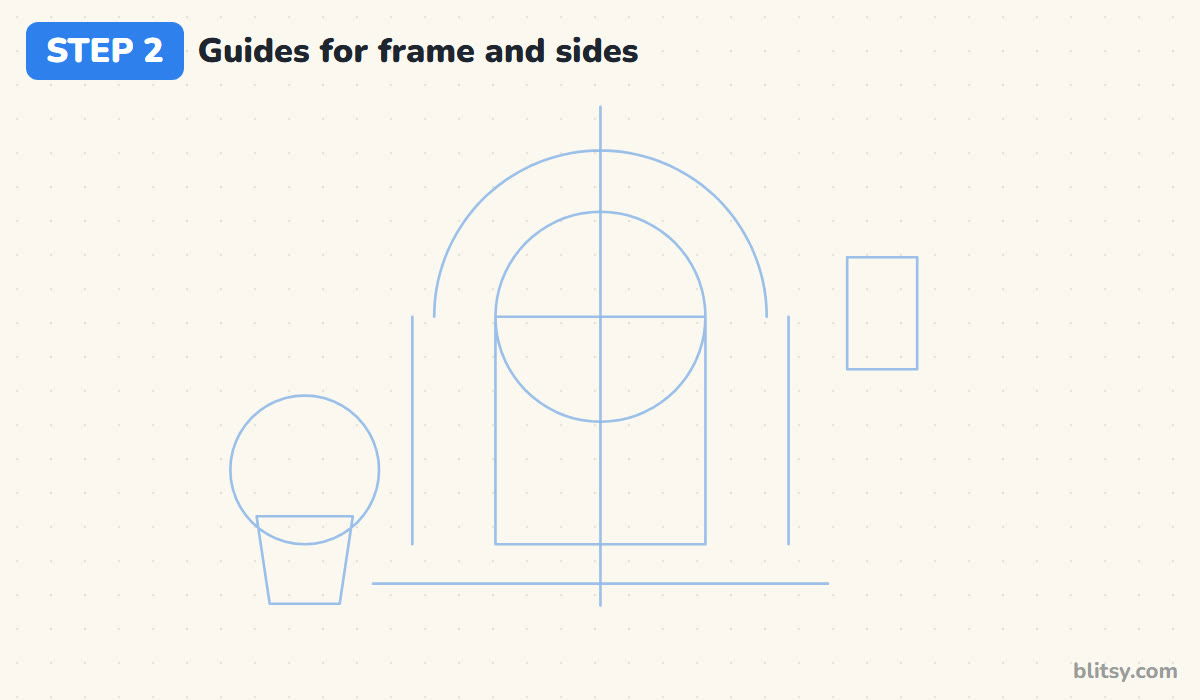
Draw a bigger half circle around the first one, leaving a gap about a third of the door's width for the stones. Drop a straight line from each end and add a ground line just under the box. On the left, sketch a circle over a small bucket shape for the plant. On the right, a little upright rectangle marks the lantern.
💡 Tip: Keep the plant and lantern guides at different heights, which balances the picture better than a matching pair.
Step 3: Outline the arched door
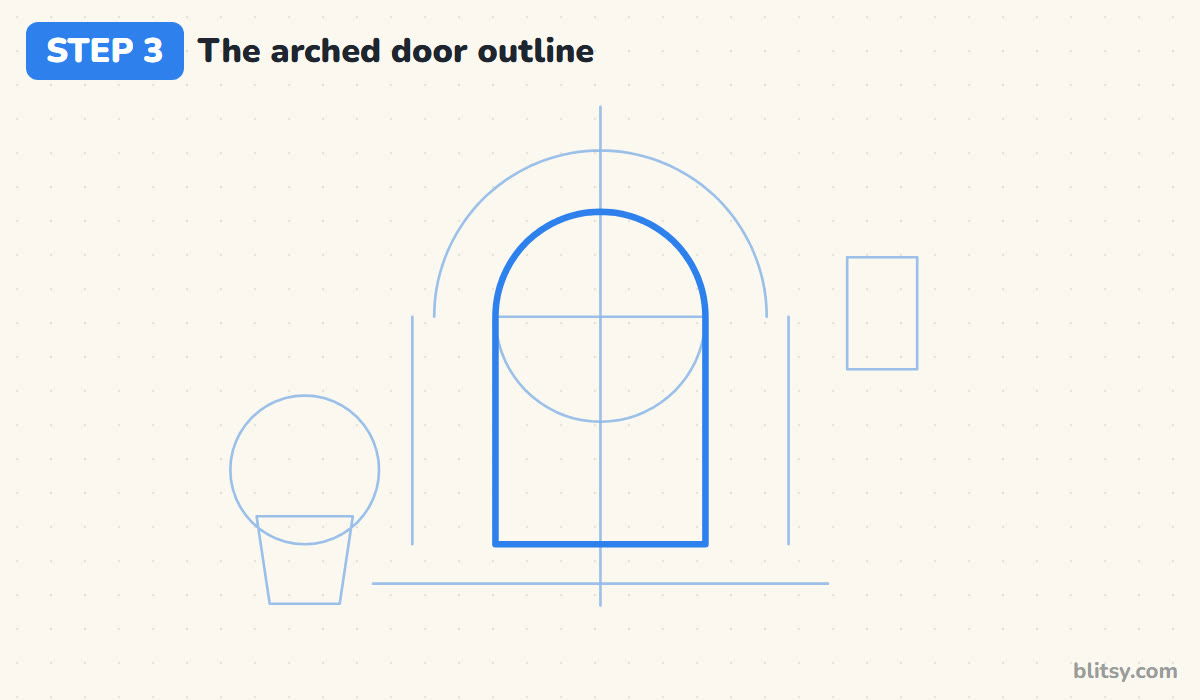
Now press a little harder. Trace the top half of the small circle, then run straight down both sides of the box and close the bottom. I always do the two sides with a ruler, because a door that leans even a little looks like it's about to fall over.




💡 Tip: Draw the arch in two halves, from each side up to the top, so both curves meet evenly.
Step 4: Fill the arch with wedge stones
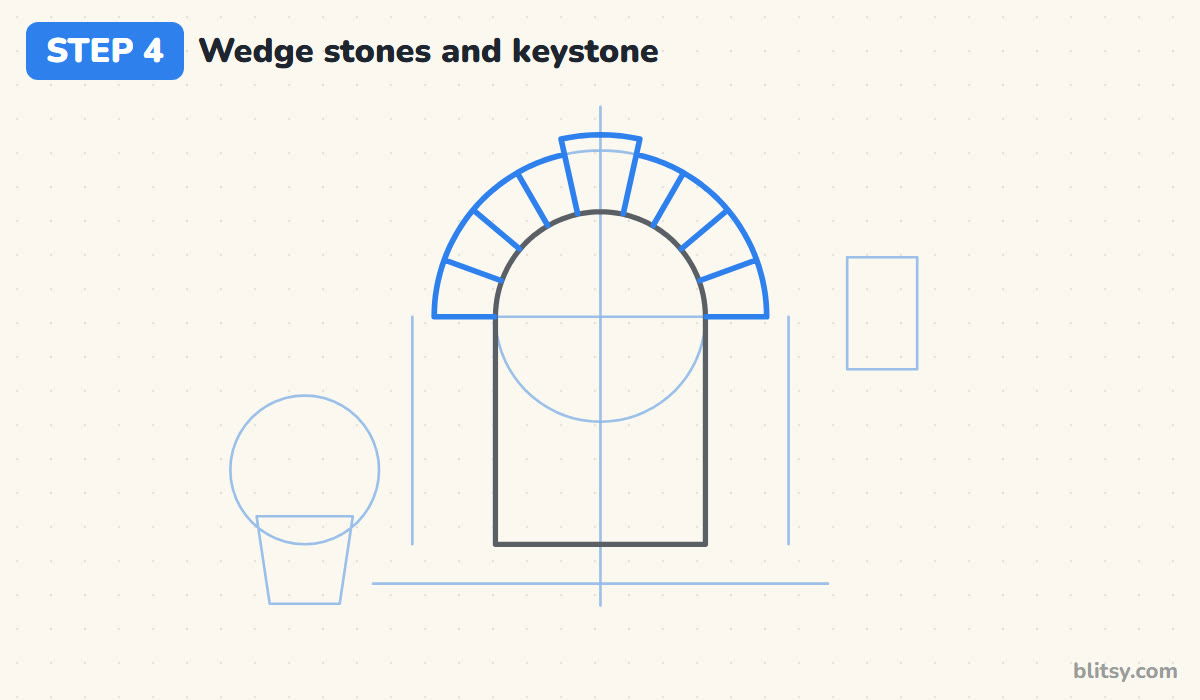
Between the door's curve and the outer half circle, draw lines that point toward the arch's center, like spokes on a wheel. Make the wedge at the very top a little wider and taller than the rest. That's the keystone, the stone that locks the arch in place. I fit four wedges on each side of it.
💡 Tip: Line your ruler up with the arch's center point for each spoke and the stones will fan out evenly.
Step 5: Stack the side stones and add a doorstep
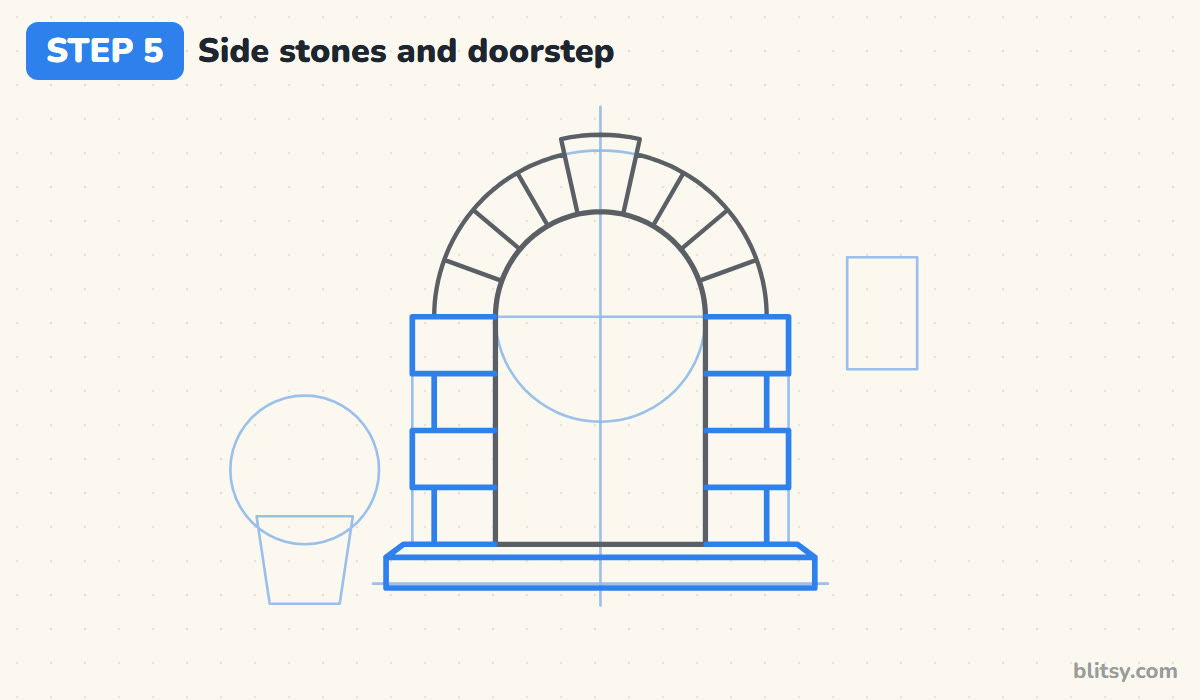
Below the arch, stack four blocks on each side of the door, down to the ground line. Alternate them long then short, so the outer edge zigzags the way real cottage stonework does. Under the door, draw a flat slab: a thin top strip that tilts slightly inward and a thicker band in front.
💡 Tip: Make the doorstep wider than the stone frame so it looks solid enough to stand on.
Step 6: Frame everything with a cottage wall
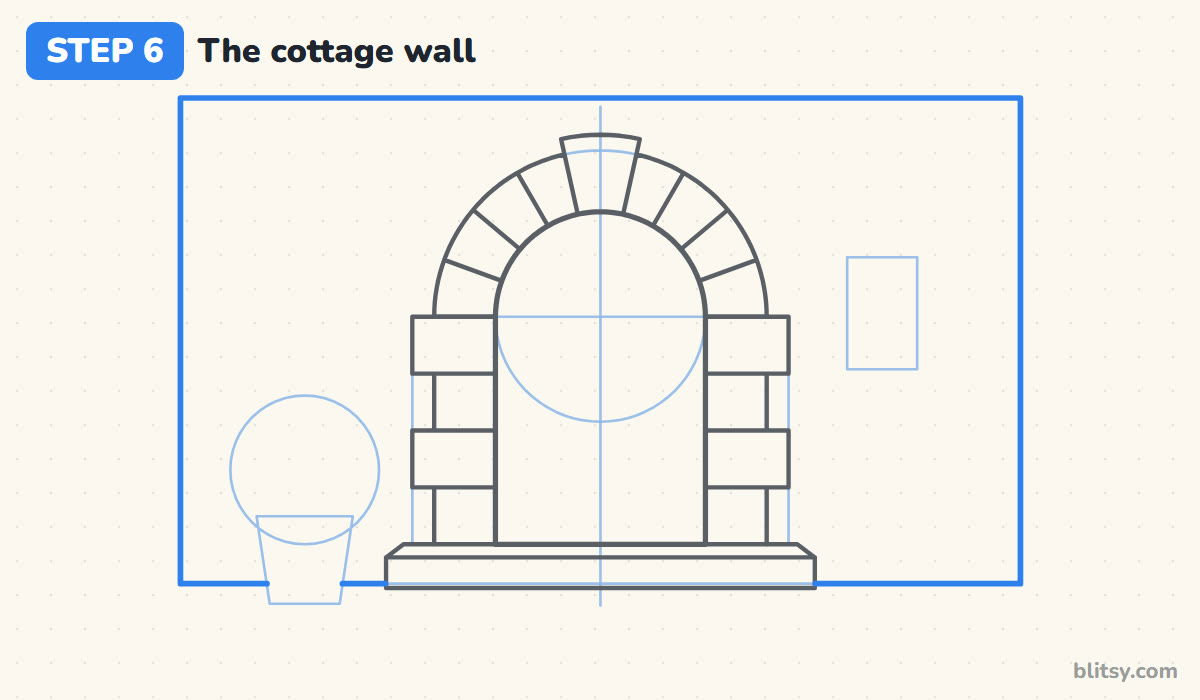
Draw a big rectangle around the door and both side guides. Its bottom edge is the ground line, and its top should stay well clear of the keystone. Without this wall, the stones and lantern seem to float in empty space.
💡 Tip: Leave about the same space left and right of the stone frame.
Step 7: Add the round window, hinges and knocker
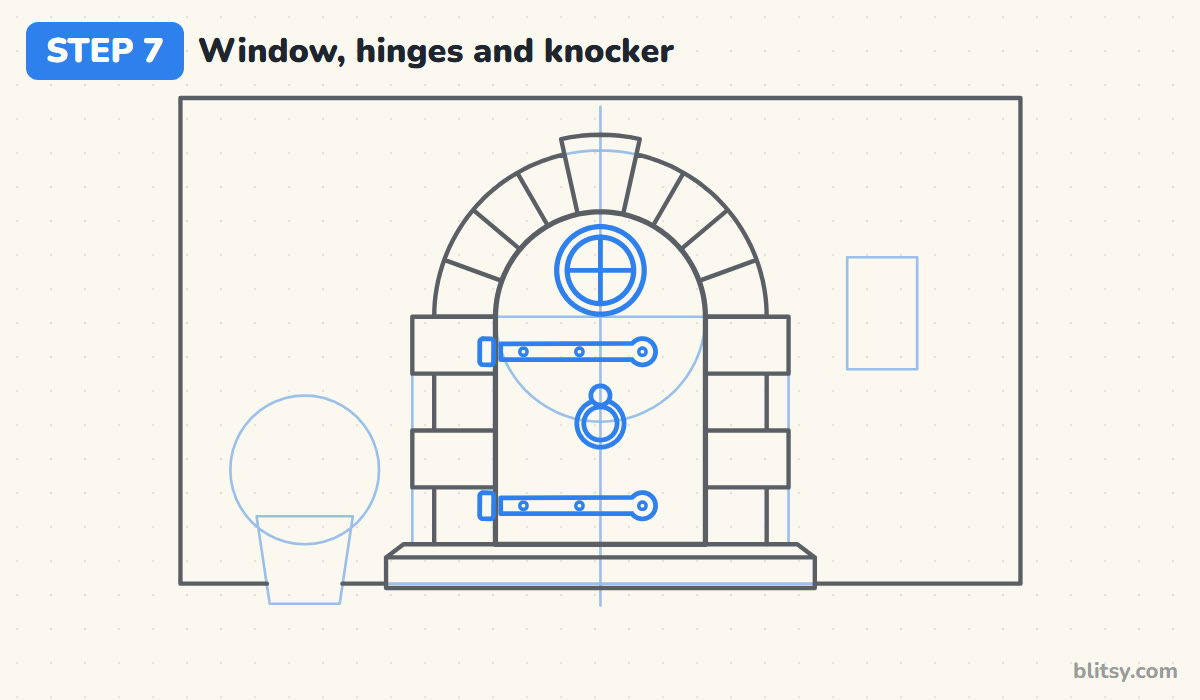
High on the door, centered, draw two circles, one inside the other, and cross the inner one with a plus sign. Next come two iron strap hinges starting at the left edge, each ending in a round disc, with tiny rivet dots. Hang a ring knocker from a small circle in the middle. I draw these before the planks on purpose, so the plank lines can simply stop at them.




💡 Tip: Put one hinge near the top and one near the bottom, never both in the middle.
Step 8: Draw the planks and some wood grain
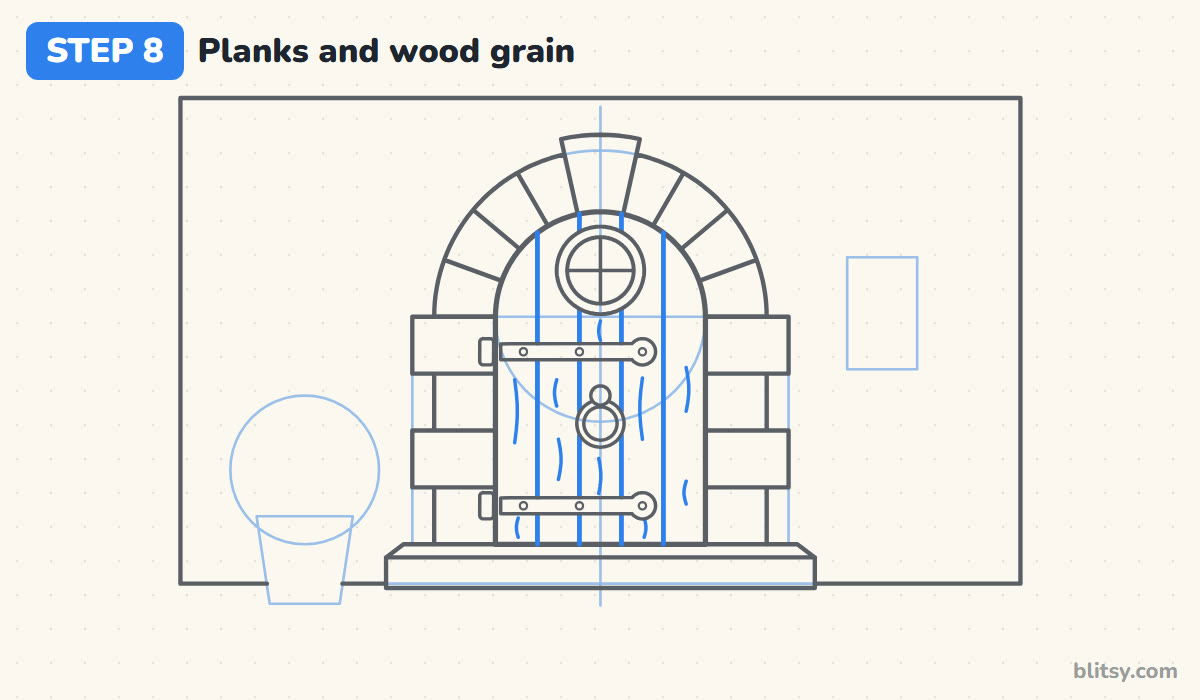
Split the door into five equal strips with four vertical lines, stopping each one at the window, a hinge or the knocker. Add one or two short, gently curving grain lines per plank. Covering every board with squiggles makes the door look scratched instead of wooden.
💡 Tip: Mark the plank spacing with dots along the bottom edge before you draw a single line.
Step 9: Place the doorknob and the wall lantern
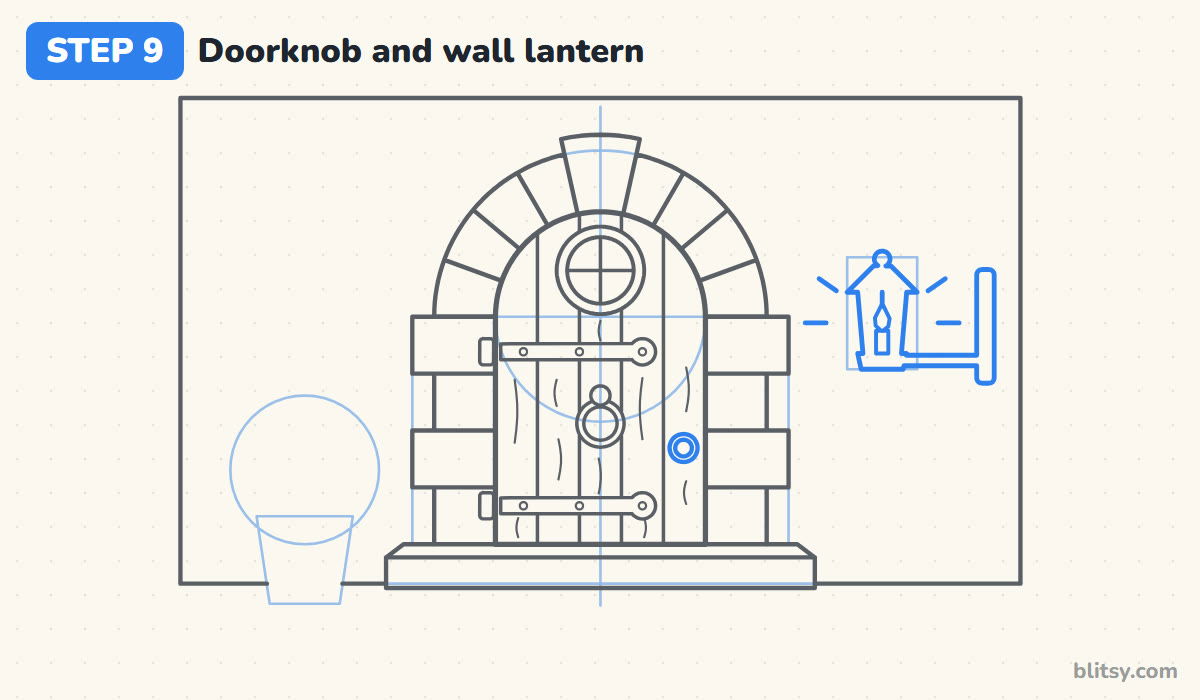
On the right, about halfway down, draw a small circle inside a slightly bigger one for the knob. Then build the lantern in its guide: a little roof with a ball on top, a glass box that narrows downward, a base and a bracket arm to a wall plate. Add a candle with a teardrop flame and four short dashes to show it's shining.
💡 Tip: Keep the knob on the side away from the hinges, since that's the side a door opens from.
Step 10: Grow a plant and lay the welcome mat
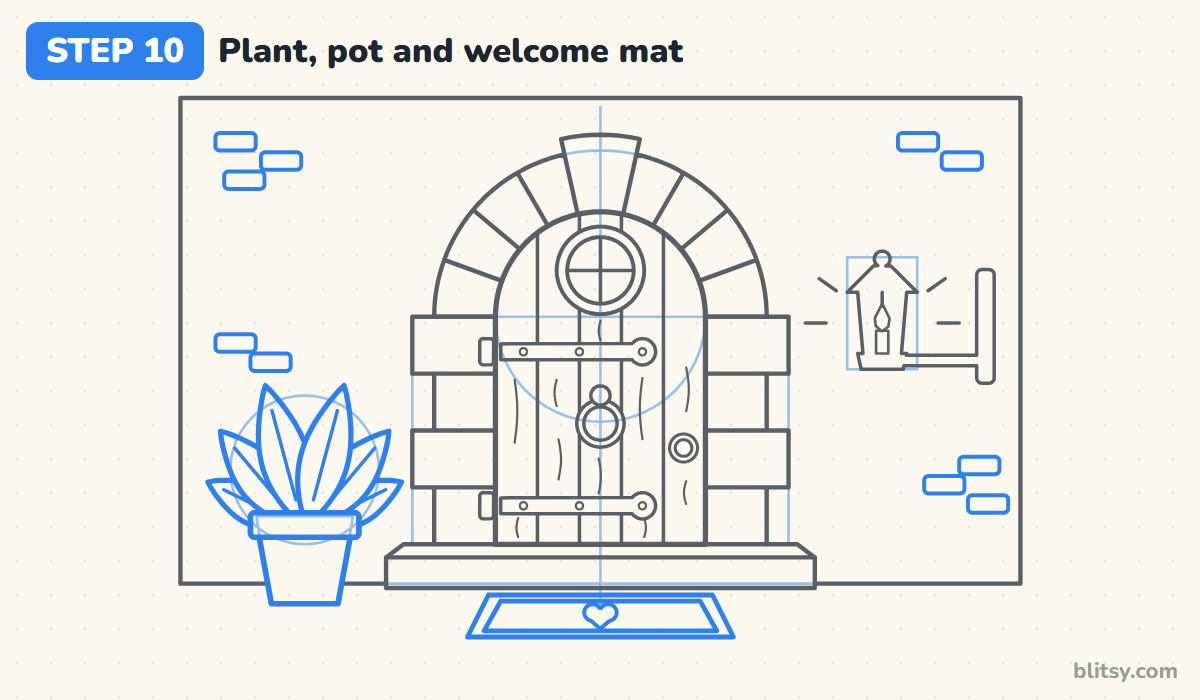
Inside the circle guide, fan out six long, pointed leaves from one spot, tallest in the middle, with a line down each. Below them goes the pot: a rim band over a shape that narrows toward the bottom. In front of the step, draw a mat with an inner border and a tiny heart. Finally, scatter a few bricks where the plaster has worn off.
💡 Tip: Group the bricks in twos and threes near the corners and keep them away from the door.
Step 11: Ink the lines and erase the guides
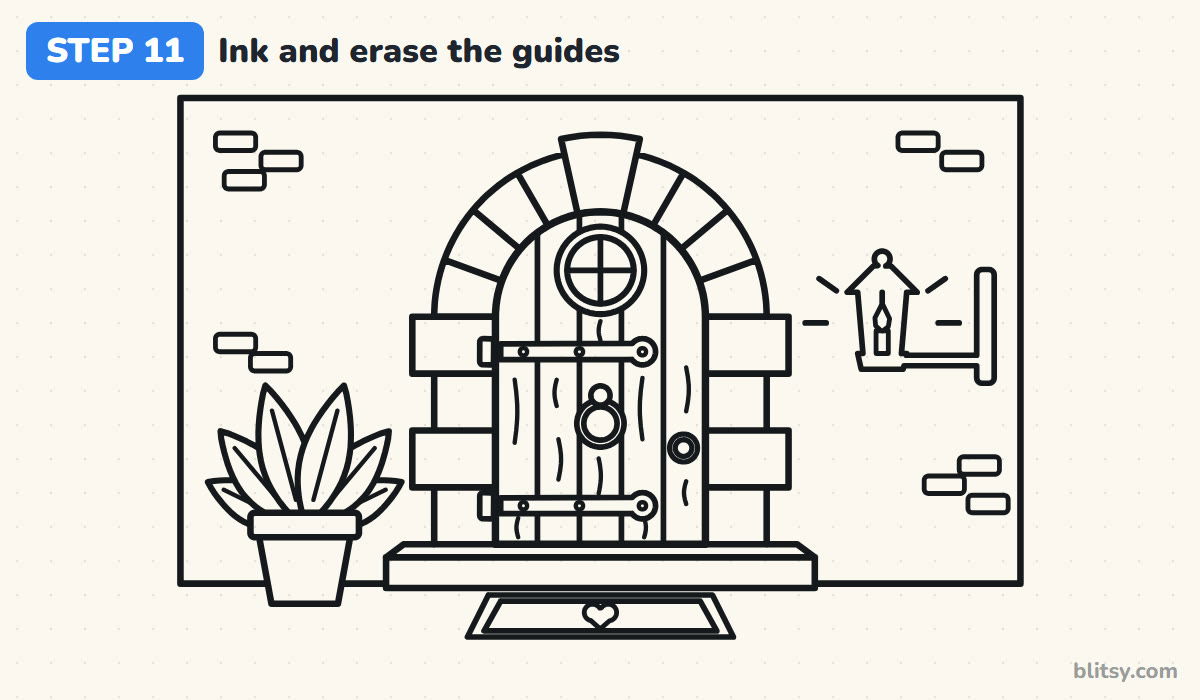
Trace every line you want to keep with the black fineliner. Go slowly on the arch stones and the round window, since those curves show every wobble. Let the ink dry for a minute, then erase the center line, the circles and the guide boxes.




💡 Tip: Ink from the top of the page down so your hand never rests on wet lines.
Step 12: Color your cottage door
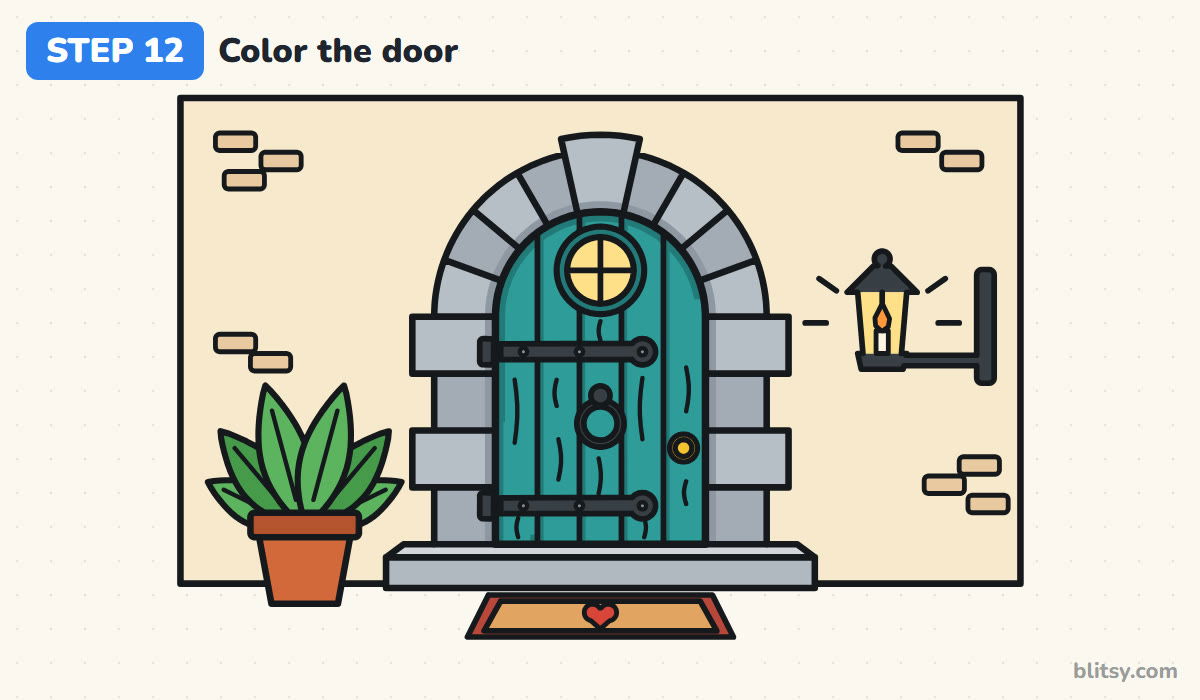
Color the door teal, then go over the right edge of each plank and the area under the arch with darker teal so the boards look deeper. Swap two grays from stone to stone. The iron parts are black and the glass turns warm yellow. Finish with a cream wall, a green plant, an orange pot and a red mat.
💡 Tip: Leave a tiny white spot on the gold knob so it looks shiny.
Where Door Drawings Tend to Go Crooked
- Leaning door sides. Even a small tilt makes the door look broken. Use a ruler for both sides and check them against the center line.
- Stone lines that point every which way. Wedges that don't aim at the arch's center look like crazy paving. Line each one up with the center point first.
- A lopsided arch. One side of the curve ends up higher than the other. Draw it in two halves that meet at the top, or trace something round.
- Hinges and knob on the same side. The door couldn't open that way. Put the hinges on one edge and the knob near the other.
- Too much wood grain. Dozens of lines turn the planks into a scribble once you color them. A couple of soft curves per board says wood clearly enough.
Ways to Give Your Door Its Own Story
Paint the door red or wood brown instead of teal, hang a wreath on it in winter, or open it a crack with yellow light spilling out. A door needs a home around it, so the house drawing tutorial is a natural next step, and how to draw a castle step by step gives you an arched gateway with a portcullis to practice.
Cottage Door Coloring Page and Printable PDF Steps
The door coloring page has a colored sample and a color key at the top so kids can copy the teal door and gray stones, plus a big outline with room for a house number. The step-by-step PDF guide holds all 12 steps and tips. Both print on Letter or A4.
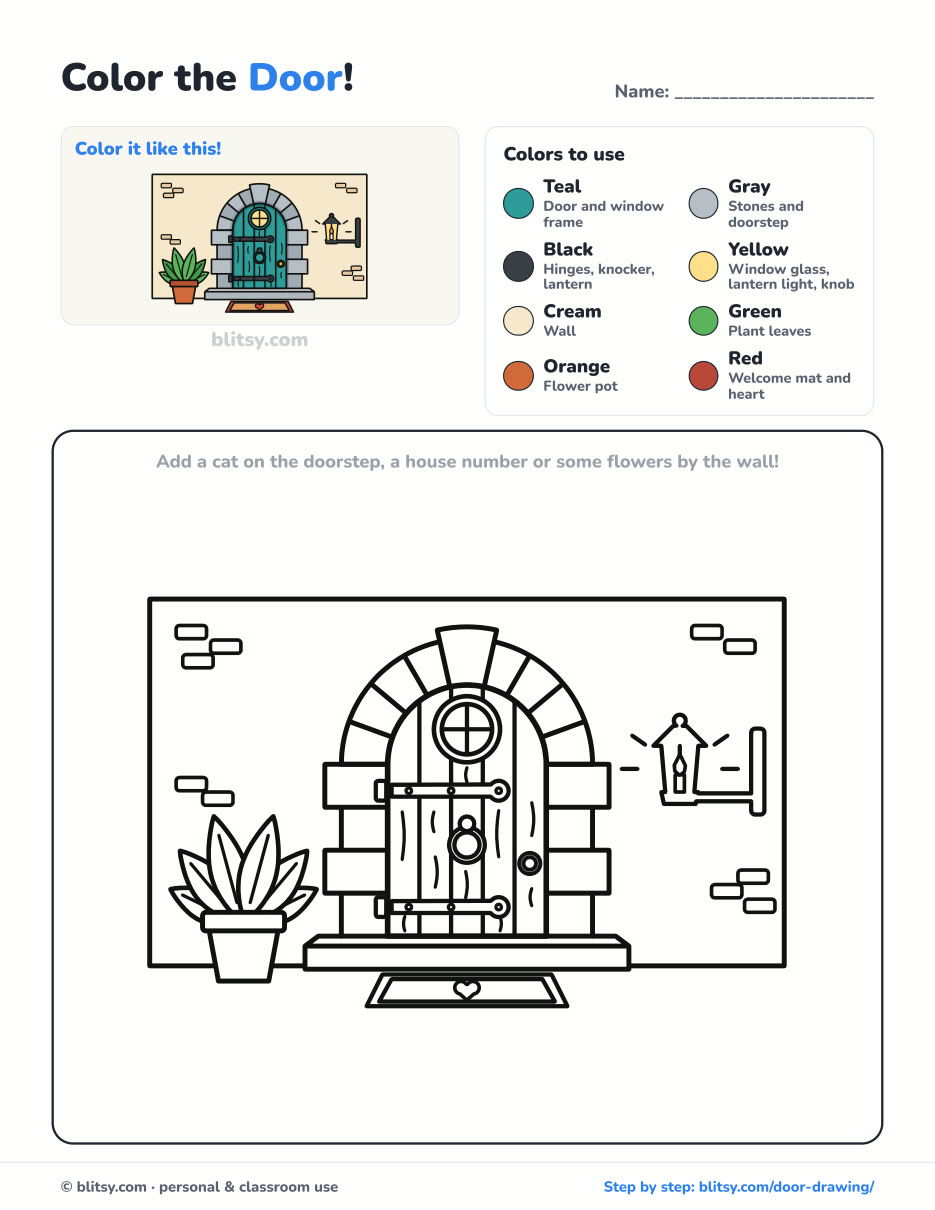
Black outlines with a colored example and the color names at the top. Ready to print and color.
⬇️ Download Coloring PageEvery step picture with its instructions and tips, to keep beside your paper while you draw.
⬇️ Download Drawing Guide📱 On a phone? Tap a download button, then open the file and choose Share → Save to Files or Print. On a computer, the PDF opens or saves straight to your Downloads folder.
Pin the Door Steps for Your Next Drawing Session
Cottage Door Built? Draw the House Around It
This step-by-step tutorial gives your door a whole home.
- House Drawing: Learn how to draw a house step by step with a 3D look, smoke drifting from the chimney and a path curving down to the lawn.
Door Drawing Questions With Quick Answers
What is the easiest way to draw a door?
Draw a tall rectangle with a ruler, add a half circle on top, and put a small circle near one side for the knob. Planks and hinges can come later.
How do you draw a door that looks old or wooden?
Split it into vertical planks, add a few short curved grain lines, and give it dark iron strap hinges. A stone frame around it makes it look even older.
How long does it take to draw this door?
About 40 minutes with coloring. The arch stones and inking take longest; the planks and mat go quickly.
How can I make this door easier for young kids?
Skip the lantern, the bricks and the grain. A rounded door, a few stones on top, a round window and a knob are plenty for a five or six year old.
Once your door is colored, think about who lives behind it, and maybe draw them peeking out next time. 🚪
Related posts:
 How to Draw a Whale Step by Step (Easy for Beginners)
 How to Draw Lungs Step by Step (Easy Science Diagram)
 How to Draw a Pineapple Step by Step (Easy Crown and Slice)
 How to Draw Iron Man Step by Step (Easy Chibi for Kids)
 How to Draw a Dress Step by Step (Easy Party Dress)
 How to Draw a Chicken Step by Step (Easy for Beginners)
 How to Draw a UFO Step by Step (Cute Alien Saucer)
 How to Draw Flames Step by Step (Easy Campfire Drawing)
 How to Draw a Moon Step by Step (Sleepy Crescent + Phases)
 How to Draw a Sunflower Step by Step (Big and Bright)
 How to Draw a Fall Leaf Step by Step (Maple, Oak and Birch)
 How to Draw a Mushroom Step by Step (Easy Storybook Toadstool)

