
Pooh is a bear made almost entirely of circles, which makes him one of the friendliest characters a beginner can pick. Get the pear-shaped tummy right, plus that famous shirt that never quite reaches his belly, and he's already recognizable. Below I'll show you how to draw Winnie the Pooh step by step, waving with one paw and hugging his honey pot with the other. This is my own simple fan-art version for practice, not official artwork, so feel free to make it yours.
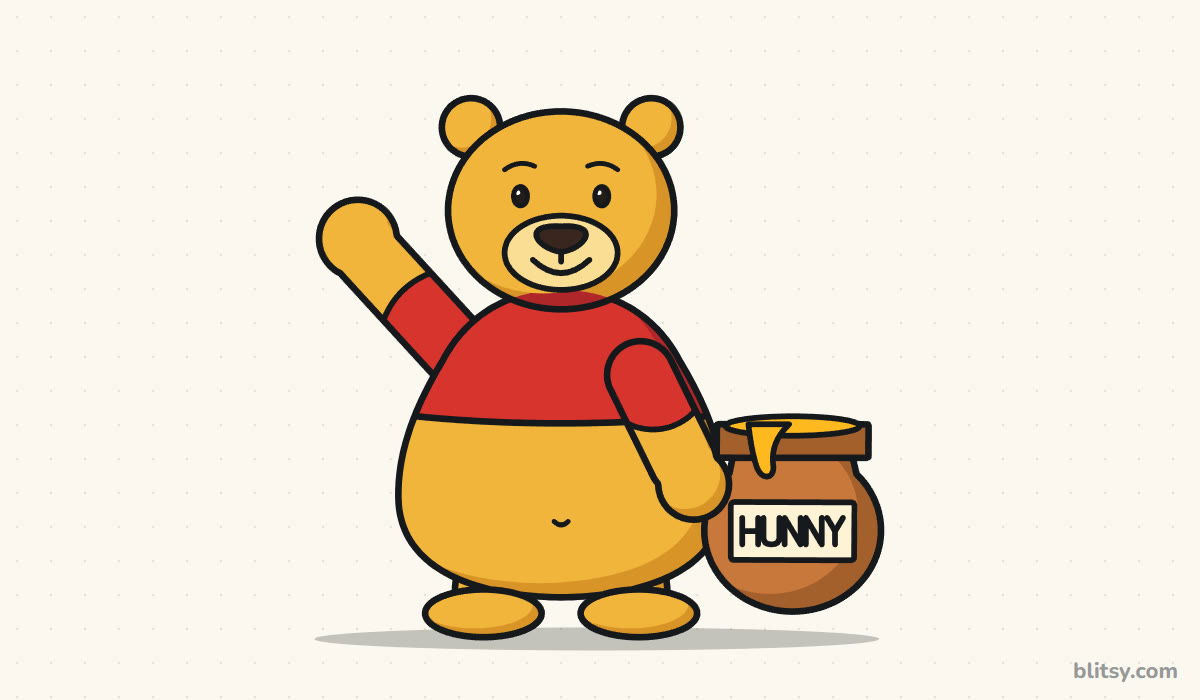
Pooh's pictures use two pencil shades: blue for this step's lines, gray for older work. Copy only the blue part, then check yours against it before the next step.
Quick overview
⏱️ Time: around 30 to 35 minutes, coloring included
🎯 Level: easy, fine for kids aged 6 and up
✏️ Steps: 12
🍯 You'll draw: Pooh standing and waving, with a HUNNY pot
Supplies for a Honey-Loving Bear
- A pencil for light sketching (HB works well)
- A soft eraser
- A black marker or fineliner for the final outline
- Colored pencils or crayons in golden yellow, red, orange brown and cream
- Plain white paper, turned sideways
Sideways paper matters here, because the waving paw and the honey pot stick out on both sides.
How to Draw Winnie the Pooh Step by Step
Step 1: Sketch the head circle and a big body oval
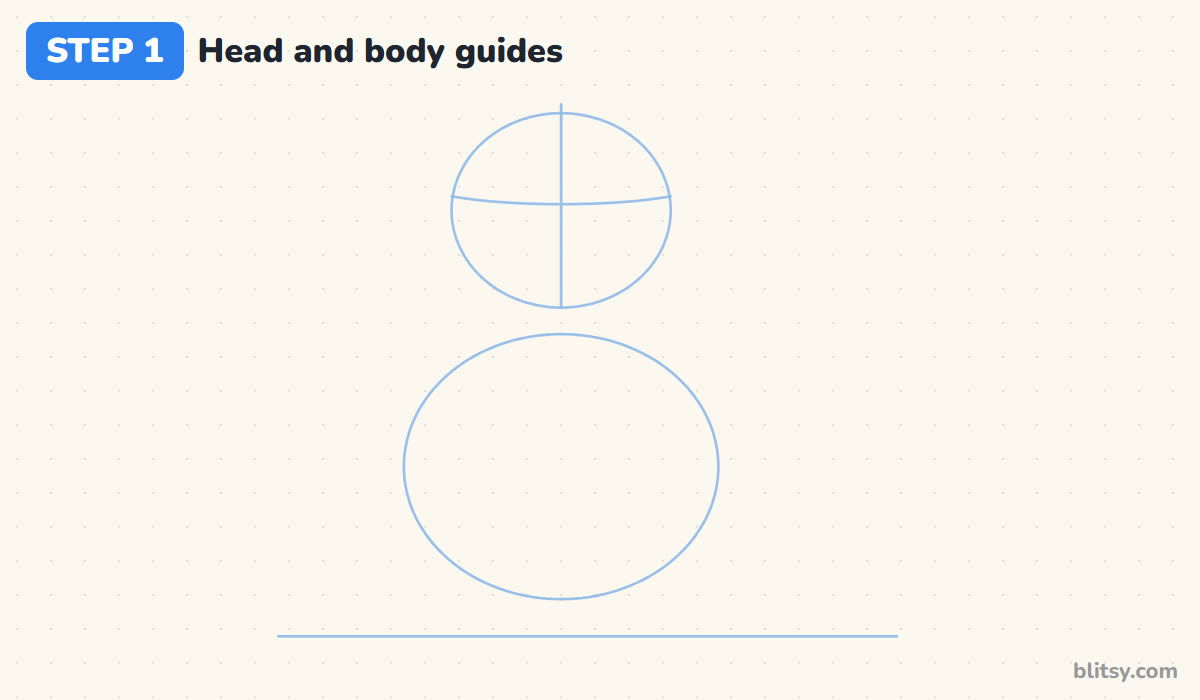
Draw a light line near the bottom of the page for the ground. Above it, sketch a wide oval for the body that almost touches that line. Put a smaller circle on top for the head, overlapping the body a little, then add a line down its middle and a gentle curve across it, slightly above center. The eyes will sit on that curve.
💡 Tip: Press so lightly you can hardly see it. Every line in this step gets erased.
Step 2: Add guide lines for the limbs and the honey pot
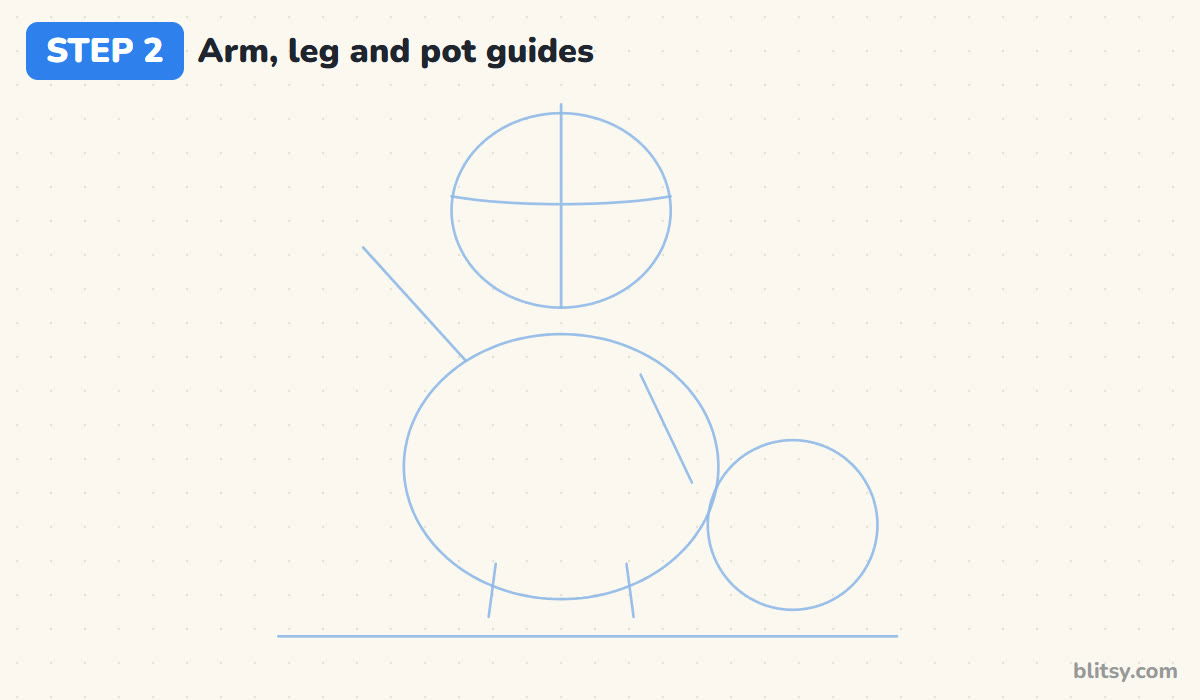
From the upper left of the body, draw one slanted line going up and out. That's the waving arm. On the right, a shorter line goes down from the shoulder toward the side. Add two short lines under the body for legs, and a circle on the right, sitting on the ground, for the honey pot.
💡 Tip: Keep the pot circle touching the body's right side so the arm can reach it later.
Step 3: Draw a round head with small round ears
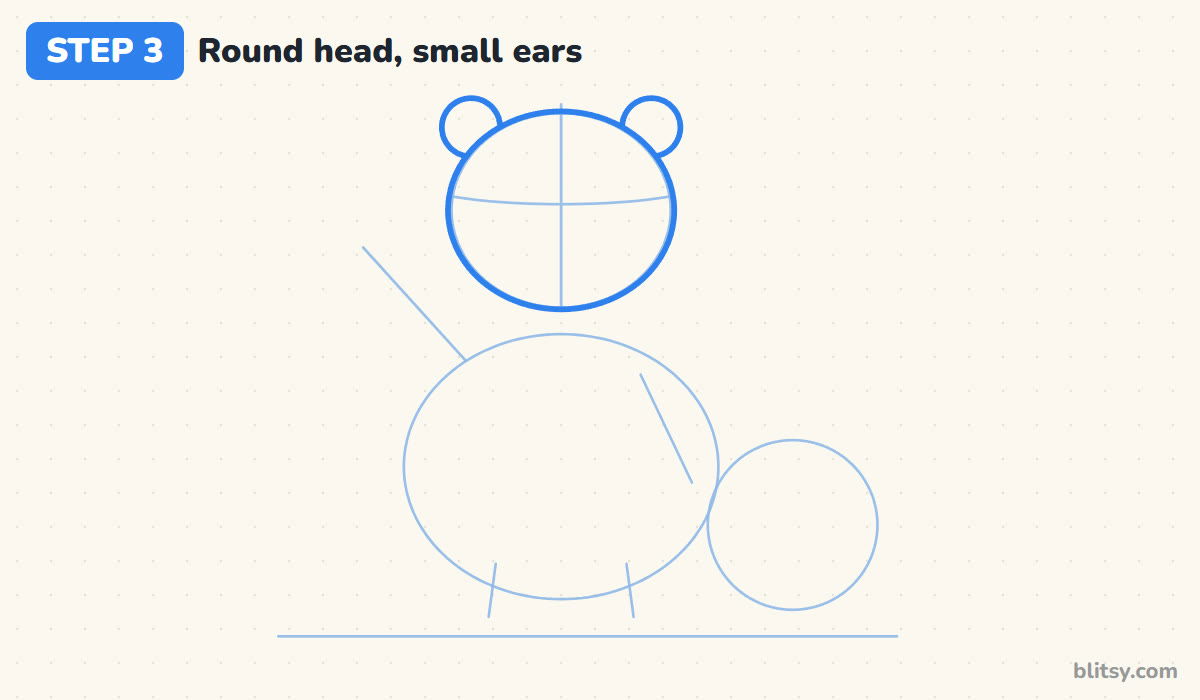
Trace over the head circle with a confident line, making it just a touch wider than tall. On top, near each side, draw a small round ear. Pooh's ears are tiny compared to his head, about a quarter of its width.
💡 Tip: If the ears come out big, he starts to look like a teddy bear or a mouse. Small and round keeps him Pooh.




Step 4: Add the muzzle, nose and eyes plus a smile
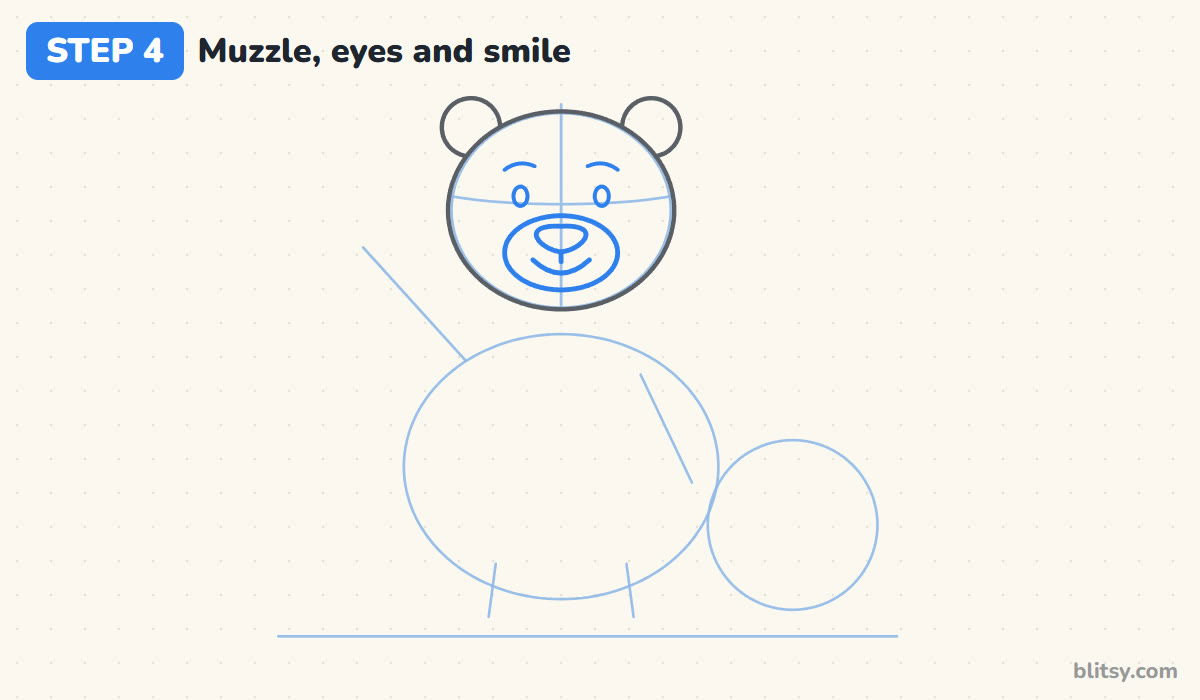
Low in the face, draw a soft oval for the muzzle, wider than tall. At its top sits a rounded triangle nose. A tiny line drops from the nose into a wide, gentle smile. Now place two small oval eyes on the curved guide, fairly close together, with short arched brows above.
💡 Tip: Draw the smile as one curved line. A big open mouth changes his whole mood.
Step 5: Outline a round, pear-shaped body
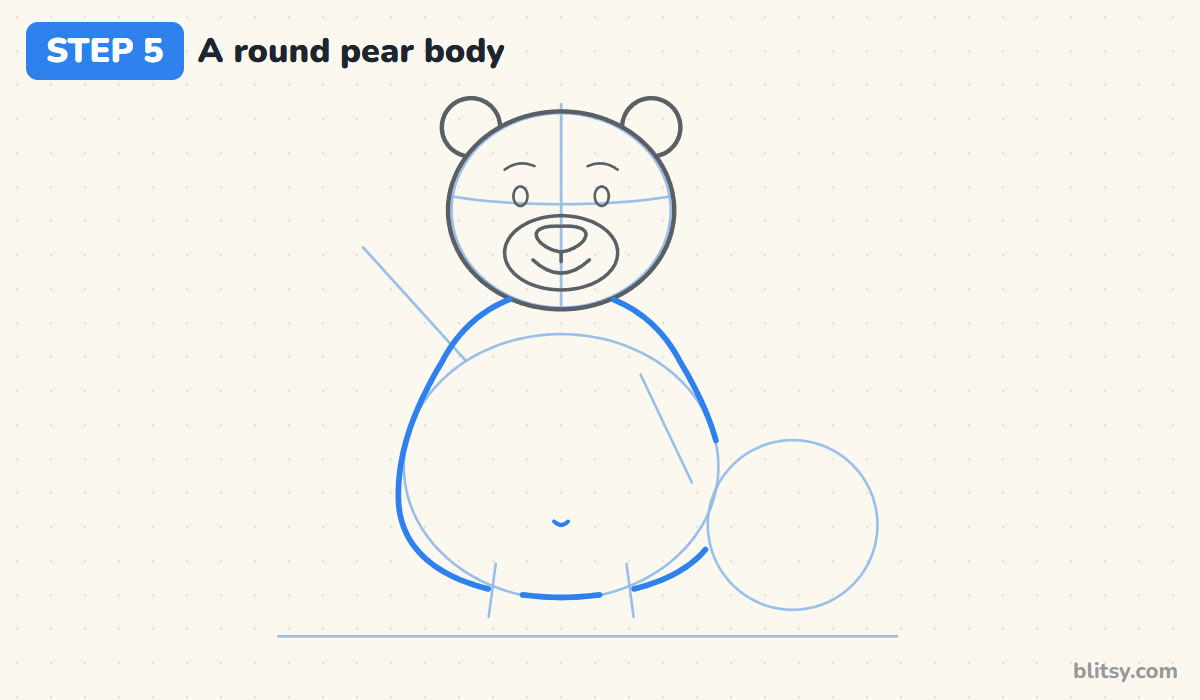
Starting under the head, curve the body outward on each side so it's narrow at the shoulders and widest near the bottom, like a pear. Round the bottom off and leave the right side open where the arm and pot will cover it. Add a tiny curved belly button low in the middle.
💡 Tip: Make the body clearly wider than the head. Pooh's charm is in that round tummy.
Step 6: Draw the hem of his short red shirt
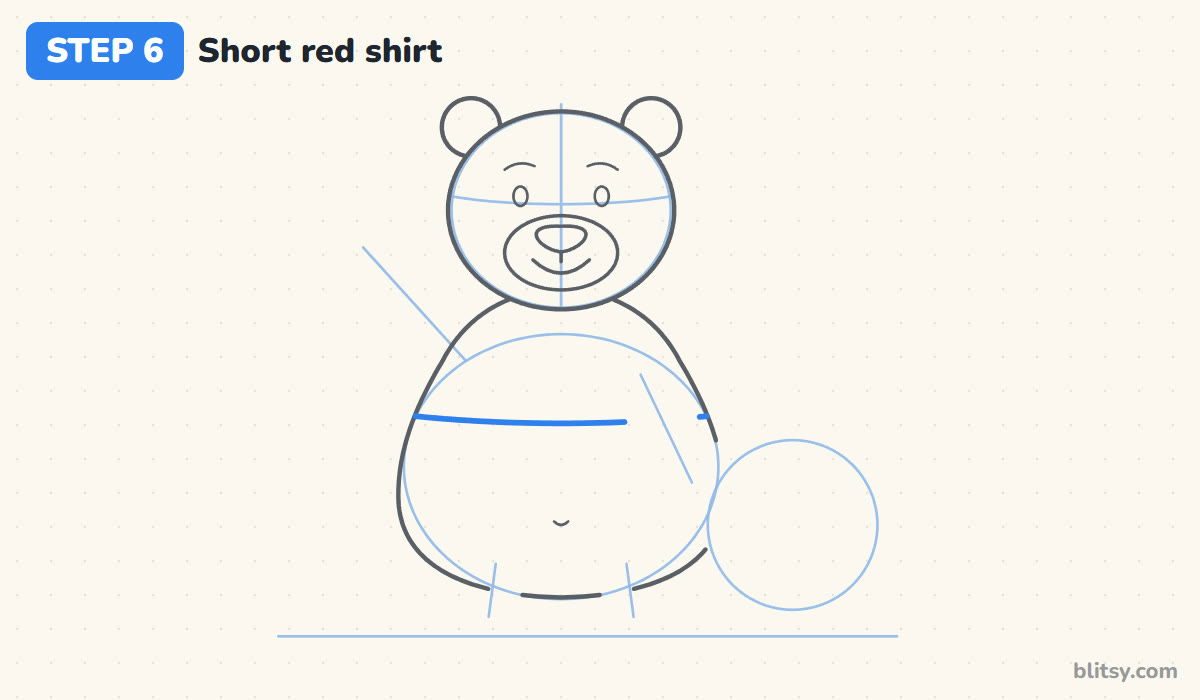
About halfway down the body, draw one line straight across with a slight downward curve in the middle. Everything above it is the shirt, and everything below is his tummy. The shirt's top edge is hidden by his chin, so you don't need a collar.
💡 Tip: Keep the hem above the widest part of the body. A short shirt is half of what makes him recognizable.
Step 7: Add a waving arm with a short sleeve
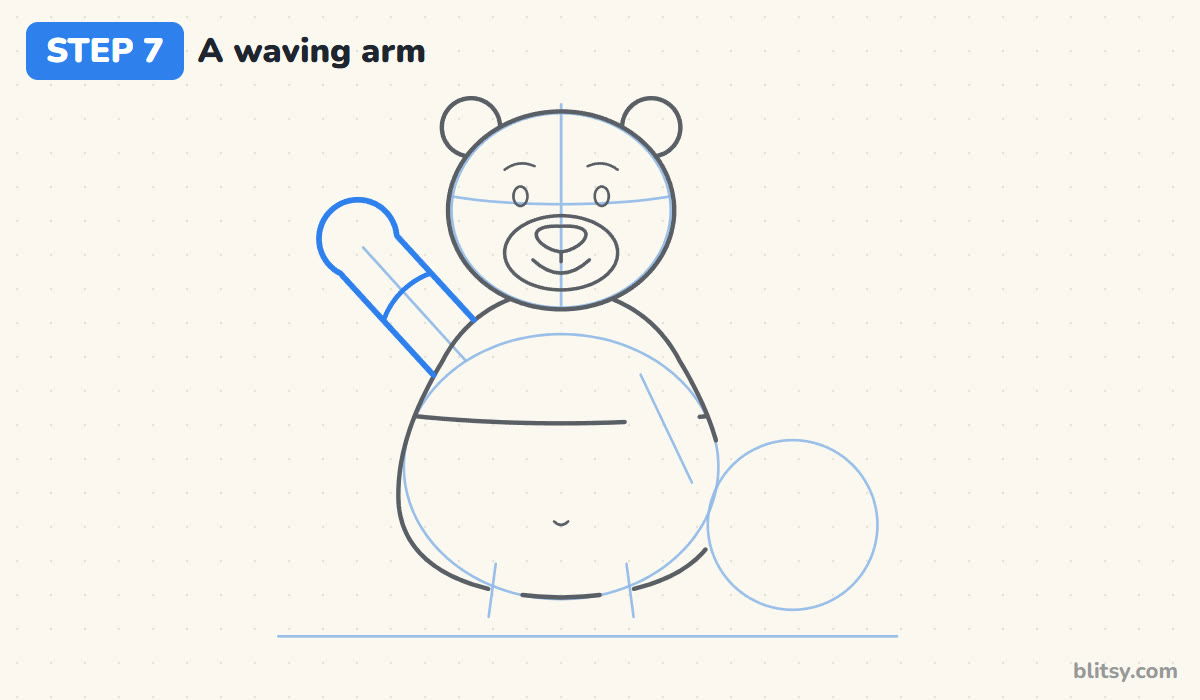
Follow the slanted guide on the left with two lines a little apart, and finish them in a round mitten paw at the top. The arm starts behind the body, so stop the lines where they meet the body outline. Close to the shoulder, draw a curved line across the arm for the end of the sleeve.
💡 Tip: Give the arm real thickness. Stick arms make a soft bear look stiff.


Step 8: Draw short legs and flat oval feet
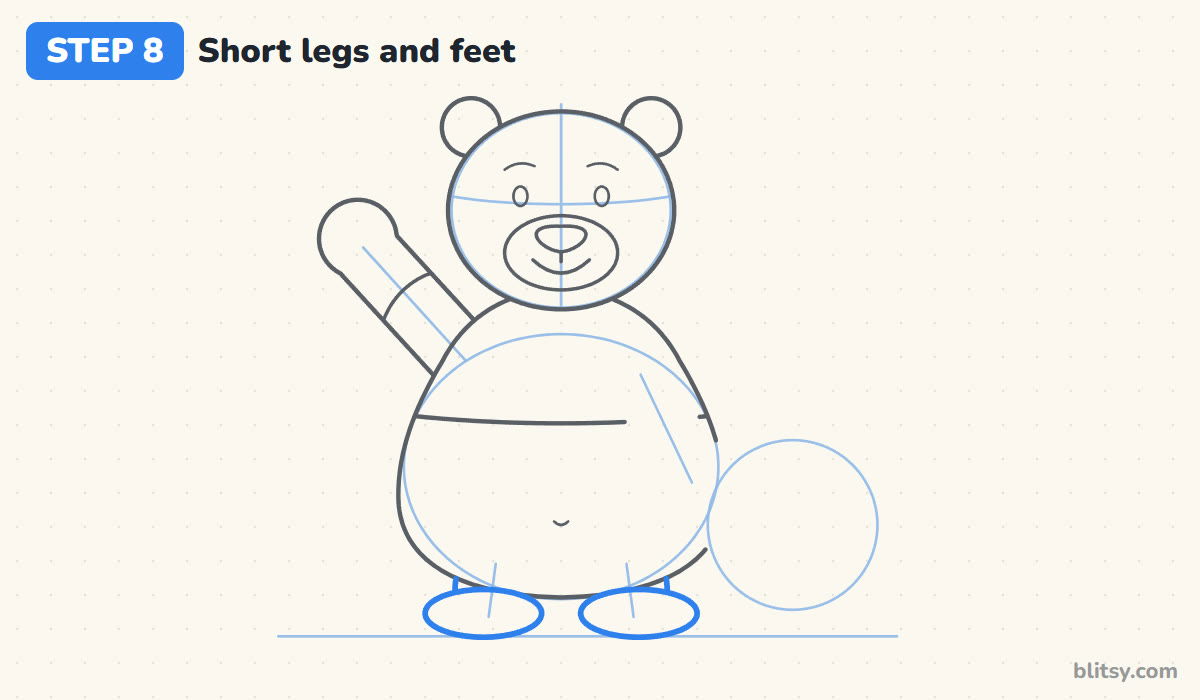
Pooh's legs are so short they barely show. Draw two small stubs under the body, then a wide flat oval at the bottom of each one, resting right on the ground line.
💡 Tip: Make the feet wider than the legs. That gives him a steady, solid stance.
Step 9: Draw the honey pot with a rim and a drip
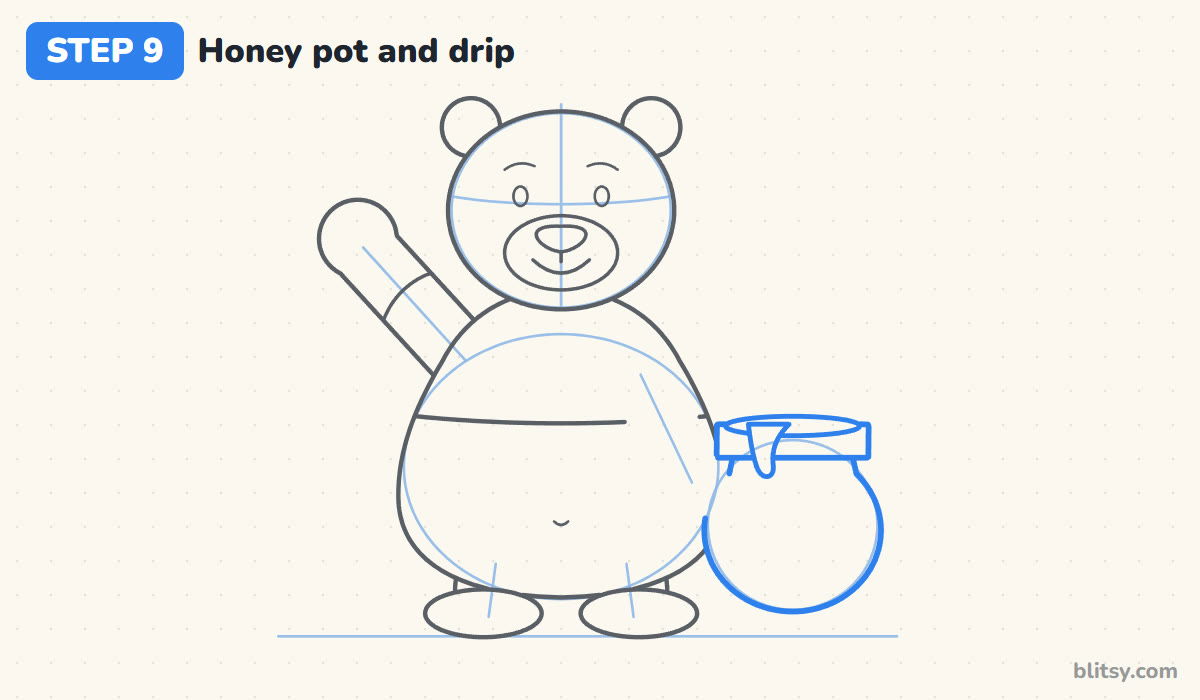
Turn the pot circle into a round jar with a short, straight neck at the top. Across the neck, draw a flat rim that sticks out a little on both sides, with a thin oval on top for the honey inside. Then let one drop of honey run down over the rim on the left, ending in a round blob.
💡 Tip: One drip is plenty. Several drips make the rim look messy once it's colored.
Step 10: Add the hugging arm and the HUNNY label
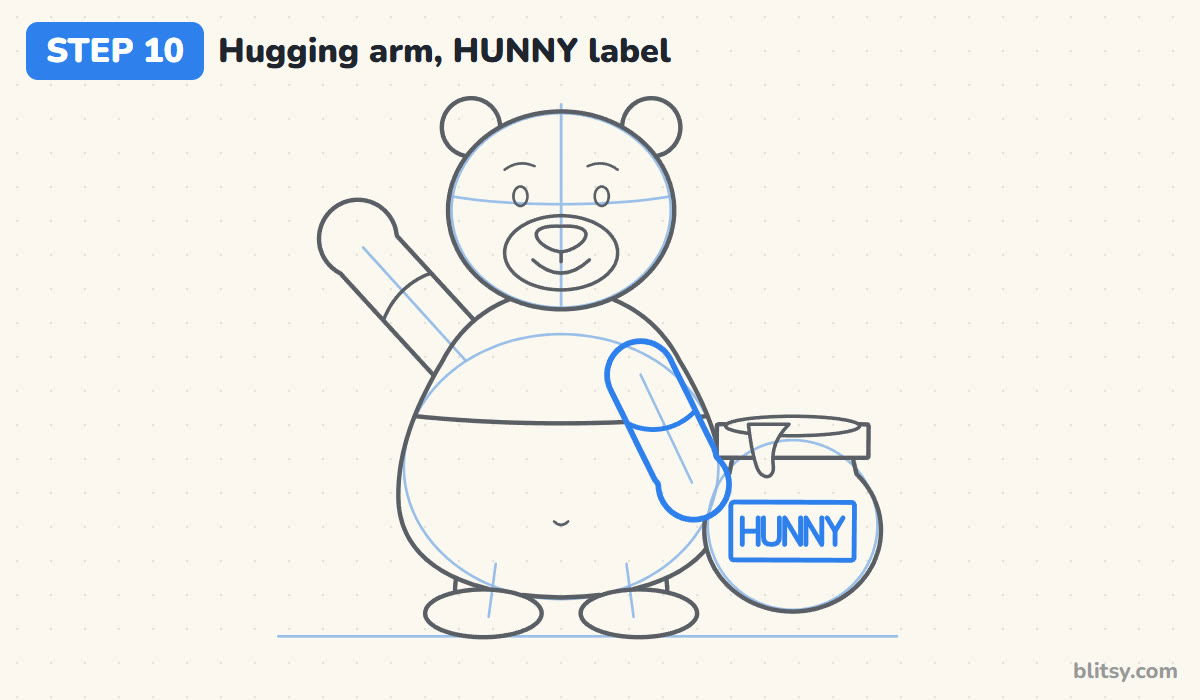
From the right shoulder, bring a thick arm down and round to the pot, ending in a mitten paw that rests on its left side. Add the short sleeve line near the shoulder, as on the other arm. On the pot's belly, draw a small rounded rectangle and write HUNNY inside in simple capital letters. The spelling is part of the joke, so keep it.
💡 Tip: Lightly mark five even spaces in the label first, then fit one letter in each.
Step 11: Ink the outline and erase the guides
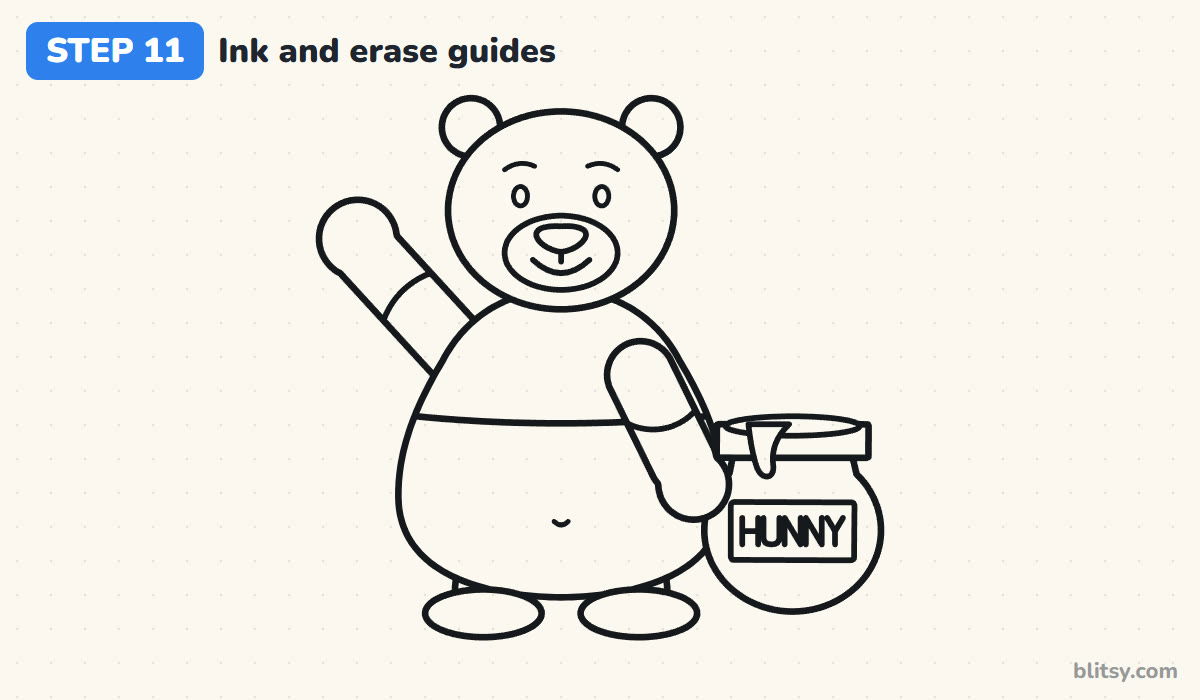
Trace every keeper line with the black marker. I start with the face while my hand is steady. Wait for the ink to dry before erasing, or it'll smear. Then rub out all the light circles and lines until only the clean drawing remains.
💡 Tip: Write the HUNNY letters slowly with short strokes. Lettering is where shaky ink shows most.

Step 12: Color your Pooh bear
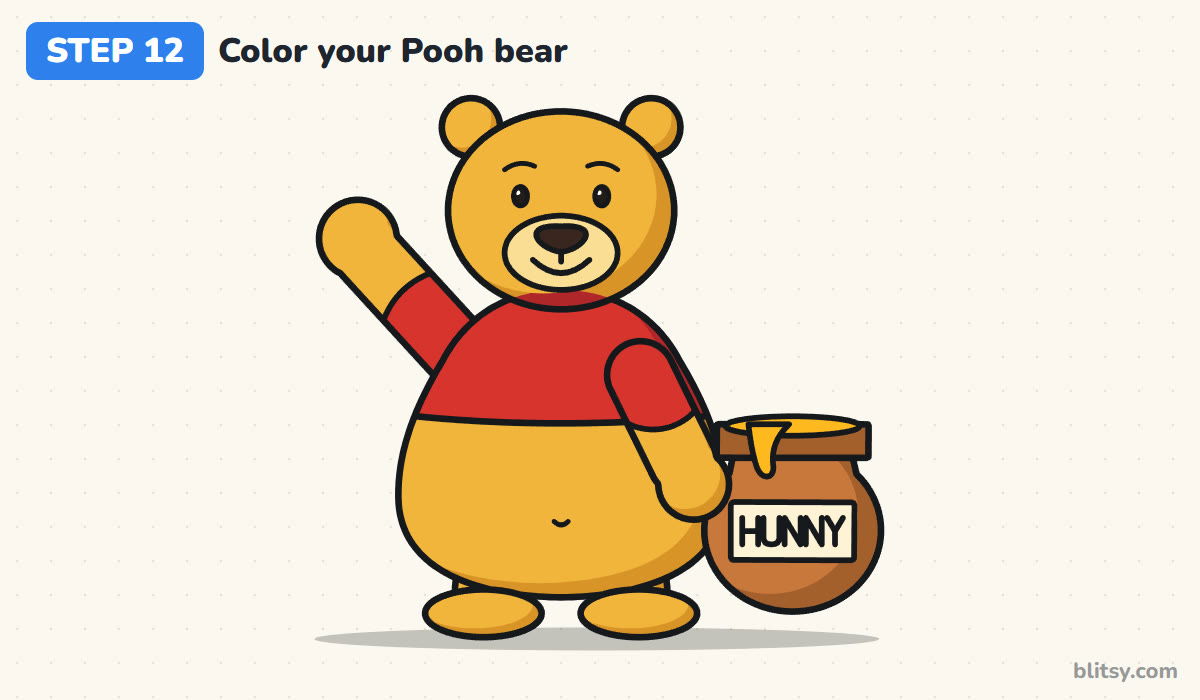
Golden yellow covers all his fur, with a lighter yellow on the muzzle. The shirt and sleeves are bright red. Color the pot orange brown with a darker rim. The honey is orange yellow and the label cream. The nose and eyes are black, with a small white shine left in each eye. A slightly darker yellow along his right side makes him look round.
💡 Tip: Color the tummy in small circles instead of straight strokes. It looks softer and fills more evenly.
Where Pooh Bear Sketches Go Sideways
- A shirt that covers the tummy. A long shirt makes him look like any bear in a sweater. Keep the hem high so the round belly shows underneath.
- Ears that are too big. Large ears turn him into a teddy bear. Keep them small and set near the top of the head.
- A skinny body. If the body is narrower than the head, the character disappears. Make the tummy the widest shape in the drawing.
- Wide-open cartoon eyes. Big eyes with lots of white look surprised. Small dark ovals keep his calm, gentle face.
- Squeezing the label text. Letters crammed against one edge look wrong. Center HUNNY on the label and give each letter the same width.
Little Changes for a Different Pooh Day
Once the basic pose works, try a few small changes. Swap the waving paw for a paw dipped in the honey pot, give him a red balloon on a string, or add a couple of bees buzzing around the rim. If you'd like to draw a real wild bear next, the how to draw a bear step by step tutorial uses the same simple shape method. The bees can come from this bee drawing tutorial, and for more bears to color, try the bear coloring pages.
Free Winnie the Pooh Coloring Page and Step PDF
The free Winnie the Pooh coloring page has a finished, colored Pooh at the top as a guide, a color key for each part, and a large outline below to color in. The step-by-step PDF guide puts all 12 steps with pictures and tips on paper, so kids can draw without a screen. Both print on Letter or A4.
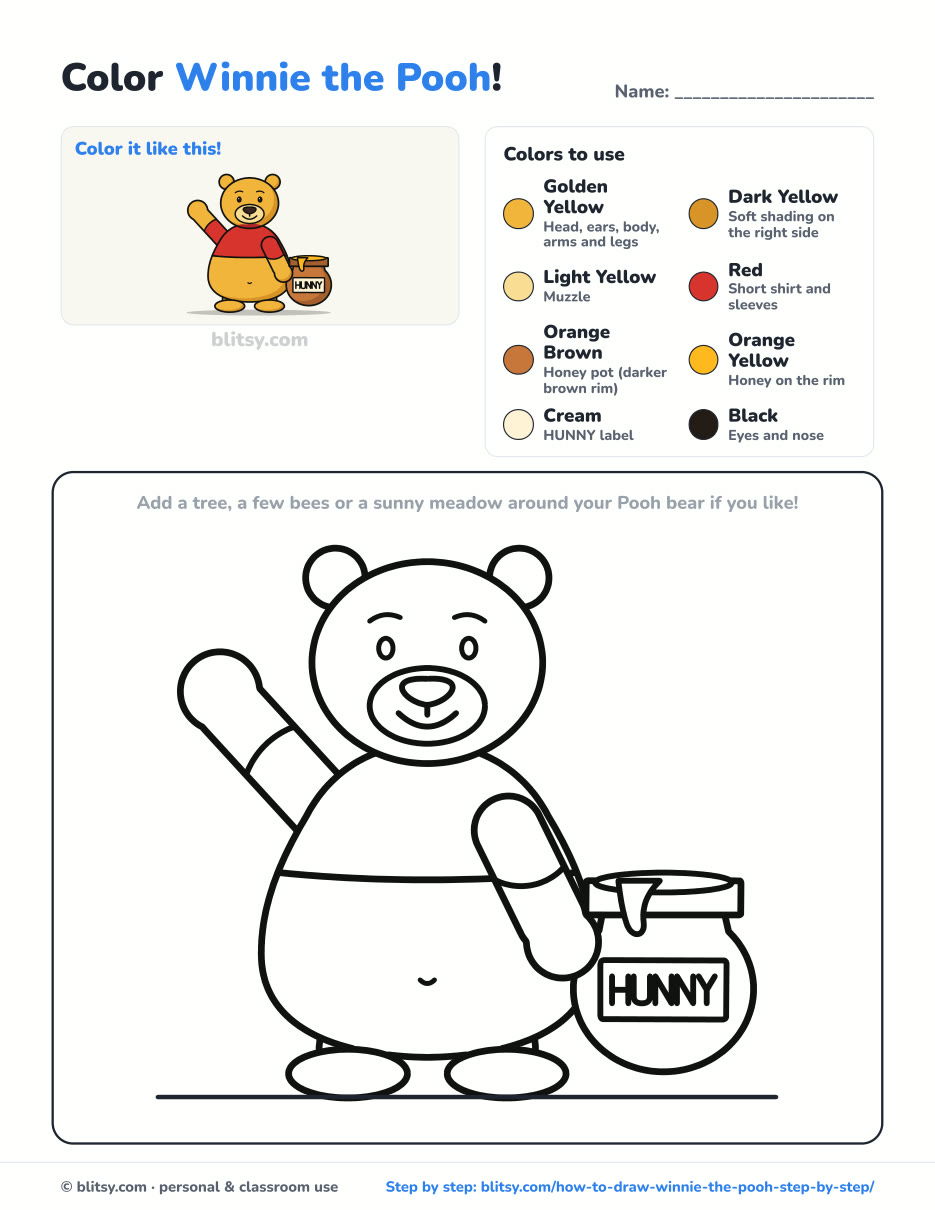
Black outlines with a colored example and the color names at the top. Ready to print and color.
⬇️ Download Coloring PageEvery step picture with its instructions and tips, to keep beside your paper while you draw.
⬇️ Download Drawing Guide📱 On a phone? Tap a download button, then open the file and choose Share → Save to Files or Print. On a computer, the PDF opens or saves straight to your Downloads folder.
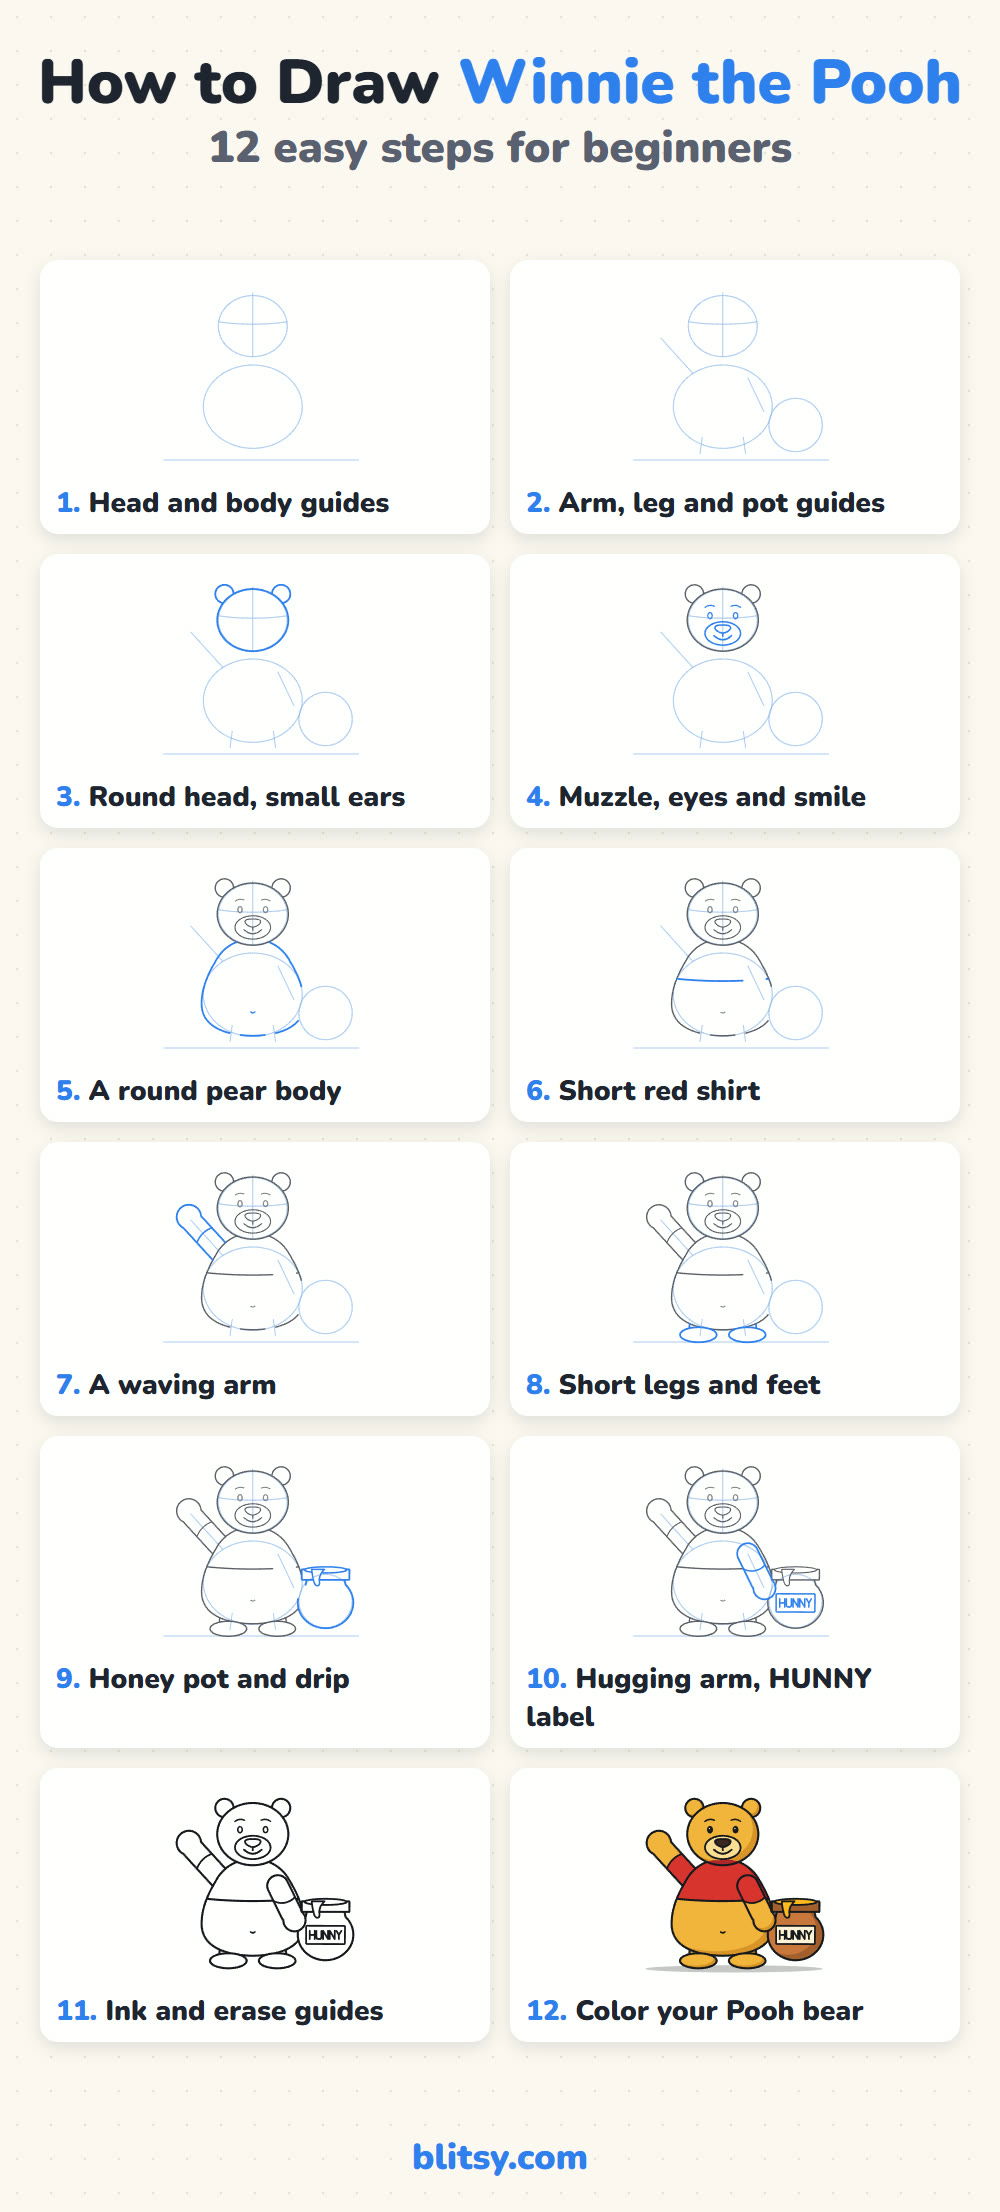
Keep the Pooh Steps on One Pin
More Bears and Buzzing Friends to Draw
Each lesson below is a full step-by-step tutorial with one picture per step, so the same easy method carries over.
- Bear Drawing: A brown bear walking through the grass, head low and hump high, in this how to draw a bear step by step guide.
- Care Bear Drawing: A pink bear with open arms and a rainbow on its tummy in this Care Bear drawing tutorial.
- Polar Bear Drawing: Draw a white polar bear standing on the ice with this polar bear drawing lesson.
- Bee Drawing: A friendly striped bee, the perfect buddy for Pooh, in this bee drawing step by step guide.
- Bunny Drawing: Long ears and a fluffy tail make a sweet rabbit in this bunny drawing tutorial.
Pooh Drawing Questions from Parents and Kids
How do you draw Winnie the Pooh easy for kids?
Start with two circles, a small one for the head and a big oval for the body. Add tiny round ears, a muzzle with a smile, and a line across the middle of the body for his short shirt. The arms, legs and honey pot can be added one at a time.
What colors do you need to draw Winnie the Pooh?
Golden yellow for his fur, light yellow for the muzzle, red for the shirt, black for the eyes and nose, plus orange brown and cream if you draw the honey pot.
Why is HUNNY spelled that way on Pooh's honey pot?
In the stories, the label is spelled the way a young child might write it. Keeping that spelling on your pot is part of what makes the drawing feel right.
How long does it take to draw Winnie the Pooh?
Most beginners need about 30 to 35 minutes, coloring included. The honey pot and the lettering take the most care.
Find a sunny spot, sharpen your pencil, and give Pooh his pot of HUNNY. 🍯✏️
Related posts:
 How to Draw a Car Step by Step (Easy Drawing for Beginners)
 How to Draw a Whale Step by Step (Easy for Beginners)
 How to Draw an Arctic Fox Step by Step (Easy for Beginners)
 How to Draw a Shark Step by Step (Easy for Beginners)
 How to Draw a Chicken Step by Step (Easy for Beginners)
 How to Draw a Snowman Step by Step (Easy for Beginners)
 How to Draw an Airplane Step by Step (Easy Jet for Beginners)
 How to Draw a Mouse Step by Step (Easy for Beginners)
 How to Draw a T-Rex Step by Step (Easy for Beginners)
 How to Draw a Pig Step by Step (Easy for Beginners)
 How to Draw a Minion Step by Step (Easy for Beginners)
 How to Draw a Yorkie Step by Step (Easy for Beginners)

