
Giraffes look tricky because they're so tall, yet the whole animal is just a small oval body, one long tube for the neck and four sticks for legs. Get those parts in the right place and the patches are pure fun. This lesson shows you how to draw a giraffe step by step, from a light oval and two little head circles to a smiling giraffe standing in the grass.
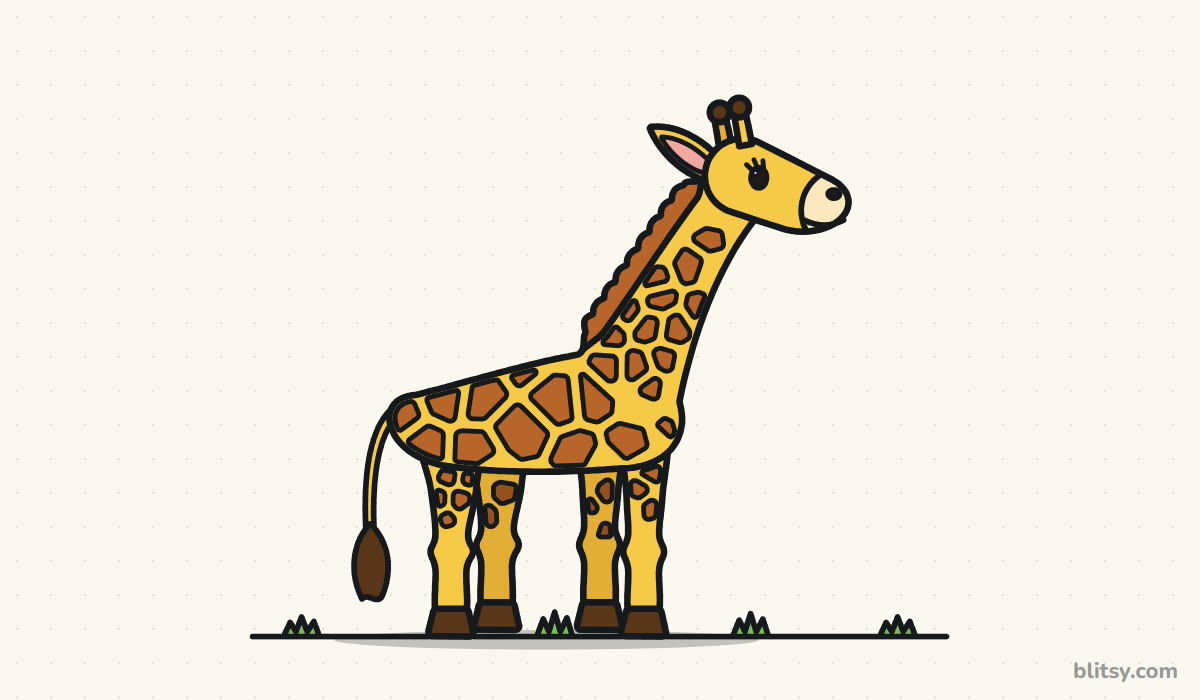
Blue marks what a step adds; gray is the work you already did. Copy the blue, compare, then go on.
Quick overview
⏱️ Time: about 30 to 40 minutes including coloring
🎯 Level: easy, fine for kids from about 6 or 7
✏️ Steps: 12
🦒 You'll draw: a standing giraffe seen from the side
Supplies for a Tall Giraffe Sketch
- A pencil you can press lightly with (HB works well)
- A soft eraser
- A black marker or fineliner for the final outline
- Colored pencils or crayons in yellow, golden yellow, two browns, cream, pink plus green
- A sheet of plain white paper, held upright or sideways
Leave some room at the top of the page, because the head sits much higher than you expect.
How to Draw a Giraffe Step by Step
Step 1: Draw a body oval and two head circles
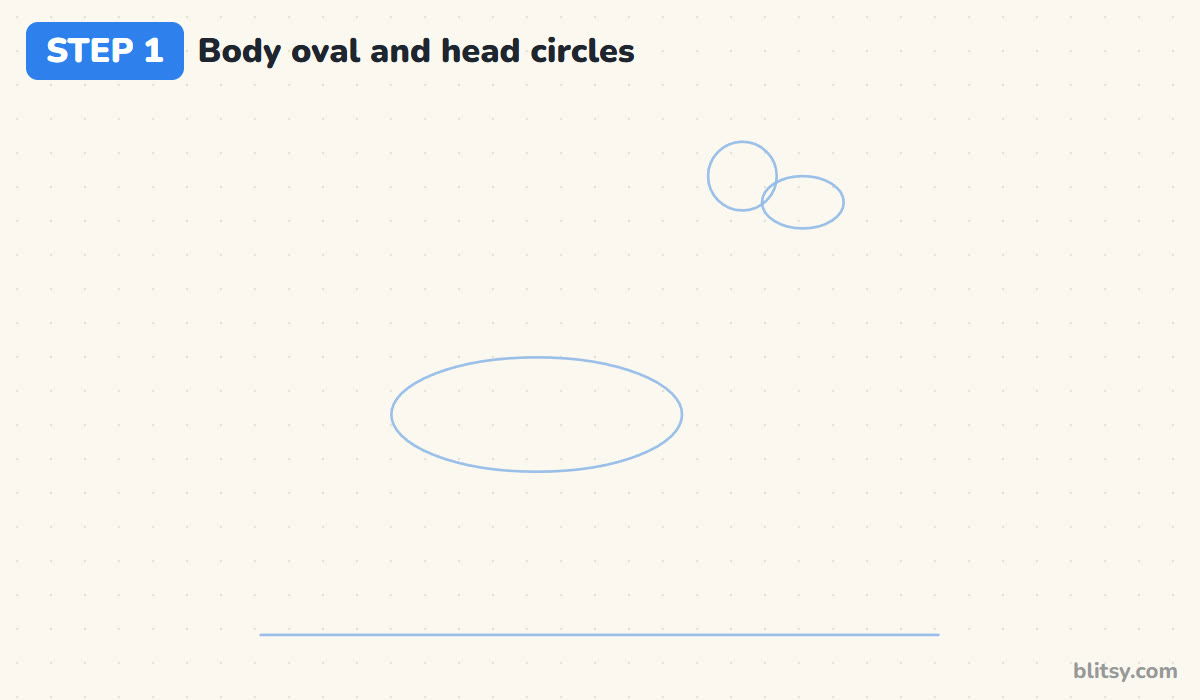
Put a light ground line near the bottom of the page. Above it, about a third of the way up, draw a flat oval for the body, on the left side of the paper. Now go high and to the right: a small circle for the back of the head and a smaller oval just in front of it for the nose.
💡 Tip: The head circles should sit well above the body, roughly as high above the oval as the oval is above the ground.
Step 2: Sketch neck and leg lines plus a tail
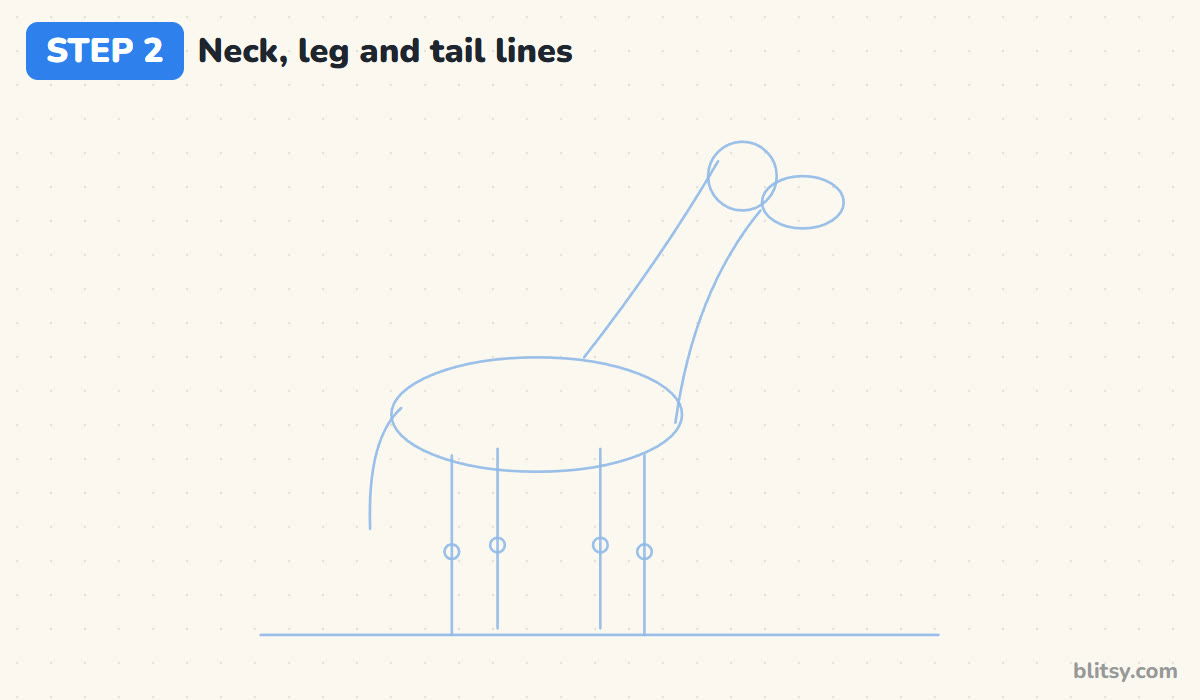
Join the body to the head with two lines. One leaves the top of the oval near its middle, the other leaves the front of the oval lower down, and both meet the head circle. Drop four straight lines to the ground for the legs, two near each end, with a little circle on each for the knee. A short curve at the back becomes the tail.
💡 Tip: Put all four knee circles at about the same height. Uneven knees make the giraffe look like it's limping.
Step 3: Outline the body and the long neck
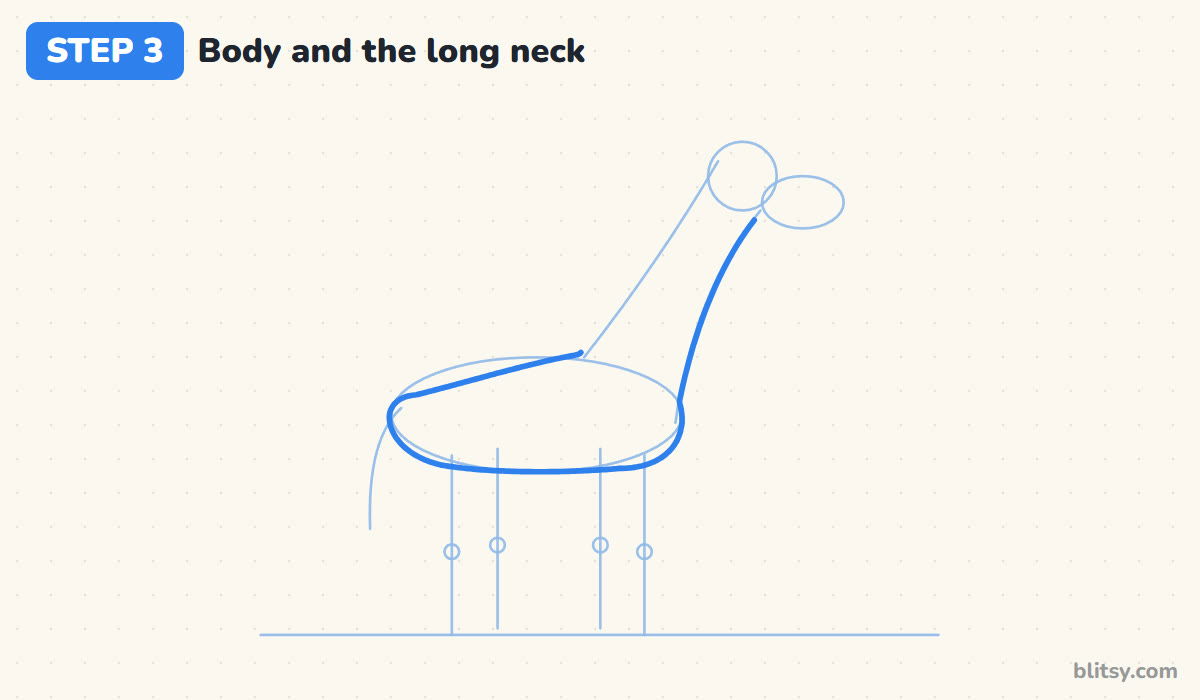
Trace the real outline now. Start at the back of the body, run along the top, which slopes up toward the shoulders, and keep going up the neck to the head. Then come back down the front of the neck and around the round belly. The neck should be wide where it meets the chest and get thinner near the head.
💡 Tip: I always let the back slope downhill toward the tail. A flat, level back is the fastest way to make a giraffe look like a horse.




Step 4: Draw the small head and muzzle
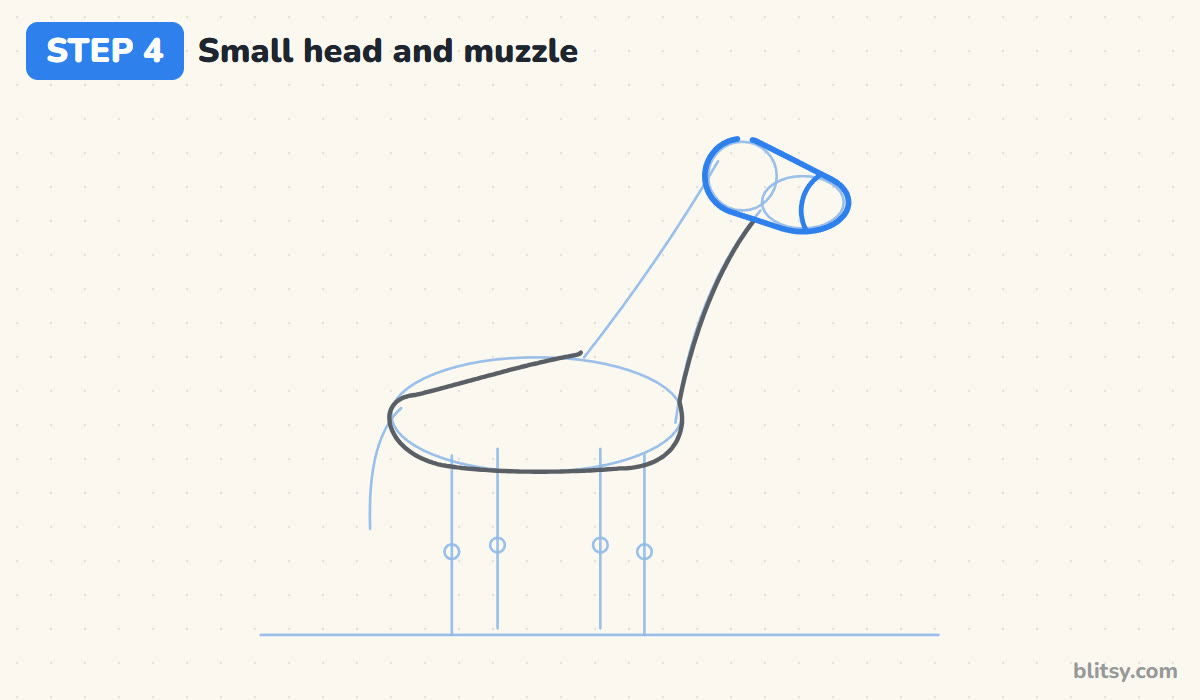
Wrap one smooth line around both head circles so they become a single head shaped a bit like a light bulb lying on its side. Near the front, draw a curved line across the snout to mark off the muzzle. I keep the head small, because giraffes really do have little heads on all that neck.
💡 Tip: Make the snout end round, not pointed, so the face stays gentle.
Step 5: Add two horns and an ear
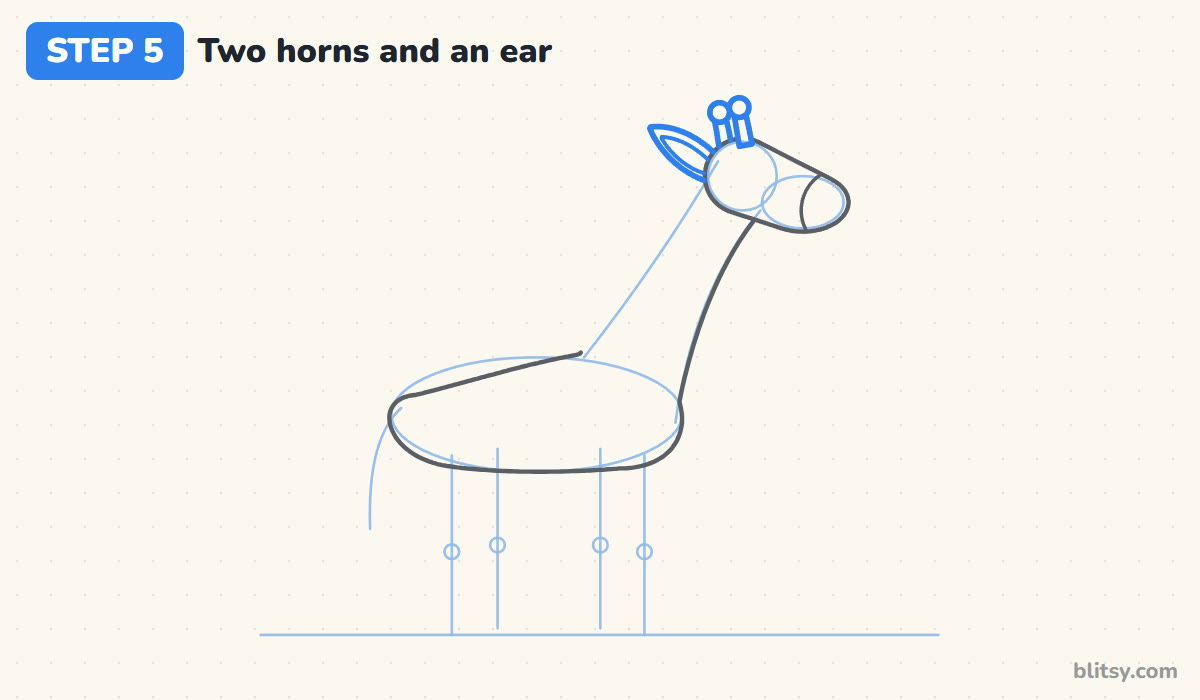
On top of the head, draw two short stubby rods side by side, each with a round ball on top. These are the ossicones, the giraffe's soft horns. The one in back sits slightly lower and to the left. Behind them, add a leaf-shaped ear that points backward, with a smaller leaf inside it.
💡 Tip: Keep the horns short. If they're taller than the head is deep, they start to look like antennae.
Step 6: Draw a short mane and the tail
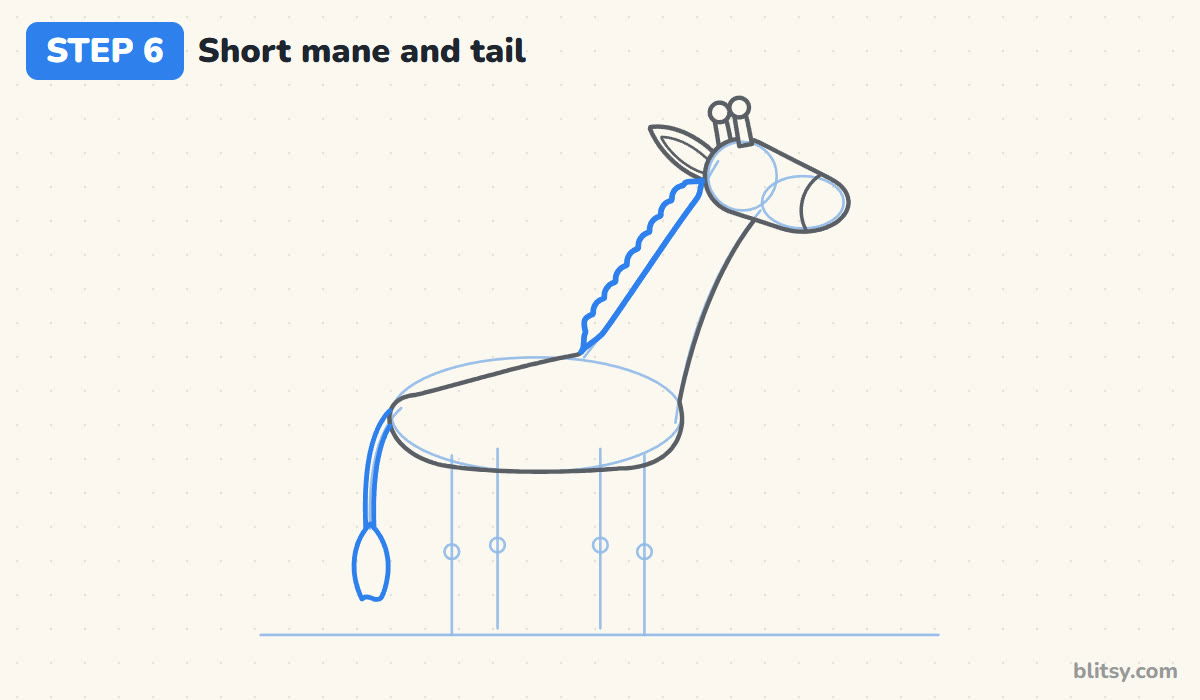
Along the back of the neck, from just behind the ear down to the shoulders, draw a narrow strip with a bumpy top edge. That's the short, stiff mane. For the tail, follow the guide with two thin lines close together, then finish it with a long teardrop for the hairy tuft.
💡 Tip: Draw the mane bumps small and close together, like the teeth of a comb.
Step 7: Add four long legs and the grass
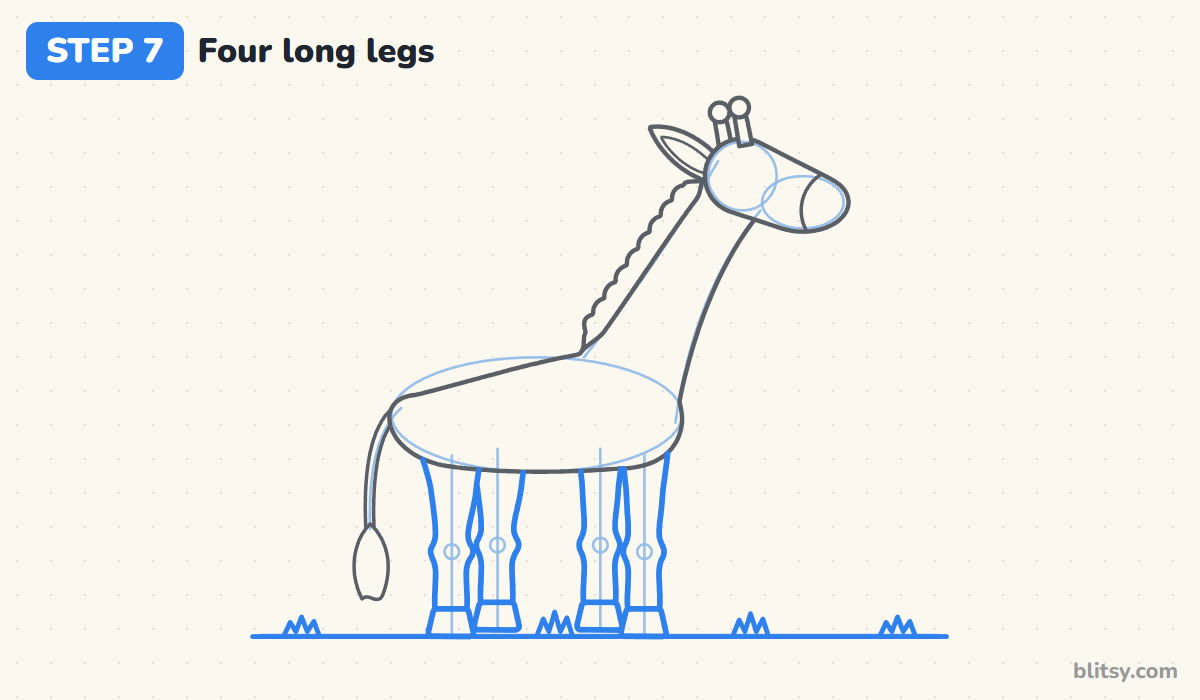
Build each leg around its guide line: two long, slightly wavy sides that bulge a little at the knee circle, ending in a small boxy hoof. Draw the two near legs first, then the two far legs just behind them. Run a ground line under the hooves and add a few spiky tufts of grass.
💡 Tip: The legs should be about as long as the body is wide. Short legs turn your giraffe into a llama.


Step 8: Give it an eye, a nostril and a smile
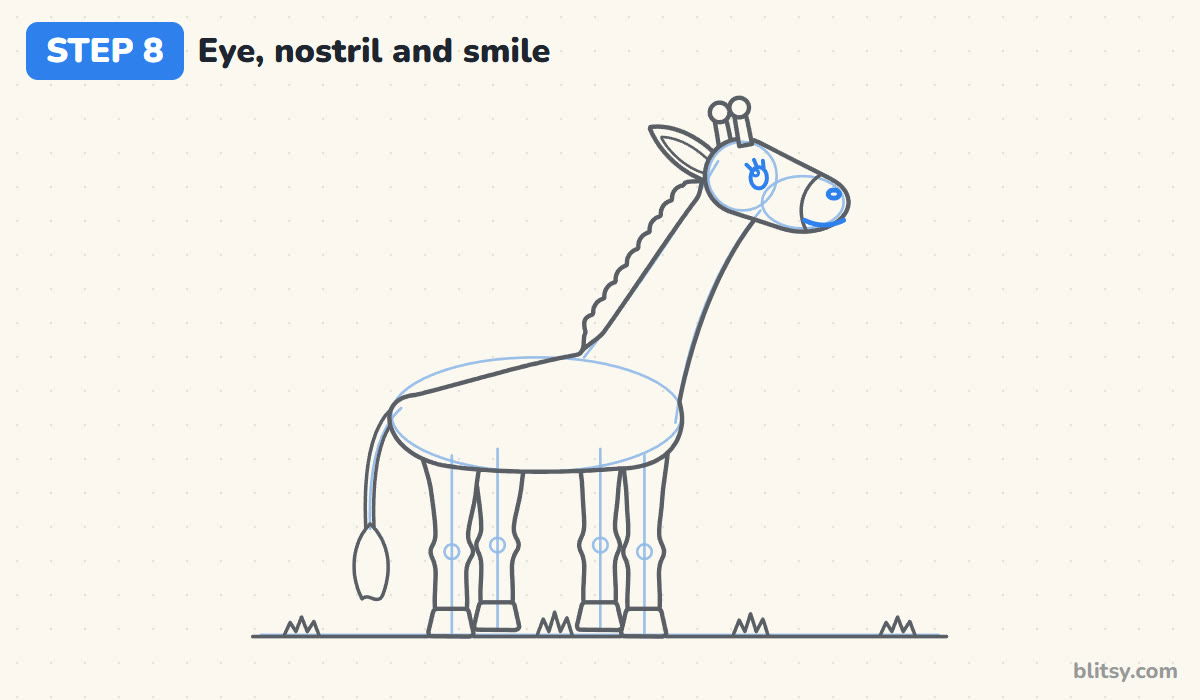
Place an oval eye in the upper middle of the head, closer to the back than to the nose. Leave a tiny white circle in it for shine and add three short lashes on top. On the muzzle, a small oval makes the nostril, and a gentle curve under it makes the smile.
💡 Tip: A slightly bigger eye with lashes is what makes this giraffe look friendly rather than sleepy.
Step 9: Draw patches on the neck
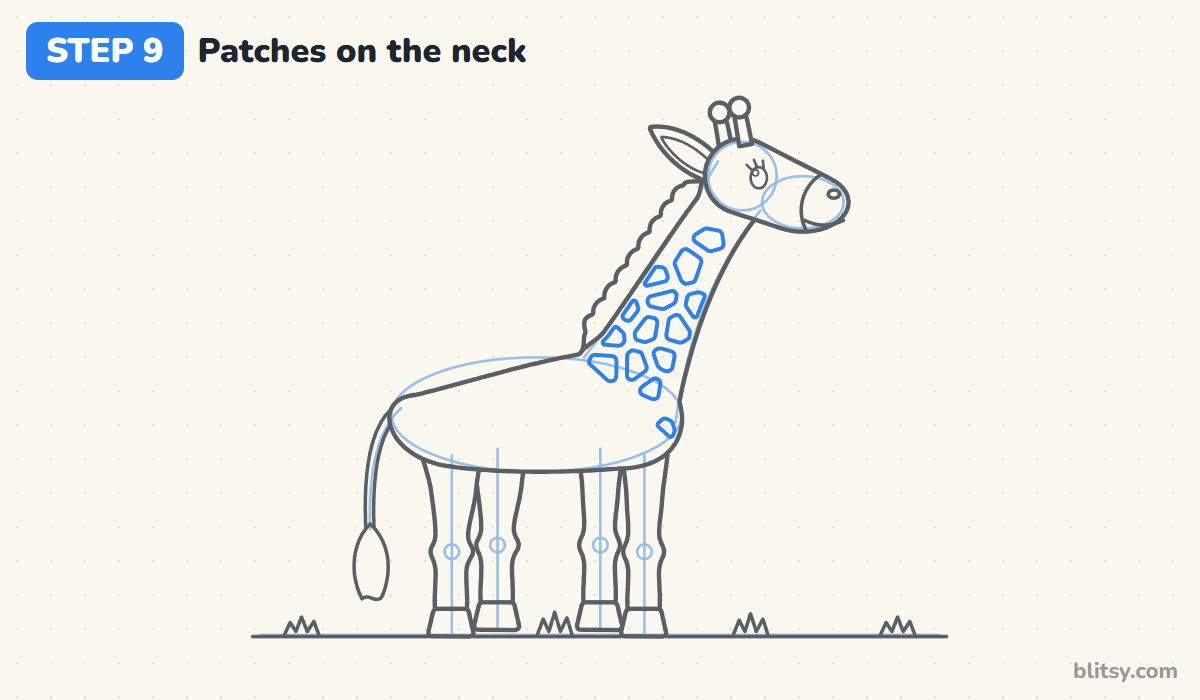
Fill the neck with small rounded shapes that look a bit like cracked pebbles. Leave an even gap of yellow between them, a little narrower than the patches themselves. I draw the smallest patches near the head and let them grow as I move down toward the shoulders.
💡 Tip: Avoid perfect circles or squares. Patches with four to six soft corners look most like a real giraffe coat.
Step 10: Add patches on the body and legs
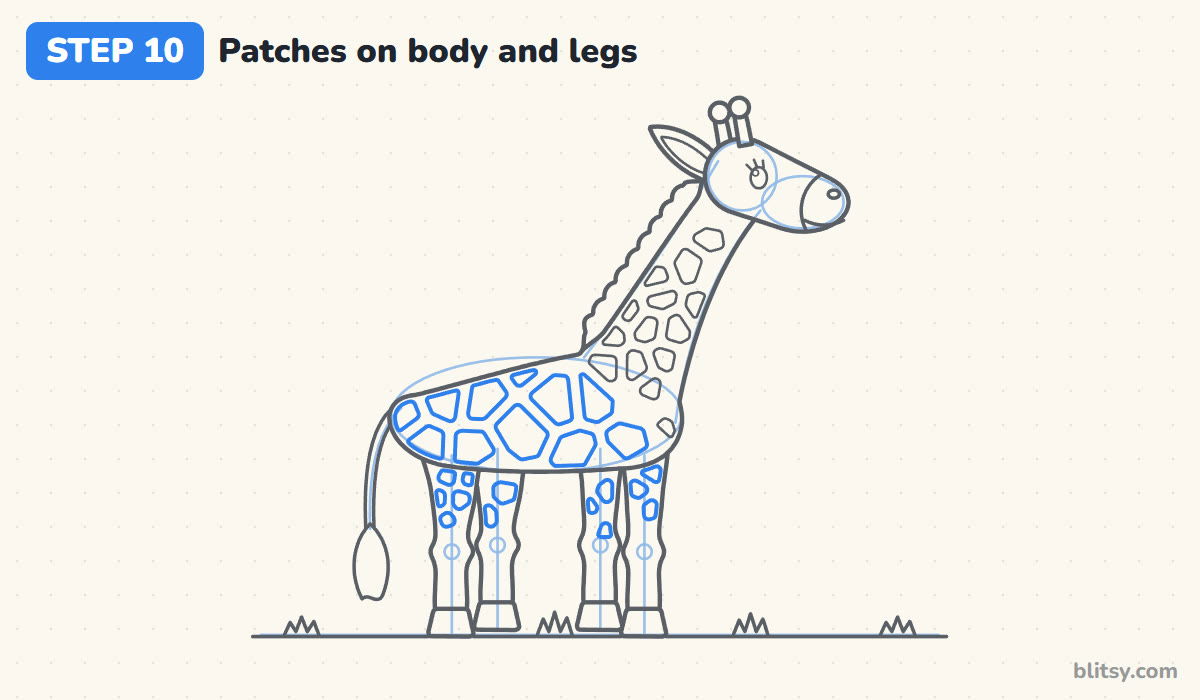
Carry the same pattern onto the body, with bigger patches this time since there's more room. Then add a few small patches to the top half of each leg. Below the knees, giraffe legs are usually plain and light, so I leave that part empty.
💡 Tip: Keep every patch a little away from the outline. That way you won't have to squeeze color into thin slivers later.
Step 11: Ink the giraffe and erase the guides
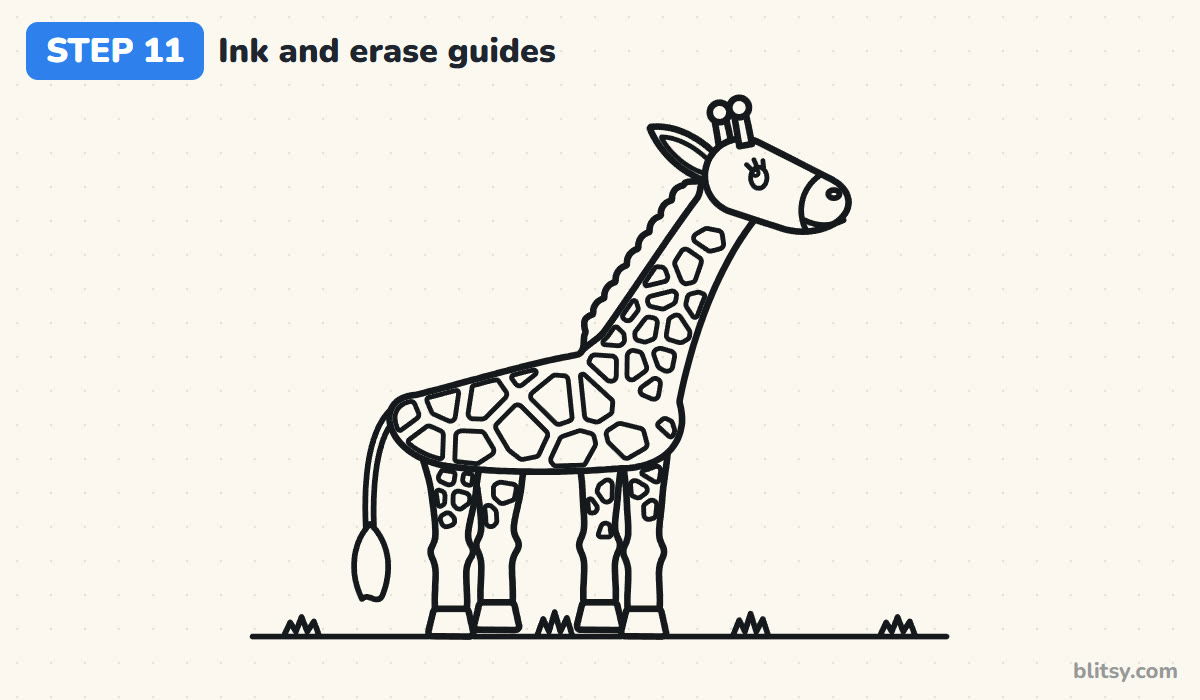
Go over all the keeper lines with your marker: the outline and mane, the horns and ear, the face, then every patch. Skip the oval, the head circles and the straight leg lines. When the ink is dry, erase the pencil until only the clean drawing is left.
💡 Tip: Ink the patches last. They're the most lines, and your hand will be warmed up by then.


Step 12: Color your giraffe
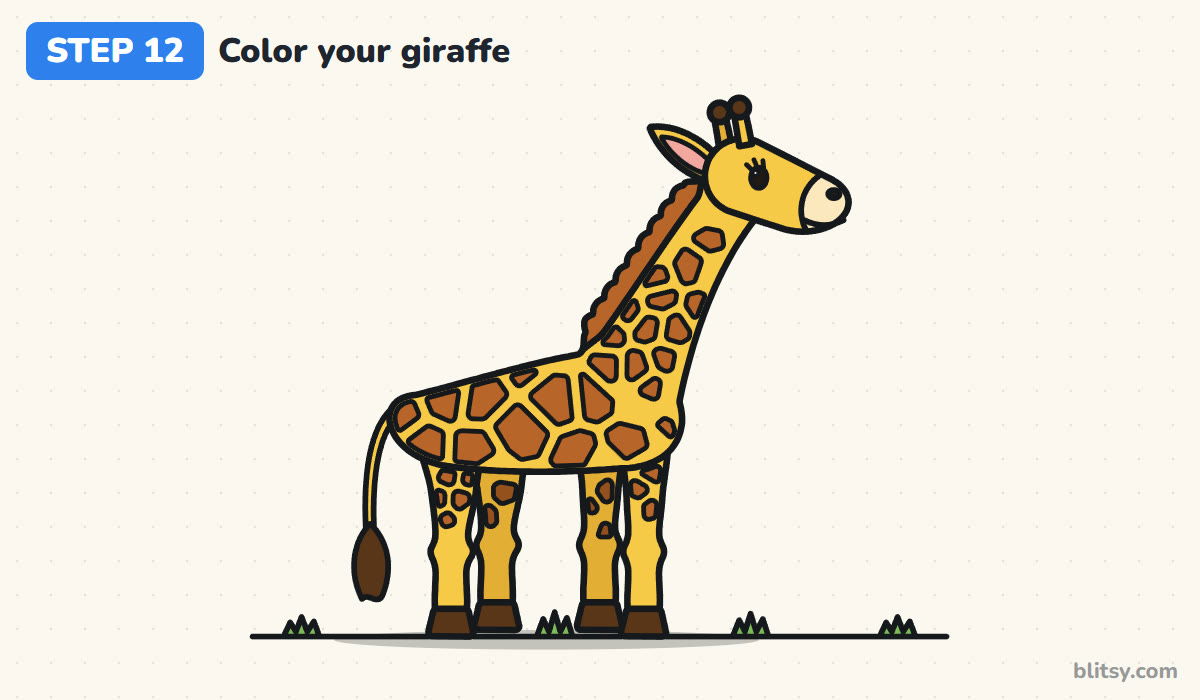
Color the whole giraffe a warm yellow, from the head down the neck to the tail, plus the two near legs. A slightly deeper golden yellow on the two far legs pushes them back. The patches and mane are brown. Dark brown goes on the horn tips and hooves, plus the tail tuft. Finish with cream on the muzzle, pink inside the ear and green grass.
💡 Tip: Color the yellow first and the brown patches second, so any brown that slips over the edge just looks like part of the pattern.
Where Giraffe Drawings Start Looking Like Horses
- A short neck. If the head ends up only a little above the back, stretch the neck until the head sits roughly as high above the body as the body sits above the ground.
- A big, heavy head. A giraffe's head is small for its size. Keep it about as long as the body is tall.
- Legs that are too short. Long legs are half of what makes a giraffe. Measure them against the body width.
- Spots instead of patches. Round dots look like a leopard or a cow. Use bigger blocky shapes with thin yellow gaps in between.
- Forgetting the horns. Those two little rods with round tips tell everyone it's a giraffe, even before you add color.
Spinning Off Your Own Giraffe Ideas
The body here is close to a horse with stretched legs and a much longer neck, so it's worth comparing the two in my horse drawing tutorial. I like to bend the neck down so the giraffe nibbles grass, or add a tiny baby giraffe beside it. Younger kids can skip the leg patches and the mane bumps and it still reads clearly as a giraffe. For a ready-made picture to color afterward, browse these free giraffe coloring pages, and for another big savanna animal try the elephant drawing step by step lesson.
Free Giraffe Coloring Page and Printable Drawing Guide
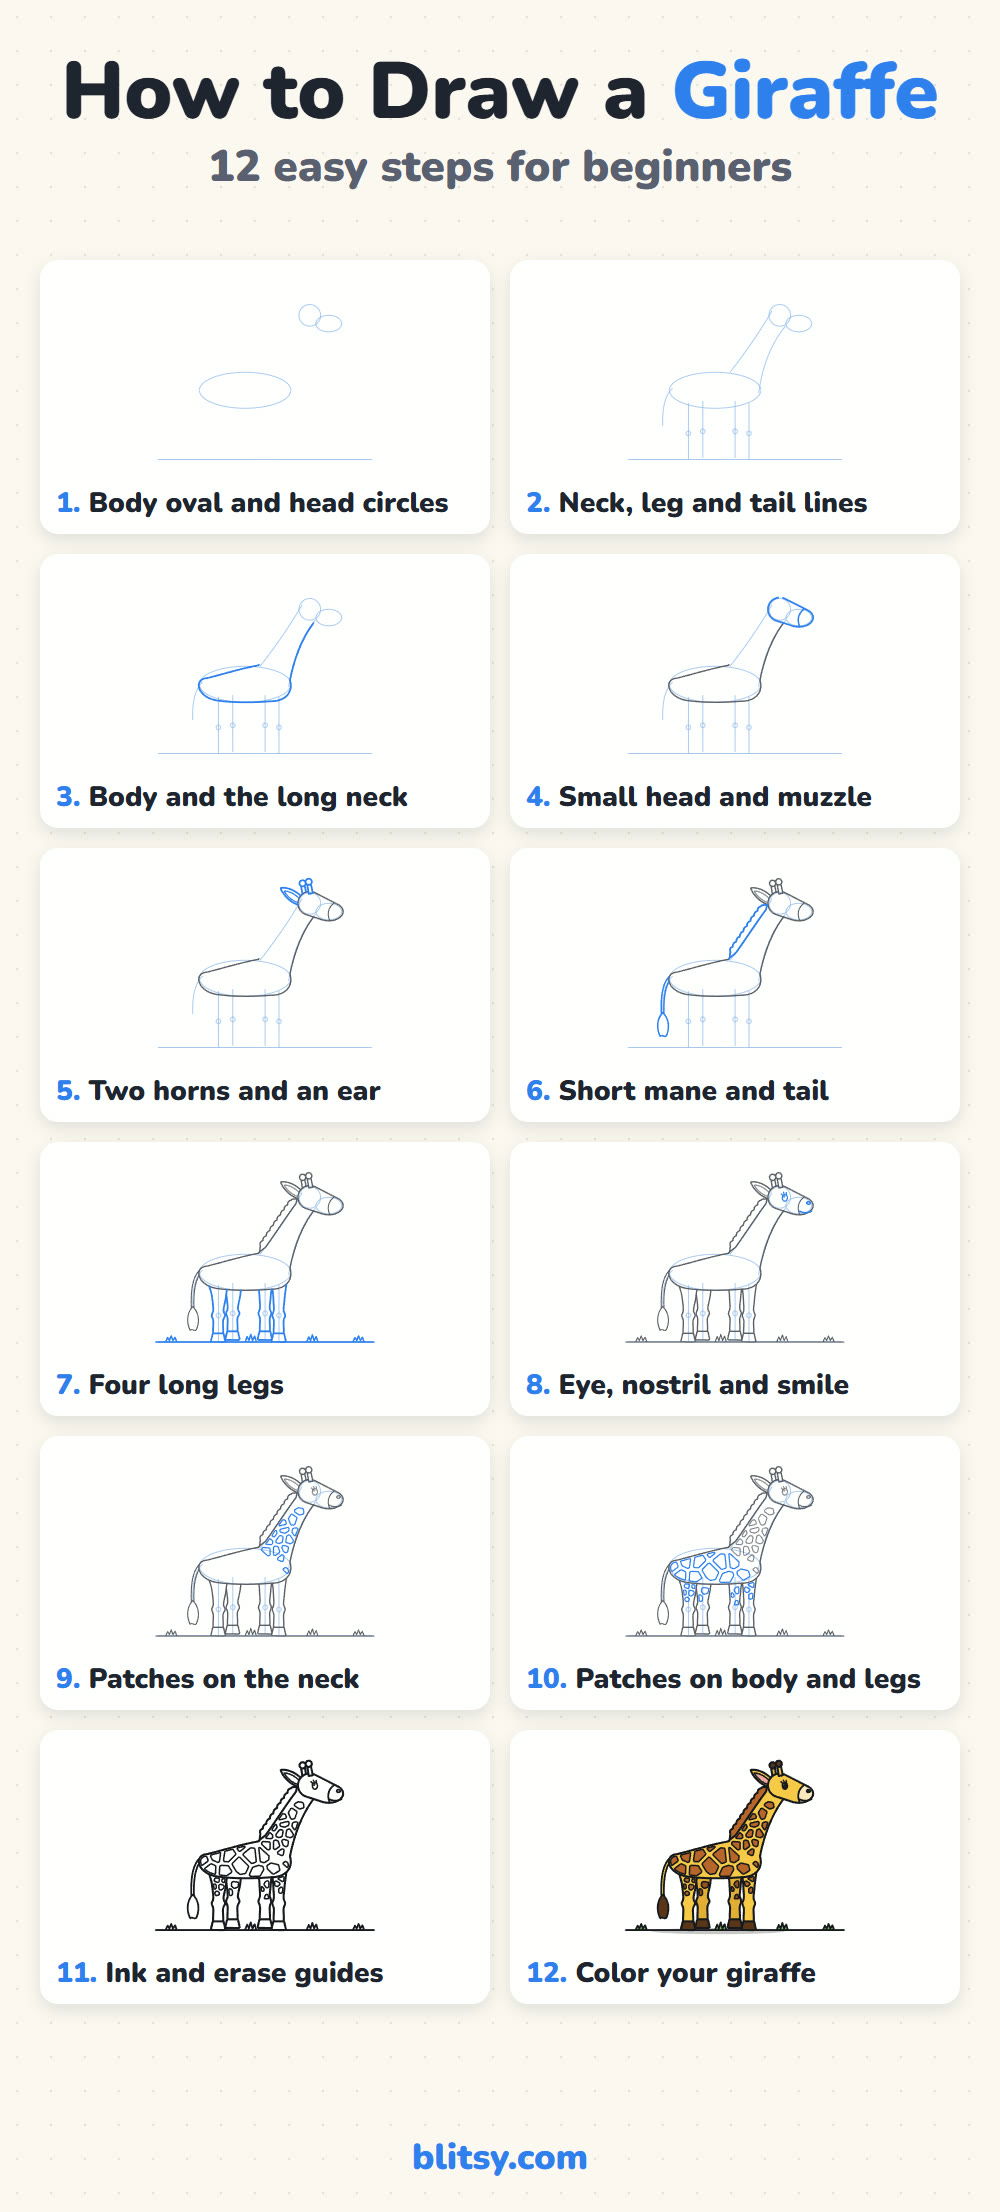
The free giraffe coloring page has a colored giraffe at the top to copy from, a small key that matches each color to a body part, and a large outline below for coloring. The step-by-step PDF guide includes all 12 steps with pictures and tips, so you can draw without a screen. Both fit on Letter or A4 paper.
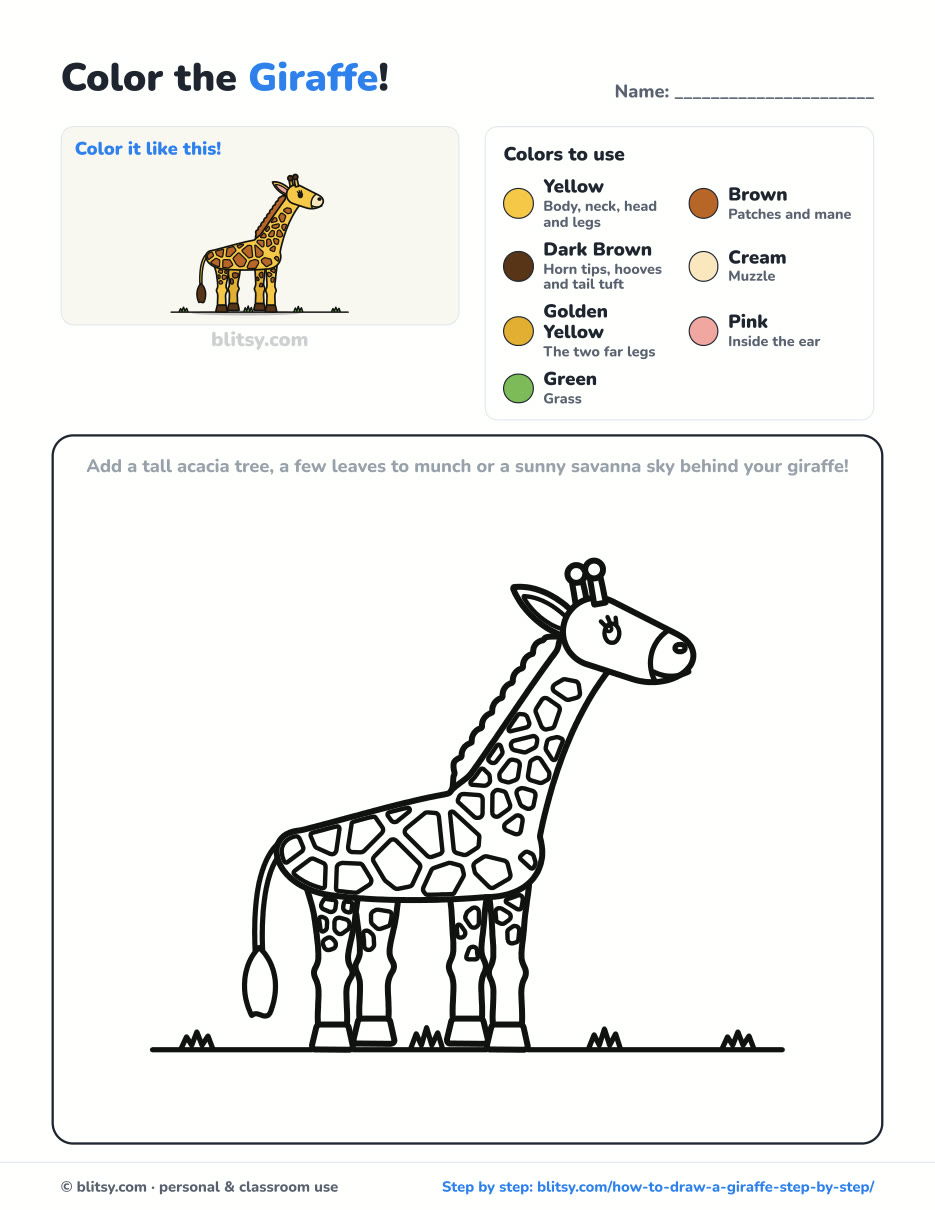
Black outlines with a colored example and the color names at the top. Ready to print and color.
⬇️ Download Coloring PageEvery step picture with its instructions and tips, to keep beside your paper while you draw.
⬇️ Download Drawing Guide📱 On a phone? Tap a download button, then open the file and choose Share → Save to Files or Print. On a computer, the PDF opens or saves straight to your Downloads folder.
Pin Every Giraffe Step for Later
More Wild Animals to Draw After Your Giraffe
Each of these is a full lesson with one picture per stage, so the same simple-shapes method carries over.
- Lion Drawing: A friendly sitting lion with a big scalloped mane and a tufted tail in this how to draw a lion step by step lesson.
- Leopard Drawing: Practice rosette spots instead of patches with this leopard drawing tutorial.
- Tiger Drawing: Bold black stripes on an orange big cat in this tiger drawing step by step guide.
- Cow Drawing: Another four-legged animal with patches, this time in black and white, in the how to draw a cow tutorial.
- Bear Drawing: A brown bear walking through the grass, head low and hump high, in this bear drawing tutorial.
Giraffe Drawing Questions Kids Often Ask
What is the easiest way to draw a giraffe?
Start with a flat oval for the body and a small circle up high for the head. Connect them with two neck lines, add four long legs, then the horns, the face and finally the patches.
How do you draw giraffe spots for kids?
Think of cracked pebbles or puzzle pieces. Draw rounded shapes with a few soft corners and leave thin gaps between them. Smaller patches go on the neck, bigger ones on the body.
How long does it take to draw a giraffe?
Most beginners need about 30 to 40 minutes with coloring. The patches take the longest, so younger kids can draw fewer of them.
What colors does a giraffe need?
Yellow for the coat, brown for the patches and mane, and dark brown for the horn tips and hooves. Add cream on the muzzle and a little pink inside the ear.
Your giraffe is only one small oval away, so sharpen that pencil and let it reach for the sky. 🦒✏️
Related posts:
 How to Draw a Car Step by Step (Easy Drawing for Beginners)
 How to Draw a Whale Step by Step (Easy for Beginners)
 How to Draw an Arctic Fox Step by Step (Easy for Beginners)
 How to Draw a Shark Step by Step (Easy for Beginners)
 How to Draw a Chicken Step by Step (Easy for Beginners)
 How to Draw a Fish Step by Step (Easy Goldfish for Beginners)
 How to Draw a Snowman Step by Step (Easy for Beginners)
 How to Draw Hands Step by Step (Easy Palm View for Beginners)
 How to Draw an Airplane Step by Step (Easy Jet for Beginners)
 How to Draw a Mouse Step by Step (Easy for Beginners)
 How to Draw the Joker Step by Step (Easy Chibi for Beginners)
 How to Draw a T-Rex Step by Step (Easy for Beginners)

