
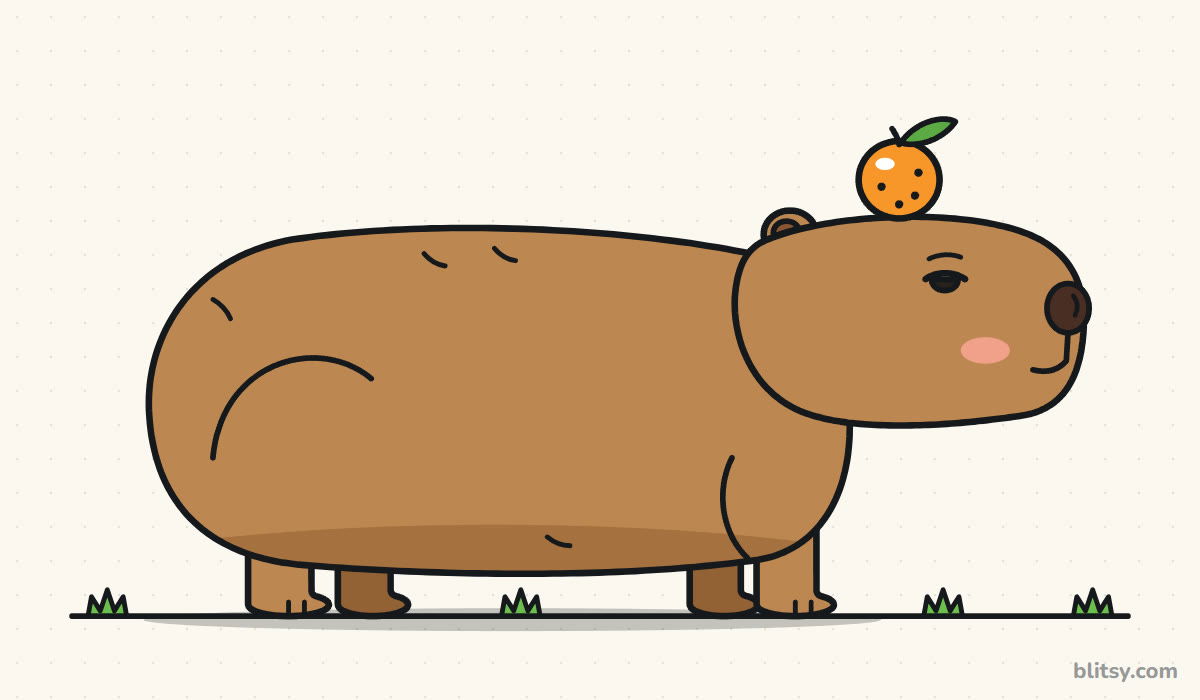
Capybaras look like they have never been in a hurry in their lives, and that relaxed mood is exactly what makes them fun to draw. Their shapes are simple, too: a long loaf of a body, a boxy head and tiny legs. In this lesson I'll show you how to draw a capybara step by step, ending with the famous pose where a little orange sits on its head and the capybara doesn't seem to mind at all.
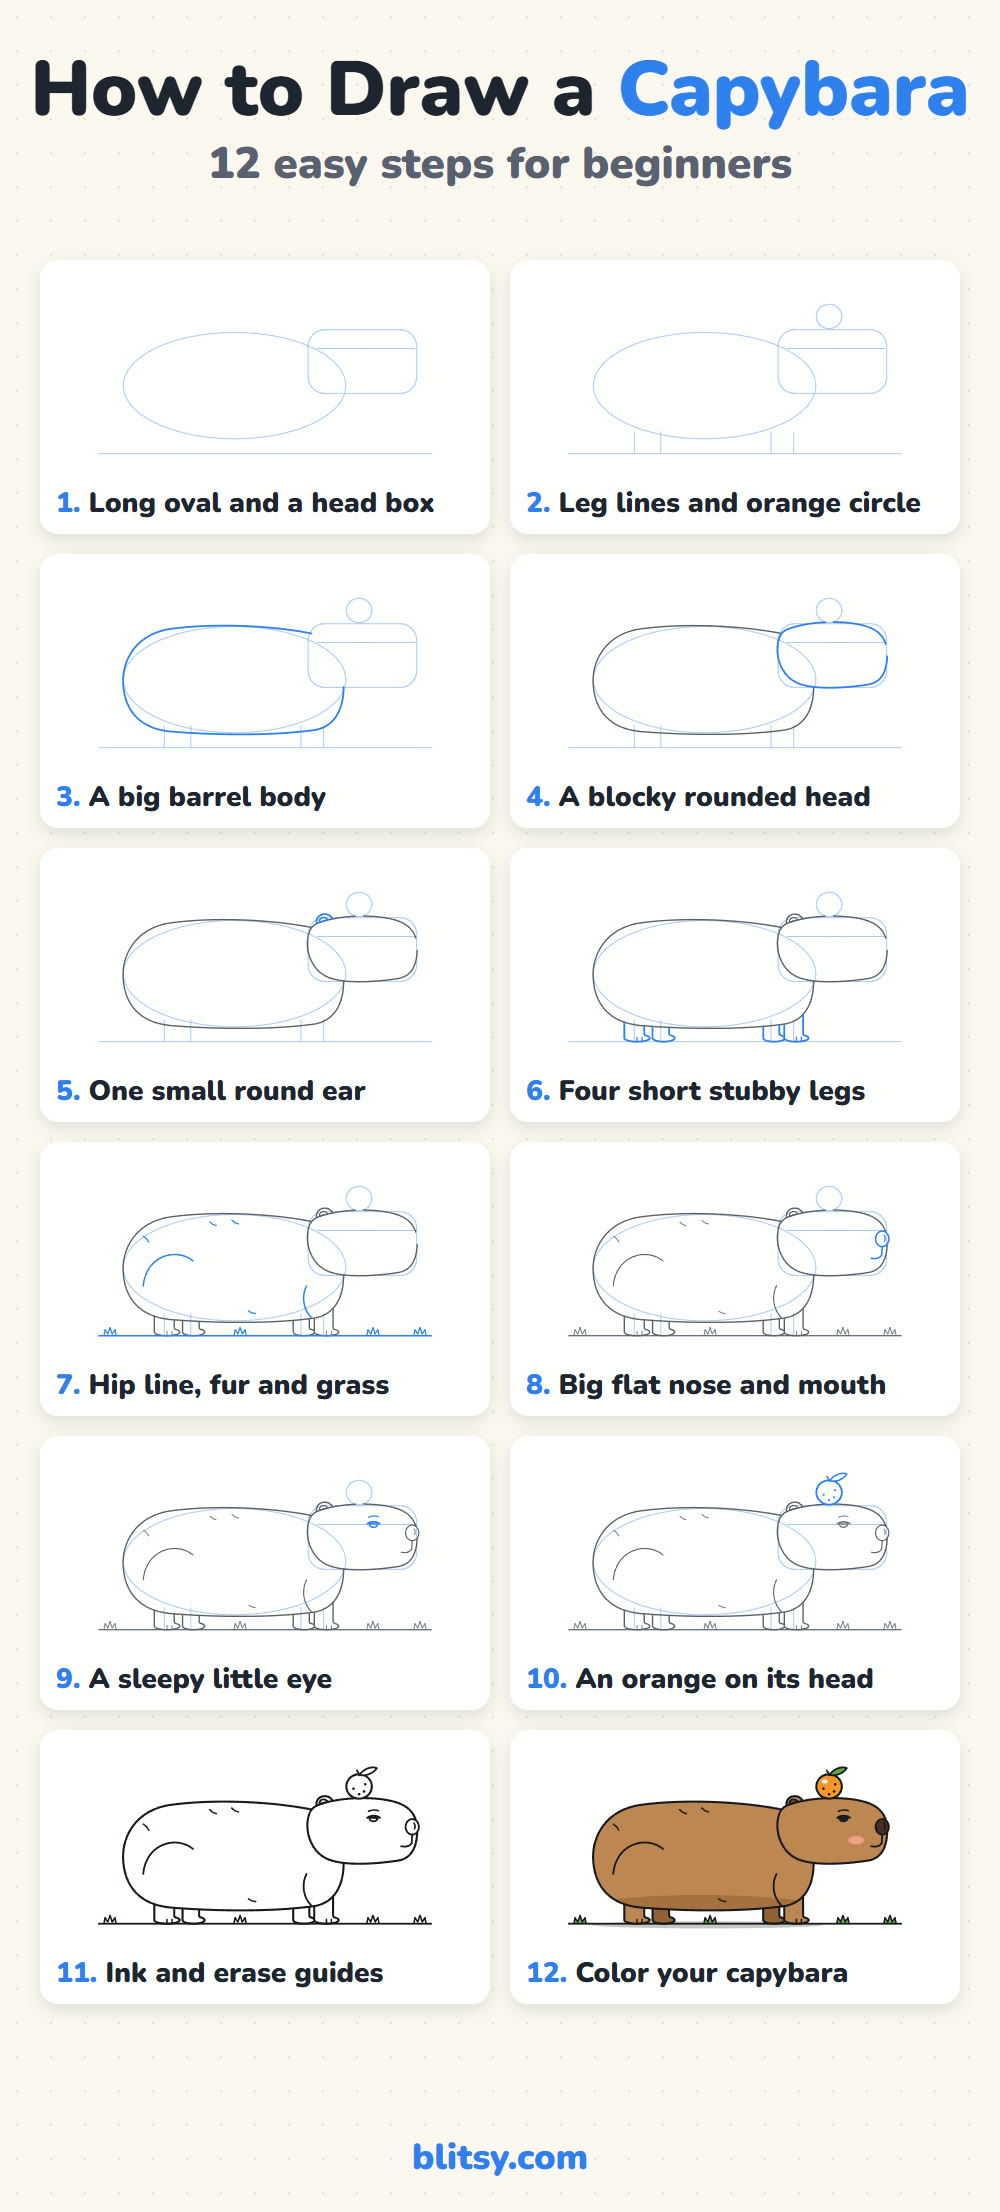
Think of each picture as a little puzzle piece: the blue lines are new, the gray ones you already drew. Copy only the blue before moving on.
Quick overview
⏱️ Time: around 30 minutes, coloring included
🎯 Level: easy, fine for kids from about 6 up
✏️ Steps: 12
🍊 You'll draw: a calm capybara in side view with an orange on its head
Supplies for a Chill Capybara Sketch
- A pencil you can press softly with (HB works well)
- An eraser that doesn't smudge
- A black marker or fineliner for the final outline
- Colored pencils or crayons: light brown, brown, dark brown, orange, green and a little pink
- Plain white paper, turned sideways
A capybara is long and low, so a sideways sheet gives the body room to stretch out.
How to Draw a Capybara Step by Step
Step 1: Sketch a long oval and a head box
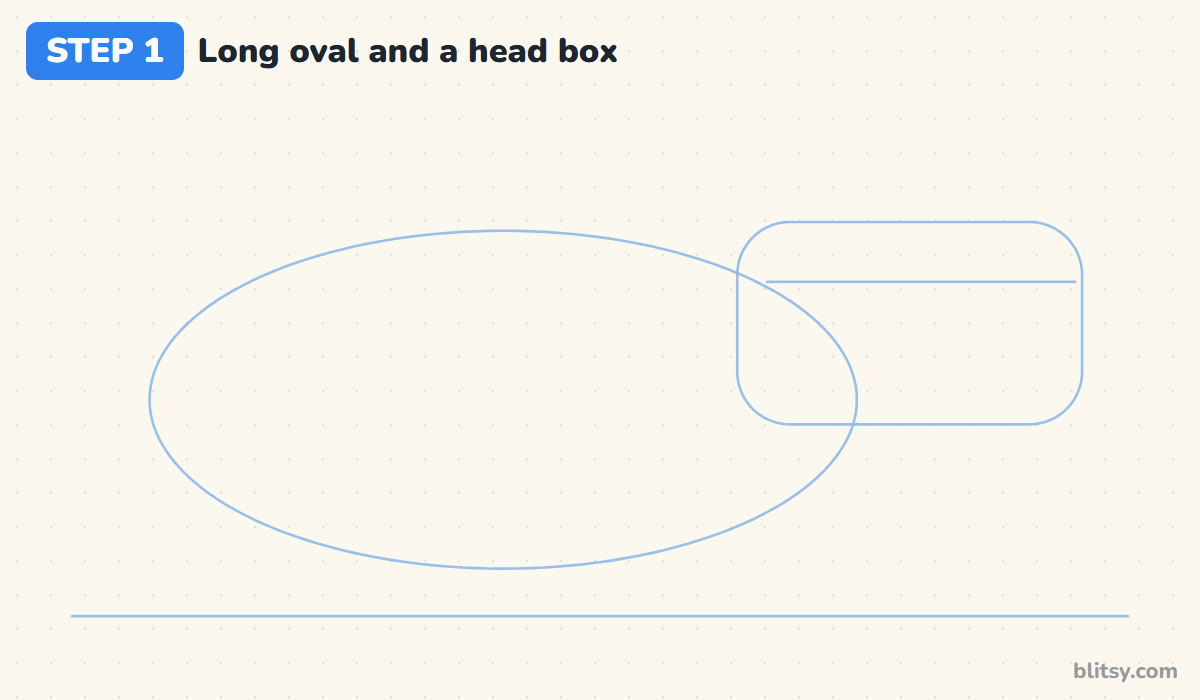
Draw a light ground line near the bottom of the page. Just above it, sketch a long oval that takes up about two thirds of the width; that's the body. On its right end, overlapping the oval a little, draw a rounded box for the head, about half as tall as the body. A straight line across the upper part of the box marks where the eye goes.
💡 Tip: Keep these first shapes faint. They're scaffolding, and you'll erase every one of them.
Step 2: Add four leg lines and a small circle
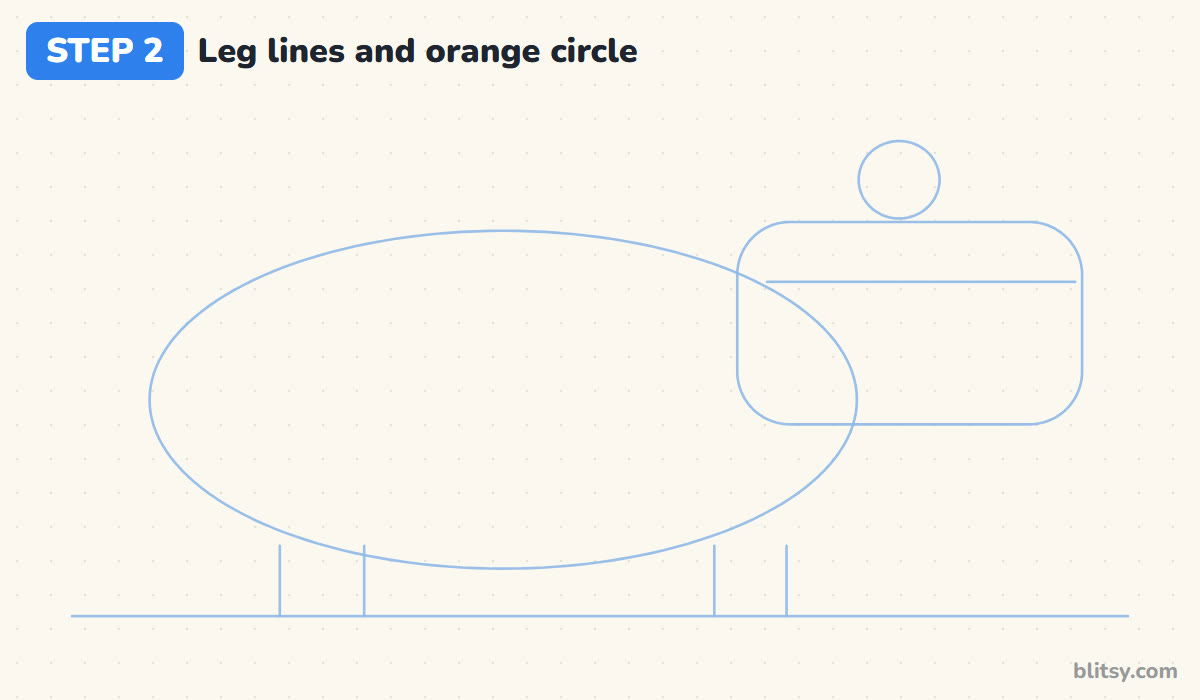
Under the oval, drop four short lines to the ground: two near the back and two near the front. They're only guides for where the legs stand. Then put a small circle right on top of the head box, a bit left of center. That circle becomes the orange later.
💡 Tip: Space the leg pairs well apart. If all four bunch up in the middle, the body looks like it's balancing.
Step 3: Draw the big barrel body
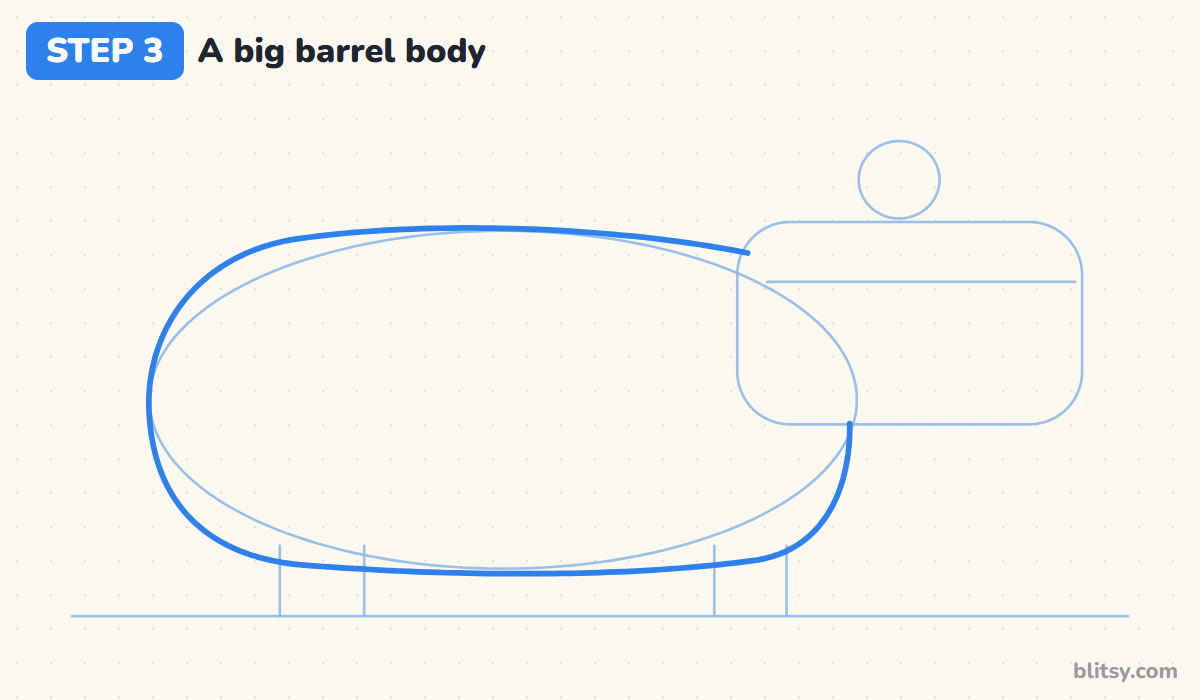
Now trace a firm outline around the body. The back is almost flat, with a slight rise toward a big round rump. Let the belly run low and fairly straight. Stop the line where it meets the head box, because the head sits in front of the body.
💡 Tip: Make the rump higher than the shoulders. That little slope is a very capybara detail.




Step 4: Shape the blocky rounded head
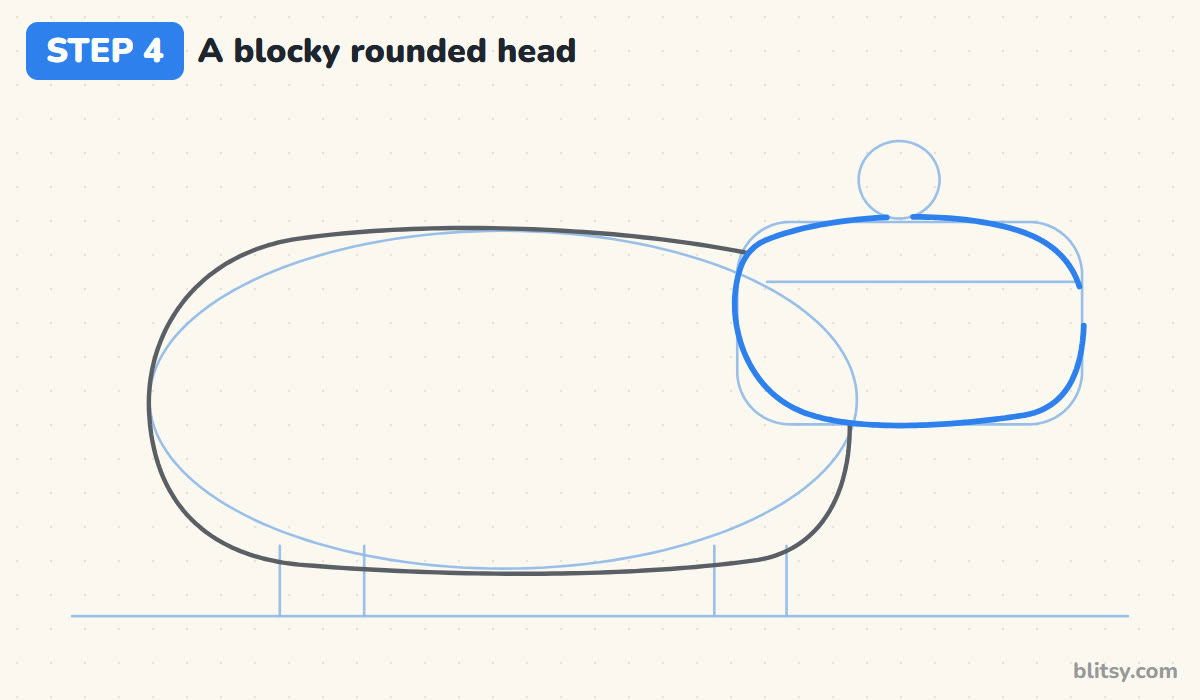
Go around the head box with a solid line, softening every corner. The top stays fairly flat, and the front of the snout is tall and blunt, almost a straight up and down edge. Round off the back of the head where it overlaps the body. I like a slight bulge at the bottom of the cheek, as it gives the face some weight.
💡 Tip: Resist the urge to make a pointy snout. A pointed nose turns it into a rat or a mouse.
Step 5: Add one small round ear
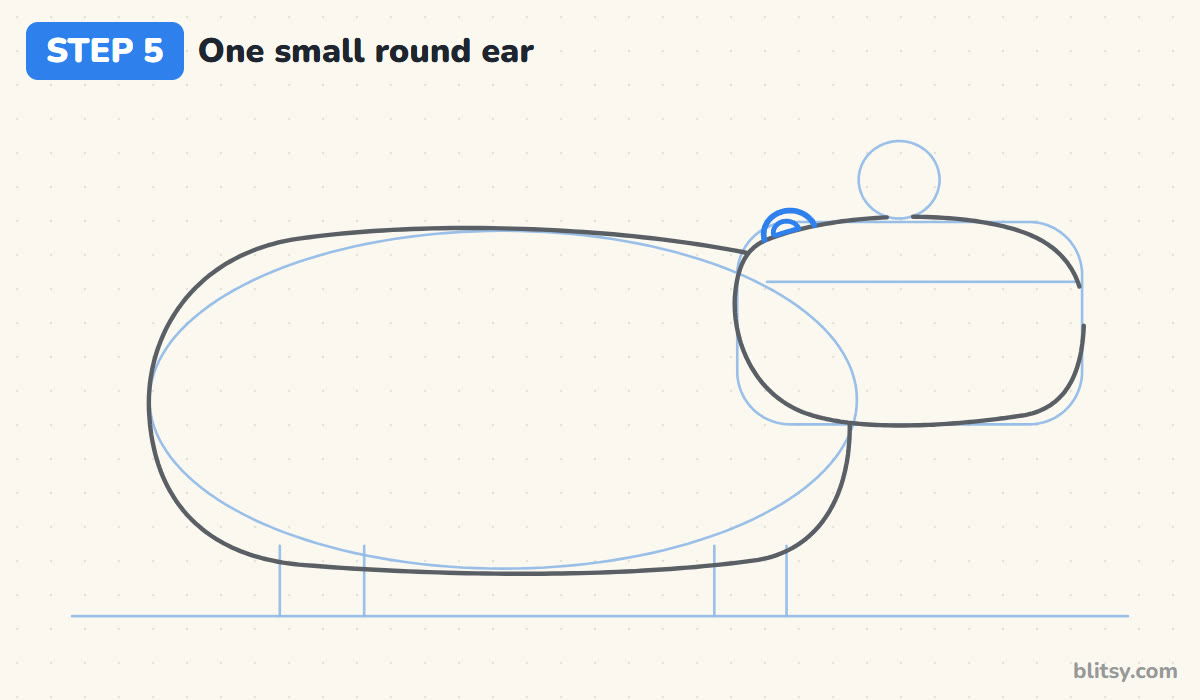
At the top back corner of the head, draw a small round ear that peeks up above the outline. Add a smaller curve inside it. Capybara ears are tiny compared with the head, so keep it about the size of the orange's top half.
💡 Tip: Draw just the part of the ear you can see; the head covers its bottom edge.
Step 6: Draw four short stubby legs
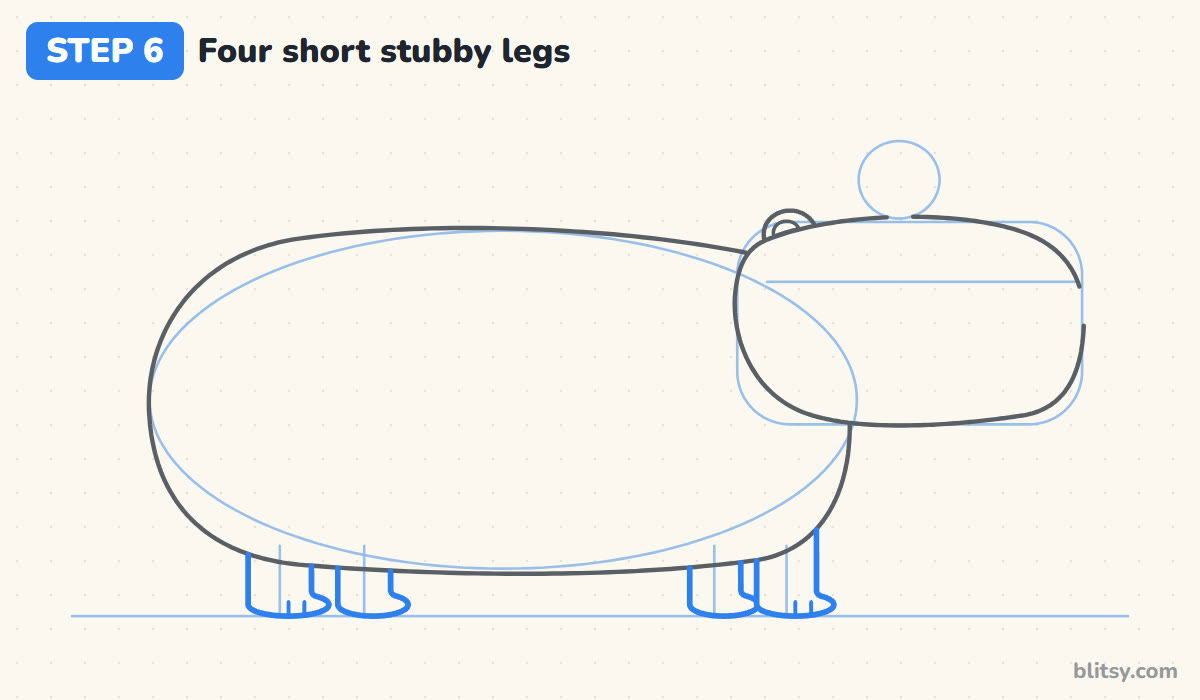
Follow your leg lines down from the belly. Each leg is a short, thick column that ends in a rounded foot pointing forward. Draw the two near legs first, then tuck a far leg just behind each one. Finish with two tiny toe lines on the front of each near foot.
💡 Tip: Only a little of each leg shows under the belly. Short legs are what keep the capybara looking calm and heavy.
Step 7: Add a hip line, fur flicks and grass
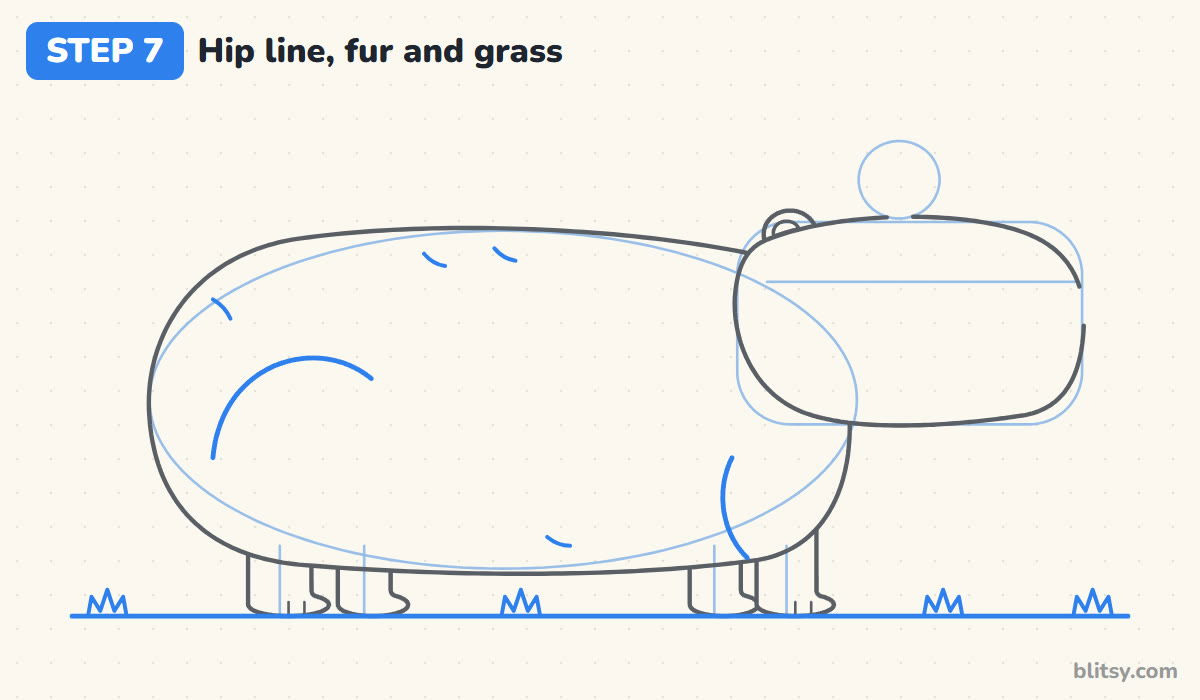
Inside the back of the body, draw one curved line that sweeps up and over toward the rump; it shows the big back leg under the fur. A smaller curve in front of the front leg marks the shoulder. Scatter three or four short flicks on the back and belly for fur. Then go over the ground line and add a few little grass tufts.
💡 Tip: Fewer fur flicks look better than many. Three or four on the whole body is enough.


Step 8: Draw the big flat nose and the mouth
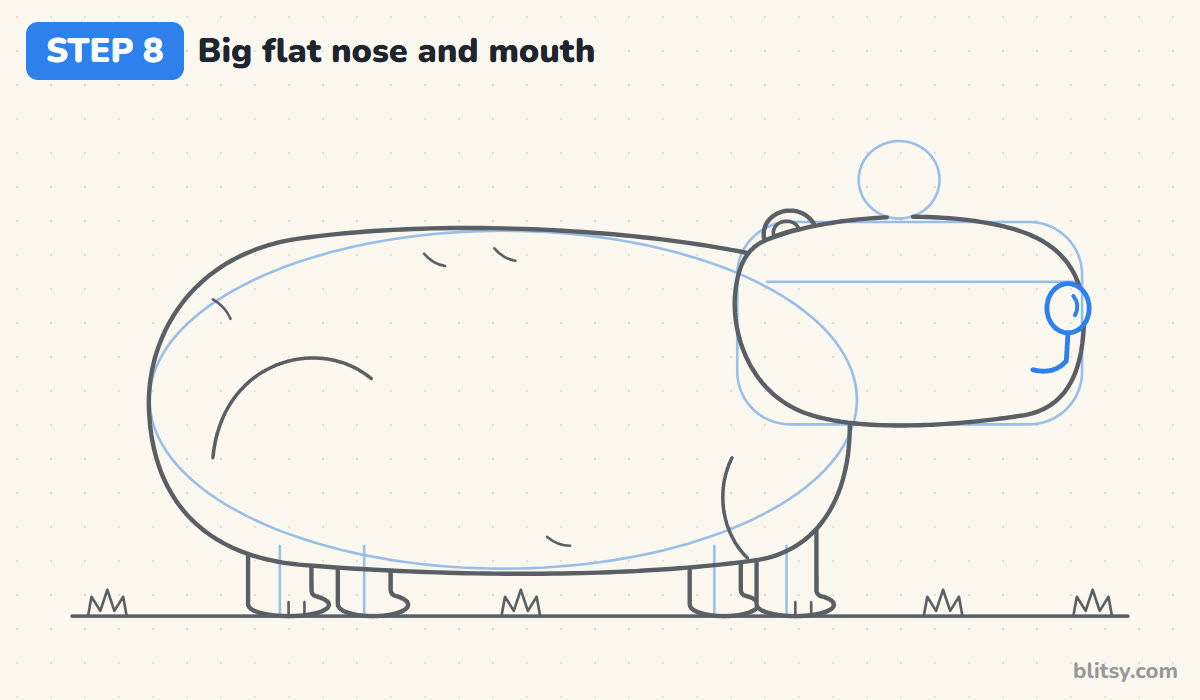
Right at the tip of the snout, near the top, draw a large rounded nose that slightly overlaps the front edge. Under it, a short line drops down and then curves back into a small, content smile. Add a tiny curve inside the nose for the nostril.
💡 Tip: Make the nose bigger than feels right. It sits at the end of a very wide face, so a small dot gets lost.
Step 9: Give it a sleepy little eye
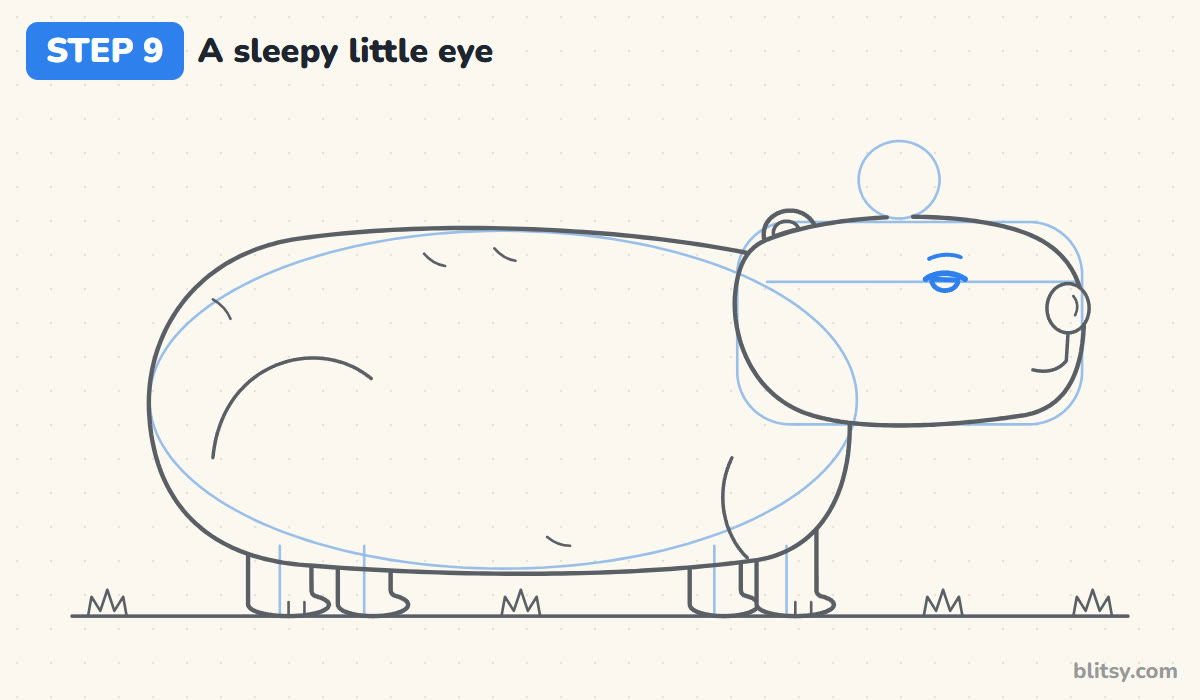
On the eye line, roughly halfway along the head, draw a small half circle that's flat on top. Put a slightly longer curved lid line across the flat side. A short eyebrow above it finishes the drowsy expression. This one change does most of the work in making the capybara look relaxed.
💡 Tip: Keep the eye small and high on the head. A big round eye makes it look surprised instead of calm.
Step 10: Balance an orange on its head
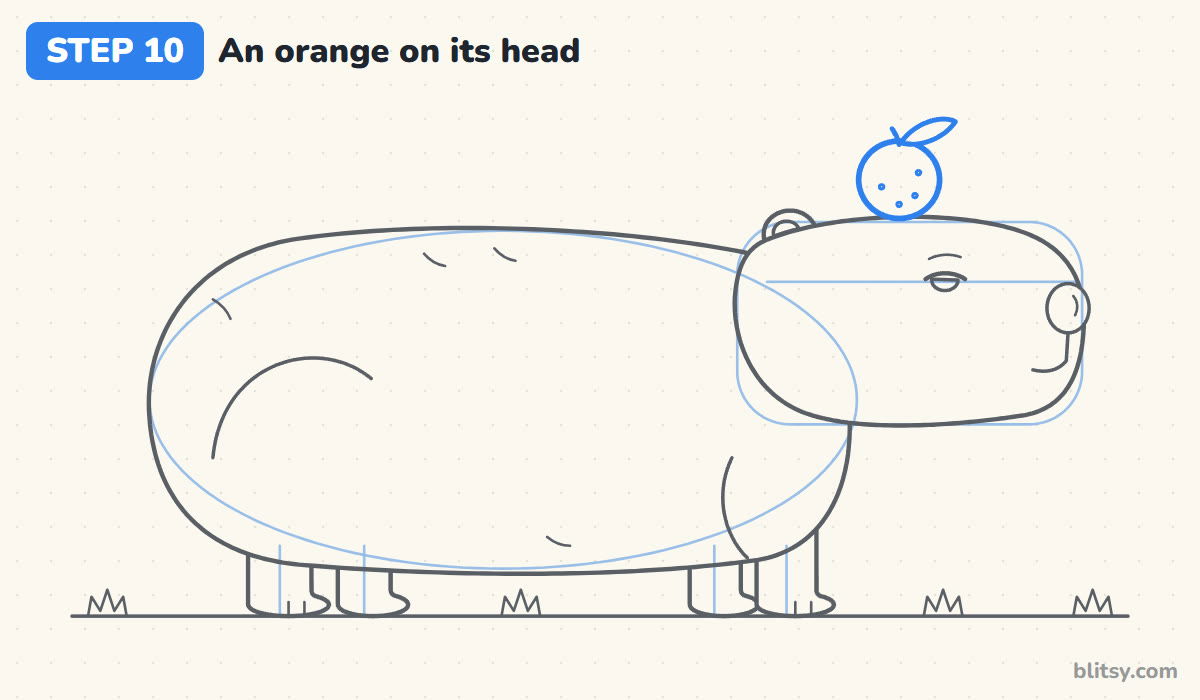
Trace the small circle on top of the head into a round orange, letting its bottom sink just into the head line so it looks like it's resting there. Add a short stem and a pointed leaf leaning to the right. A few dots on the skin give it that citrus texture.
💡 Tip: If you don't have an orange crayon, a lemon or a little bird works on top just as well.
Step 11: Ink the outline and erase the guides
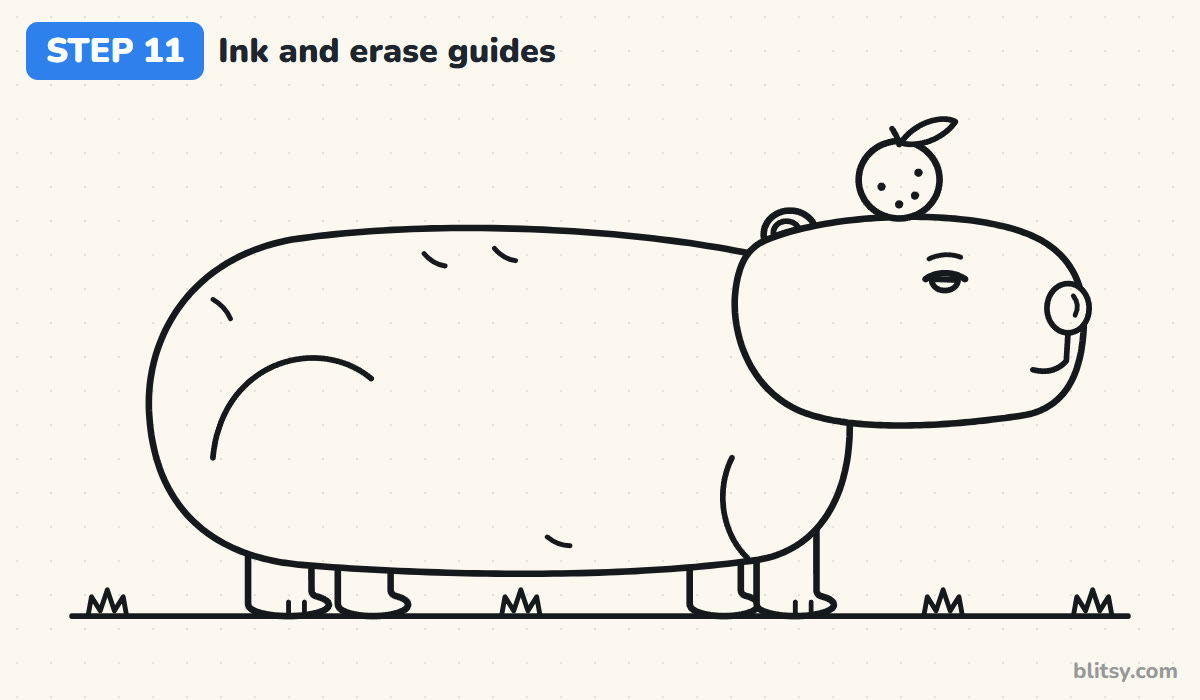
Trace every keeper line with the black marker. I start with the face while my hand is steady, then the orange, the body and the legs. Leave the oval, the box and the leg lines alone. When the ink is completely dry, erase all the pencil underneath.
💡 Tip: Wait a minute before erasing. Fresh marker smears and leaves gray streaks across the body.

Step 12: Color your capybara
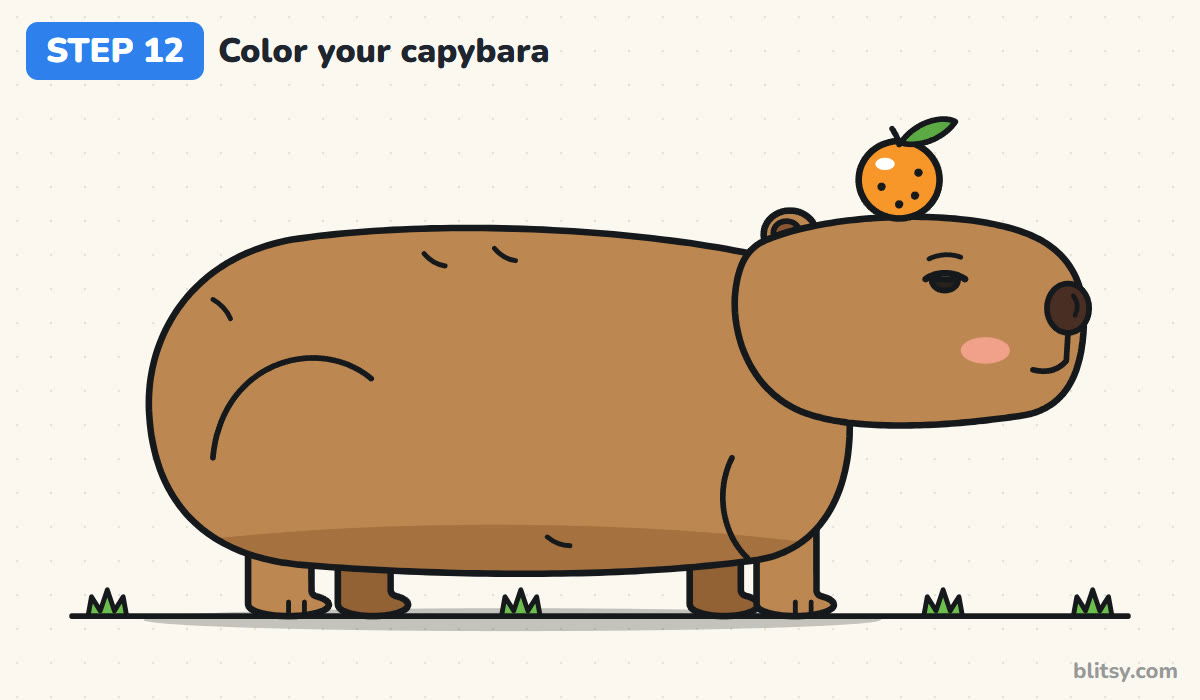
Light brown covers the body, the head, the ear and the two near legs. Use a regular brown for the far legs and a soft shadow along the belly, and dark brown for the nose. The eye is black, the cheek gets a little pink, the orange is orange and the leaf and grass are green.
💡 Tip: Color the fur with short strokes that all go the same way. It looks furry instead of flat.
Capybara Slip-Ups That Turn It into a Hamster
- A round, short body. A ball-shaped body reads as a hamster or a guinea pig. Stretch the body so it's about twice as long as it is tall.
- A pointy snout. Mice and rats have tapering faces. A capybara's snout is tall and blunt at the front.
- Long legs. Drawn tall, the legs turn it into a dog or a pig. Let only a short stub of each leg show below the belly.
- Wide-open eyes. Big round eyes take away the calm look. A small half-closed eye keeps it sleepy.
- A floating orange. If there's a gap between the fruit and the head, it looks like it's hovering. Let the orange's bottom touch the head line.
Orange Swaps and Other Capybara Ideas
Put your capybara in a pond with just its head and the orange above the water, or stack a little bird on top of the orange for a silly tower. A baby capybara walking behind its parent is easy too: same shapes, only smaller. Younger kids can skip the hip line and the fur flicks and it will still look right. The body is built a lot like the one in this how to draw a bear step by step lesson, so that's a good next try. For another calm animal, the sloth drawing tutorial is just as relaxed, and the cow drawing in side view uses the same long body and short legs idea.
Free Capybara Coloring Page and Printable Guide
The free capybara coloring page has a colored capybara at the top to copy from, a small key that matches each color to its part, and a big clean outline to fill in. The step-by-step PDF guide holds all 12 steps with pictures and tips, so you can draw away from the screen. Both print on Letter or A4 paper.
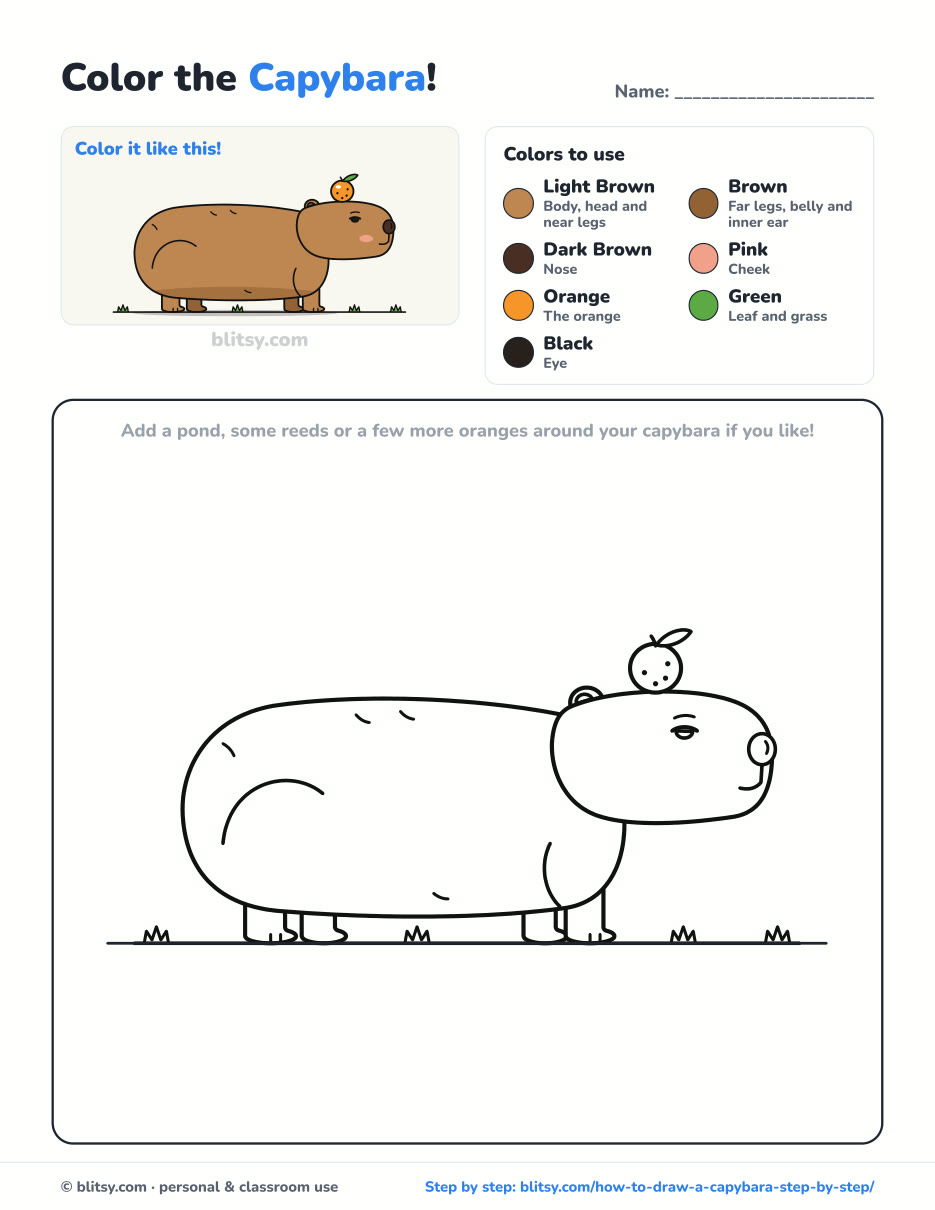
Black outlines with a colored example and the color names at the top. Ready to print and color.
⬇️ Download Coloring PageEvery step picture with its instructions and tips, to keep beside your paper while you draw.
⬇️ Download Drawing Guide📱 On a phone? Tap a download button, then open the file and choose Share → Save to Files or Print. On a computer, the PDF opens or saves straight to your Downloads folder.
A Capybara Cheat Sheet for Pinterest
More Animals to Draw After Your Capybara
Each tutorial below works the same way, one picture per step with the new lines in blue, so you can pick any of them next.
- Bear Drawing: A friendly brown bear walking through the grass, built from an oval, a circle and a snout box in this how to draw a bear step by step guide.
- Sloth Drawing: A smiling sloth hangs from a leafy branch in this sloth drawing tutorial.
- Cow Drawing: A black and white dairy cow in side view starts as a long box in this cow drawing step by step lesson.
- Raccoon Drawing: A gray raccoon with a masked face and a striped tail walks on all fours in this raccoon drawing tutorial.
- Mouse Drawing: A little field mouse sits up with a wedge of cheese in this how to draw a mouse lesson.
Capybara Drawing Questions Kids Ask
What is the easiest way to draw a capybara?
Start with a long oval for the body and a rounded box for the head. Add four short legs, a big nose at the front and a small sleepy eye, and it already looks like a capybara.
Why do people draw capybaras with an orange on their head?
Real capybaras are famous for staying calm while things sit on them, from fruit to birds. The orange on top became a well known joke about how relaxed they are.
How long does it take to draw a capybara?
Around 30 minutes with coloring. The outline itself goes quickly, because the shapes are big and simple.
What colors do I need for a capybara?
A light brown and a darker brown for the fur, dark brown for the nose, black for the eye, pink for the cheek, plus orange and green for the fruit and the leaf.
Somewhere a calm capybara is waiting for its orange, so go draw one. 🍊✏️
Related posts:
 How to Draw a Car Step by Step (Easy Drawing for Beginners)
 How to Draw a Whale Step by Step (Easy for Beginners)
 How to Draw an Arctic Fox Step by Step (Easy for Beginners)
 How to Draw a Shark Step by Step (Easy for Beginners)
 How to Draw a Chicken Step by Step (Easy for Beginners)
 How to Draw a Fish Step by Step (Easy Goldfish for Beginners)
 How to Draw a Snowman Step by Step (Easy for Beginners)
 How to Draw Hands Step by Step (Easy Palm View for Beginners)
 How to Draw an Airplane Step by Step (Easy Jet for Beginners)
 How to Draw a Mouse Step by Step (Easy for Beginners)
 How to Draw the Joker Step by Step (Easy Chibi for Beginners)
 How to Draw a T-Rex Step by Step (Easy for Beginners)

