
Two circles stacked like a snowman. That's the secret skeleton behind almost every teddy bear you've ever hugged. In this lesson I'll show you how to draw a teddy bear step by step, the classic stuffed toy kind, sitting with its legs pointing at you, a bow tie under its chin and a sewn seam down its tummy. It's a friendly first project for kids, and grown-ups who haven't drawn in years tend to enjoy it just as much.
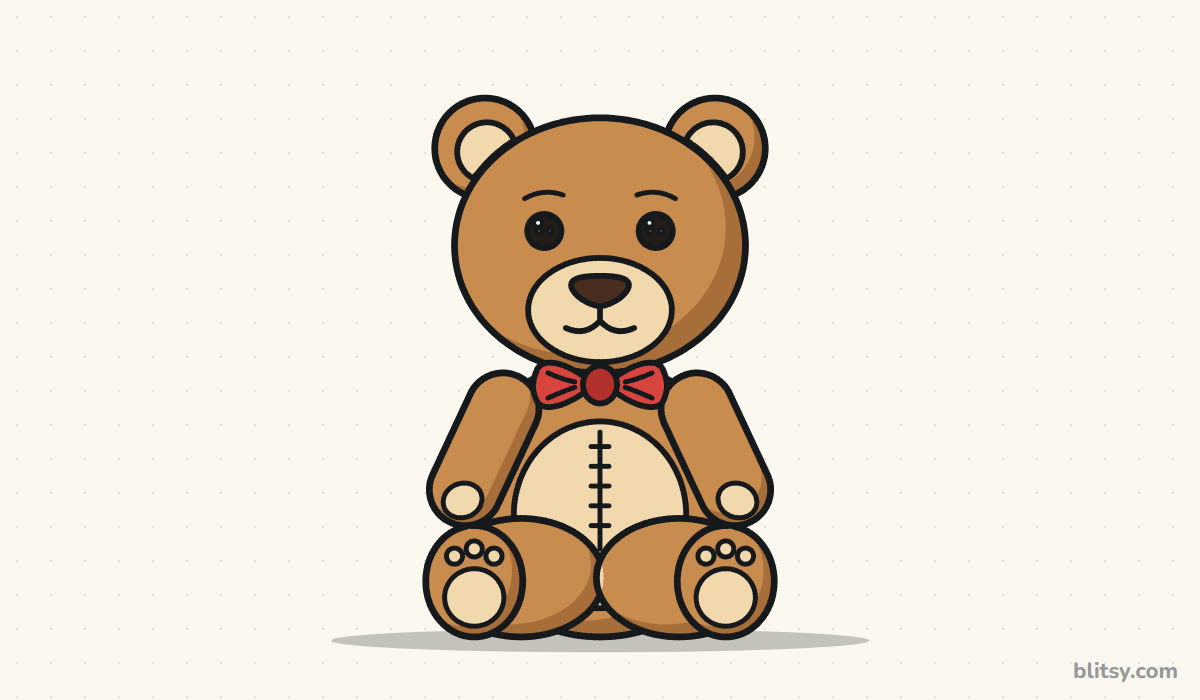
Your teddy grows one blue layer at a time here: blue lines are new, gray lines were drawn in earlier steps. Copy only the blue lines, check them against the picture, and move on.
Quick overview
⏱️ Time: about 25 to 30 minutes, coloring included
🎯 Level: easy, fine for kids from about 6
✏️ Steps: 12
🧸 You'll draw: a sitting stuffed teddy bear toy with a bow tie
What to Grab Before Your Teddy Sketch
- A regular pencil (HB works well) for light guide lines
- An eraser that doesn't smudge
- A black marker or fineliner for the final outline
- Colored pencils or crayons (two browns plus peach, red and black)
- Plain white paper, printer paper is fine
Keep the paper upright this time, because a sitting bear is taller than it is wide.
How to Draw a Teddy Bear Step by Step
Step 1: Sketch the head and body circles
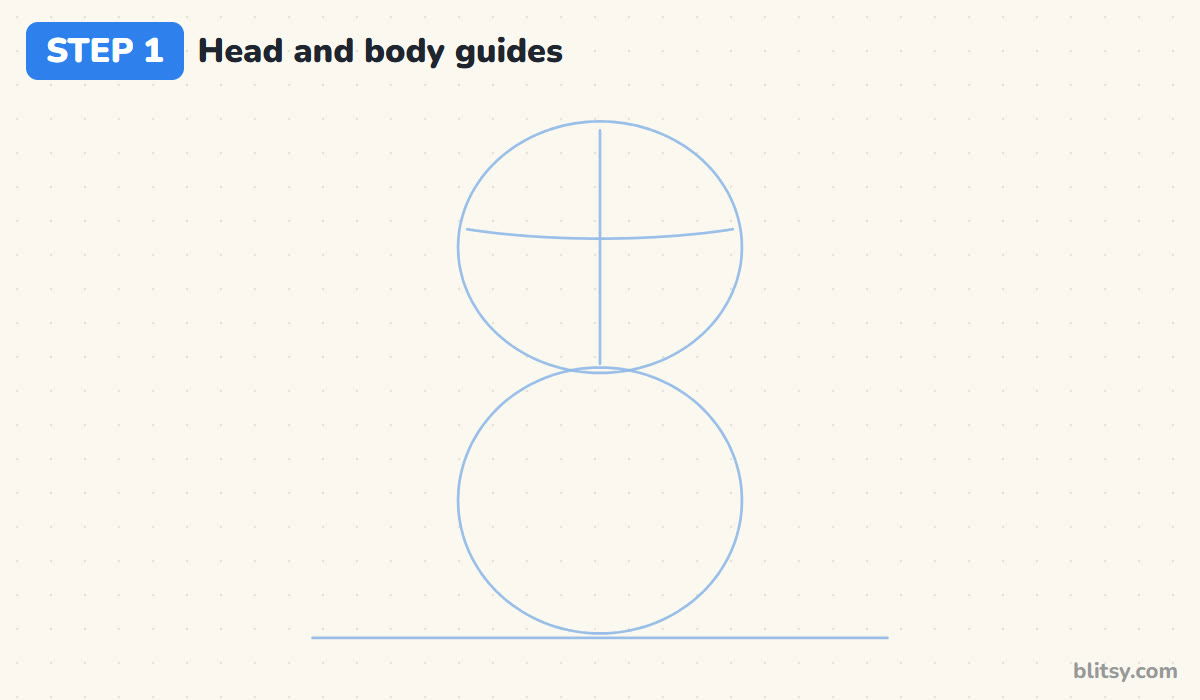
Draw a light line near the bottom of the page for the floor. Above it, sketch a big circle for the body that sits right on that line, then a slightly wider circle on top for the head. The two should just touch. Add a vertical line through the head and a gentle curve across it, a little above the middle, to mark where the eyes go.
💡 Tip: A toy bear has a big head. Make the head circle as wide as the body or even a touch wider.
Step 2: Add guides for the ears, arms and feet
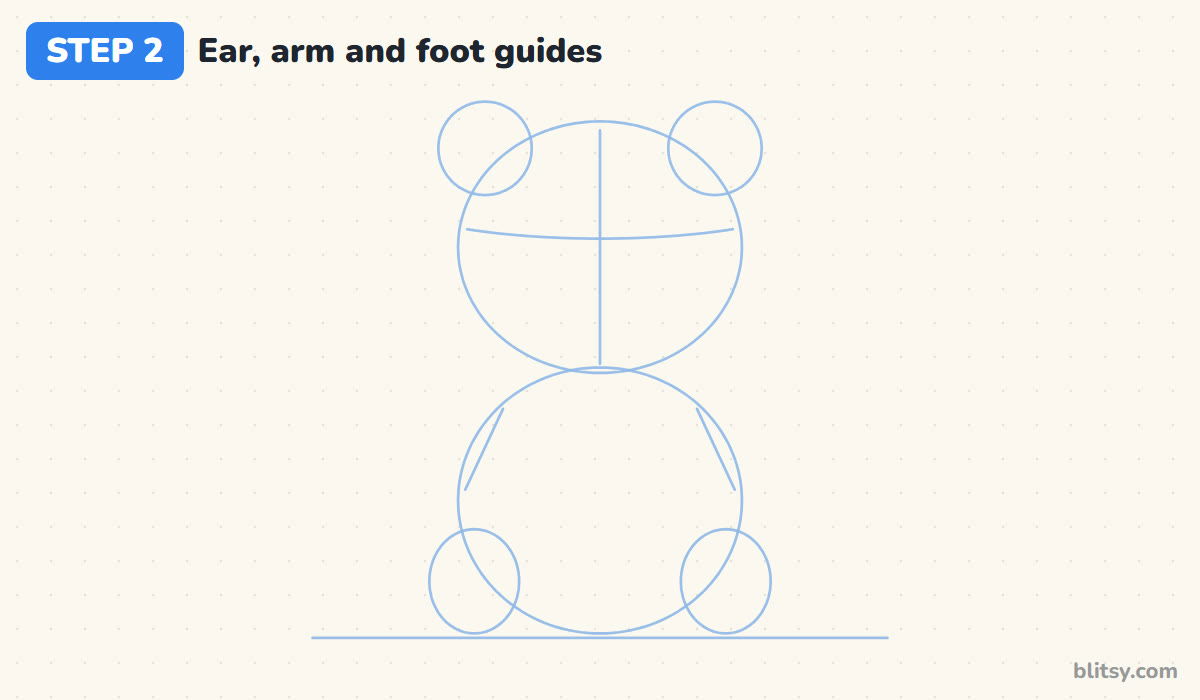
Place two small circles on the top corners of the head for ears. Next, draw two slanted lines from the shoulders down and out to show where the arms will hang. At the bottom corners of the body, sketch two ovals sitting on the floor line. Those are the feet, which point straight at you because the bear is sitting.
💡 Tip: Let the ear circles overlap the head a little. Ears that only touch the head look stuck on.
Step 3: Draw the round head and ears
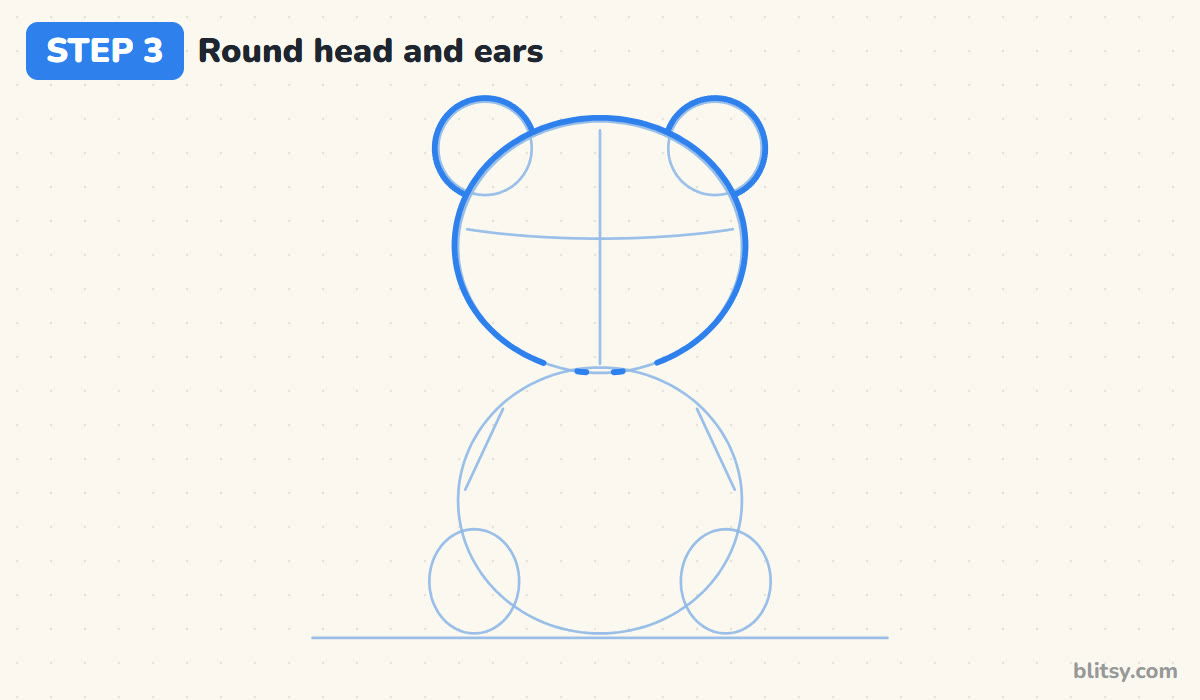
Now trace over the head circle with a firmer line and round out the cheeks a bit. Go over the two ear circles too, but stop each one where it meets the head. That small break is what makes the ears sit behind the head instead of floating in front of it.
💡 Tip: Keep your wrist loose and draw the head in two halves, left side then right side. The curve comes out smoother.




Step 4: Add the inner ears and the muzzle patch
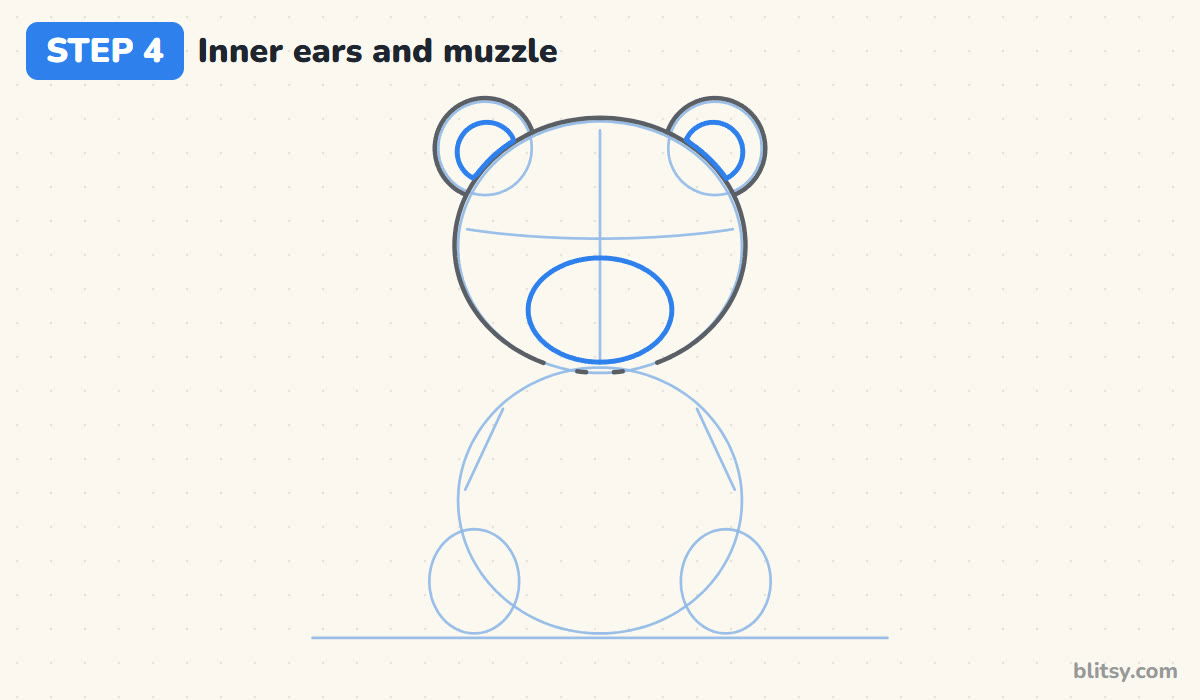
Inside each ear, draw a smaller curve for the soft inner patch. Then sketch a wide oval low on the face, centered on the vertical guide, for the muzzle. On real teddy bears this patch is often sewn from a lighter fabric, and that's exactly the look we're going for.
💡 Tip: Put the muzzle low. If it sits in the middle of the face, the bear looks surprised instead of sweet.
Step 5: Draw the nose, smile and button eyes
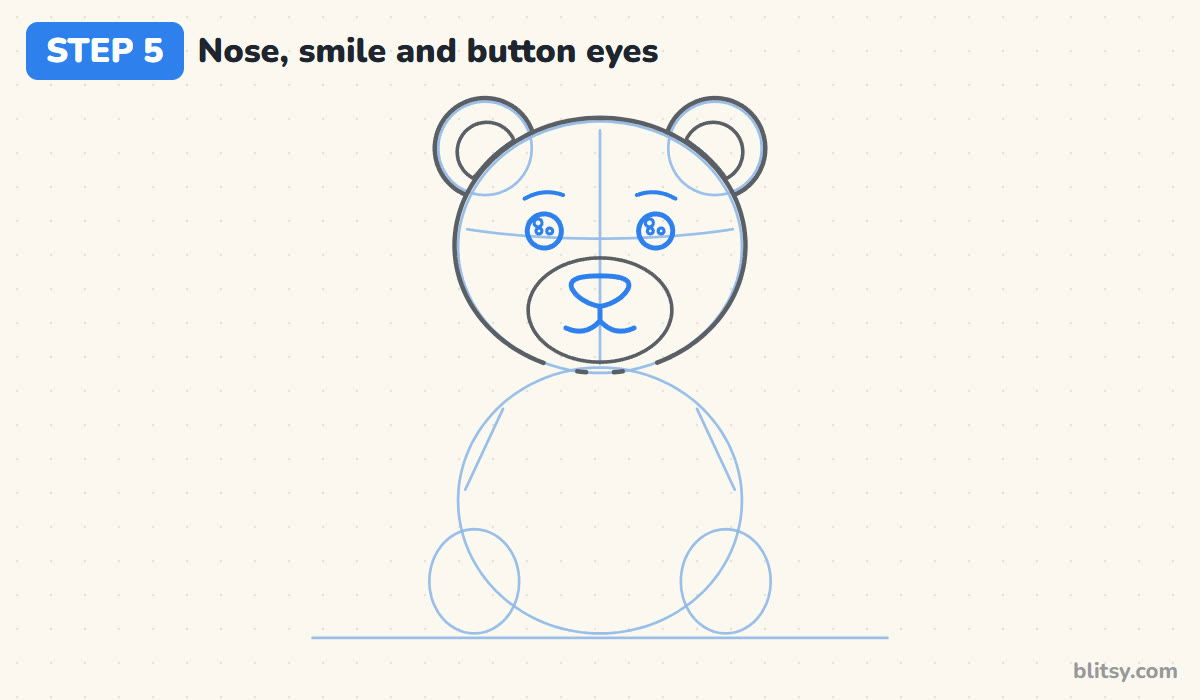
At the top of the muzzle, draw a rounded triangle nose pointing down. From its tip, pull a short line down and split it into two small curves for the smile. For the eyes, draw two circles on the eye guide with two tiny holes in each, like real sewn-on buttons. Small curved brows above them add a happy look.
💡 Tip: Space the eyes wide apart, roughly in line with the edges of the muzzle. Close eyes make a toy look worried.
Step 6: Add a bow tie under the chin
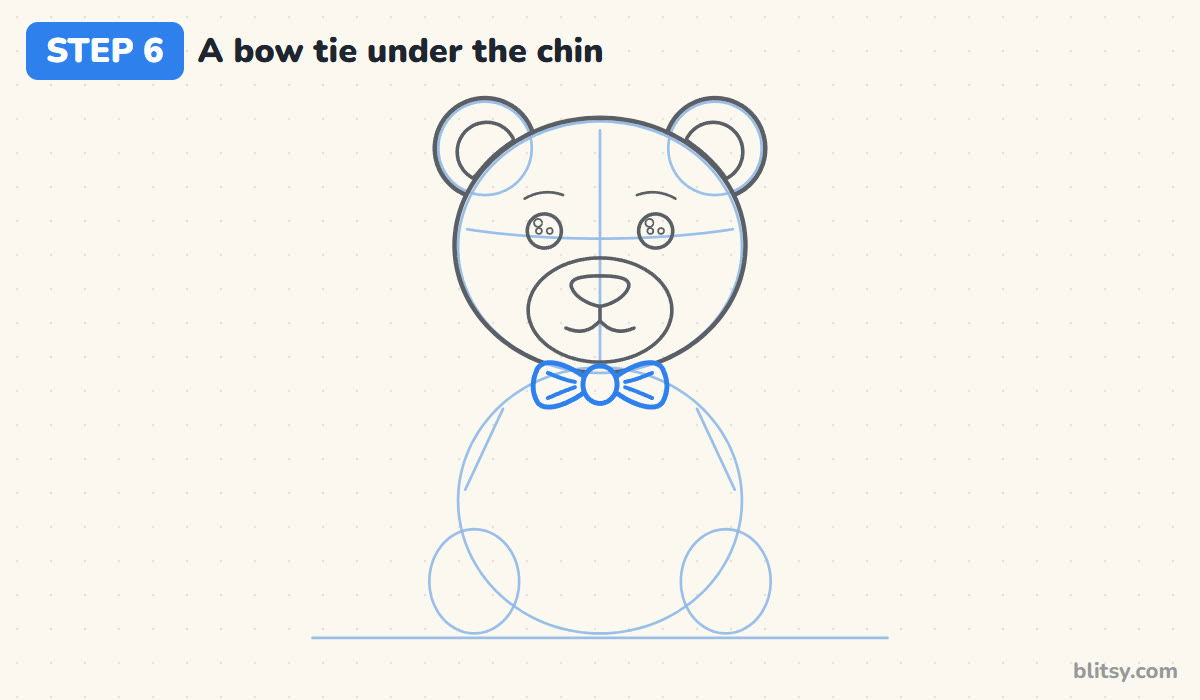
Right where the head meets the body, draw a small oval for the knot. On each side, add a rounded triangle wing that points outward. Two short lines inside every wing show the folds of the ribbon. I like the bow because it hides the neck join, which is the trickiest spot on any bear.
💡 Tip: Keep each wing about as wide as one eye area. A huge bow covers the shoulders you need next.
Step 7: Draw the arms with paw pads
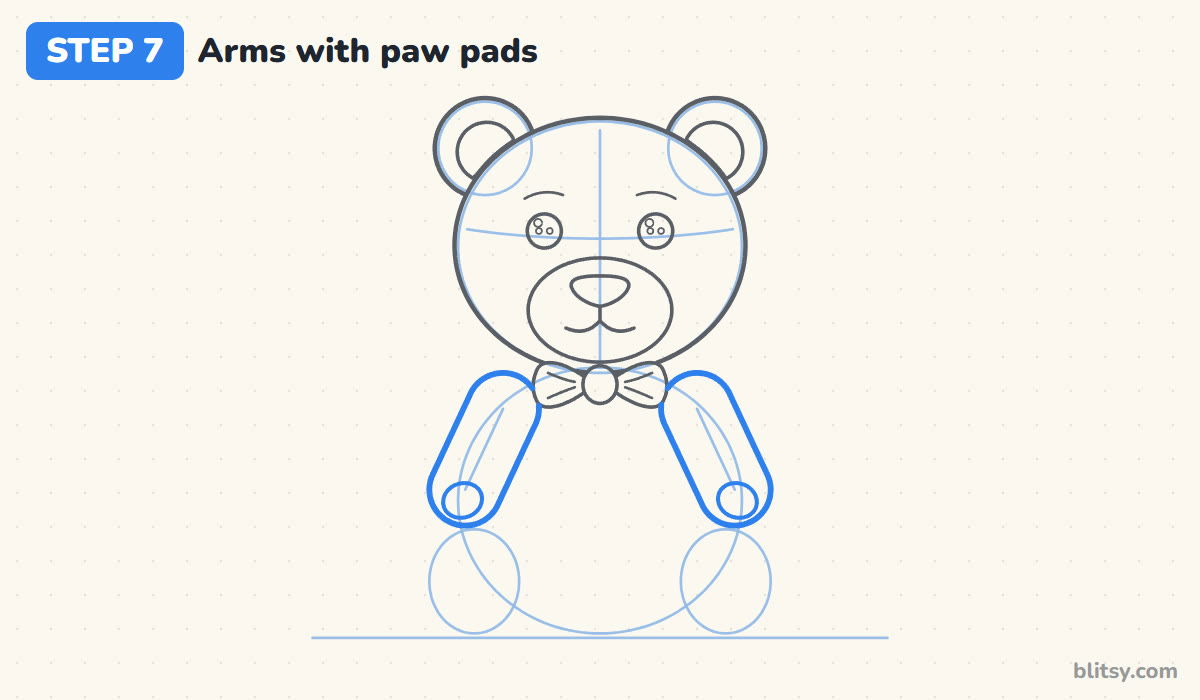
Follow the slanted guide lines to draw two long, rounded arms like sausages, starting just under the bow and ending above the feet. Make each arm thick, roughly as wide as the muzzle is tall. Put a small oval pad near the end of each arm. These soft shapes are what make the bear read as a plush toy and not a real animal.
💡 Tip: Round both ends of each arm. Pointy arms make the bear look like it has claws.




Step 8: Draw the legs and big foot soles
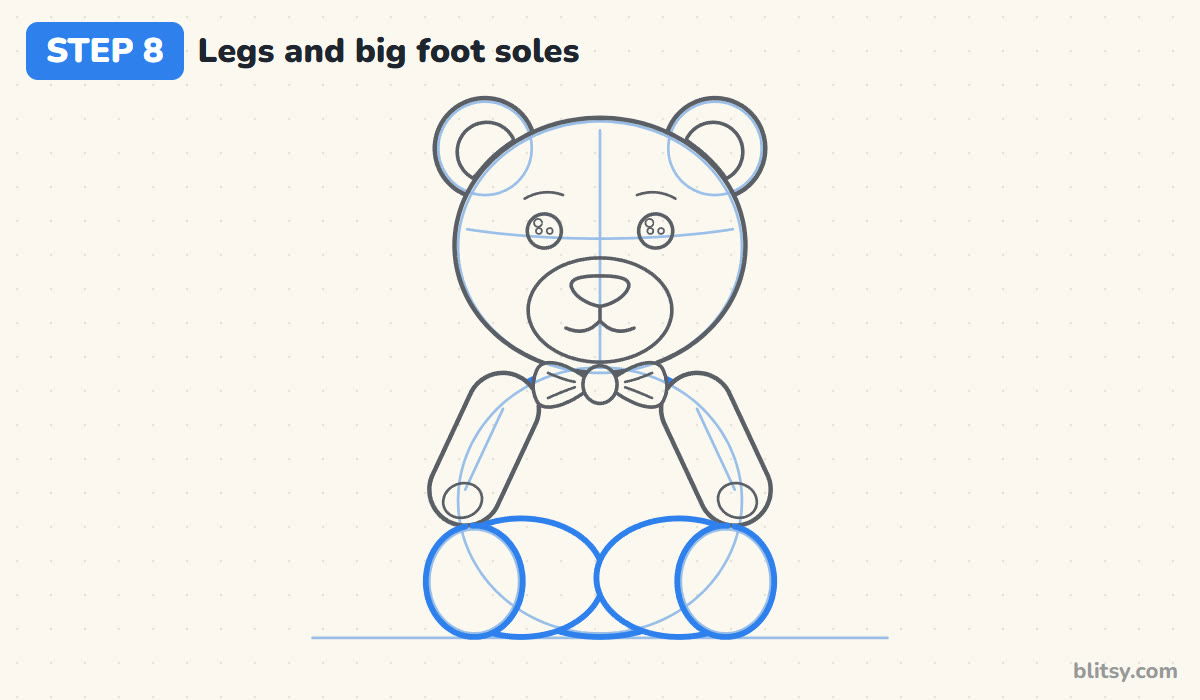
Below the arms, draw two wide, chunky legs that bulge out from the bottom of the body and meet in the middle. At the outer end of each leg, trace a tall oval for the foot sole, facing you. Finish by drawing the small curve of the bottom between the legs where the bear rests on the floor.
💡 Tip: Make the soles big. Oversized feet help the toy sit steady, and they look cute.
Step 9: Add the foot pads and toes
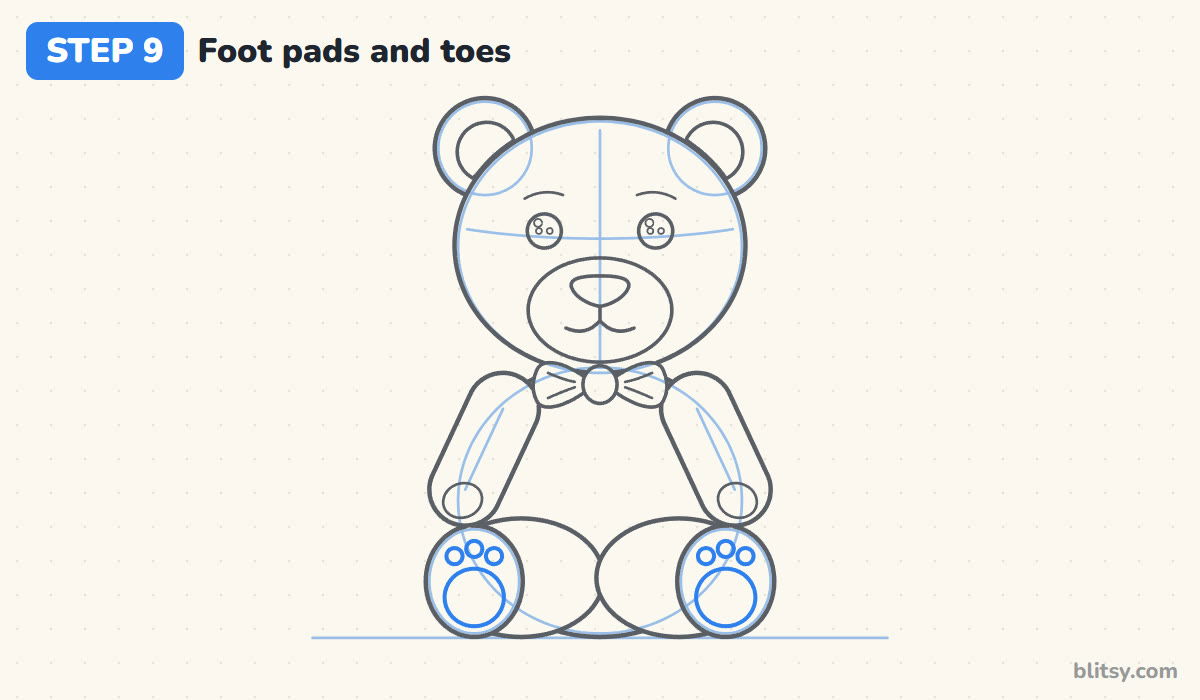
Inside each sole, draw a round pad in the lower part. Above it, add three little toe circles in a small arc. On a stuffed bear these are usually stitched-on felt, so plain, simple circles work best here.
💡 Tip: Draw the middle toe first, then one on each side. That keeps the three of them even.
Step 10: Draw the tummy patch and the stitched seam
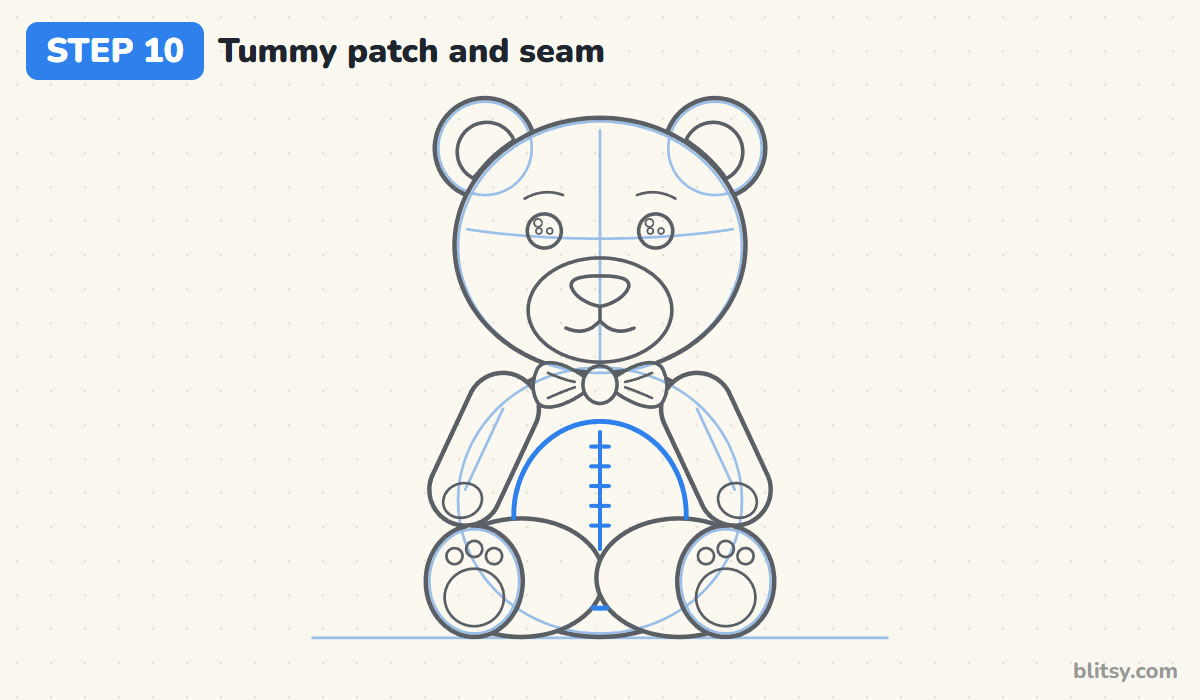
Sketch a big oval on the belly between the arms, from just under the bow down to the tops of the legs. Through its middle, draw a straight line and cross it with short dashes, like stitches. That seam is my favorite detail, because it instantly tells everyone this bear was sewn and stuffed.
💡 Tip: Keep the stitches the same length and spacing. A ruler is fine for the center line if your hand wobbles.
Step 11: Ink the outline and erase the guides
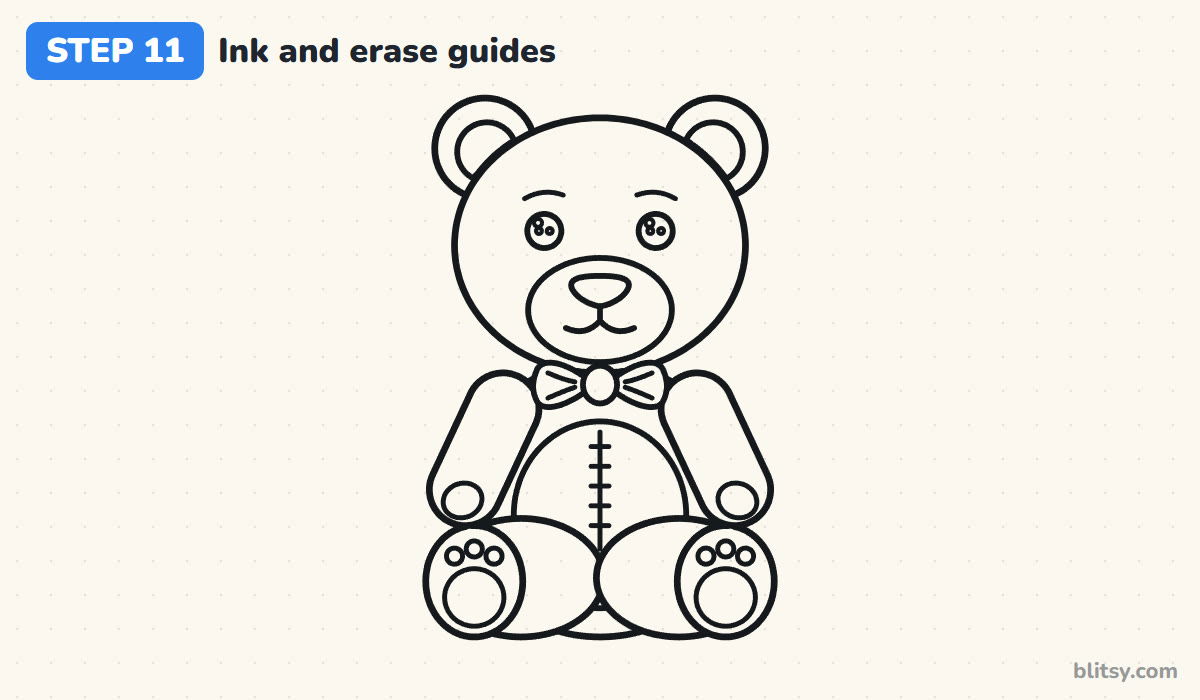
Go over every keeper line with your black marker or fineliner. Wait a minute for the ink to dry, then erase all the light guide circles and lines. Check the spots where the arms meet the legs, since that's where stray pencil marks like to hide.
💡 Tip: Ink the face first while your hand is fresh. Small details like the button holes need the steadiest lines.


Step 12: Color your teddy bear
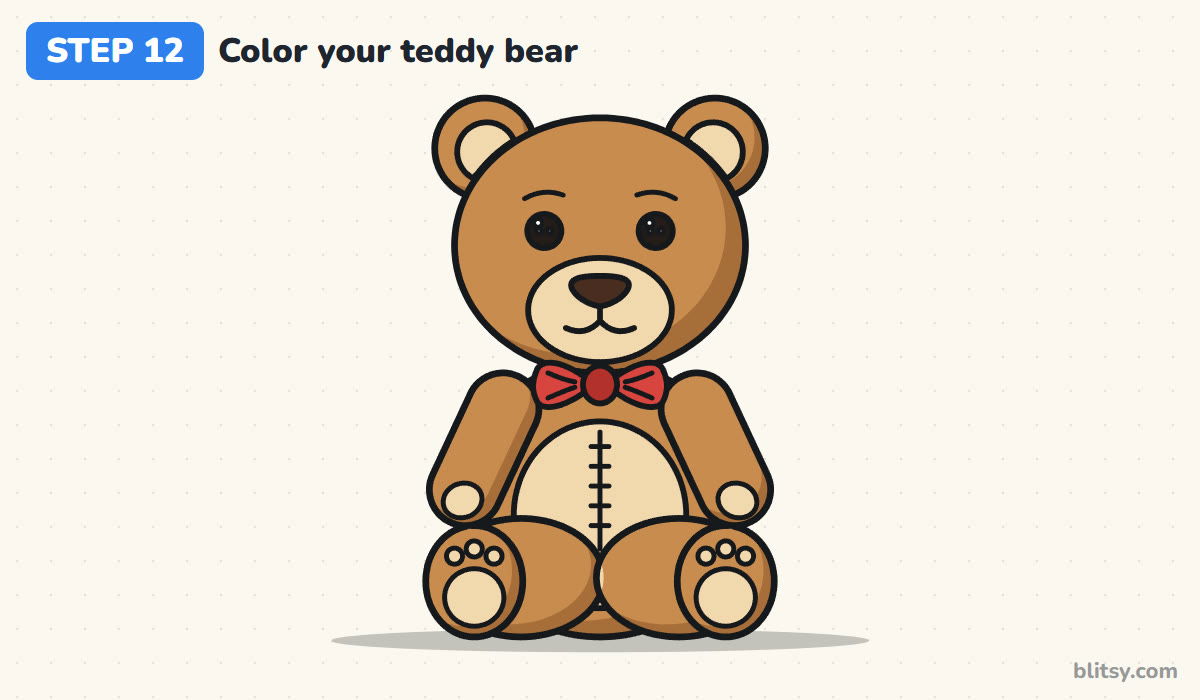
Fill all the fur with light brown. Use peach for the muzzle, inner ears, tummy patch and all the paw pads. Then add a darker brown along the right edge of every furry part for soft shading, and finish with a dark nose, black buttons and a red bow tie.
💡 Tip: Color the fur with small circular strokes. It gives the bear a soft, fuzzy look like real plush fabric.
Where Teddy Bear Drawings Often Go Wrong
- The head comes out too small. Toy bears are top-heavy, so keep the head circle at least as wide as the body.
- The muzzle sits too high. Slide it down until its bottom nearly reaches the chin, and leave space above it for the eyes.
- The arms turn into thin sticks. Give them real width with rounded ends. Stuffed limbs are always chubby.
- The ears float. Let them overlap the head and stop the line where the head starts.
- Pressing too hard on the guides. Dark guide circles won't erase cleanly. Sketch lightly, then ink only the lines you keep.
Swap the Bow, Change the Fur
Once the basic bear works, swap the bow tie for a scarf, a party hat or a tiny heart on the tummy patch. You can also change the fur to cream or gray for a different toy. If you'd like a bear with a rainbow on its belly, my Care Bear drawing tutorial uses the same round head with a pink color scheme. For a real wild animal instead of a toy, try the brown bear drawing lesson, and if your kids want more to color afterward, the bear coloring pages are a nice next stop.
Teddy Bear Coloring Page and Step Guide
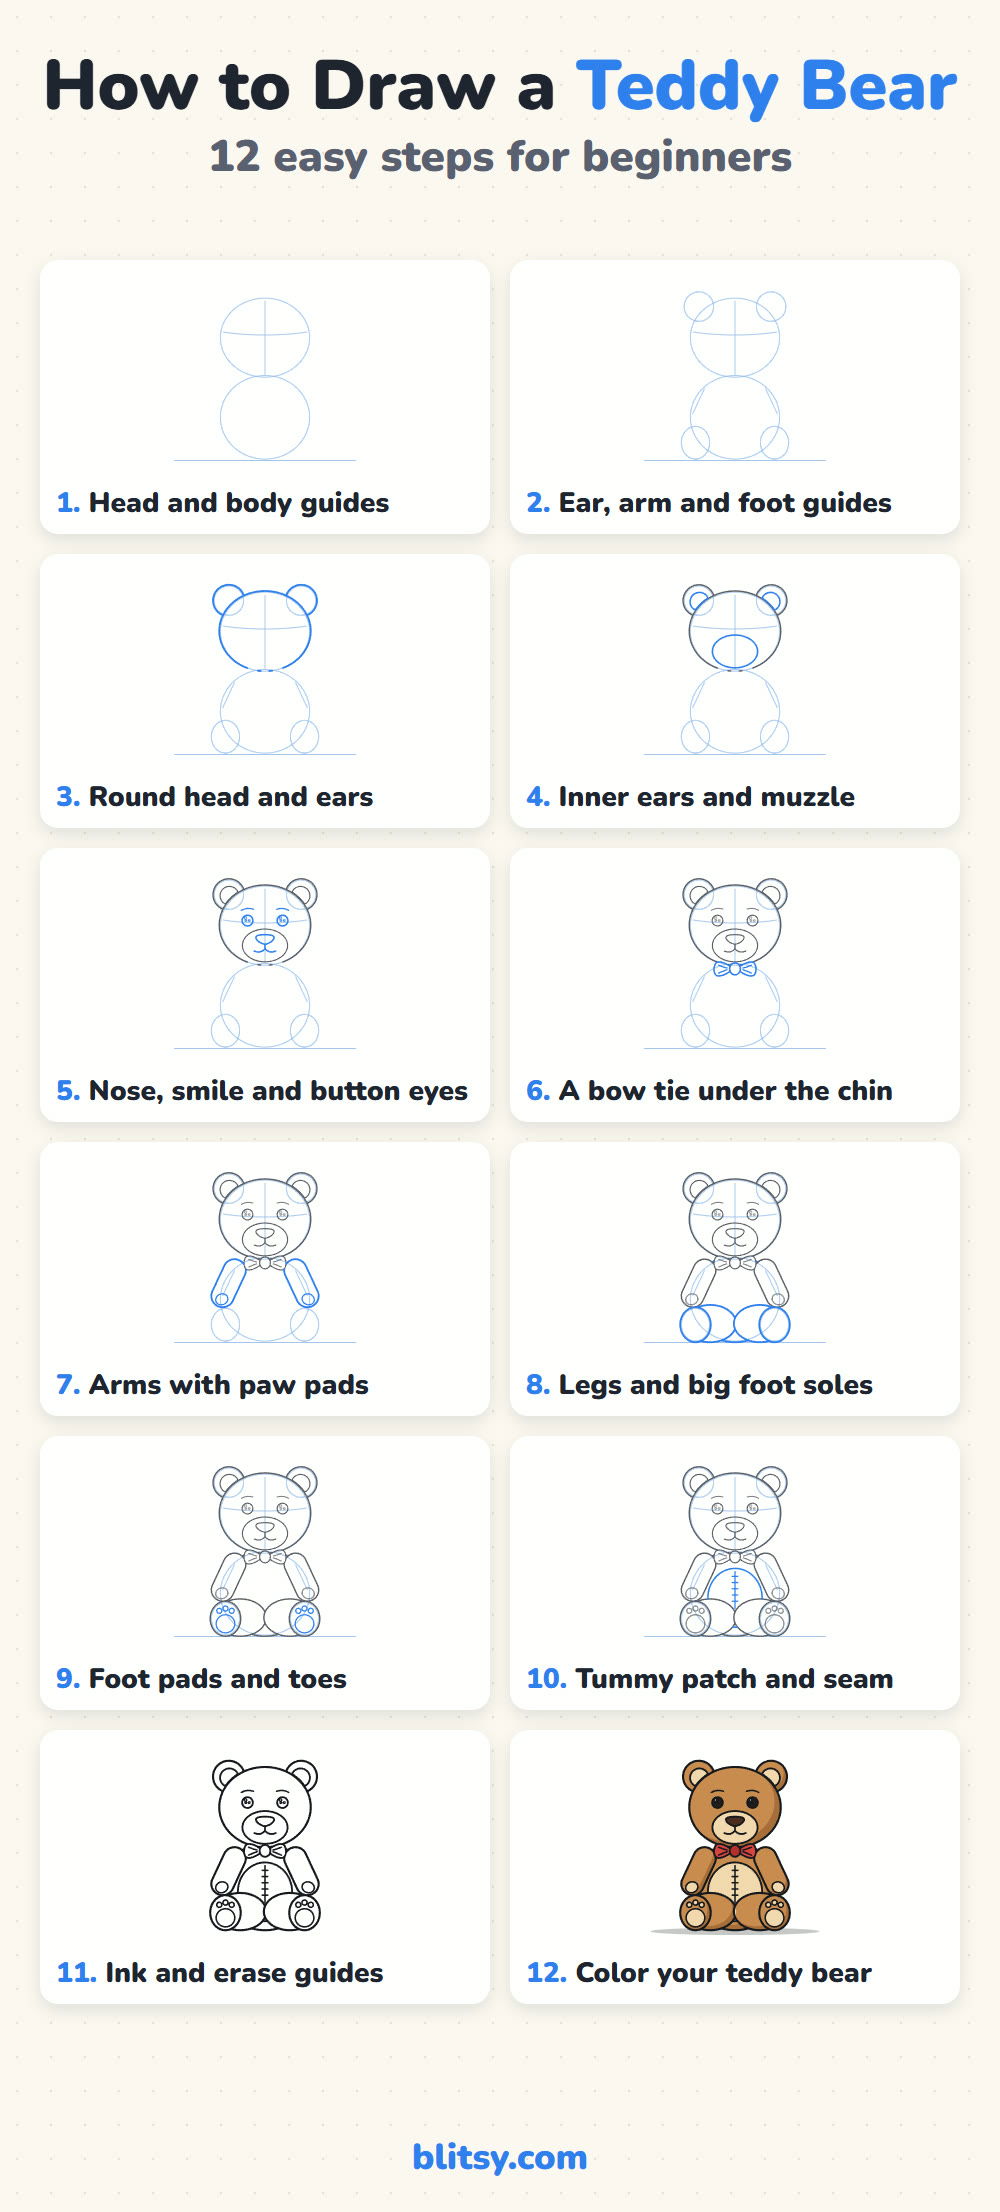
Print the outline as a coloring page, or keep the full step guide next to you while you draw. Both are free and fit on regular letter paper.
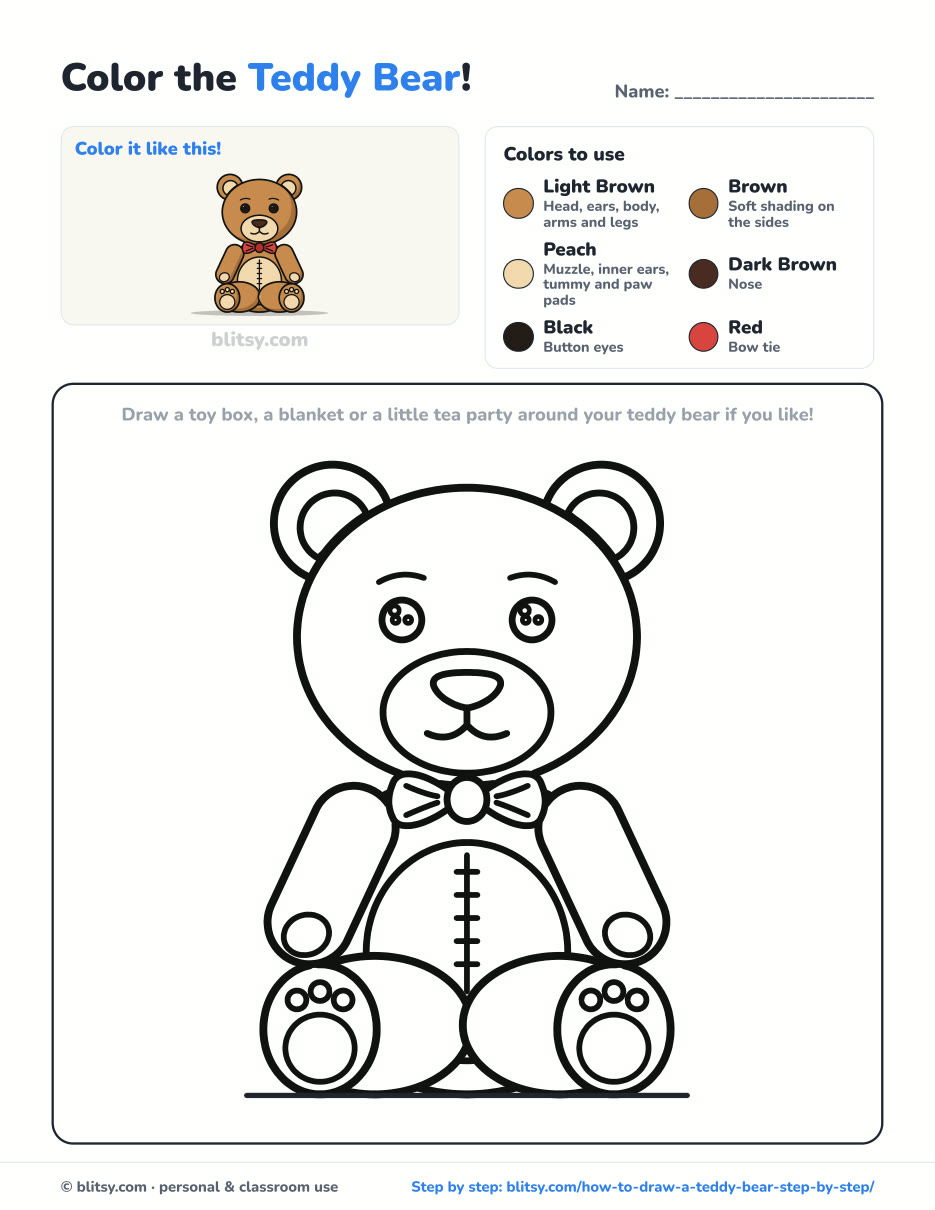
Black outlines with a colored example and the color names at the top. Ready to print and color.
⬇️ Download Coloring PageEvery step picture with its instructions and tips, to keep beside your paper while you draw.
⬇️ Download Drawing Guide📱 On a phone? Tap a download button, then open the file and choose Share → Save to Files or Print. On a computer, the PDF opens or saves straight to your Downloads folder.
Keep the Teddy Steps on Pinterest
More Cuddly Animals to Draw Next
Every link below is a full step-by-step lesson with a picture for each stage, so the same simple method carries over.
- Care Bear Drawing: A pink bear with open arms and a rainbow tummy badge in this Care Bear drawing tutorial.
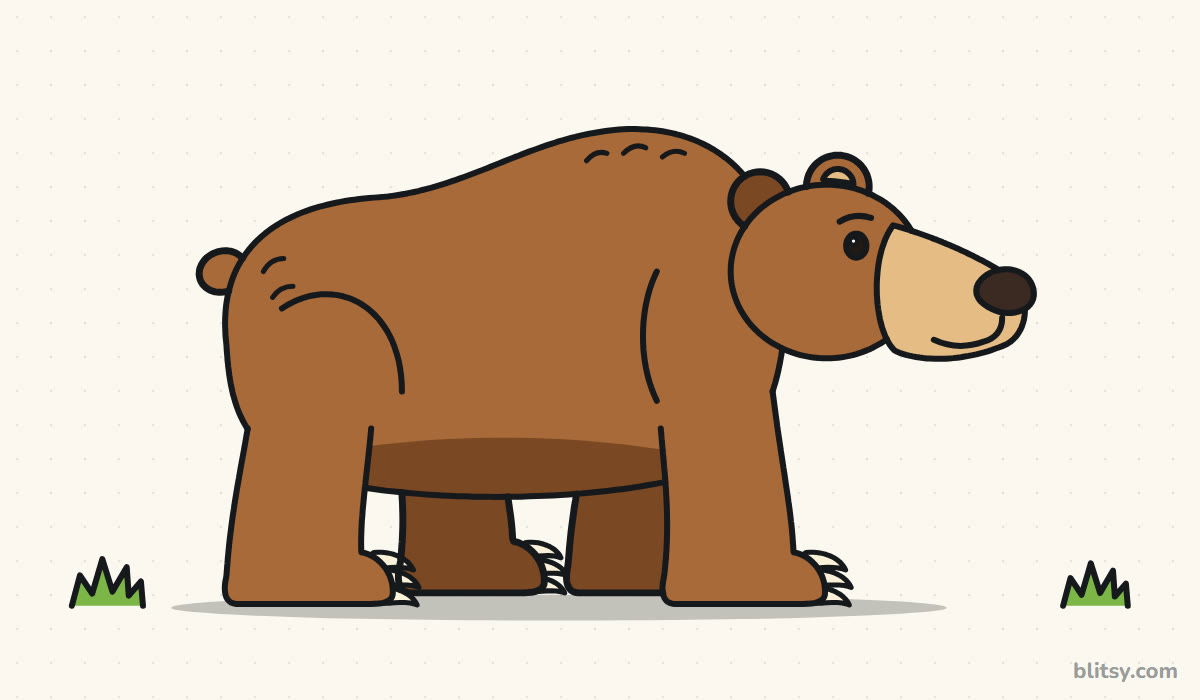
- Bear Drawing: A brown bear walking through the grass in this how to draw a bear step by step guide.
- Polar Bear Drawing: Draw a white polar bear on the ice with this polar bear drawing tutorial.
- Bunny Drawing: Long ears and a fluffy tail make a sweet rabbit in this bunny drawing lesson.
- Puppy Drawing: A playful little dog with floppy ears fills this puppy drawing step by step guide.
Teddy Bear Drawing Questions from Kids and Parents
How do you draw a teddy bear easy for kids?
Start with two circles, a big one for the head and one for the body, then add round ears and a muzzle oval. Chubby arms and legs come last. Younger kids can skip the seam and toe pads.
What is the difference between a teddy bear and a real bear drawing?
A teddy has a bigger head and rounder limbs, plus sewn details like button eyes and a tummy seam. A real bear is longer, with a pointed snout and a shoulder hump.
What colors should I use for a teddy bear?
Use light brown or caramel for the fur and peach for the patches. Add a darker brown for shading, black for the eyes, and any bright color you like for the bow.
How long does it take to draw a teddy bear?
Most people finish in 25 to 30 minutes, including coloring. The face takes the most care.
Give your teddy a name once it's colored. Somehow they always look happier after that. 🧸✏️
Related posts:
 How to Draw a Bear Step by Step (Easy for Beginners)
 How to Draw a Polar Bear Step by Step (Easy for Beginners)
 How to Draw Cute Animals Step by Step (Cat, Bear & Bunny)
 How to Draw a Care Bear Step by Step (Cute Fan Art for Kids)
 How to Draw a Car Step by Step (Easy Drawing for Beginners)
 How to Draw a Whale Step by Step (Easy for Beginners)
 How to Draw an Arctic Fox Step by Step (Easy for Beginners)
 How to Draw a Chicken Step by Step (Easy for Beginners)
 How to Draw a Snowman Step by Step (Easy for Beginners)
 How to Draw an Airplane Step by Step (Easy Jet for Beginners)
 How to Draw a Mouse Step by Step (Easy for Beginners)
 How to Draw a T-Rex Step by Step (Easy for Beginners)

