
A bat looks like the simplest thing in the dugout until you try to draw one and it comes out as a stiff stick or a lumpy club. The secret is the taper: a bat gets thicker slowly, from a thin handle to a fat barrel. In this lesson on how to draw a baseball bat step by step, one slanted line and a row of shrinking circles do that work for you, and a baseball and a glove join it to make a small still life.
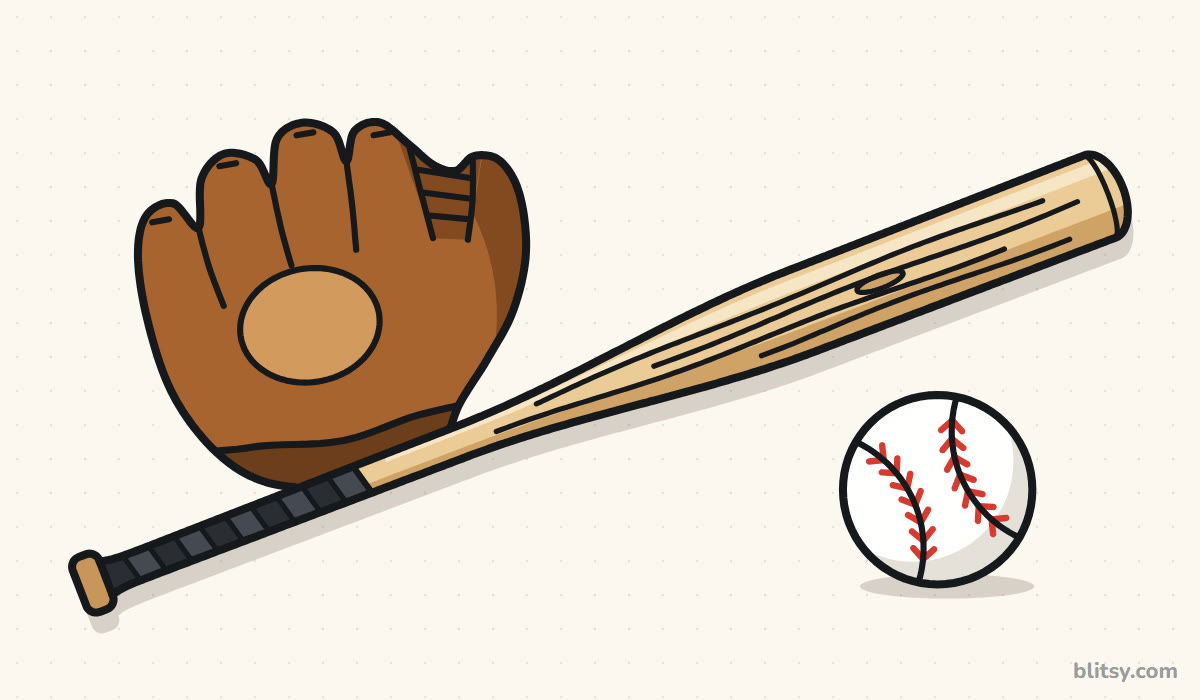
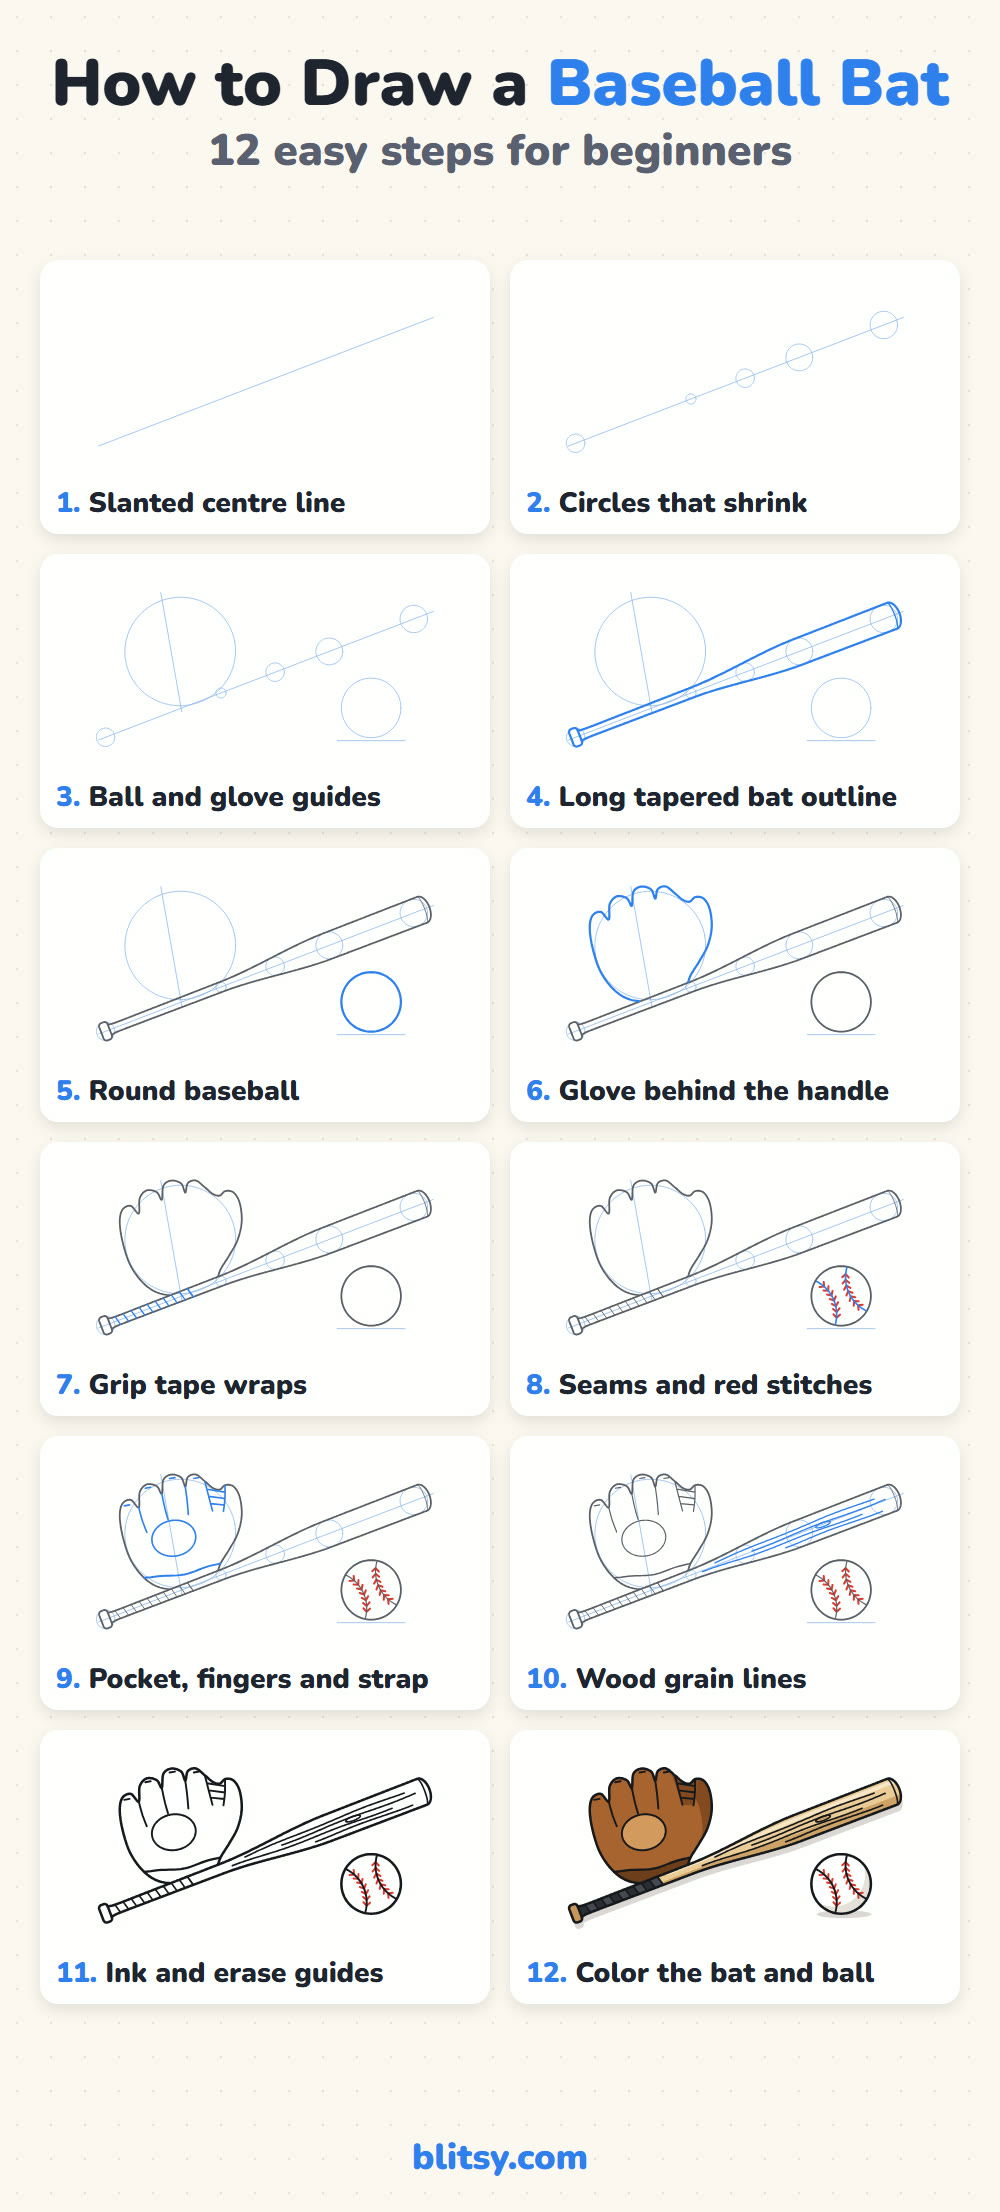
Each step picture keeps the earlier work in gray and shows that step's new lines in bright blue. Pale blue circles and lines are light helpers that you erase before coloring.
Quick overview
⏱️ Time: around 35 minutes with coloring, 15 if you draw only the bat
🎯 Level: easy; kids from about 7 can follow it, younger ones can skip the glove
✏️ Steps: 12
⚾ You'll draw: a wooden baseball bat, a baseball with red stitches and a leather glove
Gear for Your Ballpark Sketch
- A pencil you can press very lightly (HB or 2B)
- A soft eraser
- A ruler for the long slanted centre line
- A black fineliner or felt-tip pen
- A red colored pencil for the ball stitches
- Colored pencils or markers in tan, light brown, brown, dark brown and black
- Plain paper turned sideways
A coin or a bottle cap helps if you'd like rounder guide circles, but freehand ones work fine.
How to Draw a Baseball Bat Step by Step
Step 1: Rule one long slanted centre line

Lay the ruler from the lower left of the page to the upper right and draw a light line nearly corner to corner. Every part of the bat hangs on this line. I keep the slant gentle, about the angle of a playground slide, because a steep line leaves no room for the glove.
💡 Tip: Press so lightly you can barely see it; this line disappears later.
Step 2: Space out guide circles that shrink toward the handle
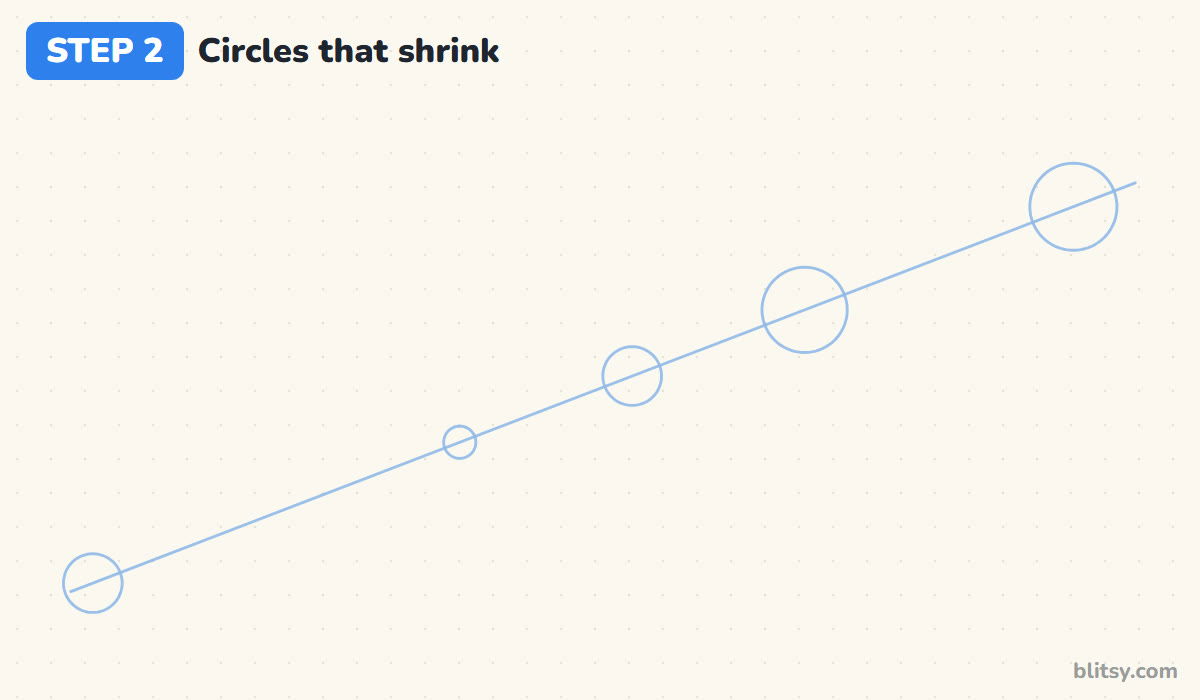
Place five circles on the line. Draw a big one near the top end and a second big one about two thirds of the way up. A middle-sized circle goes near the halfway point, a tiny one a third of the way up, and a small one at the very bottom for the knob. These circles hold the whole taper.
💡 Tip: Draw the two barrel circles first, then make each new one smaller than the last.
Step 3: Add guides for the ball and the glove
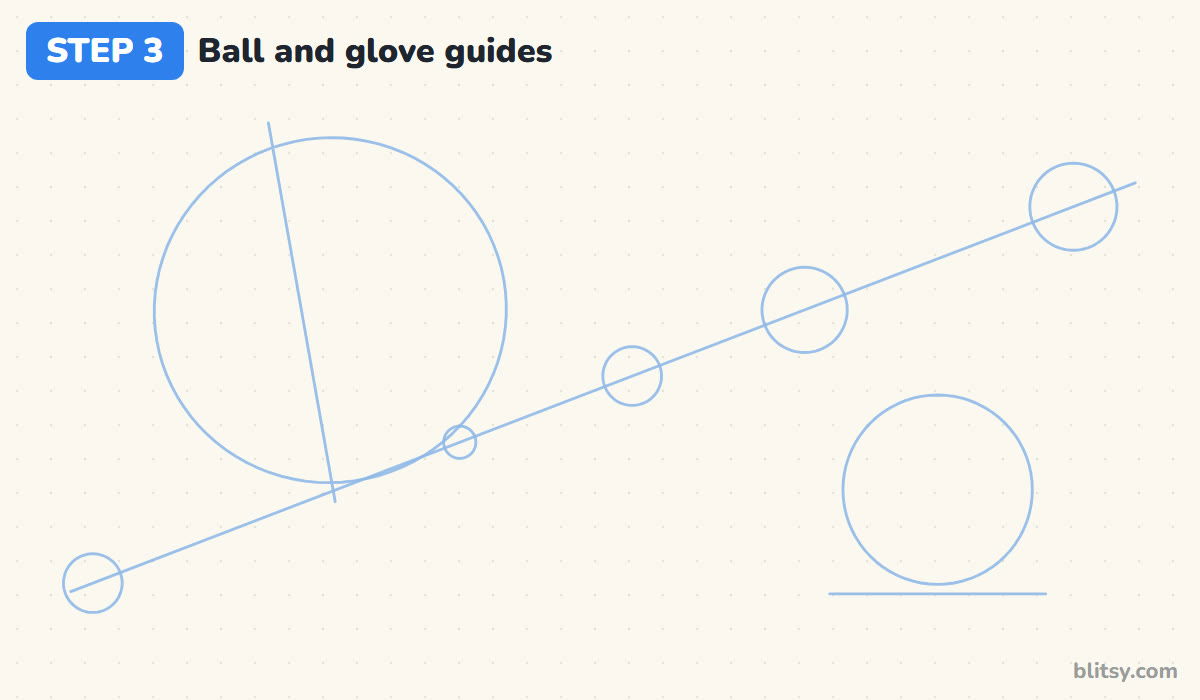
Under the barrel, draw a circle a little wider than the barrel is thick, with a short flat line under it for a floor. Above the handle, sketch a big circle for the glove with a tilted line through it. Let that circle touch the handle; the glove will rest behind the bat.




💡 Tip: Keep a gap between the ball and the bat so they never touch.
Step 4: Draw the tapered outline of the bat
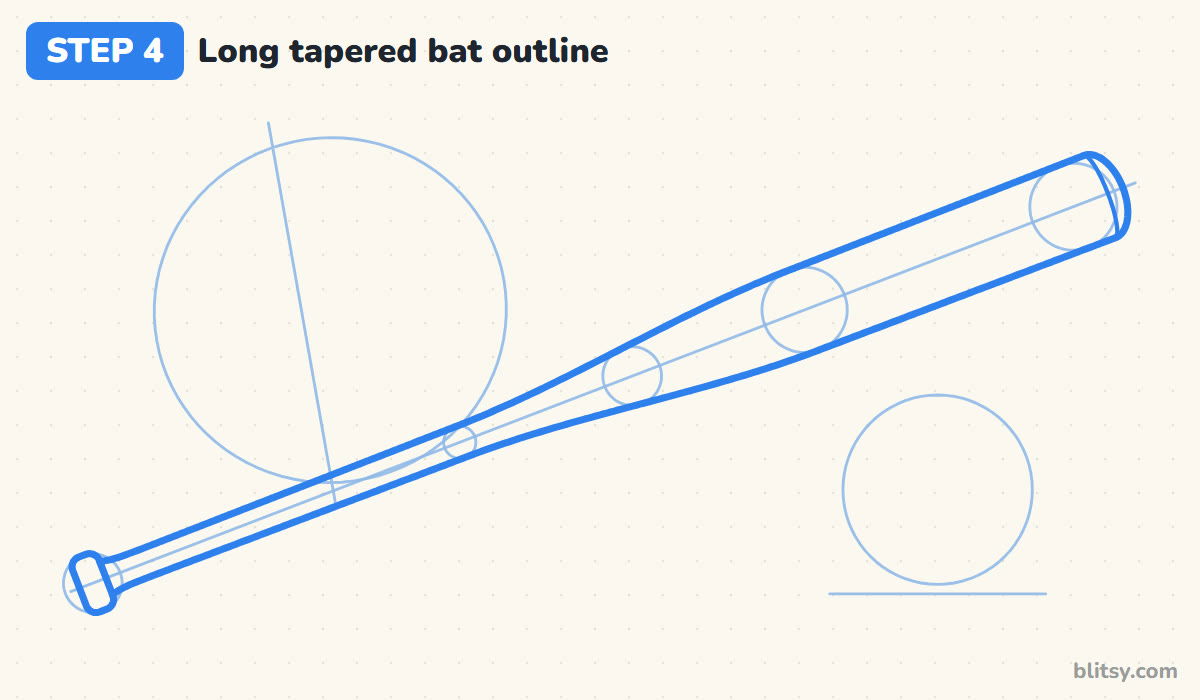
Here comes the important line. Run along the top edges of the two big circles, then slide down so the line just touches the middle and tiny ones. Below the tiny circle, keep the handle thin and straight. Repeat on the bottom edge, round off the barrel end and add a small rounded box for the knob.
💡 Tip: Let the outline bend slowly; a sudden step in the taper looks like two bats glued together.
Step 5: Trace the round baseball
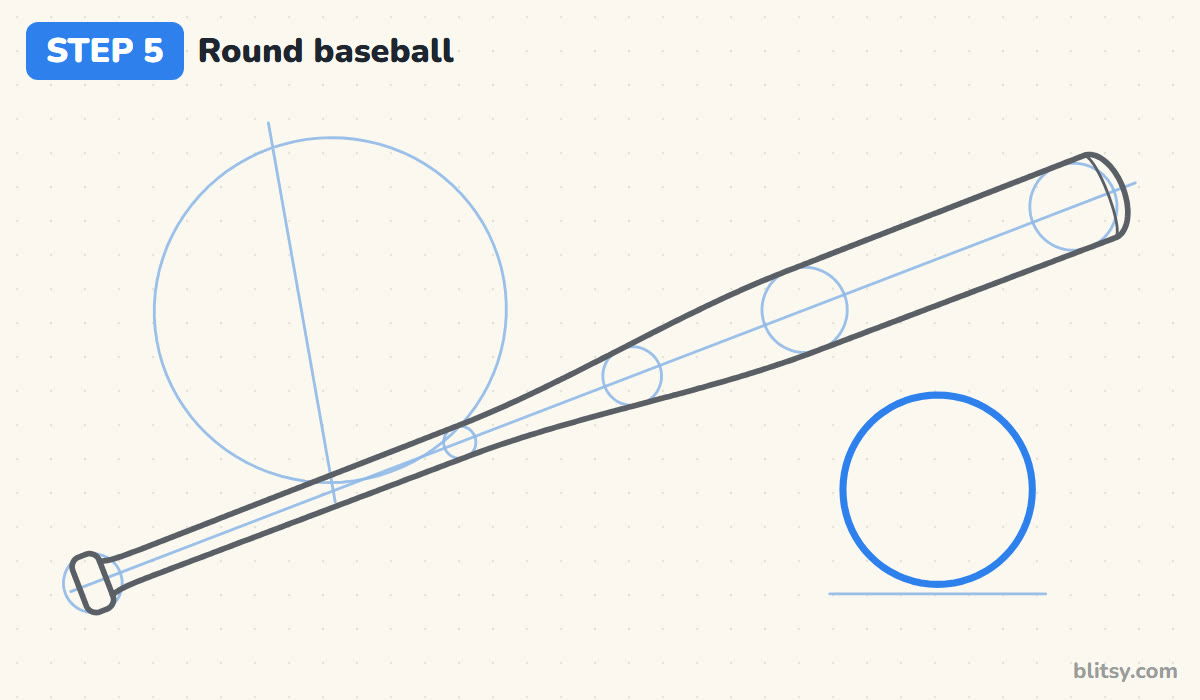
Go over the ball guide with a smooth line. Most beginners draw it in short scratchy strokes, and the ball ends up fuzzy. I turn the paper so my hand can sweep around the curve in two or three long moves.
💡 Tip: Draw the circle in two halves, top and bottom, if one sweep feels shaky.
Step 6: Outline the glove behind the handle
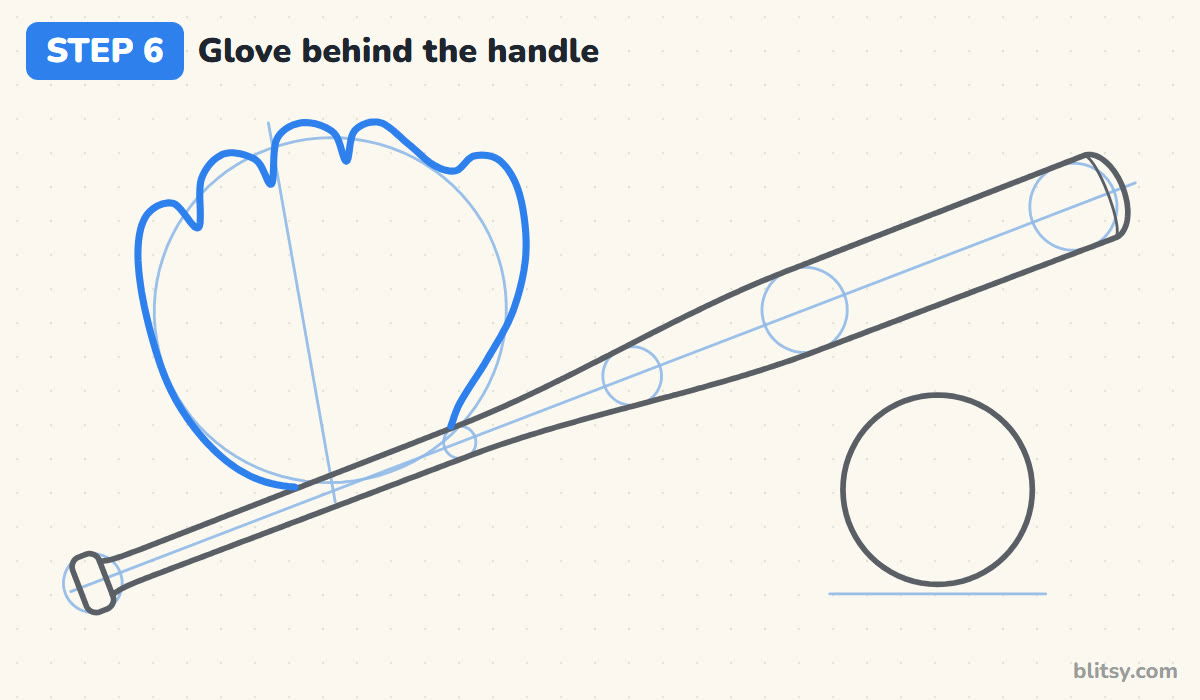
Start at the bottom left of the glove circle and go up into four rounded fingertips, the middle ones a little taller. After the fourth finger, dip into a shallow notch, then rise into a wide thumb on the right. Curve back down and stop where the line meets the bat, since the glove sits behind it.
💡 Tip: Make the fingers short and puffy; long thin fingers turn the glove into a hand.
Step 7: Wrap the handle in grip tape
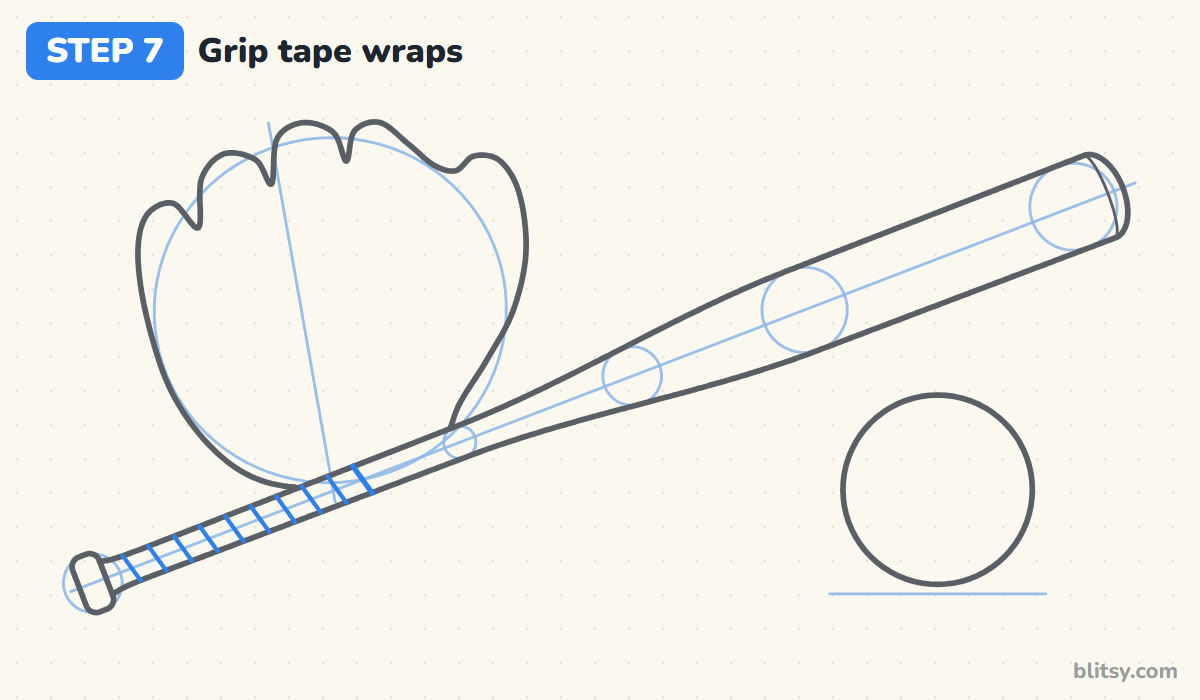
About a third of the way up from the knob, draw a slanted line across the handle where the tape ends. Between the knob and that line, add nine more slanted lines, evenly spaced and all leaning the same way. They read as tape wound around the handle.




💡 Tip: Lean every wrap line the same direction, or the tape looks twisted.
Step 8: Draw the seams and the red stitches
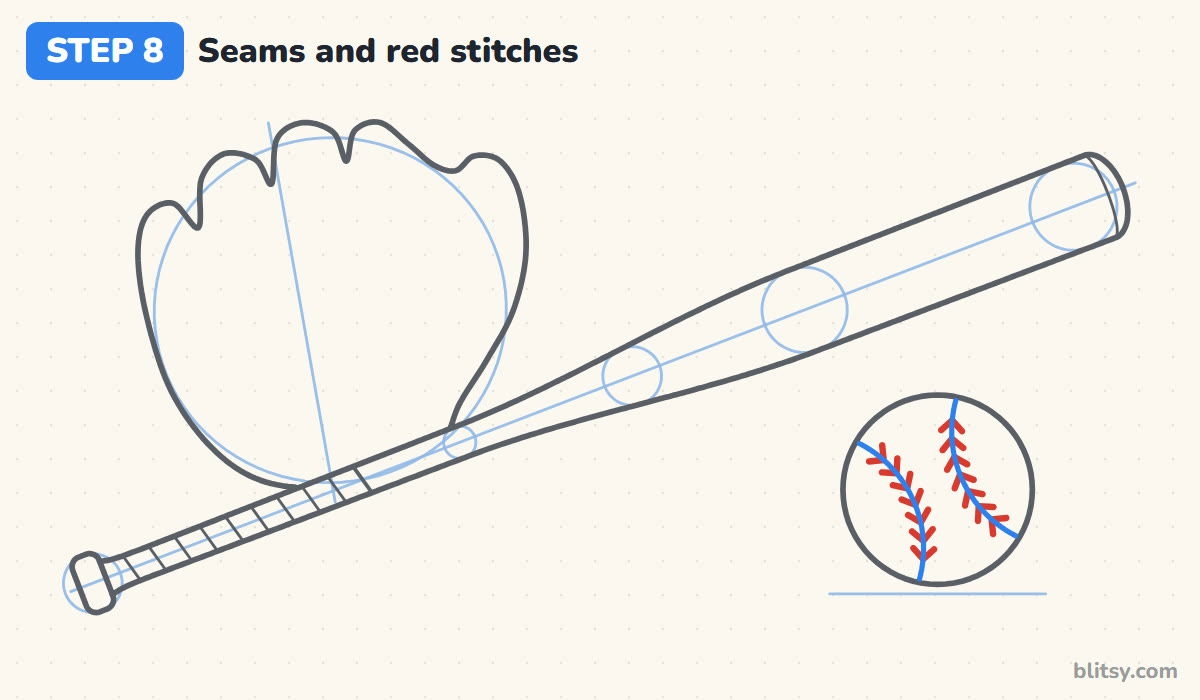
A baseball has two seams that curve toward each other like a pair of brackets. Draw one curve on each half of the ball, both bending in toward the middle. Then take your red pencil and add small V marks along each seam, about eight per seam, with the points all aimed the same way.
💡 Tip: Keep the stitches short; long Vs crowd the ball and start to look like feathers.
Step 9: Add the glove pocket, finger lines and wrist strap
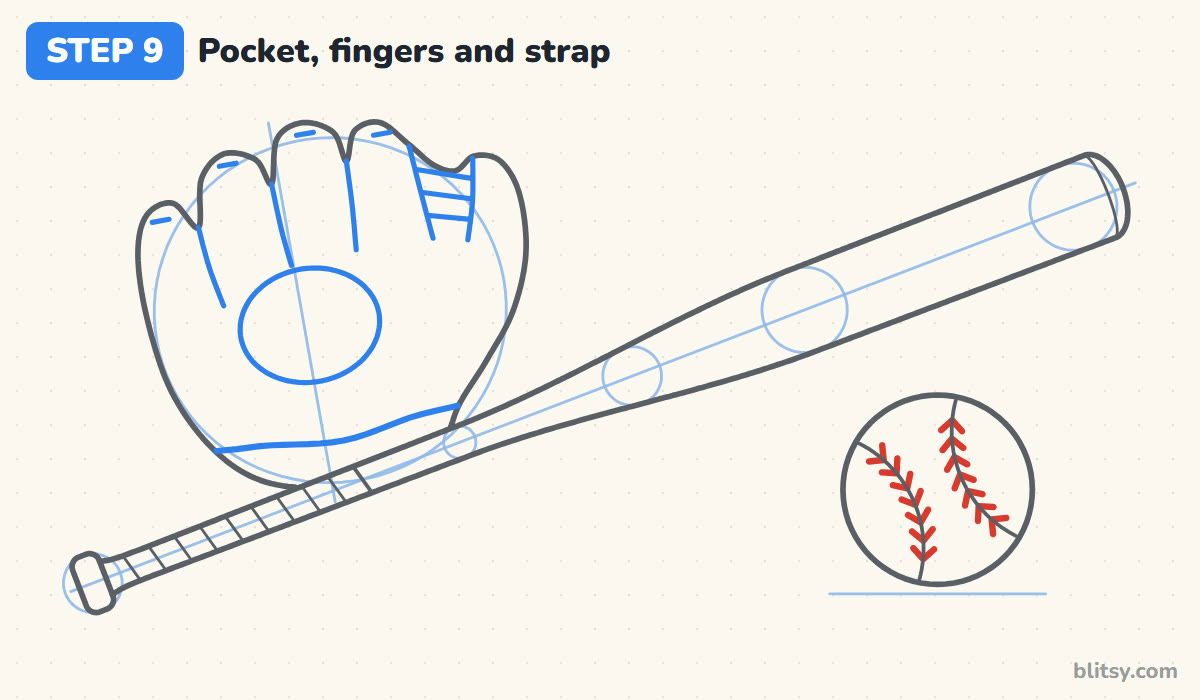
Draw an oval in the palm for the pocket, where the ball lands. Three curved lines run from the gaps between the fingers toward it. In the notch beside the thumb, draw two side lines with three short laces across them for the webbing. A wavy line across the bottom marks the wrist strap.
💡 Tip: Stop the finger lines before they reach the pocket so the palm stays open.
Step 10: Sketch the wood grain
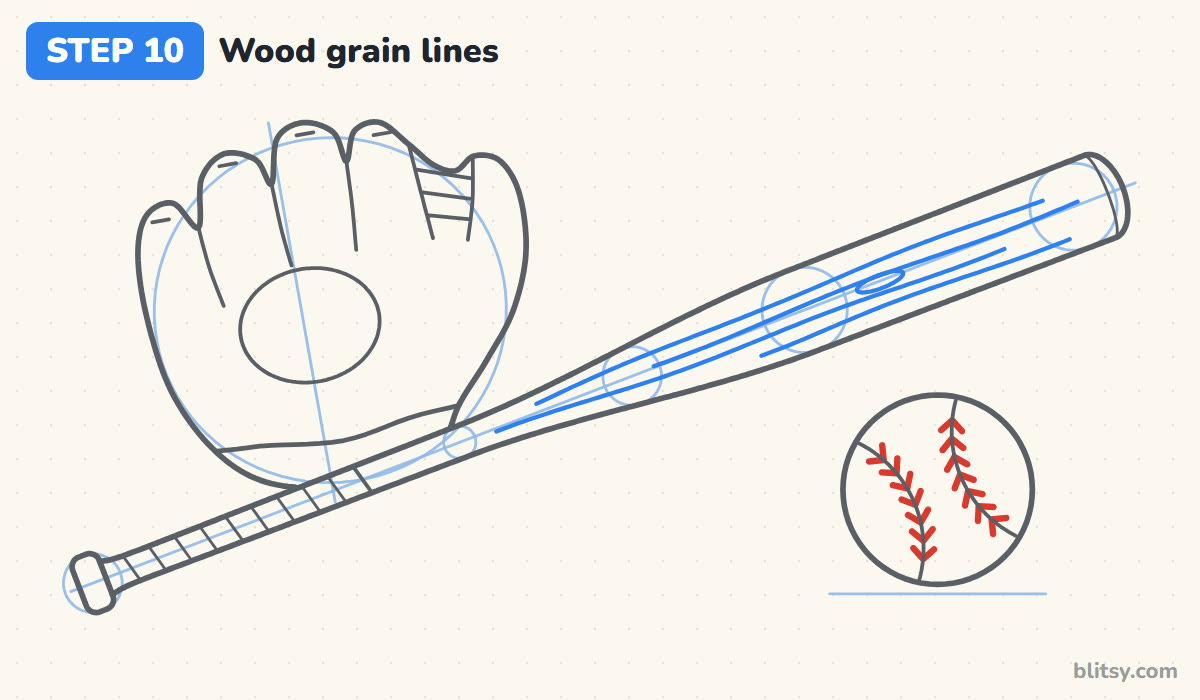
Grain runs along the length of the bat, so draw four long, gently wavy lines from the taper up to the barrel, starting and stopping at different spots. Add one small oval knot near the top. Leave the handle bare, since the tape covers it.
💡 Tip: Fewer grain lines look cleaner than many; four is plenty for this size.
Step 11: Ink the drawing and erase the guides
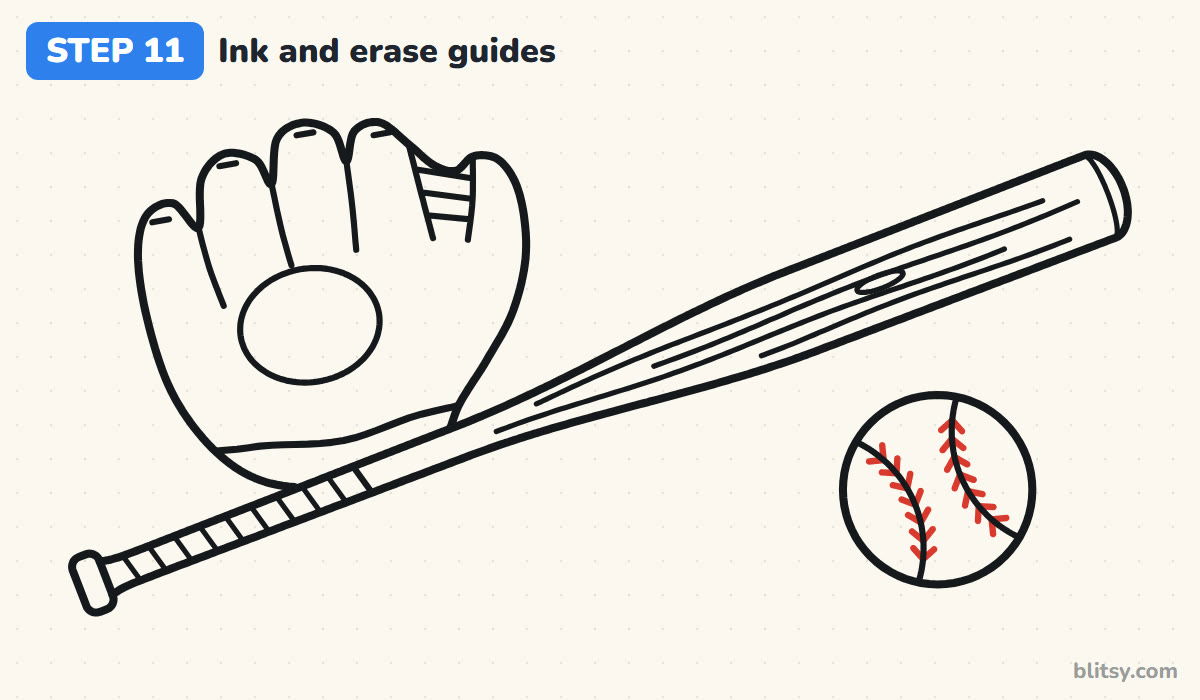
Trace every keeper line with the black pen, going slowly around the knob and the fingertips. When the ink is dry, erase the centre line, all the circles and the floor line under the ball. The red stitches stay as they are.



💡 Tip: Test the ink with a fingertip in a corner before you start erasing.
Step 12: Color the bat, the ball and the glove
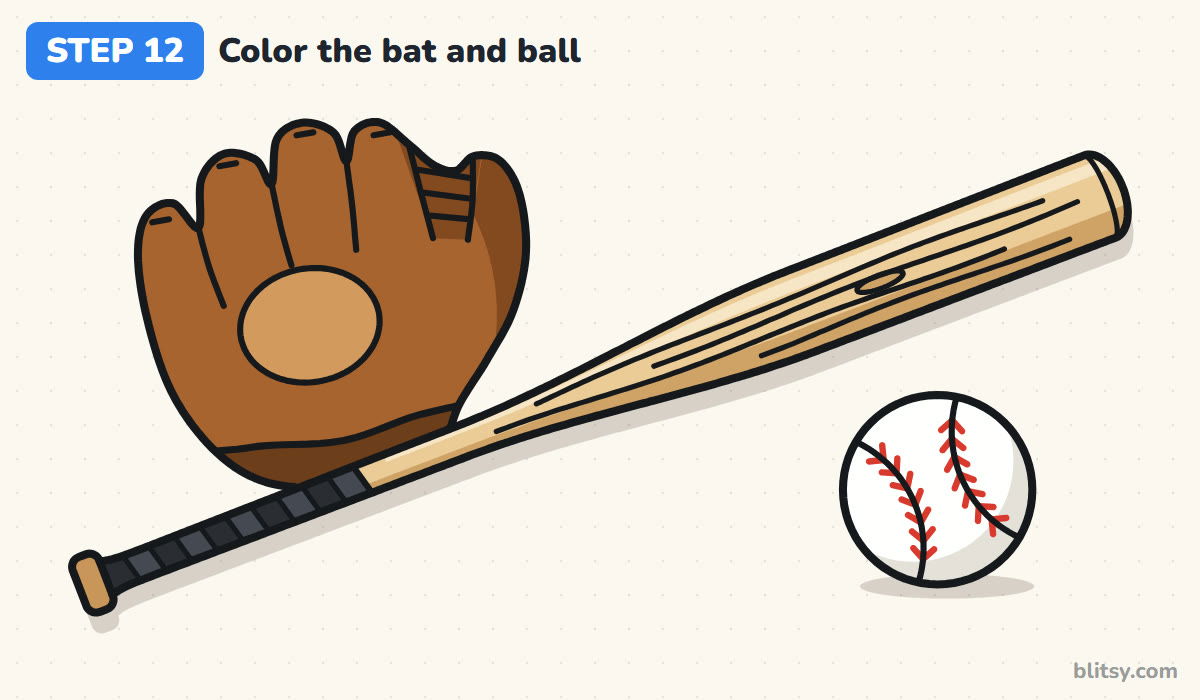
Fill the bat with light tan, then add light brown along its lower edge so it looks round. Color the tape black and the knob a warm brown. The glove gets brown, with dark brown on the thumb side and the strap and a lighter orange-brown in the pocket. Leave the ball white with a hint of gray at the bottom.
💡 Tip: Color the bat along its length, not across it, so the strokes look like wood.
Where Bat Drawings Tend to Go Wrong
- A bat with straight sides. Without a taper it reads as a stick or a rolling pin. Use the shrinking circles and let the outline touch each one.
- A barrel that ends in a point. Real bats end in a soft dome. Round the tip like the end of a capsule.
- A handle as thick as the barrel. The handle should be about a third of the barrel's thickness, thin enough to wrap a hand around.
- Baseball seams drawn as an X. The two seams never cross. They curve toward each other and stay apart, like ( and ) turned around.
- Glove lines crossing the bat. When one object sits behind another, its lines stop at the edge. Lift the pencil where the glove meets the handle.
New Twists on Your Baseball Bat
After my first wooden bat, I like trying a shiny metal one: color it silver or bright blue, skip the grain and leave a white stripe for the shine. You can also stand the bat upright against a fence, or swap the tape color for red or green to match your favorite team. If you're filling a sports page, the basketball drawing tutorial makes a good next ball to try, and a pair of sneakers from this shoe drawing tutorial fits right beside the glove.
Free Baseball Bat Coloring Page and Printable Step Guide
The baseball bat coloring page has the bat, the ball and the glove in thick outlines, with a colored example and a color key at the top so kids can match the shades. The step-by-step guide PDF puts all 12 steps and their tips on paper, and it prints on Letter or A4.
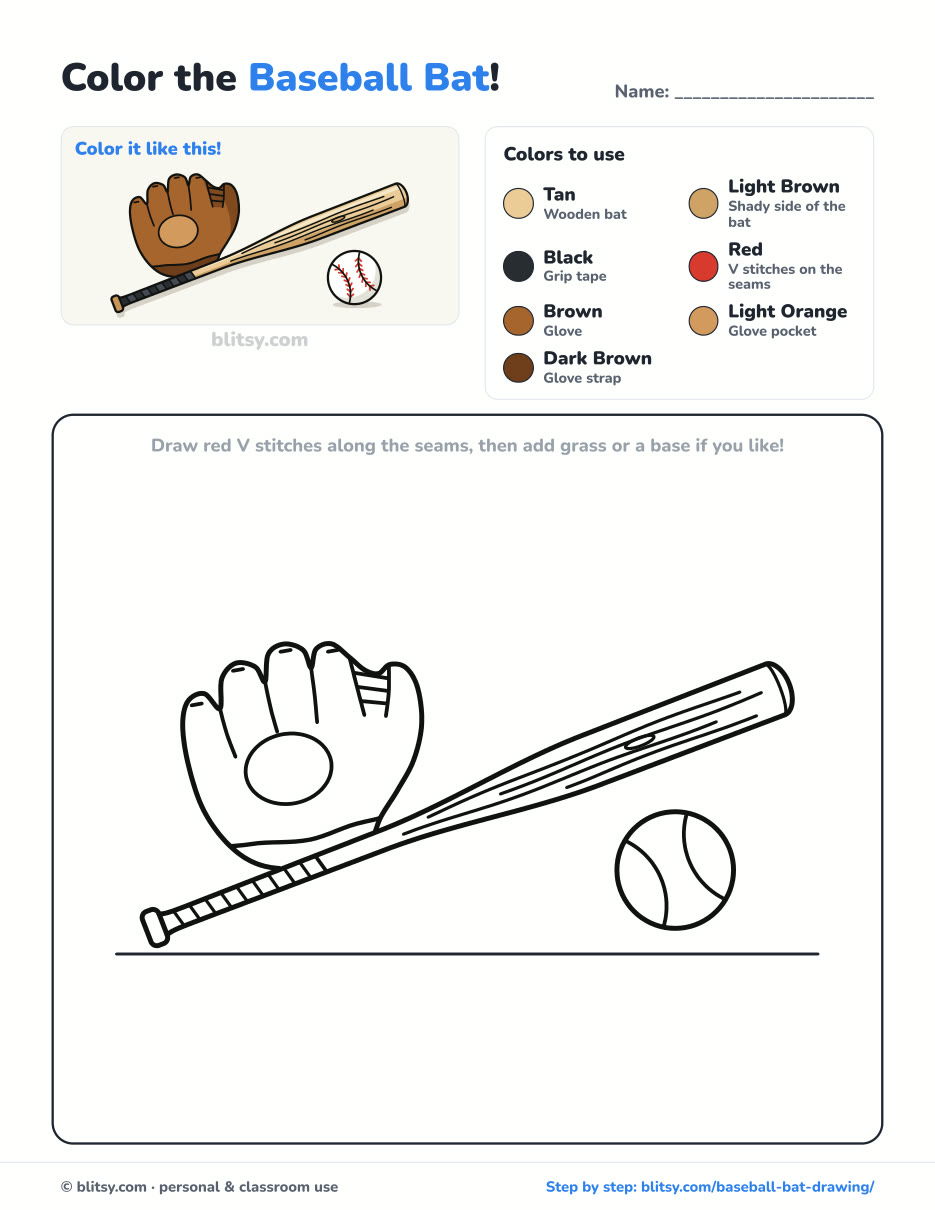
Black outlines with a colored example and the color names at the top. Ready to print and color.
⬇️ Download Coloring PageEvery step picture with its instructions and tips, to keep beside your paper while you draw.
⬇️ Download Drawing Guide📱 On a phone? Tap a download button, then open the file and choose Share → Save to Files or Print. On a computer, the PDF opens or saves straight to your Downloads folder.
Every Bat Step on One Tall Image
Batter Up for More Step-by-Step Lessons
These are full step-by-step tutorials, mostly vehicles and objects, which suit anyone who liked drawing the bat's clean shapes.
- Realistic Drawing: Learn light, value and shadow on one red apple in this realistic drawing step by step lesson.
- Train Drawing: Boxes and circles build a red and blue steam engine in the how to draw a train tutorial.
- Monster Truck Drawing: The monster truck drawing tutorial lifts a flame-painted pickup onto giant tires.
- UFO Drawing: A green alien peeks out of a flying saucer in this UFO drawing step by step guide.
- Castle Drawing: Three towers and a drawbridge over the moat finish the castle drawing tutorial.
- Tank Drawing: Draw a friendly olive cartoon tank with a long track loop in the how to draw a tank lesson.
- Rocks Drawing: The rocks drawing tutorial shows why flat sides make a boulder look solid.
- Rocket Drawing: A cartoon rocket blasts off through puffy smoke in this rocket drawing step by step lesson.
- Bed Drawing: One light box in perspective becomes a cozy bed in the bed drawing tutorial.
- Diamond Drawing: Straight lines are all you need for the how to draw a diamond lesson, which adds two smaller gems.
Baseball Drawing Questions From Young Players
What is the easiest way to draw a baseball bat?
Draw a slanted centre line, then circles along it that get smaller toward one end. Connect the edges of the circles and you have the taper. Add a knob at the thin end.
How do you draw the stitches on a baseball?
Draw two curved seams that bend toward each other without touching. Then add small red V shapes along each seam, all pointing the same way.
Can little kids draw a baseball bat?
Yes. The bat and the ball alone are simple enough for young kids. The glove has more parts, so they can leave it out or draw it as a big mitten.
What colors do you need for a wooden bat?
A light tan for the wood and a light brown for the shady side are enough. Add black for the grip tape and a warm brown for the knob.
Start with that one slanted line and let the circles do the measuring. Once the taper clicks, you'll be drawing bats from every angle. ⚾✏️
Related posts:
 How to Draw a Basketball Step by Step (Ball, Hoop and Net)
 How to Draw a Princess Step by Step (Easy Ball Gown Cartoon)
 How to Draw a Whale Step by Step (Easy for Beginners)
 How to Draw Lungs Step by Step (Easy Science Diagram)
 How to Draw a Pineapple Step by Step (Easy Crown and Slice)
 How to Draw Iron Man Step by Step (Easy Chibi for Kids)
 How to Draw a Dress Step by Step (Easy Party Dress)
 How to Draw a Chicken Step by Step (Easy for Beginners)
 How to Draw a UFO Step by Step (Cute Alien Saucer)
 How to Draw a Volcano Step by Step (Easy Erupting Volcano)
 How to Draw a Crow Step by Step (Easy for Beginners)
 How to Draw a Tiger Step by Step (Easy Walking Pose)

