
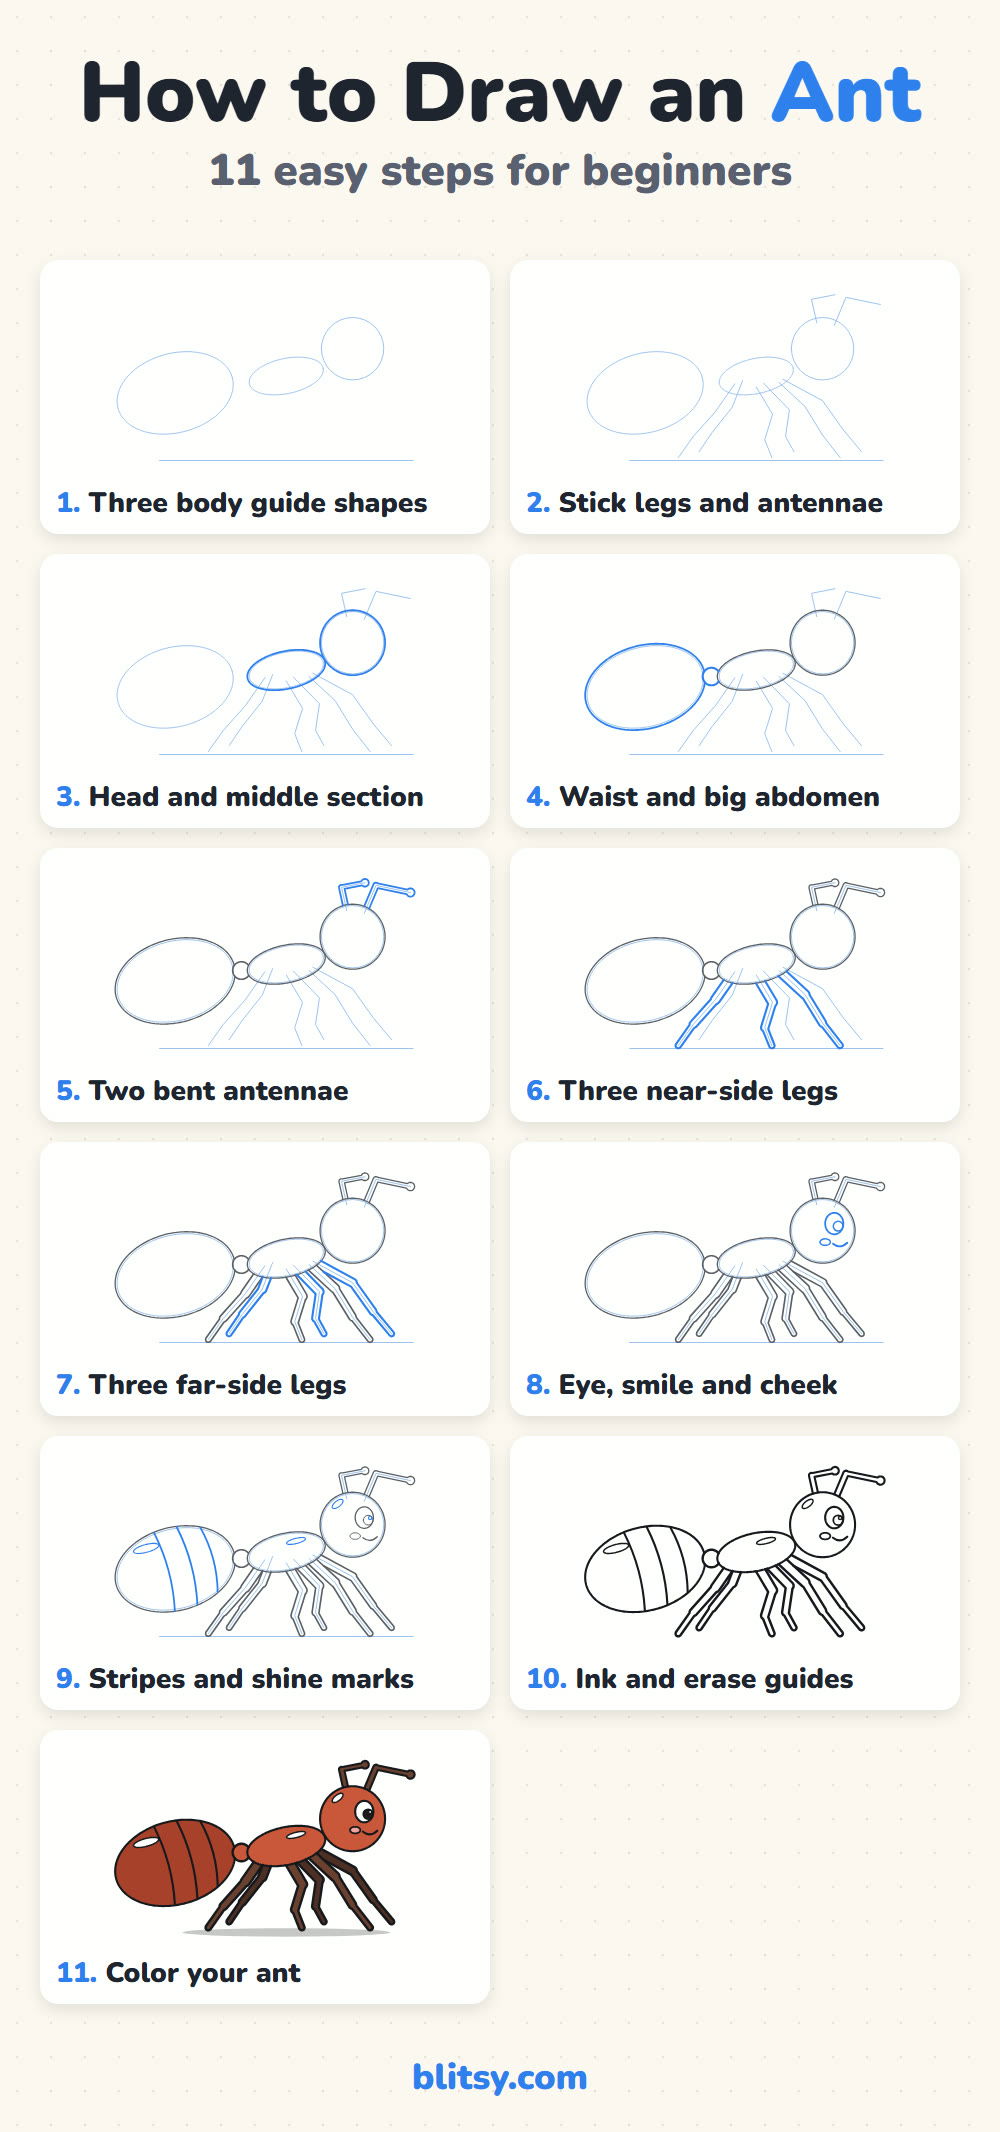
Ants are tiny, but their bodies follow a pattern so tidy that you can draw one from three ovals and a handful of bent lines. Here I'll walk you through how to draw an ant step by step, from light guide shapes to a cheerful red ant standing on six legs. People usually miss where the legs go and how the antennae bend, so we fix both early. Bring a pencil and a little patience for the legs.
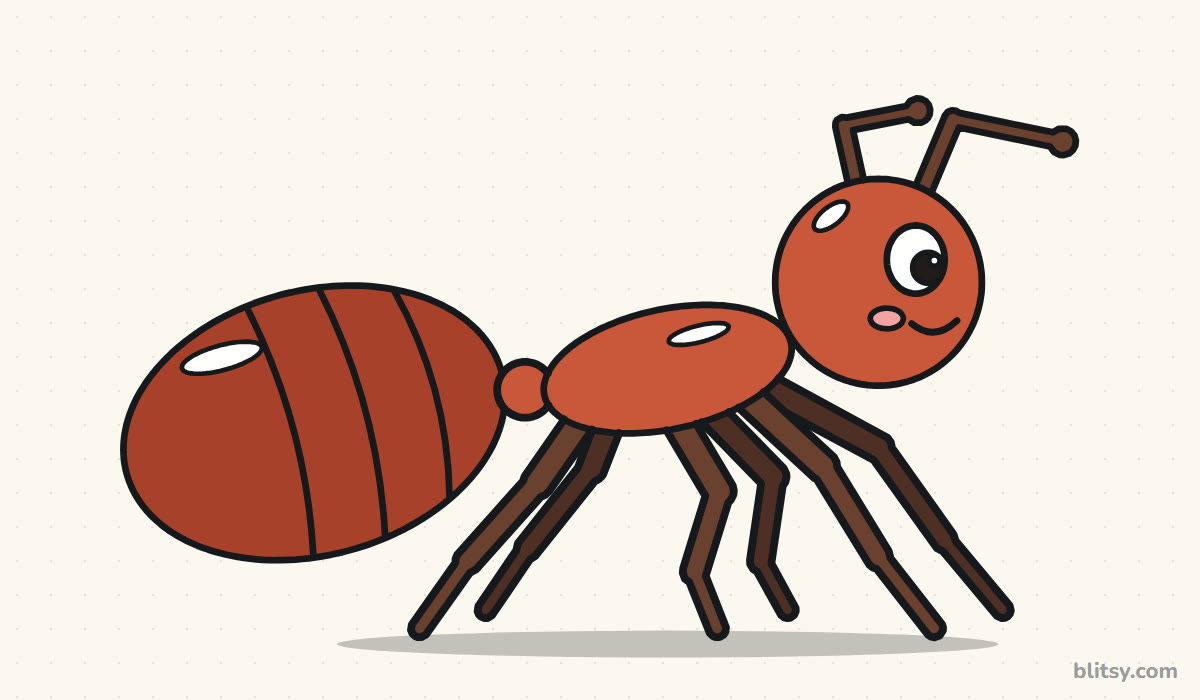
Blue shows you what to add right now. Gray lines are from earlier steps, so you can check your page against the picture and see exactly where the new part joins on.
Quick overview
⏱️ Time: around 25 minutes with coloring
🎯 Level: easy, good for kids from about 6
✏️ Steps: 11
🐜 You'll draw: a friendly red ant seen from the side
Tools for a Tiny Six-Legged Sketch
- A pencil you can press lightly with
- An eraser that doesn't smear
- A black fineliner or thin marker
- Red, dark red and brown colored pencils or crayons
- A scrap of pink for the cheek
- Plain paper turned sideways
Turn the paper landscape, since an ant is long and low, and the abdomen and front legs need room on both ends.
How to Draw an Ant Step by Step
Step 1: Sketch three body guide shapes
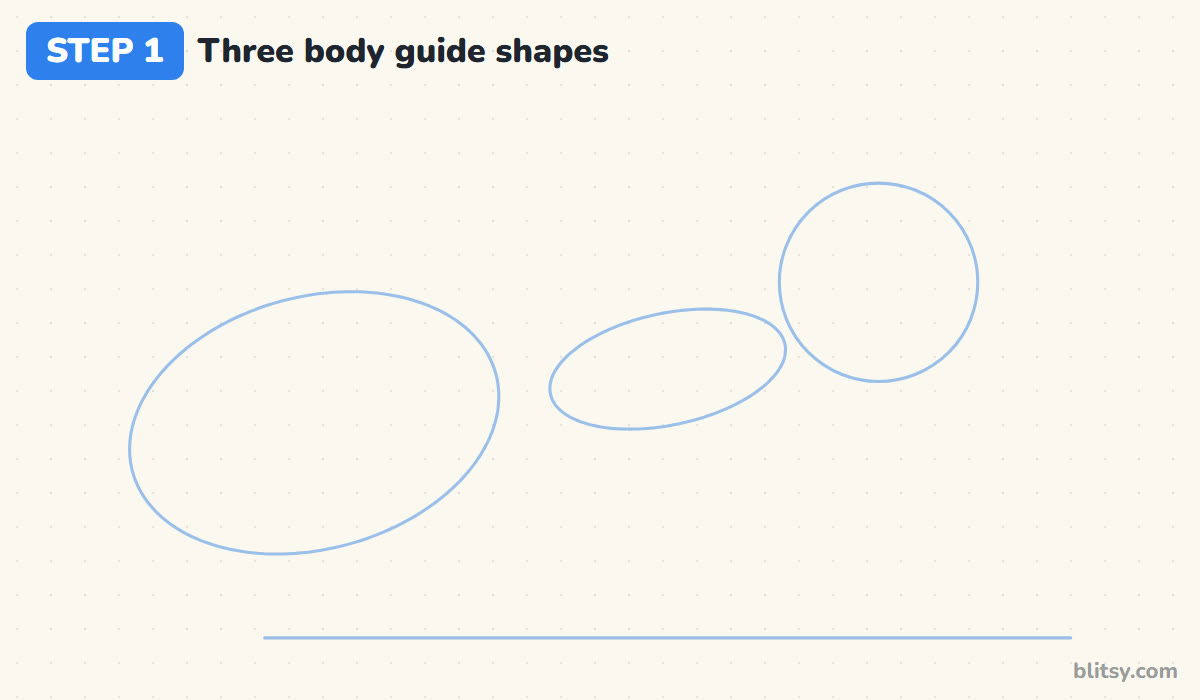
Start with a long, light ground line near the bottom of the page. Above it, draw three shapes in a row: a big tilted oval on the left for the abdomen, a smaller flat oval in the middle for the thorax, and a circle on the right, a little higher, for the head. Leave a small gap between the big oval and the middle one. That gap becomes the waist in step 4.
💡 Tip: Hold the pencil far back from the tip. You'll press more softly without trying.
Step 2: Add stick legs and antennae
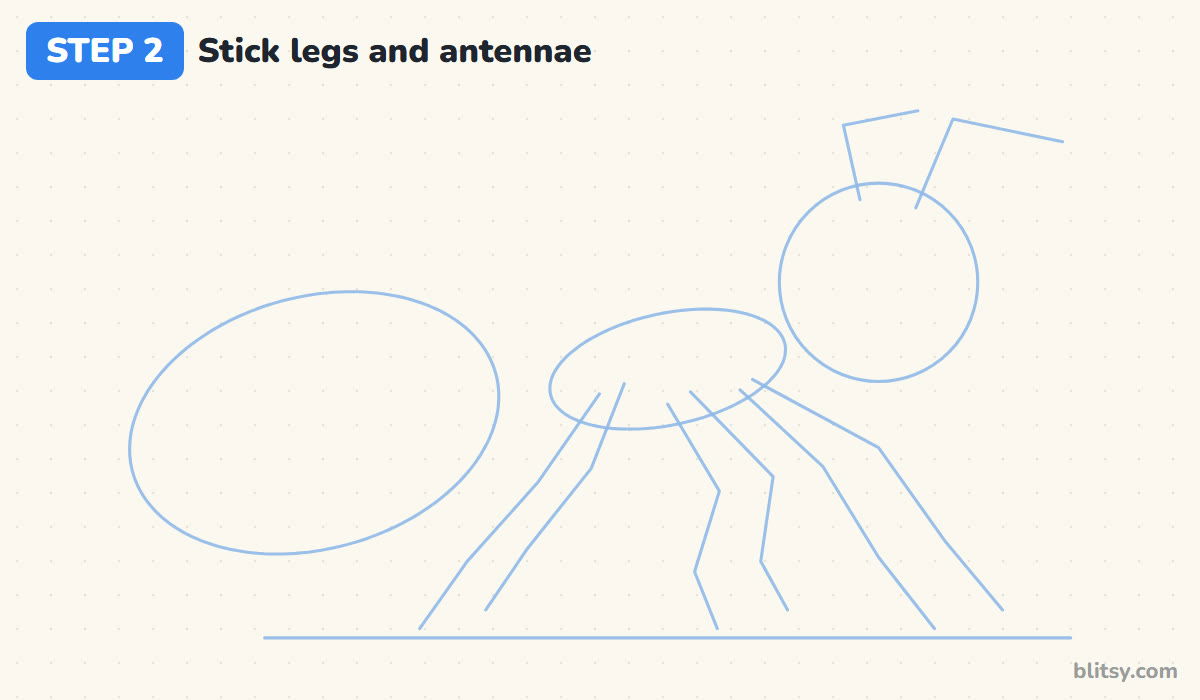
Here's the rule that makes an ant look right: every leg starts on the middle oval. Draw six stick lines from its underside, three on the near side and three more just in front of them for the far side. Bend each stick twice, like a zigzag, so it has a knee and an ankle. On top of the head, draw two sticks that go up and then bend sharply forward.
💡 Tip: Count the sticks out loud as you draw them. Six is easy to lose track of.
Step 3: Outline the head and middle section
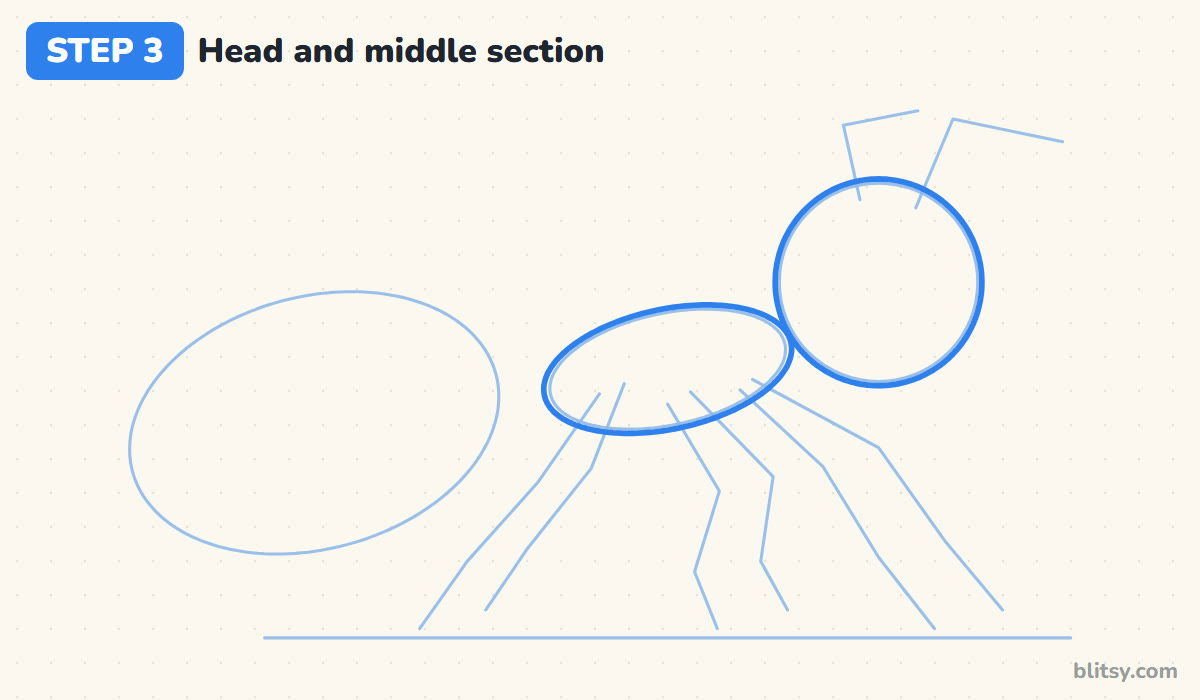
Go over the head circle with a firmer line. Then trace the middle oval, letting its right end tuck just behind the head so the two shapes touch. I tilt this oval slightly upward toward the head, because a flat thorax makes the ant look like it's slumping.



💡 Tip: Turn your paper so your hand curves naturally around the circle.
Step 4: Draw the waist and the big abdomen
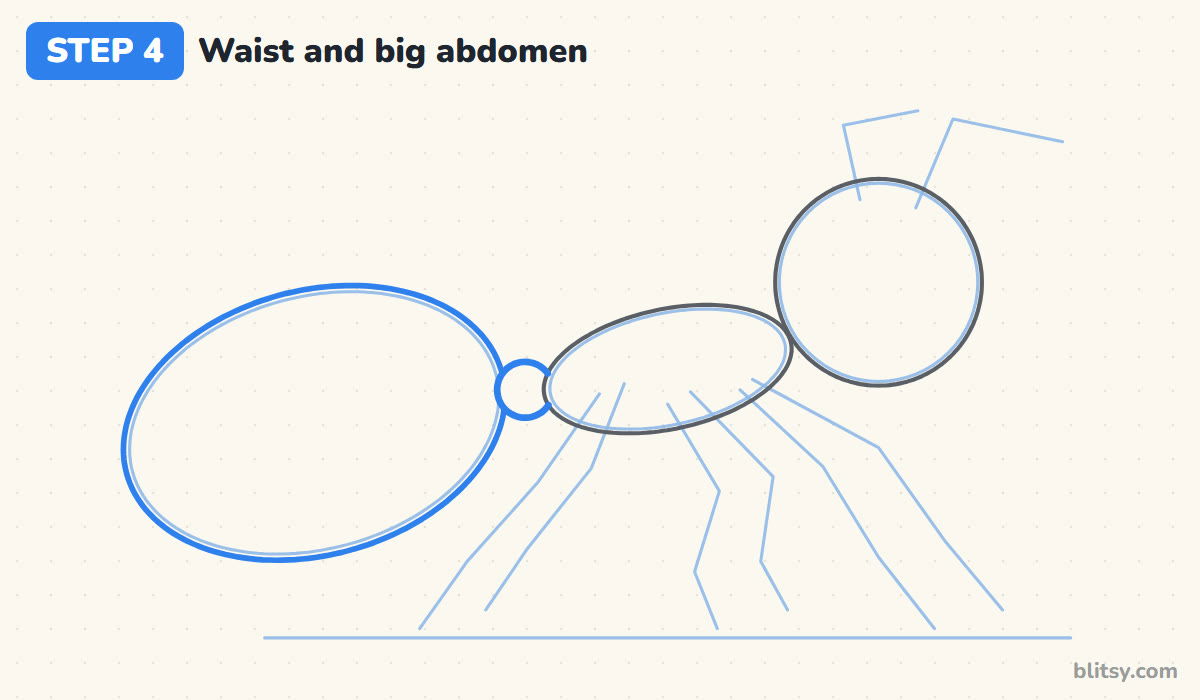
In the gap between the middle oval and the big one, draw a small circle that touches both. This bead is the ant's narrow waist, and it's the detail that stops your ant from looking like a bug or a beetle. Now outline the big oval for the abdomen. Keep it the largest shape on the page, roughly twice the size of the head.
💡 Tip: Make the waist bead small. A big one turns the ant into a string of beads.
Step 5: Turn the sticks into two bent antennae
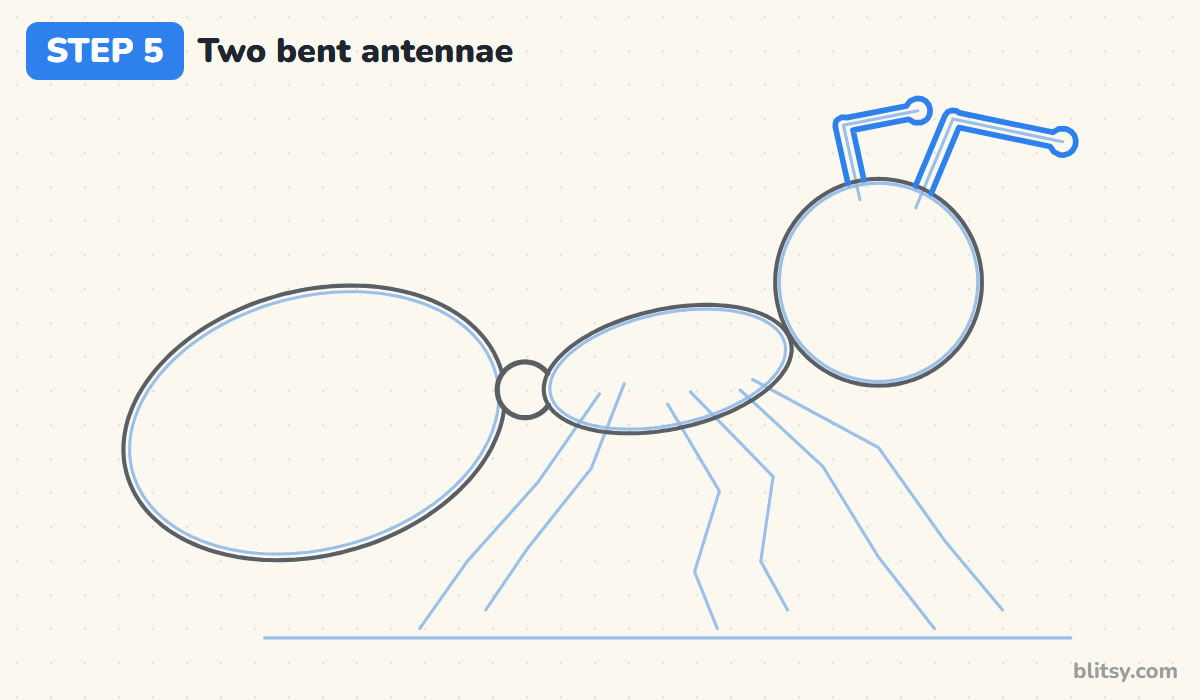
Thicken each antenna stick into a narrow tube by drawing a line on both sides of it. Follow the elbow: up first, then a sharp turn forward. Finish each one with a small round knob at the tip. Let the near antenna be a little longer, which adds depth for free.
💡 Tip: Draw the outside edge of the elbow first. The inside edge is easier to fit after that.
Step 6: Draw the three near-side legs
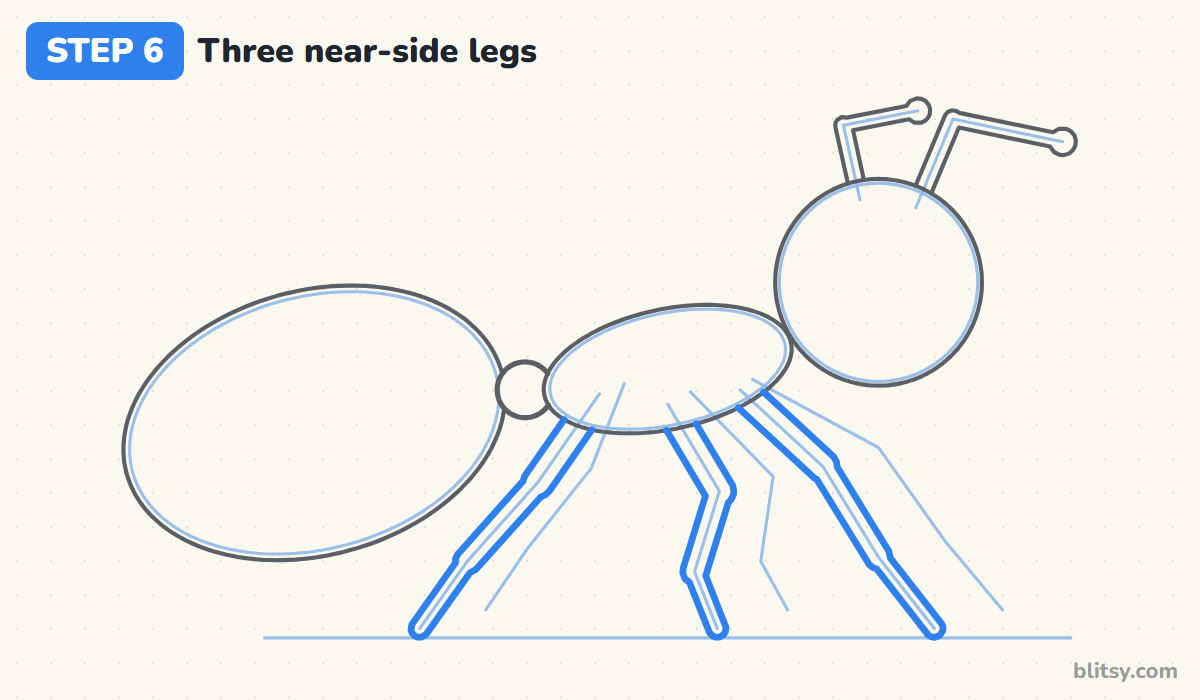
Wrap a tube around the three closest leg sticks, the ones that reach the ground line. Start each leg right at the bottom edge of the middle oval and leave out any line inside the body. Make the top part of each leg a bit thicker and let it taper toward the foot, with a small bump at each bend. The front leg reaches forward, the middle one stands under the body, and the back one stretches behind.
💡 Tip: Thin feet and thick thighs look natural. Keep the width shrinking as you go down.
Step 7: Add the three far-side legs
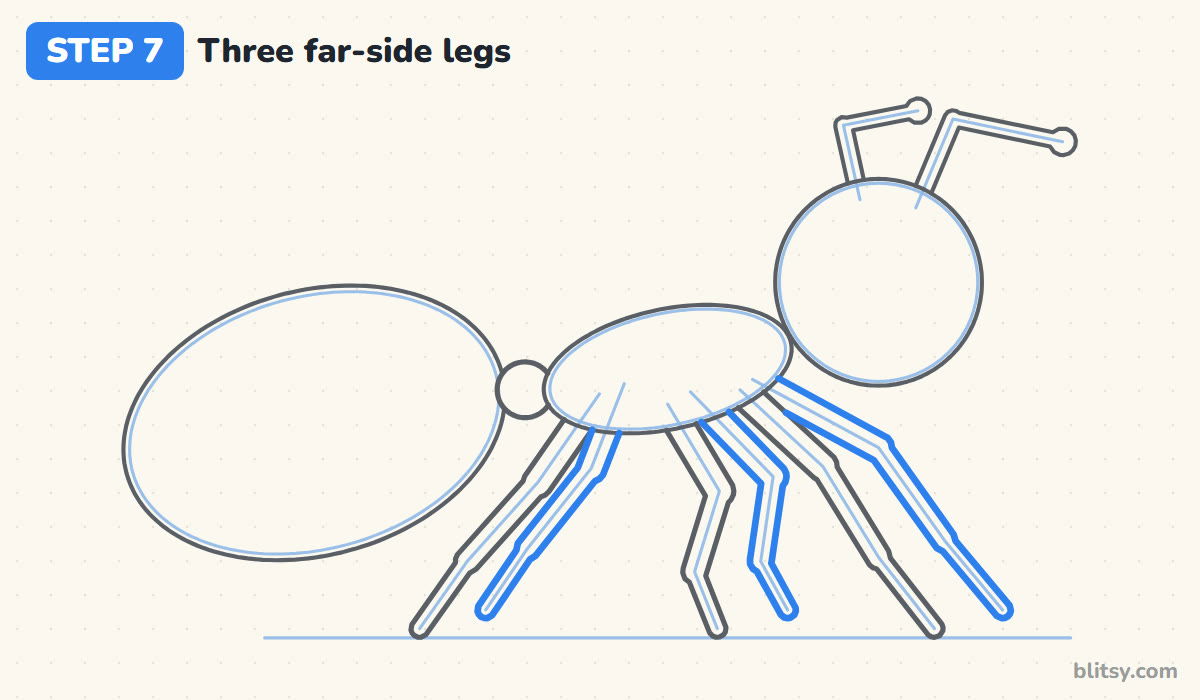
The other three legs sit just in front of the first ones and stop a little higher, because they're farther away from us. Wherever a near leg crosses in front, stop your line at its edge instead of drawing through. Most beginners skip the far legs or draw all six from one point. Spread them along the body and the ant suddenly stands properly.

💡 Tip: Lift the pencil where a far leg disappears behind a near one.
Step 8: Draw the eye, smile and cheek
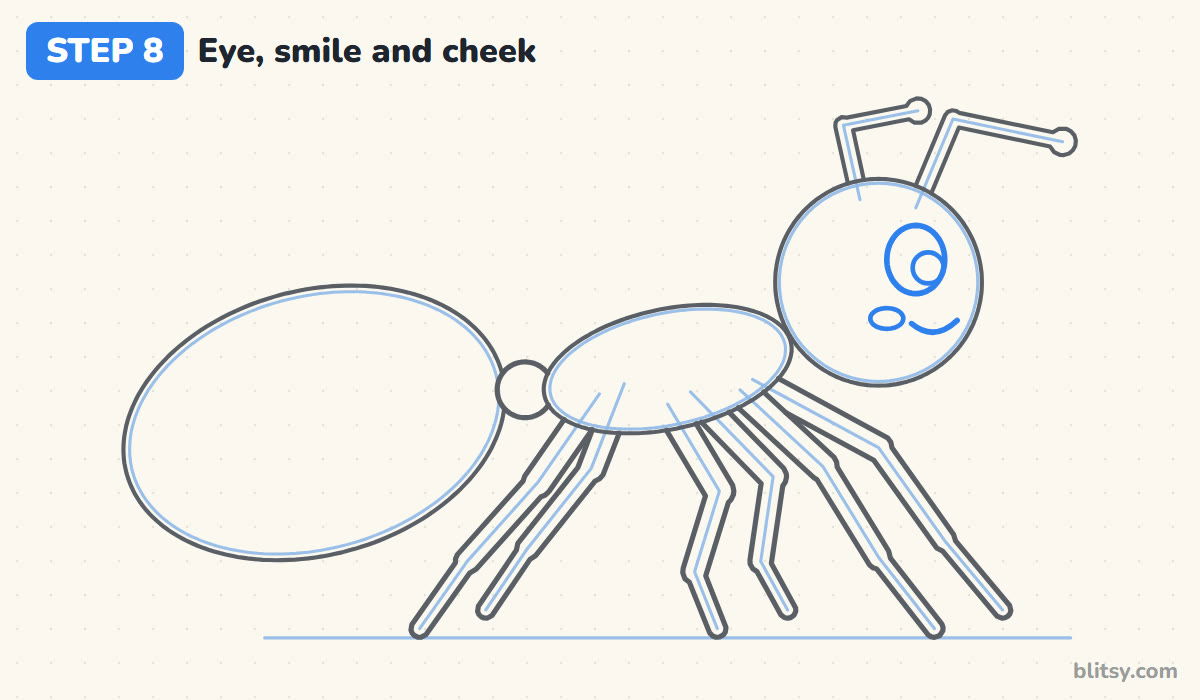
Place one tall oval eye in the upper right part of the head, since we only see one side of the face. Add a round pupil inside it, pushed toward the front so the ant looks where it's walking. Under the eye, draw a short curved smile near the front of the head and a small flat oval for a cheek just behind it.
💡 Tip: Keep the smile short. A wide grin crowds the little head fast.
Step 9: Add stripes and shine marks
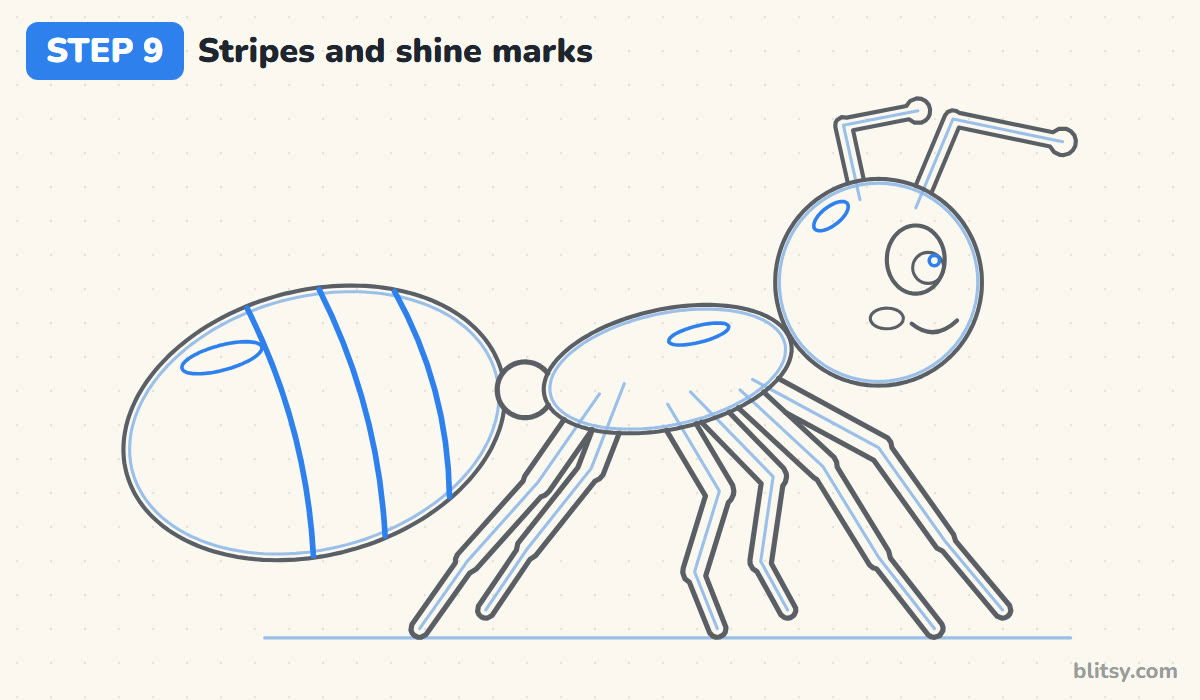
Draw three curved lines across the abdomen, each running from the top edge to the bottom edge and bowing slightly toward the waist. These are the ring segments real ants have. Then add a few small, thin ovals for shine: one on the abdomen, one on the thorax, one on the head, plus a dot in the eye. They make the shell look glossy.
💡 Tip: Put every shine mark on the upper left so the light seems to come from one place.
Step 10: Ink the lines and erase the guides
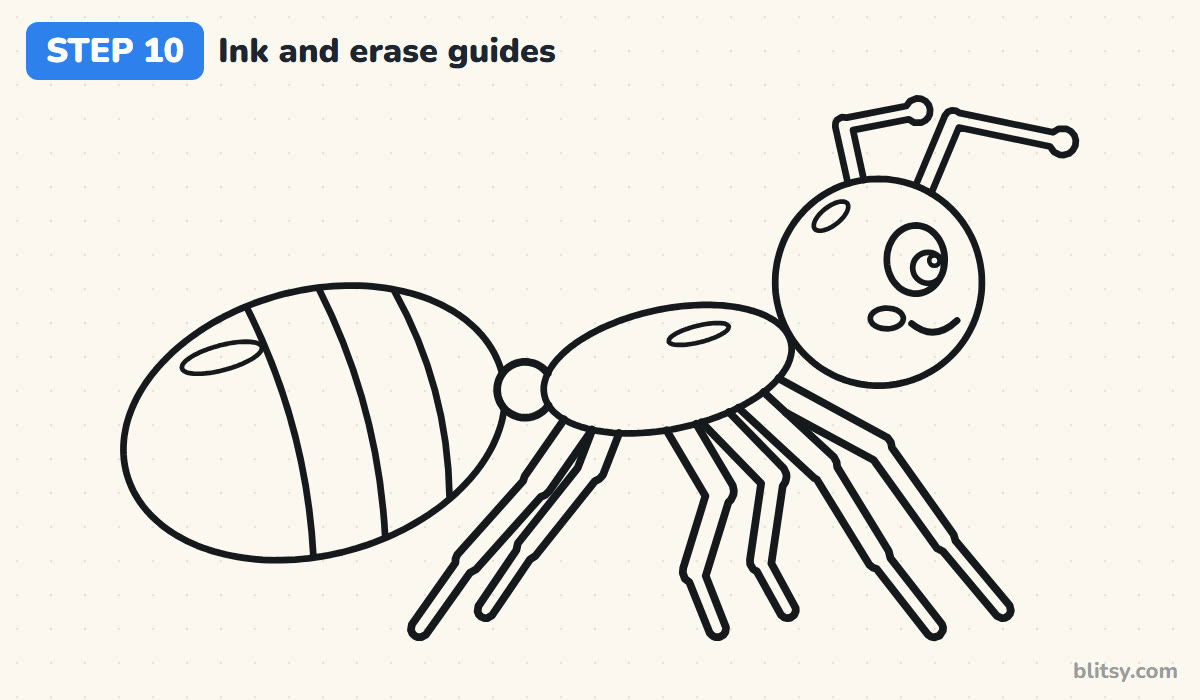
Trace all the final lines with your fineliner. I ink the legs slowly, one edge at a time, since they're the easiest place to wobble. Leave the guide ovals and leg sticks alone. Once the ink is fully dry, rub out the pencil so only the clean outline remains.
💡 Tip: Wait a full minute before erasing. Fresh ink smears into a gray mess.
Step 11: Color your ant
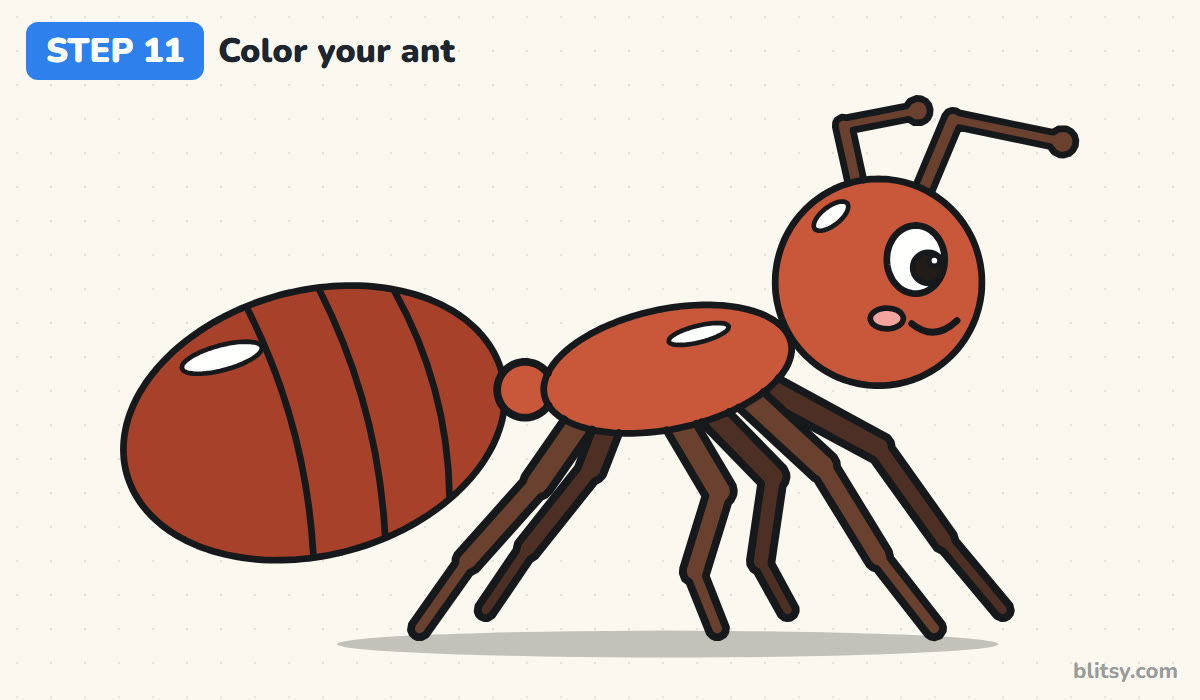
Color the head and the middle section a warm red, waist included, and use a darker red for the big abdomen. The near legs and antennae are brown, while the far-side legs get a deeper brown so they sink into the background. Fill the eye white, the pupil black and the cheek pink. Leave the shine marks white and finish with a soft gray shadow under the feet.
💡 Tip: Press harder on the abdomen than on the head. That alone gives you the darker red.
Ant Shapes That Go Wrong Most Often
- Legs coming out of the abdomen. All six legs belong to the middle section. Move them forward so the big oval has none.
- Straight, stiff legs. Real ant legs have joints. Bend each one twice and the ant looks like it could walk off the page.
- Antennae drawn like curly springs. An ant's antennae go up and then bend at a sharp elbow. Curls make it look like a butterfly.
- No waist. Without the little bead between thorax and abdomen, the body reads as a caterpillar. Keep that narrow link.
- A tiny abdomen. The back section should be the biggest part. If yours is smaller than the head, redraw it larger.
Colony Ideas and Other Ant Variations
Once one ant works, draw a line of them marching across the page, each one a little smaller as they go into the distance. Give one ant a leaf to carry over its head, or a crumb that's far too big for it. For a black ant, color everything dark gray and keep the shine marks white. Younger kids can skip the far-side legs and the stripes, and the drawing still looks like an ant. For another insect lesson, my dragonfly drawing tutorial pairs nicely with this one, and if you'd like to paint bugs instead, try this ladybug rock painting guide.
Ant Coloring Page With a Matching Step PDF
The free ant coloring page shows a colored ant at the top to copy, a short key naming each color and the part it goes on, and a big outline underneath with room to add a leaf or an anthill. The step-by-step PDF guide holds all 11 steps with pictures and tips. Both fit Letter or A4 paper.
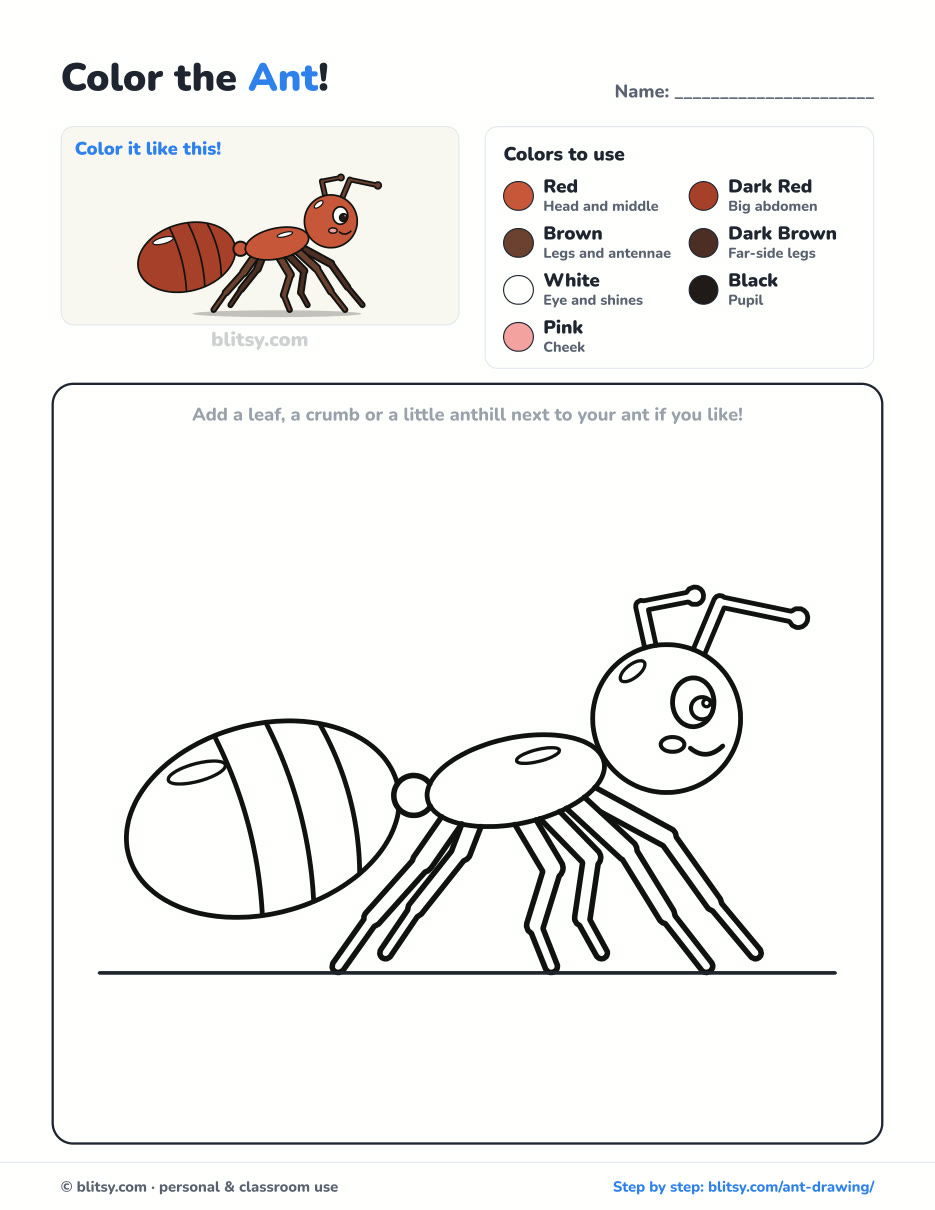
Black outlines with a colored example and the color names at the top. Ready to print and color.
⬇️ Download Coloring PageEvery step picture with its instructions and tips, to keep beside your paper while you draw.
⬇️ Download Drawing Guide📱 On a phone? Tap a download button, then open the file and choose Share → Save to Files or Print. On a computer, the PDF opens or saves straight to your Downloads folder.
Stash All Eleven Ant Steps in One Pin
Ant Done? Draw One of These Creatures Next
These are complete step-by-step lessons like the ant above, each one starting from a few light shapes.
- Arctic Fox Drawing: This arctic fox drawing tutorial ends with a sitting fox, cheek tufts out and tail curled to the side.
- Puppy Drawing: Learn how to draw a puppy step by step, tongue out and collar on, in eleven steps.
- Narwhal Drawing: A narwhal with its tusk pointed up takes 11 steps in the easy narwhal drawing tutorial.
- King Kong Drawing: Draw the giant gorilla with fists down and mouth open using the how to draw King Kong guide.
- Whale Drawing: For something calm and round, follow the whale drawing step by step lesson and finish a happy blue whale with its spout.
- Kitten Drawing: One ginger kitten sits politely at the end of this kitten drawing tutorial.
- Godzilla Drawing: Start with two ovals and finish with a friendly kaiju in the Godzilla drawing step by step guide.
- Sloth Drawing: The easy sloth drawing tutorial leaves you with a sloth hanging from its branch and smiling.
- Miraculous Ladybug Drawing: Ant fans who like spots can try how to draw Miraculous Ladybug, a chibi hero with her mask and yo-yo.
- Realistic Drawing: Practice real shading on a single apple with this realistic drawing step by step lesson, lit by one lamp.
- Paw Print Drawing: The paw print drawing tutorial shows a dog print and a cat print side by side, with a little heart between them.
- Dragonfly Drawing: Another insect with wings spread wide waits in this dragonfly drawing tutorial, ten steps long.
- Penguin Drawing: Draw a penguin with rosy cheeks and flippers out for balance using the how to draw a penguin lesson.
- Rat Drawing: A curious gray rat, nose first with its tail curled behind, is what you get from the rat drawing step by step guide.
What Beginners Ask Me About Drawing Ants
What is the easiest way to draw an ant?
Draw three ovals in a row for the head, thorax and abdomen, link the back two with a small waist bead, then add six bent legs to the middle oval and two elbowed antennae on the head.
How many legs does an ant have, and where do they go?
Six. All of them attach to the middle section, the thorax, with three on each side. In a side view you see three near legs and three far ones peeking out behind.
How do you draw a cute ant for kids?
Make the head big and round, give it one large eye with a shine dot and a small smile, and use thick legs. Kids can leave out the far legs and the stripes.
How long does it take to draw an ant?
Around 25 minutes including color. The legs take the longest, so give them a few extra minutes and don't rush the bends.
Sketch those three ovals, bend six little legs, and send your ant off to find its first crumb. 🐜✏️
Related posts:
 How to Draw a Car Step by Step (Easy Drawing for Beginners)
 How to Draw a Whale Step by Step (Easy for Beginners)
 How to Draw a Rat Step by Step (Easy for Beginners)
 How to Draw an Arctic Fox Step by Step (Easy for Beginners)
 How to Draw a Rose Step by Step (Spiral Method for Beginners)
 How to Draw Olaf Step by Step (Easy for Beginners)
 How to Draw a Ladybug Step by Step (Easy for Beginners)
 How to Draw a Dog Step by Step (Easy Side View for Beginners)
 How to Draw a Leopard Step by Step (Easy for Beginners)
 How to Draw a Light Bulb Step by Step (Easy for Beginners)
 How to Draw a Crow Step by Step (Easy for Beginners)
 How to Draw an Eagle Step by Step (Easy for Beginners)

