
That huge fan of eyespots scares a lot of people off, but a peacock is really a small bird standing in front of a decorated half circle. In this lesson I'll show you how to draw a peacock step by step, from three light guide shapes to a finished bird in royal blue with a green and gold tail. Every eye feather is the same teardrop repeated, so the hardest part is simply staying patient.
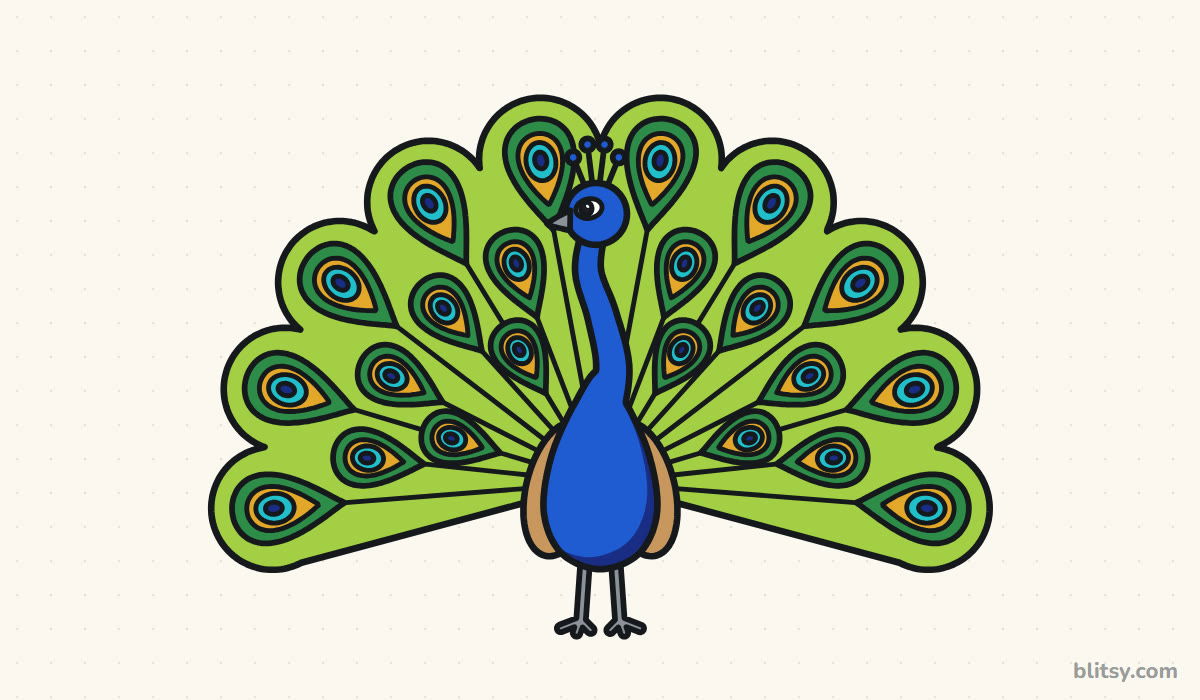
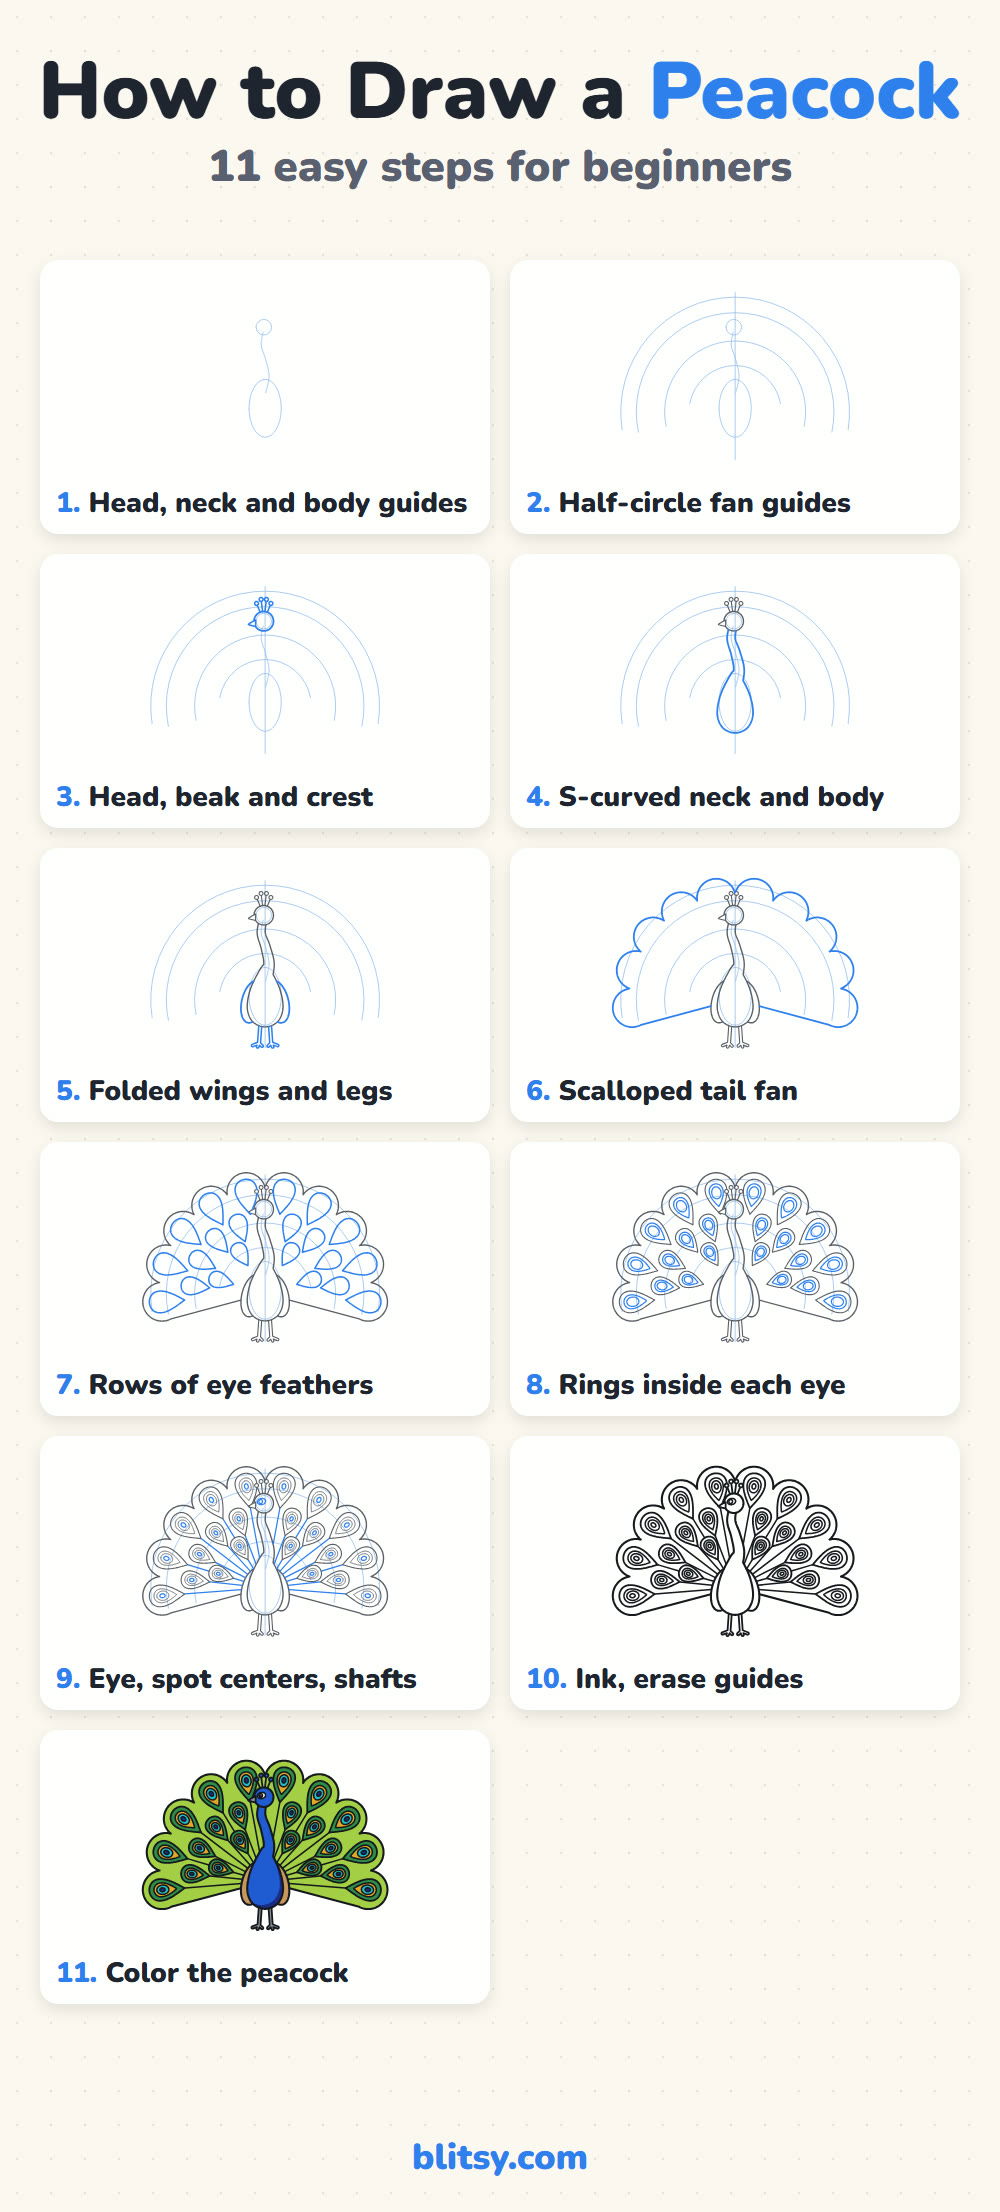
Blue lines show what you add in each picture, and gray lines are work you already did. Pale blue marks guide shapes. Draw those with almost no pressure, because they get erased in step 10.
Quick overview
⏱️ Time: about 40 to 50 minutes
🎯 Level: medium, good for kids aged 8 and up with some patience
✏️ Steps: 11
🦚 You'll draw: a peacock facing you with its tail fanned out in a half circle
Tools for Drawing a Proud Peacock
- A light pencil, such as an HB or 2H
- A clean eraser that won't smudge
- A black fineliner or thin marker
- Colored pencils or markers in blues, greens and a gold
- A sheet of paper turned sideways, since the fan is wide
A gold or yellow-orange pencil makes the eyespots glow, so set it aside before you start coloring.
How to Draw a Peacock Step by Step
Step 1: Sketch the guide shapes
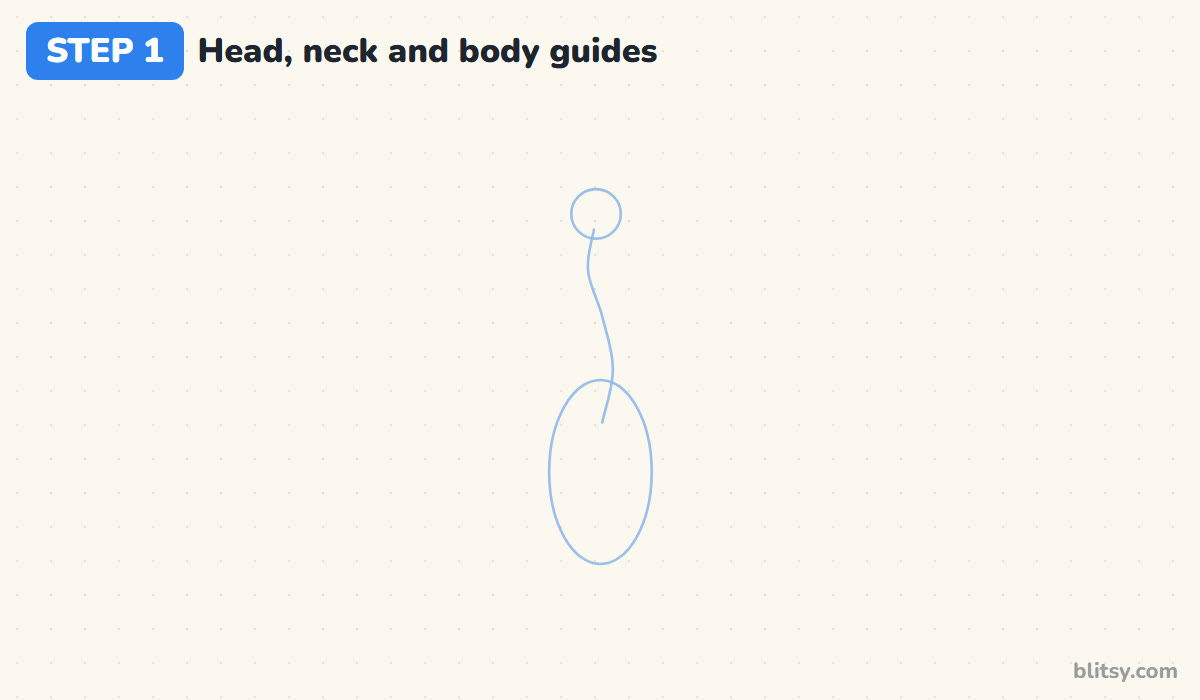
Start near the top middle of your page with a small circle for the head. Far below it, draw a tall oval for the body, then join the two with a gentle S-shaped line for the neck. Leave plenty of room on both sides, because the tail fan will spread almost to the edges of the paper.
💡 Tip: Lay your pencil almost flat and let it glide. Guides should be barely visible.
Step 2: Add the half-circle fan guides
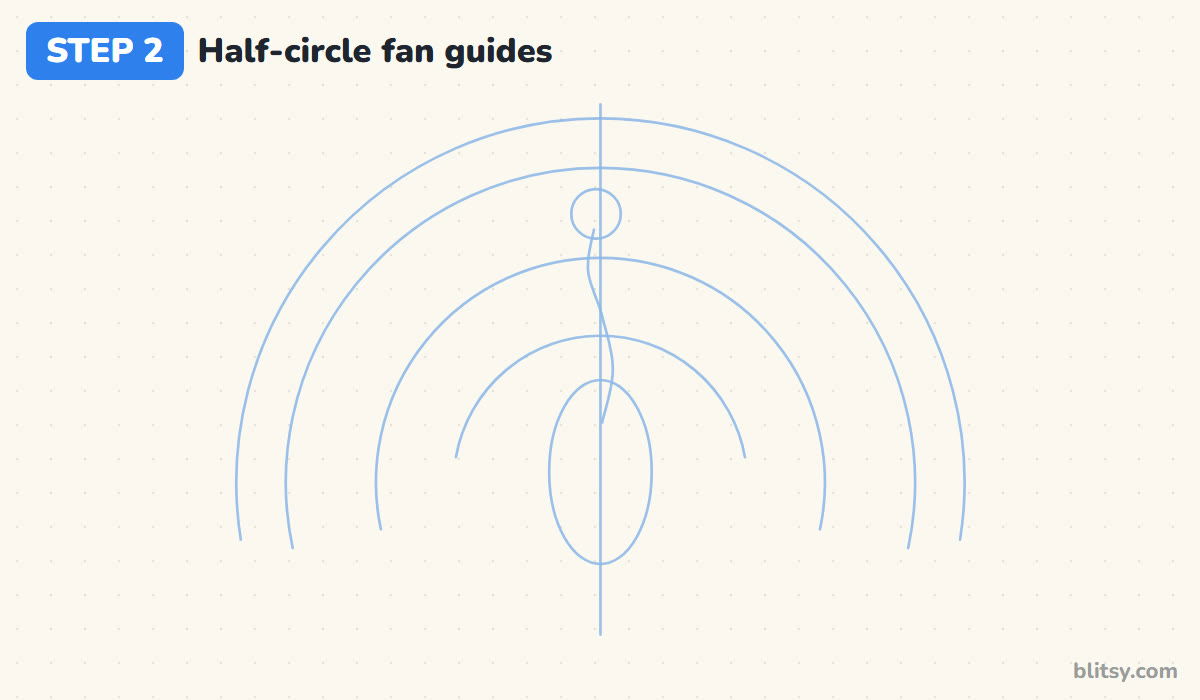
Draw a straight line down the center. Then sketch one big half circle around the bird, with the oval near its bottom middle, and two smaller half circles inside it. These three arcs are the rows where your eye feathers will sit. I take my time making the arcs even, because a lopsided fan is the first thing anyone notices.
💡 Tip: Turn the page upside down to check the arcs. Uneven sides jump out right away.
Step 3: Draw the head, the beak and the crest
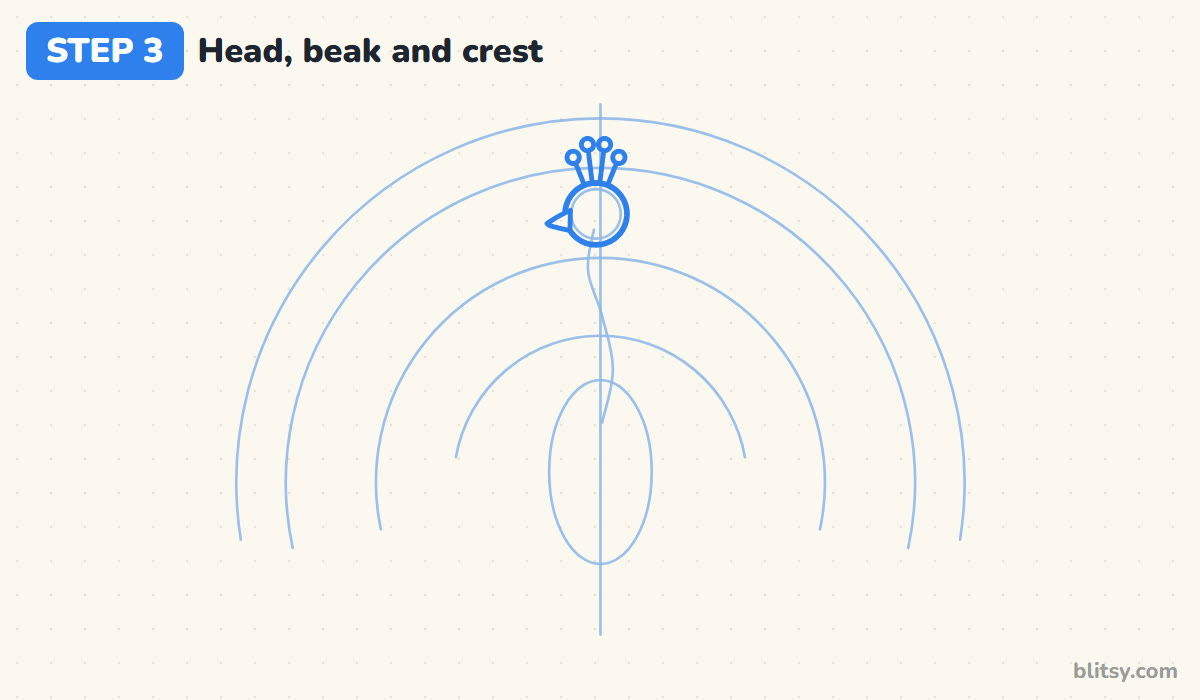
Go over the head circle with a firmer line. On its left side, add a short pointed beak, so the bird looks a little to one side. On top, draw four thin stalks that fan out slightly, each ending in a tiny circle. That crest says peacock at a glance, so keep it small.




💡 Tip: Make the two middle crest stalks a bit longer than the outer two. The crest looks like a little fan.
Step 4: Shape the S-curved neck and the body
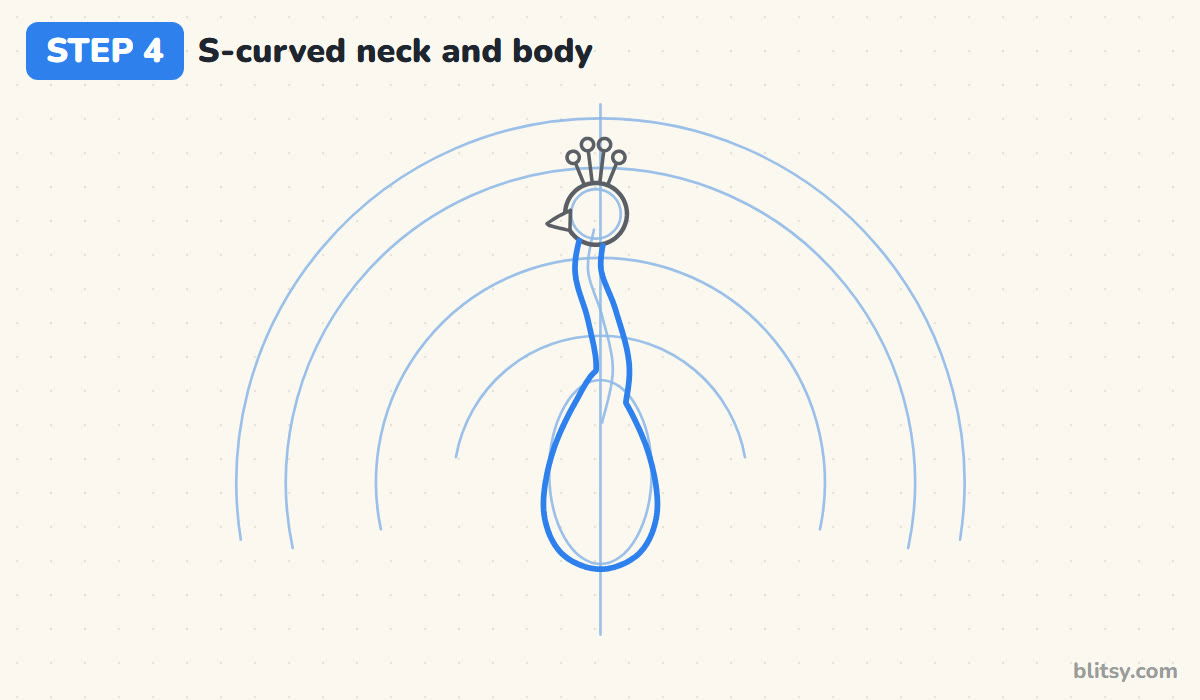
Follow the S-guide down with two lines, slim near the head and a little wider near the body. Let the neck flow straight into a teardrop body: narrow at the top and full at the bottom. Peacocks have long necks, and a thick or short one makes the bird look like a chicken in fancy dress.
💡 Tip: Draw the left neck line first, then the right one, keeping the gap between them almost the same all the way.
Step 5: Add the folded wings and thin legs
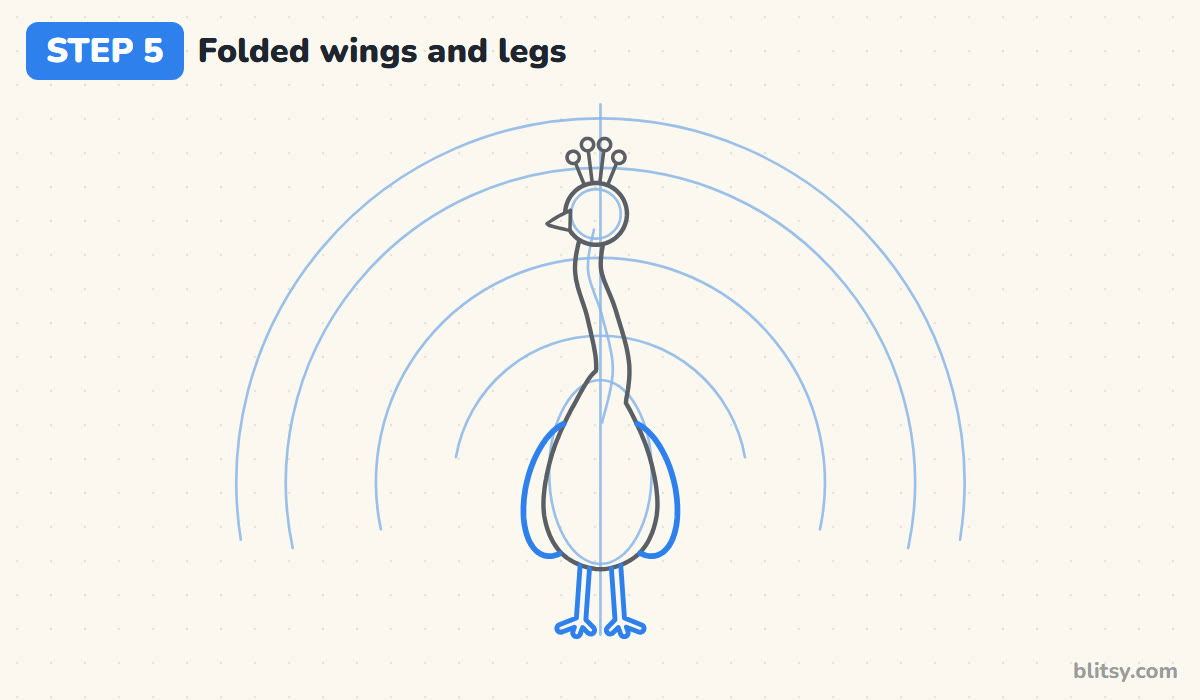
On each side of the body, draw a long rounded wing that peeks out from behind it. Only a slim edge shows, so don't make them wide. Below the body, add two thin legs going straight down with three small toes on each foot. Skinny legs keep such a big bird looking graceful.
💡 Tip: Stop each wing line where it touches the body instead of drawing it across.
Step 6: Draw the scalloped edge of the tail fan
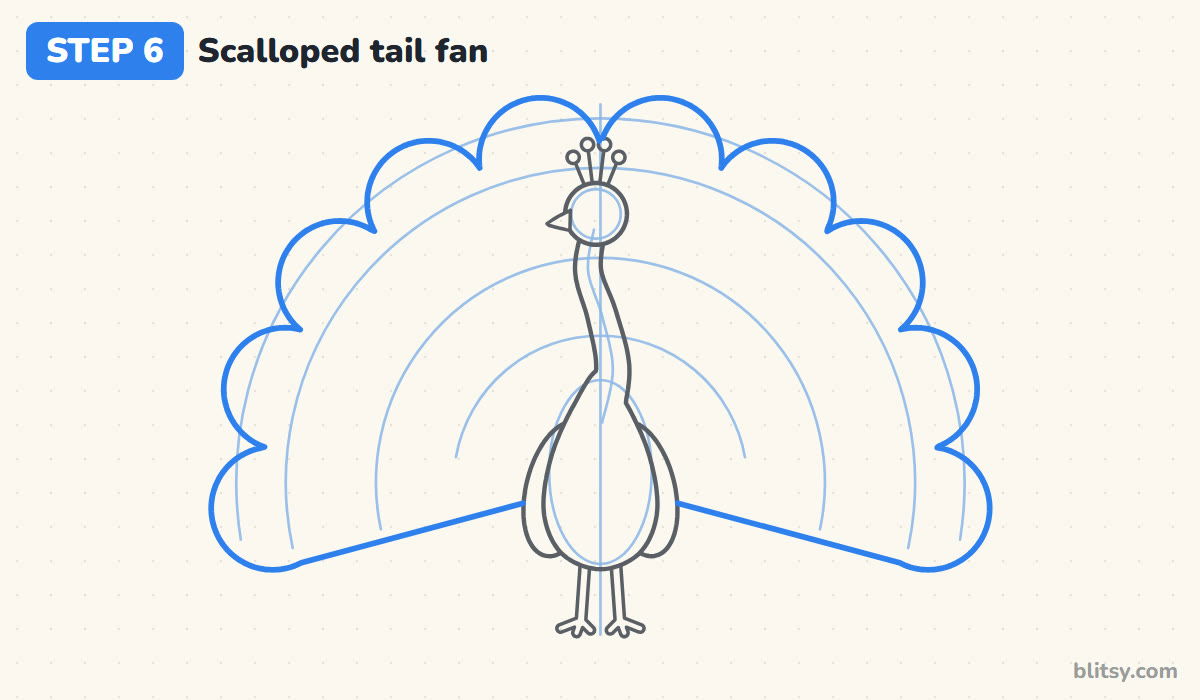
Now trace around the big outer guide with a row of round bumps, ten in all, like the edge of a flower or a cloud. Make the bumps the same size and let the guide arc run through their middles. At the bottom on each side, finish the fan with a straight line slanting back to the wing.
💡 Tip: Mark the top of each bump with a dot along the arc first, so you can space them evenly.
Step 7: Draw rows of eye feathers
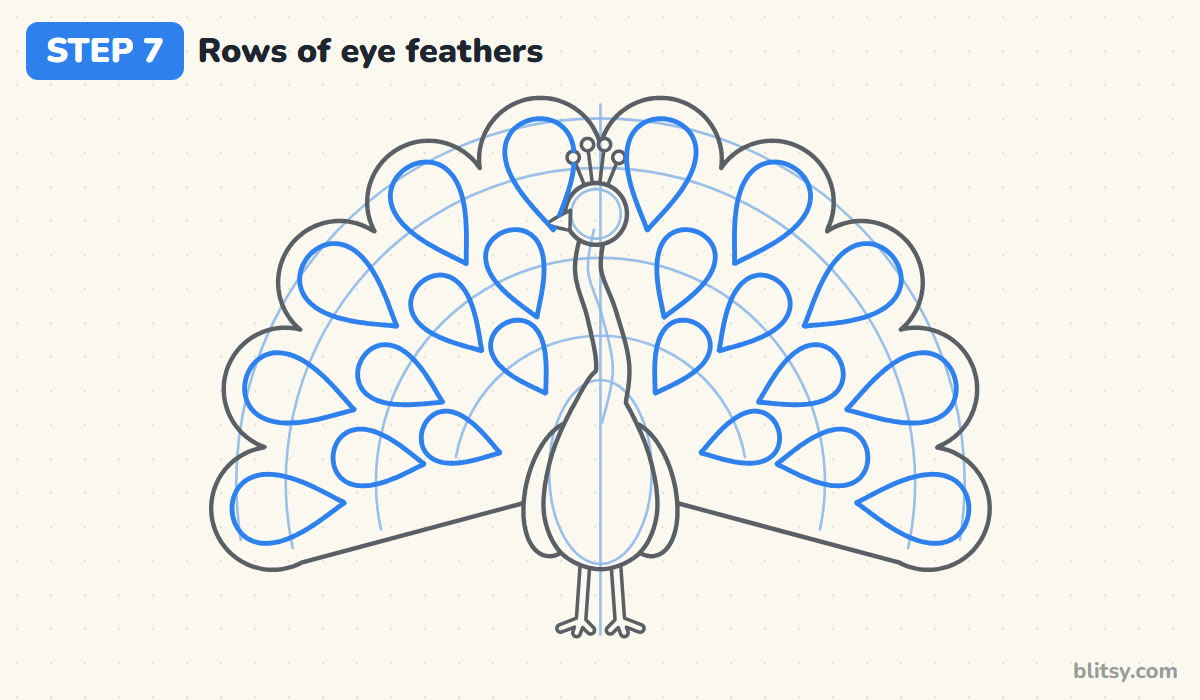
Inside each scallop, draw a teardrop with its round end toward the edge and its point aimed at the body. That's the outer row. Add a second row of slightly smaller teardrops on the middle arc, placed in the gaps between the outer ones, and then four small ones on the inner arc. Staggering the rows like bricks is what makes the fan look full instead of lined up like a grid.




💡 Tip: Every teardrop's point should aim toward the center of the body, like spokes on a wheel.
Step 8: Draw the rings inside each eye
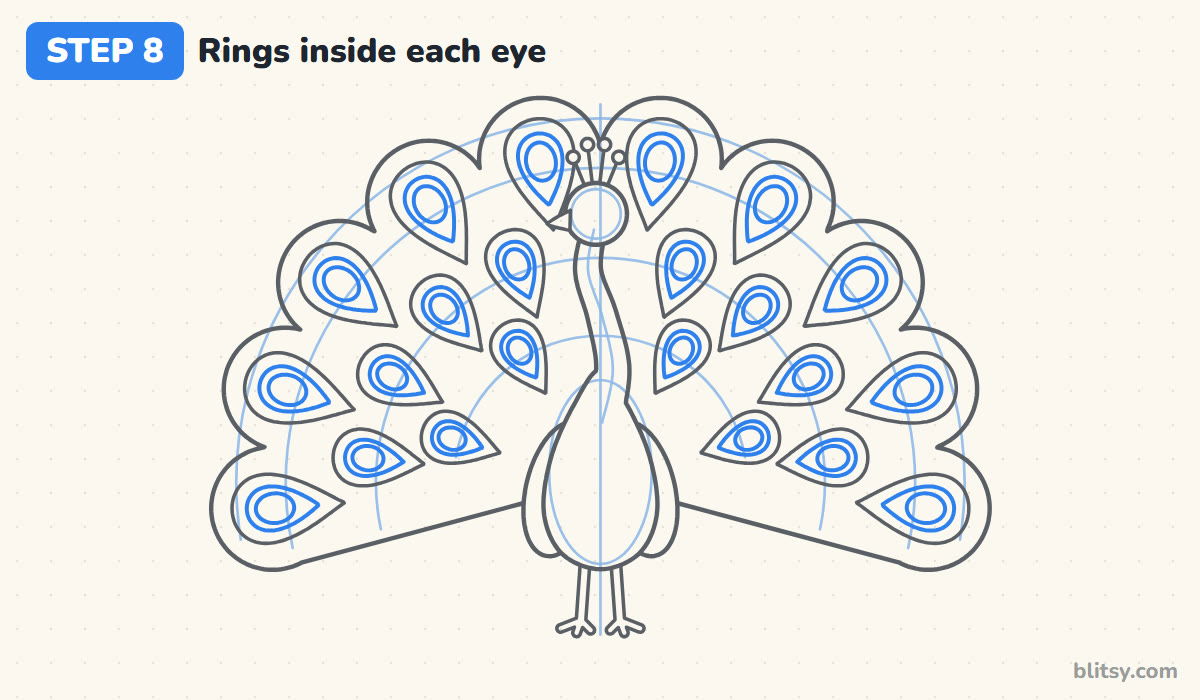
Inside every teardrop, draw a smaller teardrop, then a small oval inside that one. Leave a visible gap between each ring so there's space to color them later. This is the slowest step. I do the whole outer row first, then the middle row, so I don't lose track.
💡 Tip: Rest the side of your hand on a scrap of paper so it doesn't smudge the rings you already drew.
Step 9: Add the eye, the spot centers and the feather shafts
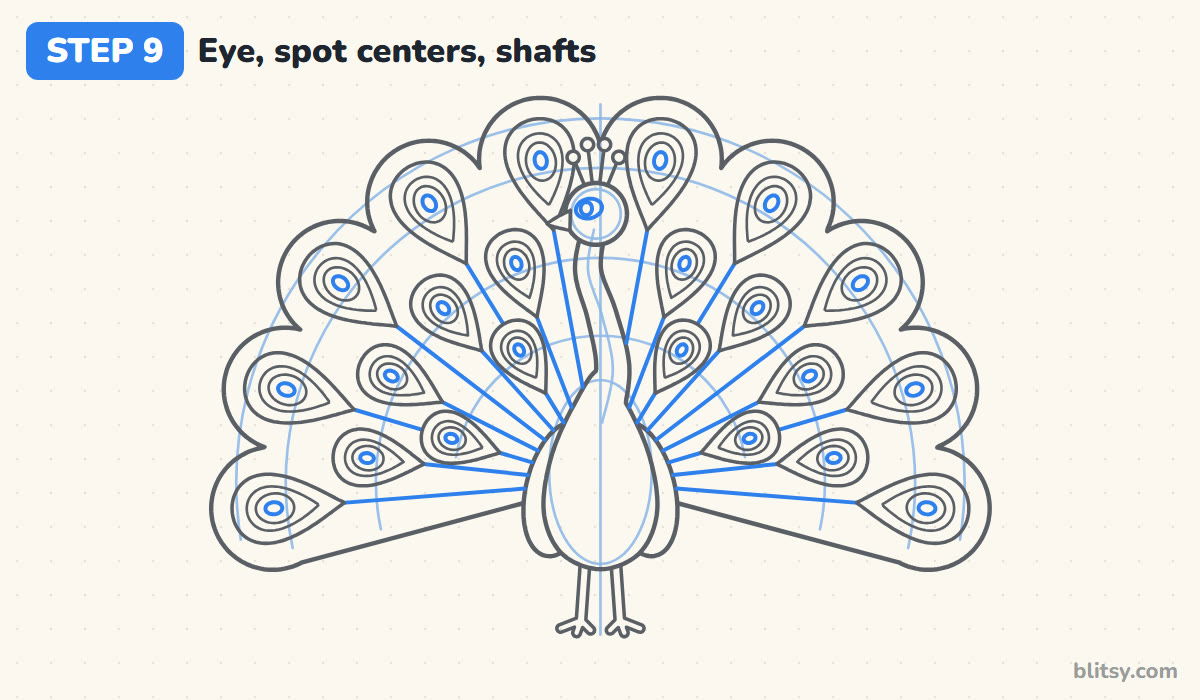
Give the peacock a small dark eye inside a white almond-shaped patch, which is the pale face marking real peacocks have. Then put a tiny oval in the middle of every eyespot. Last, draw a thin straight line from each feather point back toward the body. These shafts show that every eyespot sits at the end of its own long feather.
💡 Tip: Use a ruler for the shafts if your hand wobbles. Aim each one at the middle of the body.
Step 10: Ink the lines and erase the guides
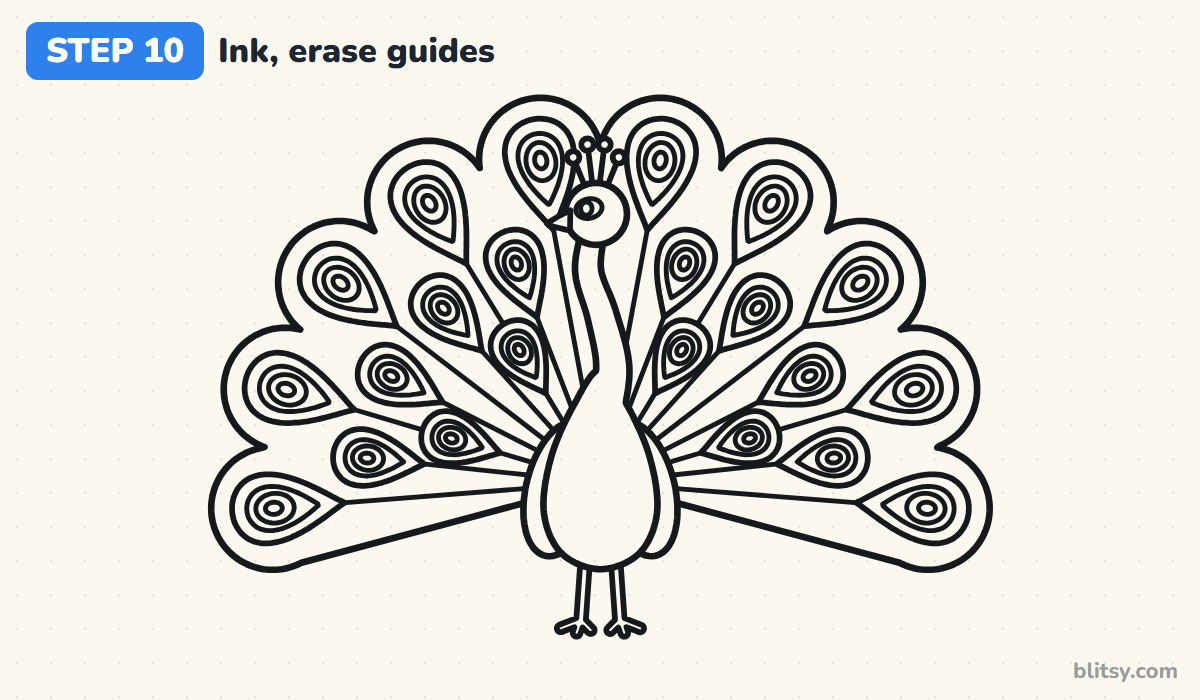
Trace all the lines you want to keep with your black pen, but skip the arcs, the center line and the oval. The rings need a light, steady hand, so take short breaks if your fingers get tired. Wait until the ink is fully dry, then erase every pencil mark.
💡 Tip: Ink the bird first and the fan after. If you smudge something, it's easier to fix on the plain fan.
Step 11: Color your peacock
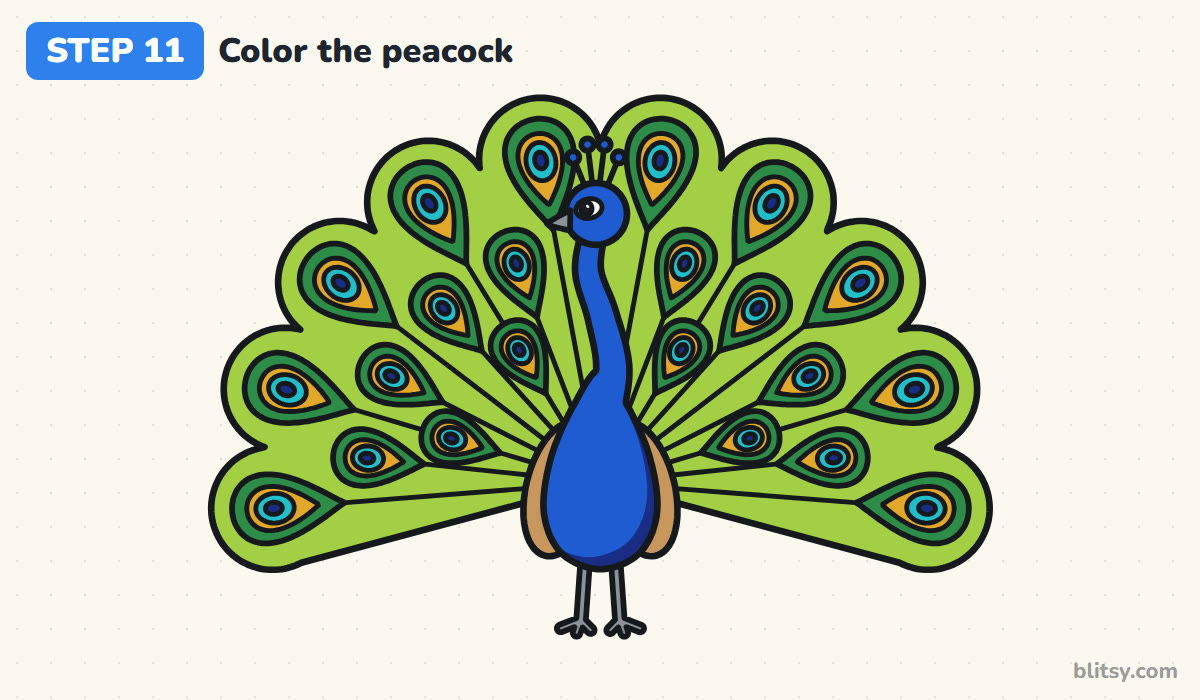
Paint the whole bird a strong royal blue, and add darker blue along the lower right of the body for shading. The wings are tan, the legs and beak gray. In the tail, color the fan light green and each teardrop a deeper green. Then work inward: gold ring, turquoise oval and a dark blue center.



💡 Tip: Color all the gold rings in one go, then all the turquoise. Switching pencils less keeps the eyespots matching.
Peacock Fans That Look Lopsided
- One side of the fan is bigger. Sketch the center line and the half-circle guides first, and count the bumps on both sides before you ink.
- Too many eyespots. Packing in dozens makes the tail turn into a dark blur. About twenty, spread over three rows, reads much better.
- Eyespots in straight lines. Rows that line up like a checkerboard look stiff. Put each middle-row feather in the gap between two outer ones.
- A thick, short neck. A heavy neck makes the bird look like a turkey. Keep it slim and give it a gentle S-curve.
- Rings drawn too close together. When the rings almost touch, the colors have nowhere to go. Leave a small gap between every ring.
Peacock Ideas to Try on Your Next Page
Once this version feels easy, try the tail folded down behind the bird, like a long trailing train, or draw a white peacock in pale gray and cream. With younger kids I skip the inner ring of eyespots and the shafts, which still gives a cheerful drawing. If you liked shaping the eye feathers, practice a single plume with our feather drawing tutorial, or move on to another colorful bird with this how to draw a parrot step by step lesson.
Peacock Coloring Page and Printable Drawing Steps
Want to work on paper? Print the free peacock coloring page. It has a small colored example at the top with a key that names the color for each part, from the blue body to the gold eye rings. The step-by-step PDF guide includes all 11 steps with their tips and fits Letter or A4 paper.
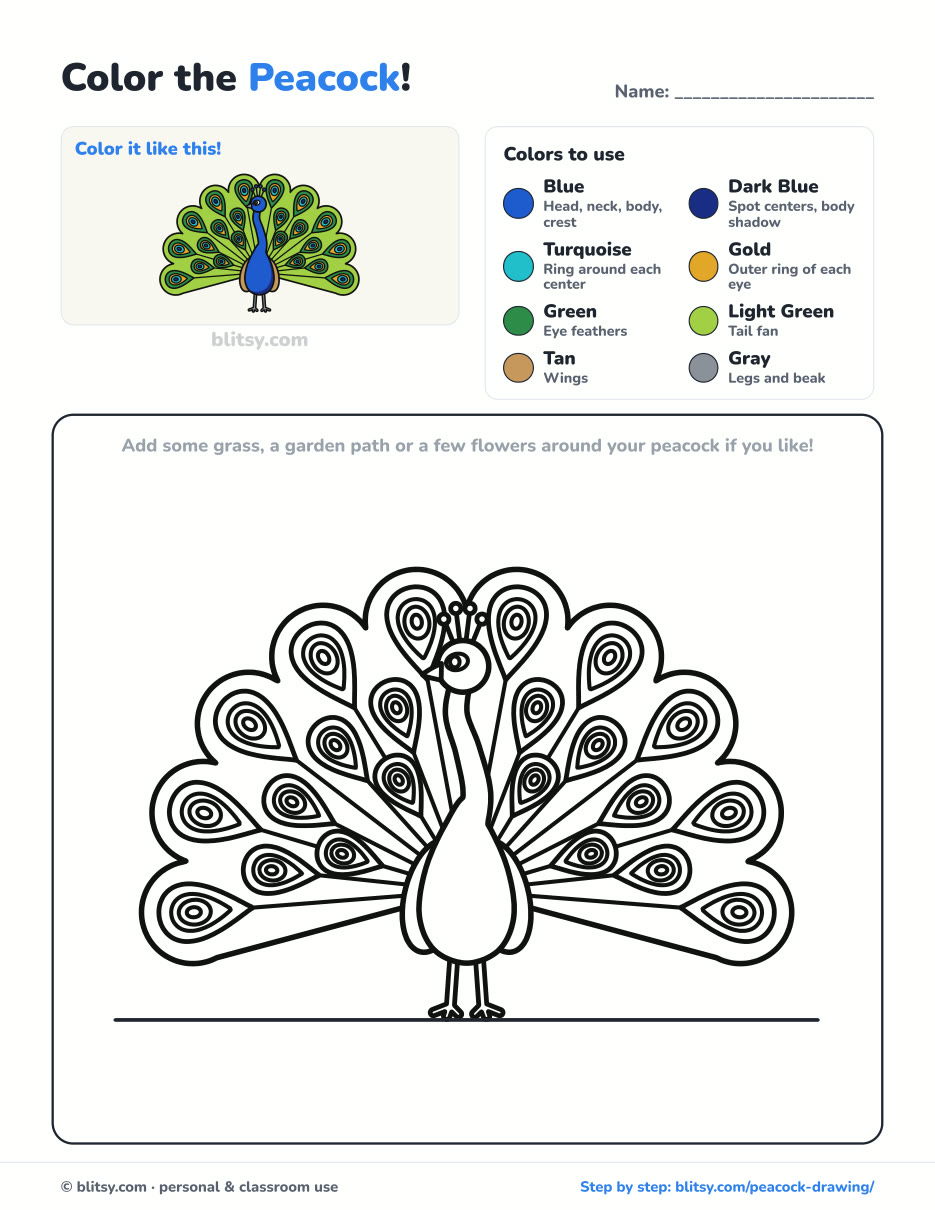
Black outlines with a colored example and the color names at the top. Ready to print and color.
⬇️ Download Coloring PageEvery step picture with its instructions and tips, to keep beside your paper while you draw.
⬇️ Download Drawing Guide📱 On a phone? Tap a download button, then open the file and choose Share → Save to Files or Print. On a computer, the PDF opens or saves straight to your Downloads folder.
Keep the Peacock Steps on Pinterest
Peacock Drawing Questions, Answered
What is the easiest way to draw a peacock?
Draw it facing you with the tail fanned in a half circle. Both sides match, so you can plan the fan once and copy it to the other side. Start with guide circles for the head and body, then build the tail in rows.
How do you draw a peacock for kids?
Keep the fan to one row of big eye feathers plus a scalloped edge, and leave out the shafts. A blue body, a green fan and a gold ring in each eye is enough to make it look like a peacock.
What colors do you need to draw a peacock?
Royal blue for the bird itself, green for the tail, plus gold, turquoise and dark blue for the eyespots. Only the male, the peacock, has the long colorful train. The female is called a peahen and is mostly brown and gray with some green on her neck.
How long does it take to draw a peacock?
Plan on 40 to 50 minutes with inking and coloring. The rings in the eye feathers take the longest, so younger artists may want to color the tail on a second day.
Open up that fan, give every eyespot its gold ring, and show your peacock off. The peacock is the national bird of India, so you're in good company. 🦚✏️
Related posts:
 How to Draw a Dragon Step by Step (Wings, Horns and Tail)
 How to Draw a Whale Step by Step (Easy for Beginners)
 How to Draw Lungs Step by Step (Easy Science Diagram)
 How to Draw a Pineapple Step by Step (Easy Crown and Slice)
 How to Draw Iron Man Step by Step (Easy Chibi for Kids)
 How to Draw a Dress Step by Step (Easy Party Dress)
 How to Draw a Chicken Step by Step (Easy for Beginners)
 How to Draw a UFO Step by Step (Cute Alien Saucer)
 How to Draw Flames Step by Step (Easy Campfire Drawing)
 How to Draw a Moon Step by Step (Sleepy Crescent + Phases)
 How to Draw a Sunflower Step by Step (Big and Bright)
 How to Draw a Fall Leaf Step by Step (Maple, Oak and Birch)

