
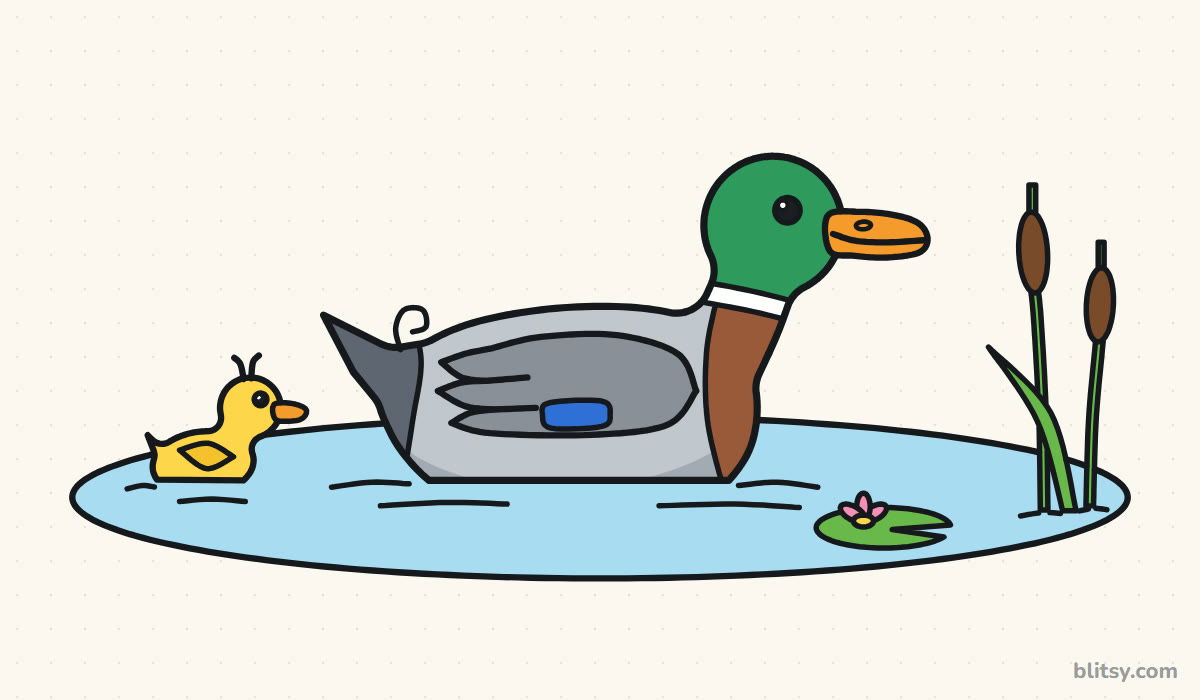
Picture a duck on a pond and you'll notice something handy: the water hides its feet, so all you really draw is a head, a curvy neck and a boat-shaped body. Below I'll walk you through how to draw a duck step by step, from two light guide shapes to a colorful mallard with a duckling trailing behind. The bill is the only fiddly part, and I'll show you a trick for it.
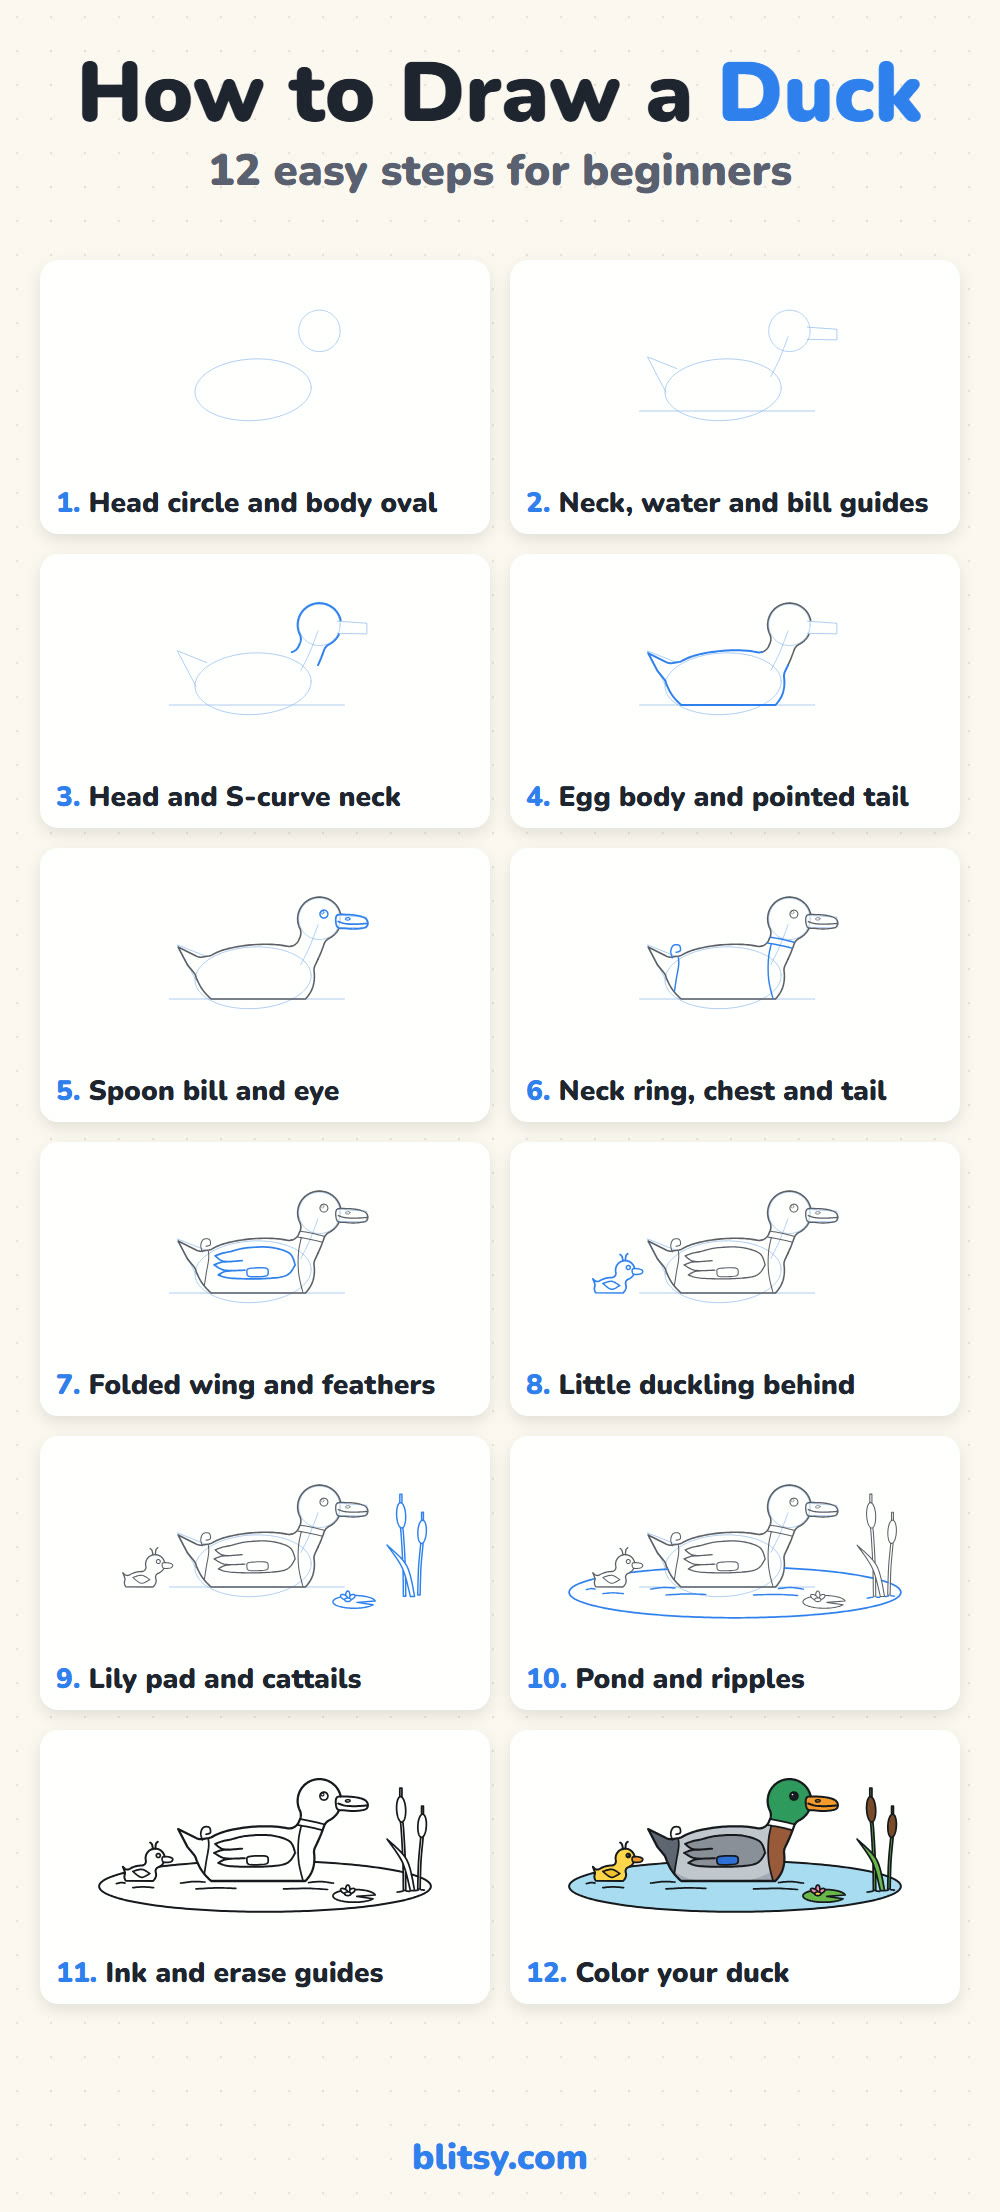
Every step picture uses three line colors. Bright blue is what you add in that step, gray is finished work, and pale blue marks the soft guides you'll erase near the end.
Quick overview
⏱️ Time: roughly 30 to 40 minutes with coloring
🎯 Level: easy, good for kids from about 6
✏️ Steps: 12
🦆 You'll draw: a green-headed mallard floating on a pond, plus a duckling, a lily pad and two cattails
Pond Sketching Kit for Your Duck
- An HB pencil, kept light for the guide shapes
- A soft eraser
- A black fineliner or thin marker for the final outline
- Colored pencils or markers in green, brown, gray, blue, orange, yellow, light blue and pink
- Plain paper turned sideways, so the pond has room to spread out
Crayons work fine too; just press harder on the dark green head so it looks rich.
How to Draw a Duck Step by Step
Step 1: Draw a head circle and a body oval
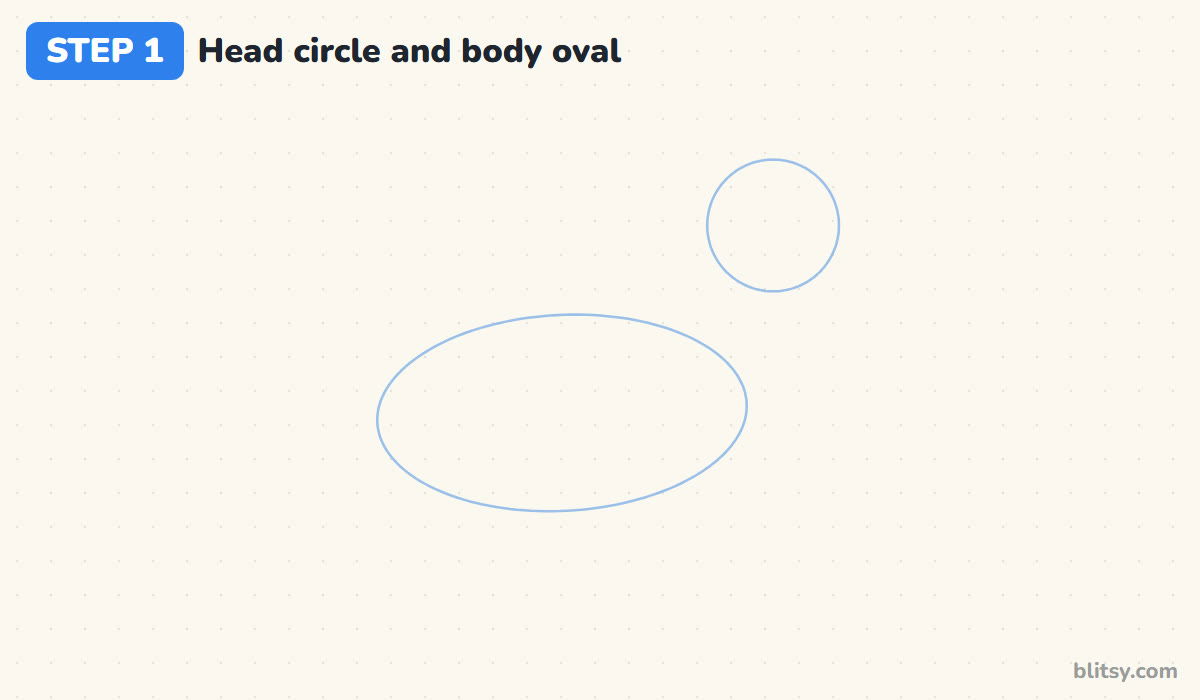
Start with a wide, flat oval a little left of center for the body. Then put a circle up and to the right for the head, about a third as wide as the oval, with a clear gap between them. That gap is where the neck will go, so don't let the shapes touch.
💡 Tip: Press so lightly that you can barely see the line. These shapes disappear later.
Step 2: Add the neck, water, tail and bill guides
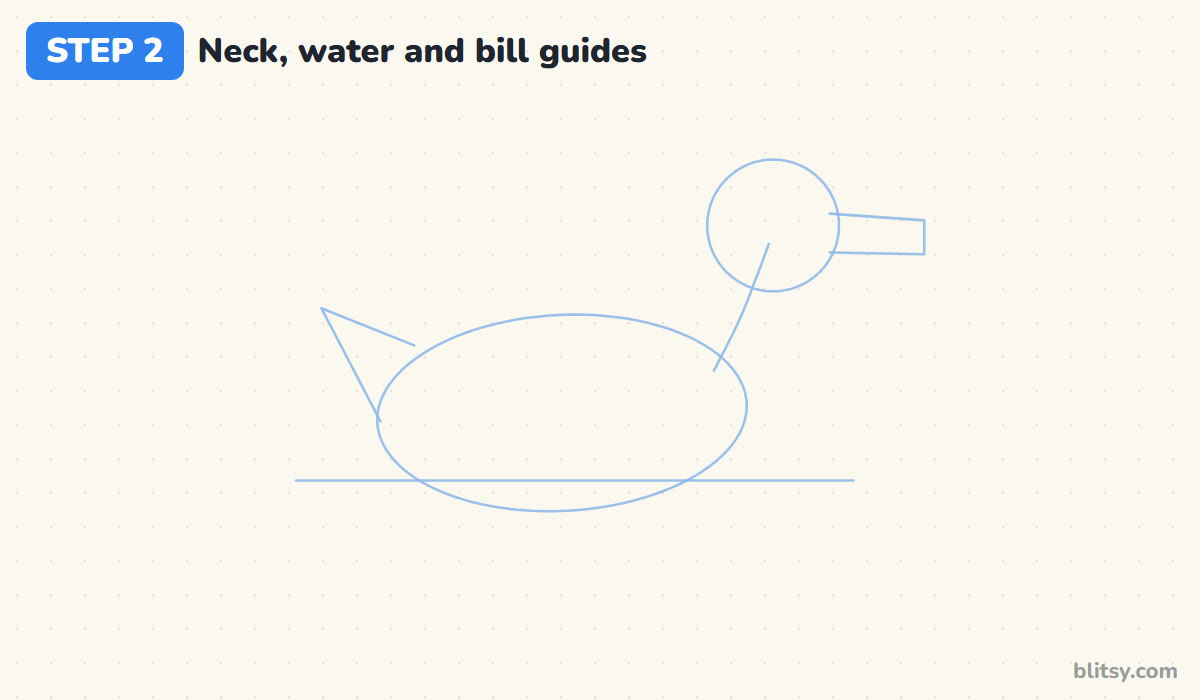
Join the head and body with one gently bent line for the neck. Draw a straight waterline across the lower part of the oval; nothing under it will show. On the left, sketch a narrow V for the tail, and on the right side of the head add a long box for the bill.
💡 Tip: Make the bill box almost as long as the head is wide. Ducks have big, flat bills.
Step 3: Outline the head and S-curve neck
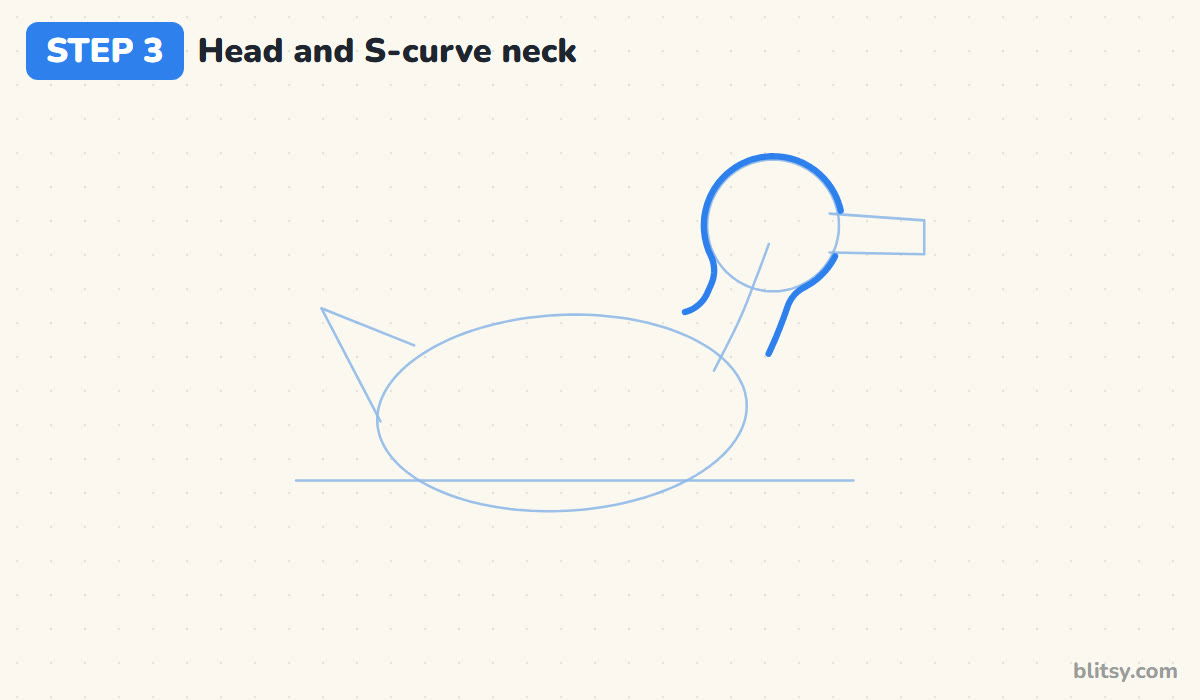
Follow the head circle around the top. At the back, let the line dip into the neck and bulge out again as it reaches the body, a soft S shape. The front of the neck curves under the chin and then swells forward into the chest. I leave a gap where the bill joins the face, because the bill sits on top there.




💡 Tip: Keep the neck thick. A thin neck turns your duck into a goose.
Step 4: Draw the egg body and pointed tail
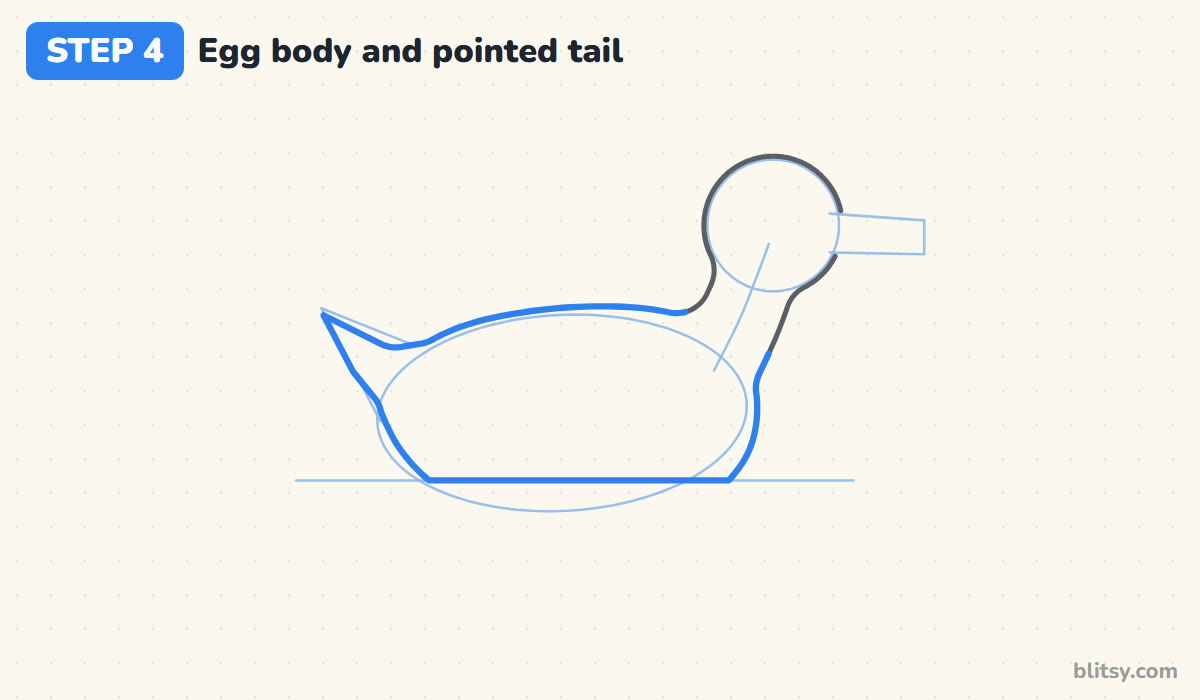
From the back of the neck, draw a slightly arched back toward the tail guide. Sweep up into a sharp tail point, then come down along the underside to the waterline. Bring the round chest down to the water too, and trace the waterline between those two points so the body floats.
💡 Tip: Let the back rise in a gentle hump before it dips to the tail. A flat back looks like a toy boat.
Step 5: Add the spoon bill and the eye
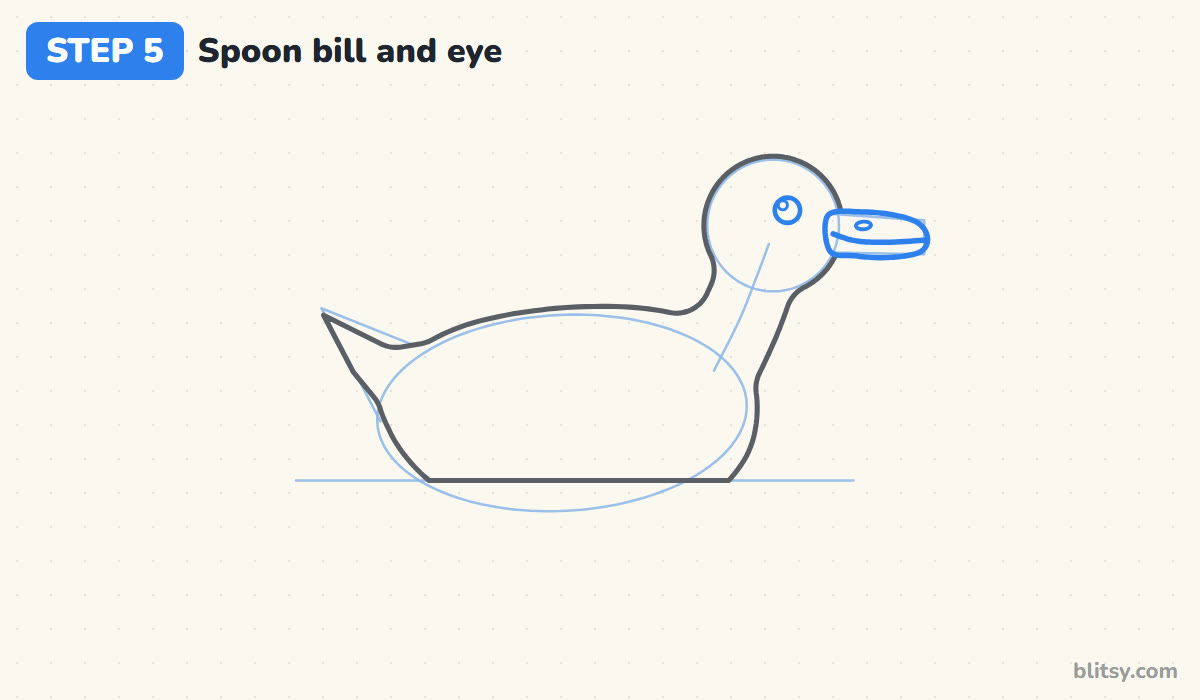
Inside the bill box, draw a flat bill with a straight end on the face and a rounded tip, like a spoon. Run one line along the middle for the mouth and add a small oval nostril. Place a round eye just above and behind the bill, with a tiny circle inside for the shine.
💡 Tip: Curve the mouth line up slightly where it meets the face. It reads as a small smile.
Step 6: Mark the neck ring, chest and tail colors
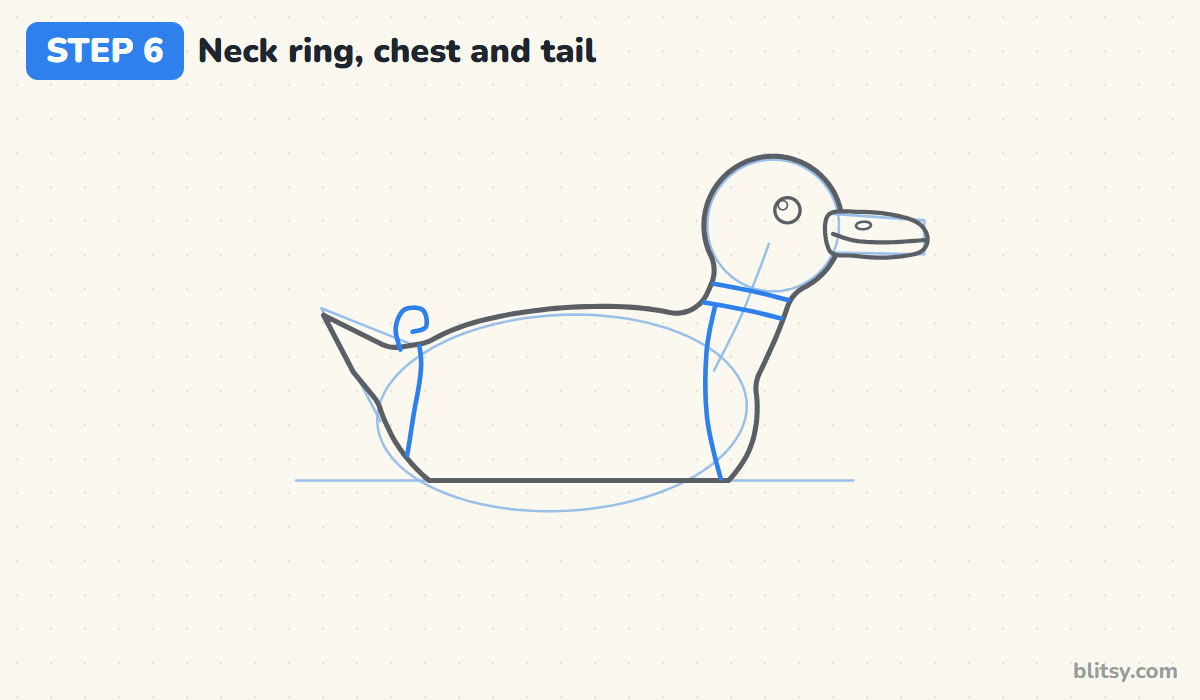
A mallard drake has a thin white collar, so draw two parallel curves across the neck, slanting down toward the front. From the lower curve, run a line down to the water to separate the brown chest from the gray body. Add one more line near the tail for the dark tail feathers, plus a little curl on top.
💡 Tip: Keep the white ring thin, about the width of your fingernail tip on the paper.
Step 7: Draw the folded wing and feathers
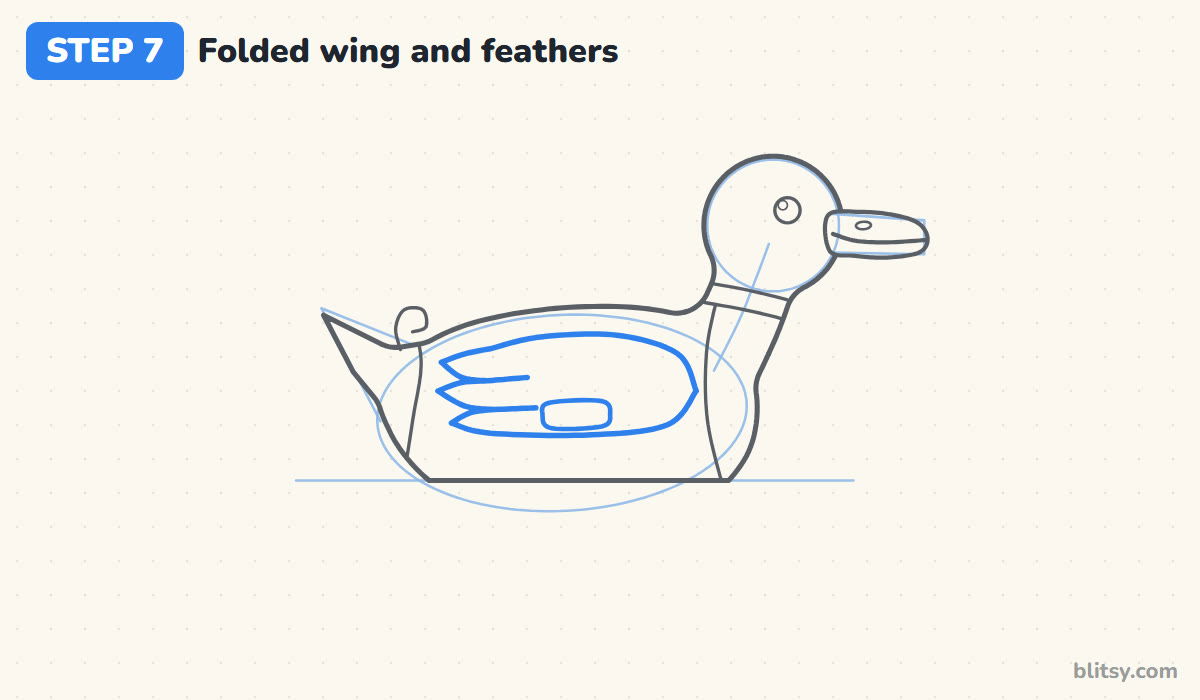
The folded wing lies along the side like a long teardrop, round at the front, just behind the chest line. Instead of ending in one point, split its back end into three feather tips stacked one above the other. Then add a small rounded rectangle for the blue patch.




💡 Tip: Stop the wing short of the tail line so the dark tail still shows behind it.
Step 8: Add a little duckling behind
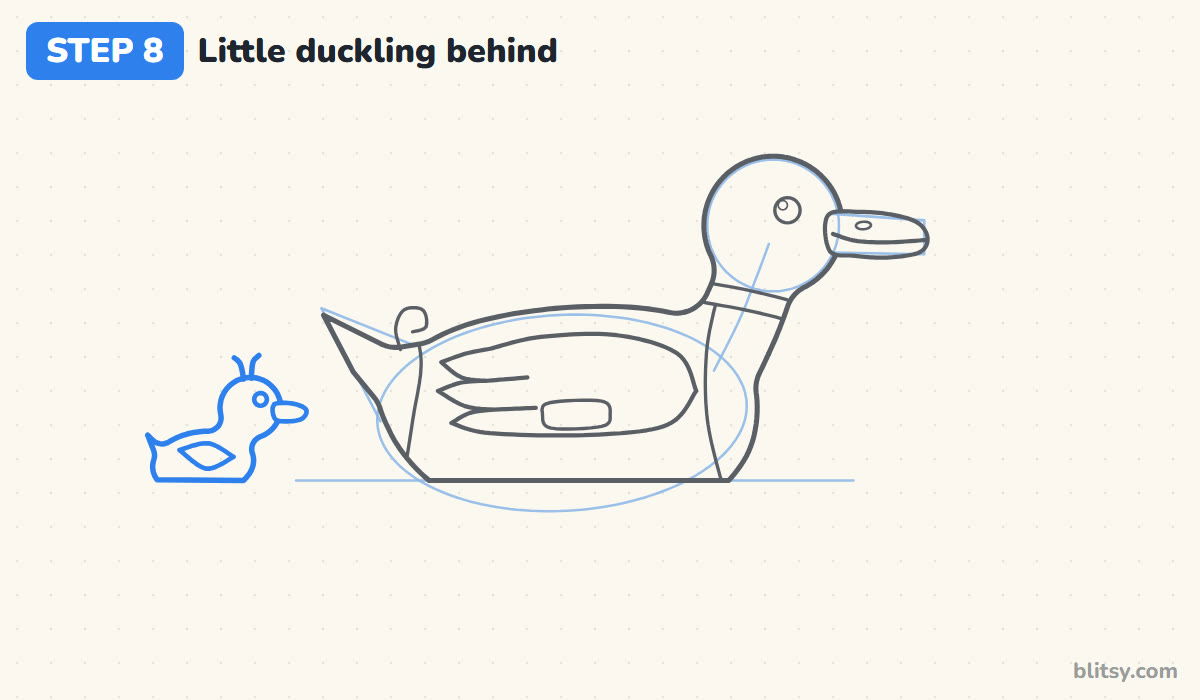
To the left, leave some space and draw a tiny duck: a round head, a small oval body and a stubby tail. Give it a short bill, a dot eye and a leaf-shaped wing. Two little hair tufts on top make it look newly hatched. Its bottom sits on the same waterline as the big duck.
💡 Tip: Make the duckling's head big compared with its body. Baby animals always look cuter that way.
Step 9: Draw a lily pad and cattails
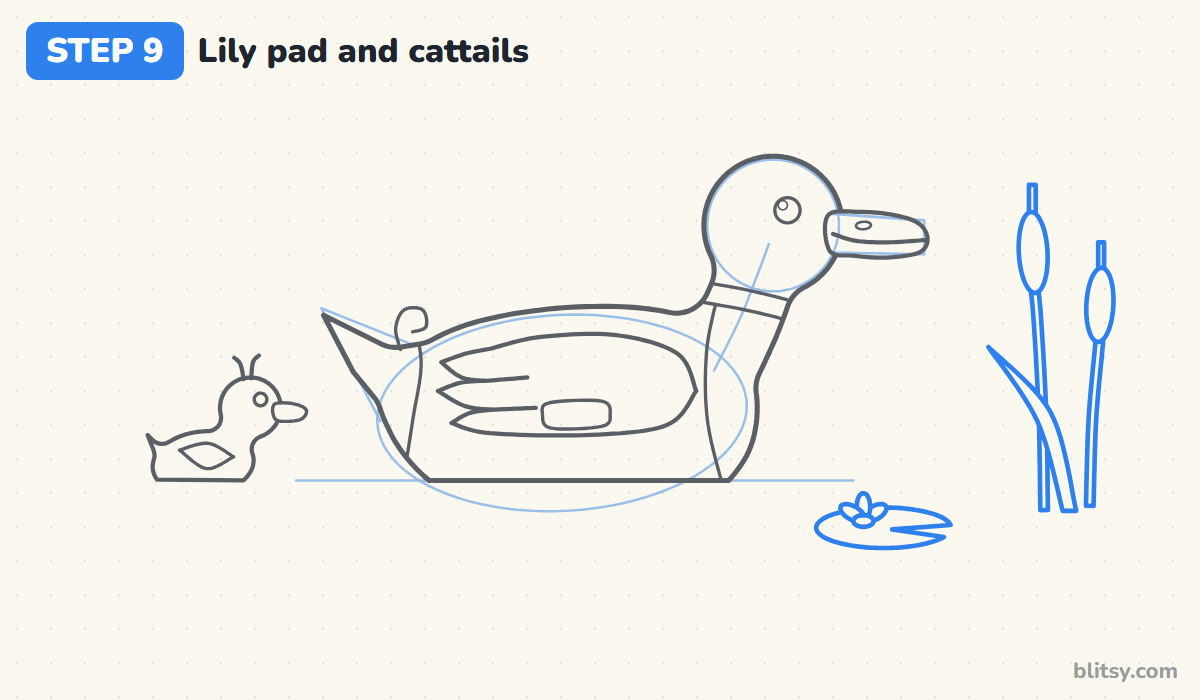
Low down, under the bill, draw a flat oval lily pad with a narrow wedge cut out, and a small pink flower on it. On the far right, add two tall cattail stems with brown, sausage-shaped heads and one long leaf leaning left.
💡 Tip: Draw the lily pad as a very squashed oval. Seen from the side, water plants look flat.
Step 10: Draw the pond and ripples
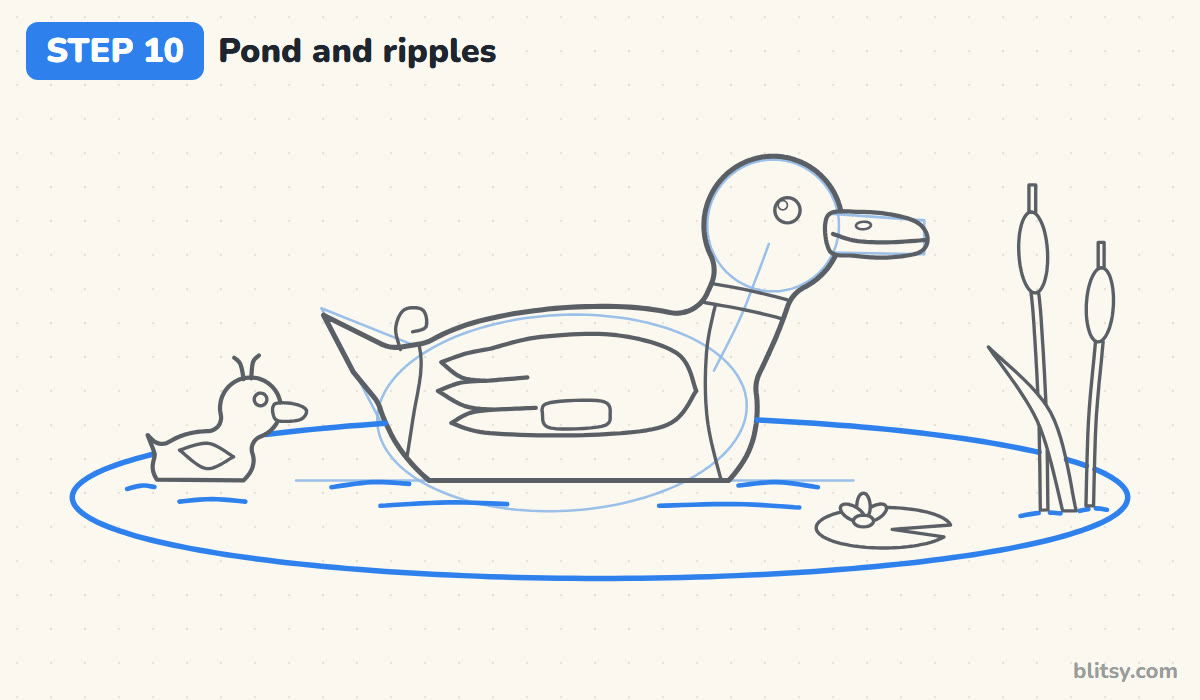
Now draw a wide oval around everything for the pond. Its back edge goes behind both ducks, so stop the line at each body and pick it up on the other side. Short, curved ripple lines beside each duck show that they're floating, not sitting on a floor.
💡 Tip: Draw ripples in pairs of different lengths. Matching ones look like stripes.
Step 11: Ink your lines and erase the guides
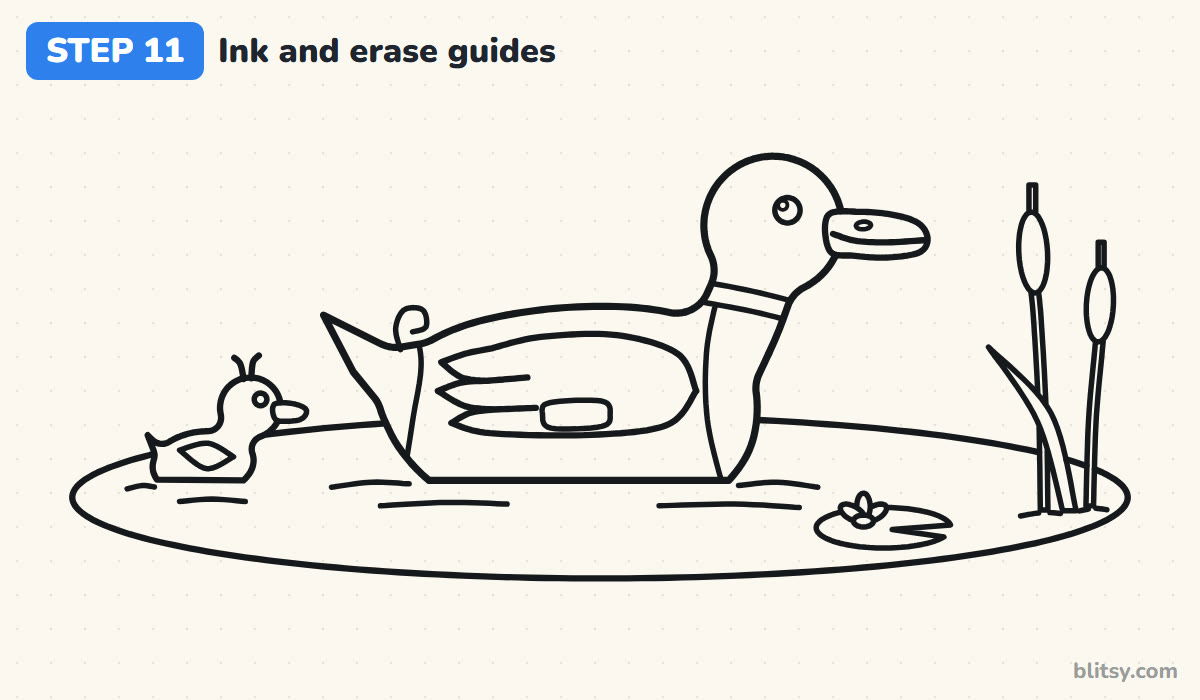
Trace every line you want to keep with the black pen. I ink the face first, while my hand is fresh, then the body, the duckling and the pond. Skip the oval, the circle and the guide lines. Once the ink is fully dry, erase all the pencil guides and any smudges.




💡 Tip: Turn the paper as you ink the long pond oval, so your hand always pulls the pen toward you.
Step 12: Color your duck
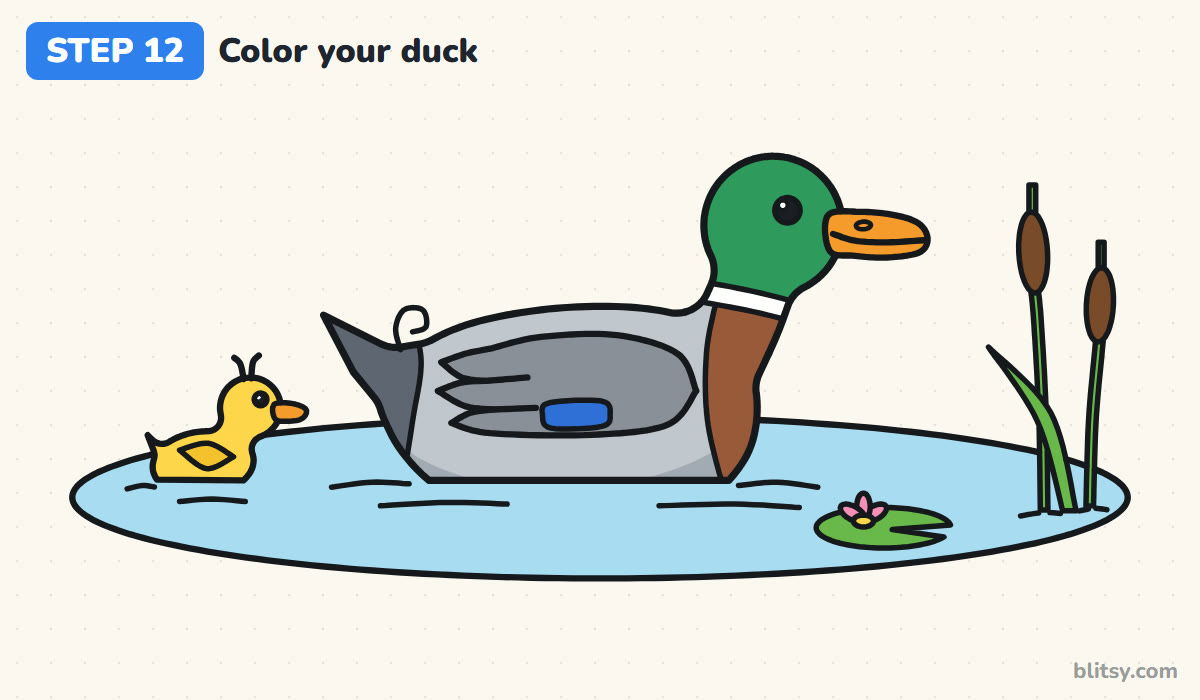
Color the head dark green and leave the neck ring white. The chest is chestnut brown, the body light gray, and the wing a darker gray with a bright blue patch. Use dark gray for the tail and orange for both bills. The duckling is yellow and the pond light blue.
💡 Tip: Shade the bottom edge of the gray body a little darker, right where it meets the water.
Where Duck Drawings Tend to Wobble
- A pointy bird beak instead of a bill. Ducks have flat, wide bills with a rounded tip. Draw a long spoon shape, not a triangle.
- A long, skinny neck. That looks like a goose or a swan. Keep the neck short and thick, with the head sitting close to the body.
- Legs and feet showing on the water. A floating duck hides its feet. Cut the body off flat at the waterline instead.
- A body shaped like a ball. Duck bodies are long, like a little boat. Stretch the oval and give it a pointed, upturned tail.
- No ripples. Without them the duck seems to sit on a blue table. A few short curved lines fix it straight away.
Swapping Feathers: Other Ducks to Try
Color the big duck mottled brown and you have a female mallard; since mother ducks raise the ducklings on their own, that version suits the little one even better. Leave the body white with an orange bill for a classic farm duck. Younger kids can skip the cattails and the wing patch. The chicken drawing tutorial makes a good next step, and the frog drawing step by step lesson gives you another pond friend for that lily pad.
Free Duck Coloring Page and Printable Steps
Want to color on paper instead? Print the free duck coloring page. A small finished example at the top shows which colors go where, and the big outline underneath leaves the pond and sky open for your own ideas. The PDF drawing guide holds all 12 steps with their tips on a few pages, and it prints on Letter or A4.
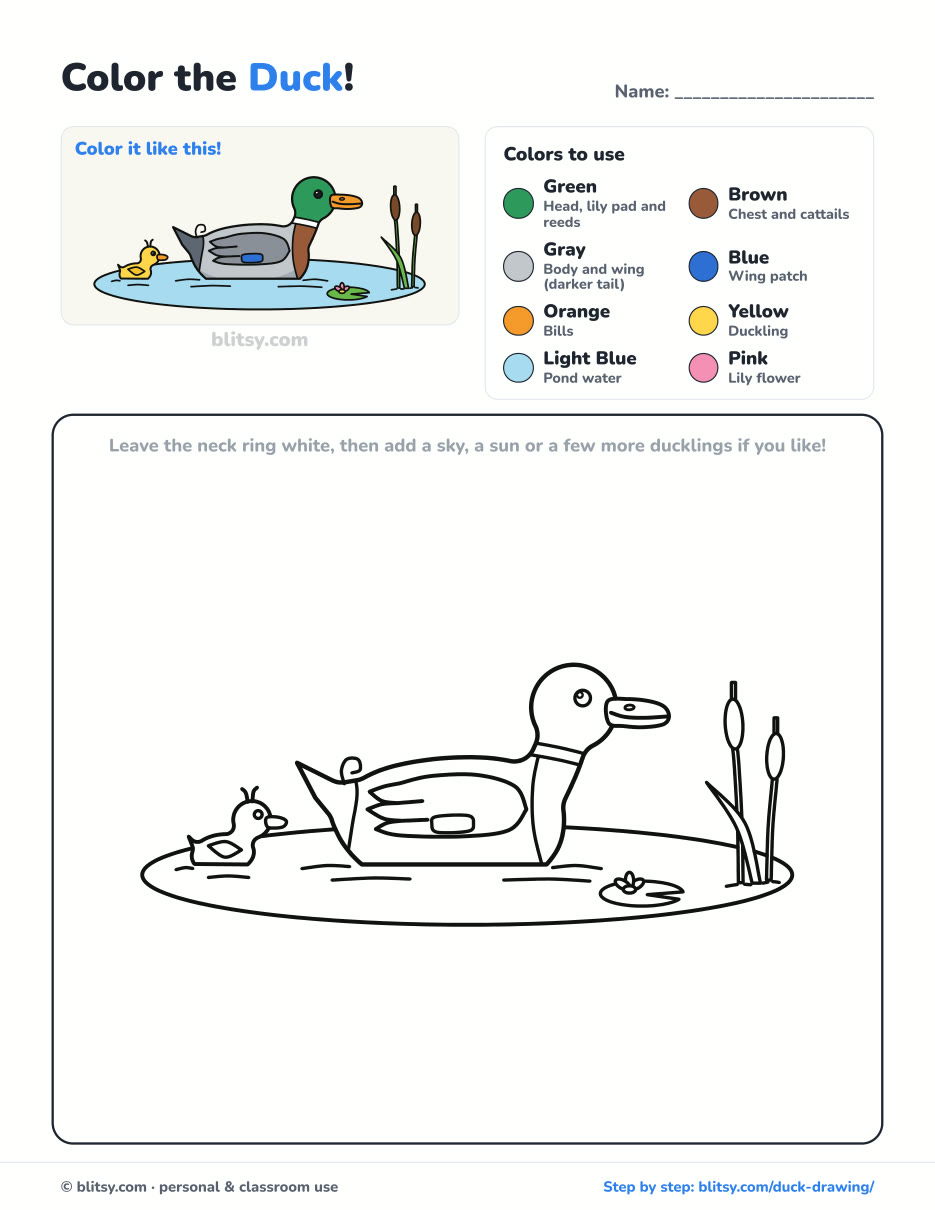
Black outlines with a colored example and the color names at the top. Ready to print and color.
⬇️ Download Coloring PageEvery step picture with its instructions and tips, to keep beside your paper while you draw.
⬇️ Download Drawing Guide📱 On a phone? Tap a download button, then open the file and choose Share → Save to Files or Print. On a computer, the PDF opens or saves straight to your Downloads folder.
Keep the Duck Lesson on a Pinterest Board
Duck Drawing Questions From Young Artists
What is the easiest way to draw a duck?
Use a small circle for the head and a long oval for the body, joined by a short, thick neck. Add a flat bill shaped like a spoon, a dot eye and a pointed tail. Drawing it on water saves you from drawing the feet.
Why is the male duck's head green?
Male mallards, called drakes, grow shiny green head feathers, while females are mostly mottled brown. Drakes also have a few curled feathers on top of the tail, which is the little curl in this drawing.
Why don't ducks get wet when they swim?
Ducks have an oil gland near the base of the tail. They spread that oil over their feathers with the bill while preening, which makes the feathers waterproof, so water rolls right off.
How long does it take to draw this duck?
About half an hour for the pencil and ink, and another ten minutes or so to color. Leave out the duckling and the reeds if you want a quicker version.
Grab that green pencil and set your own mallard afloat. Does your duckling get a brother or sister? 🦆
Related posts:
 How to Draw a Whale Step by Step (Easy for Beginners)
 How to Draw Lungs Step by Step (Easy Science Diagram)
 How to Draw a Pineapple Step by Step (Easy Crown and Slice)
 How to Draw Iron Man Step by Step (Easy Chibi for Kids)
 How to Draw a Dress Step by Step (Easy Party Dress)
 How to Draw a Chicken Step by Step (Easy for Beginners)
 How to Draw a UFO Step by Step (Cute Alien Saucer)
 How to Draw Flames Step by Step (Easy Campfire Drawing)
 How to Draw a Moon Step by Step (Sleepy Crescent + Phases)
 How to Draw a Sunflower Step by Step (Big and Bright)
 How to Draw a Heart Step by Step (Even, Symmetric Shape)
 How to Draw a Jellyfish Step by Step (Cute, Easy Guide)

