
Yorkies are tiny dogs with a lot of hair, and that hair is the whole trick. Get the long fur hanging down beside the face and the little bow on top, and anyone will know the breed. In this lesson I'll show you how to draw a yorkie step by step, starting with a light circle and ending with a colored Yorkshire Terrier sitting up nicely. It's a calm drawing for kids and grown-ups alike.
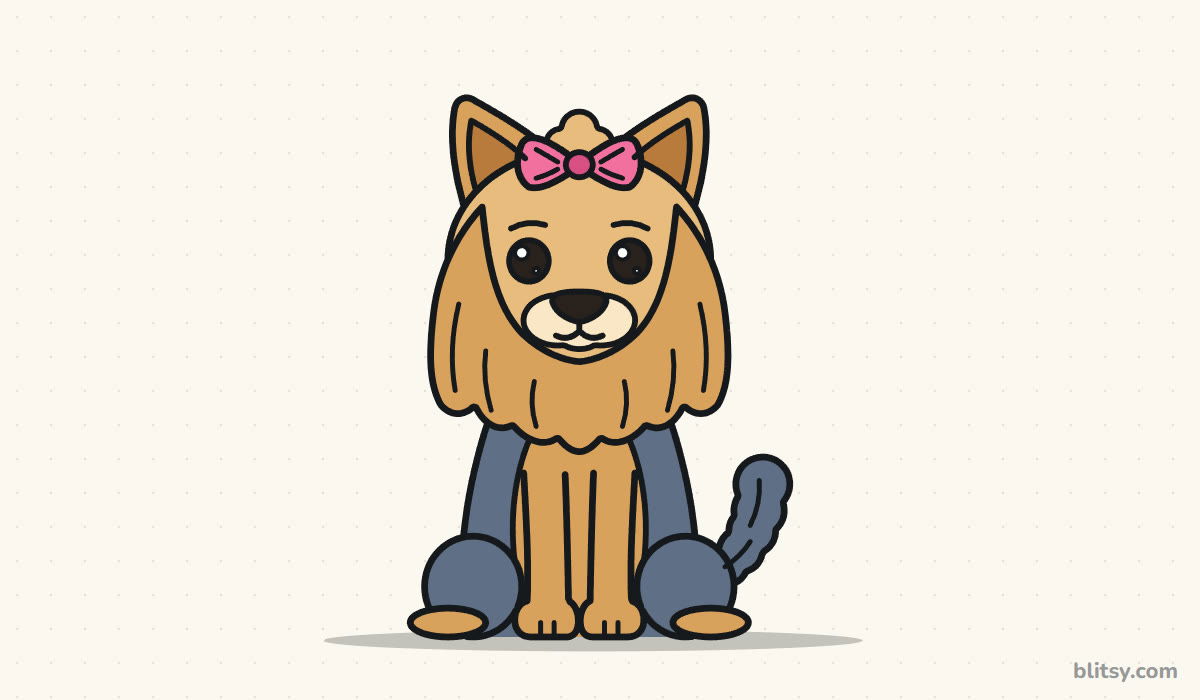
Yorkie fur has lots of lines, so I've marked each step's new ones in blue and left your earlier work in gray. Copy only the blue, compare it with your paper, then go on.
Quick overview
⏱️ Time: about 30 to 35 minutes with coloring
🎯 Level: easy, fine for kids from about 6 up
✏️ Steps: 12
🐶 You'll draw: a sitting Yorkshire Terrier with a hair bow
Supplies for a Silky Little Terrier
- A pencil that draws light lines (HB works well)
- A soft eraser
- A black marker or fineliner for the final outline
- Crayons or colored pencils: golden brown, light brown, blue gray and cream, plus pink for the bow and black
- Plain white paper
If you only have one brown, press harder on the face fur and softer on the head to get two shades.
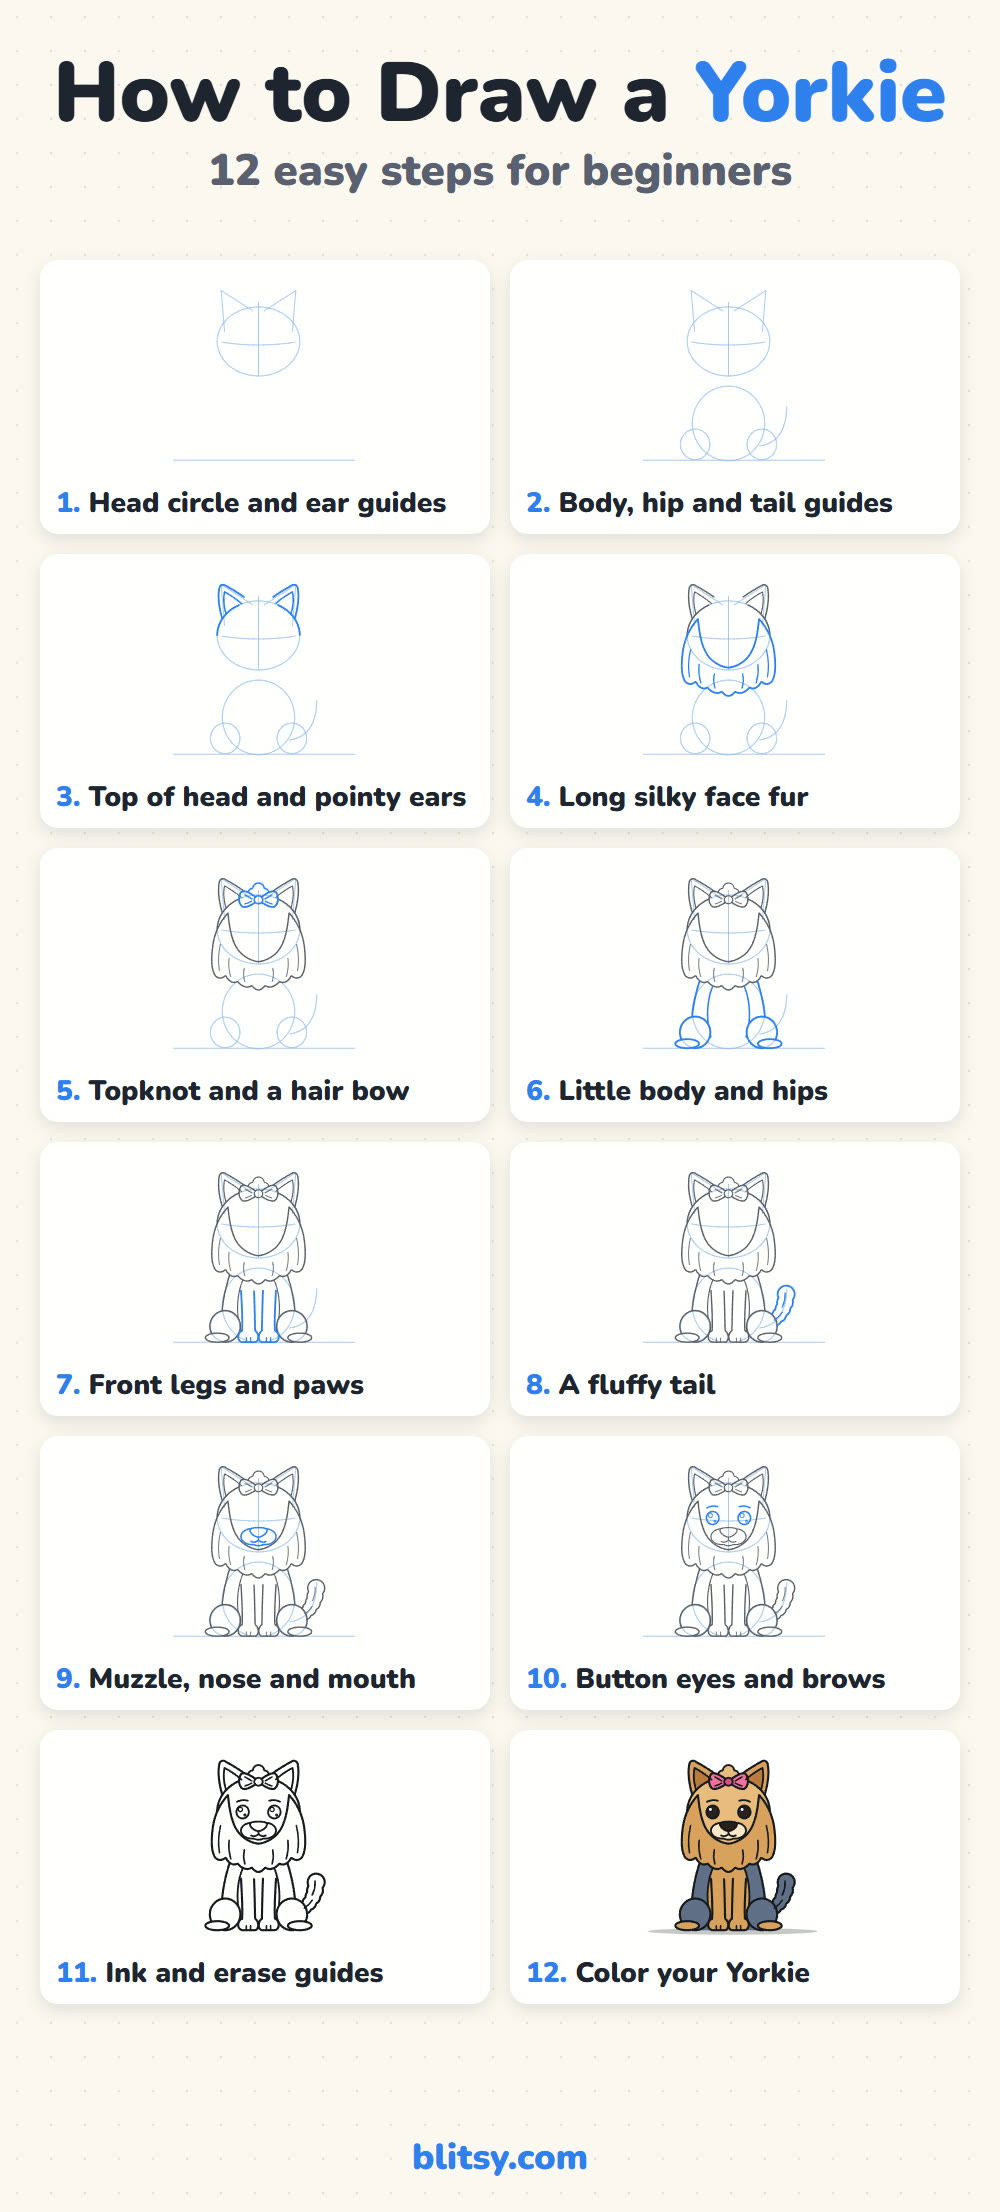
How to Draw a Yorkie Step by Step
Step 1: Sketch the head circle and ear guides
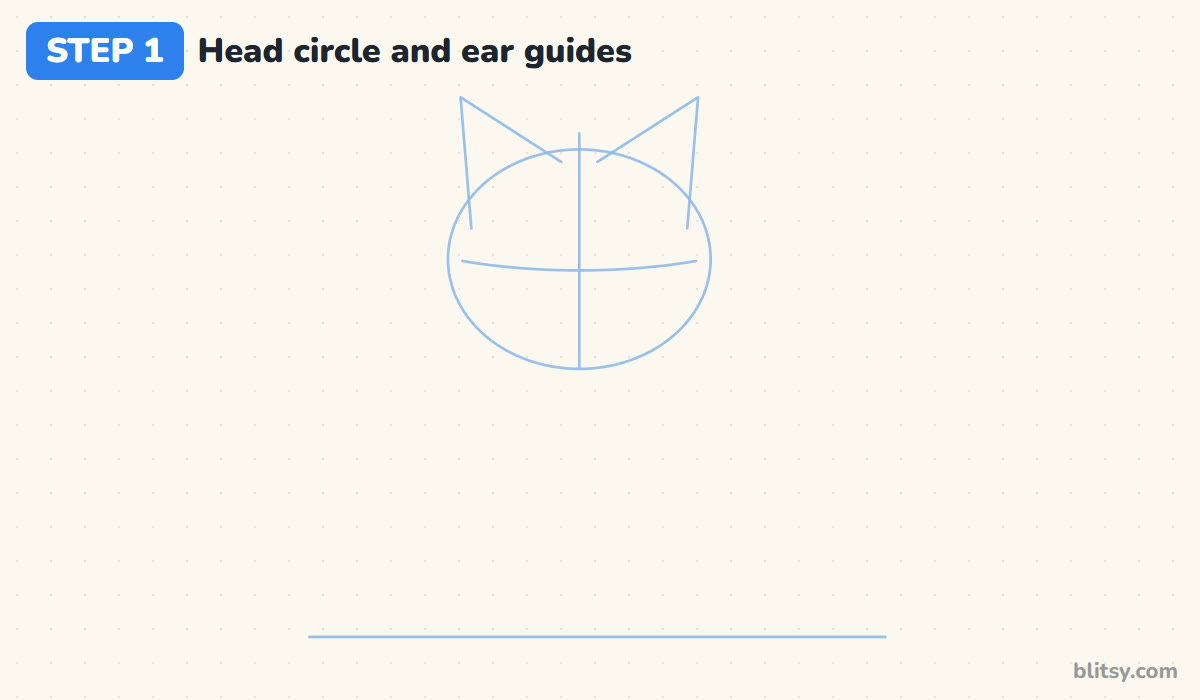
Draw a light ground line near the bottom of the page. High above it, sketch a wide circle for the head, then a line down the middle and a soft curve across it, a bit below halfway. That curve is where the eyes go. On top of the circle, add two tall triangles leaning out a little for the ears.
💡 Tip: Leave a big gap between the head and the ground line. The body needs about the same height again.
Step 2: Add guides for the body and hips, plus a tail line
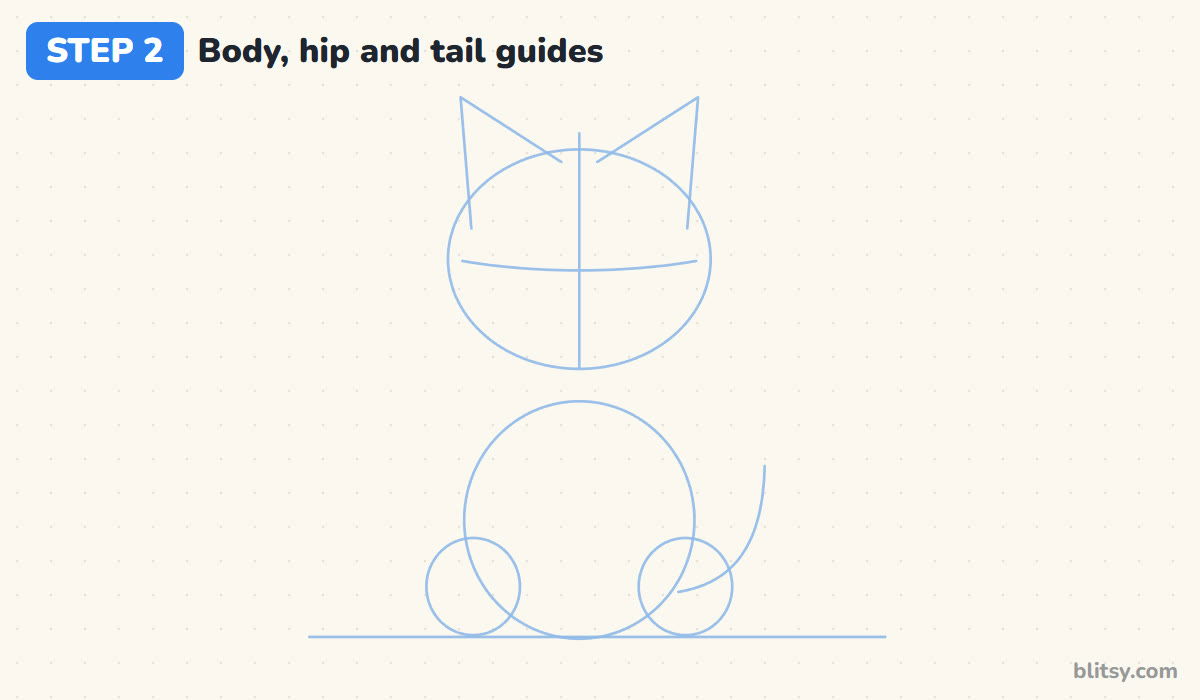
Below the head, draw a round body circle that sits right on the ground line. Its top should just touch the bottom of the head. Put a smaller circle low on each side for the back legs, and a curved line rising from the right hip for the tail.
💡 Tip: Keep the body circle a little smaller than the head. Yorkies are small dogs, and a big head makes them look cute.
Step 3: Draw the top of the head and pointy ears
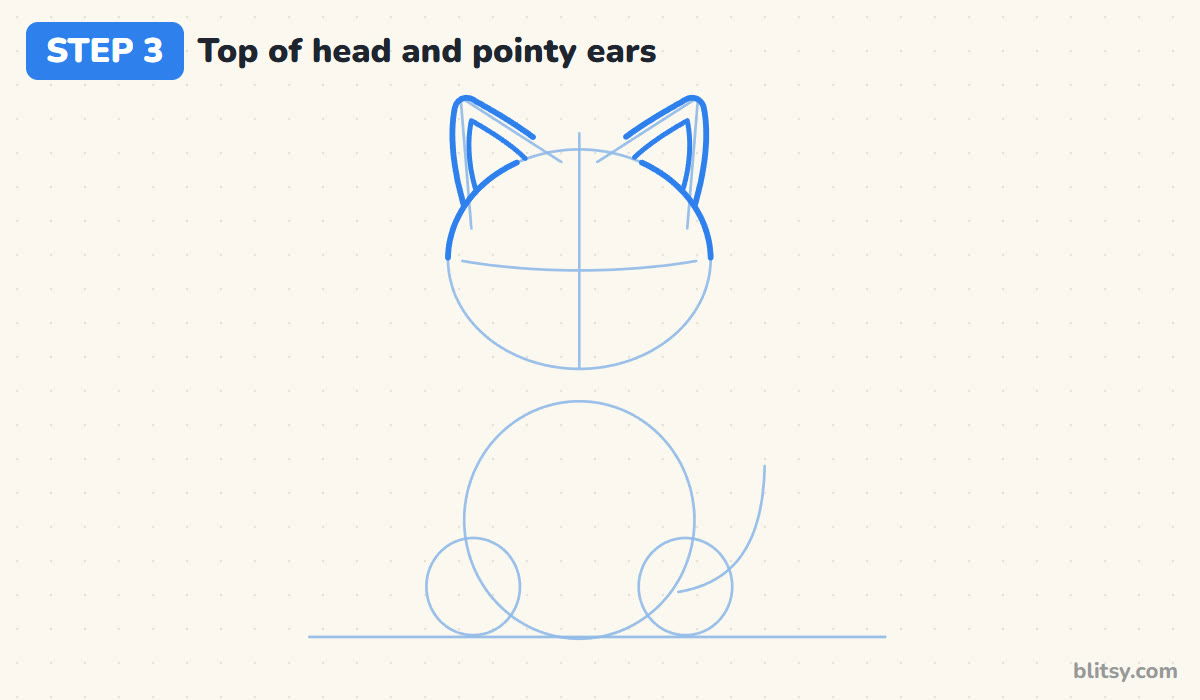
Trace the top of the head circle with a firmer line. Then turn the ear triangles into real ears: round off the tips slightly and curve the sides. Inside each ear, draw a smaller triangle. Their bottoms tuck into the head, so stop the lines where they meet the circle.
💡 Tip: Make the ears stand straight up. Floppy ears would turn this into a different dog.




Step 4: Add the long silky face fur
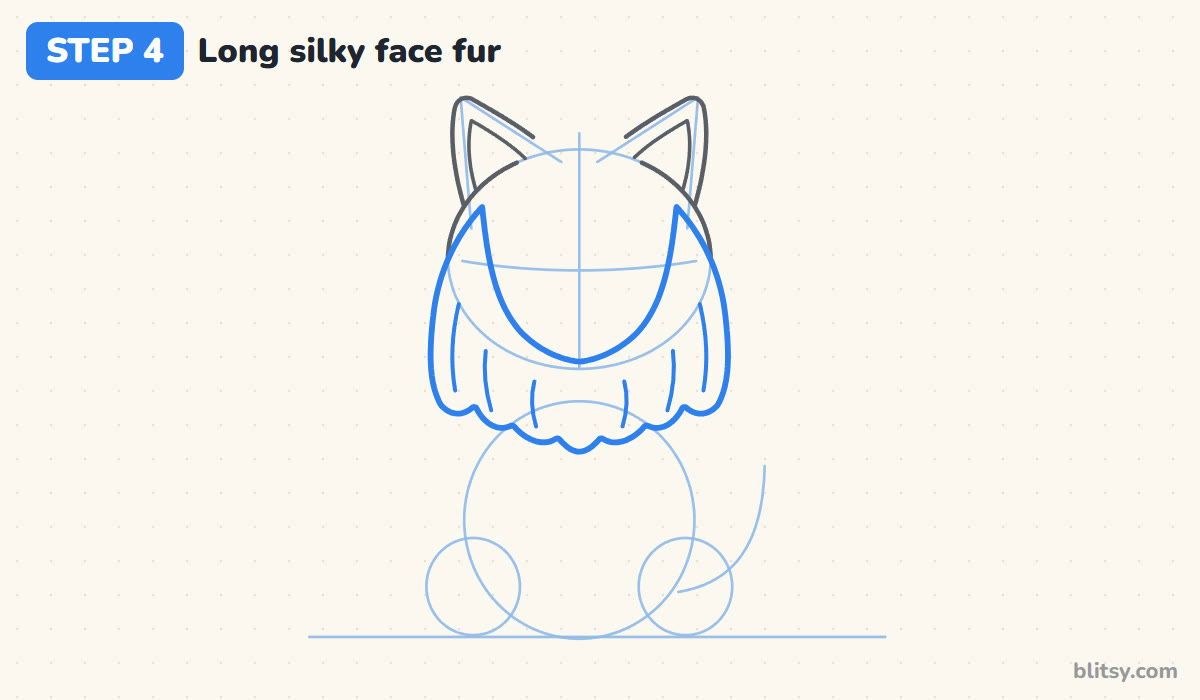
This is the step that makes it a Yorkie. From each side of the head, let the fur flow down past the cheeks and out a little, like two curtains. At the bottom, draw a row of soft, rounded points for the hair tips. Then bring an inner line down from each ear, around the face, to meet in a gentle point under the chin. Add a few curved lines inside the fur so it looks silky.
💡 Tip: I keep the inner fur lines well outside the eye guide. The face needs room for big eyes.
Step 5: Draw the topknot and a hair bow
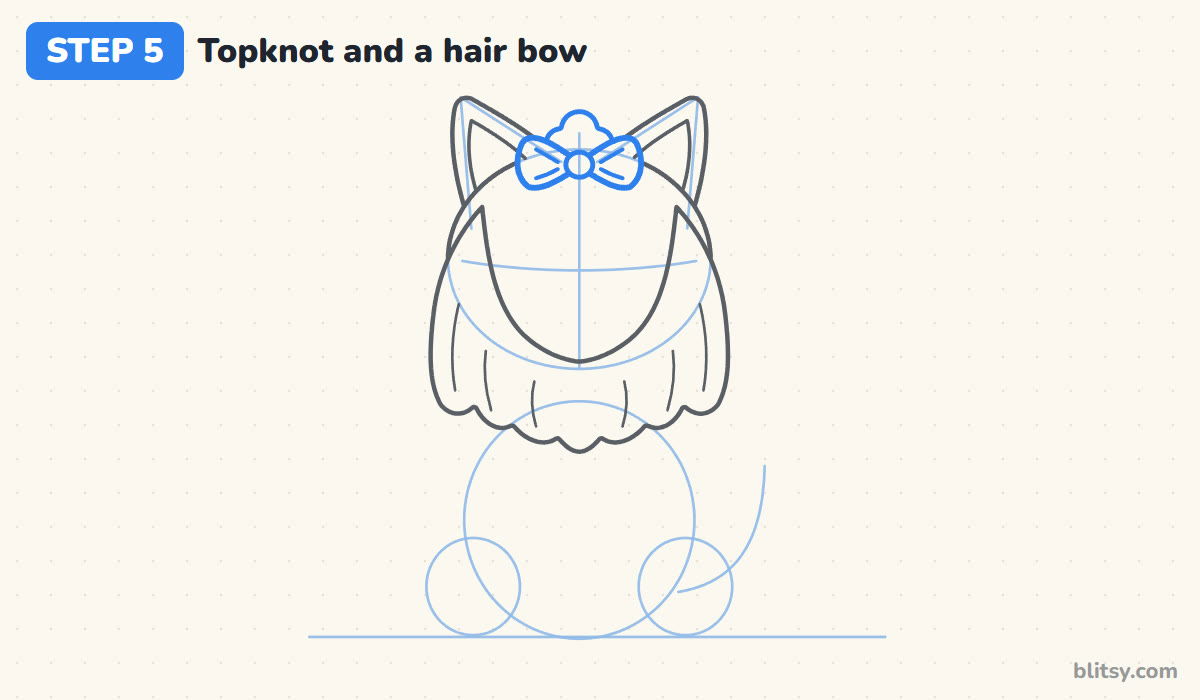
On top of the head, between the ears, draw a small puff of fur made of three bumps. Right below it, draw a bow: two rounded loops pointing left and right with a little circle in the middle. Add two short fold lines inside each loop.
💡 Tip: Keep the bow narrower than the space between the ears so it doesn't crowd them.
Step 6: Outline the little body and hips
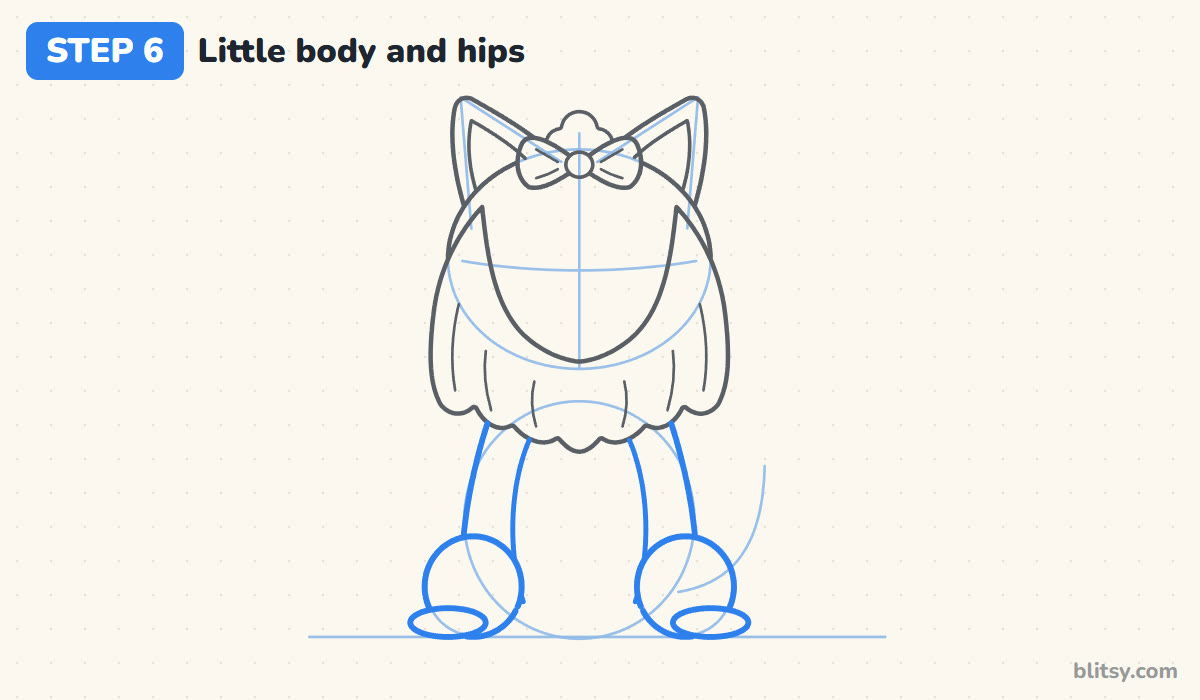
Draw the body's sides from under the fur down to the ground, curving out a little toward the bottom. Add two curved lines in the middle for the tan chest. Then outline the hip circles and give each one a flat oval in front for a back foot.
💡 Tip: Rest the back feet flat on the ground line. It makes the dog look settled and sitting.
Step 7: Add the front legs and paws
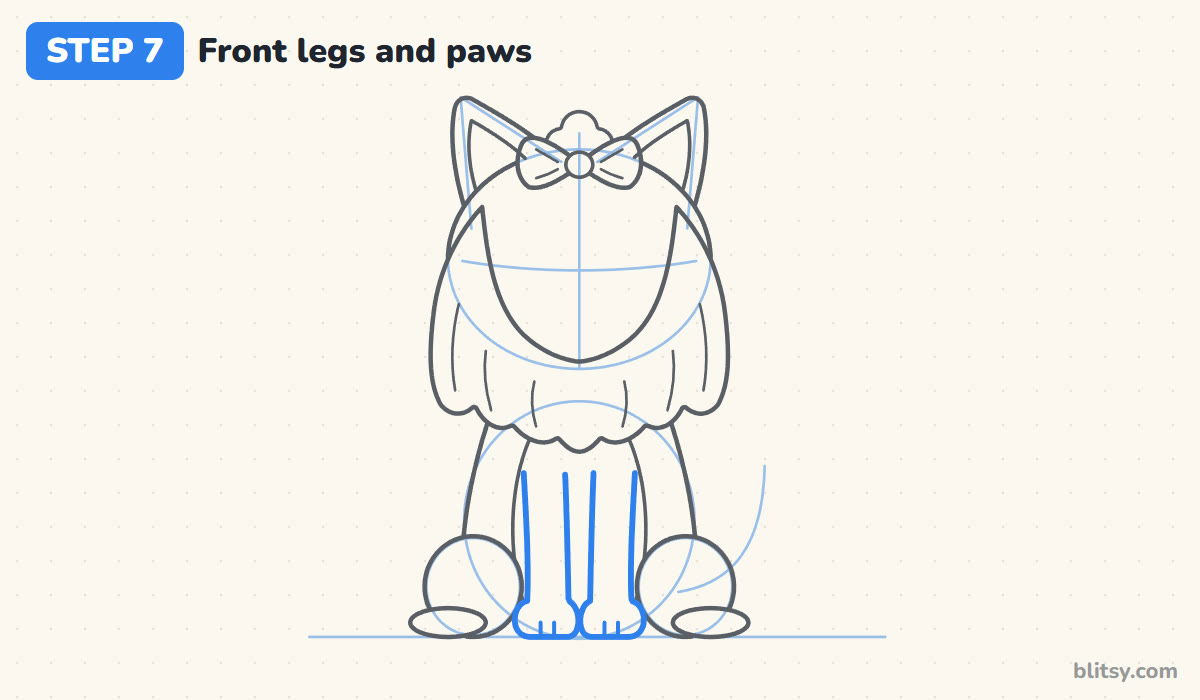
Draw two thin front legs coming straight down from under the fur, close together in the middle. At the bottom, round each leg out into a small paw. Two tiny lines on each paw mark the toes.
💡 Tip: Yorkie legs are short and slim. Keep them narrower than the hips.


Step 8: Draw a fluffy tail
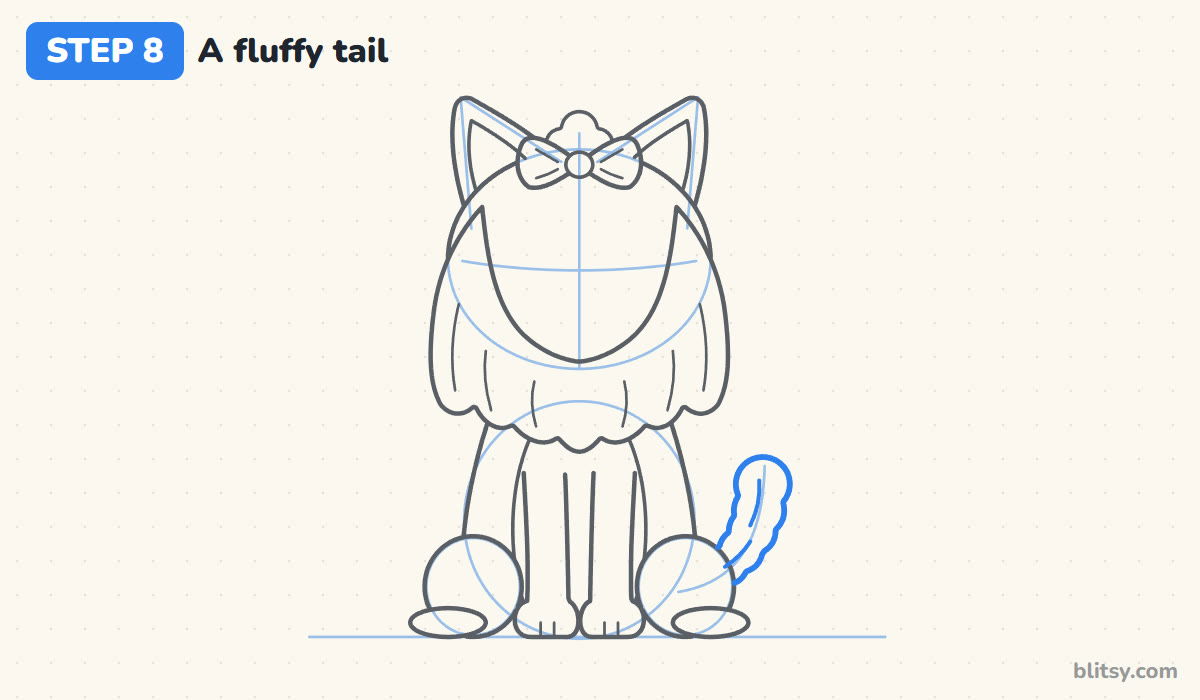
Follow the tail guide with a bumpy outline that starts thin near the hip and gets wider toward the top. Finish it with a round, fluffy tip. Two short curved lines inside the tail show the fur.
💡 Tip: Small bumps along the edges say fluffy much better than one smooth line.
Step 9: Draw the muzzle, nose and mouth
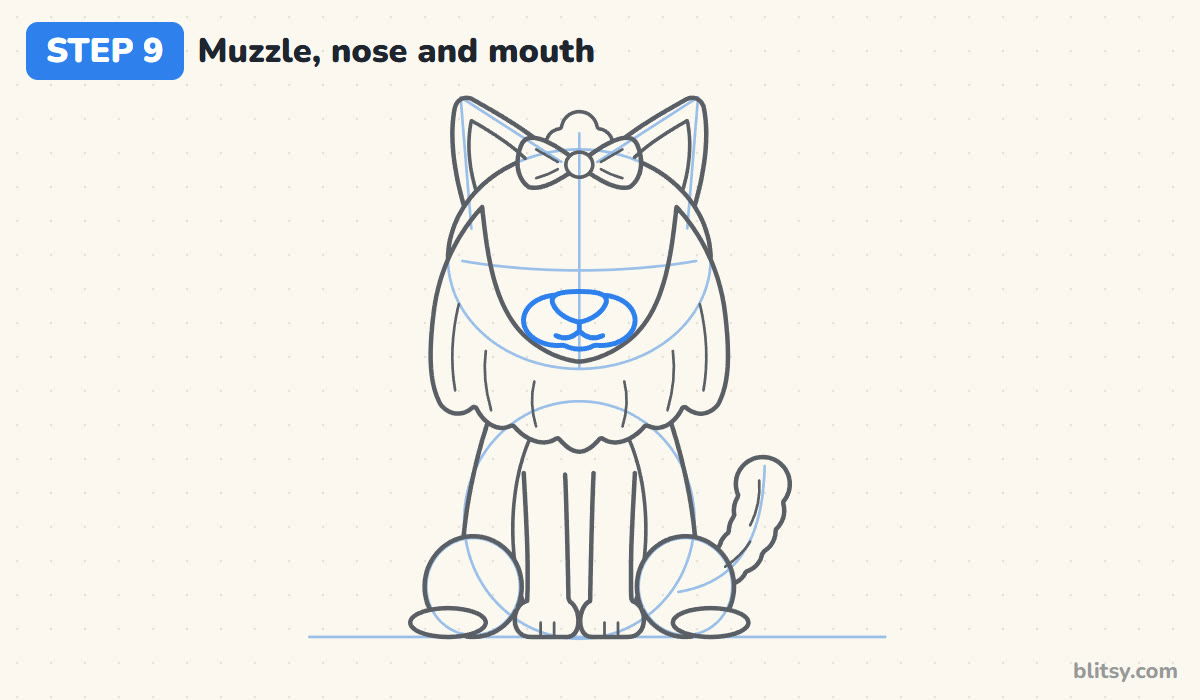
Low in the face, draw a small muzzle made of two cheek bumps side by side with a tiny chin bump under them. On top, add a rounded triangle for the nose. A short line drops from the nose and splits into two small curves for the smile.
💡 Tip: Keep the muzzle short and wide. A long snout makes the dog look older and less cuddly.
Step 10: Add button eyes and little brows
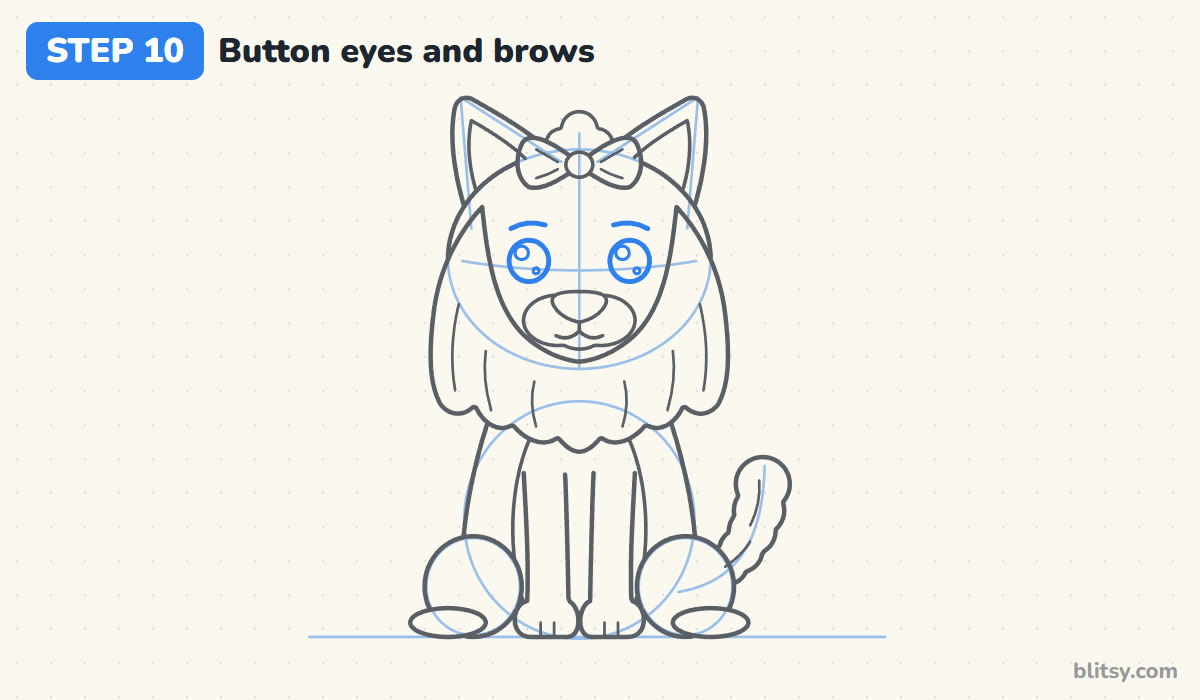
Place two big round eyes on the curved cross line, one on each side of the center. Inside each, draw a big shine circle near the top and a tiny one lower down. Above them, add short curved brows.
💡 Tip: Put both shine circles on the same side of each eye, or the dog will look cross-eyed.
Step 11: Ink the Yorkie and erase the guides
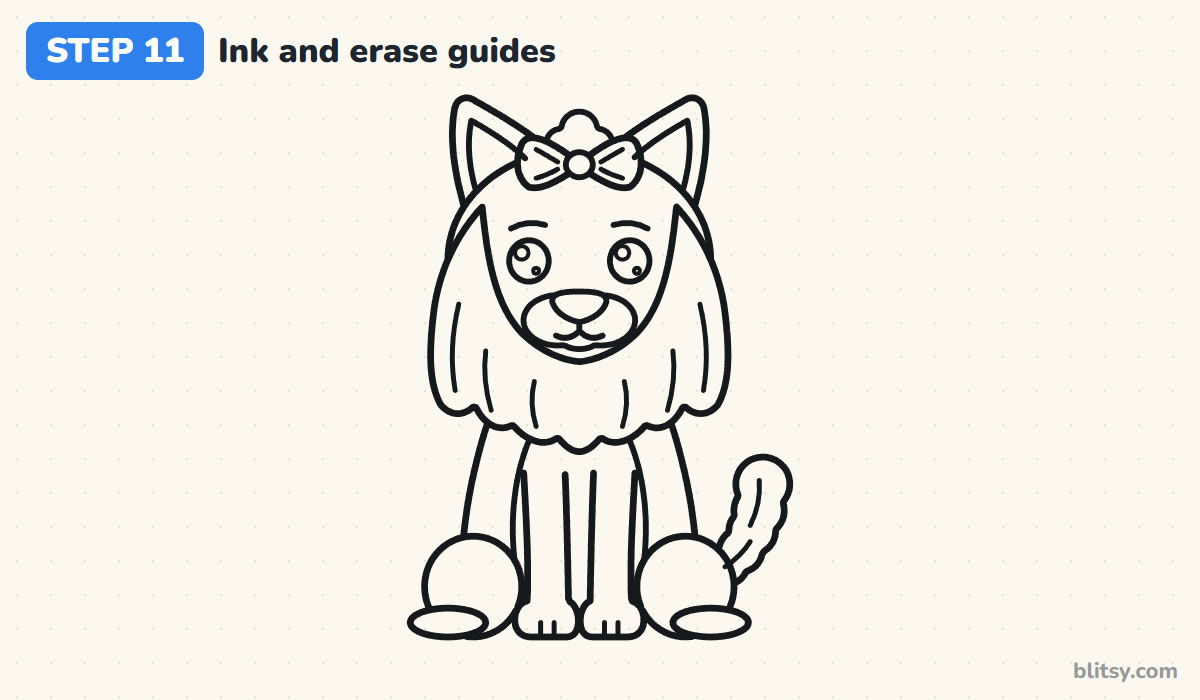
Go over all the keeper lines with your black marker. I start with the face while my hand is steady, then the fur, and finish with the body and tail. Wait for the ink to dry, then erase every pencil guide.
💡 Tip: Lift the marker between the fur tips instead of dragging it. The points stay sharper.

Step 12: Color your Yorkie
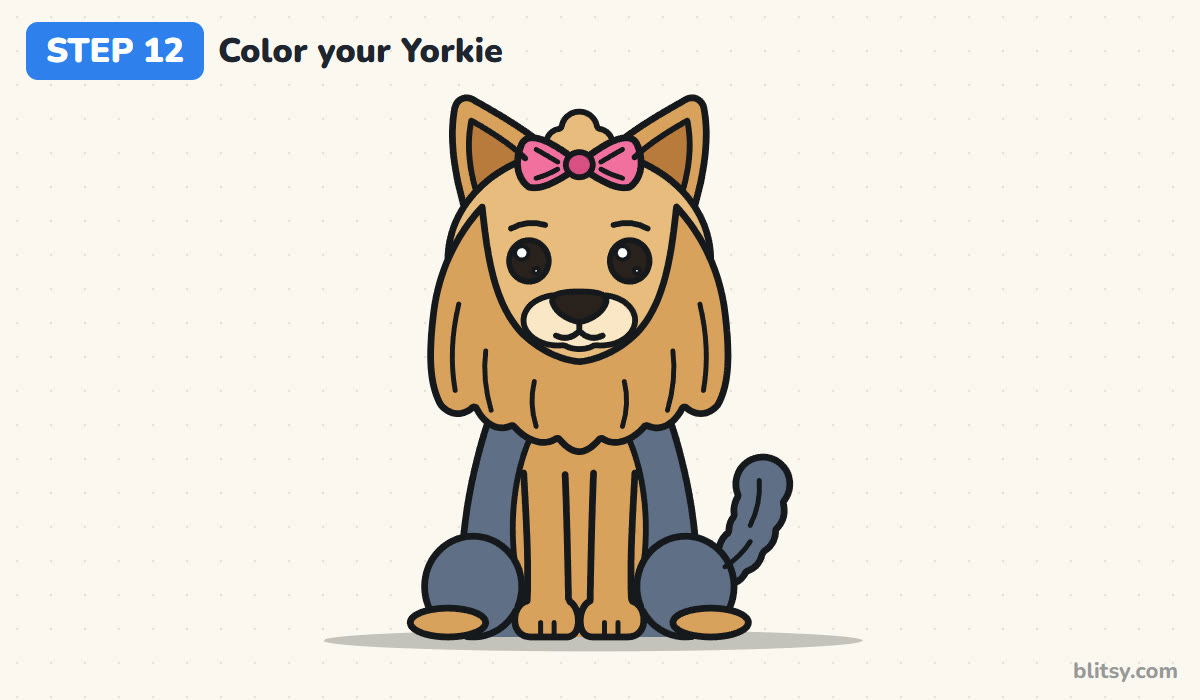
Use golden brown on the face fur and chest. The legs, the feet and the ears get it too, while the head and topknot take a lighter brown. The back and hips are blue gray, and so is the tail. Color the muzzle cream, the bow pink and the inner ears a darker brown. Fill the eyes and nose black, leaving the shine circles white, and add a soft gray shadow under the dog.
💡 Tip: Stroke the crayon downward on the face fur, the same way the long hair hangs.
Why a Yorkie Sketch Can Look Like Another Breed
- Short face fur. Without the long hair around the face, the dog looks like a plain puppy. Let the fur hang well below the chin.
- Floppy or tiny ears. Yorkie ears stand up in a sharp V. Make them tall enough to see clearly above the head.
- A long body and long legs. Yorkies are compact. Keep the body short and the legs slim and short.
- One brown for everything. The blue-gray back is part of the breed look. Use it on the back and hips, and on the tail too.
- Eyes too small. Little dots make the face look serious. Big round eyes with shine circles keep it friendly.
Giving Your Yorkie a New Look
Swap the pink bow for a red, purple or polka-dot one, or add a tiny collar with a heart tag. You can trim the face fur shorter for a puppy cut, the way many pet Yorkies are groomed. Younger kids can skip the fur lines and the inner ears and it still looks right. If you liked this, the puppy drawing tutorial uses the same sitting pose with floppy ears and a collar. For another small breed with a big personality, try the French bulldog drawing step by step lesson, and the dog drawing tutorial shows a whole dog from the side.
Free Yorkie Coloring Page and Printable Step Guide
The free Yorkie coloring page has a colored model at the top with a key that shows which color goes where, plus a large outline to color below it. The step-by-step PDF guide has all 12 steps with pictures and tips, so you can draw without a screen. Both print well on Letter or A4 paper.
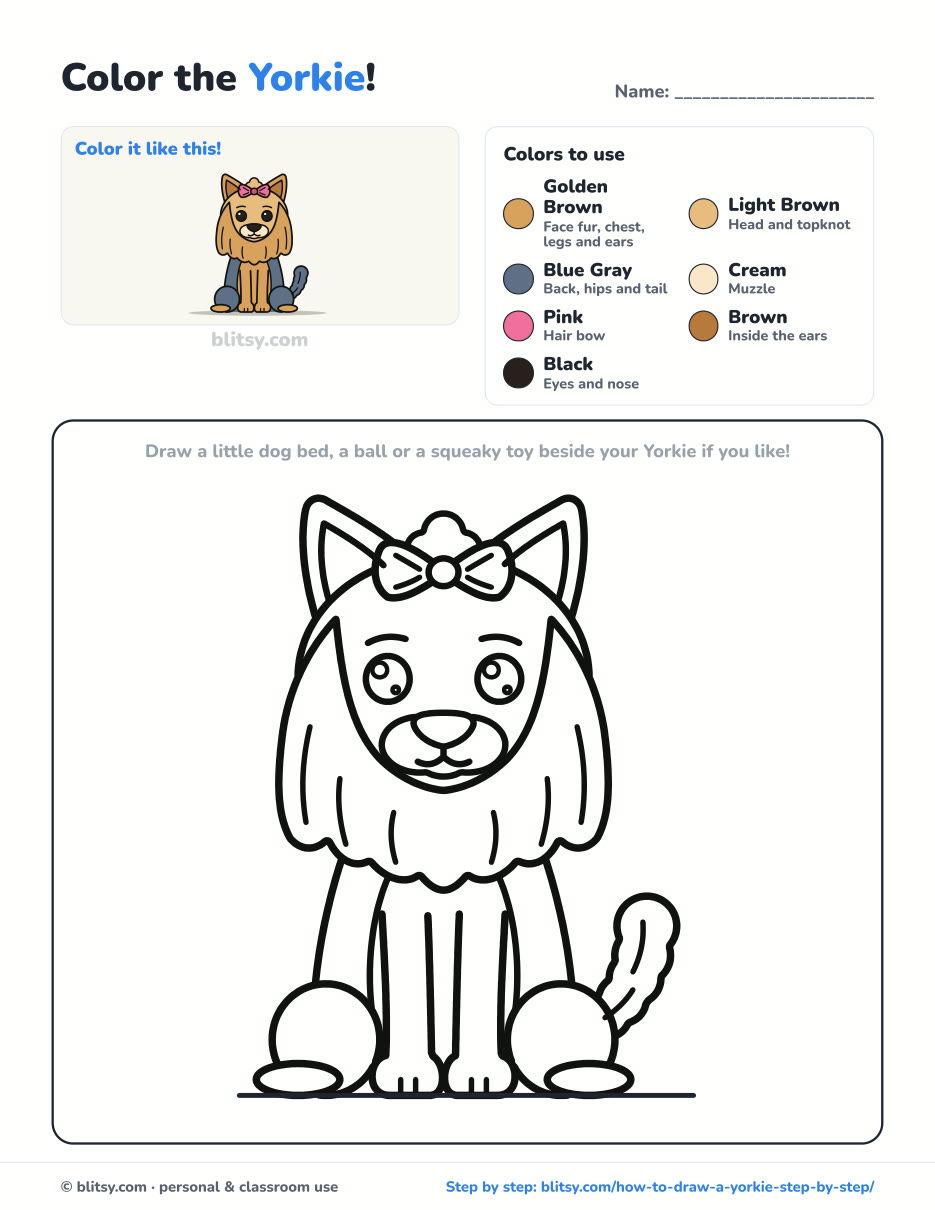
Black outlines with a colored example and the color names at the top. Ready to print and color.
⬇️ Download Coloring PageEvery step picture with its instructions and tips, to keep beside your paper while you draw.
⬇️ Download Drawing Guide📱 On a phone? Tap a download button, then open the file and choose Share → Save to Files or Print. On a computer, the PDF opens or saves straight to your Downloads folder.
A Yorkie Cheat Sheet to Save
More Pets and Animals to Draw Next
Each of these is a full tutorial with a picture for every step and a free coloring page.
- Puppy Drawing: A golden puppy sits with long floppy ears, an eye patch and a blue collar in this puppy drawing tutorial.
- French Bulldog Drawing: Draw a sitting Frenchie with big bat ears and a red bow tie with this French bulldog drawing step by step guide.
- Dog Drawing: Build a friendly beagle-style dog in side view from three circles in this how to draw a dog tutorial.
- Kitten Drawing: A sitting ginger kitten with big eyes and tabby stripes grows from two ovals in this kitten drawing tutorial.
- Bunny Drawing: Draw a sitting bunny with long ears, a cotton tail and a carrot with this bunny drawing step by step lesson.
Yorkie Drawing Questions Kids Often Ask
How do you draw a Yorkie easy?
Start with a circle for the head and two triangle ears. Add long fur hanging beside the face, a bow on top, then a small sitting body with short legs and a fluffy tail.
What colors is a Yorkie?
A Yorkshire Terrier has tan or golden fur on the head and face, and down the chest and legs, and steel blue or dark gray fur on the back and tail.
How do you draw Yorkie hair?
Draw it as two long curtains falling from the sides of the head, with soft points at the bottom. A few curved lines inside make it look silky.
How long does it take to draw a Yorkie?
Around 30 to 35 minutes, coloring included. The face fur takes the longest.
Your Yorkie only needs one light circle to get started, so find a pencil and give it a go. 🐶✏️
Related posts:
 How to Draw a Car Step by Step (Easy Drawing for Beginners)
 How to Draw a Whale Step by Step (Easy for Beginners)
 How to Draw an Arctic Fox Step by Step (Easy for Beginners)
 How to Draw a Shark Step by Step (Easy for Beginners)
 How to Draw a Chicken Step by Step (Easy for Beginners)
 How to Draw a Fish Step by Step (Easy Goldfish for Beginners)
 How to Draw a Snowman Step by Step (Easy for Beginners)
 How to Draw an Airplane Step by Step (Easy Jet for Beginners)
 How to Draw a Mouse Step by Step (Easy for Beginners)
 How to Draw a T-Rex Step by Step (Easy for Beginners)
 How to Draw a Pig Step by Step (Easy for Beginners)
 How to Draw a Minion Step by Step (Easy for Beginners)

