
Pigs are one of the friendliest animals to draw, because almost everything about them is round. If you can sketch an oval, a circle and a smaller oval, you already have the pig. In this lesson I'll show you how to draw a pig step by step: a plump pink farm pig standing in a puddle, with floppy ears, a flat snout and a tail that curls like a spring. It's an easy one for kids, and grown-ups who haven't drawn in years tend to enjoy it too.

Look for the blue: that's the part to copy in each step. The gray lines are your earlier work, shown so you know where the new piece attaches.
Quick overview
⏱️ Time: about 25 to 30 minutes with coloring
🎯 Level: easy, fine for kids from about 6 up
✏️ Steps: 12
🐷 You'll draw: a pink farm pig standing in a small mud puddle
Supplies for a Plump Pink Pig
- A pencil you can press lightly with (HB works well)
- A soft eraser
- A black marker or fineliner for the final outline
- Colored pencils, crayons or markers in light pink, darker pink, rose, brown and black
- Plain white paper, turned sideways
Turn the paper sideways so the long body and the tail both have room.
How to Draw a Pig Step by Step
Step 1: Draw a ground line and a big body oval
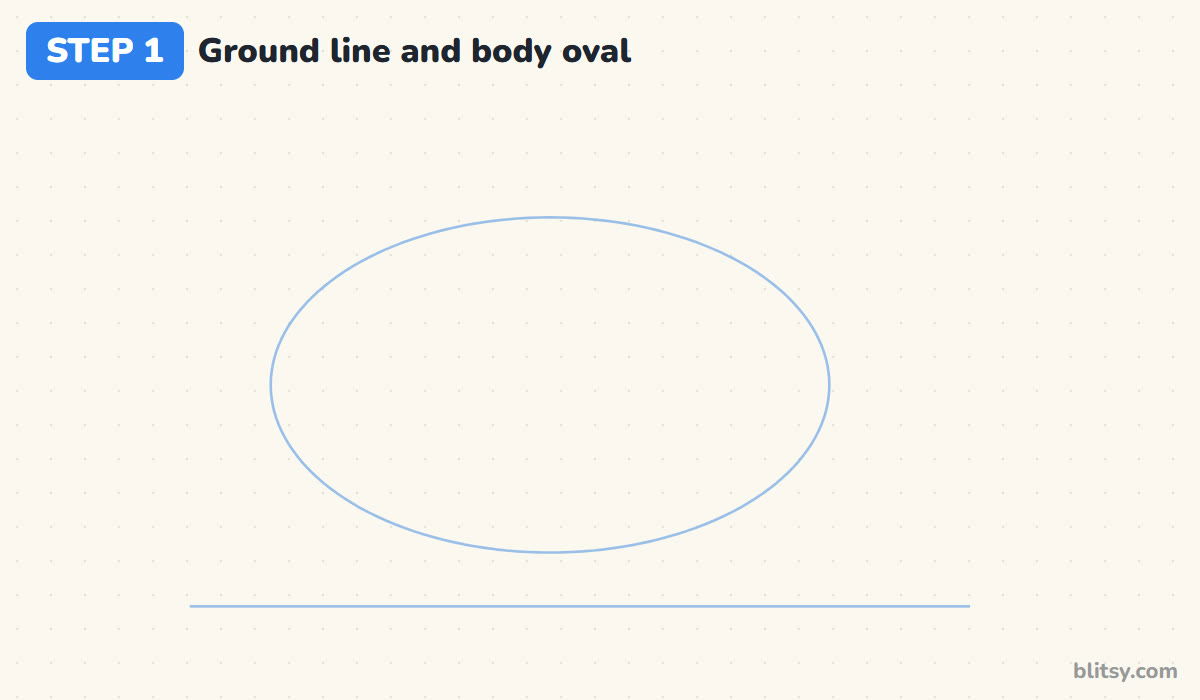
Start with a light straight line near the bottom of the page. Above it, draw a wide oval for the body, a little longer than it is tall, floating just above the line. Leave space on the right for the head and on the left for the tail.
💡 Tip: Press so lightly you can barely see it. Every line in the first three steps gets erased.
Step 2: Add a head circle and a snout oval
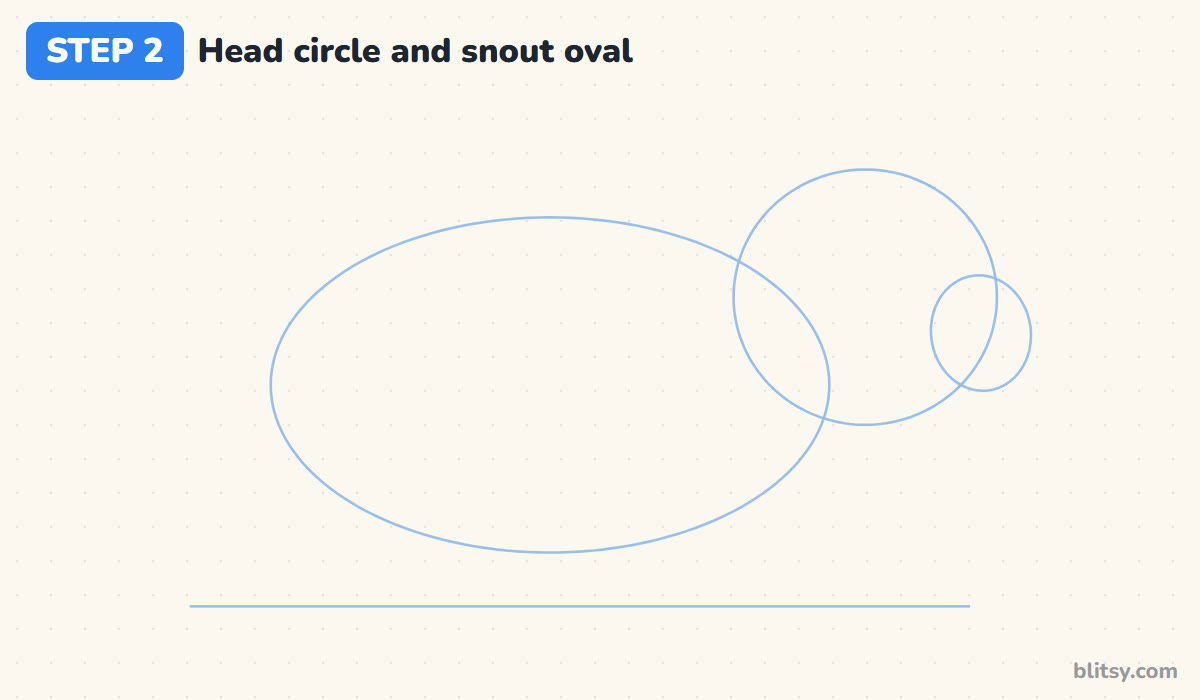
Overlap a circle on the right end of the body, a bit higher than the middle, so it sits like a head resting on the shoulders. It should be roughly half as tall as the body. Then put a small upright oval on the right edge of that circle for the snout.
💡 Tip: Let the snout hang off the head by about half its width. Tucked fully inside, it looks like a nose on a ball.
Step 3: Mark the legs and the tail
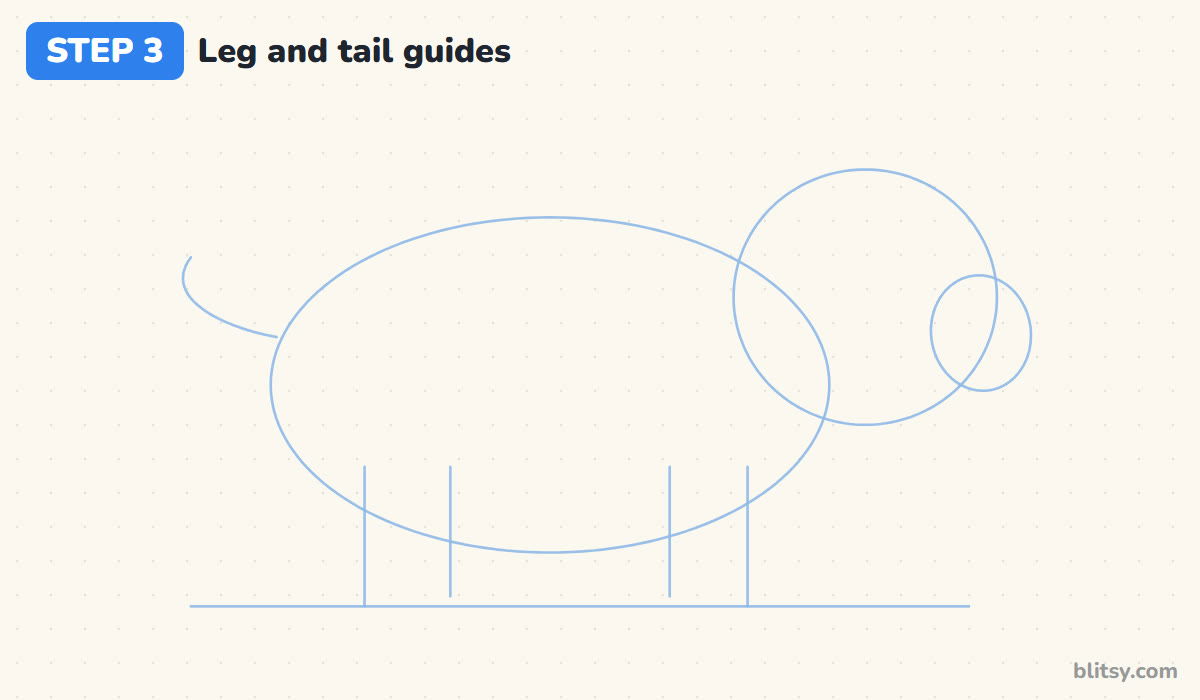
Drop four short straight lines from the bottom of the body to the ground line. I put two close together near the back and two near the chest. From the back end of the body, sketch a short curved line where the tail will go.
💡 Tip: Pig legs are short. If your lines are longer than the body is tall, move the body down.



Step 4: Outline the round barrel body
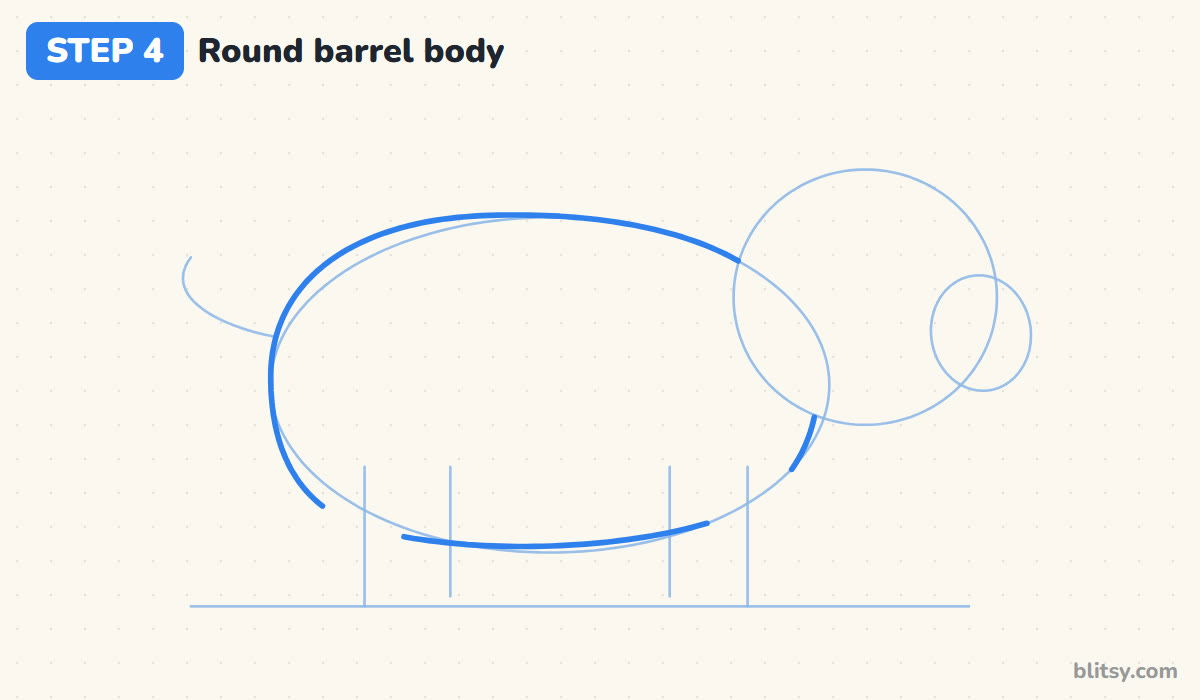
Now trace the body with a firmer line. I let the back rise a little over the rump and keep the belly full and round, like a barrel. Leave small gaps on the belly where the near legs will come down, so you don't have to erase there later.
💡 Tip: Make the body chunky. A thin, flat pig starts to look like a dog.
Step 5: Draw the head and the flat snout
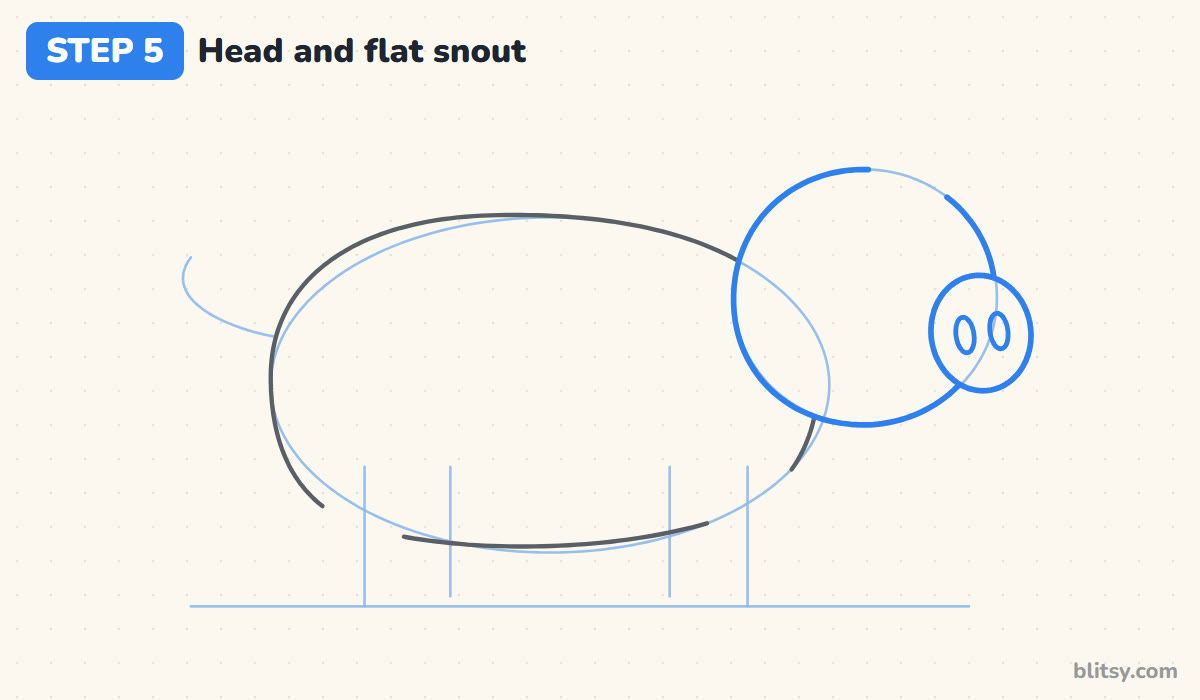
Go over the head circle, stopping where it meets the snout. Trace the snout oval in full, since it sits in front of the face. Inside it, draw two tall oval nostrils side by side. Nostrils are what turn the oval into a pig snout, so give them some size.
💡 Tip: Keep the two nostrils the same size and leave a small gap between them.
Step 6: Add two floppy triangle ears
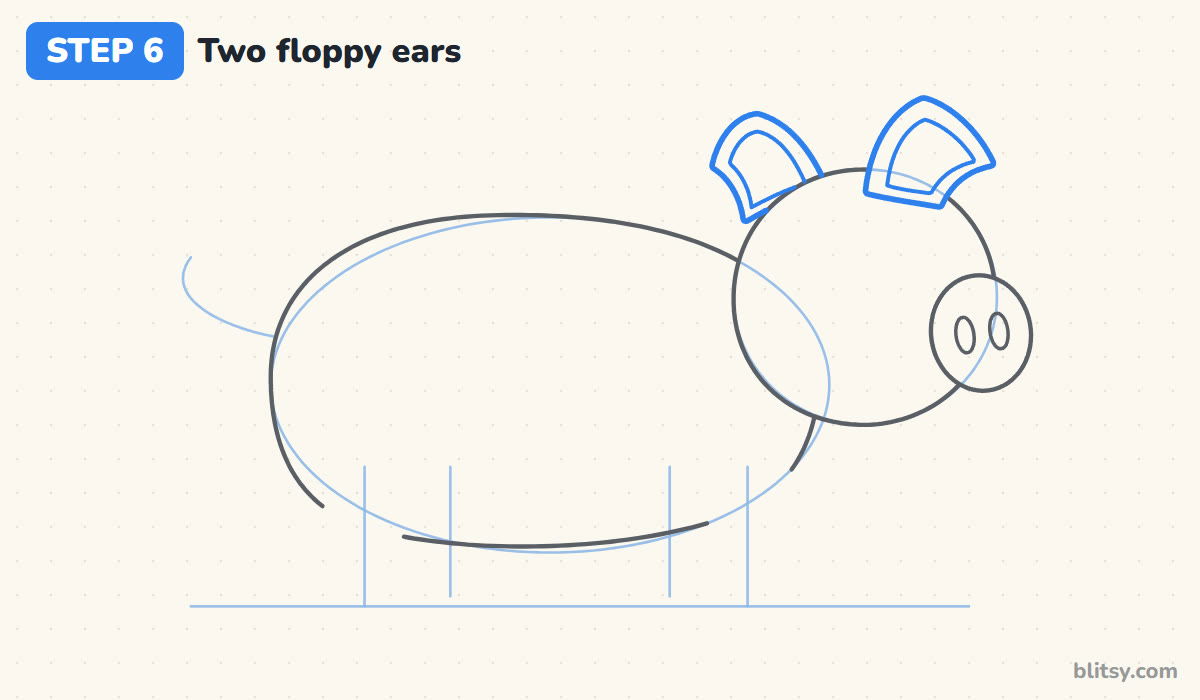
Each ear is a triangle that starts on top of the head and bends at the tip. I like the near ear leaning forward, its point flopping down toward the snout. The far ear peeks out behind the head and leans back. Draw a smaller triangle inside each one for the inner ear.
💡 Tip: Round the ear tips just a little. Sharp points make the pig look more like a cat.
Step 7: Give it eyes and a happy smile
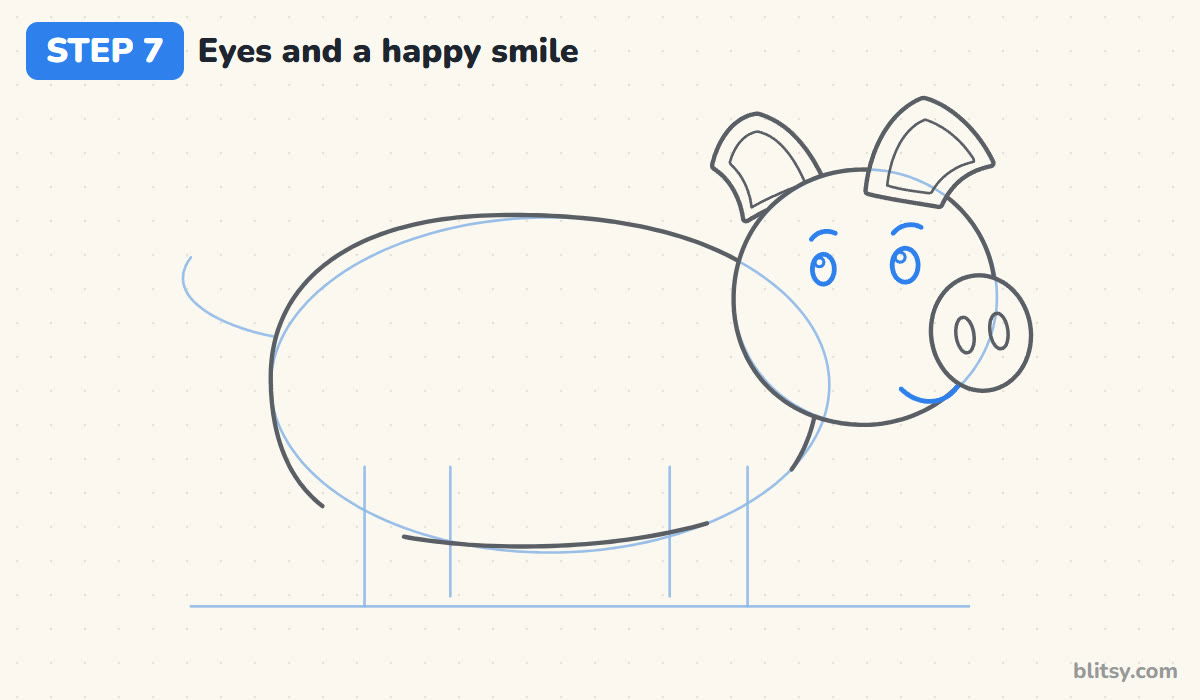
Place two small oval eyes high on the head, closer to the snout than to the back of the head. The far eye is a touch smaller, which helps the head look turned toward you. Add a shine dot in each, short raised brows, and a little curved smile just under the snout.
💡 Tip: Small eyes suit a pig. Big cartoon eyes are cute, but they cover too much of the face.



Step 8: Draw the front legs with split hooves
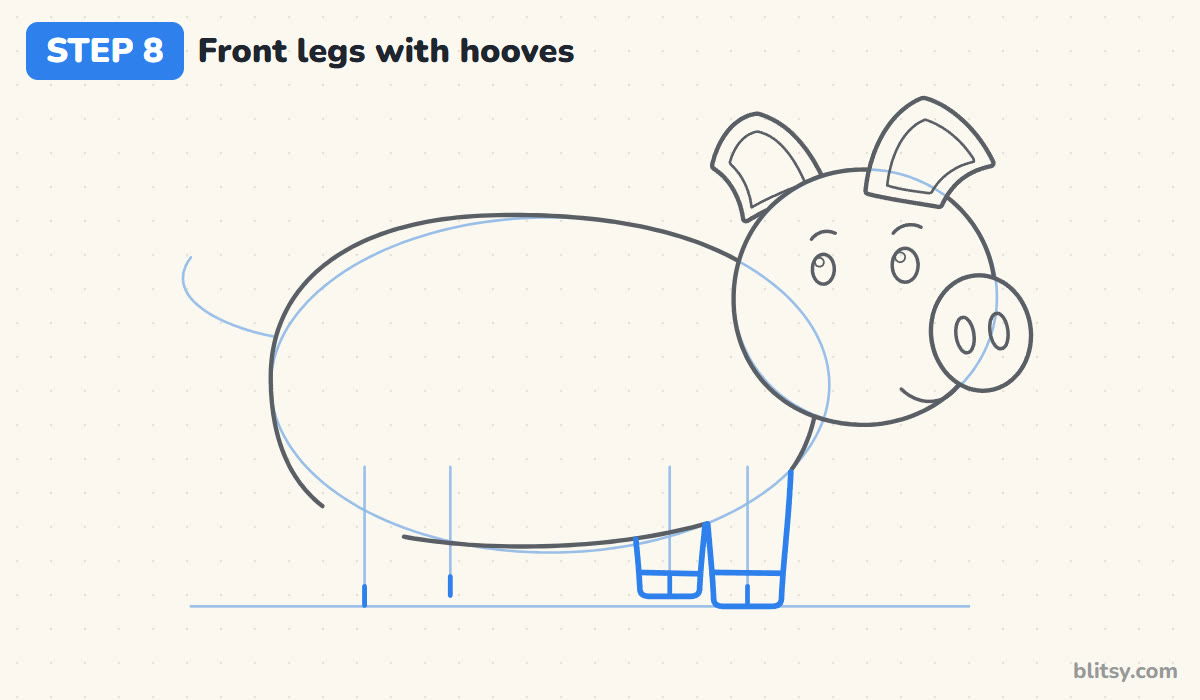
Around the two front guide lines, draw short, sturdy legs that get a little narrower toward the bottom. Start each one under the body and end it flat on the ground. Draw a line across the bottom of each leg for the hoof, then a short line up the middle to split it in two.
💡 Tip: The far leg sits slightly higher and behind the near one. That small shift adds depth.
Step 9: Add the back legs and a curly tail
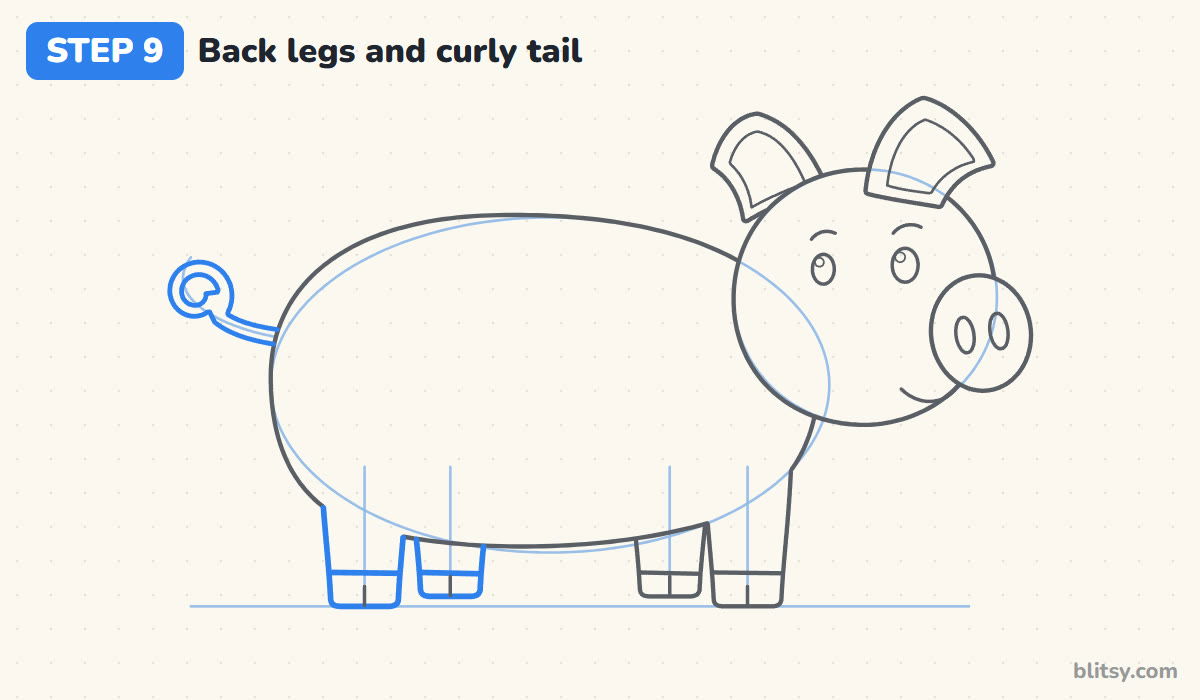
The back legs are drawn the same way as the front ones, with hooves and split lines. For the tail, draw a thin band that leaves the rump, then winds into a small curl. My trick is to think of a telephone cord. Two lines a pencil width apart are enough.
💡 Tip: Draw the curl slowly with one smooth turn of the wrist instead of many short strokes.
Step 10: Sketch a little mud puddle
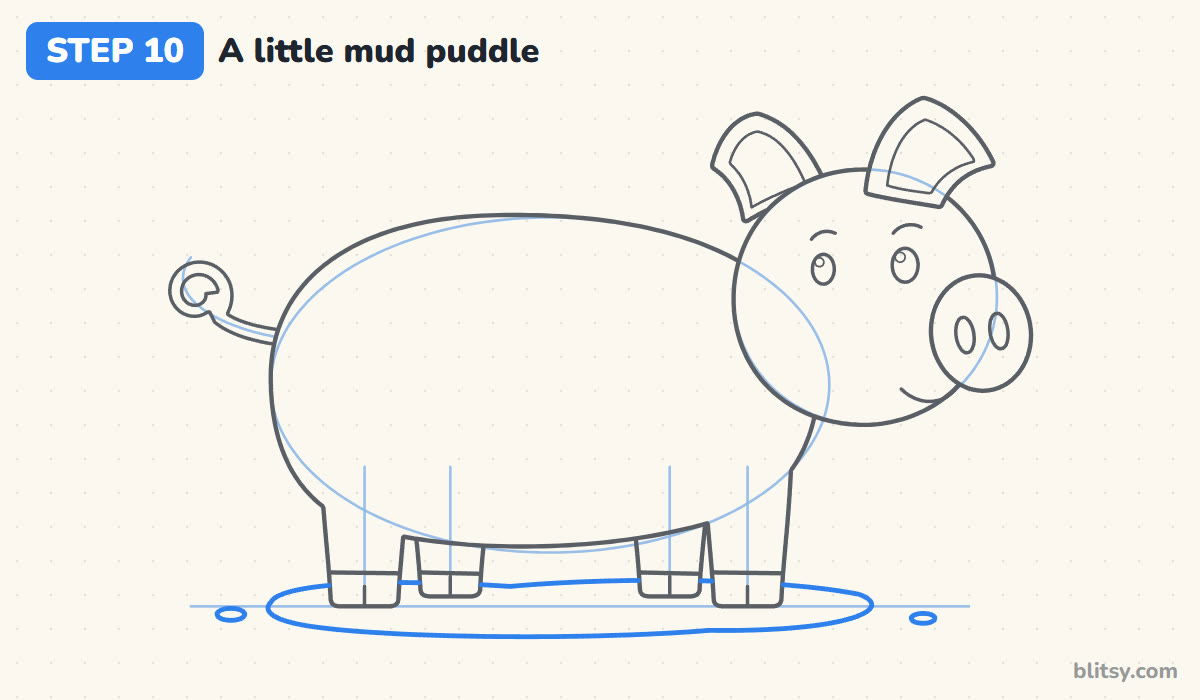
Pigs love mud, so give yours a puddle to stand in. Draw a long, flat, wobbly shape on the ground line under the feet, wider than the pig. Two small splash dots on either side make it look wet. Skip it if you prefer a clean pig on grass.
💡 Tip: Keep the puddle flat. A tall puddle looks like a rug standing on its edge.
Step 11: Ink the pig and erase the guides
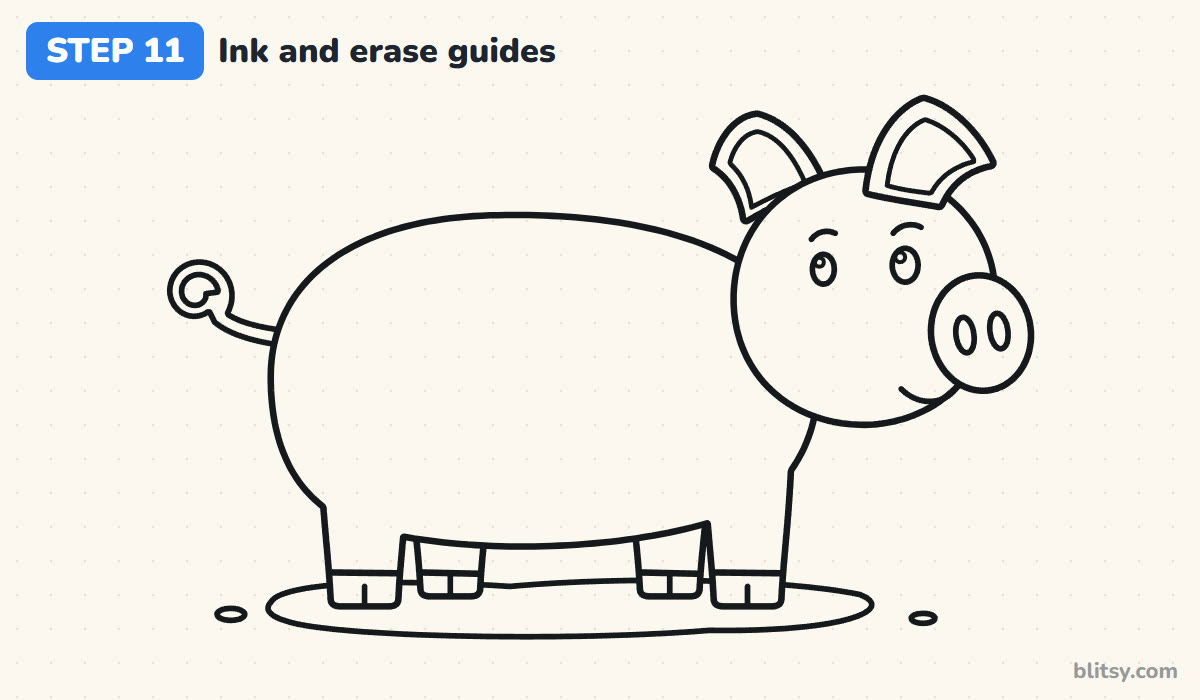
Go over every keeper line with the black marker. I usually start with the face, then the ears and body, then the legs and tail last. Once the ink is dry, erase all the light guide shapes. You should end with a clean outline and no stray circles.
💡 Tip: Wait a minute before erasing. Marker that's still wet smears across the whole page.

Step 12: Color your pig
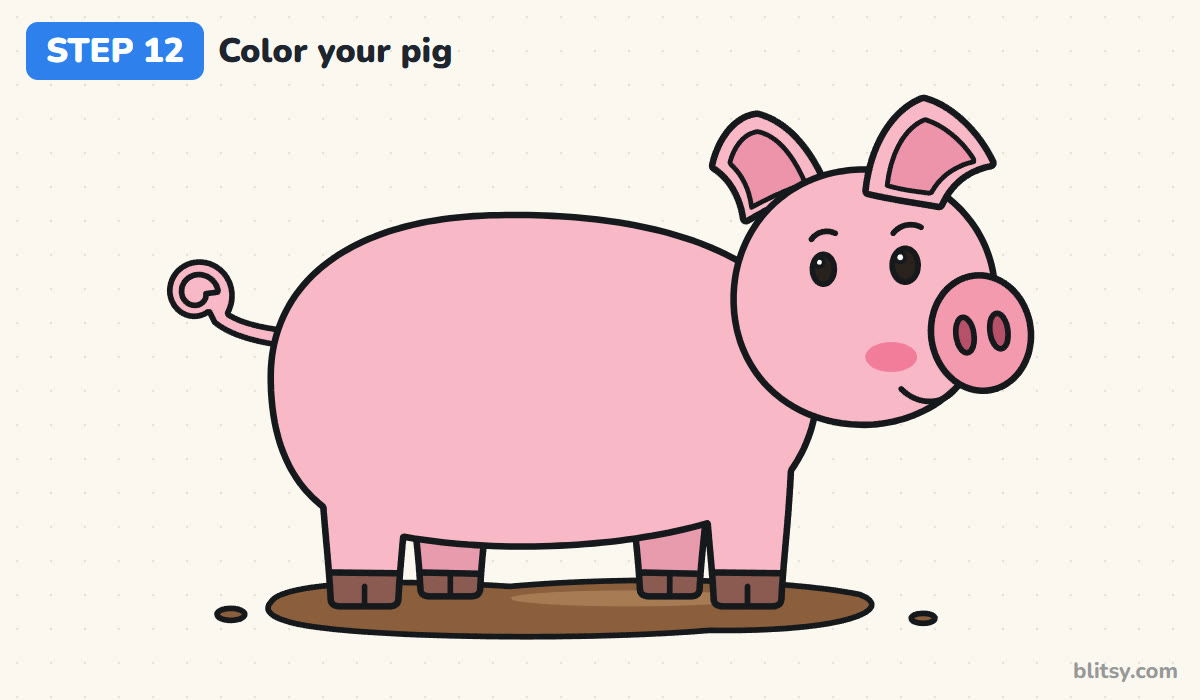
Light pink covers the body, head, legs and tail. A deeper pink goes inside the ears, on the snout and along the bottom of the belly. Color the nostrils dark pink, add a rose cheek, and make the hooves brown. The puddle is dark brown, eyes black with white shine left showing.
💡 Tip: I press harder with the pink along the belly. The extra color makes the pig look round instead of flat.
Pig Drawings That Turn Into Dogs (and Fixes)
- A long, thin body. Pigs are round and heavy. If yours looks sleek, make the belly hang lower.
- A snout that's too small. A tiny button nose reads as a dog or bear. I aim for a snout close to a third of the head's width.
- Long legs. Pig legs are short and stubby. Keep them shorter than the body is tall.
- Pointy, upright ears. Straight ears belong to cats and foxes. Bend the tips forward so they flop.
- A straight tail. The curl is a big part of what says pig, so give it at least one full loop.
From Farm Pig to Piglet and Beyond
My favorite variation is a piglet: shrink everything and make the head bigger compared to the body, and you have a piglet. Add black spots for a spotted pig, give it a straw hat, or draw a row of piglets behind the big one. Younger kids can skip the puddle and the inner ears. This is a real farm pig, but if your kids love the cartoon version, try the Peppa Pig drawing tutorial next. To fill out the farm, the cow drawing step by step lesson and this chicken drawing tutorial fit right next to your pig.
Free Pig Coloring Page and Step Guide PDF
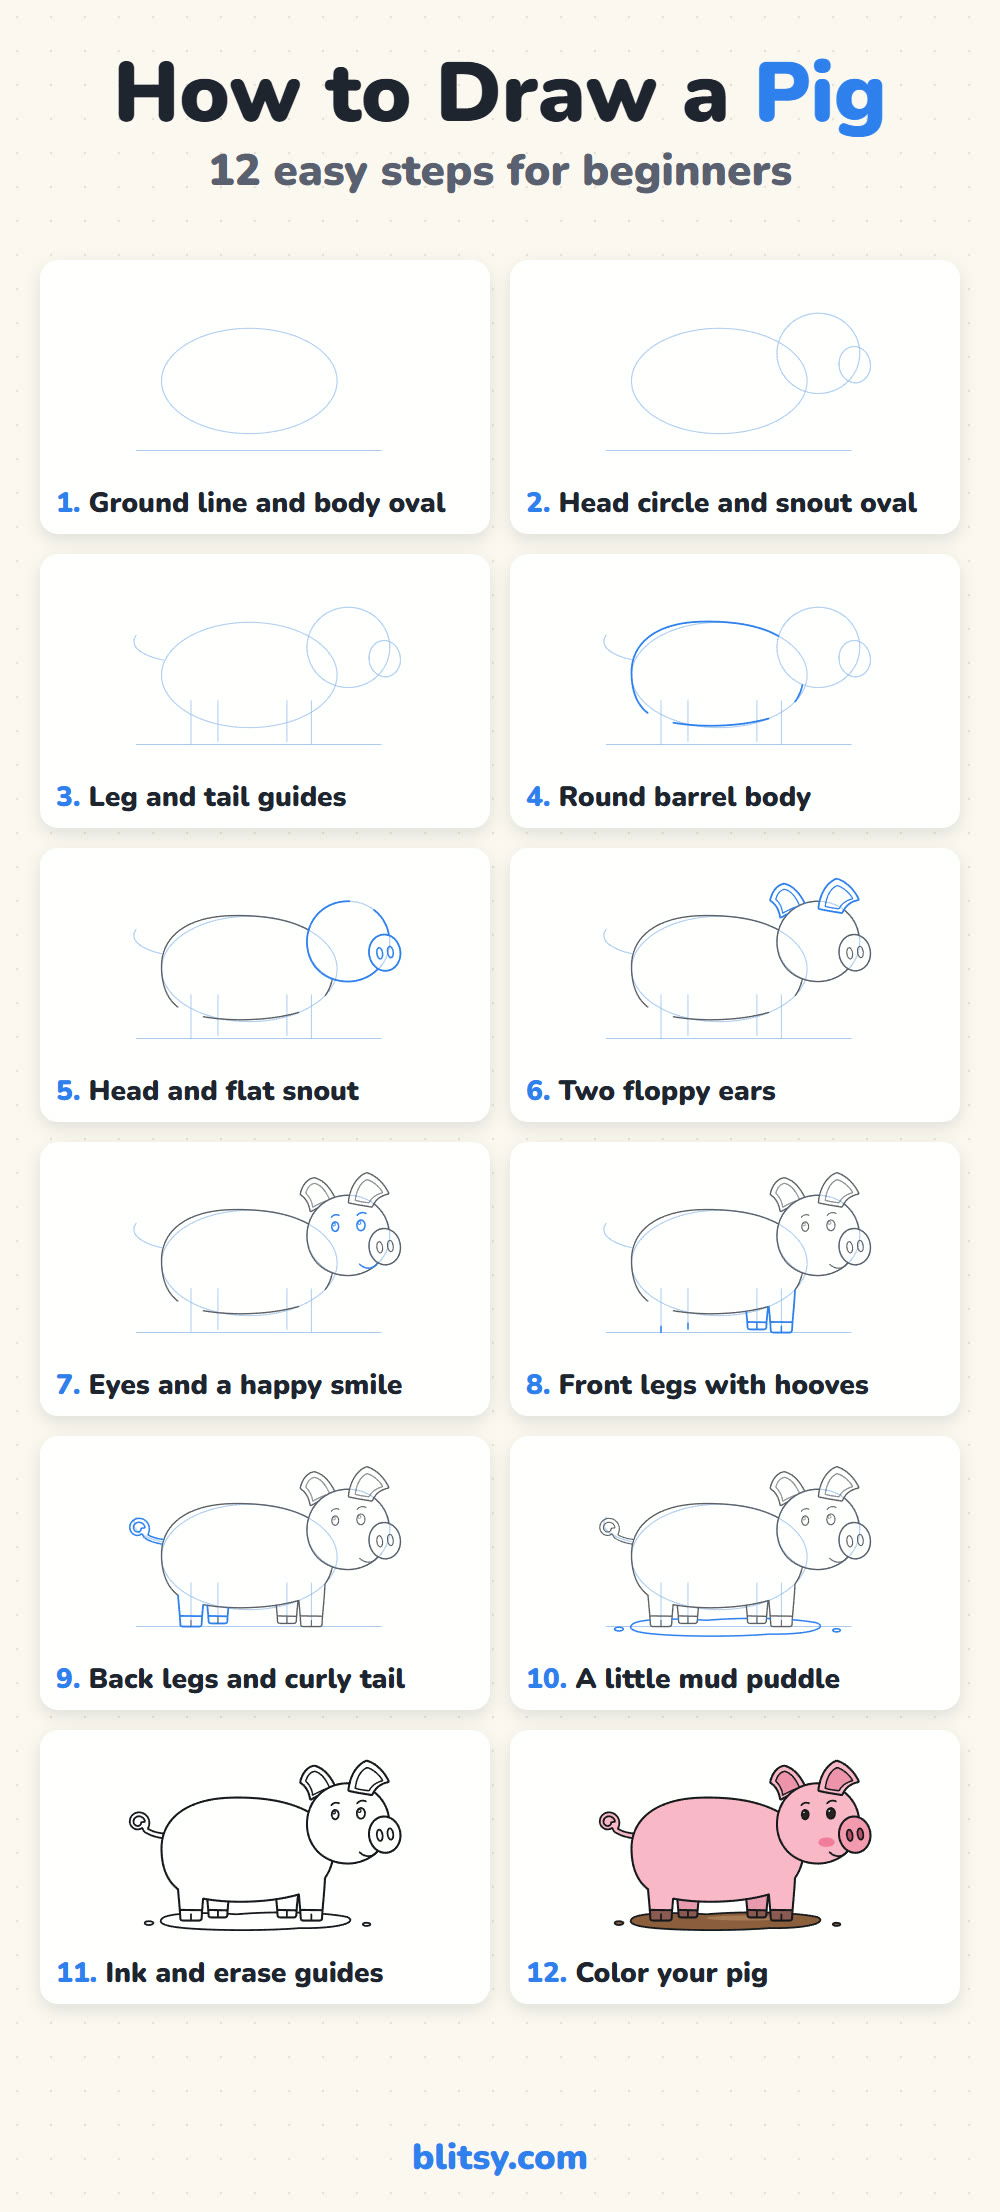
The free pig coloring page has a colored pig at the top to copy from, a key telling which color goes where, and a big outline to color below. The step-by-step PDF guide holds all 12 steps with pictures and tips, so kids can draw away from the screen. Both print on Letter or A4 paper.
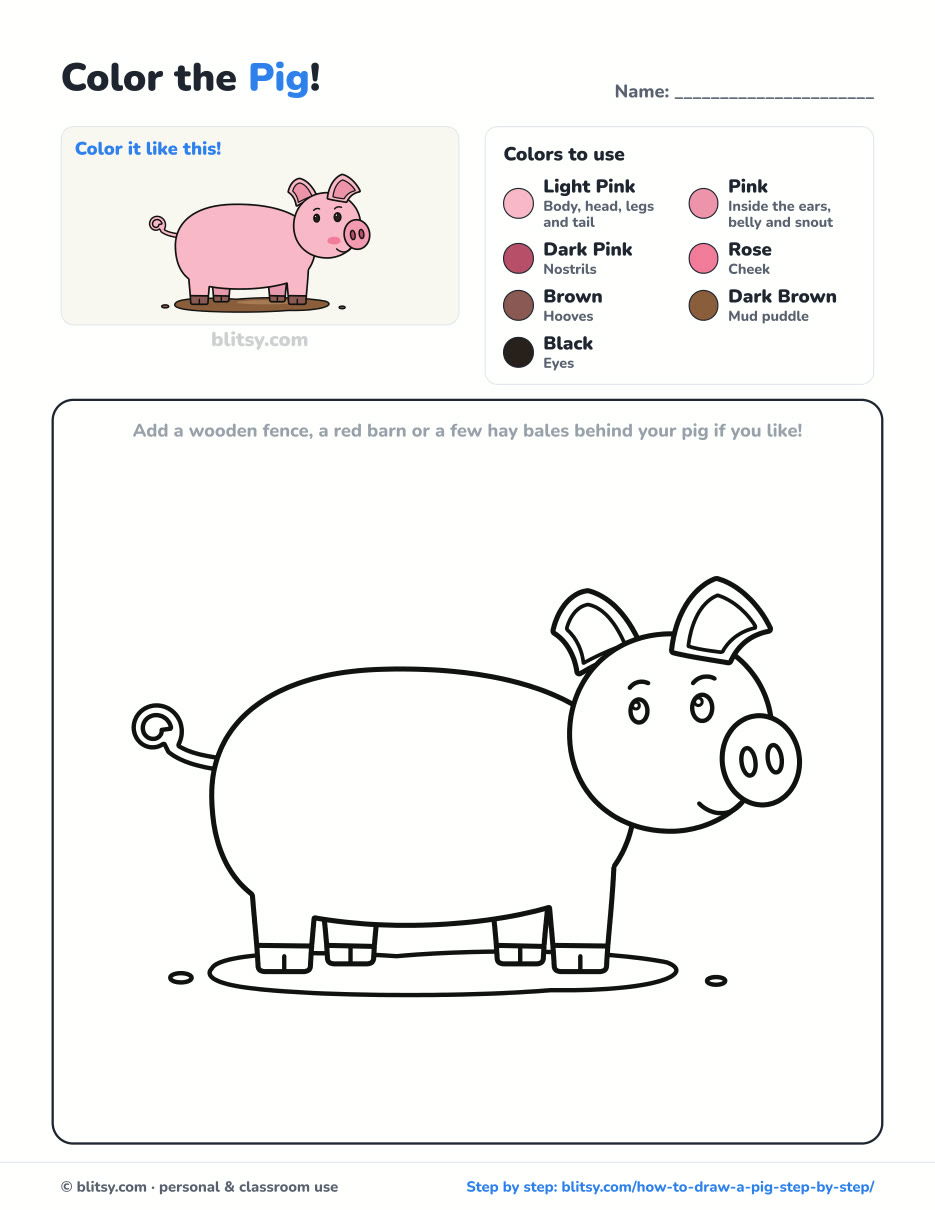
Black outlines with a colored example and the color names at the top. Ready to print and color.
⬇️ Download Coloring PageEvery step picture with its instructions and tips, to keep beside your paper while you draw.
⬇️ Download Drawing Guide📱 On a phone? Tap a download button, then open the file and choose Share → Save to Files or Print. On a computer, the PDF opens or saves straight to your Downloads folder.
Keep the Pig Steps on Pinterest
More Animals to Draw After Your Pig
Every link below is a full step-by-step lesson with a picture for each stage, so you can keep practicing the same way.
- Horse Drawing: Another farm favorite, built from simple shapes in this horse drawing tutorial.
- Duck Drawing: A pond friend for your pig in this duck drawing step by step lesson.
- Bunny Drawing: Round shapes again, this time with long ears, in the bunny drawing tutorial.
- Dog Drawing: Compare a dog's muzzle with a pig's snout in this dog drawing step by step guide.
- Elephant Drawing: Big ears and a long trunk in this elephant drawing tutorial.
Pig Drawing Questions from Kids and Parents
What is the easiest way to draw a pig?
Start with a wide oval for the body, a circle for the head and a small oval for the snout. Add two nostrils, floppy ears, four short legs and a curly tail, and it's a pig.
How do you draw a cute pig for kids?
Keep every shape round, make the eyes small and dark with a white shine dot, and add a pink cheek and a little smile. A curly tail and a mud puddle make it extra fun.
What colors do you need to draw a pig?
Light pink for the body, a darker pink for the snout and inner ears, brown for the hooves and mud, and black for the eyes.
How do you draw a pig's snout?
Draw an oval that sticks out from the front of the head, then two tall oval nostrils inside it. Color the snout a little darker than the face.
Grab a pink crayon and see how your own muddy little pig turns out. 🐷✏️
Related posts:
 How to Draw Peppa Pig Step by Step (Easy for Kids)
 How to Draw a Car Step by Step (Easy Drawing for Beginners)
 How to Draw a Whale Step by Step (Easy for Beginners)
 How to Draw an Arctic Fox Step by Step (Easy for Beginners)
 How to Draw a Shark Step by Step (Easy for Beginners)
 How to Draw a Chicken Step by Step (Easy for Beginners)
 How to Draw a Fish Step by Step (Easy Goldfish for Beginners)
 How to Draw a Snowman Step by Step (Easy for Beginners)
 How to Draw Hands Step by Step (Easy Palm View for Beginners)
 How to Draw an Airplane Step by Step (Easy Jet for Beginners)
 How to Draw a Mouse Step by Step (Easy for Beginners)
 How to Draw a T-Rex Step by Step (Easy for Beginners)

