
Orcas are easy to recognize from across the room, because their black and white pattern does most of the talking. Get the patches in the right places and even a simple outline turns into a killer whale. Here I'll show you how to draw an orca step by step, starting with one tilted oval and ending with a friendly orca leaping out of a splash. You don't need any drawing experience, only a pencil you can press lightly.
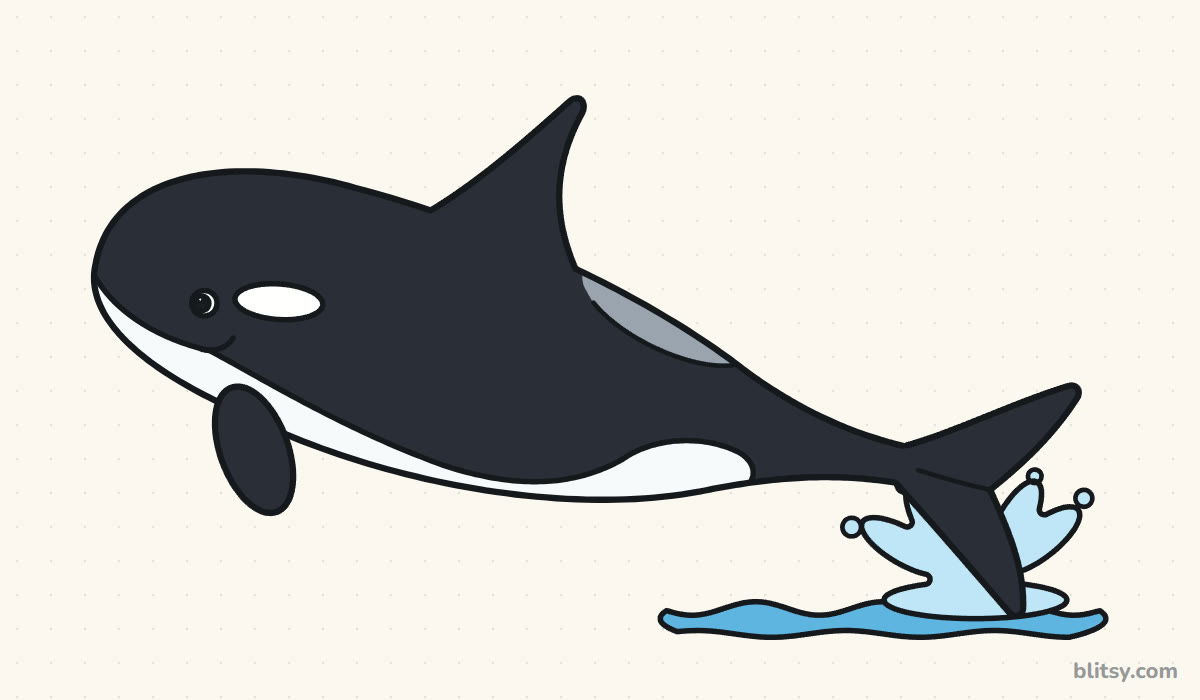
Orca parts you add in a step show up in blue, while gray shows what you finished earlier. Copy only the blue, check it against the picture, and carry on.
Quick overview
⏱️ Time: about 30 minutes, a bit more with coloring
🎯 Level: easy, fine for kids around 6 and up
✏️ Steps: 12
🐋 You'll draw: a leaping orca (killer whale) with a water splash
Gear for a Black and White Orca
- A pencil for light sketching (an HB works well)
- An eraser that doesn't smudge
- A black marker or fineliner
- Crayons or colored pencils in black, gray and two blues
- White paper, turned sideways
A black crayon covers big areas faster than a black colored pencil, so use one if you have it.
How to Draw an Orca Step by Step
Step 1: Sketch a tilted body oval
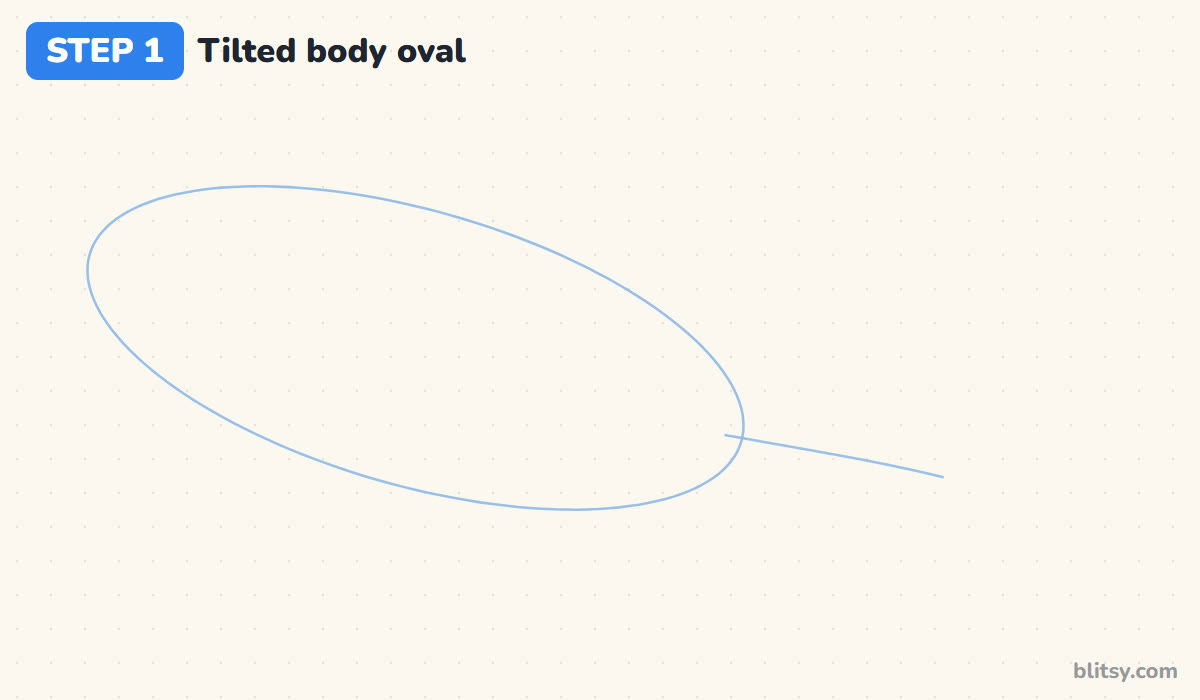
Draw a long oval across the left two thirds of the page, tipped so the left end sits higher than the right. That slant is what makes the orca look like it's jumping up out of the water. From the lower right end, add one gently curving line heading right. It marks the tail stalk.
💡 Tip: Make the oval fat, about two and a half times as long as it is tall. Orcas are chunky, not skinny like sharks.
Step 2: Add guides for the fin, flipper, tail and water
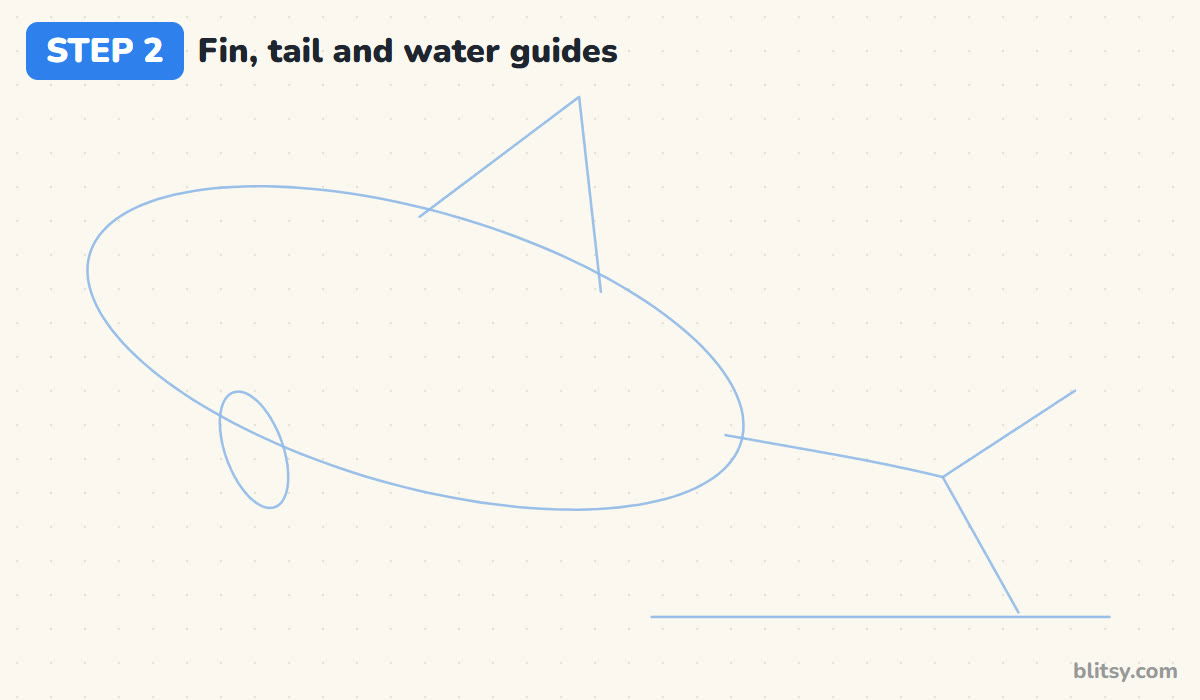
On top of the oval, a little right of center, draw a tall narrow triangle for the dorsal fin. It should be almost as tall as the oval is thick. Put a small tilted oval under the front of the body for the flipper. At the end of the tail line, draw a V that opens to the right, and finish with a flat line across the bottom right for the sea.
💡 Tip: Let the lower arm of the tail V touch the water line. That's where the splash will go later.
Step 3: Draw the orca's body outline
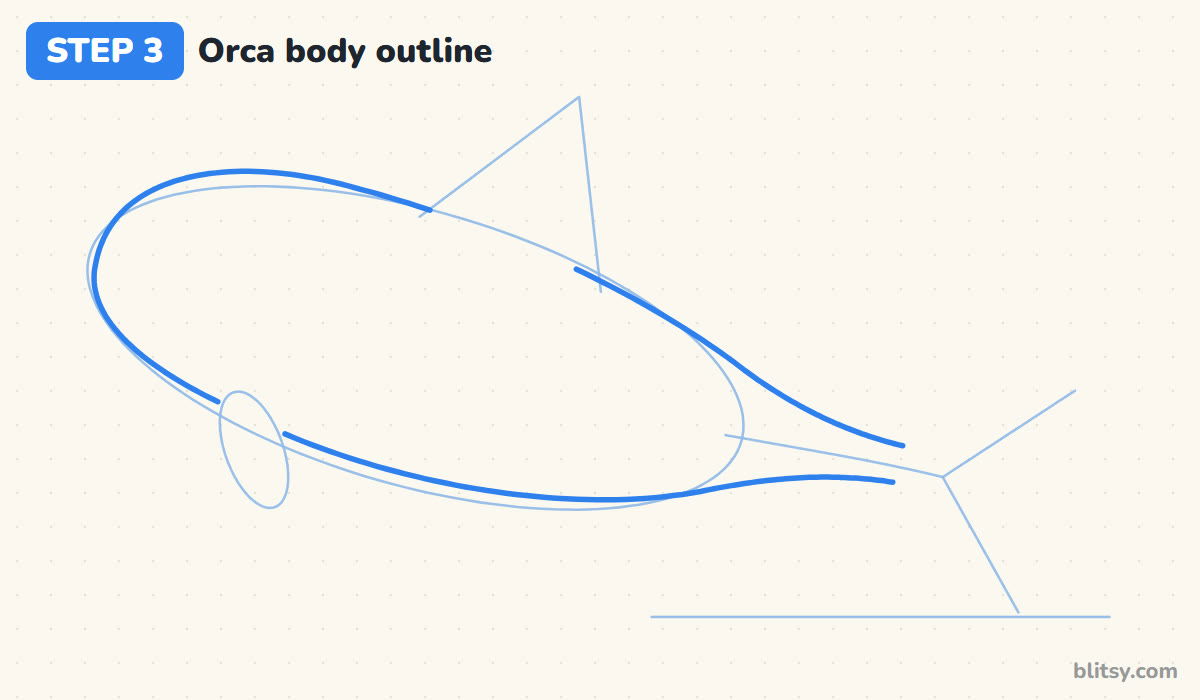
Now go around the oval with a firmer line, but change its shape a little. Make the head round and blunt at the front, keep the back smooth, then narrow the body into the tail stalk as you follow the curved guide. Leave small gaps where the fin and the flipper attach, since those parts get their own lines next.
💡 Tip: Orcas have no pointy nose. If your front end looks sharp, round it off before you move on.




Step 4: Draw the tall dorsal fin
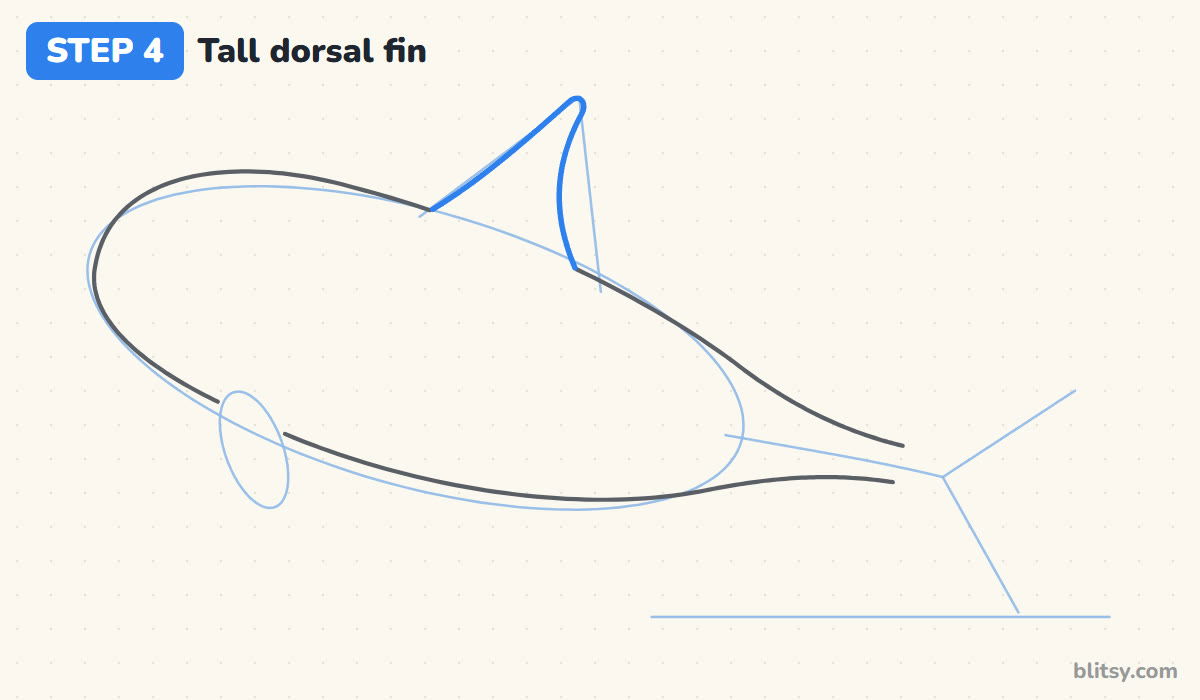
Follow the triangle guide, but bend it. The front edge rises in a long gentle curve, the tip gets a small round top, and the back edge swoops inward before it meets the body. That inward curve is what makes a fin look like it's slicing through the water.
💡 Tip: Keep the fin tall. A short fin is the quickest way to make your orca look like a dolphin.
Step 5: Add two horizontal tail flukes
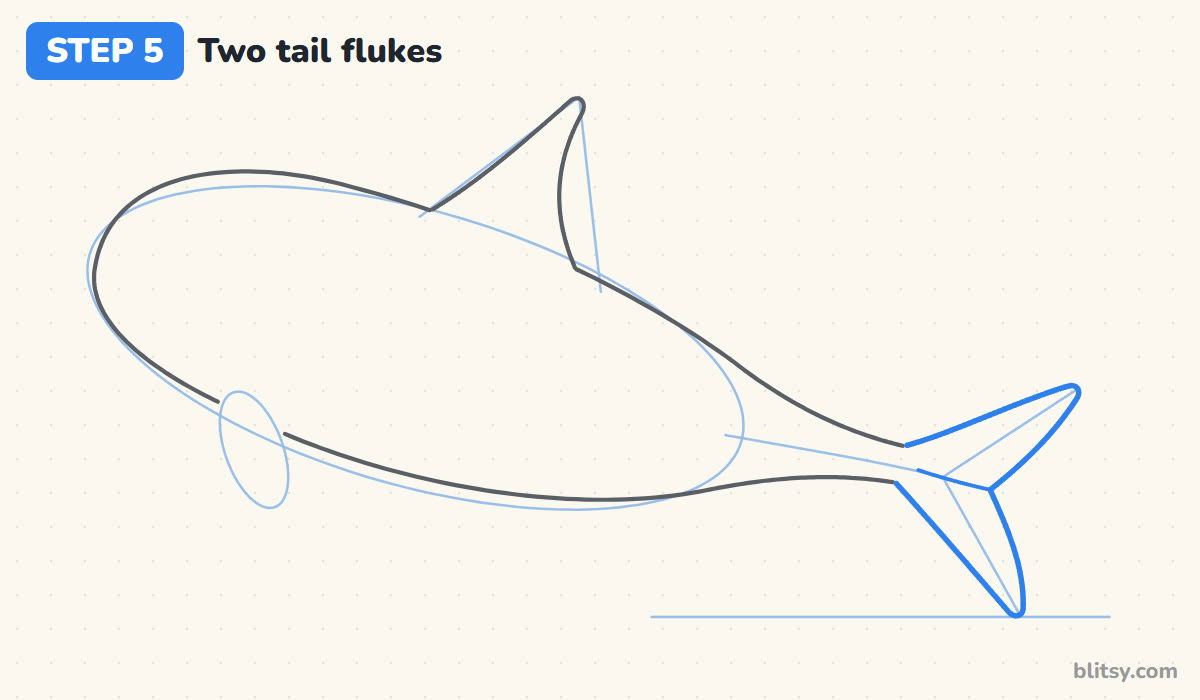
Orca flukes lie flat, like a pair of wings, so from the side you see one lobe pointing up and back and one pointing down and back. Draw both along the V guide with slightly curved edges and rounded tips. Add one short line from the notch toward the body to split the two lobes.
💡 Tip: The lower lobe is the one closer to you, so you can make it a tiny bit bigger.
Step 6: Draw the paddle flipper
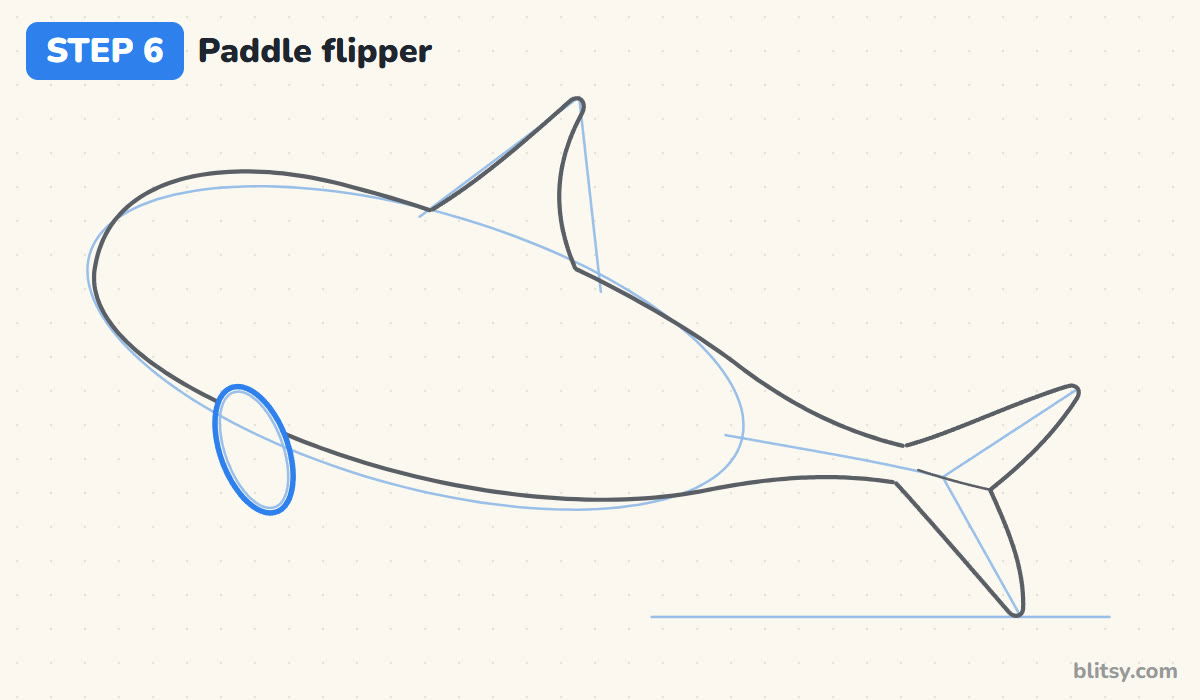
Trace the small oval under the chest to make a wide, rounded flipper that points down and back. An orca's flipper looks like a paddle or a big round leaf, much rounder than the narrow pointed flippers on many other whales.
💡 Tip: Draw the flipper fully, right over the belly line. It sits in front of the body.
Step 7: Draw the smile and the white belly line
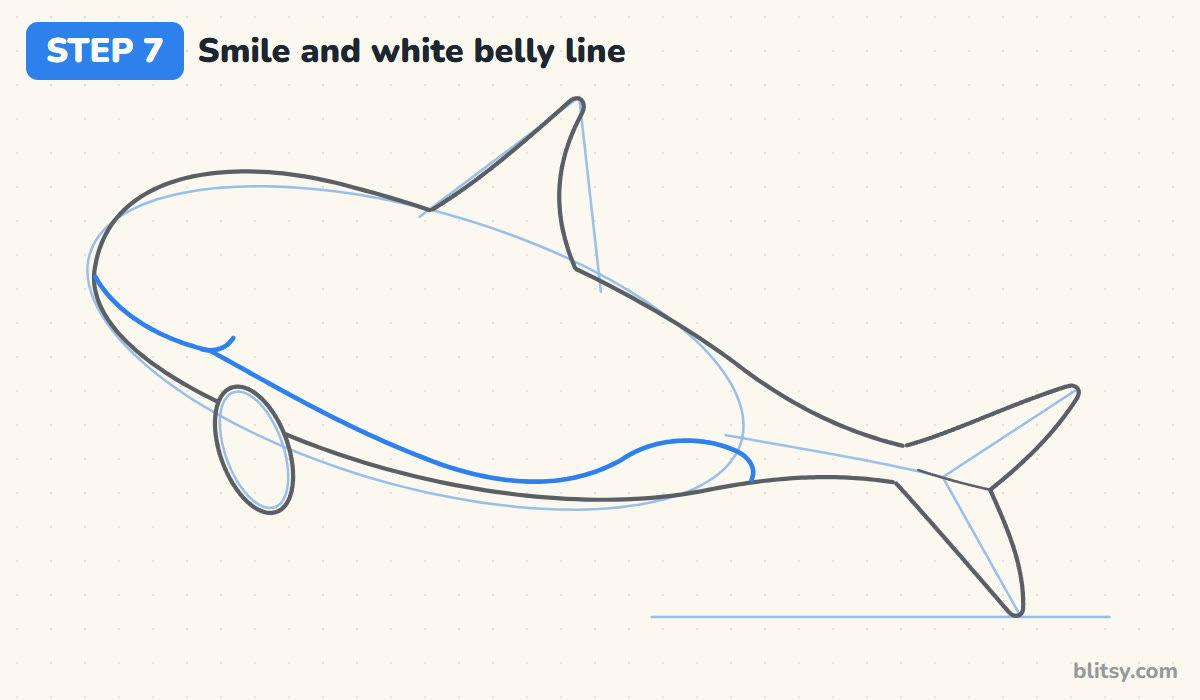
Start right at the front of the head and draw a curve sweeping down and back. This line is both the mouth and the top edge of the white chin. Keep it running along the lower body, then near the tail let it rise into a rounded bump before it drops back to the belly. That bump is the white flank patch. Finish with a tiny upturned curl where the mouth ends, which gives the orca its smile.
💡 Tip: The flank bump points toward the tail. Copy its direction from the picture before you commit.


Step 8: Add the eye patch and the gray saddle
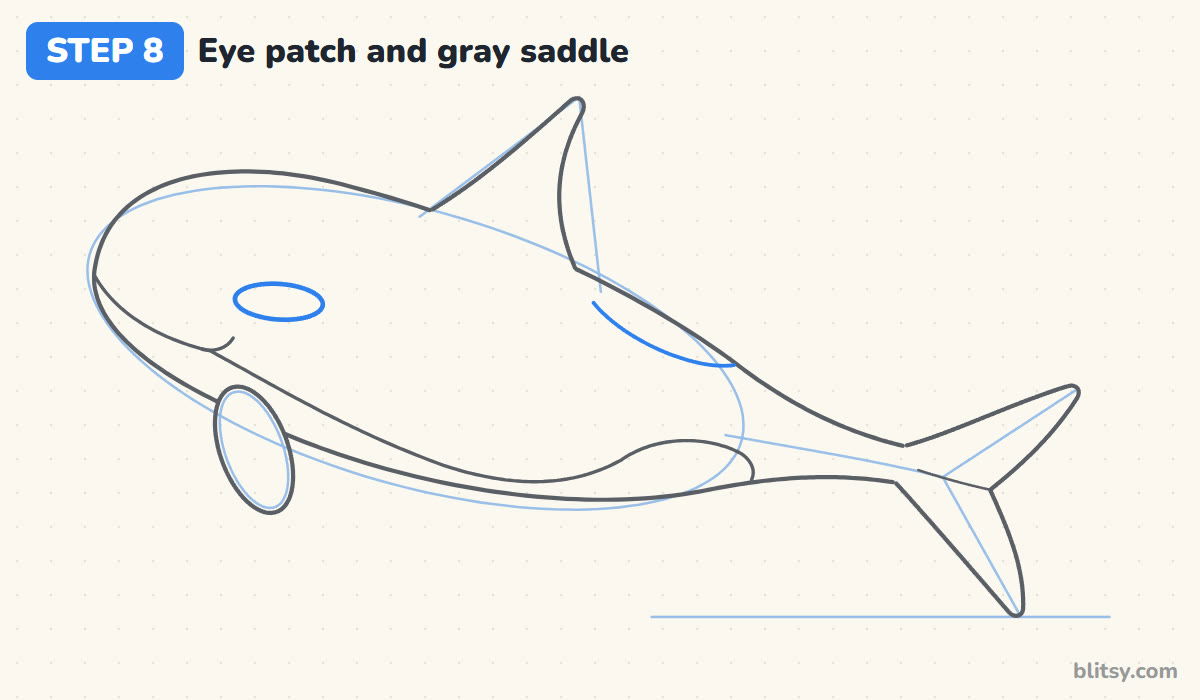
Draw a flat oval above and just behind where the eye will go, tipped up slightly toward the back. This is the white eye patch, and it's the part people notice first on a real orca. Then, behind the dorsal fin, draw a soft curved line under the back. The space between that line and the back becomes the gray saddle patch.
💡 Tip: Many beginners put the eye inside the white patch. Keep them apart, because the real eye sits in the black part in front of it.
Step 9: Draw a friendly eye
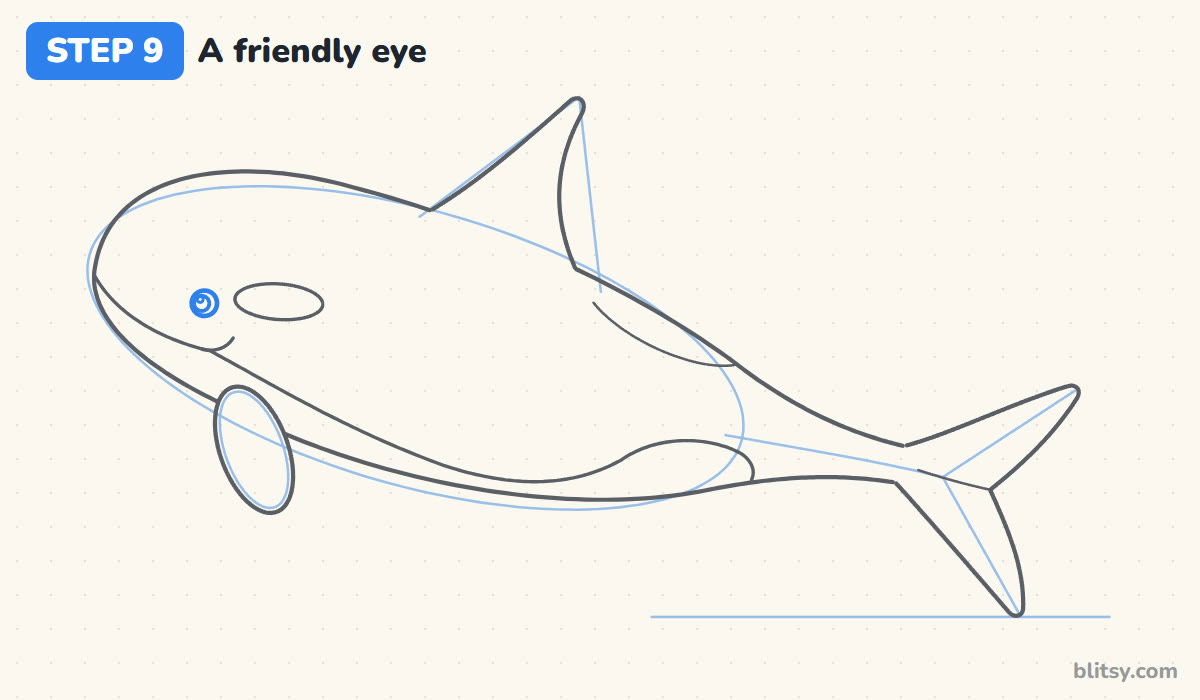
Put a small circle a little above the end of the smile, in front of the eye patch. Inside, draw a smaller circle for the pupil and a tiny dot for the shine. I give the eye a white ring here, because a plain black eye on a black body disappears once you color it.
💡 Tip: Keep the eye small. A big eye turns the orca into a baby seal very quickly.
Step 10: Draw the water splash
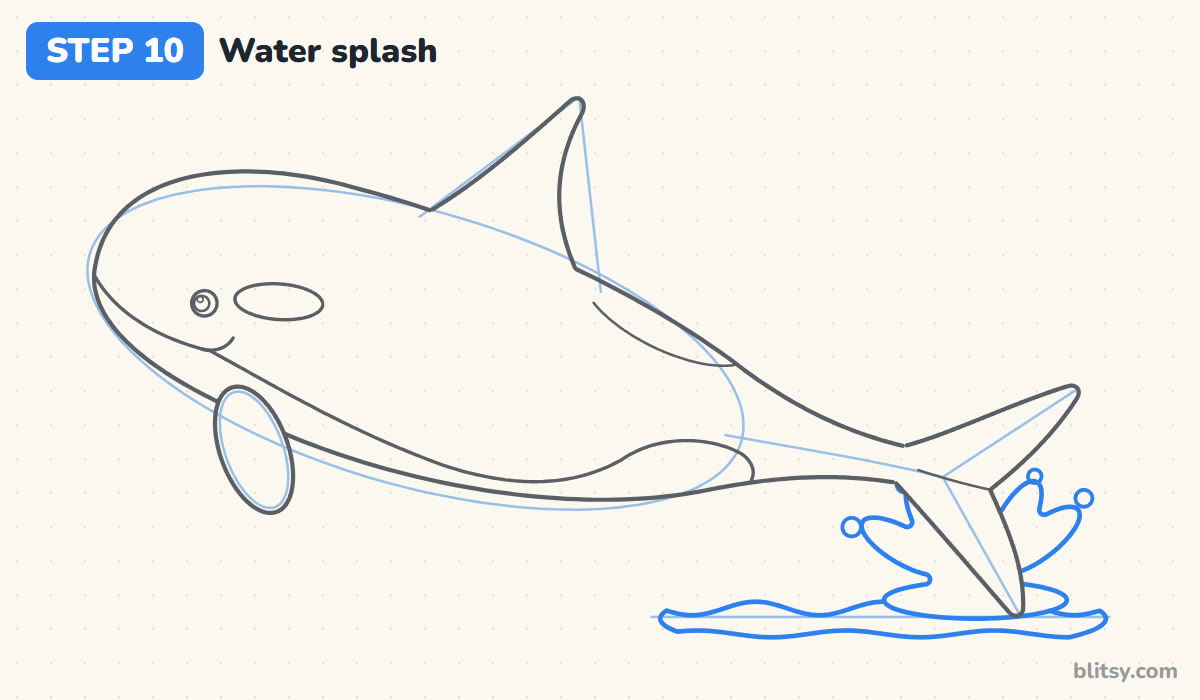
Along the water guide, draw a wavy strip with rounded ends. Where the tail meets the water, add a splash: a flat puddle shape with four or five rounded jets springing up around the tail. Finish with a few round drops flying out to the sides.
💡 Tip: Stop the splash lines where they reach the tail. The tail sits in front of the water.
Step 11: Ink the orca and erase the guides
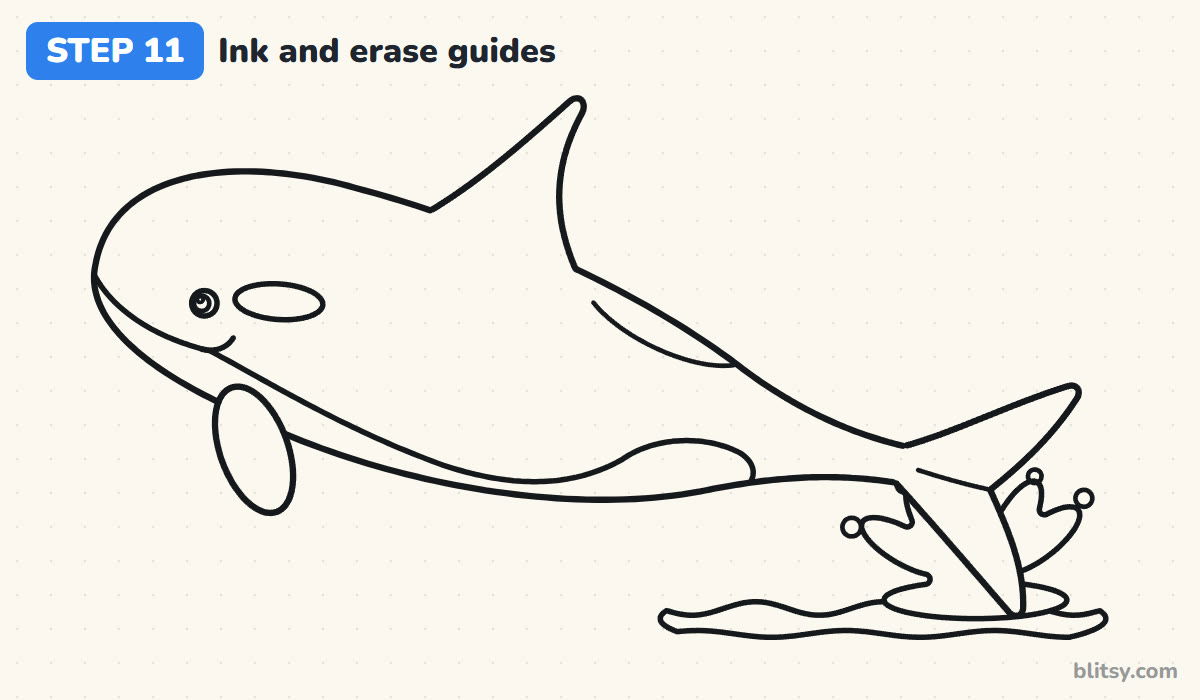
Go over every keeper line with your black marker. I usually ink the body outline first, then the fin and tail, and save the eye and smile for when my hand is steady. Skip the oval, the triangle and the V. When the ink is dry, erase every pencil line underneath.
💡 Tip: Wait a full minute before erasing. Marker that looks dry can still smear on smooth paper.

Step 12: Color your orca
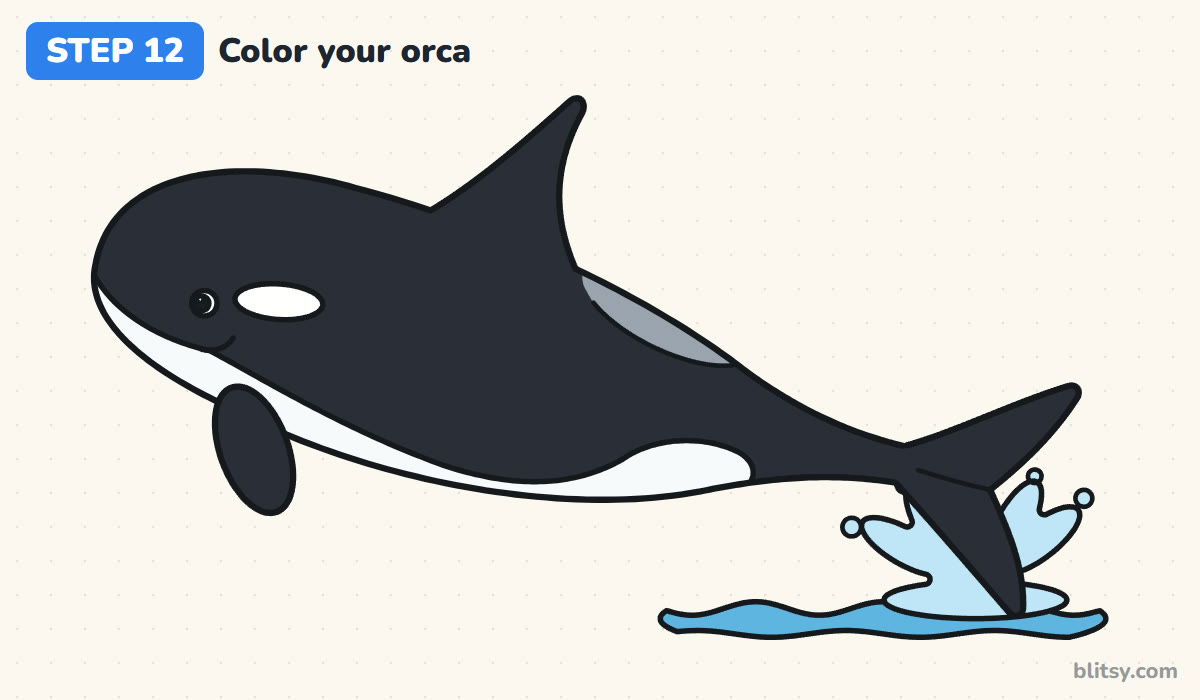
Color the body, fin, flipper and tail black. Leave the chin, belly, flank patch and eye patch white, or give them the lightest touch of gray. The saddle behind the fin is medium gray. Make the sea blue, and use a lighter blue for the splash and the drops. The white ring around the eye stays white too.
💡 Tip: Color the black parts slowly along the white edges first, then fill the middle. It keeps the patches crisp.
Orca Sketches That End Up Looking Like Sharks
- A pointed snout. Sharks and dolphins have noses that stick out. An orca's head is round and blunt, so keep the front end curved.
- Flukes standing up and down. A fish tail is vertical. Orca flukes are flat, so draw one lobe up and back and one down and back from a single notch.
- Patches in the wrong spot. The eye patch goes behind and above the eye, and the flank patch sits near the tail. Moving them forward makes the pattern hard to read.
- A tiny dorsal fin. Grown male orcas have very tall fins. If the fin is shorter than the body is thick, stretch it up.
- A thin body. Orcas are heavy, so a skinny outline looks wrong. Round out the belly before you ink.
Killer Whale Variations to Try Next
Draw a second, smaller orca swimming next to the first for a mother and calf, or flip the pose so the orca dives back into the sea with only the tail showing. A sunset sky behind the splash looks great with the black and white body. Small kids can skip the saddle and the flank bump and it still reads as an orca. For another big ocean animal, the how to draw a whale tutorial uses the same oval start with a softer shape and a spout. If you liked the tall fin, try this shark drawing step by step lesson next and compare the two.
Orca Coloring Page and Printable Drawing Steps
The free orca coloring page has a colored orca at the top to copy, a short color key, and a large outline for coloring underneath. The step-by-step PDF guide holds all 12 steps with their pictures and tips, so you can draw away from the screen. Both print on Letter or A4 paper.
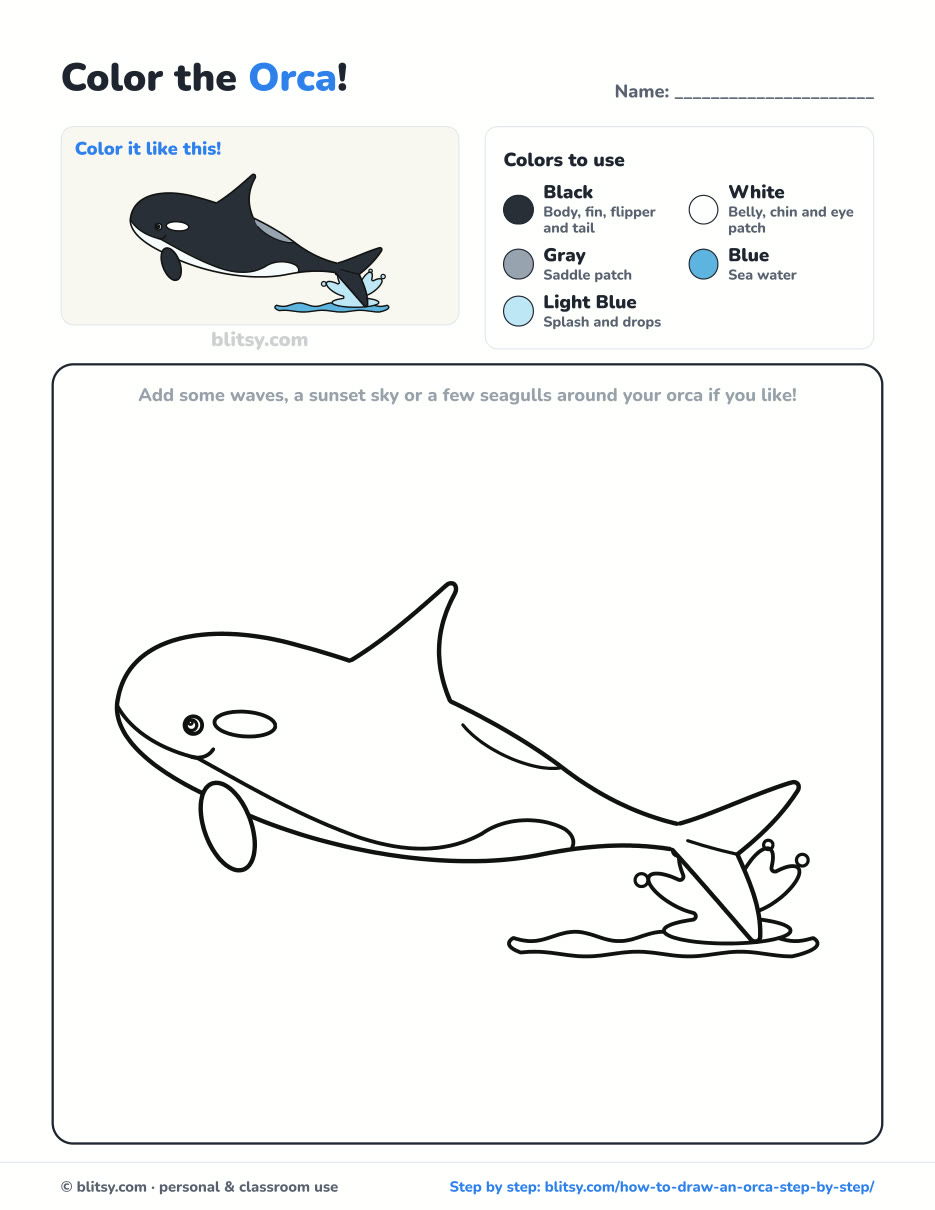
Black outlines with a colored example and the color names at the top. Ready to print and color.
⬇️ Download Coloring PageEvery step picture with its instructions and tips, to keep beside your paper while you draw.
⬇️ Download Drawing Guide📱 On a phone? Tap a download button, then open the file and choose Share → Save to Files or Print. On a computer, the PDF opens or saves straight to your Downloads folder.
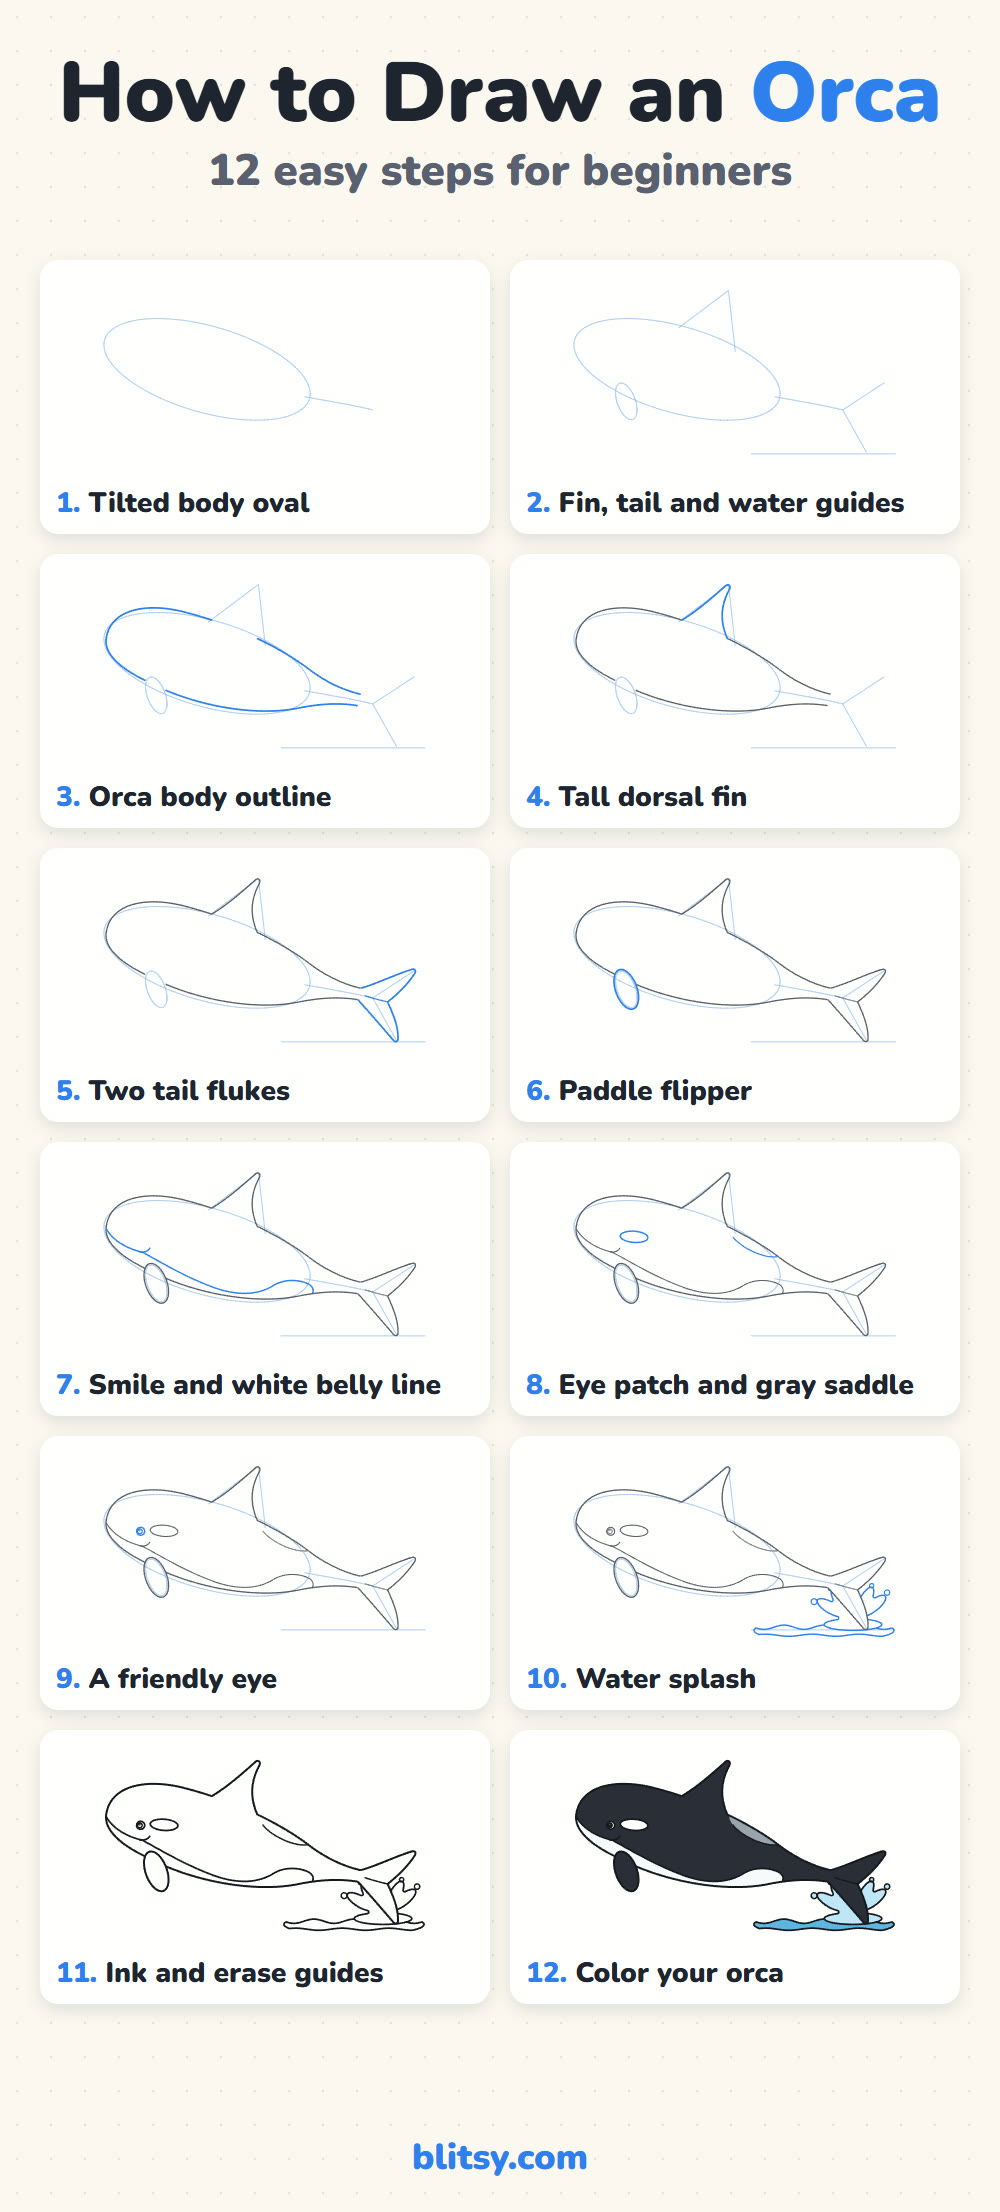
Orca Steps on One Tall Pin
More Sea Creatures to Sketch
These tutorials follow the same picture-per-step method, so they make good next drawings after your orca.
- Whale Drawing: A smiling blue whale with a raised tail and a water spout starts from one big oval in this how to draw a whale step by step lesson.
- Shark Drawing: Practice another tall dorsal fin on a friendly great white in this shark drawing tutorial.
- Penguin Drawing: Another black and white animal to practice, with a round body and little flippers, in this penguin drawing step by step guide.
- Octopus Drawing: Eight curling arms and a round head come together one line at a time in this octopus drawing tutorial.
- Jellyfish Drawing: A soft dome and wavy tentacles make a calm ocean drawing in this jellyfish drawing step by step lesson.
Orca Drawing Questions from Kids and Parents
What is the easiest way to draw an orca?
Start with one fat tilted oval, add a tall fin on top and a tail line at the back. Then draw the white belly line and the eye patch. The pattern does most of the work.
Is an orca a whale or a dolphin?
Orcas are called killer whales, but they're actually the largest member of the dolphin family. That's why this drawing has a round head and a tall fin.
How long does it take to draw an orca?
Most people finish the lines in about 20 minutes. Coloring the big black areas adds another 10 to 15.
What colors do I need for an orca?
Black and white do most of the job. Add a medium gray for the saddle and two blues for the water and splash.
Somewhere there's a blank sheet of paper that needs a splash, so tip that oval up and send your orca flying. 🐋✏️
Related posts:
 How to Draw a Car Step by Step (Easy Drawing for Beginners)
 How to Draw a Whale Step by Step (Easy for Beginners)
 How to Draw an Arctic Fox Step by Step (Easy for Beginners)
 How to Draw a Chicken Step by Step (Easy for Beginners)
 How to Draw a Snowman Step by Step (Easy for Beginners)
 How to Draw an Airplane Step by Step (Easy Jet for Beginners)
 How to Draw a Mouse Step by Step (Easy for Beginners)
 How to Draw a T-Rex Step by Step (Easy for Beginners)
 How to Draw a Pig Step by Step (Easy for Beginners)
 How to Draw a Minion Step by Step (Easy for Beginners)
 How to Draw a Yorkie Step by Step (Easy for Beginners)
 How to Draw a Notebook Step by Step (Easy for Beginners)

