
Forget the scary snow monster from old stories. The yeti we're drawing today is huge and soft, and very pleased to see you. In this lesson I'll show you how to draw a yeti step by step, starting from a single gumdrop shape and ending with a white, shaggy friend who waves both arms from a pile of snow. The fur looks tricky, but it's really just a zigzag, and kids pick it up fast.
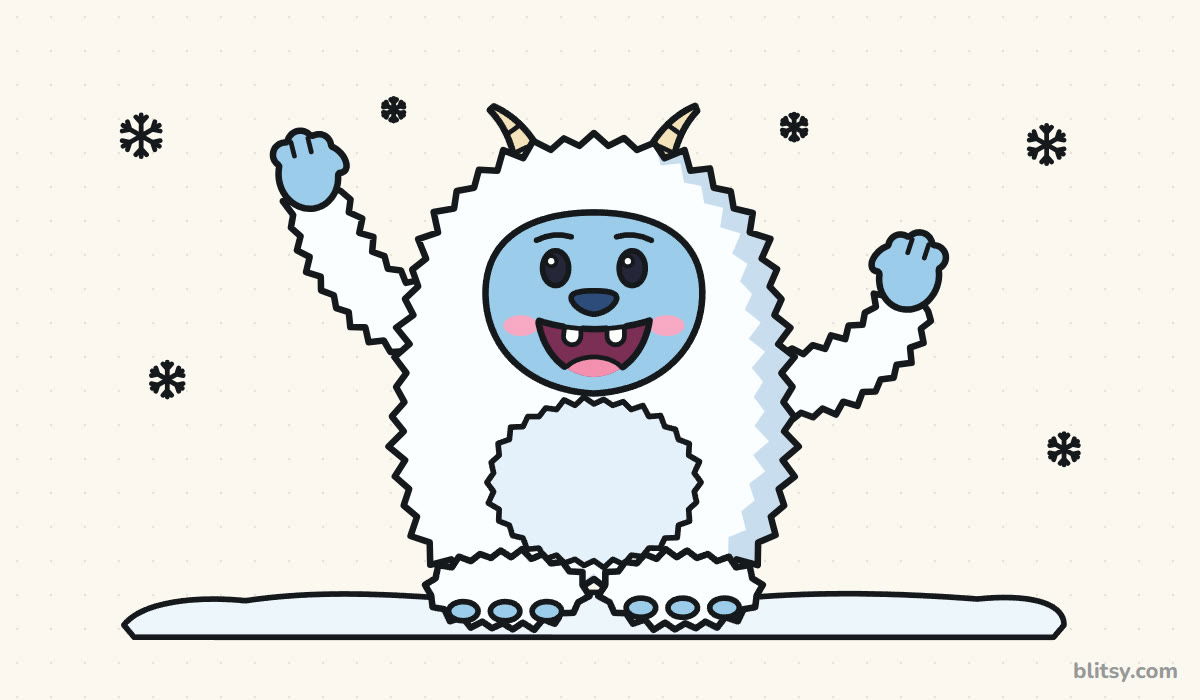
Every yeti picture below adds something in blue on top of the gray lines you already have. Draw only the blue part before you move on.
Quick overview
⏱️ Time: around 30 minutes, coloring included
🎯 Level: easy, fine for kids aged 6 and up
✏️ Steps: 11
❄️ You'll draw: a friendly cartoon yeti waving in the snow
Gathering Pencils for a Yeti Sketch
- A regular pencil for the light guide shapes
- A soft eraser that won't smudge
- A black marker or fineliner for the final outline
- Colored pencils or crayons in light blue, gray blue and pink, plus cream and navy
- White paper, ideally a little thicker than printer paper
White fur is mostly paper you leave alone, so you need fewer colors than you might expect.
How to Draw a Yeti Step by Step
Step 1: Sketch a gumdrop body and a face oval

Draw a light ground line near the bottom of your page. Sitting on it, sketch a tall rounded shape like a gumdrop: a dome on top, almost straight sides, and a flat bottom. The head and body are one piece on a yeti, so there's no neck to worry about. In the top half, draw a wide oval for the face, then a cross through it with the sideways line curving slightly down.
💡 Tip: Leave room on both sides of the body. The arms reach out wide later.
Step 2: Add arm lines and two foot ovals
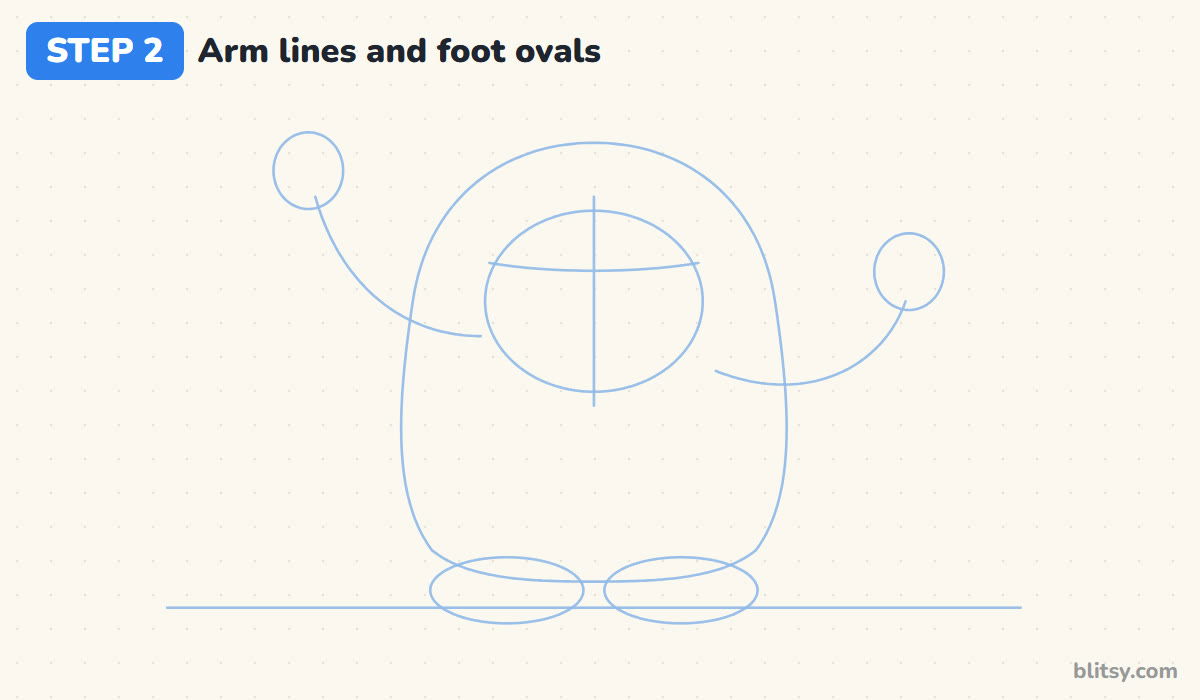
From each side of the body, draw one curving line for an arm. I like the left arm swinging high above the head and the right one bending up at shoulder height, so the yeti looks like it's waving and cheering at once. Put a small circle at the end of each line for the hands. At the bottom, two flat ovals side by side make the feet.
💡 Tip: Make the arms long. Short arms turn a yeti into a teddy bear.
Step 3: Draw the jagged fur outline
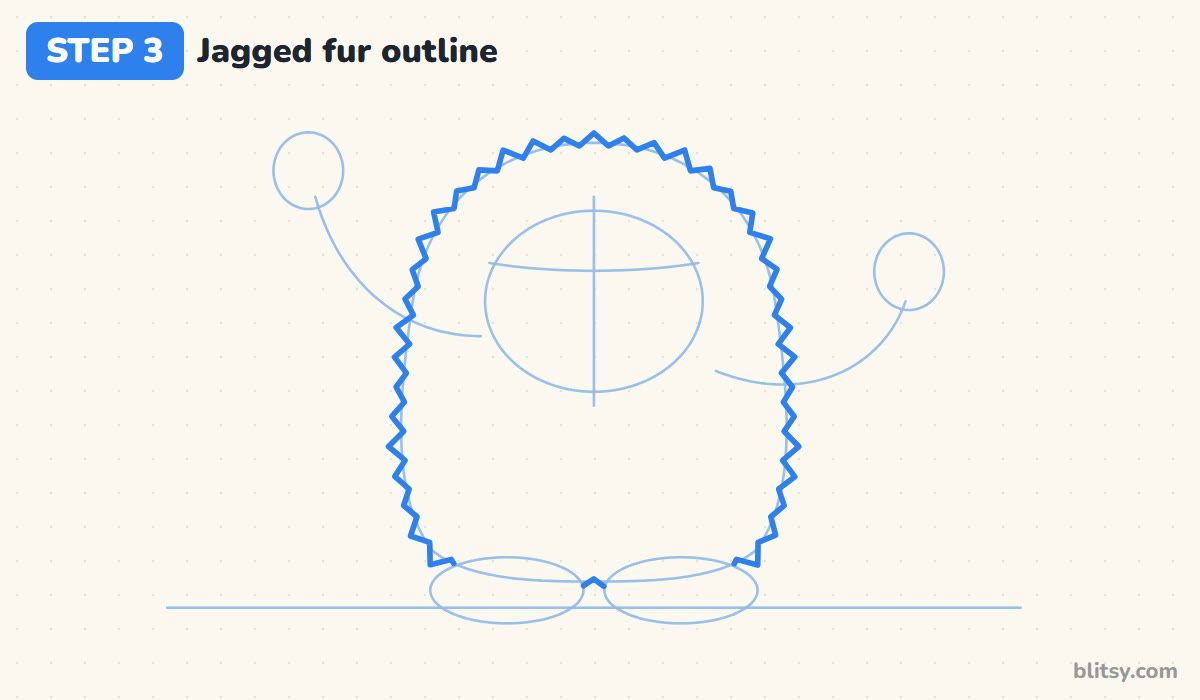
Now trace around the gumdrop with a zigzag line, little pointed tufts all the way round. Keep each point about the same size and let them stick out a bit past the guide. That zigzag is the whole trick to fluffy fur. You can leave the very bottom open, because the feet will cover it.
💡 Tip: Draw the zigzag slowly in short sections. Rushing makes the points grow bigger and bigger.


Step 4: Add little horns and the face
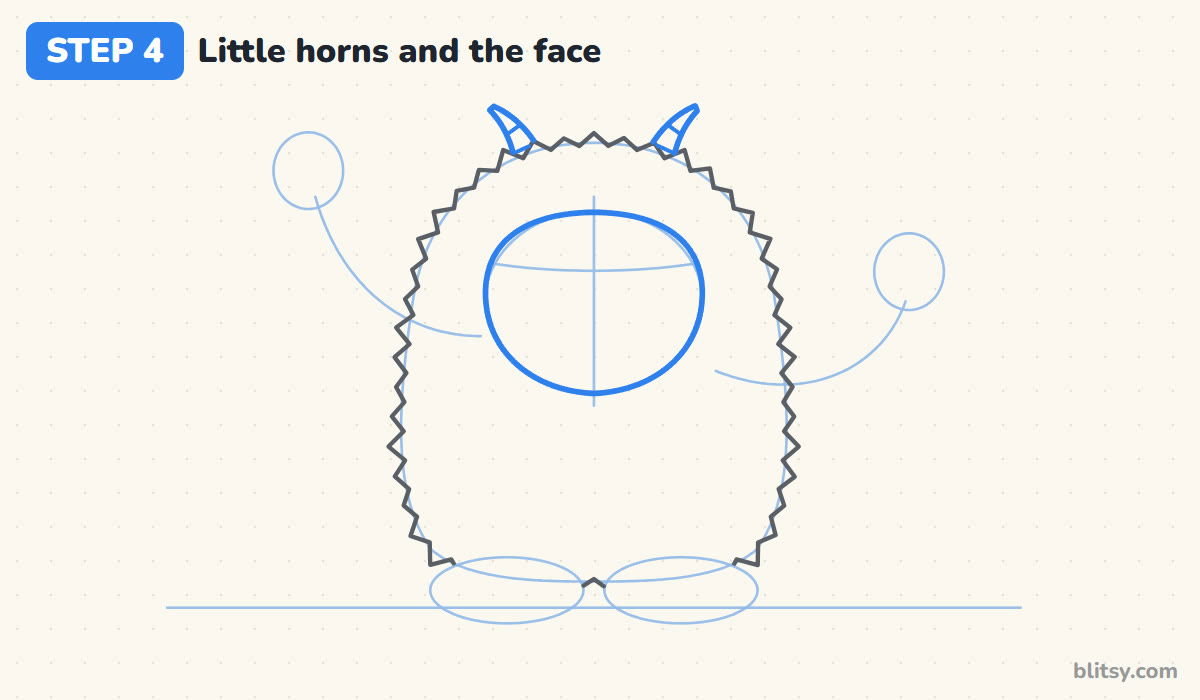
On top of the head, draw two small curved horns that point up and outward, coming out of the fur. A thin line across each one gives a ringed look. Then trace the face oval with a smooth, firm line. Smooth is important here: the face is skin, not fur, and the contrast with the zigzag around it is what makes the yeti look friendly.
💡 Tip: Keep the horns tiny. Big horns push the character toward scary.
Step 5: Draw long furry arms and mitten hands

Build each arm around its guide line with two zigzag edges, a finger width or two apart, starting from behind the body. At the end of each arm, draw a rounded mitten hand: a palm, three bumps on top for fingers and a small thumb on the inner side. Two short lines between the bumps separate the fingers.
💡 Tip: Draw the hand first, then fill in the arm up to it, so the two always line up.
Step 6: Give it big fuzzy feet
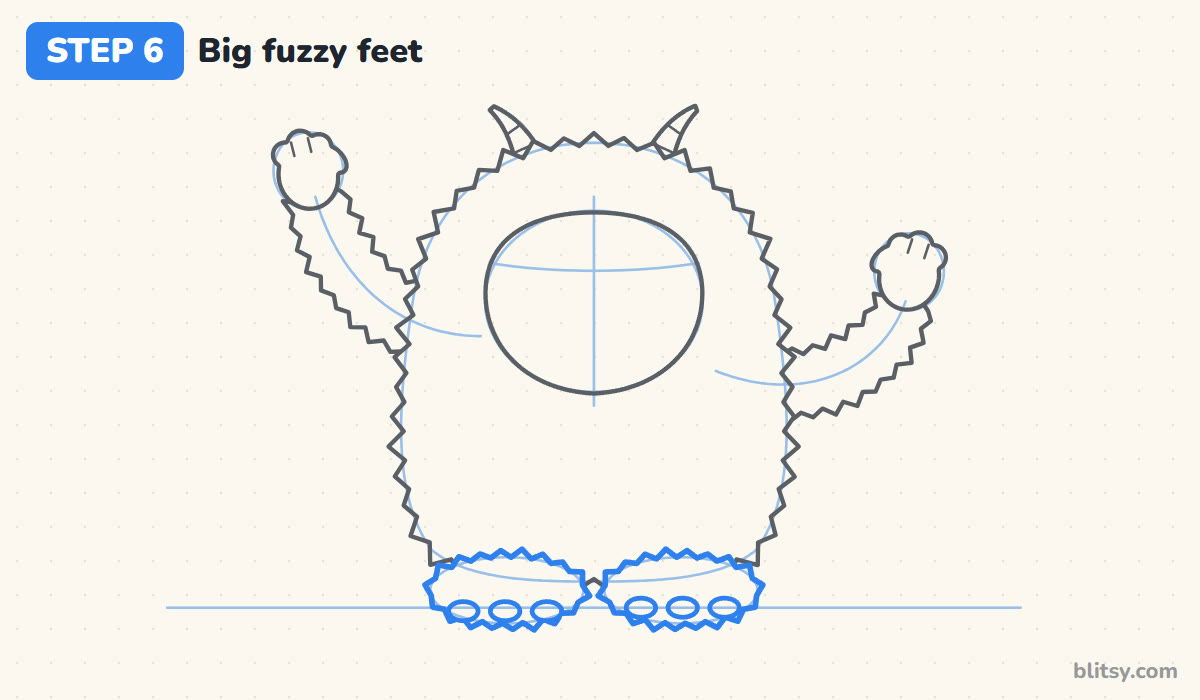
Over each foot oval, draw a shorter zigzag than the body uses, so the feet look fluffy but not wild. The feet overlap the bottom of the body, which makes the yeti look like it's standing toward you. Along the bottom edge of each foot, add three small ovals for the toes.
💡 Tip: Big feet make the yeti look steady and a little goofy, so don't shrink them.
Step 7: Draw the eyes, brows and nose
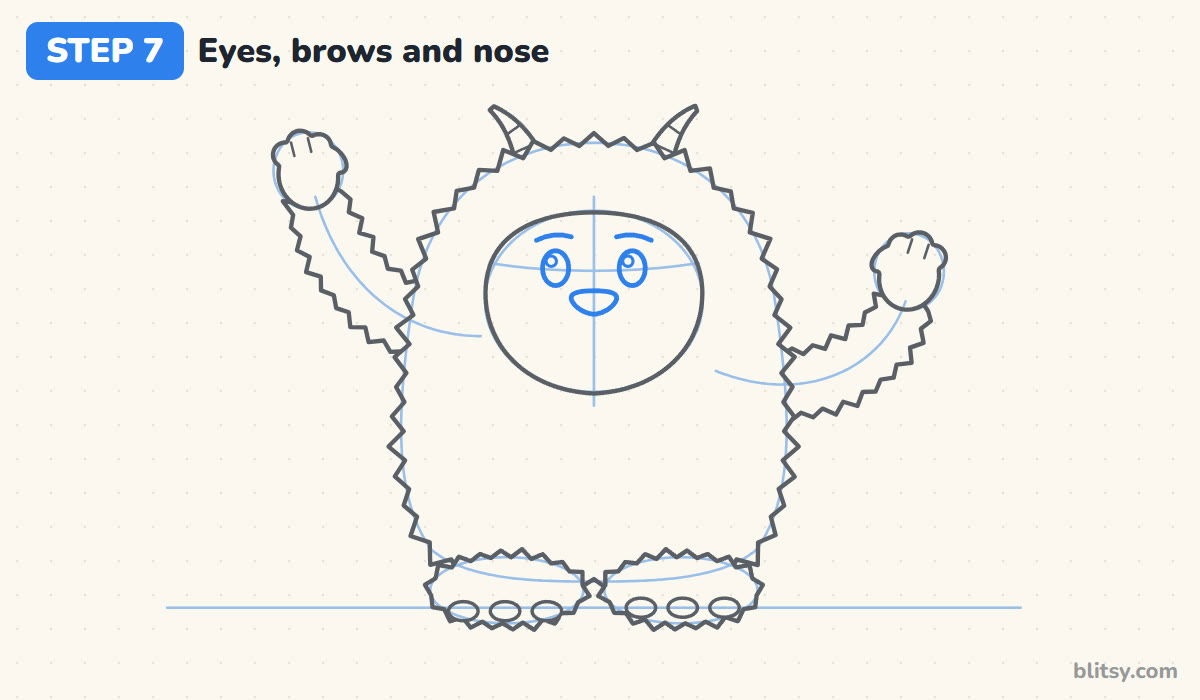
Place two upright oval eyes on the curved cross line, spaced a little wider than an eye apart. Add a shine circle near the top of each one, both on the same side. Short brows that arch upward keep the expression happy. The nose is a small rounded triangle, point down, just below the eyes and right on the center line.
💡 Tip: Eyes set low and wide on the face read as cute. High, close eyes look surprised.



Step 8: Add a big happy smile
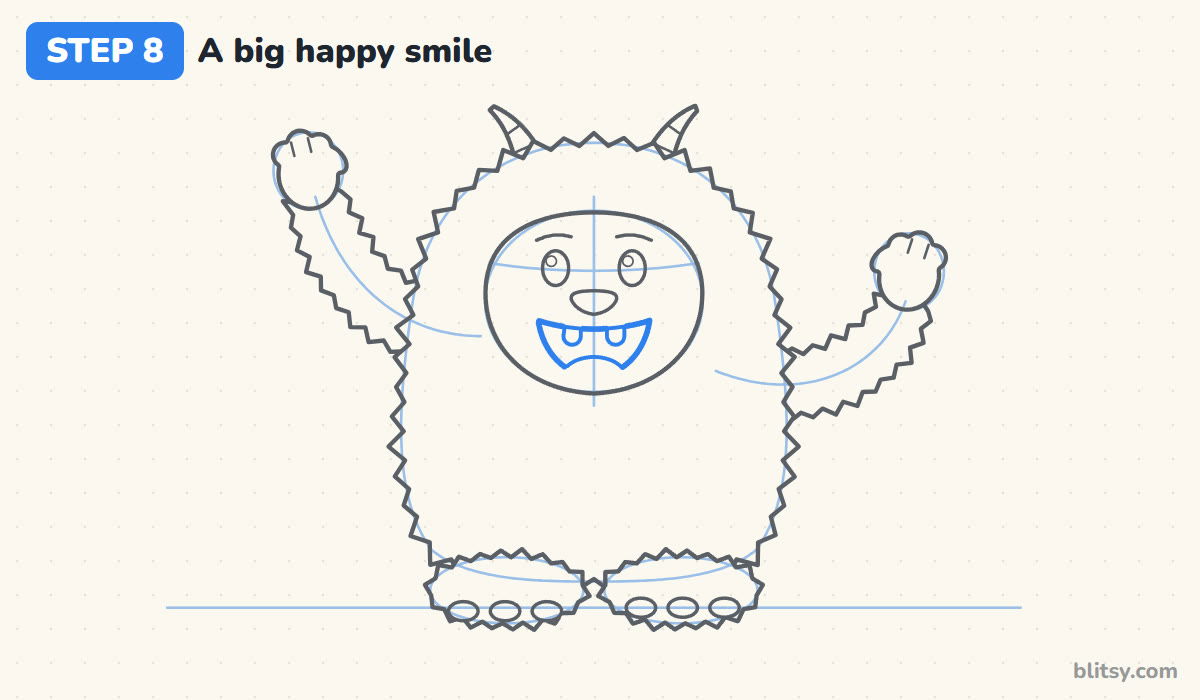
Under the nose, draw a wide open mouth: a nearly straight top edge and a deep U underneath, like a slice of watermelon. Hang two little square teeth with round bottoms from the top edge, one on each side of the center. A curved line near the bottom of the mouth makes the tongue. This smile does most of the work in keeping the yeti sweet.
💡 Tip: Two small teeth look silly and friendly. A whole row of pointy ones looks fierce.
Step 9: Draw the belly, snow and snowflakes
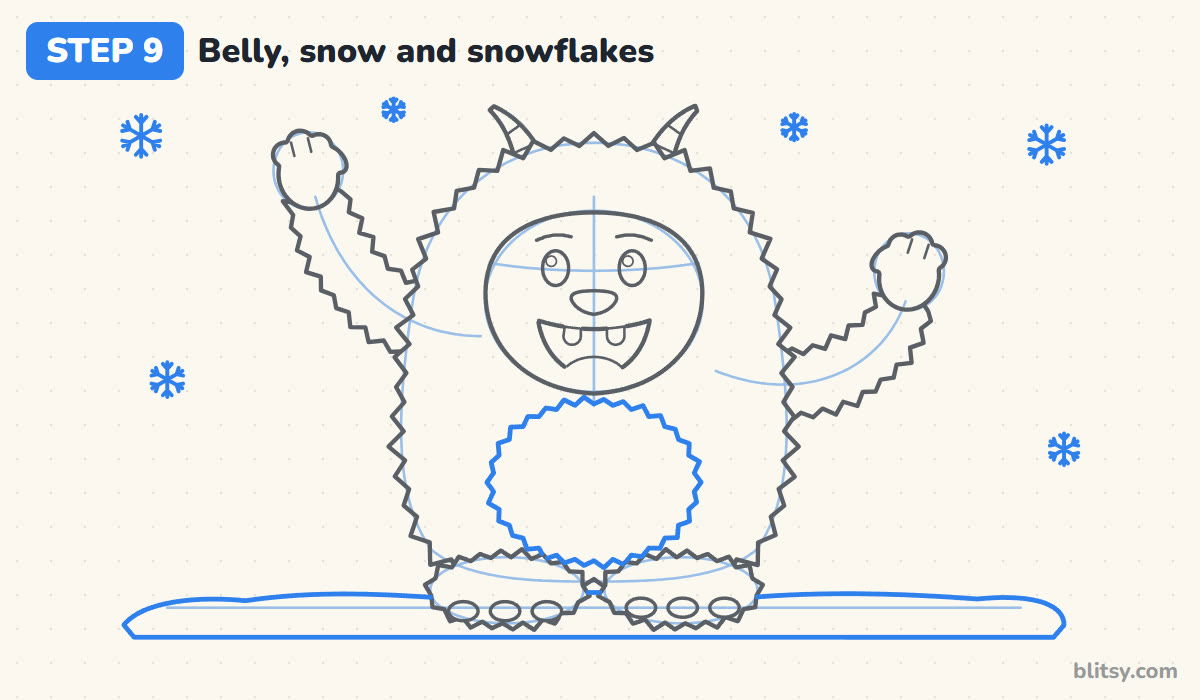
In the middle of the body, draw a round belly patch with a tiny zigzag edge. Next, around the feet, sketch a long, low snow pile with a gently bumpy top, wider than the yeti. Finish with a few snowflakes scattered around the sky: three crossing lines each, plus a small V near every tip.
💡 Tip: Vary the snowflake sizes so the sky doesn't look like a pattern.
Step 10: Ink your yeti and erase the guides
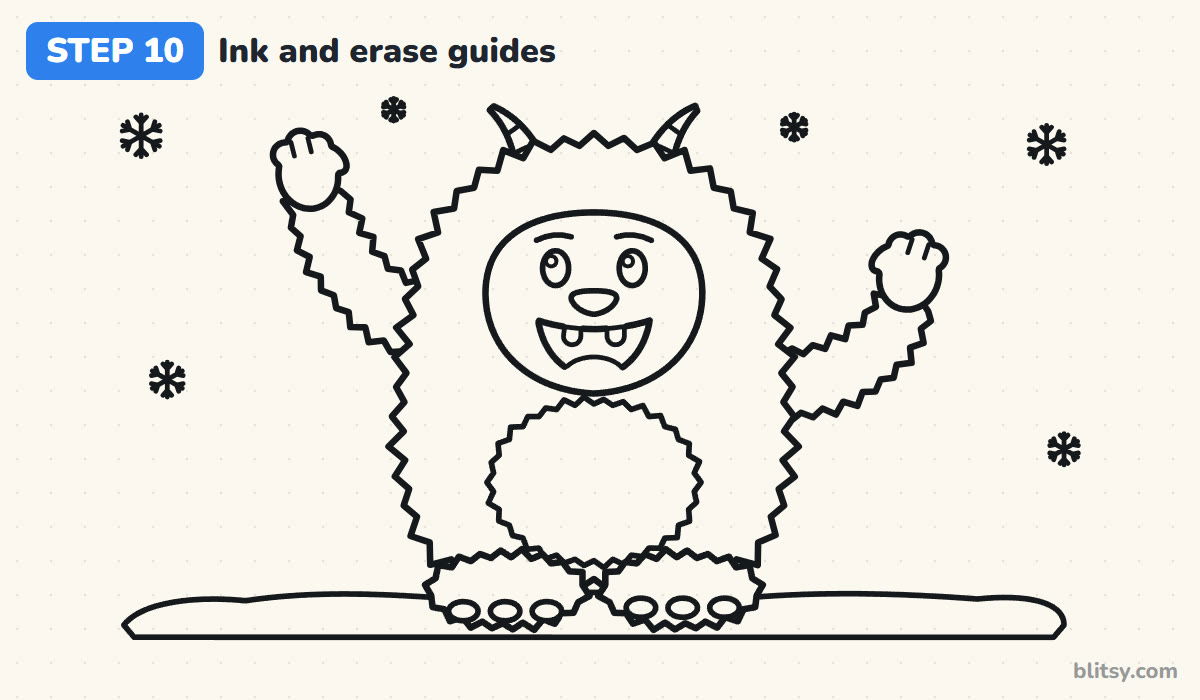
Go over every final line with a black marker. I start with the face, since it matters most, then the fur and arms, and the feet and snow last. Leave out the gumdrop guide, the cross and the arm lines. When the ink has dried completely, erase all the pencil.
💡 Tip: Wait a full minute before erasing. Marker smears more easily than you'd think.
Step 11: Color your yeti
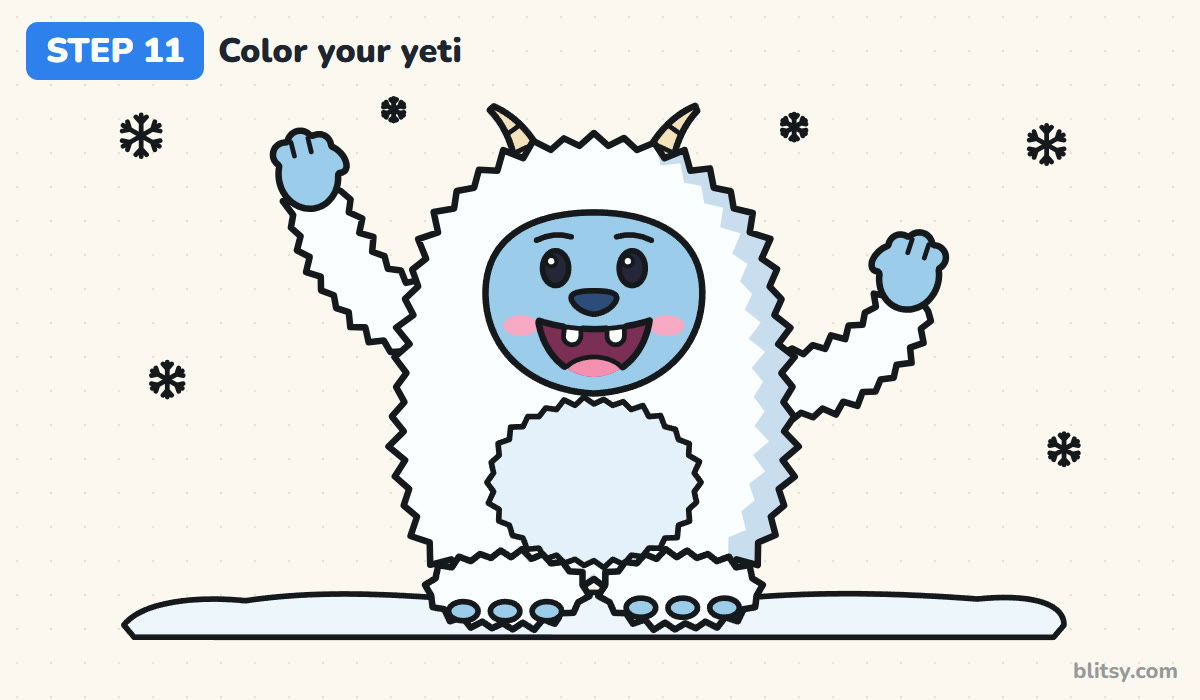
Most of the fur stays white, so color only a strip of gray blue along the right edge of the body for a soft shadow. The belly gets a very light blue. Use a stronger light blue for the face and hands plus the toes, and cream for the horns. Inside the mouth goes dark pink with a pink tongue, the cheeks get a pink blush, the nose is navy and the eyes black with a white shine.
💡 Tip: Press very lightly for the belly and shadow. Pale blue on white looks frosty.


Yeti Slip-Ups That Turn Cute into Creepy
- Fur zigzags that get huge. Long, sharp spikes look like a porcupine. Keep the points small and even.
- A fur texture on the face. If the face is zigzagged too, the expression disappears. Keep it smooth and blue.
- Angry eyebrows. Brows slanting down toward the nose make a grumpy yeti. Arch them up instead.
- Too many teeth. Two small teeth are cute. A full set of fangs changes the whole mood.
- Coloring every bit of white fur. Gray all over looks dirty. Leave most of the paper white and shade only one side.
Mountain Friends and Other Yeti Twists
Once you have the basic yeti, give it a striped scarf and a bobble hat, or swap the white fur for brown and you've drawn a forest Bigfoot. A tiny baby yeti beside the big one is a fun addition for kids who want a family scene. If you enjoy fluffy creatures with silly grins, my monster drawing tutorial uses the same zigzag fur trick on a purple one-eyed critter. For a calmer winter friend, try the snowman drawing step by step lesson, and the polar bear drawing tutorial pairs nicely with this one on a snowy page.
Yeti Coloring Page and Printable Step Guide
The free yeti coloring page has a finished color yeti up top as a model, a key that tells you which color goes where, and a big outline below to color yourself. The step-by-step PDF guide puts all 11 steps and tips on paper, handy for a snow day or a classroom. Both print well on Letter or A4.
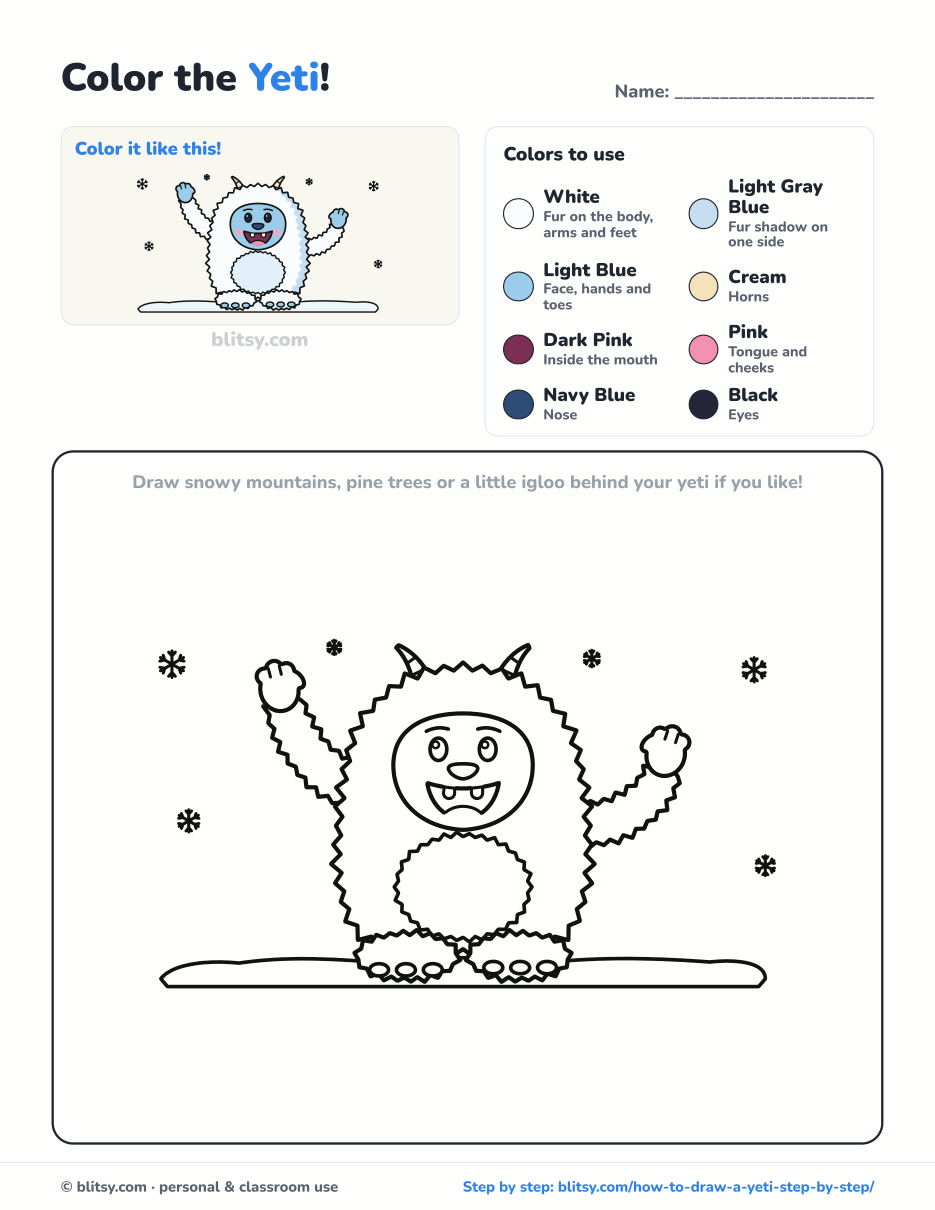
Black outlines with a colored example and the color names at the top. Ready to print and color.
⬇️ Download Coloring PageEvery step picture with its instructions and tips, to keep beside your paper while you draw.
⬇️ Download Drawing Guide📱 On a phone? Tap a download button, then open the file and choose Share → Save to Files or Print. On a computer, the PDF opens or saves straight to your Downloads folder.
Pin the Yeti Guide for a Snow Day

More Snowy and Furry Drawing Lessons
Each link below is a full step-by-step lesson with a picture for every stage, so you can keep the same easy method for your next drawing.
- Monster Drawing: A purple fur-ball monster with one big eye and a tiny green friend in this monster drawing tutorial.
- Snowman Drawing: Stack three snowballs and add a hat and scarf with this how to draw a snowman step by step lesson.
- Polar Bear Drawing: Draw a white polar bear on the ice in this polar bear drawing tutorial.
- Olaf Drawing: A simple fan-art snowman friend with a carrot nose in this Olaf drawing step by step guide.
- Penguin Drawing: A round penguin with flippers and orange feet fills this penguin drawing lesson.
Yeti Drawing Questions from Young Artists
How do you draw a cute yeti?
Start with one rounded gumdrop shape, add a smooth blue face, then zigzag fur around the edge. Big eyes, a wide smile with two small teeth and upturned brows keep it cute.
What color is a yeti?
Cartoon yetis are usually white with light blue skin on the face and the hands and feet. Some people color them pale gray or icy blue all over, which also works.
How do you draw fur that looks fluffy?
Use a zigzag line instead of a smooth one, with points that are small and roughly even. A light shadow color along one side makes it look soft and round.
Is a yeti the same as Bigfoot?
They're both legendary hairy creatures, but the yeti is said to live in the snowy Himalaya mountains and is usually drawn white. Bigfoot comes from North American forests and is drawn brown.
Grab a pencil on the next snowy day and let your own yeti wave hello from the page. ❄️✏️
Related posts:
 How to Draw a Tooth Step by Step (Cute and Easy for Kids)
 How to Draw Springtrap Step by Step (Cute Chibi for Kids)
 How to Draw a Care Bear Step by Step (Cute Fan Art for Kids)
 How to Draw a Bat Step by Step (Cute Cartoon Bat for Kids)
 Halloween Drawing Step by Step (Cute Haunted House for Kids)
 How to Draw a UFO Step by Step (Cute Alien Saucer)
 How to Draw an Astronaut Step by Step (Cute and Easy)
 How to Draw an Owl Step by Step (Cute Night Owl)
 How to Draw Freddy Krueger Step by Step (Cute Chibi Version)
 How to Draw a Jellyfish Step by Step (Cute, Easy Guide)
 How to Draw Ariana Grande Step by Step (Cute Chibi Fan Art)
 How to Draw Cerberus Step by Step (Cute and Easy)

