
Most people draw ears as a plain letter C and hope nobody looks closely. A real ear has a few folds inside, but there are only five of them, and once you can name them they stop looking like a maze. In this lesson you'll learn how to draw an ear step by step, from a small head that shows where the ear sits to a big colored ear with its rim, ridge, bowl and flap, plus the lobe. When I teach ears, I keep the pencil light for the first half, and that's my advice to you too.
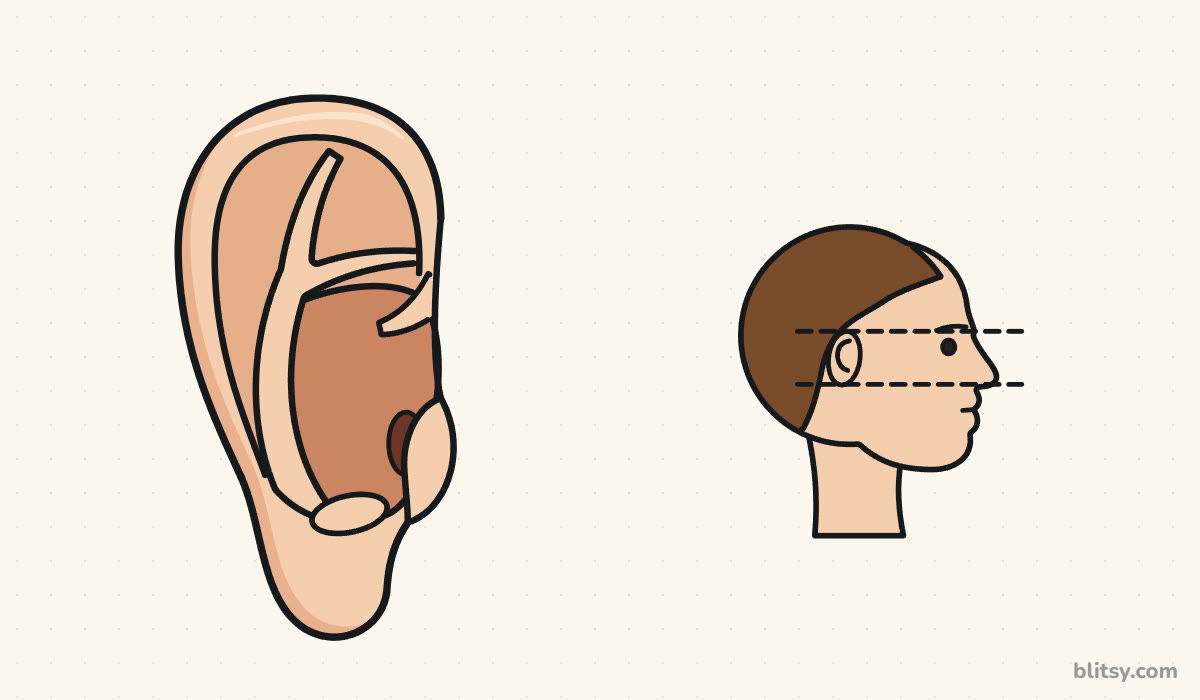
Look for the color change: blue is what this step adds, gray is earlier work. Copy only the blue each time.
Quick overview
⏱️ Time: about 30 minutes, plus 10 to color
🎯 Level: easy to medium, fine for kids from about 9 and grown-up beginners
✏️ Steps: 11
👂 You'll draw: a side-view human ear and a small head that shows where it sits
Supplies for a Clean Ear Study
- A pencil you can keep light, such as an HB
- A soft eraser for the guide lines
- A black fineliner or thin marker for the final lines
- Colored pencils: peach, tan, light brown, brown, dark brown, chocolate brown and black
- Plain white paper, printer paper is fine
One skin pencil is enough: press harder for the darker folds.
How to Draw an Ear Step by Step
Step 1: Draw a small head with two lines
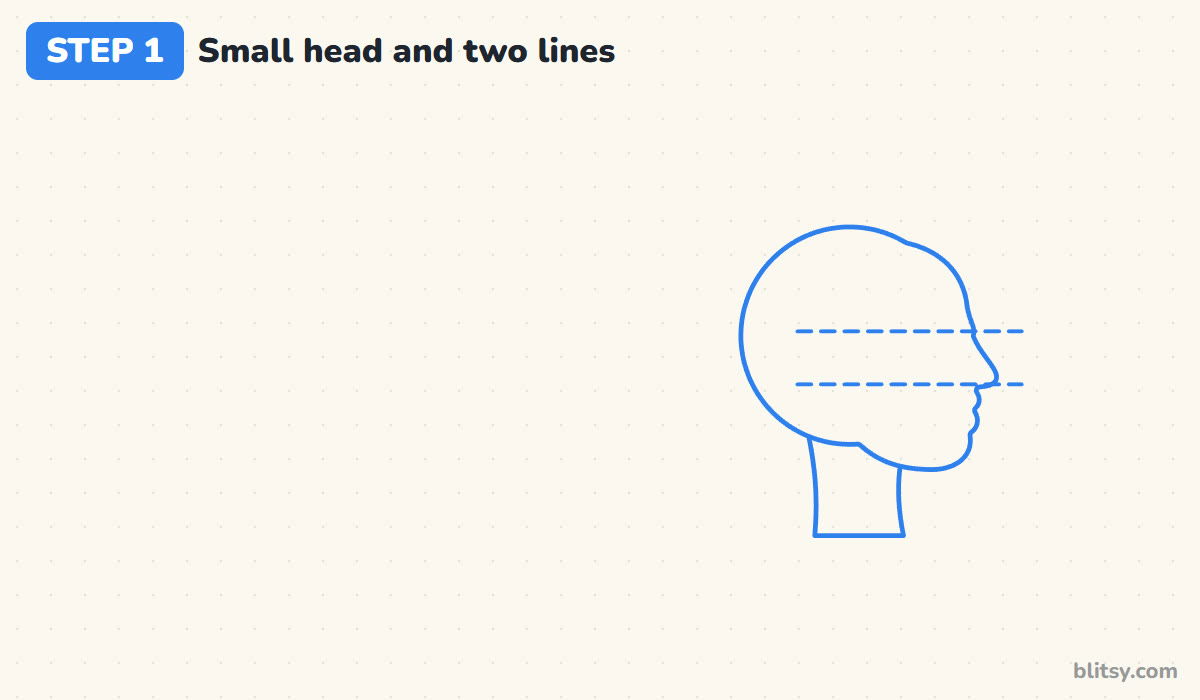
Before the big ear, I always start with a tiny side view head on the right: a circle for the skull, a face line with a nose and chin, and a short neck. Then draw two dashed lines straight across, one at the eyebrow and one at the bottom of the nose. Those two lines are the whole secret of ear placement.
💡 Tip: Keep the two lines level with the paper's edge. A tilted line will tilt the ear with it.
Step 2: Place a tiny ear between the lines
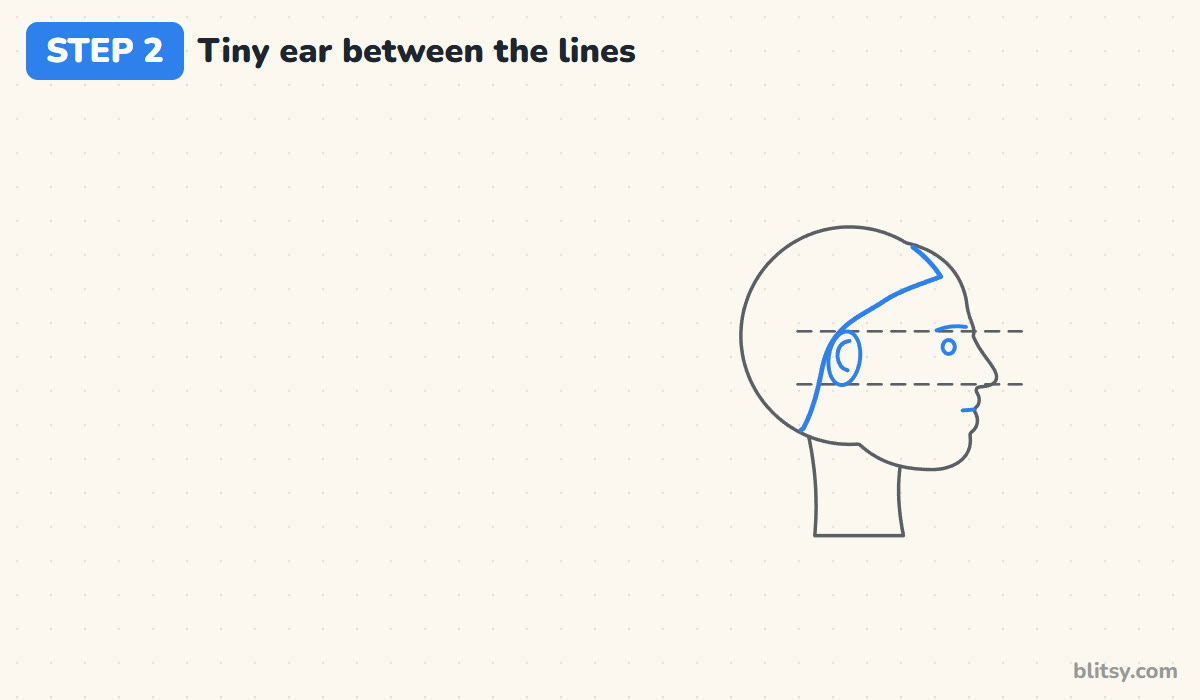
The top of the ear lines up with the eyebrow and its bottom with the bottom of the nose. Sideways, it sits just behind the middle of the head, near the back of the jaw. Draw a small oval there with a little C inside, then add a hairline, an eye dot, a brow and a mouth line.
💡 Tip: Ears drawn too far forward make the face look squashed. If yours touches the cheek, slide it back.
Step 3: Sketch light guides for the big ear
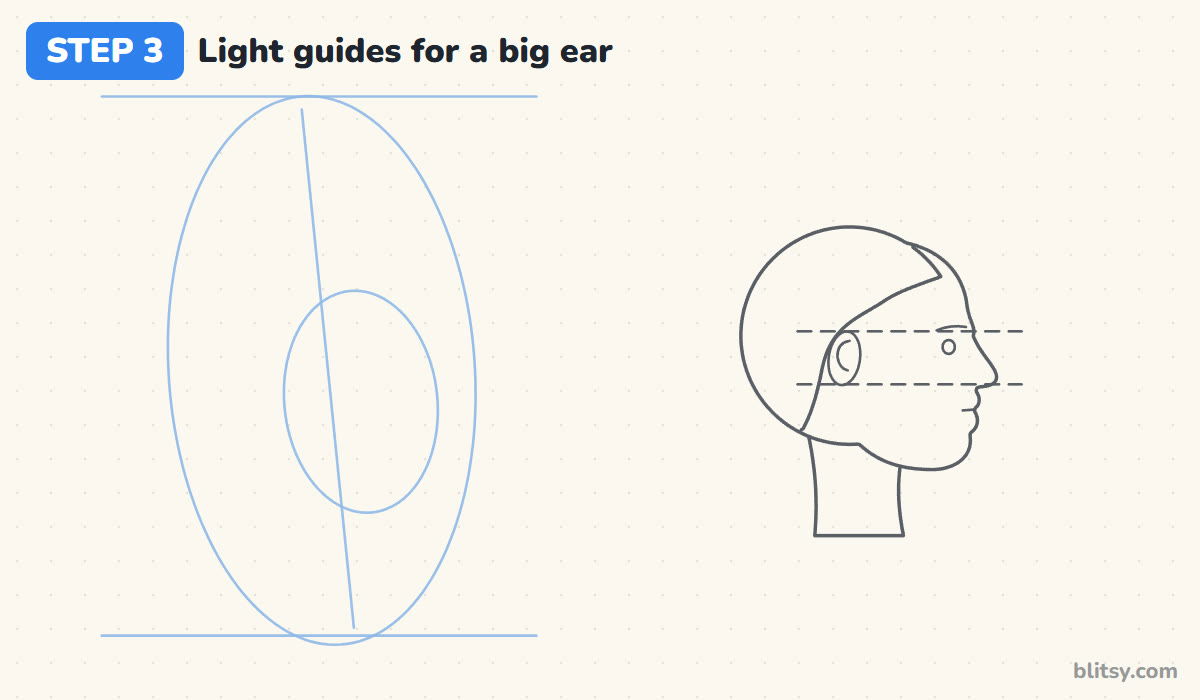
On the left, draw two long level lines for the same brow and nose levels. Between them, sketch a tall oval that leans back a tiny bit at the top. Add a slanted line through the middle and a smaller oval in the lower front for the bowl.
💡 Tip: Make the big oval about twice as tall as it is wide. Wider than that and the ear starts to look like a seashell.



Step 4: Draw the C-shaped outer rim
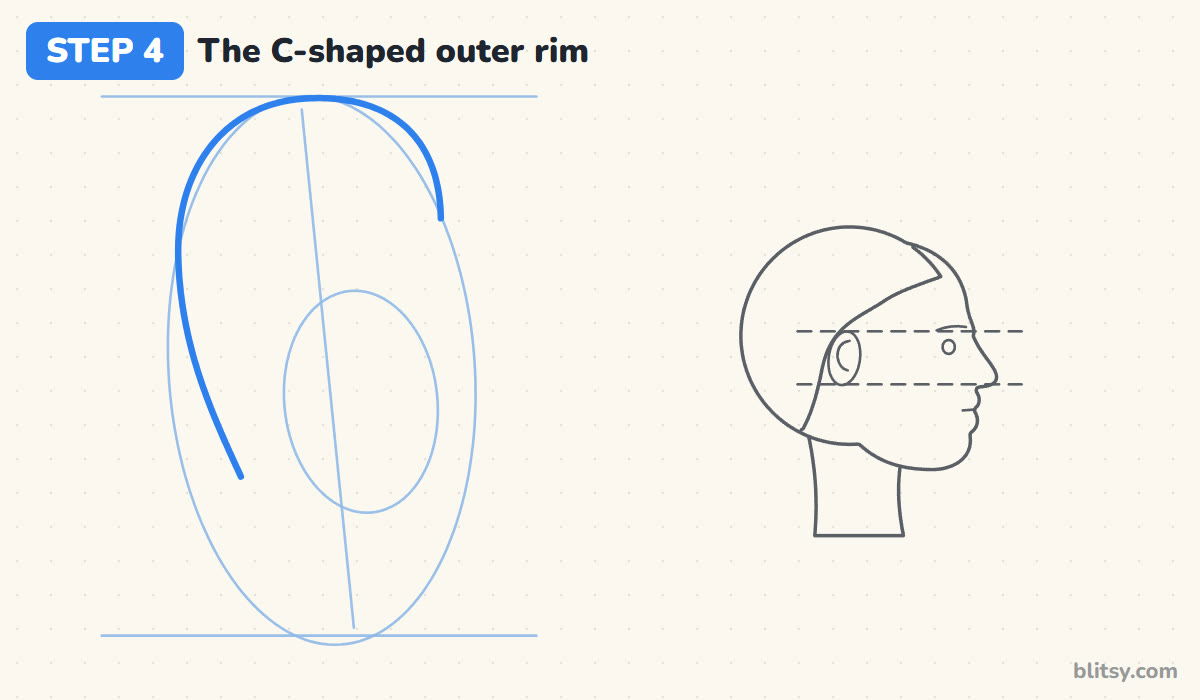
Start at the front, about a third of the way down, and sweep up over the top and down the back. This is the helix, the curled rim of the ear. It's widest across the top third, so let it bulge a little past the oval at the upper back.
💡 Tip: Pull the long back curve in one smooth arm movement.
Step 5: Add the earlobe and the front edge
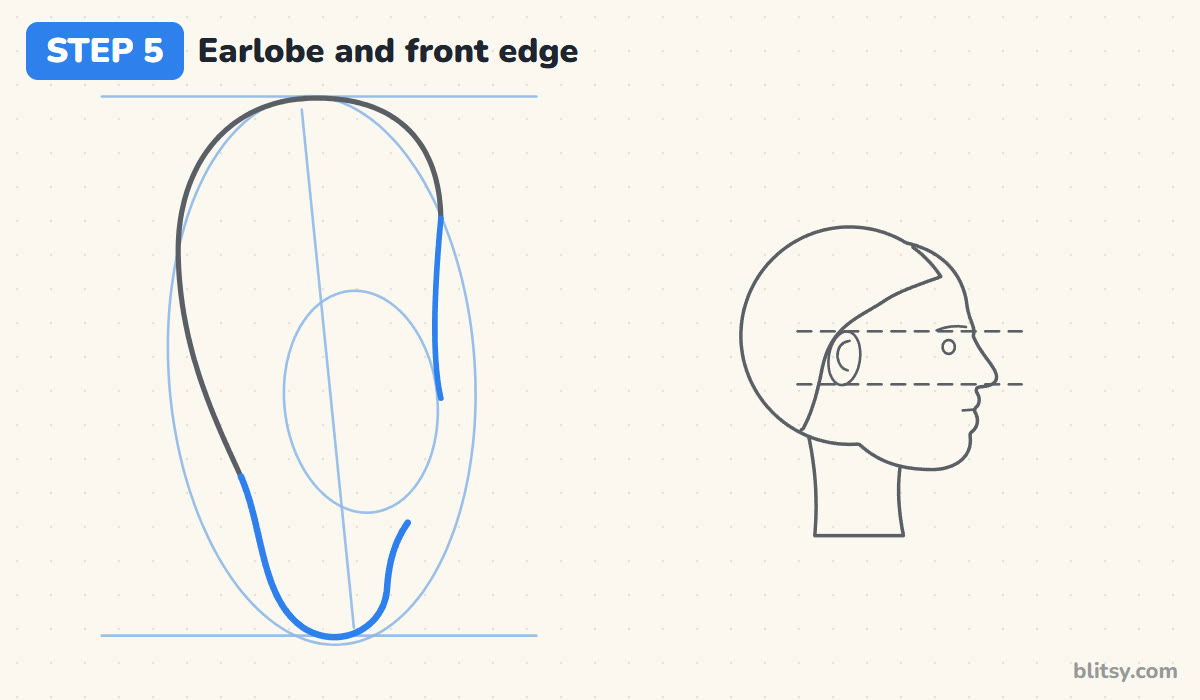
Carry the back line down, let it narrow, then round it into a soft lobe that touches the lowest guide line. Curve back up on the front and stop a little above the lobe. Then draw a short front edge from the top of the rim down toward the middle, where the ear joins the head.
💡 Tip: The lobe is soft and fleshy, so give it a round bottom. A pointed lobe looks like an elf ear.
Step 6: Draw the inner edge of the rim
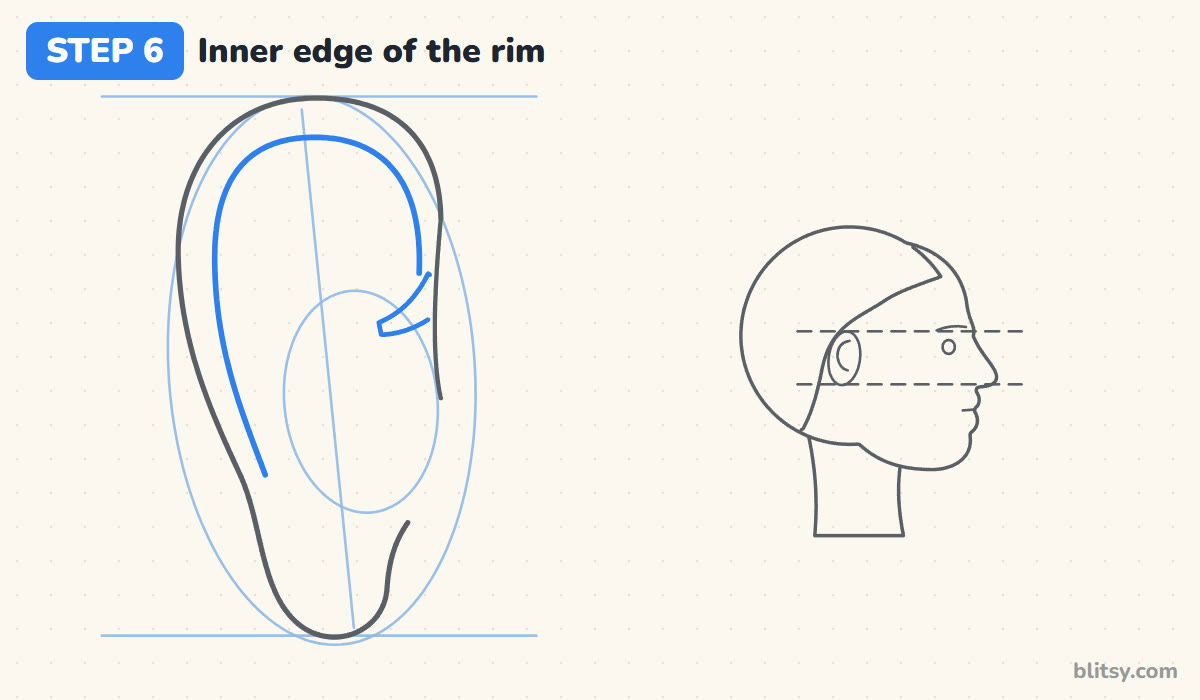
Inside the outer line, draw a second curve that follows it from the front, over the top and down the back. That gap is the thickness of the rim. At the front, add a short tapered piece dipping into the middle of the ear: the root of the rim, where it starts inside the bowl.
💡 Tip: Leave the gap a bit wider at the top than down the back.
Step 7: Draw the Y-shaped inner ridge
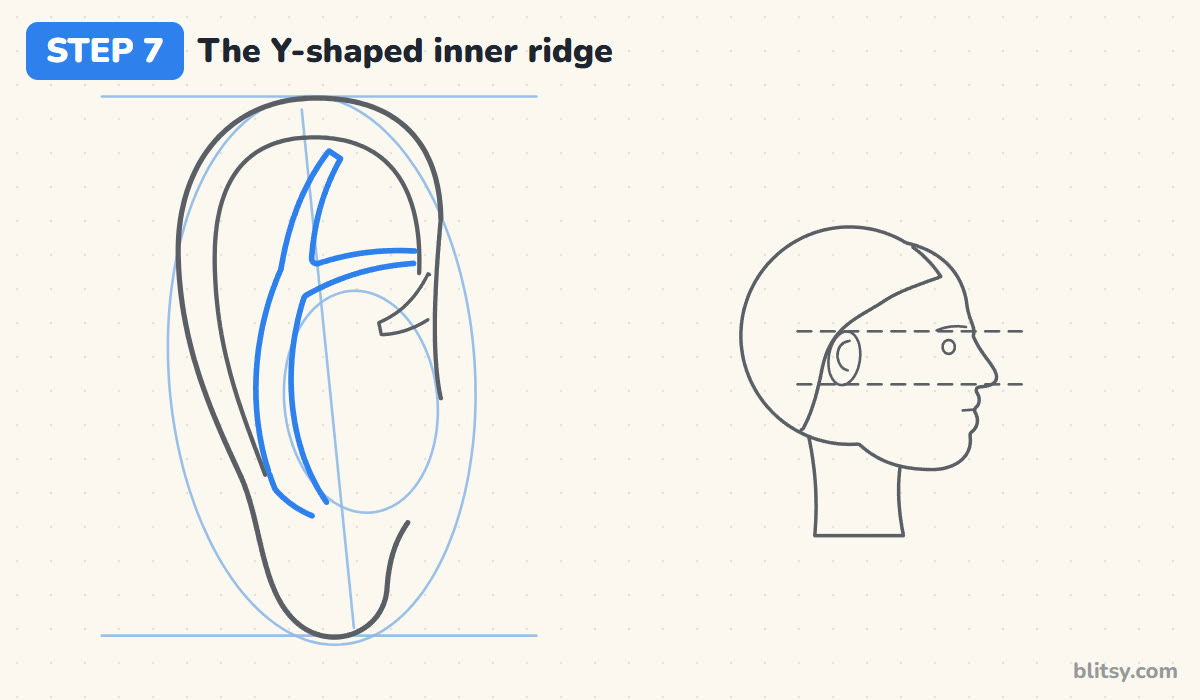
This ridge is the antihelix, and it's the part I see beginners leave out most. Start just above the lobe and draw a wide band running up the back, inside the rim. About level with the top of your bowl guide, split it into two arms: one goes up toward the top, one runs forward.
💡 Tip: Make the lower stem the thickest part and let both arms get thinner as they go. That taper sells the fold.


Step 8: Shape the bowl and the small bump
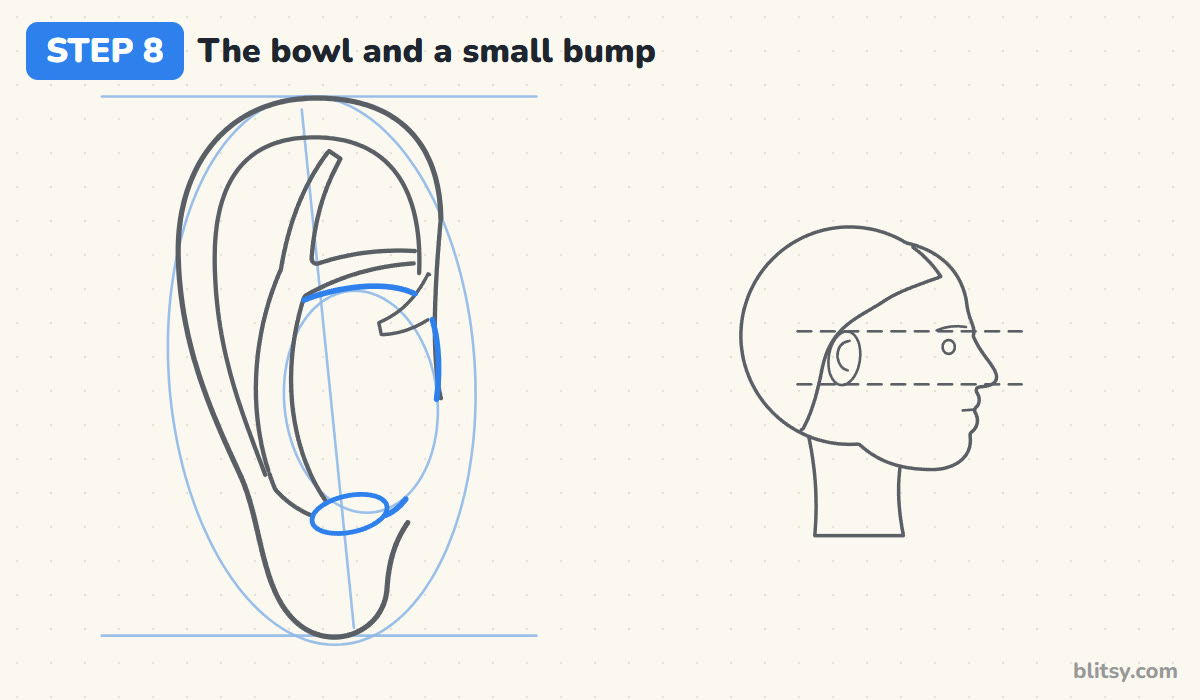
Under the front arm of the Y, draw the curved top of the bowl, called the concha. The ridge already makes its back side. At the bottom of the bowl, just above the lobe, draw a small flat oval. That bump is the antitragus, and it closes the bowl from below.
💡 Tip: The bowl is the biggest dark area in the whole ear, so give it plenty of room. A tiny bowl makes the ear look flat.
Step 9: Add the tragus flap and the ear hole
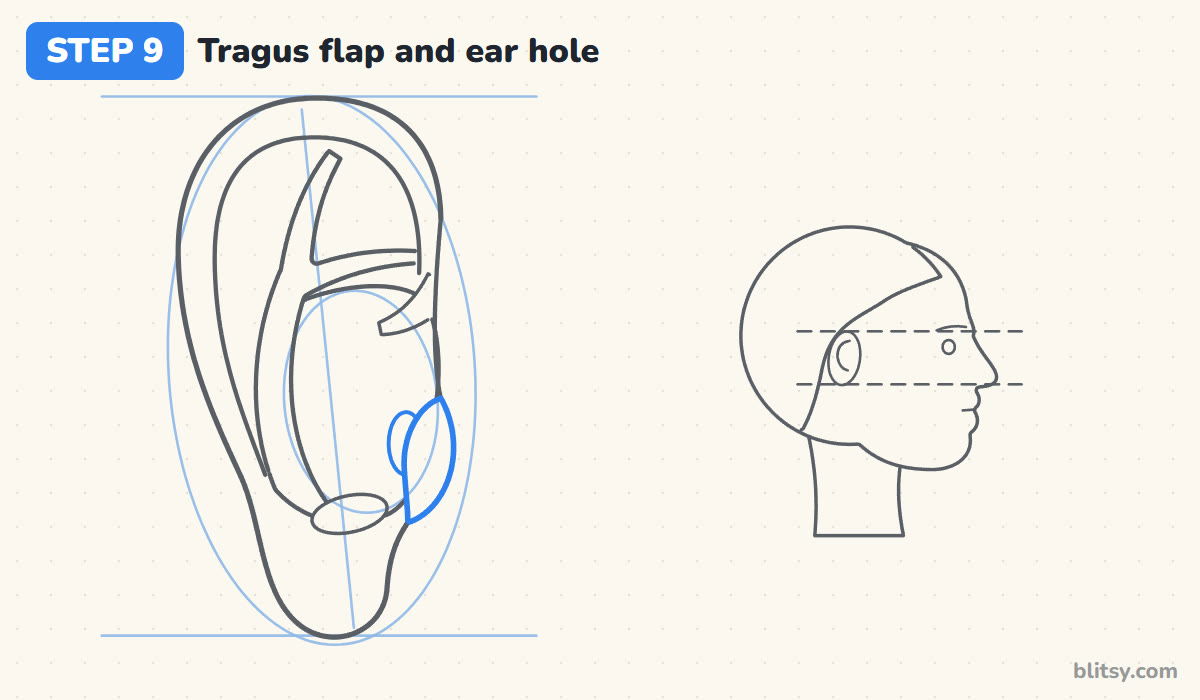
On the front edge, across from the bump, draw a rounded flap that covers the front of the bowl. That's the tragus, the bit you press to block your ear. Just behind its inner edge, add a small dark opening for the ear hole, mostly hidden by the flap.
💡 Tip: Show only a sliver of the ear hole. If you draw the whole oval, the ear looks like it has a tunnel in it.
Step 10: Ink the lines and erase the guides
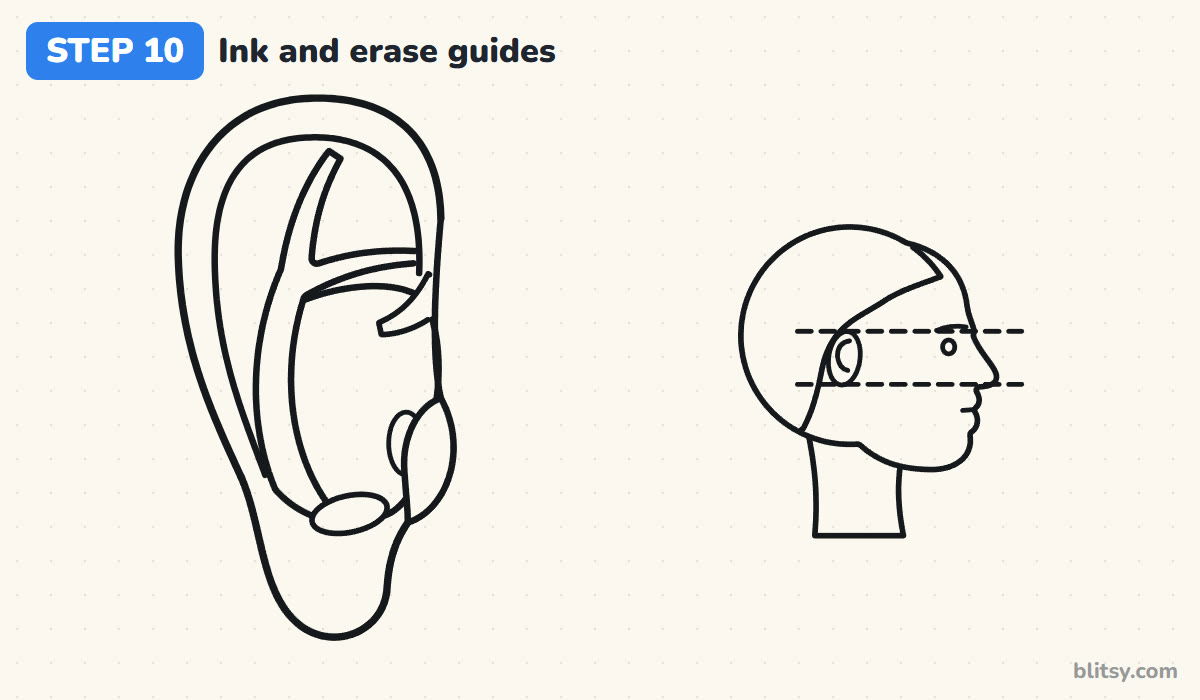
Trace every keeper line with your fineliner. I ink the outer rim and lobe first, then the inner folds, and the small head last. Let the ink dry, then erase the guides. Keep the two dashed lines on the small head, because they're part of the lesson.
💡 Tip: Press a little harder on the outer edge than on the inner folds. Slightly thinner inside lines make the folds look softer.
Step 11: Color the ear and the head
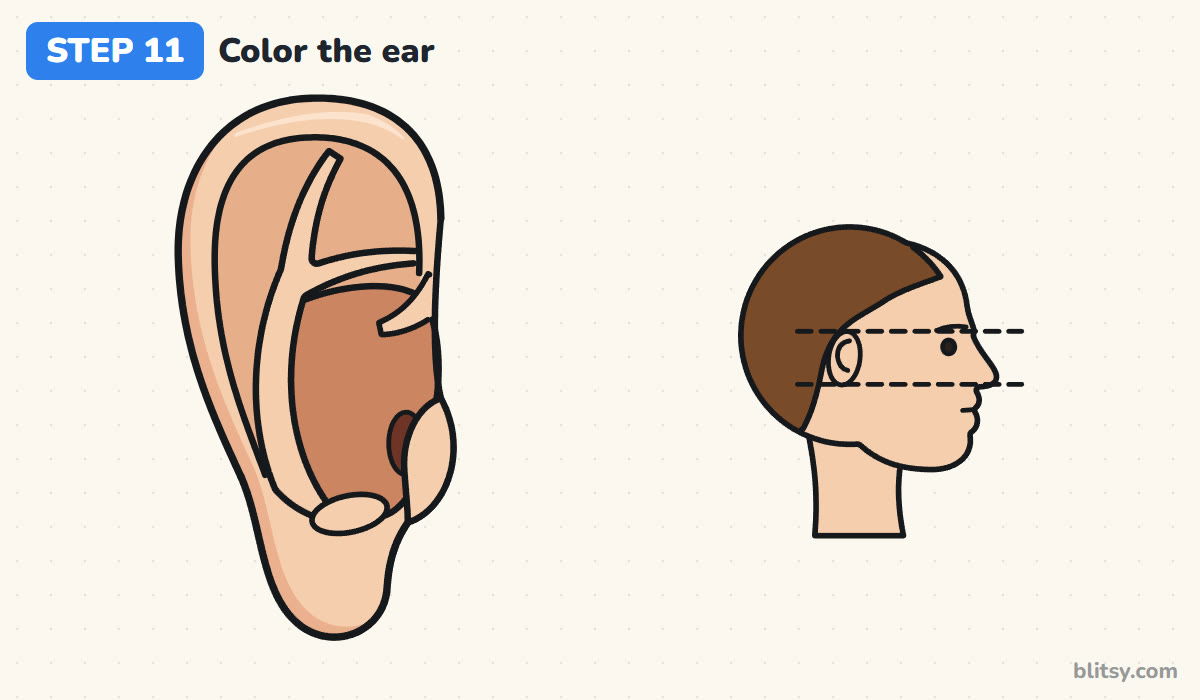
Color all the skin peach: the whole ear plus the head and neck. Use light brown in the groove inside the rim and between the arms of the Y, and a deeper brown in the bowl, the deepest part. Dark brown goes in the ear hole. Add a tan shade along the back edge and under the lobe, and chocolate brown hair on the head.
💡 Tip: Leave a thin strip of the top rim lighter than the rest. That bit of highlight makes the rim look rounded.




Where Ear Drawings Usually Go Wrong
- Placing the ear too low or too high. The top is level with the eyebrow, the lobe with the bottom of the nose. Draw those two lines first and the ear can't drift.
- Drawing only one C shape inside. A single curve reads as a cartoon ear. Add the Y ridge and the bowl, even if you keep them simple.
- Making every fold the same darkness. The bowl is deepest, the grooves are medium and the ridges stay skin color.
- A thin, stiff rim. The rim curls, so it needs real thickness across the top. Keep the inner line well away from the outer line there.
- A pointed or square earlobe. Round it off; the lobe always hangs soft.
Earrings and Other Ear Variations
Make the lobe smaller and attached to the cheek, because plenty of people have that shape. Add a stud or a small hoop earring to the lobe, or let a curl of hair fall over the top of the rim. Younger kids can skip the Y ridge; the rim, bowl and flap still read as an ear. When you're ready to put the ear on a full head, the side profile drawing tutorial uses the same brow and nose lines you learned here. You can also practise the other features with this nose drawing step by step lesson, or see how ears look from the front in the face drawing guide.
Free Ear Coloring Page and Printable Steps
The free ear coloring page shows the colored ear and head at the top as a model, with a color key that names each part, and a large outline below for coloring. The step-by-step PDF guide holds all 11 steps with their pictures and tips, so you can keep practising away from a screen. Both print on Letter or A4 paper.
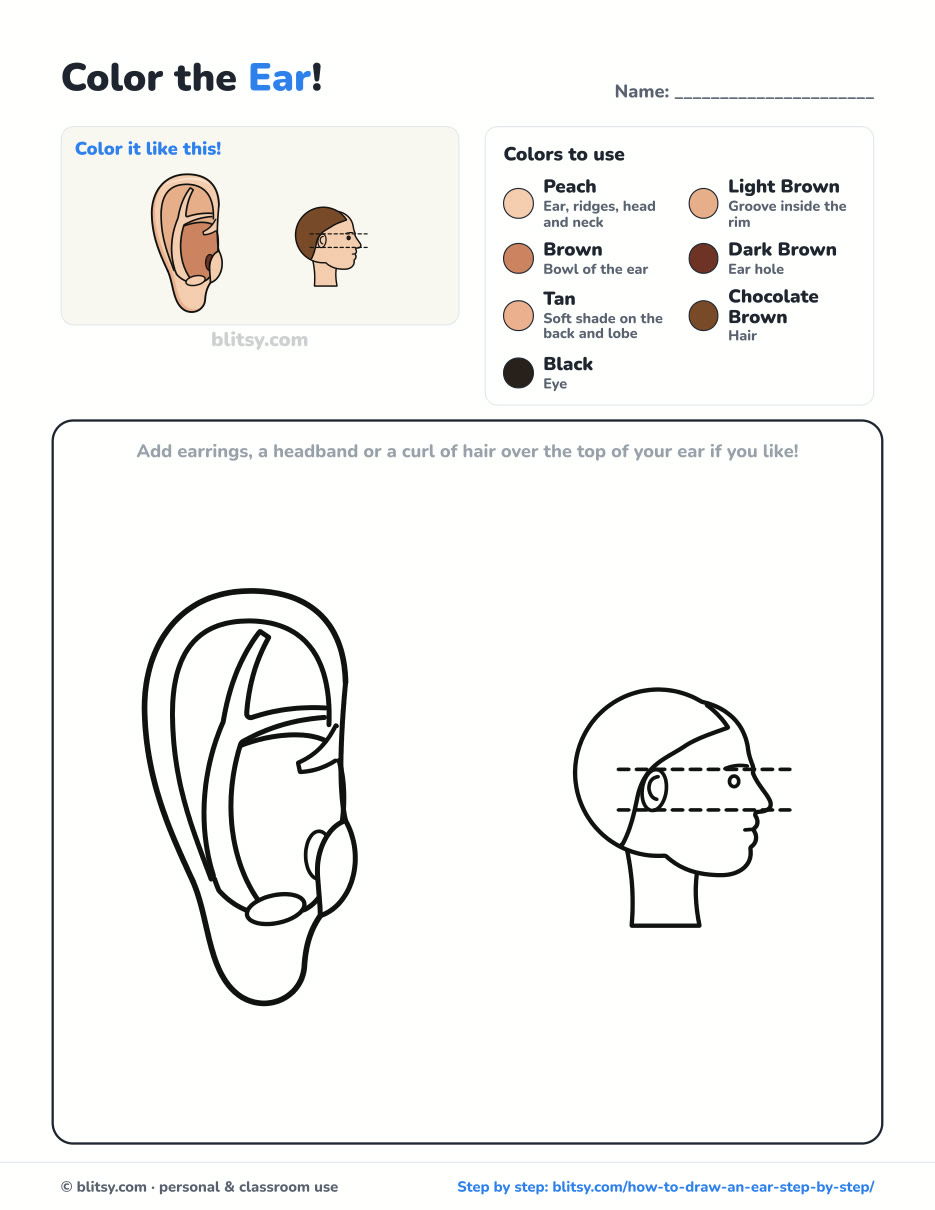
Black outlines with a colored example and the color names at the top. Ready to print and color.
⬇️ Download Coloring PageEvery step picture with its instructions and tips, to keep beside your paper while you draw.
⬇️ Download Drawing Guide📱 On a phone? Tap a download button, then open the file and choose Share → Save to Files or Print. On a computer, the PDF opens or saves straight to your Downloads folder.
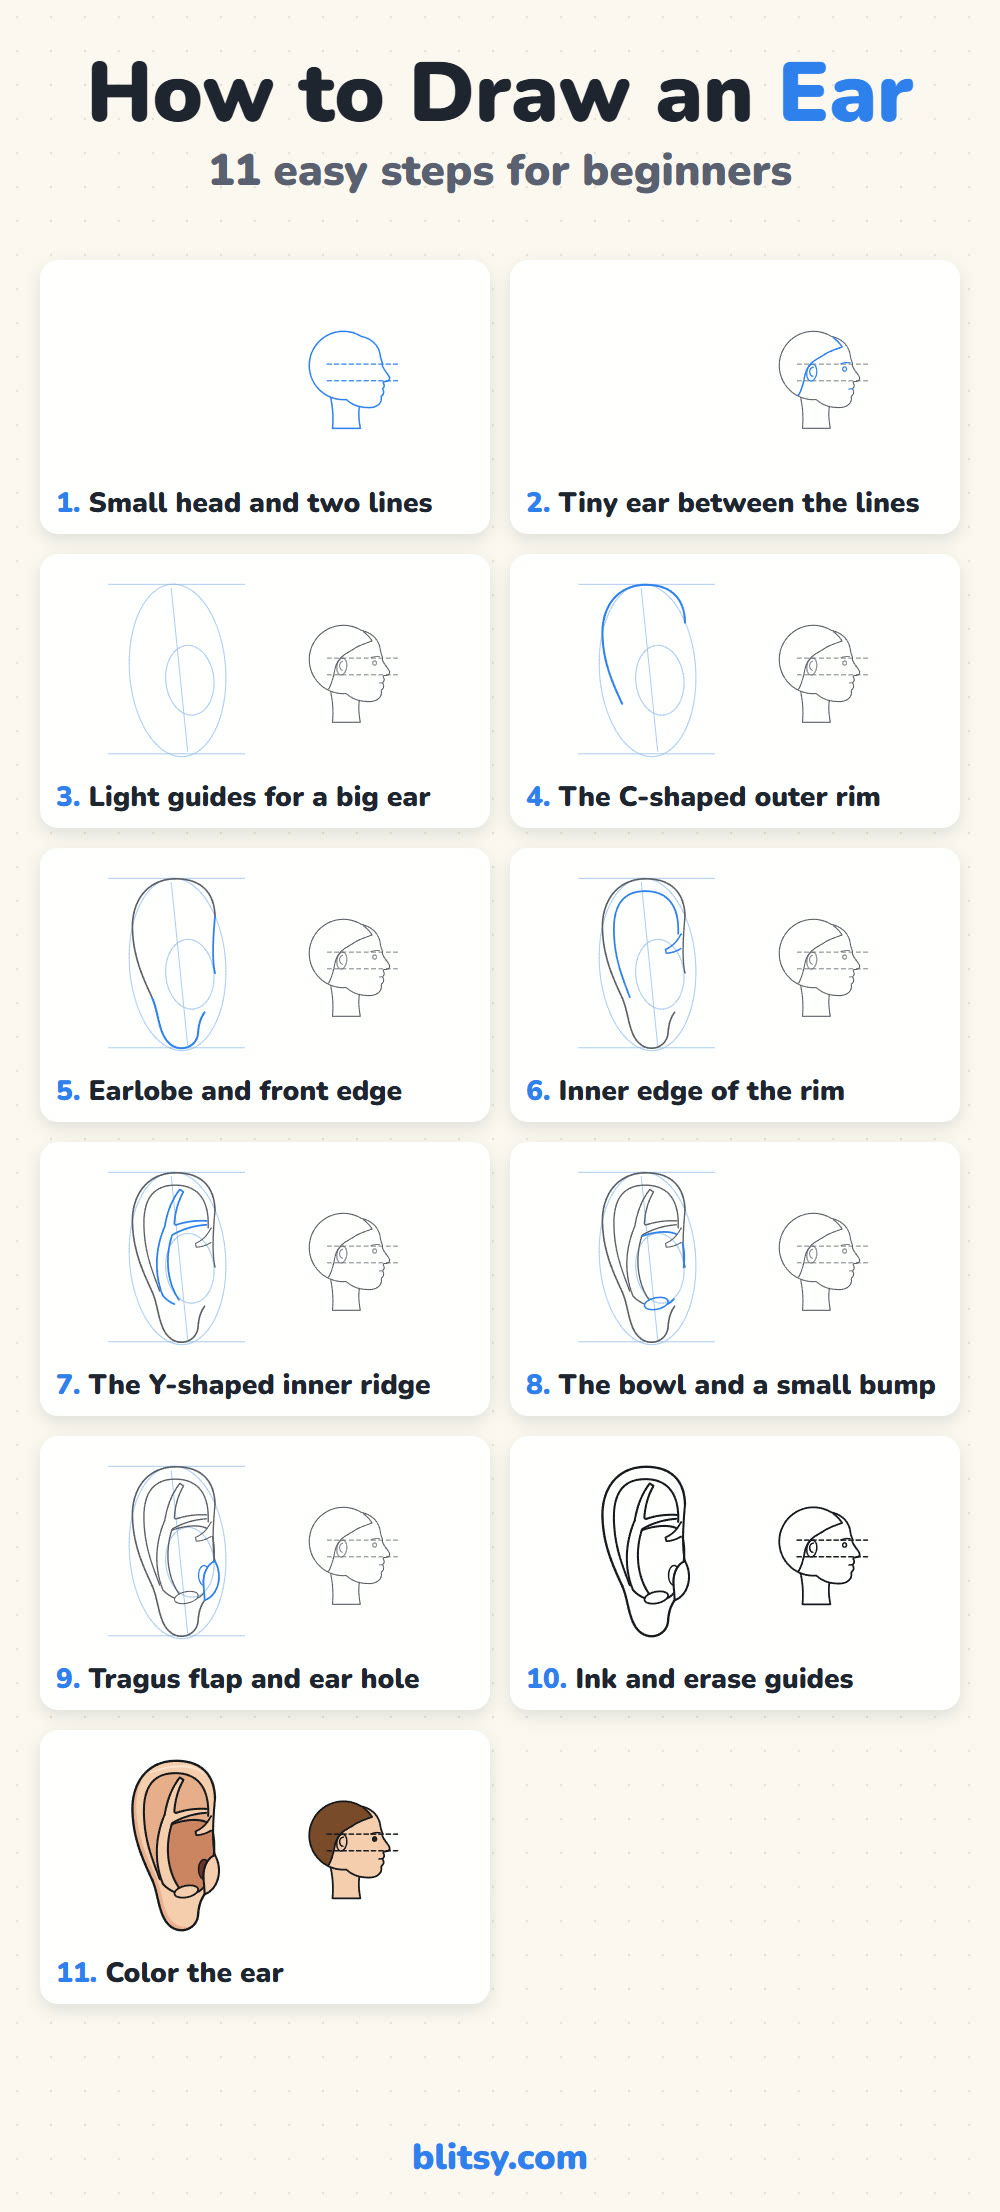
Pin the Ear Steps for Your Next Portrait
More Faces and Features to Draw
Each one is a full lesson with a picture for every step.
- Side Profile Drawing: Put this ear on a full head in side view with the side profile drawing tutorial.
- Face Drawing: Learn the proportion lines for a front-view face in this face drawing step by step guide.
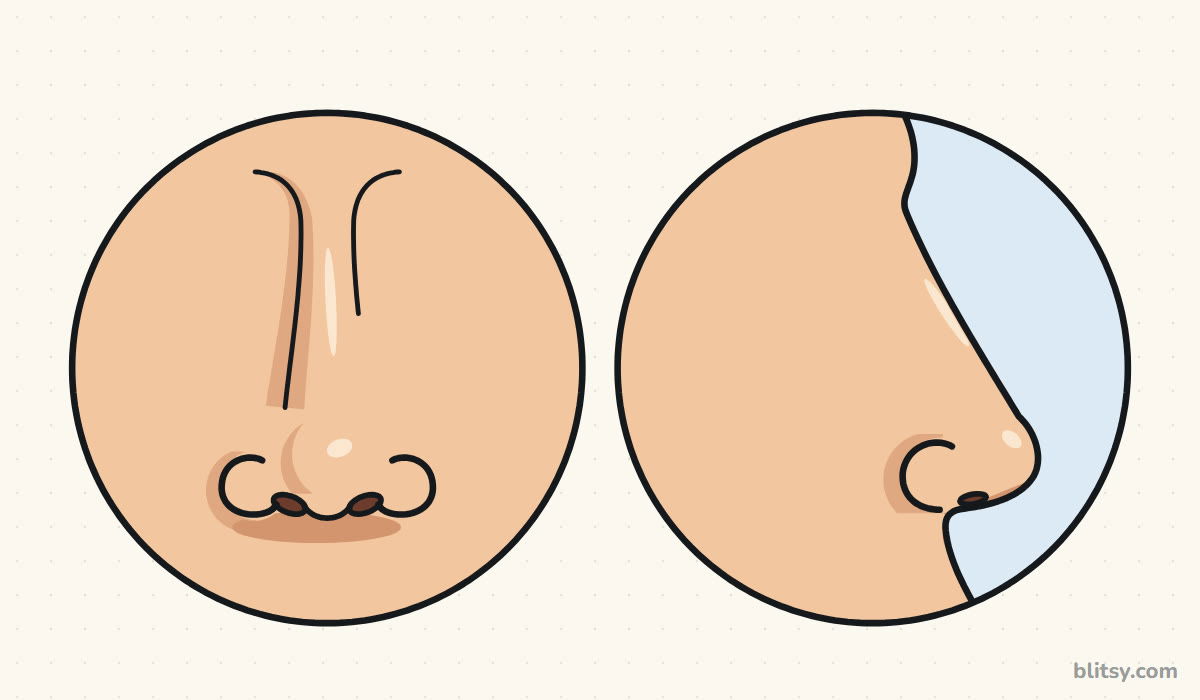
- Nose Drawing: Draw a front and a side nose from one ball and two wings with the nose drawing tutorial.
- Male Face Drawing: Build a friendly man's face with a square jaw in this male face drawing step by step lesson.
Ear Drawing Questions From Beginners
Where does the ear go on a head drawing?
Between two level lines: the top of the ear is level with the eyebrow and its lowest point is level with the bottom of the nose. In side view it sits just behind the middle of the head, near the back of the jaw.
What is the easiest way to draw an ear?
Draw a tall oval, turn it into a C-shaped rim with a soft lobe, then add a smaller C inside and a little front flap. That already looks like an ear.
What are the parts of the ear called in drawing?
The outer rim is the helix, the Y ridge inside it is the antihelix, the bowl is the concha, the front flap is the tragus and the bump above the lobe is the antitragus.
How do you shade an ear so it looks real?
Keep the ridges light and make the hollows darker: medium inside the rim and between the arms of the Y, darkest in the bowl. A light strip along the top of the rim adds roundness.
Two lines, one oval and five little folds. Next time you draw a face from the side, the ear won't be the part you hide under the hair. 👂✏️
Related posts:
 How to Draw a Dog Step by Step (Easy Side View for Beginners)
 How to Draw an Alligator Step by Step (Easy Side View)
 How to Draw a Nose Step by Step (Front and Side View)
 How to Draw a Horse Step by Step (Easy Side View)
 How to Draw a Brain Step by Step (Easy Side View)
 How to Draw a Dragon Head Step by Step (Easy Side View)
 How to Draw Hands Step by Step (Easy Palm View for Beginners)
 How to Draw a Hoodie Step by Step (Front and Back View)
 How to Draw a School Step by Step (Easy Front View)
 How to Draw a Skull Step by Step (Easy Front View)
 How to Draw a Side Profile Step by Step (Easy Head Guide)
 How to Draw a Whale Step by Step (Easy for Beginners)

