
Few cartoon characters are this kind to beginners. A Minion starts as one tall capsule, and almost everything else is a circle or a rectangle sitting on top of it. Here I'll show you how to draw a minion step by step, from a light pill shape to a grinning little helper in goggles and denim overalls. This is my own simple fan-art version for practice, not official Illumination artwork, so feel free to change him as much as you like.

Each new piece shows up bright blue in its image, so that is what you copy. Gray marks what you drew earlier, and the faint pale shapes are helpers that vanish once you ink.
Quick overview
⏱️ Time: about 25 to 30 minutes with coloring
🎯 Level: easy, good for kids from about 5 up
✏️ Steps: 11
🍌 You'll draw: a smiling two-eyed Minion standing in overalls
Supplies for a Goggle-Eyed Helper
- A pencil you can press softly (HB is fine)
- An eraser that won't smear the lines
- A black marker or fineliner for the final outline
- Crayons, markers or colored pencils in yellow, blue, gray, black, brown and pink
- A sheet of plain white paper, held upright
Use a round lid or a coin if you want tidy goggle circles; nobody will know.
How to Draw a Minion Step by Step
Step 1: Draw a tall capsule guide
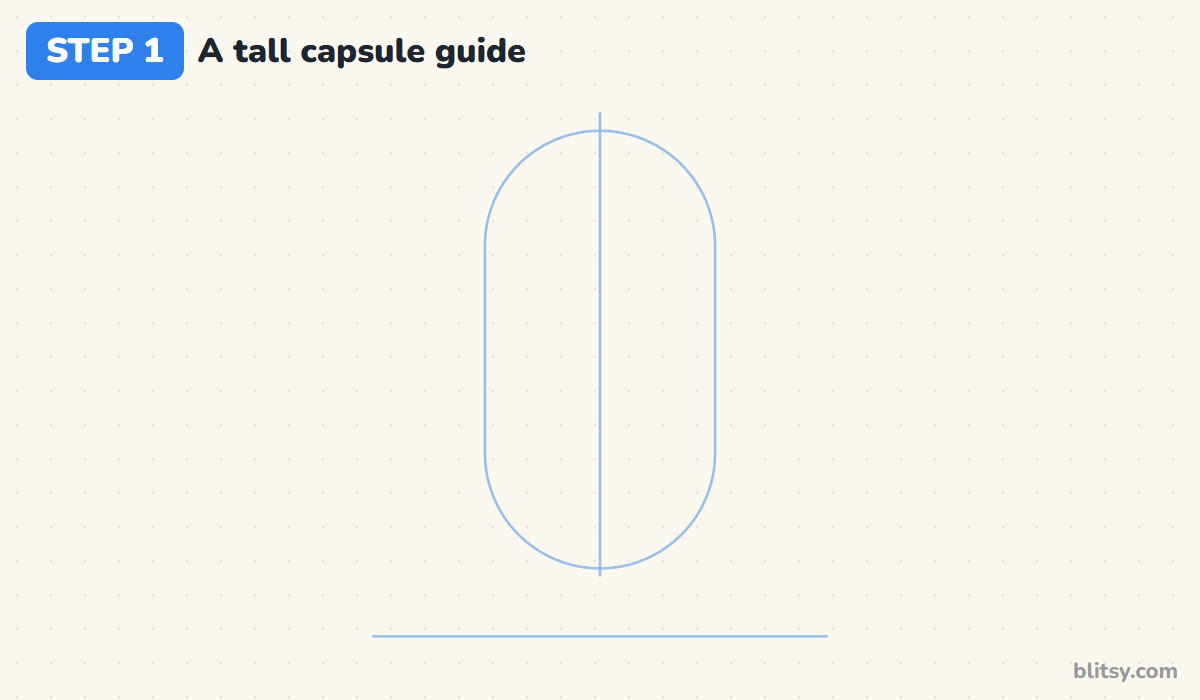
Start with a light ground line near the bottom of the page. Above it, in the middle, draw a tall rounded shape like a pill standing on its end: two straight sides with a dome on top and a curve at the bottom. Make it about twice as tall as it is wide. A light line straight down the center helps you keep both sides even later.
💡 Tip: Leave a gap of about a thumb's width between the capsule and the ground line. The legs go there.
Step 2: Add goggle, pants and feet guides
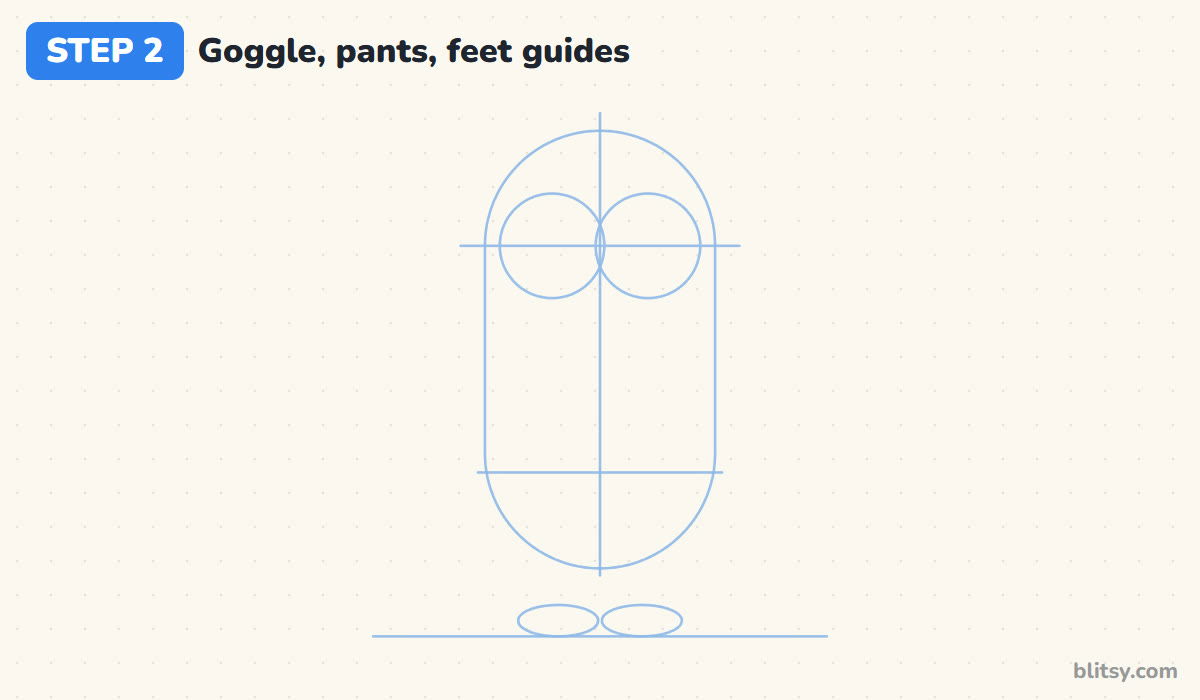
About a third of the way down, draw a level line across the capsule and put two circles on it, side by side and touching in the middle. Together they should almost fill the width of the body. Lower down, a second line marks where the overalls start, and on the ground line sketch two small flat ovals for the shoes.
💡 Tip: If your two circles stick out past the body, shrink them a little. Big goggles look great, but they still belong on the head.
Step 3: Outline the body and add hair
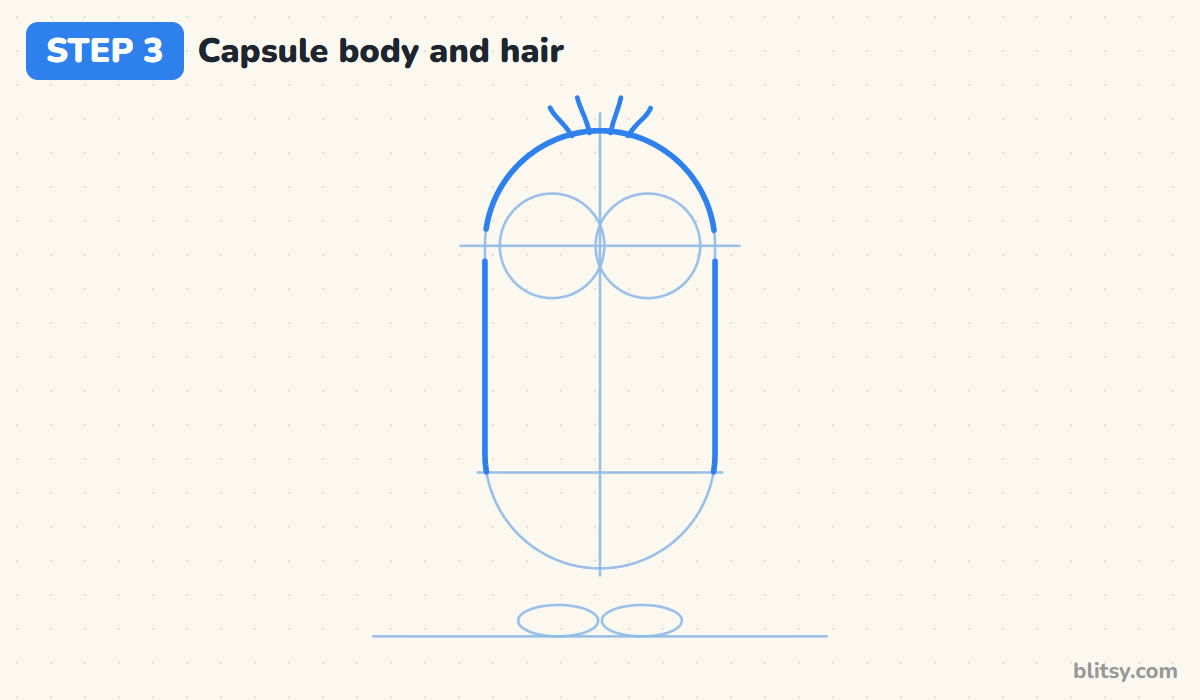
Go over the dome and the two straight sides with a firmer line. Stop at the pants line, because the overalls draw the bottom curve for you in a later step. On top of the head, add four short curved strands of hair that spray out a little, like a tiny fountain.
💡 Tip: Keep the hair sparse. Four or five strands look funny; twenty look like a brush.



Step 4: Draw two big goggle rims
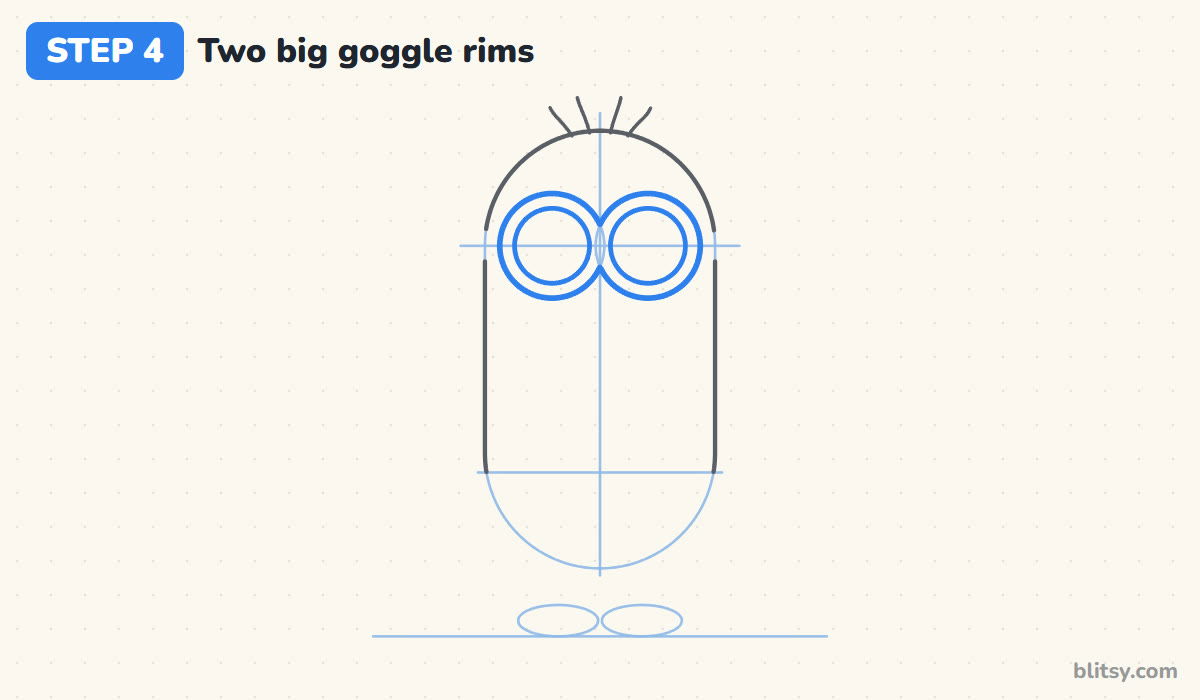
Trace each guide circle firmly, then draw a smaller circle inside each one. The ring between the two lines is the thick metal rim, so leave a clear gap all the way round. I draw the outer circles first, because once they touch in the middle, the inner ones are easy to center.
💡 Tip: Turn your paper as you go around a circle. Your hand curves more smoothly than it stretches.
Step 5: Add the strap and brown eyes
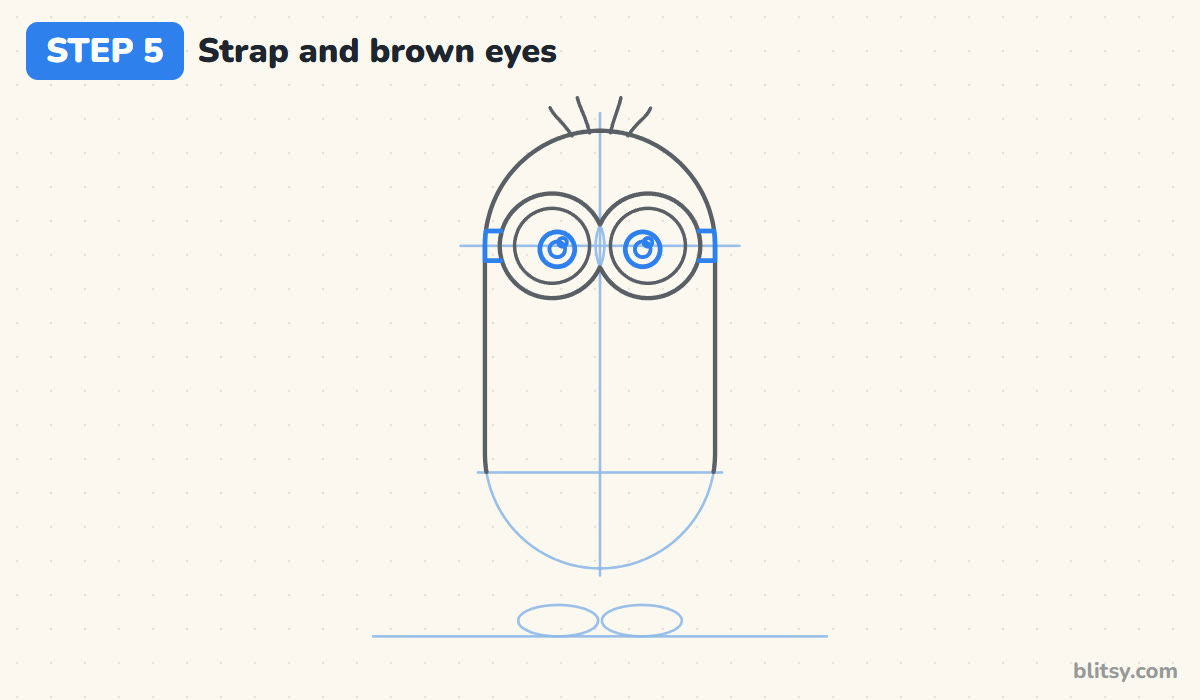
On each side, between the goggle and the edge of the body, draw a short band for the black strap. It lines up with the middle of the goggles. Inside each lens, put a round iris that leans slightly toward the nose, a smaller pupil in it, and a little shine circle.
💡 Tip: Point both eyes a touch inward. He then seems to look right at you instead of off to the sides.
Step 6: Draw a happy open smile
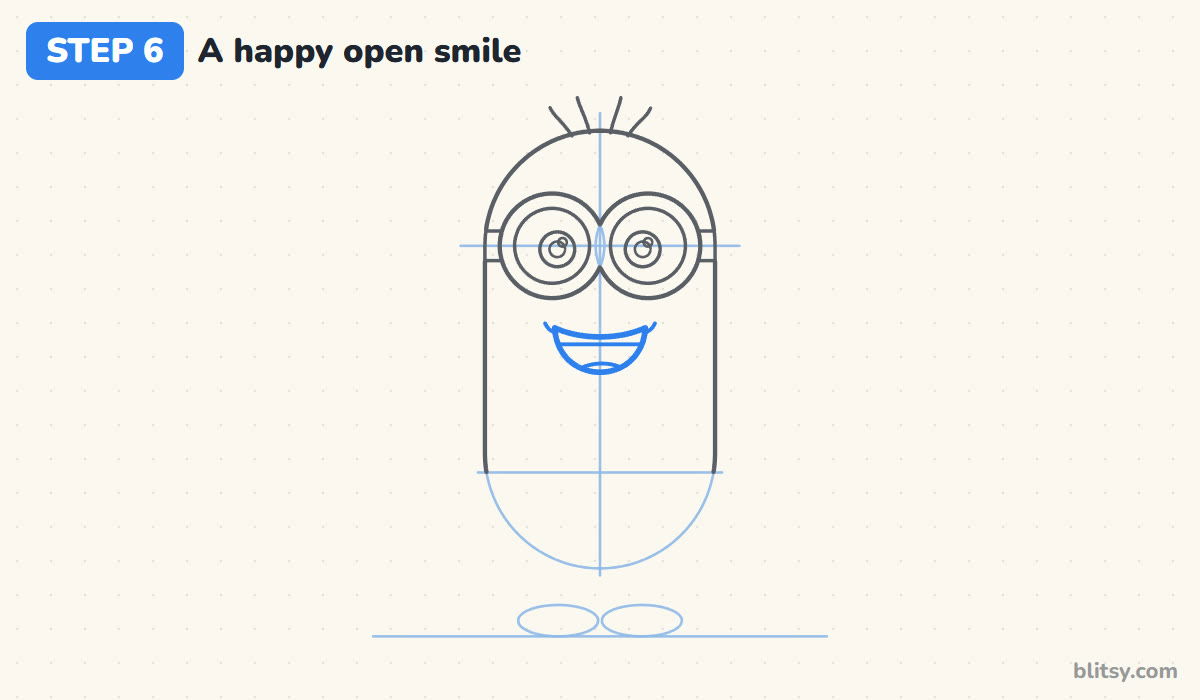
Halfway between the goggles and the pants line, draw a wide smile: a gentle curve on top and a deeper curve underneath. A straight line just under the top edge makes a row of teeth, and a small rounded bump at the bottom is the tongue. Add a tiny curl at each corner for the cheeks.
💡 Tip: Keep the mouth narrower than the two goggles together. A giant grin crowds the overalls.
Step 7: Draw the overalls and a pocket
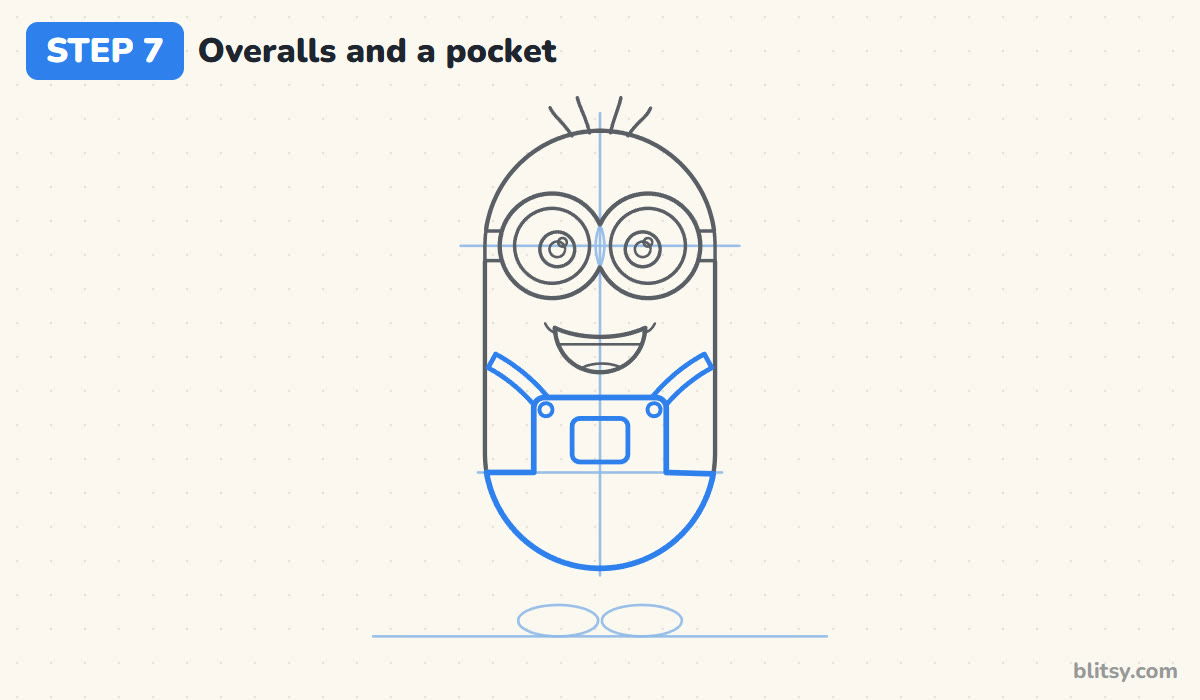
Follow the pants line across and round the bottom of the capsule, so the lower part becomes the overall pants. In the middle, raise a square bib above that line with softly rounded corners. Two diagonal straps run from the top corners of the bib out to the sides of the body. Finish with a small rectangle pocket on the bib and a button where each strap joins.
💡 Tip: Draw the straps as two parallel lines, not one. A single line looks like a crease instead of fabric.


Step 8: Add arms with black gloves
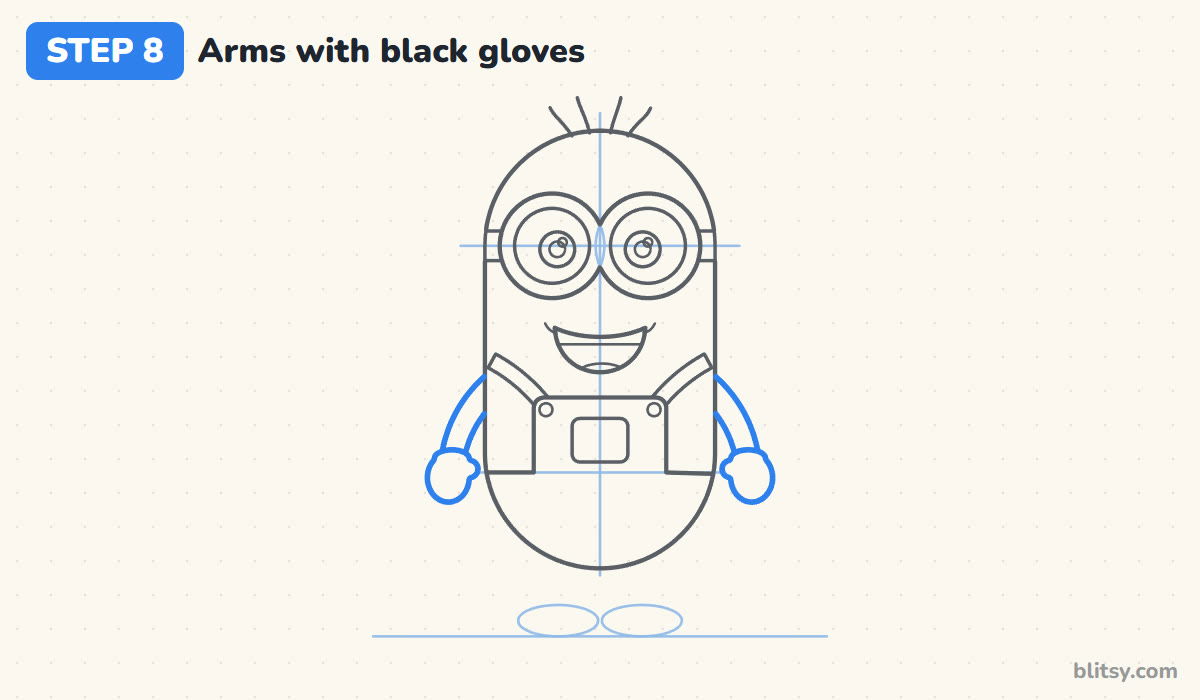
From each side of the body, just under the straps, draw a short arm that bends out and down. Give it real width with two lines, not a stick. At the end of each arm, draw a round mitten glove with a small bump for the thumb on the inside.
💡 Tip: Let the hands stop around the height of the pocket. Longer arms make him look like a different character.
Step 9: Draw short legs and shoes
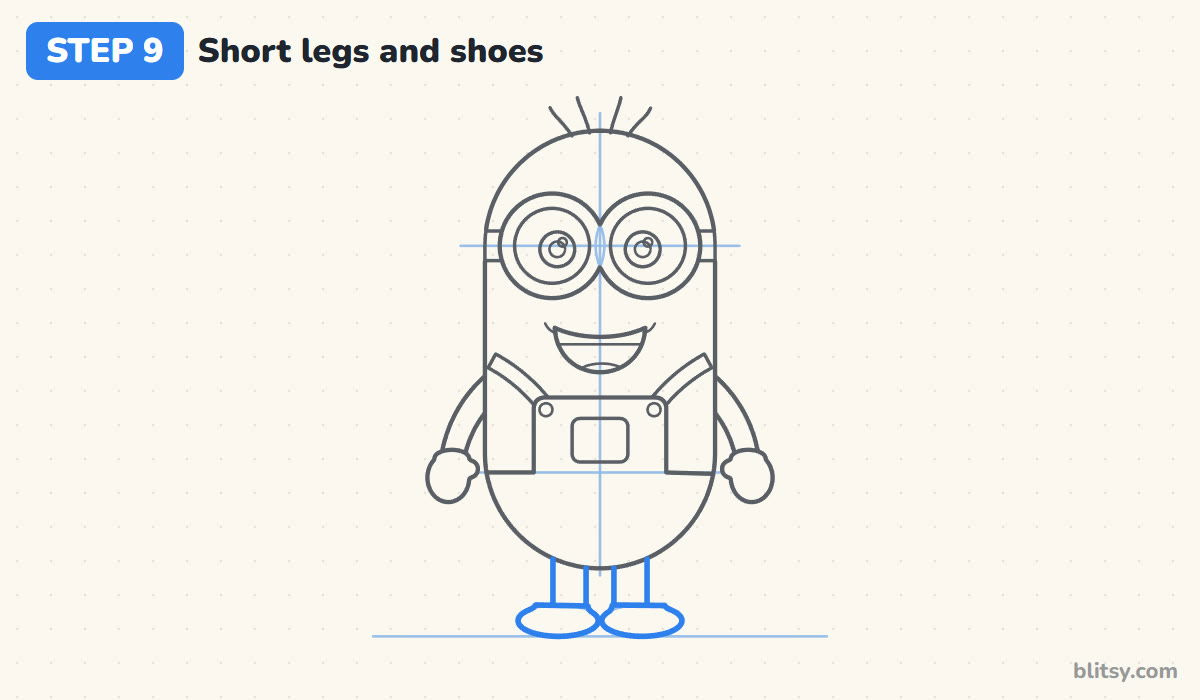
Two short, straight legs drop from under the overalls to the shoe ovals. Leave a small gap between them. Trace the shoes as rounded shapes with a flat bottom sitting right on the ground line, slightly wider than the legs.
💡 Tip: Keep the legs short. Minions are mostly body, and long legs spoil the bouncy little shape.
Step 10: Ink the lines and erase the guides
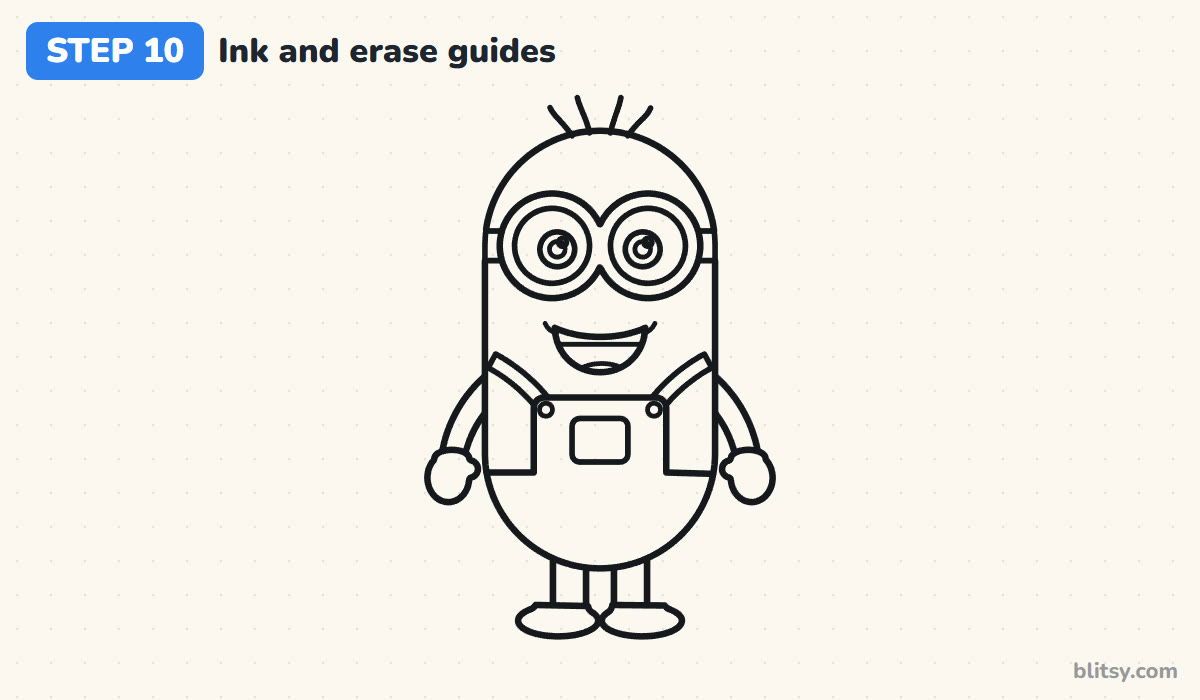
Trace every keeper line with your marker. I ink the goggles and face first while my hand is steady, then the body and overalls, and the feet last. Let the ink dry for a minute, then erase the center line, the guide circles and the other light lines underneath.
💡 Tip: Don't ink the vertical guide line through the face. It's only there to help you center things.
Step 11: Color your Minion
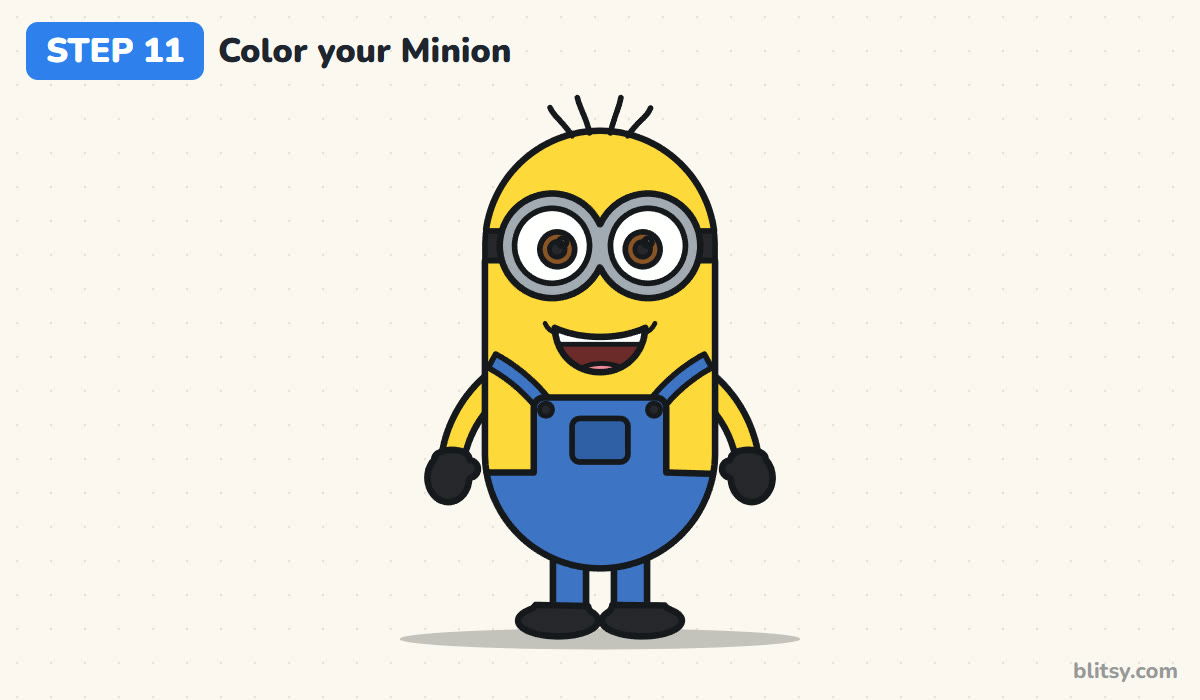
Bright yellow covers the whole capsule plus both arms. The overalls are blue, straps and legs included, with a slightly darker blue on the pocket. Color the goggle rims gray. Everything else that's dark (strap, gloves, shoes, buttons, pupils) gets black. The irises are brown, the mouth dark red, the tongue pink, and the teeth and lenses stay white. A soft gray shadow under the shoes finishes him.
💡 Tip: Press a little harder with the yellow along the right edge of the body. That slight shading makes him look round.
Minion Sketches That Look a Bit Off (and the Fix)
- A body that's too round. An egg or ball shape loses the Minion look. Keep the sides straight and the capsule tall.
- Thin goggle rims. One thin circle per eye reads as glasses. Draw two circles per goggle so the rim looks thick and heavy.
- Eyes too small inside the lenses. Tiny pupils floating in white look startled. Make the brown iris about half the width of the lens.
- Overalls that start too high. If the pants line sits near the mouth, the face gets squashed. Keep it well below the smile.
- Stick arms. Single lines look stiff. Give the arms two sides and round mitten gloves.
Remix Ideas for a Whole Minion Crew
Try a one-eyed version with a single big goggle in the middle, or make him taller and skinnier with more hair. Add a banana in one glove, a party hat, or a purple color scheme for a silly evil twin. Little kids can skip the teeth, the tongue and the pocket and he still looks right. For another famous yellow cartoon face, my Bart Simpson drawing step by step lesson is a great next challenge. You could also follow the Olaf drawing tutorial for a different round, friendly character, or design a creature from scratch with the easy monster drawing guide.
Free Minion Coloring Page and Printable Step Guide
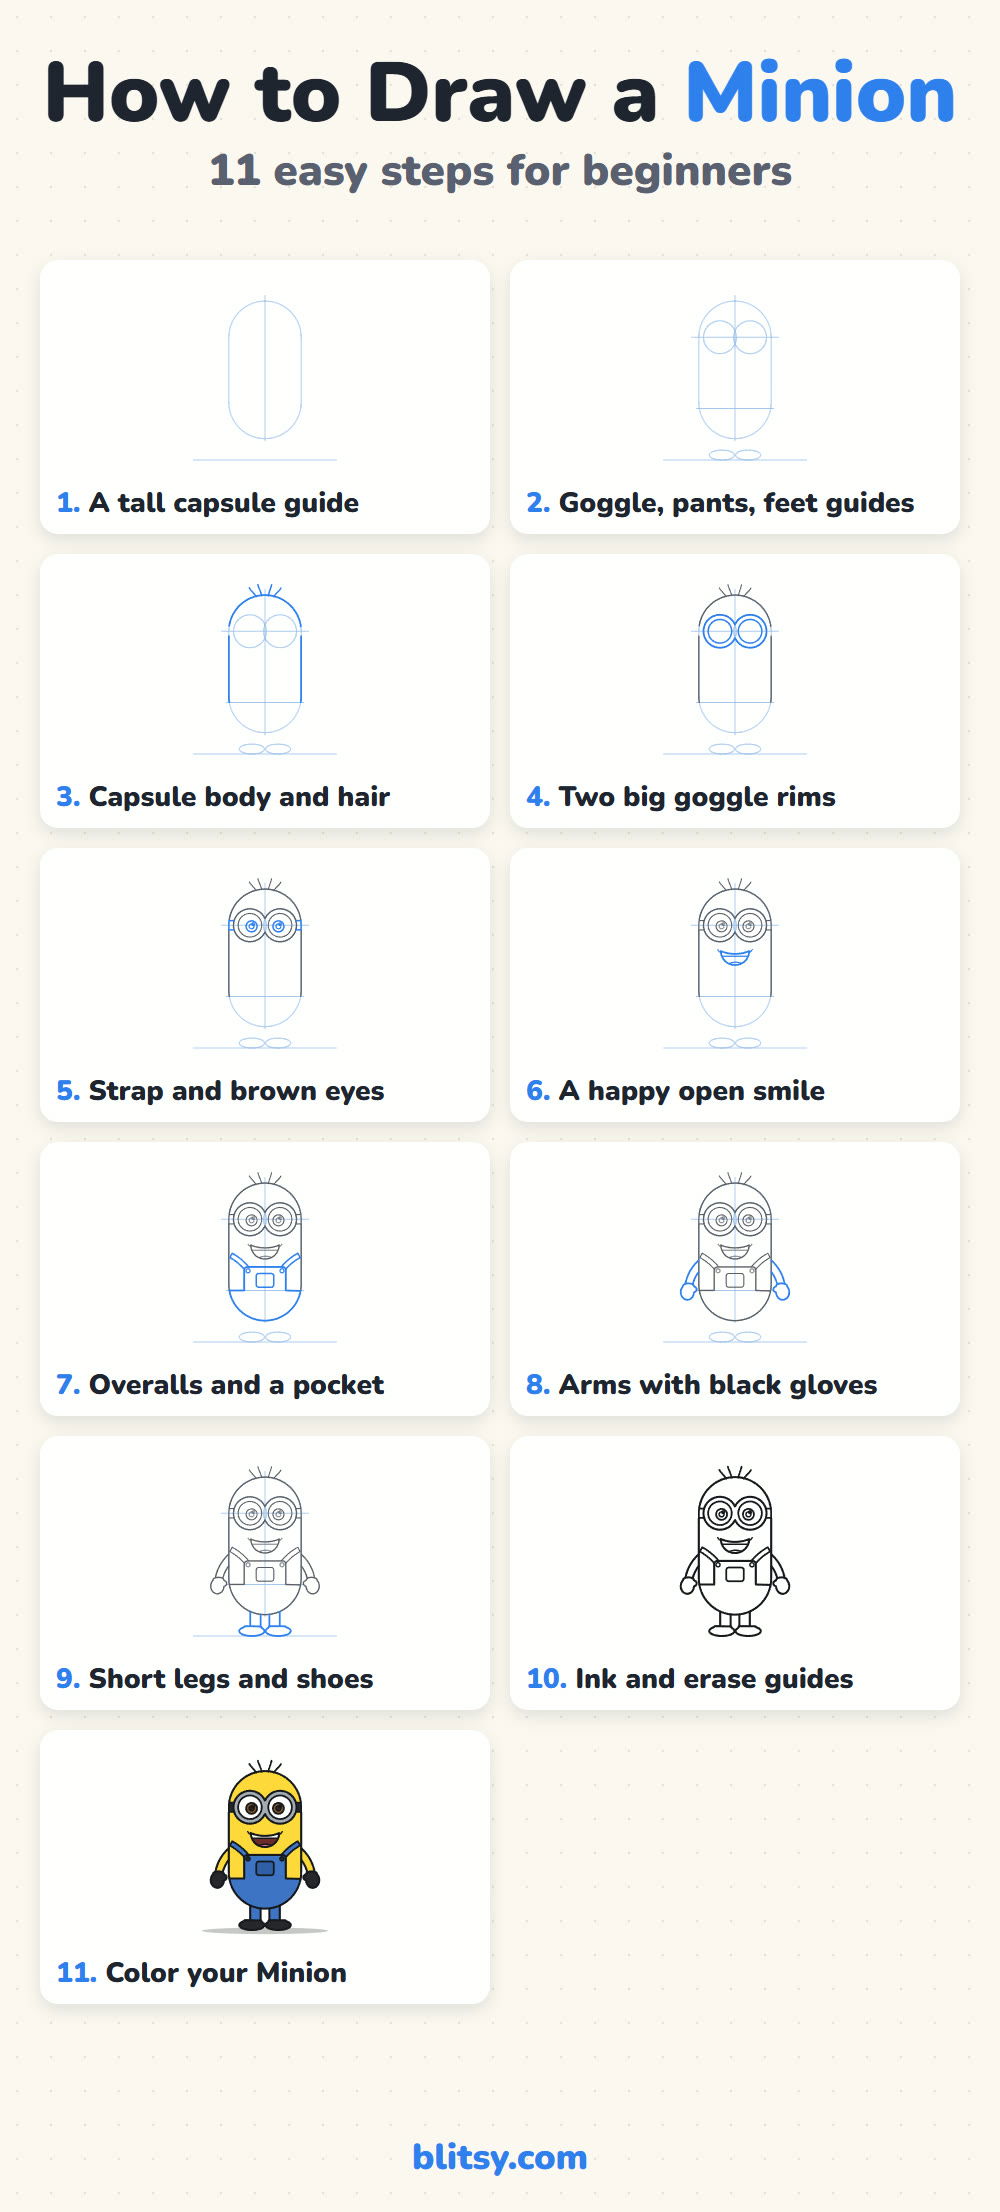
The free Minion coloring page shows a colored example at the top with a key for every part, and a large outline below for your own coloring. The step-by-step PDF guide holds all 11 steps with pictures and tips, so you can draw without a screen nearby. Both print on Letter or A4 paper.
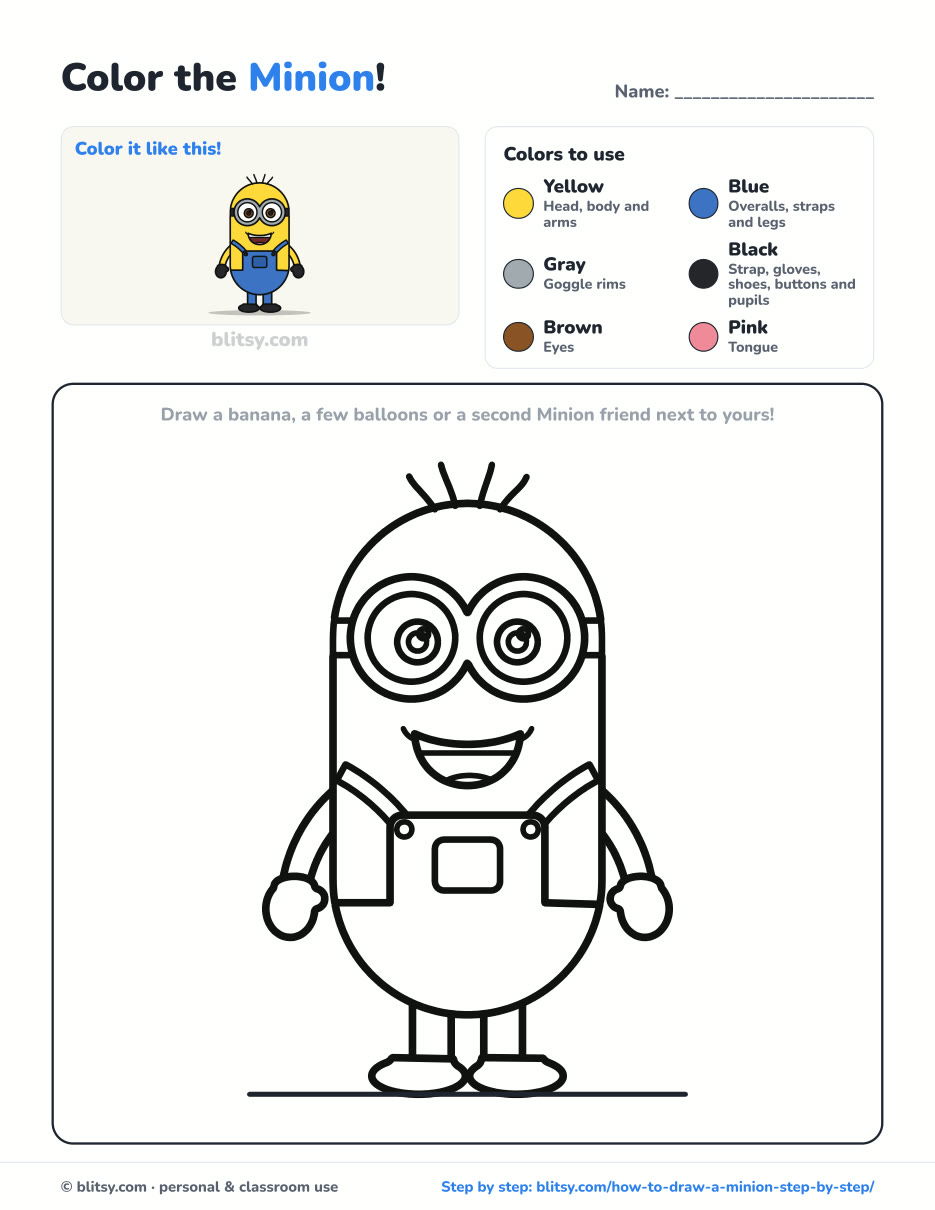
Black outlines with a colored example and the color names at the top. Ready to print and color.
⬇️ Download Coloring PageEvery step picture with its instructions and tips, to keep beside your paper while you draw.
⬇️ Download Drawing Guide📱 On a phone? Tap a download button, then open the file and choose Share → Save to Files or Print. On a computer, the PDF opens or saves straight to your Downloads folder.
All Eleven Minion Steps on One Pin
More Cartoon Friends You Can Draw Next
Every link below is a full step-by-step lesson with a picture for each stage, so the same simple-shapes method works for all of them.
- Bart Simpson Drawing: Another bright yellow cartoon kid with spiky hair, drawn from simple shapes in this Bart Simpson drawing tutorial.
- Olaf Drawing: Stack a few round shapes into a happy snowman with this how to draw Olaf step by step lesson.
- Mario Drawing: Draw a waving hero in a red cap and blue overalls with this Mario drawing tutorial.
- Monster Drawing: Invent a friendly creature with big eyes and a goofy grin in this monster drawing step by step guide.
- Emoji Drawing: Practice happy faces and expressions on a simple circle with this emoji drawing tutorial.
Minion Drawing Questions Kids Often Ask
What is the easiest way to draw a Minion?
Start with a tall capsule shape, then add two touching circles for the goggles about a third of the way down. A smile, a line for the overalls and short arms and legs finish the basic figure.
Is this Minion drawing easy enough for kids?
Yes. Children from about five can follow it, since nearly every part is a circle, curve or rectangle. Younger ones can leave out the small details such as the pocket or the buttons.
What colors do I need to color a Minion?
Yellow for the skin, blue for the overalls, gray for the goggle rims, black for the strap plus the gloves and shoes, and brown for the eyes. A little pink for the tongue is optional.
Can I draw a Minion with one eye?
Sure. Draw one big circle in the middle of the strap line instead of two, and make the body a bit shorter. Everything else in the steps stays the same.
Get that yellow crayon ready and give your Minion the biggest grin on the page. 🍌✏️
Related posts:
 How to Draw a Car Step by Step (Easy Drawing for Beginners)
 How to Draw a Whale Step by Step (Easy for Beginners)
 How to Draw an Arctic Fox Step by Step (Easy for Beginners)
 How to Draw a Shark Step by Step (Easy for Beginners)
 How to Draw a Chicken Step by Step (Easy for Beginners)
 How to Draw a Fish Step by Step (Easy Goldfish for Beginners)
 How to Draw a Snowman Step by Step (Easy for Beginners)
 How to Draw Hands Step by Step (Easy Palm View for Beginners)
 How to Draw an Airplane Step by Step (Easy Jet for Beginners)
 How to Draw a Mouse Step by Step (Easy for Beginners)
 How to Draw a T-Rex Step by Step (Easy for Beginners)
 How to Draw a Pig Step by Step (Easy for Beginners)

