
Take away the cape and the collar, and a cartoon vampire is just a smiling kid in a bow tie. Those two shapes, plus a pointed hairline and two little fangs, are what make everyone say "vampire" at first sight. This lesson shows you how to draw a vampire step by step, the friendly kind with nothing scary, waving hello while a small bat flaps beside him. He's a natural Halloween drawing, but he works any month.
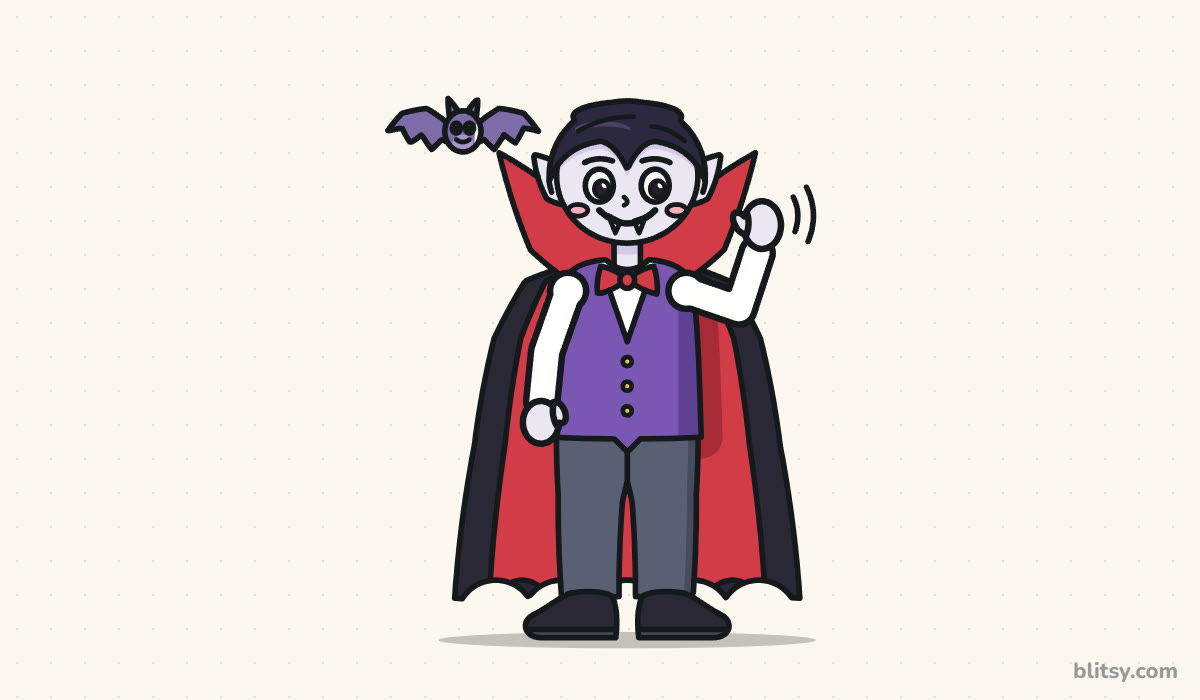
In the step pictures, new lines are blue and earlier lines are gray. Copy just the blue part, compare, and carry on.
Quick overview
⏱️ Time: about 35 to 45 minutes with coloring
🎯 Level: easy, good for kids from about 6 up
✏️ Steps: 12
🧛 You'll draw: a friendly cartoon vampire with a cape and a little bat
Supplies for a Cape and Collar Sketch
- A pencil you can press lightly (HB works well)
- A soft eraser for the guide lines
- A black marker or fineliner for the outline
- Colored pencils or markers: black, red, purple, gray, yellow, plus a pale lavender
- A sheet of plain white paper
If you don't have a pale lavender for the face, leave it white or use the lightest gray you own. Both read as vampire skin.
How to Draw a Vampire Step by Step
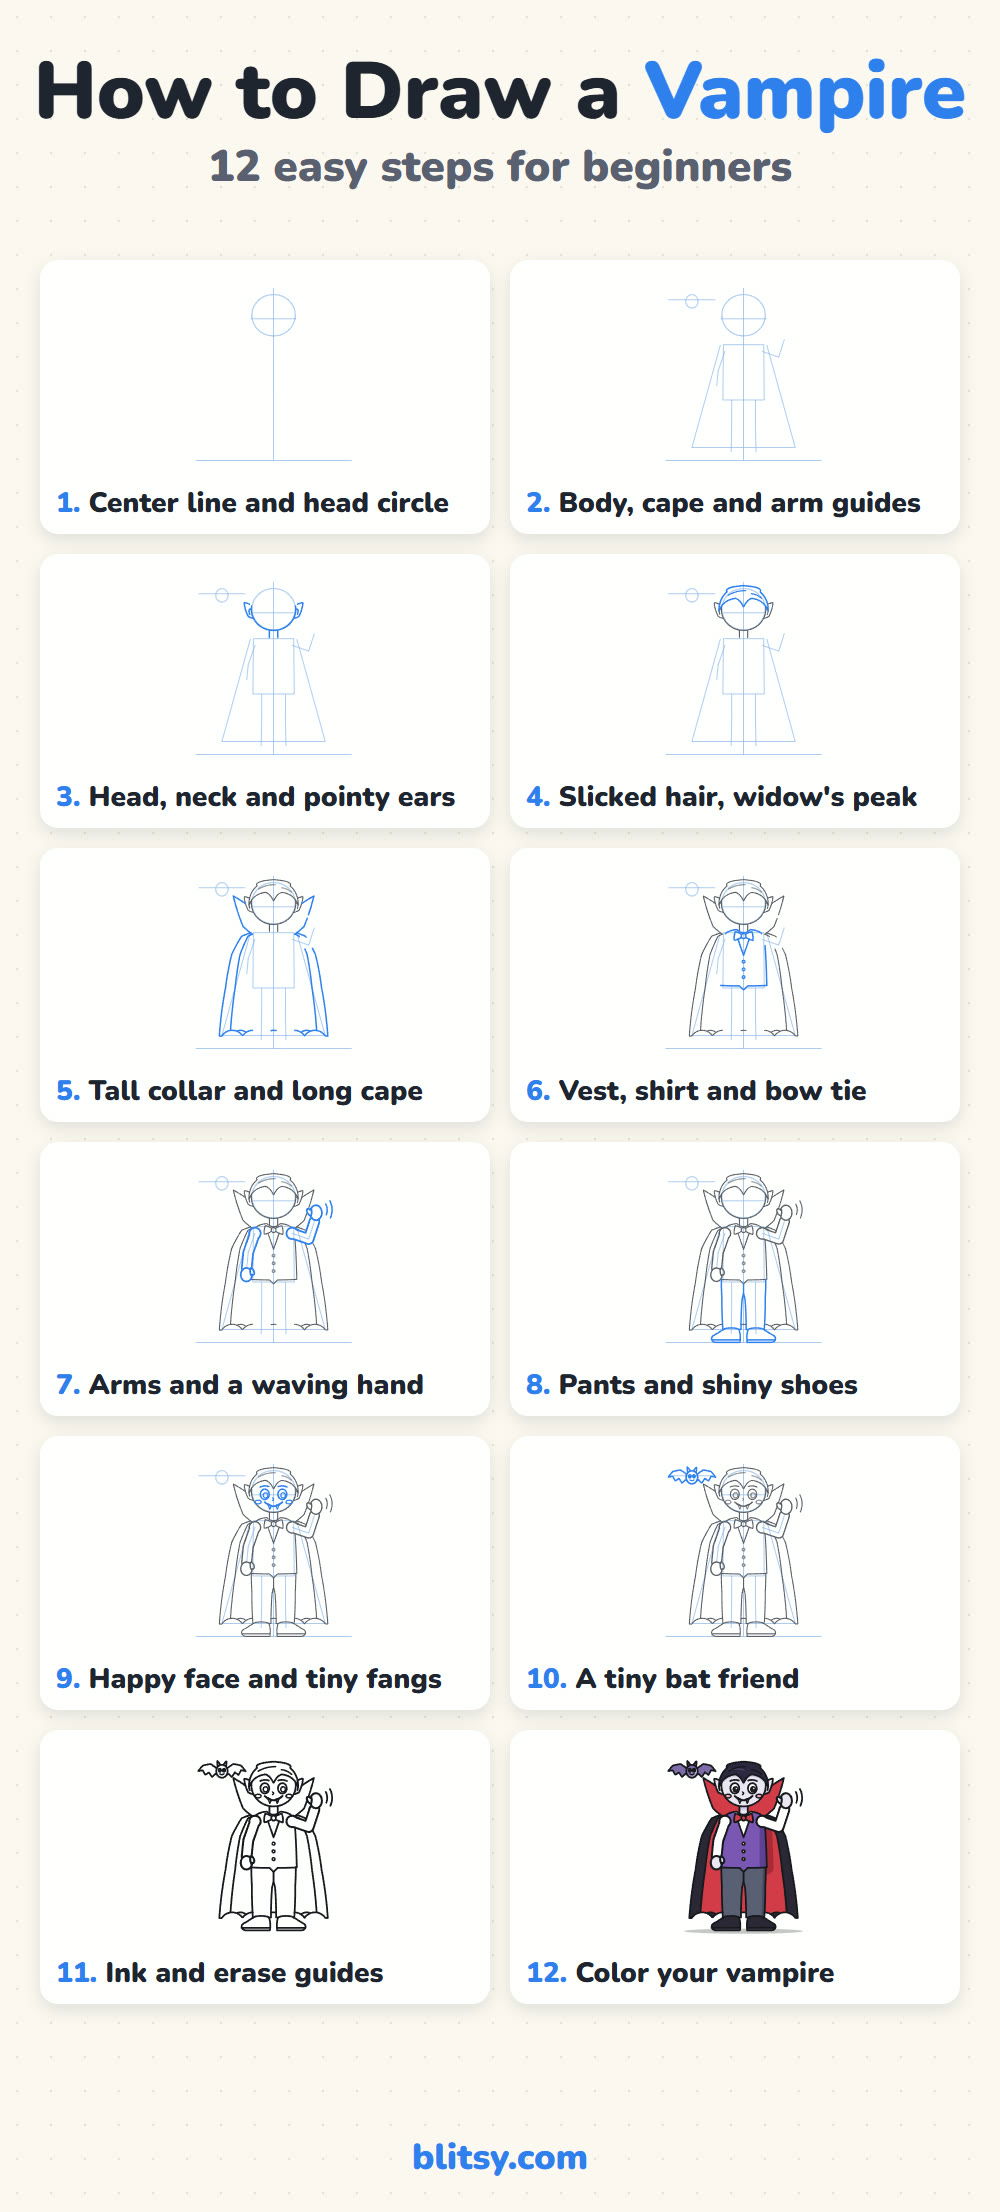
Step 1: Draw a center line and a head circle
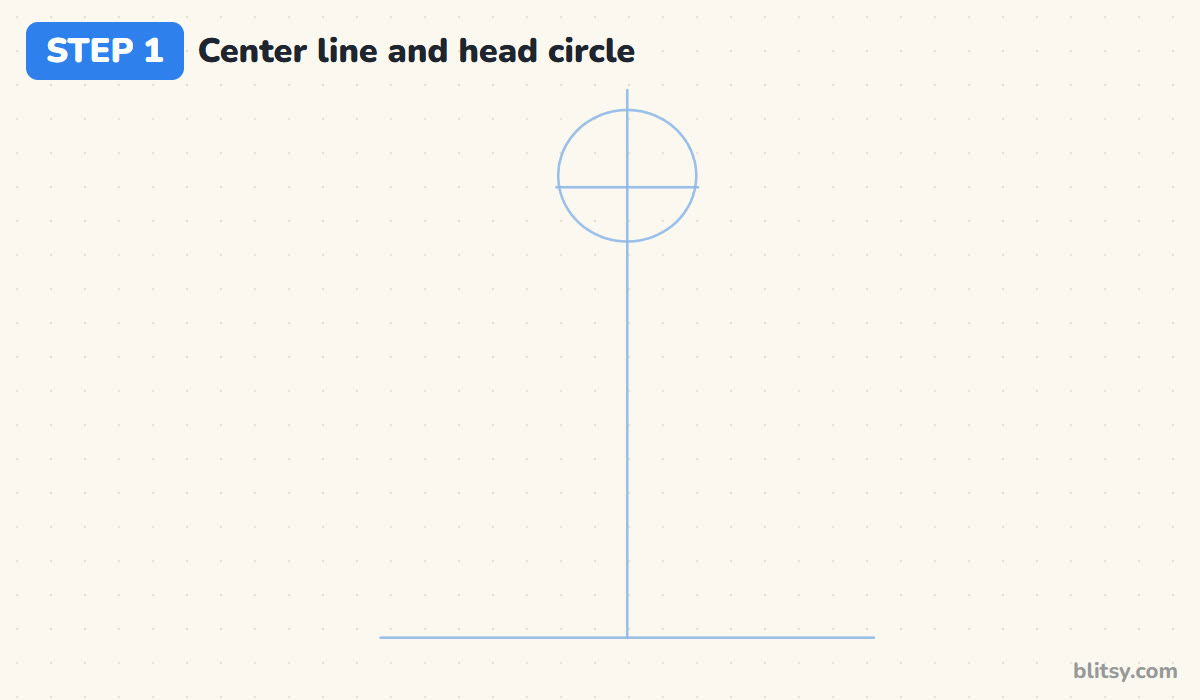
Draw a light ground line near the bottom of your paper and a straight line up the middle. Near the top, draw a circle for the head, then a short line across it just below the middle for the eyes. I keep the head big, about a quarter of the whole height, because that's what keeps him cute instead of creepy.
💡 Tip: Press so lightly you can hardly see the lines. Every one of them gets erased later.
Step 2: Sketch guides for the body and cape
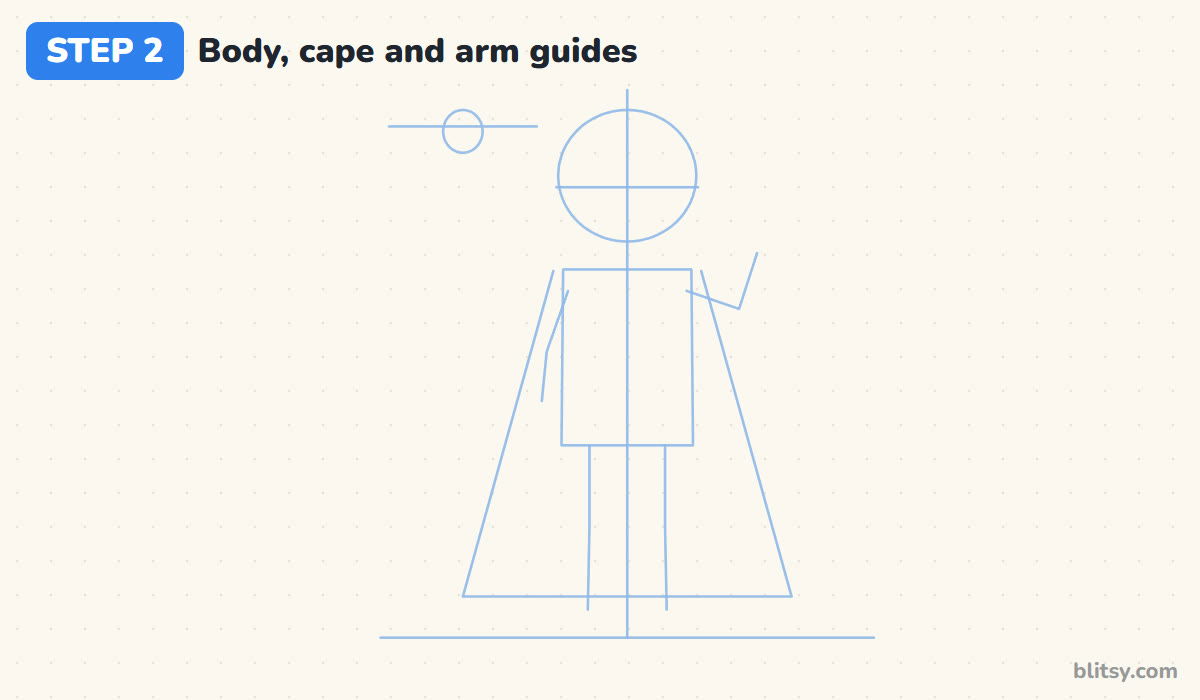
Under the head, sketch a tall box for the body and two straight leg lines down to the ground. Around it, draw a big triangle that starts at the shoulders and spreads out near the ground. That's the cape. One arm line goes down the left side; the other bends out and up, because he's going to wave. A small circle up on the left marks the bat.
💡 Tip: Make the cape triangle clearly wider than the body at the bottom. A narrow cape looks like a long coat.
Step 3: Outline the head and pointy ears
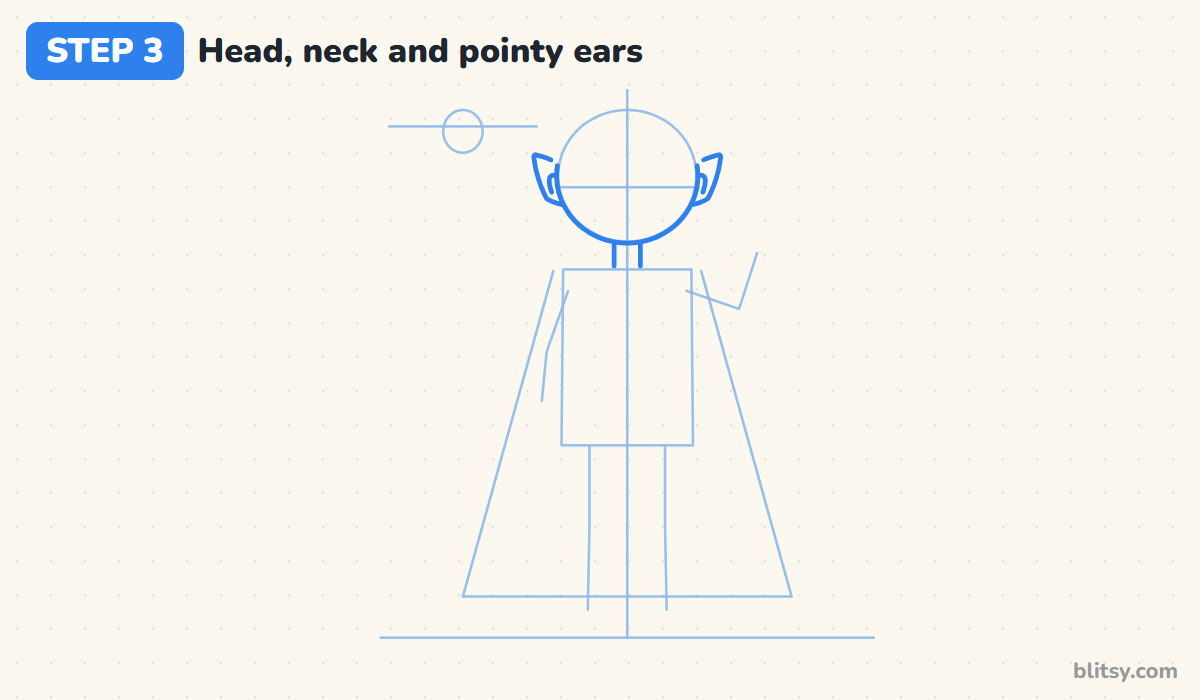
Trace the head circle with a firmer line. On each side, right at the eye line, draw a small pointed ear whose tip leans up and out like a little leaf. Then add a short neck under the chin, about as wide as the space between the eyes, attached straight to the chin so the head doesn't look stuck on.
💡 Tip: Small ears look friendly. If the points get long, he starts to look more like an elf.



Step 4: Draw slicked hair with a widow's peak
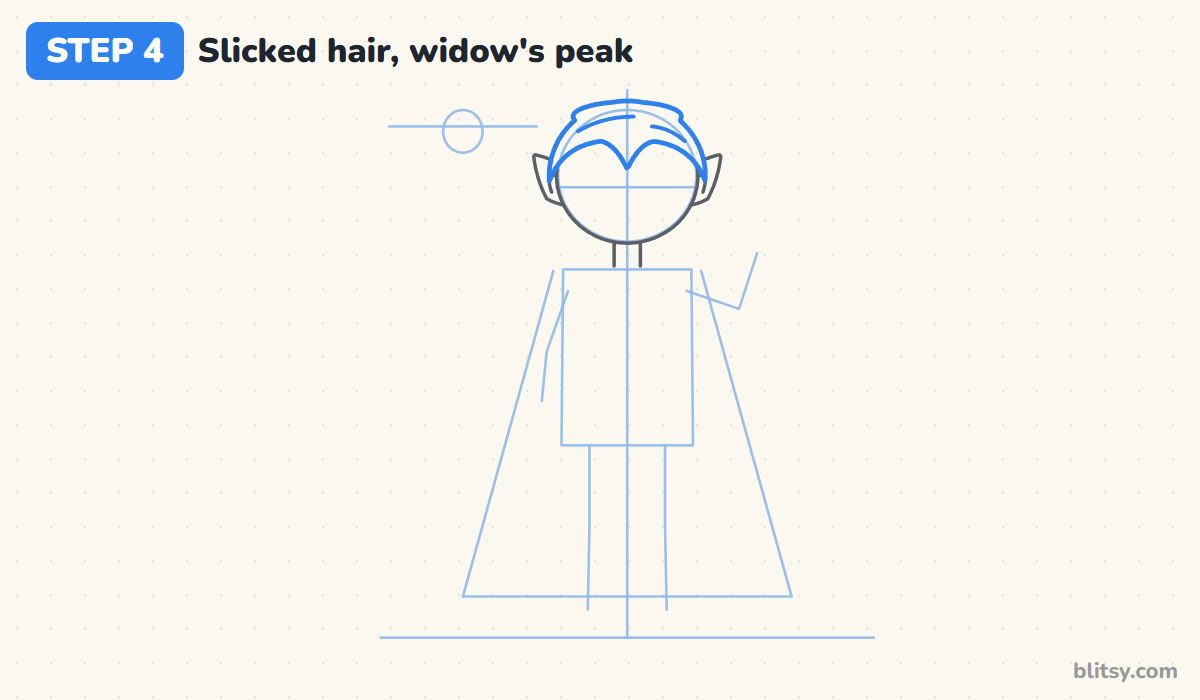
The hair covers the top of the head like a smooth cap. Start at one temple, curve up across the forehead and dip into a sharp V in the middle, then mirror it to the other temple. That V is the widow's peak, and in my opinion it's the most vampire thing on his face. Two long curves inside the hair show it's combed back.
💡 Tip: Draw the V a little below the top of the head. Too high and it gets lost in the hair.
Step 5: Add the tall collar and the long cape
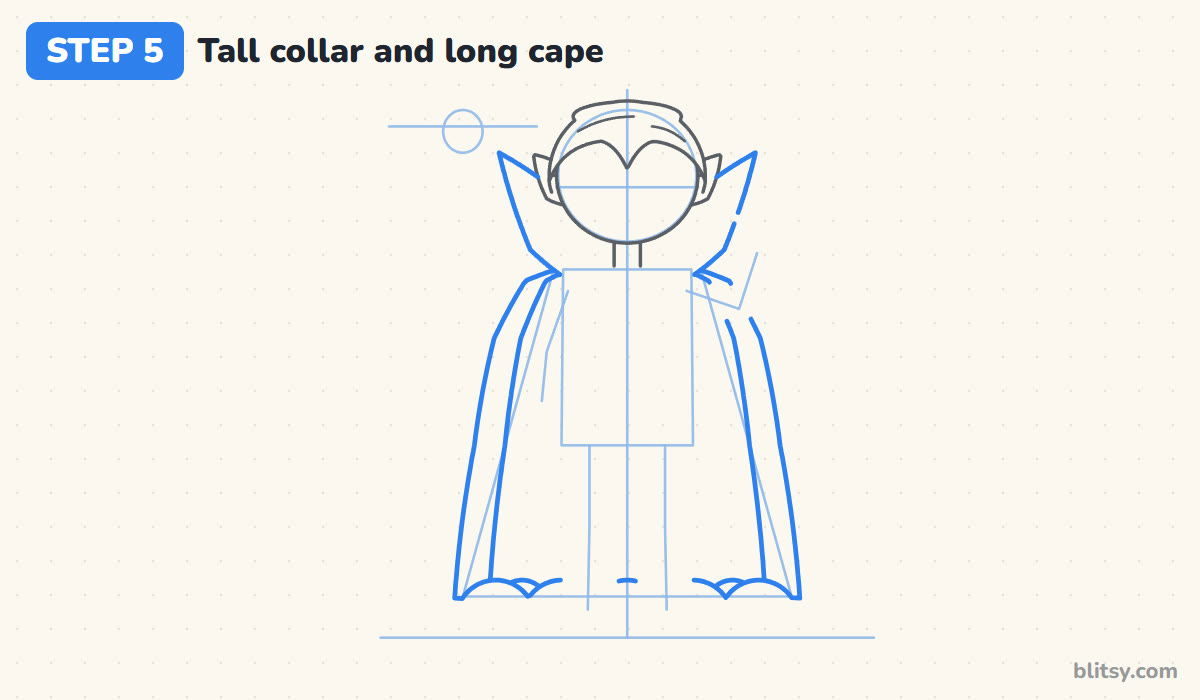
Behind the head, draw the collar as two tall pointed wings standing up from the shoulders, tips about level with the ears. Then follow the cape guide down to the ground on both sides. Instead of a straight bottom, scoop the hem into curved bites so the points look like bat wings. A second line just inside each side edge makes the lining.
💡 Tip: Parts of the hem hide behind the legs later, so a gappy middle is fine for now.
Step 6: Draw the vest and a bow tie
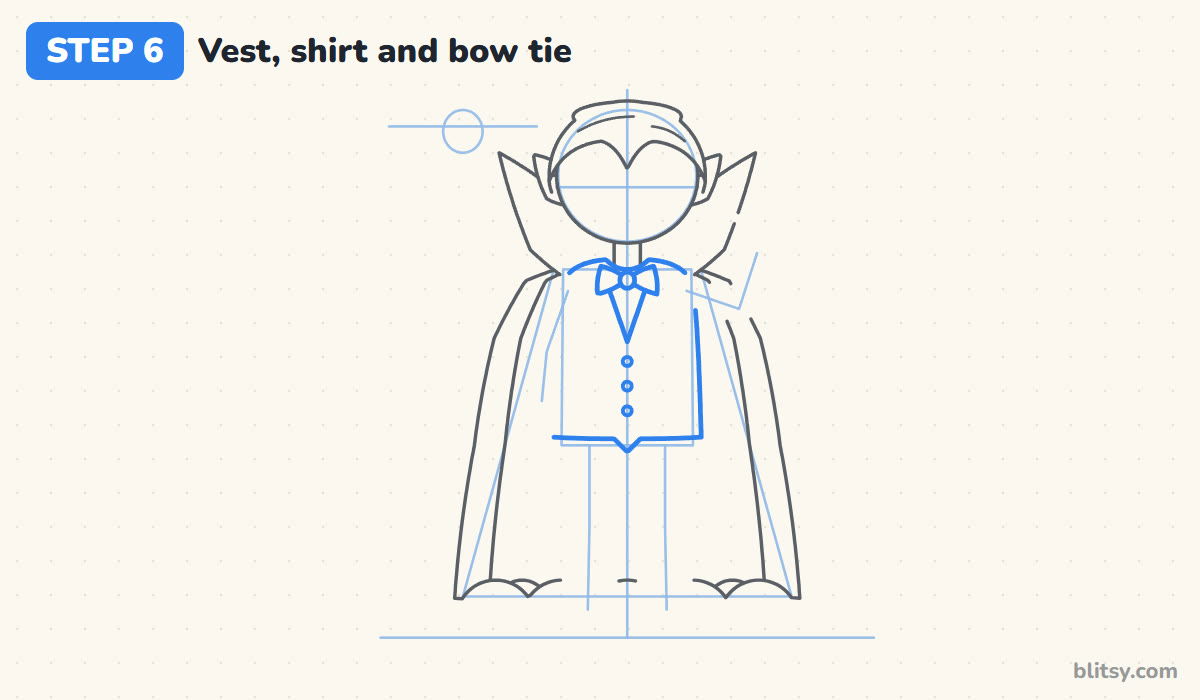
Inside the body box, draw the vest with rounded shoulders and straight sides, with a tiny point at the bottom middle like a real vest. At the top, a narrow V shows the white shirt underneath. Put a bow tie where the neck meets the shirt, two triangles with a small round knot, and add three little buttons down the middle.
💡 Tip: Draw the knot first, then the two bow triangles. That way they come out the same size.
Step 7: Add the arms and a waving hand
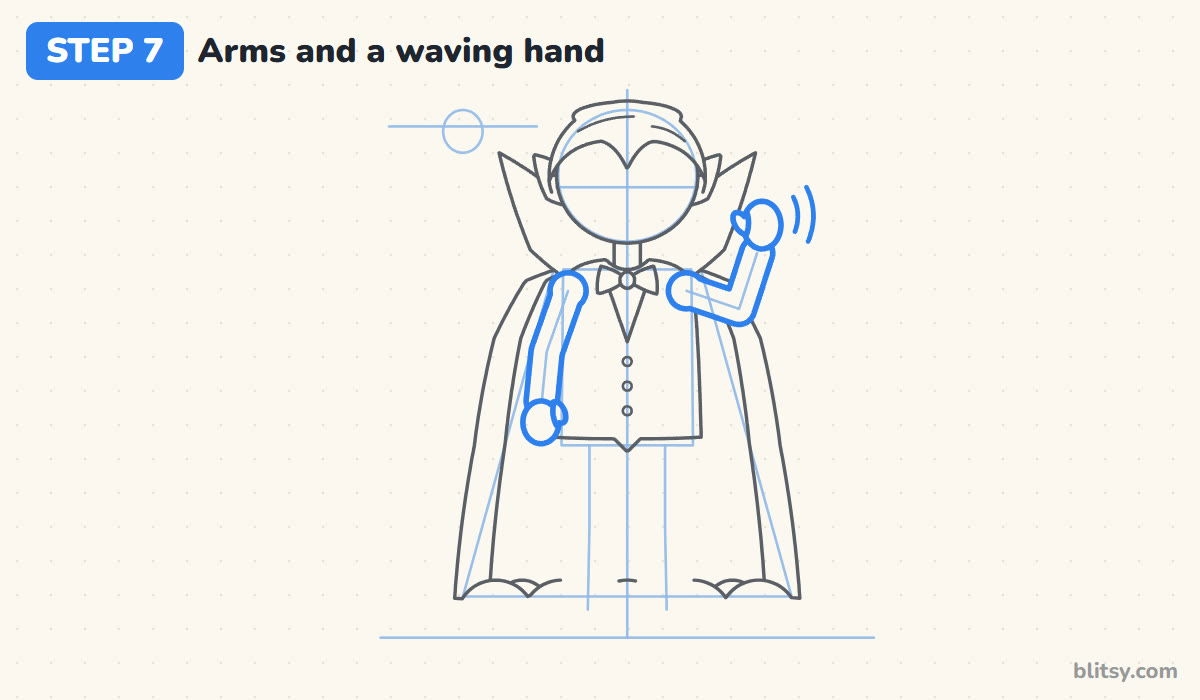
Follow each arm guide with two lines about a thumb's width apart, so the sleeves are soft tubes and not sticks. The left arm hangs down and ends in a round mitten hand with a thumb on the side nearest the body. The right arm bends at the elbow and comes up, with the mitten standing upright. Two curved lines next to it show the wave.
💡 Tip: Mitten hands are fine for this style. Five fingers on a cartoon this simple usually look busy.


Step 8: Draw the pants and shiny shoes
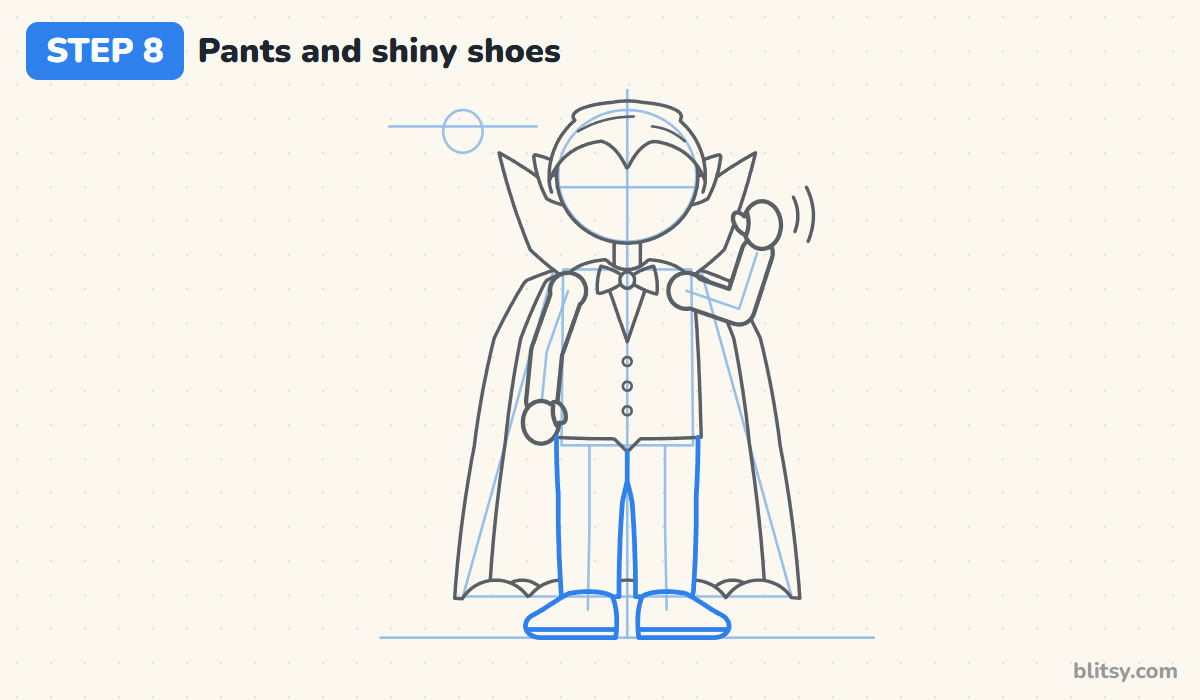
From under the vest, bring the pants straight down the leg guides, leaving a slim gap between the legs. Stop just above the ground line. Each shoe is a rounded bump with a flat bottom, toe pointing a little outward, and a line across the bottom makes the sole.
💡 Tip: Rest both shoes right on the ground line, or he'll look like he's floating.
Step 9: Give him a happy face and tiny fangs
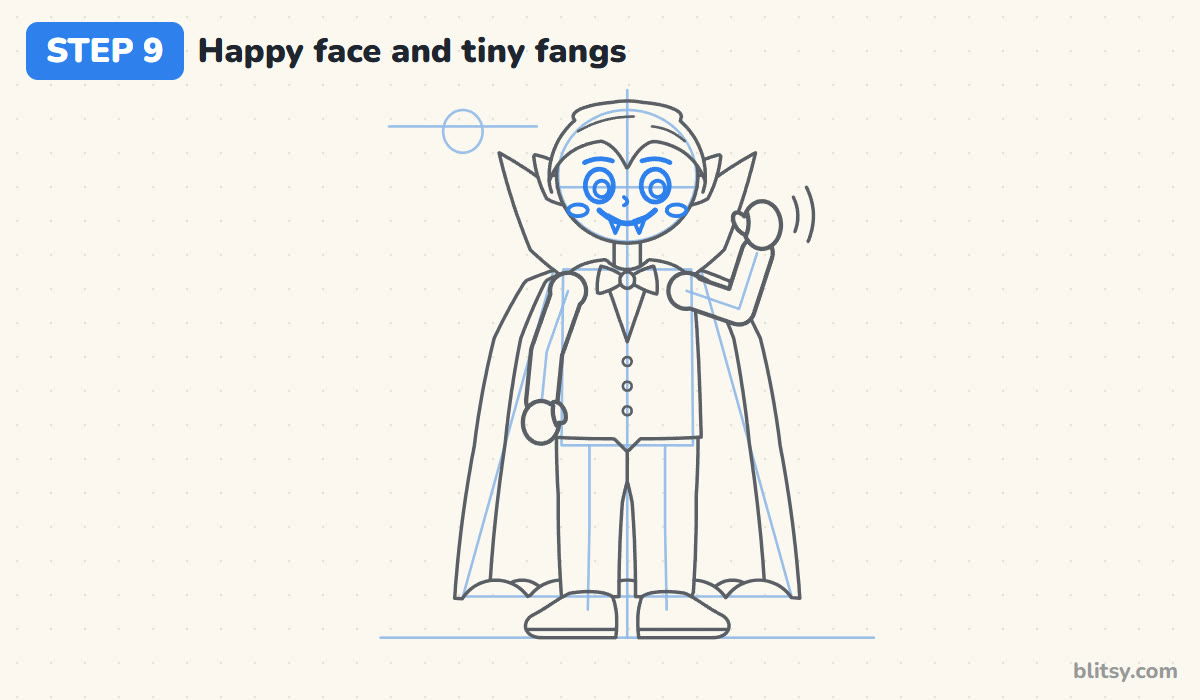
Draw two round eyes on the eye line, each with a big dark pupil and a small white dot in the same top corner. Brows that lift in the middle keep him cheerful. Add a little nose, then a wide smile. Right under the smile, near the middle, hang two small pointed fangs. Pink ovals on the cheeks finish the face.
💡 Tip: Keep the fangs short and white. Long fangs are what make a vampire scary, and we don't want that here.
Step 10: Draw a tiny bat friend
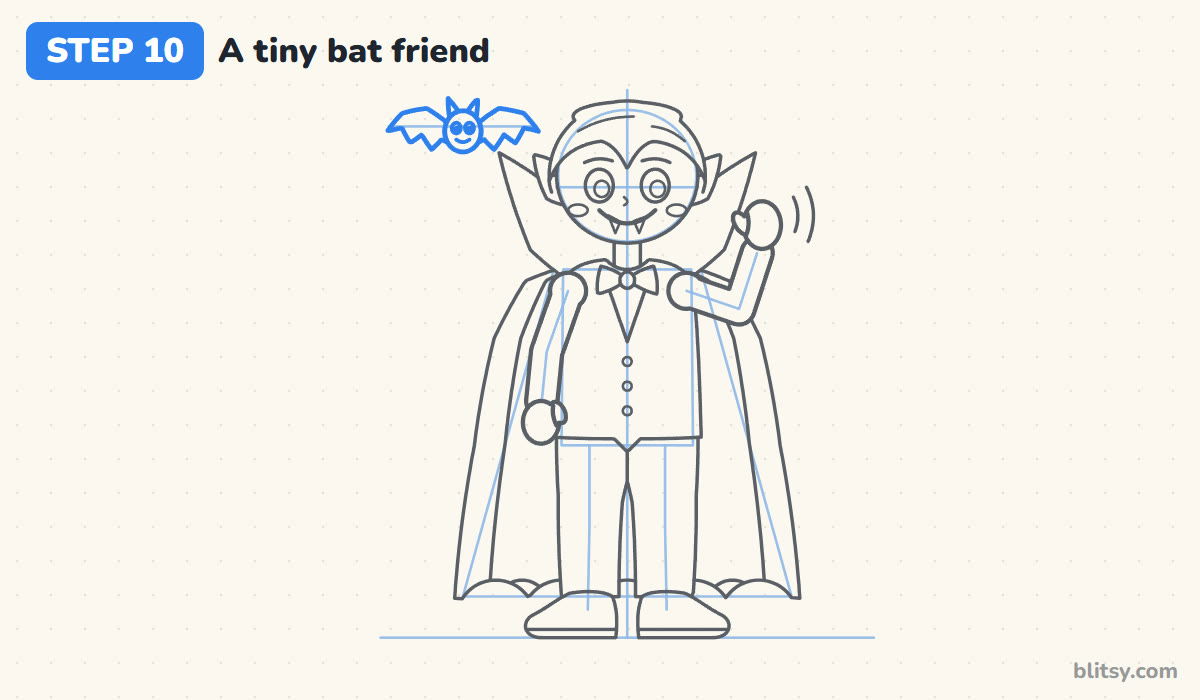
Turn the small circle on the left into a round bat body with two pointy ears. Each wing is a stretched shape with a scalloped bottom edge, like a little umbrella turned sideways. Give the bat round eyes and a tiny smile, and keep it small so it doesn't steal the show.
💡 Tip: Younger kids can skip the bat entirely. The vampire looks finished on his own.
Step 11: Ink the outline and erase the guides
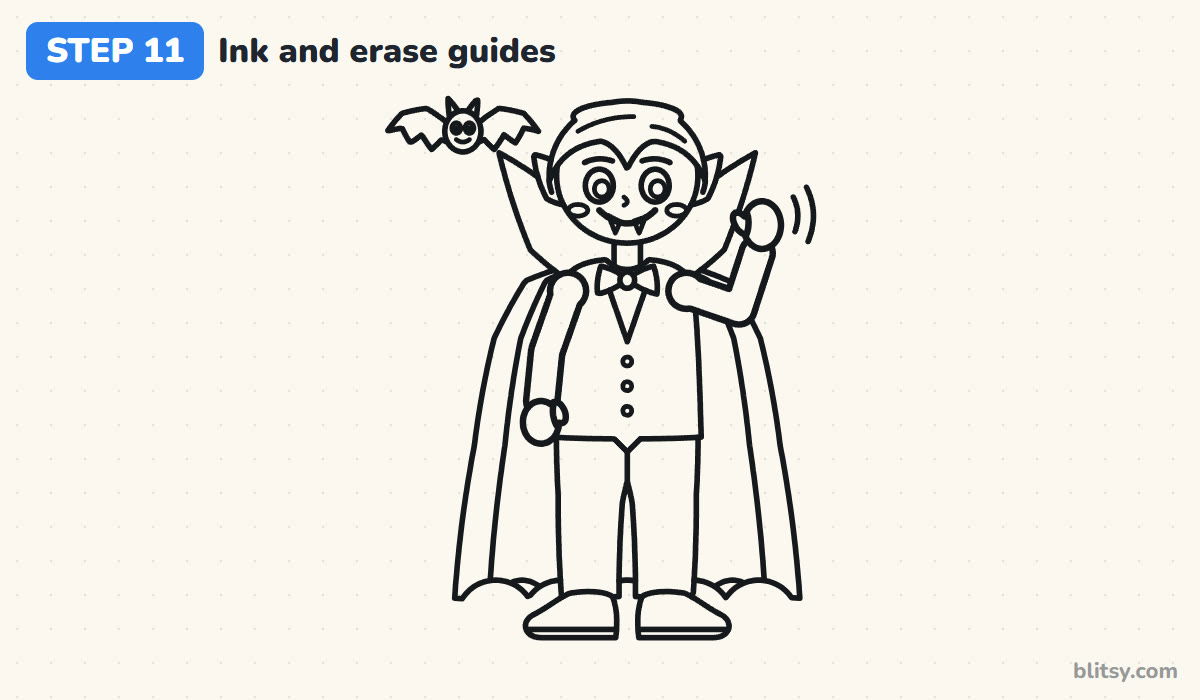
Trace all the keeper lines with a black marker. I do the face first while my hand is steady, then the collar and cape, and the legs last. Leave out the center line, the box and the triangle. When the ink is completely dry, erase every pencil mark you can see.
💡 Tip: Give the ink a full minute before you erase. Wet marker smears into gray streaks.
Step 12: Color your vampire
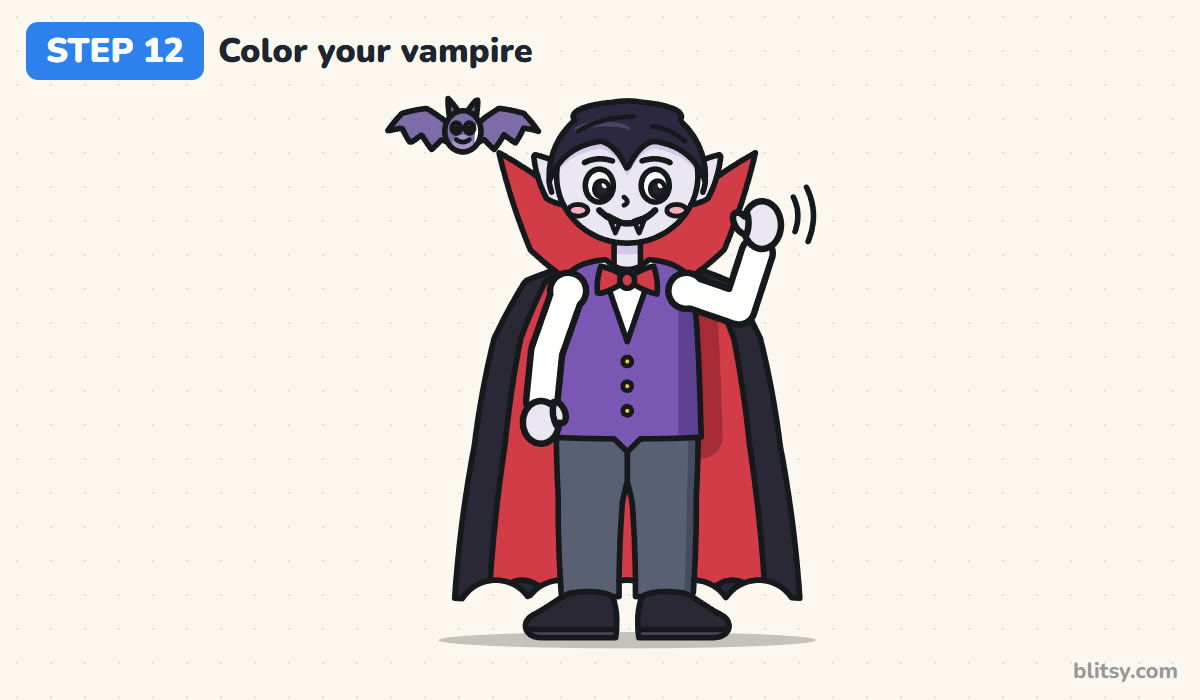
Use pale lavender for all the skin: face, ears, neck, hands. Black goes on the hair, the outside of the cape and the shoes. Use red for the collar, the lining and the bow tie. The vest is purple with yellow buttons, the pants gray, and the shirt and sleeves stay white. Give the bat a soft purple.
💡 Tip: Color the black parts last. Black smudges easily onto everything else if you go early.
Where Cartoon Vampires Turn Spooky by Accident
- Fangs that are too long. Big fangs change the whole mood. Keep them shorter than the gap between the eyes.
- A collar that's too short. If the points don't reach the ears, the cape just looks like a cloak. Let the collar stand tall.
- Angry eyebrows. Brows that slant down toward the nose look mean. Curve them up in the middle for a friendly face.
- A flat hairline. Without the V in the middle, he loses his vampire look. Draw the widow's peak clearly.
- Stick arms. Thin single lines make the figure look unfinished. Give the arms real width and round mitten hands.
Dressing Your Vampire a Different Way
Swap the purple vest for green or blue, or hang a gold medallion on a ribbon around his neck. You can also turn him into a vampire girl with a ponytail and the same cape. For a full Halloween scene, he pairs nicely with this witch drawing tutorial, where the witch flies her broom past the moon. Add a glowing pumpkin by his feet with the jack-o'-lantern drawing step by step lesson, or a floaty friend from the ghost drawing tutorial.
Free Vampire Coloring Page and Printable Step Guide
The free vampire coloring page has a finished, colored vampire at the top to copy from, a little color key, and a large outline below for coloring. The step-by-step PDF guide puts all 12 steps with pictures and tips on paper, so kids can draw without a screen. Both print well on Letter or A4.
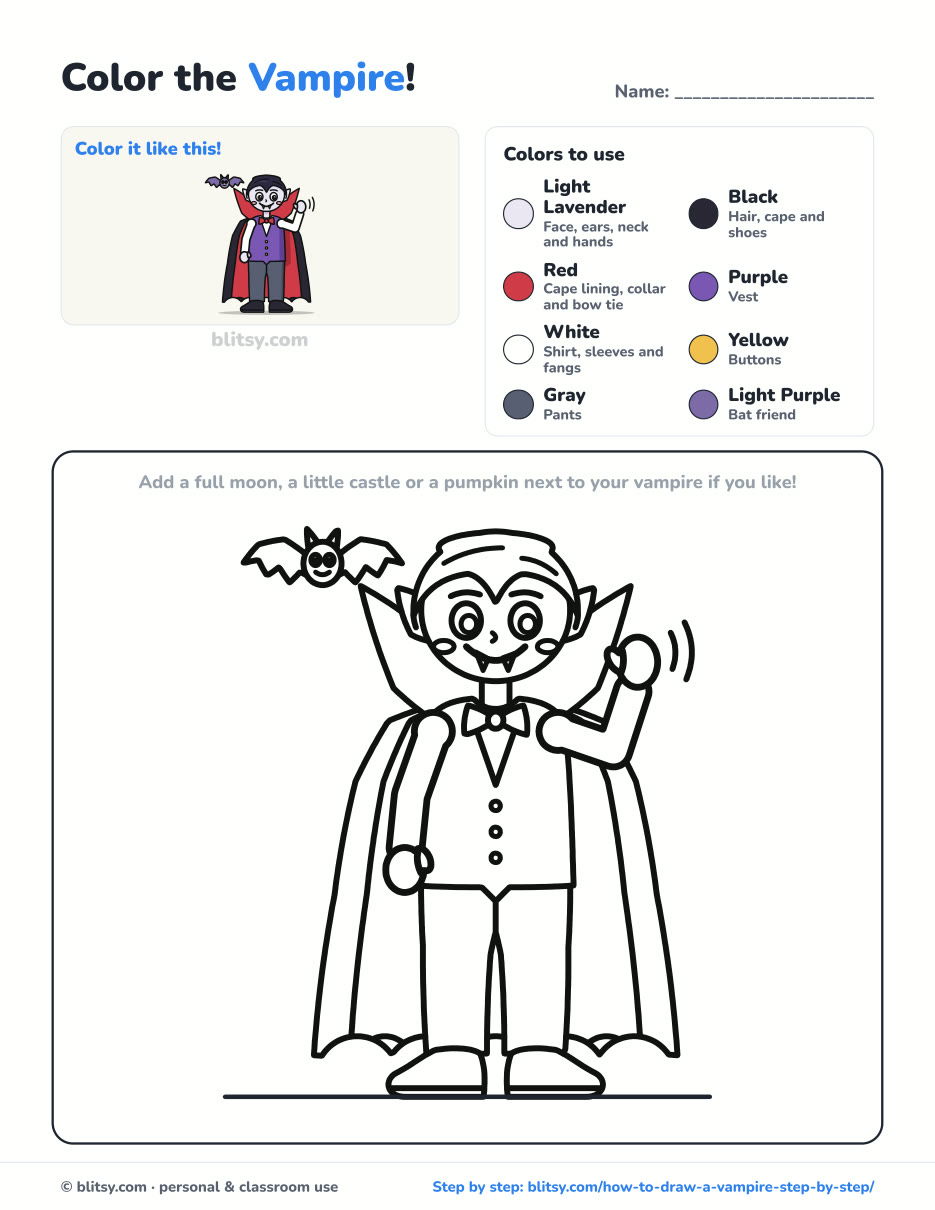
Black outlines with a colored example and the color names at the top. Ready to print and color.
⬇️ Download Coloring PageEvery step picture with its instructions and tips, to keep beside your paper while you draw.
⬇️ Download Drawing Guide📱 On a phone? Tap a download button, then open the file and choose Share → Save to Files or Print. On a computer, the PDF opens or saves straight to your Downloads folder.
Keep the Vampire Steps on Pinterest
More Halloween Characters to Draw Next
Each link is a full step-by-step lesson with a picture for every stage.
- Witch Drawing: A cheerful witch rides her broom past a full moon with her black cat in this witch drawing tutorial.
- Ghost Drawing: A friendly floating ghost waves hello beside a baby ghost in this ghost drawing step by step lesson.
- Jack-o'-Lantern Drawing: Build a grinning carved pumpkin from overlapping ovals with this jack-o'-lantern drawing tutorial.
- Skeleton Drawing: Build a goofy cartoon skeleton bone by bone in this skeleton drawing step by step guide.
- Halloween Drawing: Draw a friendly haunted house under a full moon with bats overhead in this Halloween drawing tutorial.
Vampire Drawing Questions Kids Often Ask
How do you draw a vampire for kids that isn't scary?
Give him a big round head, round eyes, a wide smile and only two short fangs. Bright colors like purple and red, plus a little bat friend, keep the mood fun.
What makes a drawing look like a vampire?
The tall pointed collar, a black cape with red lining, a V-shaped widow's peak and two small fangs. Draw those and anyone will know who he is.
How long does it take to draw a vampire?
About 35 to 45 minutes with coloring. The cape and the coloring take the longest.
What colors should a vampire be?
Most cartoon vampires use black for the cape and hair, red for the lining and collar, and a pale skin color. The vest and bow tie can be any color you like.
Your vampire is ready to wave at you from a blank page, so sharpen that pencil and start with the head circle. 🧛🦇
Related posts:
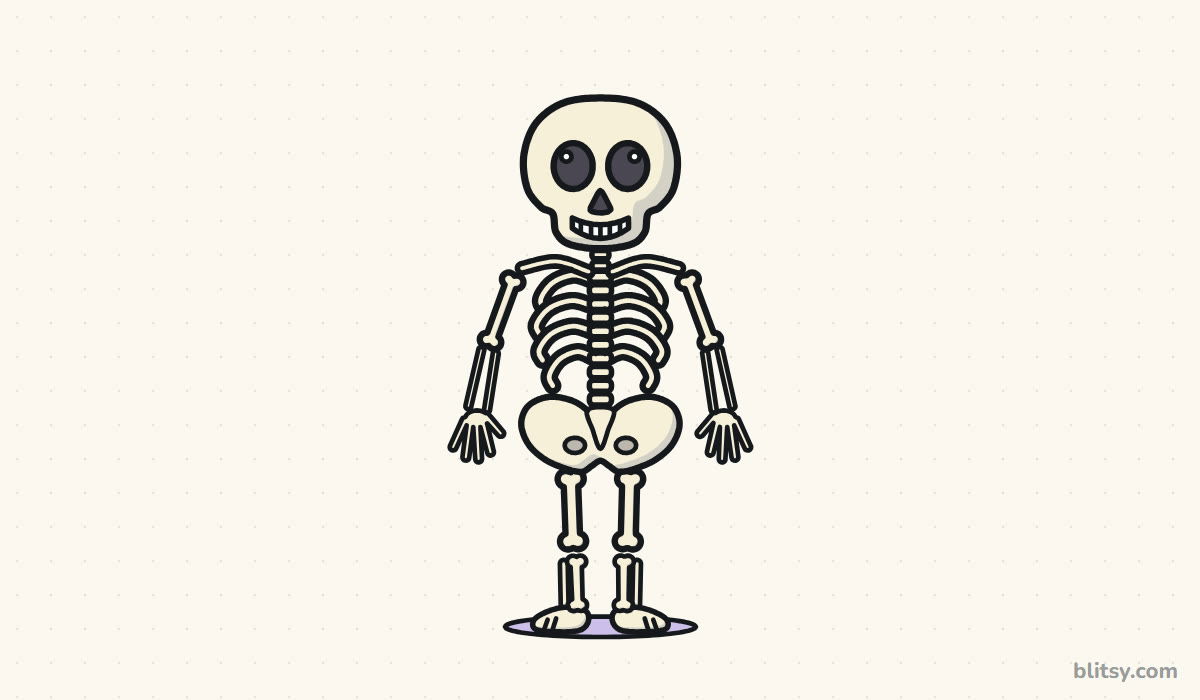 How to Draw a Skeleton Step by Step (Easy and Friendly)
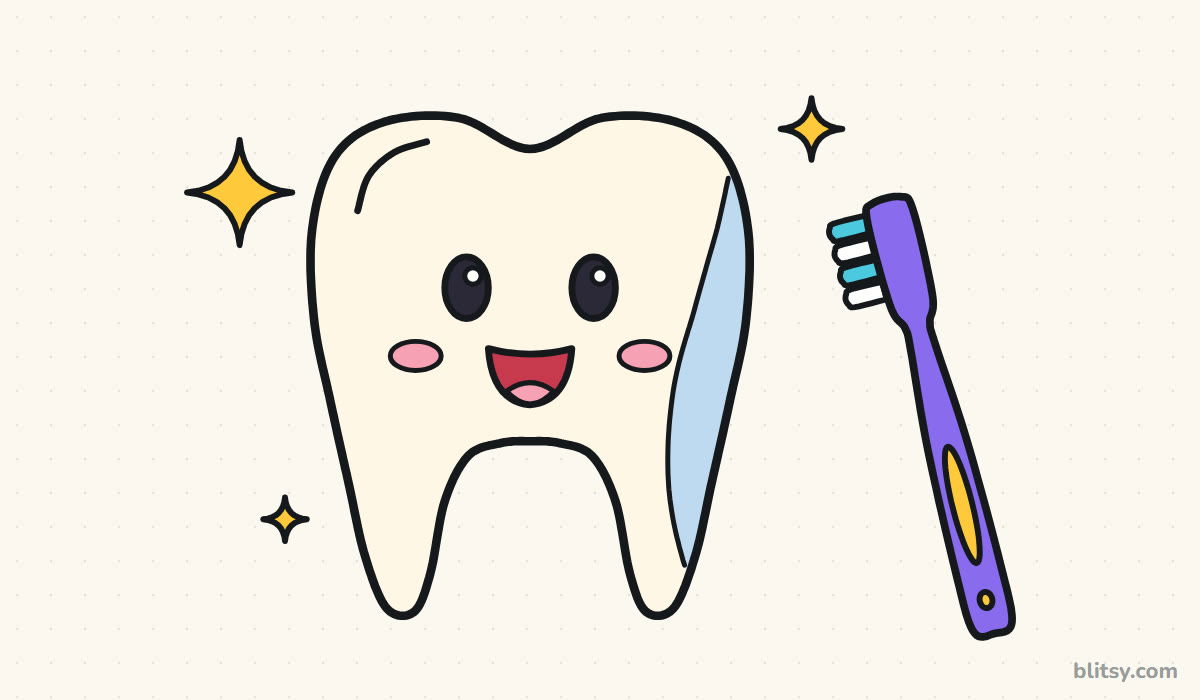 How to Draw a Tooth Step by Step (Cute and Easy for Kids)
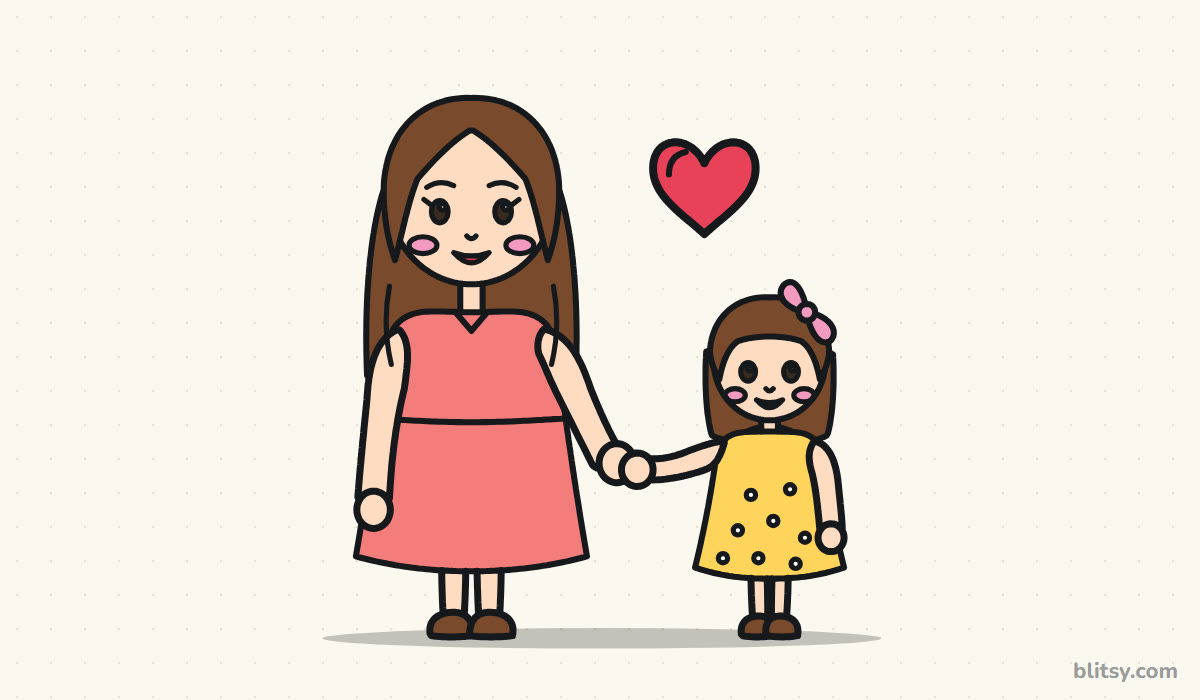 How to Draw a Mother and Daughter Step by Step (Easy for Kids)
 How to Draw Wonder Woman Step by Step (Chibi for Kids)
 How to Draw the Hulk Step by Step (Easy Chibi for Kids)
 How to Draw Iron Man Step by Step (Easy Chibi for Kids)
 How to Draw a Police Car Step by Step (Easy for Kids)
 How to Draw a Mermaid Step by Step (Easy Cartoon for Kids)
 How to Draw a Boat Step by Step (Easy Sailboat for Kids)
 How to Draw a Care Bear Step by Step (Cute Fan Art for Kids)
 How to Draw Hello Kitty Step by Step (Easy for Kids)
 How to Draw a Valentine Step by Step (Easy Card Set for Kids)

