
Sea otters spend a lot of their day lying on their backs in the water, using their own belly as a table. That relaxed pose is also the easiest one to draw. In this lesson I'll show you how to draw an otter step by step: a round head with a pale face, a long floating body, two webbed feet poking up out of the waves and a little shell held in its paws. You only need a circle, an oval and some patience with the whiskers.
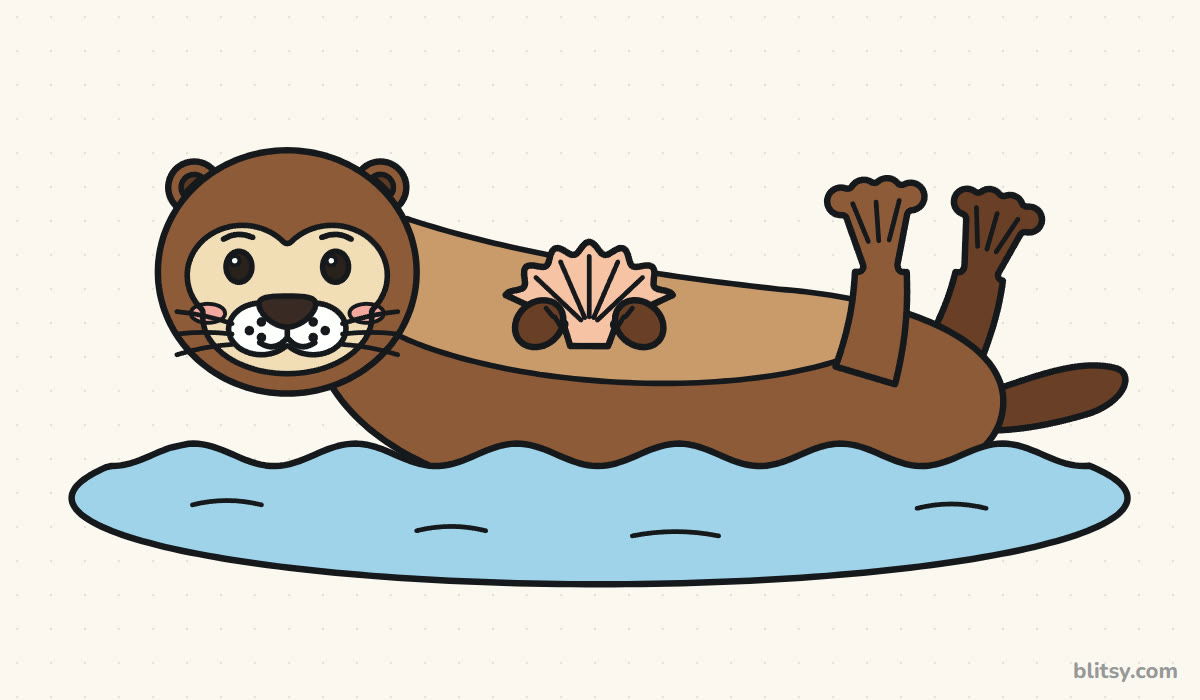
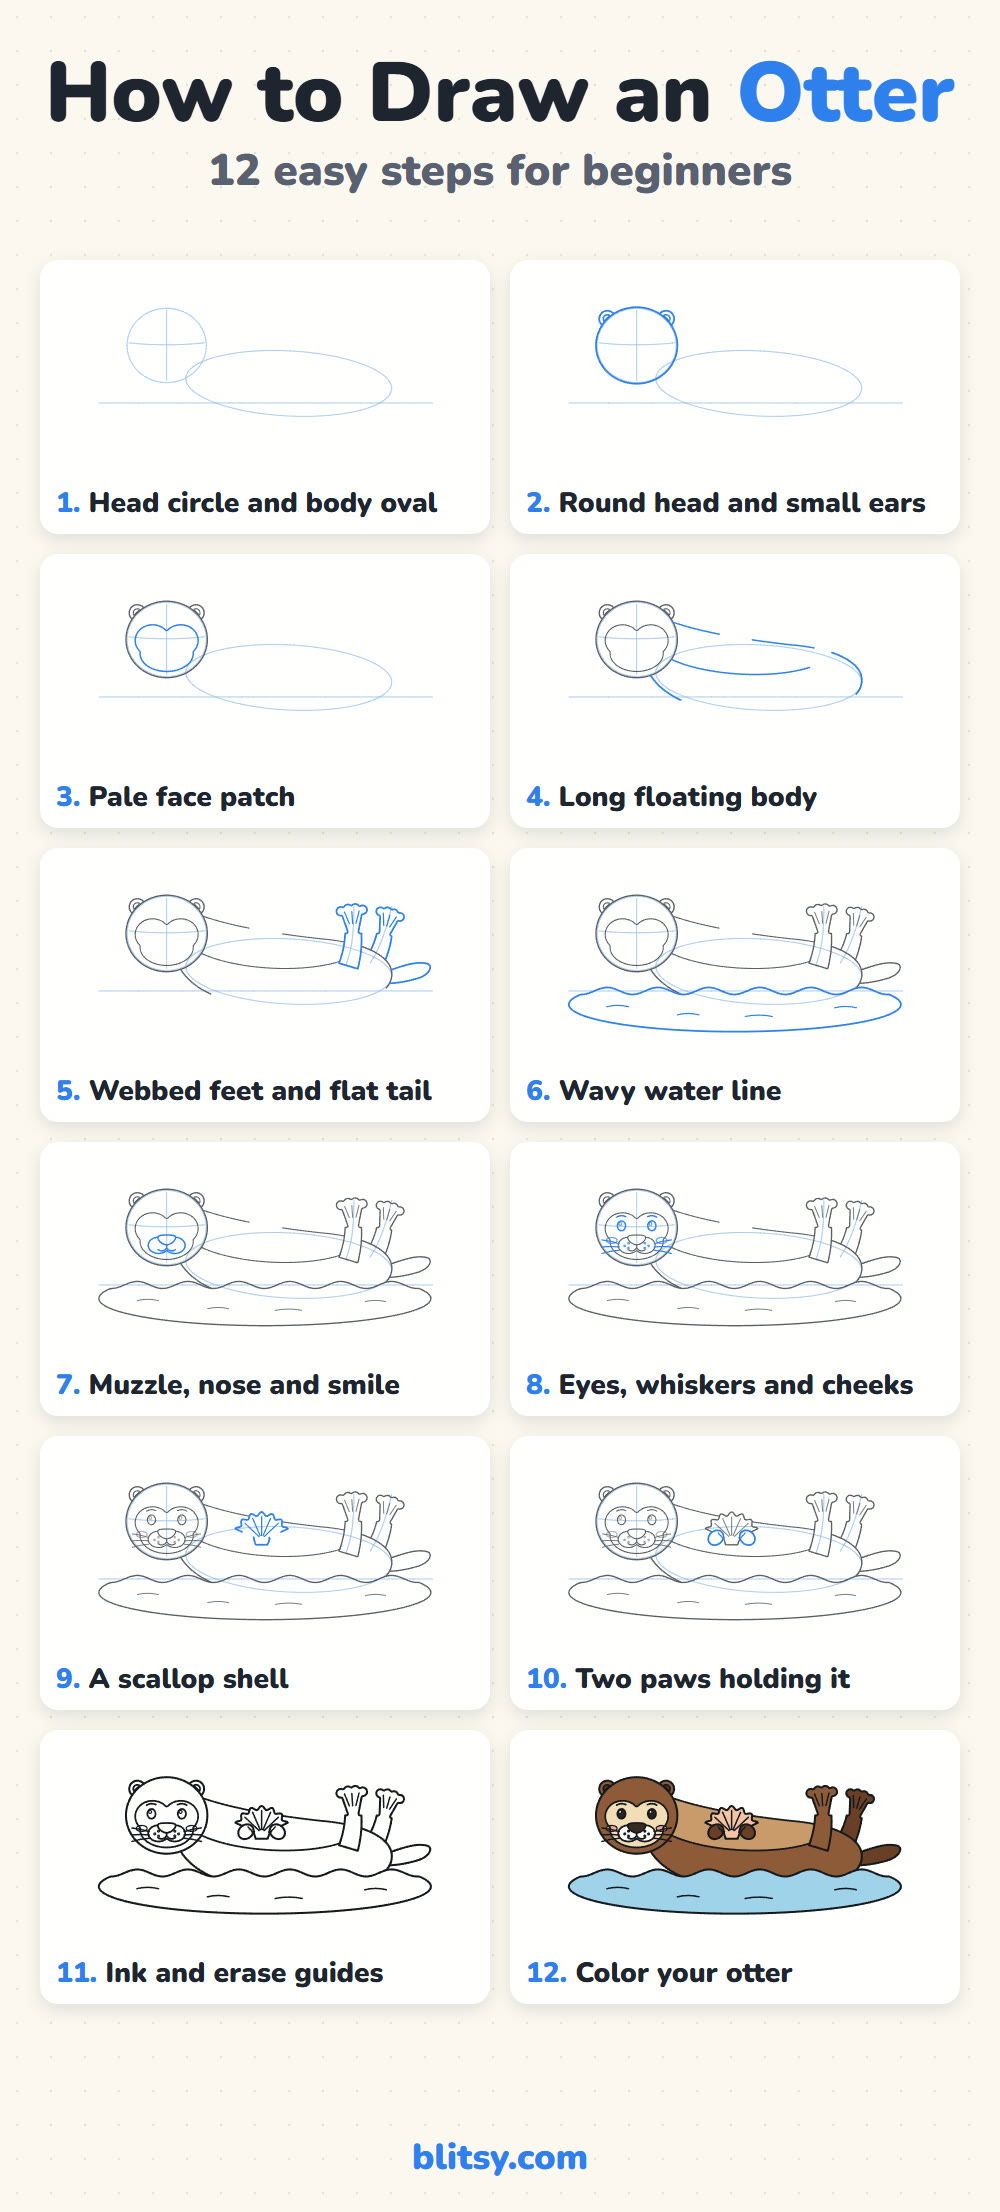
Watch for the bright blue lines in each picture: that is all you add in that step. Gray lines were drawn earlier, and the pale blue circles are soft guides that get erased near the end.
Quick overview
⏱️ Time: about 30 to 40 minutes, coloring included
🎯 Level: easy, fine for kids from about 6 up
✏️ Steps: 12
🦦 You'll draw: a sea otter floating on its back, holding a shell
Things to Grab Before Your Otter Goes Swimming
- A regular pencil (HB works well for light lines)
- A soft eraser that won't smudge
- A black fineliner or thin marker for the final outline
- Colored pencils or crayons: brown, dark brown, light brown, cream, peach, light blue and black
- Plain paper, turned sideways
The otter lies across the page from the head on the left to the tail on the right, so landscape paper gives it room to stretch out.
How to Draw an Otter Step by Step
Step 1: Sketch a head circle, a body oval and a water line
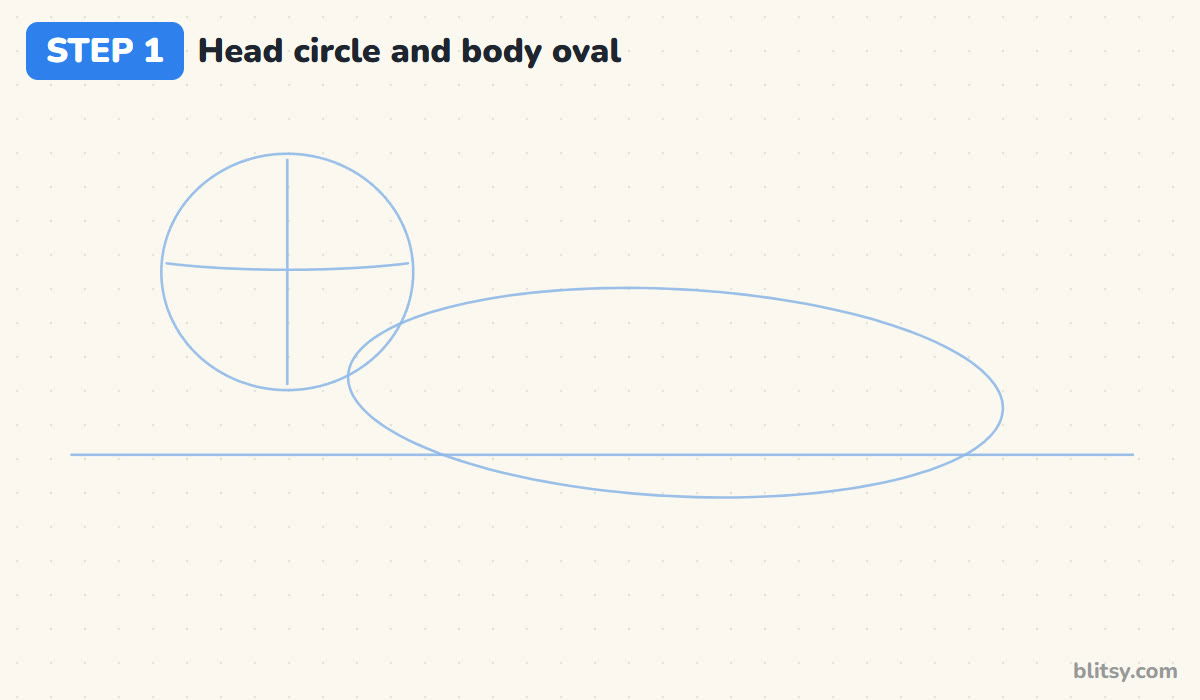
On the left side of the page, draw a circle for the head with a cross through it. Then draw a long, flat oval to its right, stretching most of the way across the paper. Under both, add one straight line. That's where the water will be.
💡 Tip: The oval should be about two and a half times as long as the circle is wide. A short oval turns the otter into a hamster.
Step 2: Draw the round head and two small ears
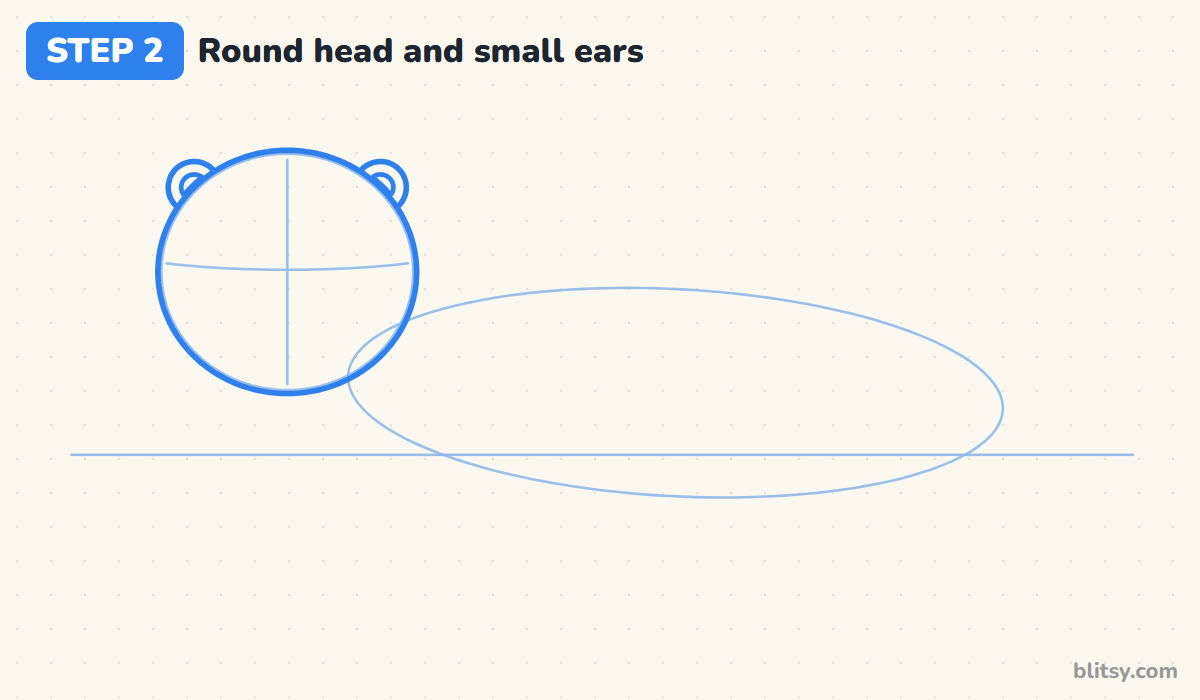
Go over the head circle with a firm line. Near the top, on the left and right, add two small round ears with a smaller circle inside each. Otter ears are tiny, so keep them about the size of a coin compared with the head.
💡 Tip: I place the ears a little out to the sides rather than straight up. Ears on top make it look like a bear.
Step 3: Add the pale face patch
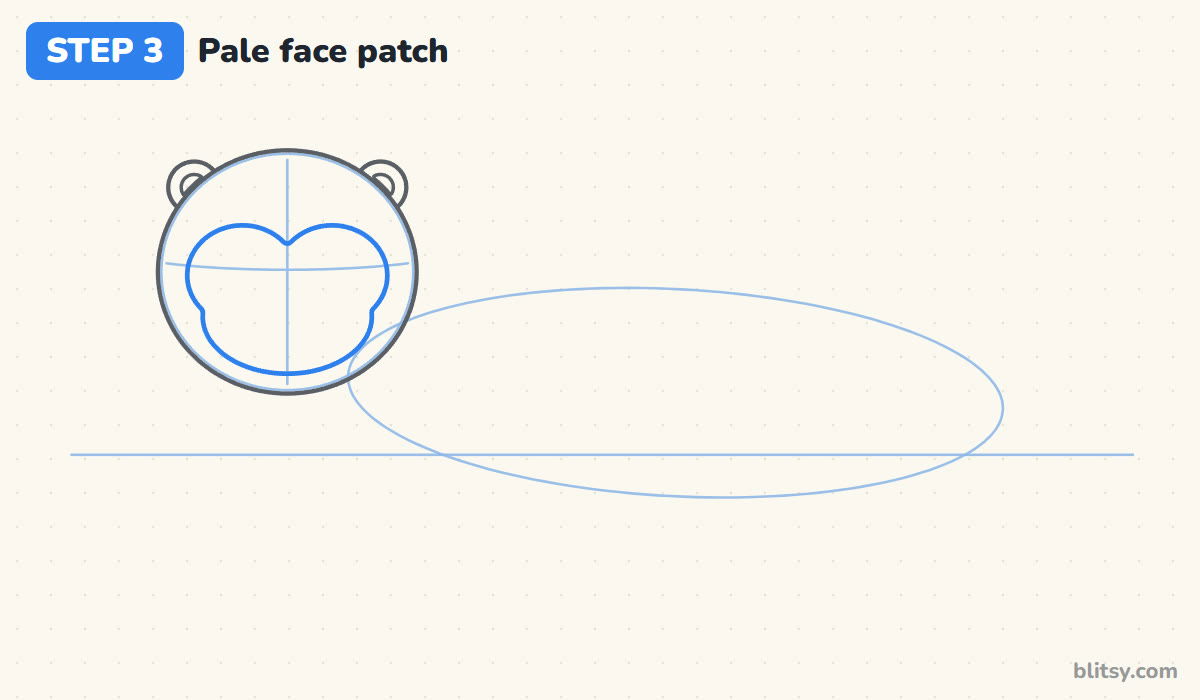
Inside the head, draw a wide rounded shape that covers the eyes and the mouth area. The top dips down in the middle a bit like a heart, and the bottom is a big soft curve. This lighter patch is what makes the face look like a sea otter.
💡 Tip: Leave a band of the head showing all around the patch, about a finger wide.




Step 4: Outline the long floating body
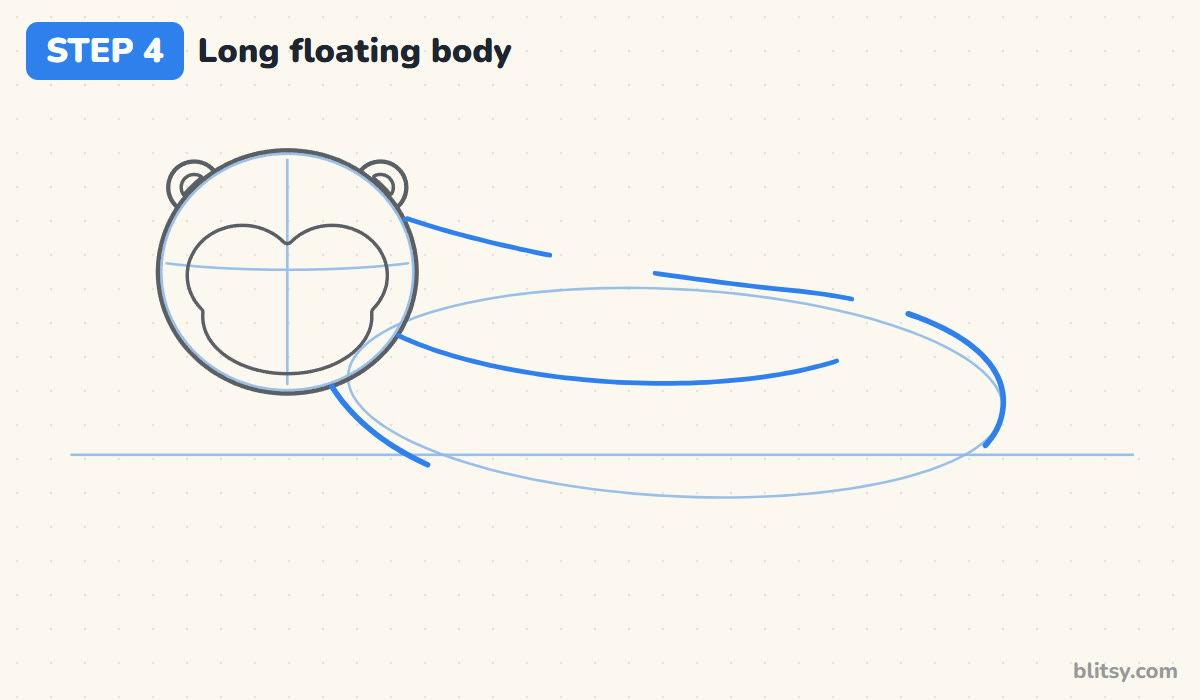
From behind the head, draw the back line along the top of the oval and round it off at the right end like a hip. Then add a second line inside, parallel to the top, for the lighter belly. Don't draw the bottom of the body, because the water will cover it. One less line, one less thing to fix.
💡 Tip: Let the body tuck in behind the head. If the line crosses the face, the head will look stuck on.
Step 5: Add the webbed feet and a flat tail
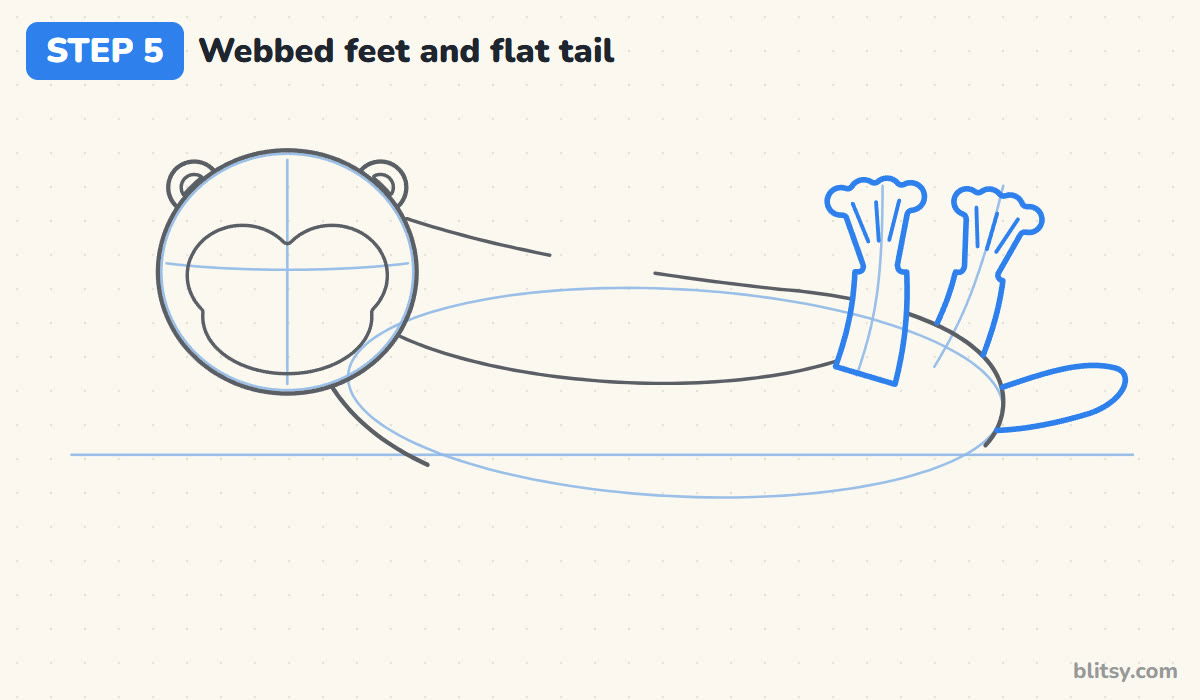
Near the right end, I draw two short, chunky legs pointing up. Each one ends in a wide foot with four rounded toes and a few lines between them for the webbing. The back foot tips slightly to the right and peeks out behind the front one. At the very end of the body, add a flat, rounded tail lying on the water.
💡 Tip: Make the feet wider than the legs. Big flippy feet are the giveaway that this animal swims.
Step 6: Draw the wavy water
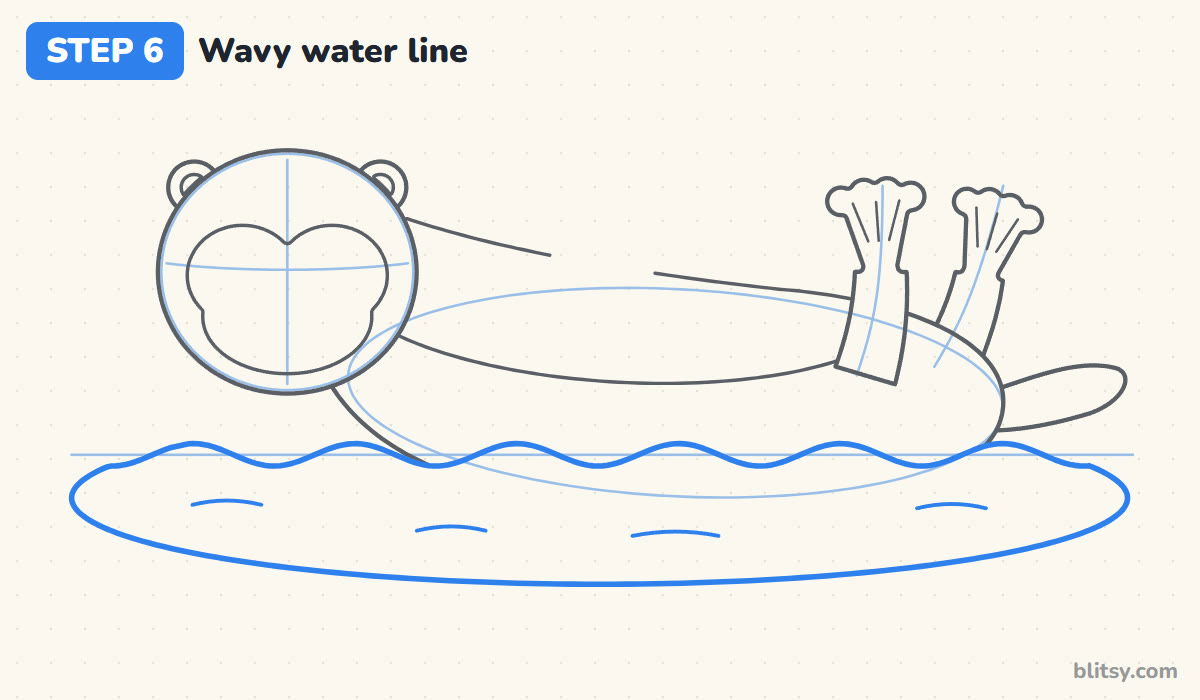
Trace over the water guide with a wavy line, little hills and dips all the way across, so it overlaps the bottom of the body. Join its two ends with a long rounded curve underneath to make a pool shape. A few short curved strokes inside the water look like ripples.
💡 Tip: My rule is waves about the same size. A row of even bumps reads as calm water.
Step 7: Draw the muzzle, nose and smile
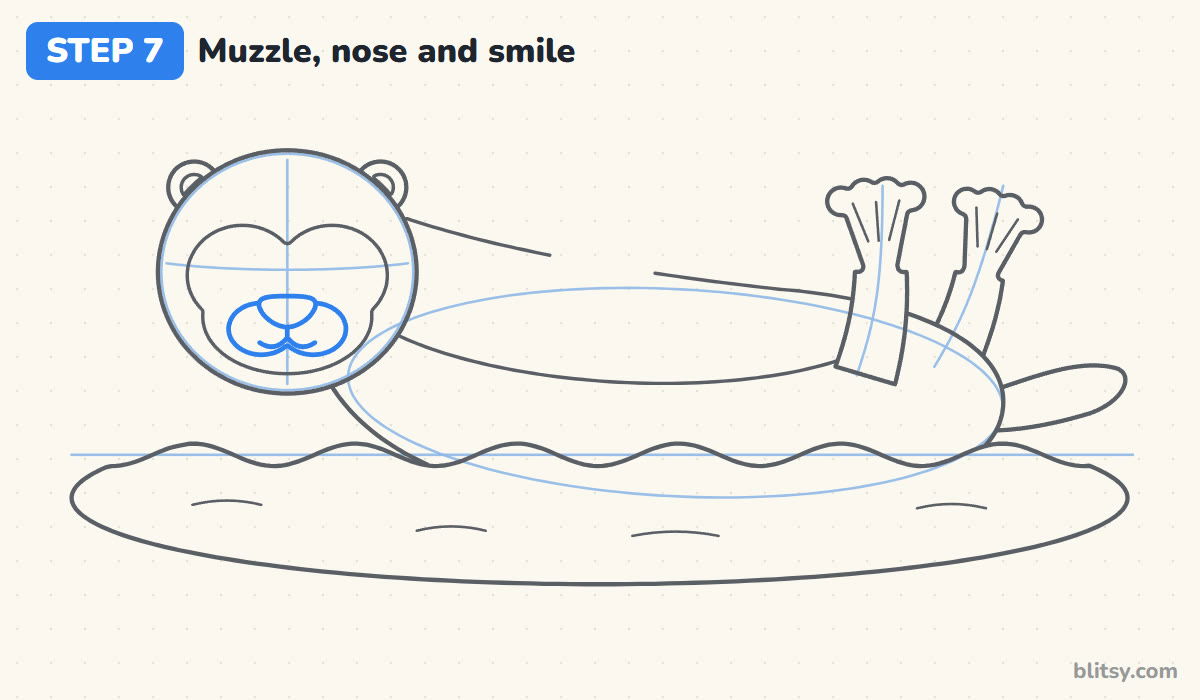
Low in the face patch, draw two puffy cheek bumps side by side. On top of them, right in the center, put a big rounded nose that's wider at the top. Under the nose, a tiny line drops down and splits into two curves for a happy little mouth.
💡 Tip: When I teach this, kids always want a tiny nose. Keep it big, because that's part of the otter look.


Step 8: Add eyes, whiskers and rosy cheeks
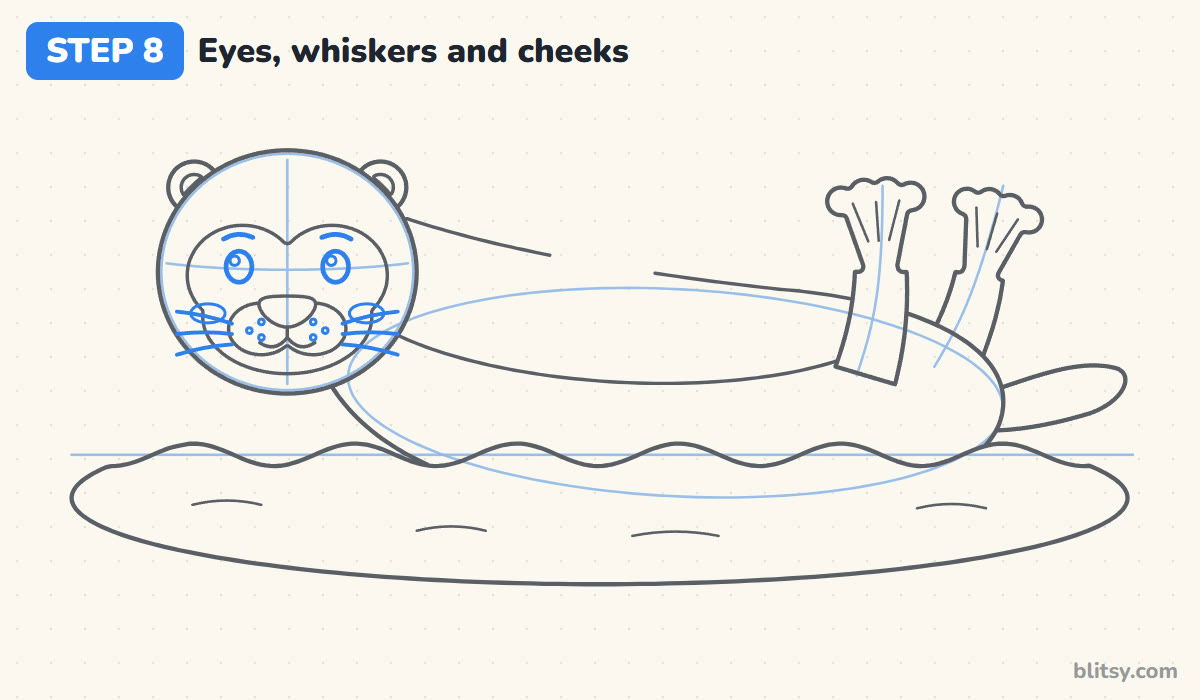
Put two oval eyes on the cross line, a nose width or more apart, each with a small shine circle in the upper left. Short curved brows sit above them. On the cheeks, dot in three whisker spots on each side, then draw three long whiskers that fan outward past the face. Small ovals under the eyes become pink cheeks.
💡 Tip: Draw whiskers with one quick flick of the wrist. Slow whiskers come out wobbly.
Step 9: Draw a scallop shell on the belly
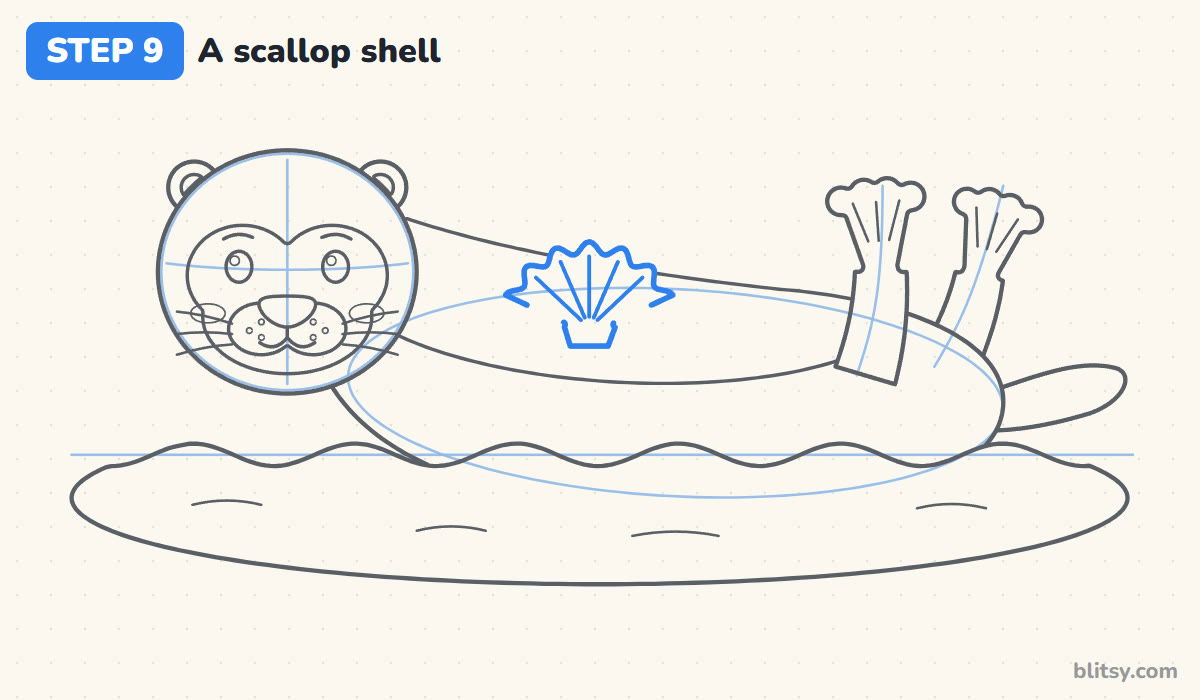
In the middle of the belly, draw a fan shape with a bumpy top edge, like a little open fan. At its bottom point, add a small square hinge. Then draw a few straight lines from the hinge out to the edge for the ridges.
💡 Tip: Sea otters often float with a shell or a rock like this, so either one works if you want to swap it.
Step 10: Add two paws holding the shell
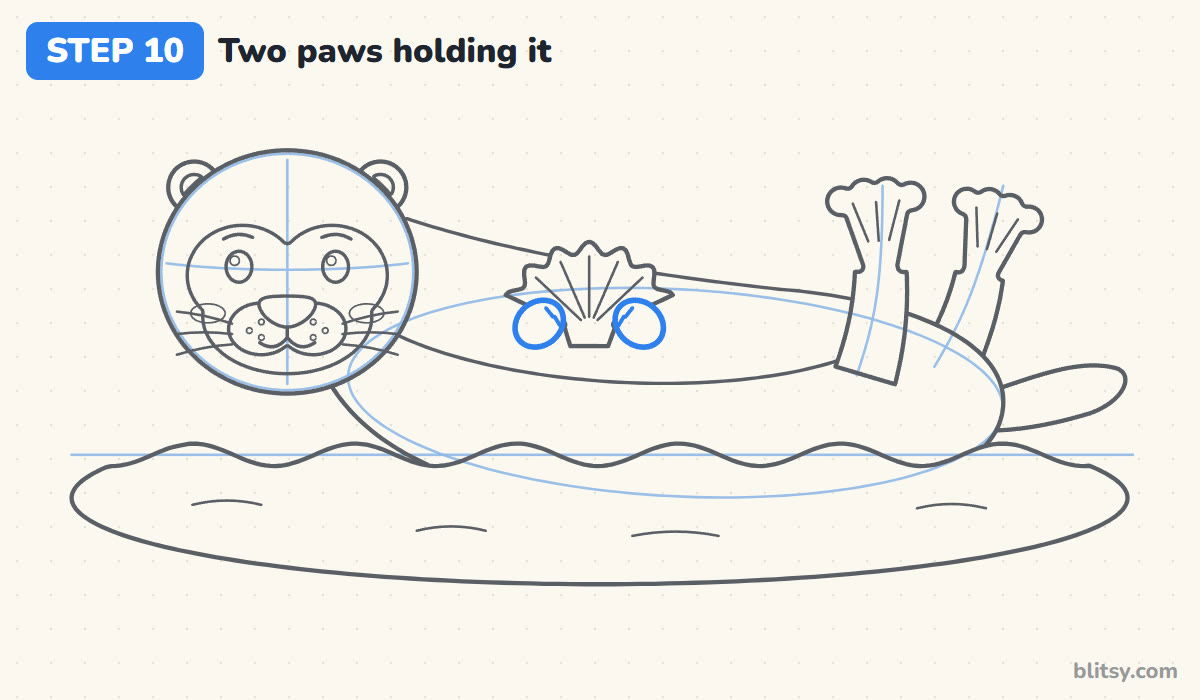
On each lower side of the shell, draw a small round paw tilted toward the middle, so the two look like they're gripping it. A couple of short lines on each paw show the fingers. Erase the parts of the shell the paws cover.
💡 Tip: I keep the paws small. Otters have short front legs, and big hands would steal attention from the face.
Step 11: Ink the otter and erase the guides
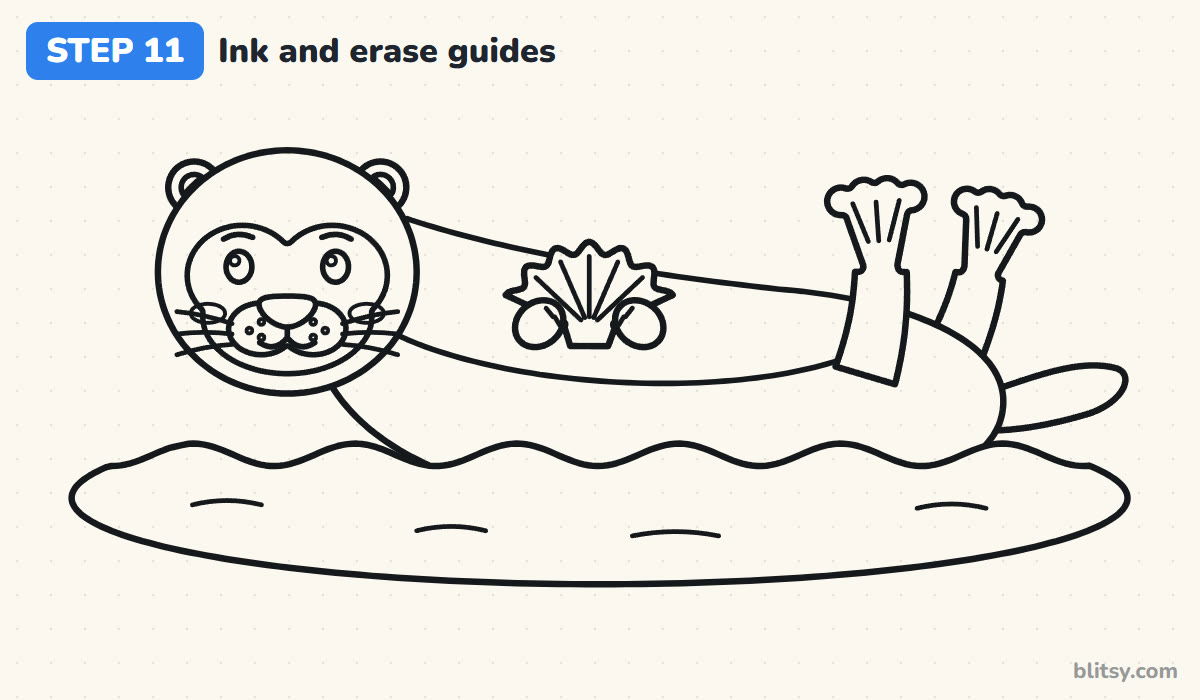
Go over every keeper line with the fineliner. I start with the face while my hand is steady, then the body, the feet and the water. Wait until the ink is fully dry before you erase all the pencil guides, otherwise it smears.
💡 Tip: Ink the whiskers last, with a light touch, so they stay thinner than the outline.


Step 12: Color your otter
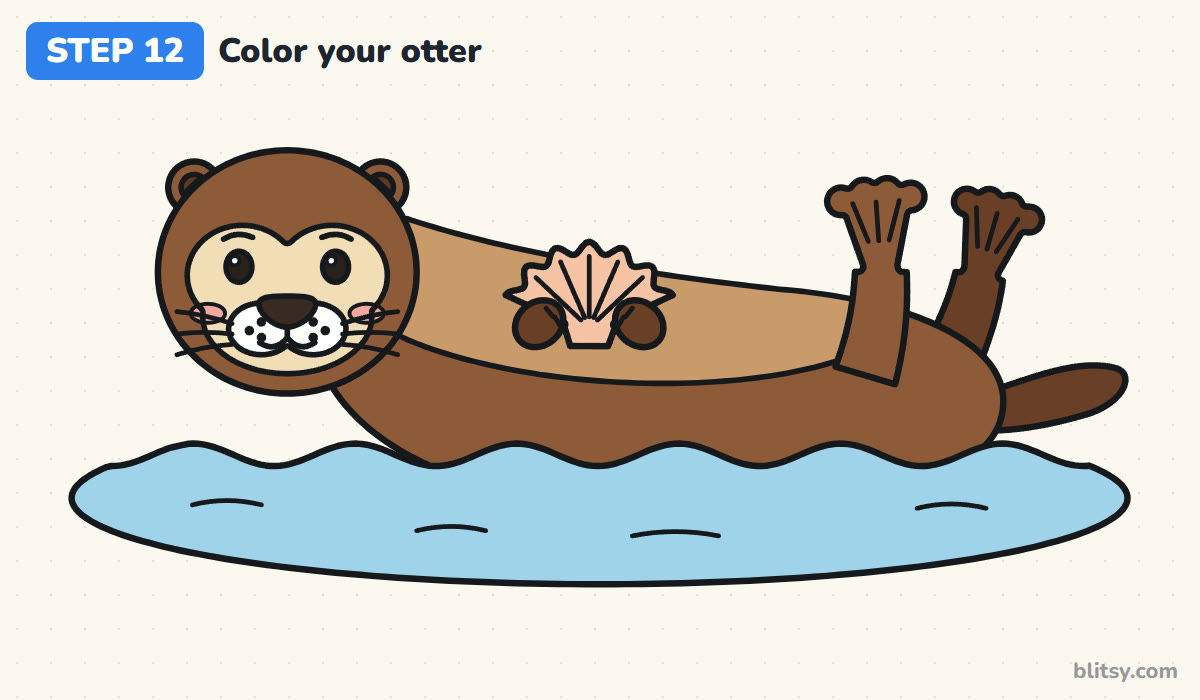
Brown goes on the head, the ears, the body and the front leg. The back leg, the tail and the paws get dark brown, which helps them sit behind or on top of the body. Use light brown on the belly, cream on the face patch and peach on the shell. Fill the eyes and nose dark, leave the muzzle white, add pink cheeks and color the water light blue.
💡 Tip: Press harder with the brown near the edges of the body and lighter in the middle. It gives the fur a soft, rounded look.
Where Otter Sketches Tend to Sink
- A body that's too short. Otters are long and stretchy. If yours looks like a potato, pull the right end out further before you add the feet.
- Ears that are too big. Large ears turn it into a bear or a mouse. Keep them small and low on the sides.
- No pale face patch. An all-brown face loses the sea otter look. The lighter mask around the eyes and nose matters a lot.
- Skinny stick feet. Thin feet look like a dog's legs. Give each foot a wide, rounded paddle with toes.
- Waves of every size. Mixed big and tiny bumps look messy. Keep the waves even so the water stays calm.
More Ways to Draw Your Otter
Swap the shell for a small gray rock or a starfish, or give your otter a fish to hold instead. A second, smaller otter floating beside the first makes a sweet mom and pup. Younger kids can skip the whisker dots and the ripples, and it still reads as an otter. If you like masked faces, the raccoon drawing step by step uses the same circle and oval start. For more sea friends, try this sea turtle drawing tutorial or the how to draw a penguin lesson.
Free Otter Coloring Page and Printable Step Guide
The free otter coloring page has a colored model at the top, a color key that tells you which part gets which color, and a big outline below for coloring. The step-by-step PDF guide puts all 12 steps with pictures and tips on paper, so you can draw at the kitchen table. Both print on Letter or A4.
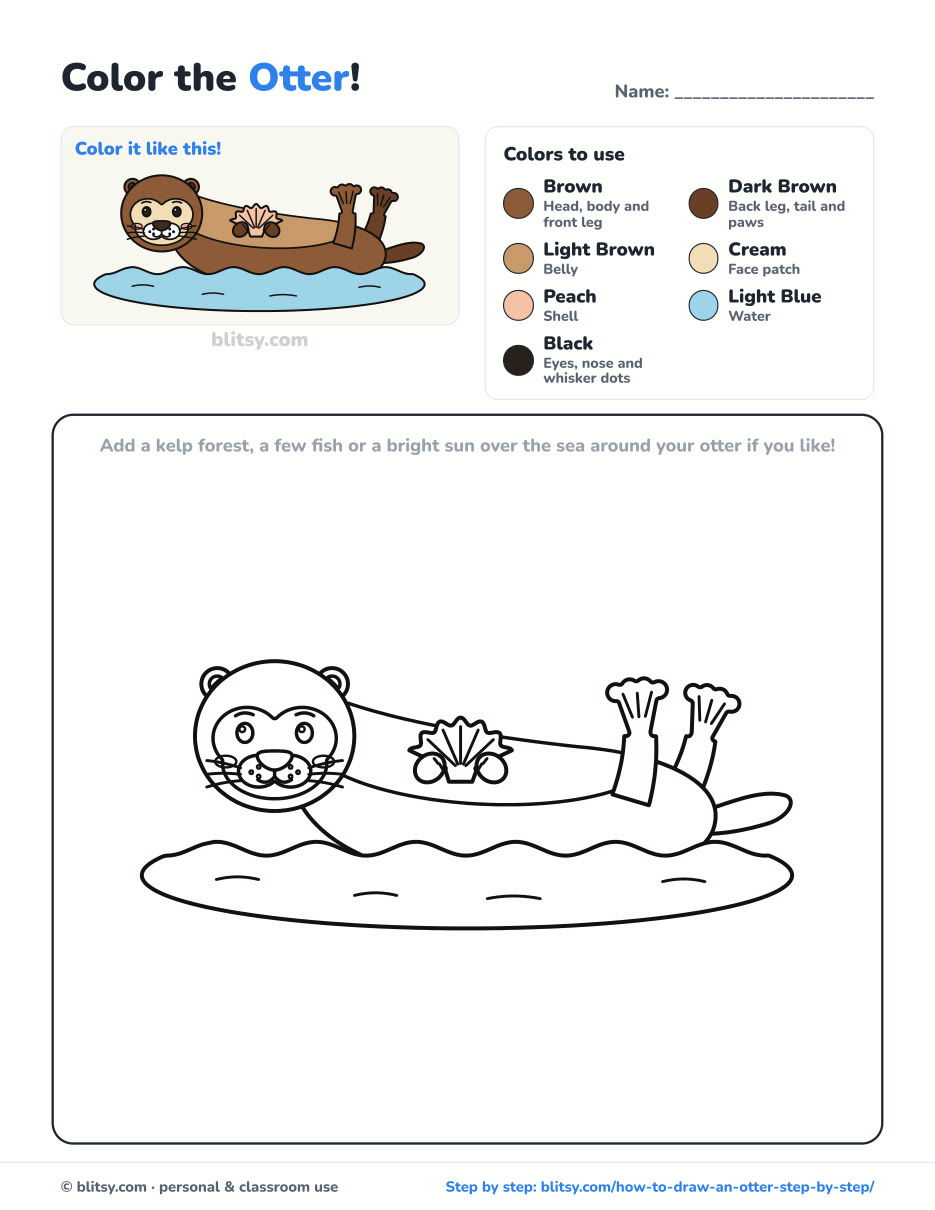
Black outlines with a colored example and the color names at the top. Ready to print and color.
⬇️ Download Coloring PageEvery step picture with its instructions and tips, to keep beside your paper while you draw.
⬇️ Download Drawing Guide📱 On a phone? Tap a download button, then open the file and choose Share → Save to Files or Print. On a computer, the PDF opens or saves straight to your Downloads folder.
Keep the Floating Otter Steps Handy
Other Animals to Draw After Your Otter
Every tutorial below shows one picture per step, just like this one, so the method carries straight over.
- Raccoon Drawing: A gray raccoon with a masked face and a striped tail, walking on all fours, in this raccoon drawing tutorial.
- Turtle Drawing: A smiling sea turtle with a hexagon shell pattern and spotted flippers in this how to draw a turtle step by step guide.
- Polar Bear Drawing: A chubby polar bear sitting on a cracked ice floe with its back paws turned up in this polar bear drawing tutorial.
- Whale Drawing: A smiling blue whale with a curving tail and a splashy spout grows from one long oval in this whale drawing step by step lesson.
- Octopus Drawing: A coral octopus with eight curling arms, drawn one center line at a time, in this how to draw an octopus tutorial.
Otter Questions From Young Artists
What is the easiest way to draw an otter?
Start with a circle for the head and a long oval for the body. Add a pale face patch, small ears and a big nose, then put the feet and tail at the far end and draw a wavy water line across the bottom.
How do you draw a cute otter for kids?
Make the head big compared with the body, use round eyes with a shine dot and give it a small smile and pink cheeks. A shell on the belly adds a lot of charm.
What is the difference between a sea otter and a river otter drawing?
A sea otter is usually drawn floating on its back with a pale face, like this one. A river otter is slimmer, darker all over and is often drawn standing or swimming on its tummy.
What colors is an otter?
Mostly brown, with a darker brown tail and feet and a cream or light gray face. Sea otters often get paler on the head as they get older.
Grab a pencil, find a calm spot on the page and let your otter float. 🦦✏️
Related posts:
 How to Draw a Car Step by Step (Easy Drawing for Beginners)
 How to Draw a Whale Step by Step (Easy for Beginners)
 How to Draw an Arctic Fox Step by Step (Easy for Beginners)
 How to Draw a Shark Step by Step (Easy for Beginners)
 How to Draw a Chicken Step by Step (Easy for Beginners)
 How to Draw a Fish Step by Step (Easy Goldfish for Beginners)
 How to Draw a Snowman Step by Step (Easy for Beginners)
 How to Draw Hands Step by Step (Easy Palm View for Beginners)
 How to Draw an Airplane Step by Step (Easy Jet for Beginners)
 How to Draw a Mouse Step by Step (Easy for Beginners)
 How to Draw the Joker Step by Step (Easy Chibi for Beginners)
 How to Draw a Zebra Step by Step (Easy for Beginners)

