
Monkeys are one of the first animals kids ask me to draw, and for good reason: the whole character comes from a circle, an oval and a few bendy tubes. This lesson shows you how to draw a monkey step by step, from two light guide shapes to a smiling brown monkey sitting on the ground with a banana. I spend a little extra time on the heart-shaped face, because that's what makes it a monkey.
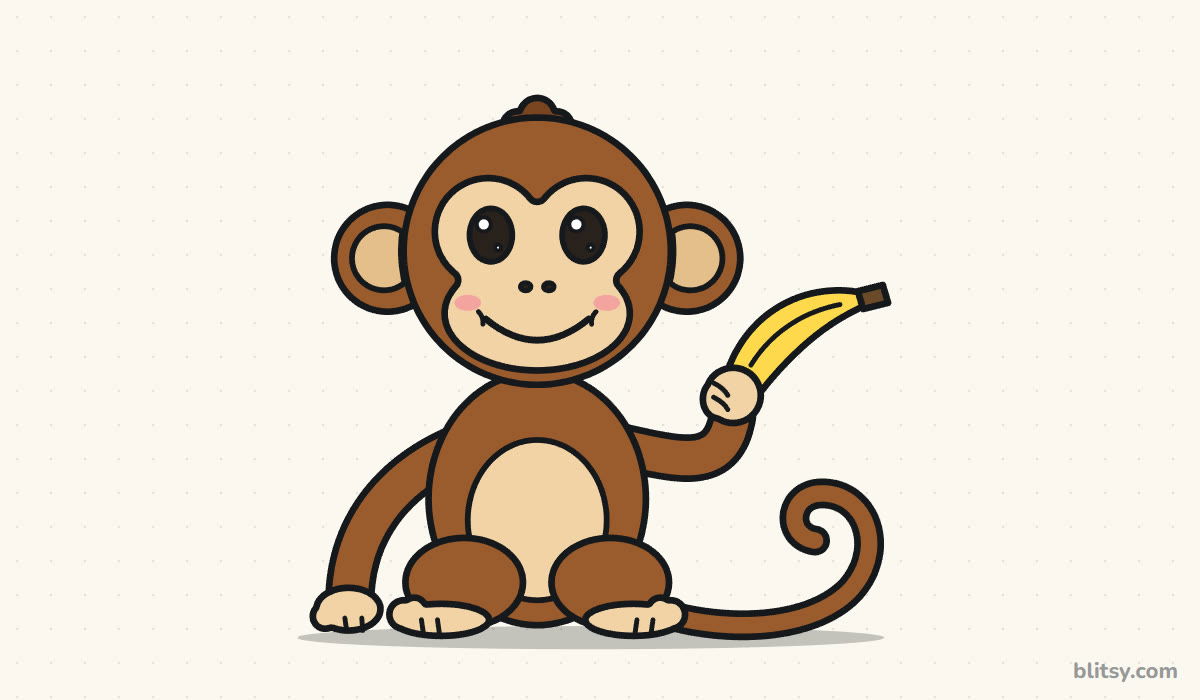
In every picture, the lines in blue are the ones you add in that step. Gray lines are from earlier steps, so you can see exactly where the new part sits.
Quick overview
⏱️ Time: around 25 to 35 minutes with coloring
🎯 Level: easy, good for kids from about 5 and up
✏️ Steps: 12
🐒 You'll draw: a cartoon monkey sitting and holding a banana
Supplies for a Cheeky Cartoon Monkey
- A pencil for light sketching (HB is fine)
- An eraser that doesn't smudge
- A black marker or fine felt pen for the final lines
- Brown and tan crayons, markers or colored pencils
- Yellow for the banana and a little pink for the cheeks
- White paper, turned sideways so the tail has room
With only one brown, I use light orange for the paler parts. The contrast is what matters.
How to Draw a Monkey Step by Step
Step 1: Sketch a head circle and a body oval
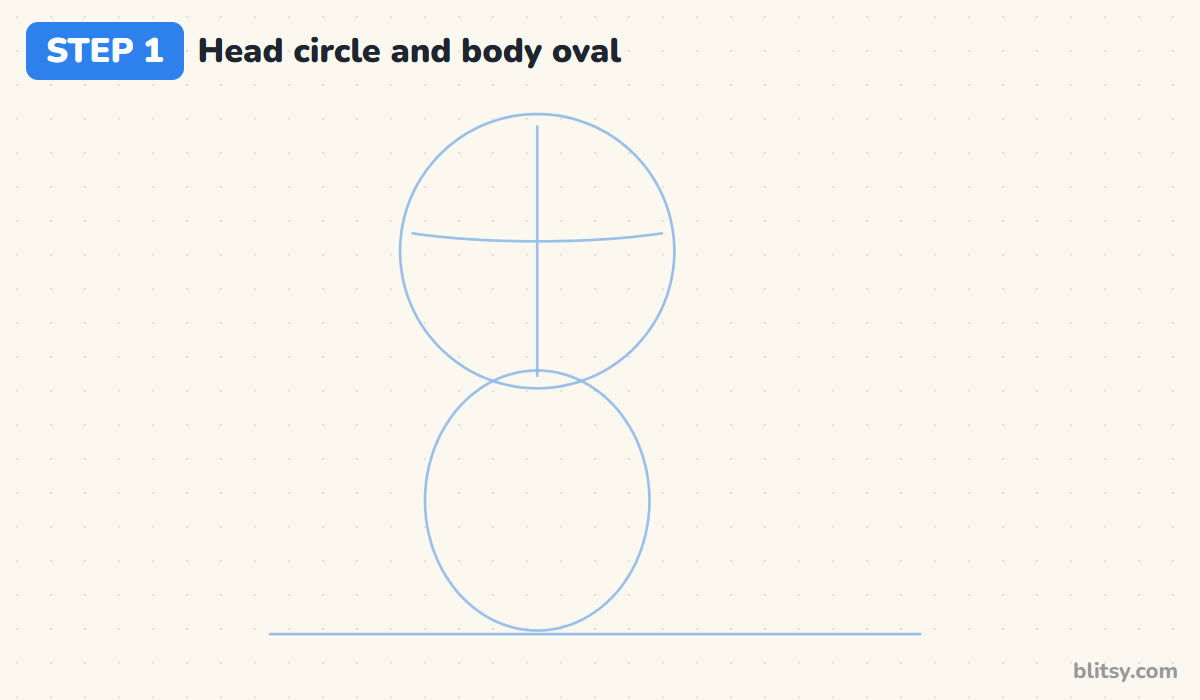
Draw a light ground line near the bottom of your page. Just above it, sketch a tall oval for the body, then stack a large circle on top for the head. I make the circle a bit wider than the oval, because a cartoon monkey is mostly head. Add a vertical line down the middle of the circle and a gently curved line across it, slightly above center.
💡 Tip: Press so lightly that you can barely see the lines. Every one of these shapes gets erased later.
Step 2: Add guides for the ears, arms and tail
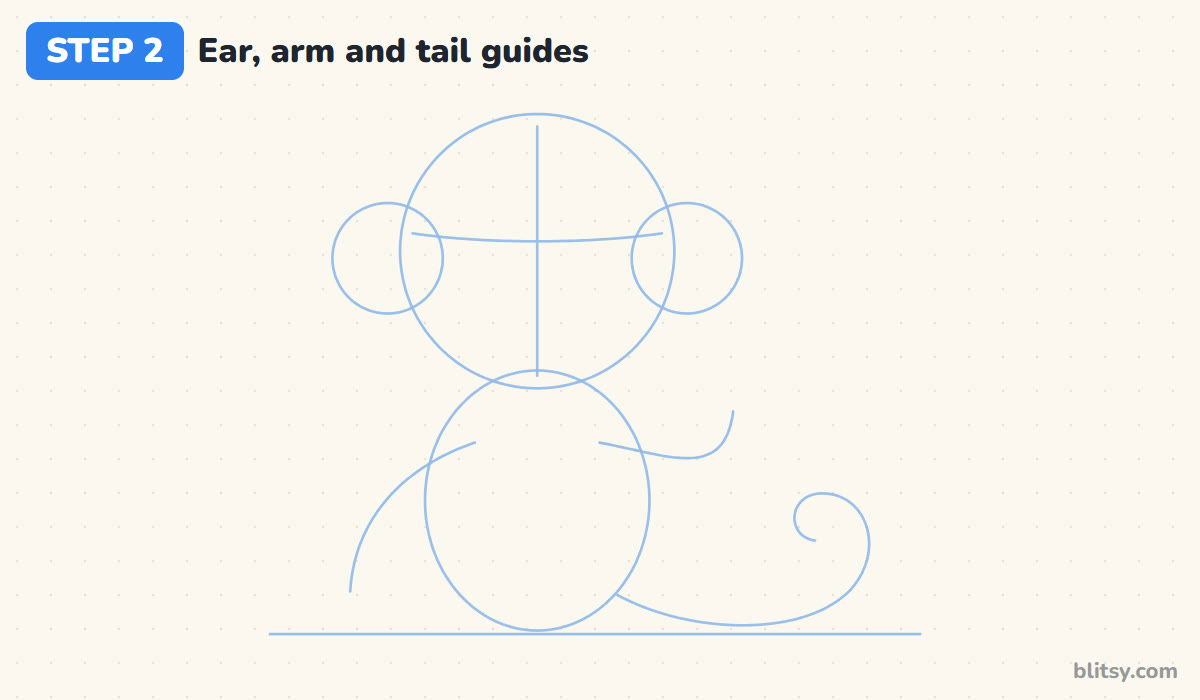
Put a small circle on each side of the head, sitting right on that curved cross line. Next, draw two curving lines for the arms: the left one sweeps down and out to the ground, and the right one bends out and then up like a hook. Last, sketch the tail as a long swoop from the bottom of the body that ends in a little curl.
💡 Tip: Monkey arms are long. If your left arm guide doesn't reach the ground line, stretch it.
Step 3: Outline the round head and ears
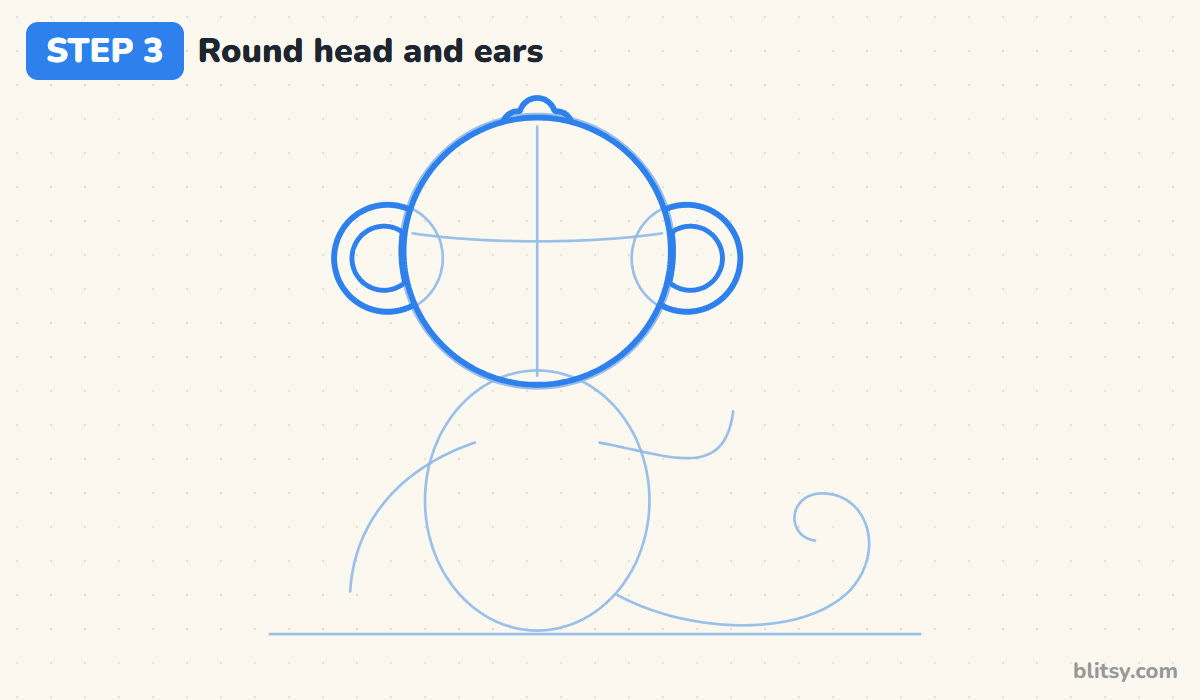
Go over the head circle with a firm line, adding a tiny tuft of hair on top made of three small bumps. Then trace the outer edge of each ear and draw a smaller circle inside it. Skip the part of each ear hidden behind the head.
💡 Tip: Keep the ears level with the eyes. Ears sitting too high make the monkey look like a mouse or a bear.




Step 4: Draw a heart-shaped face
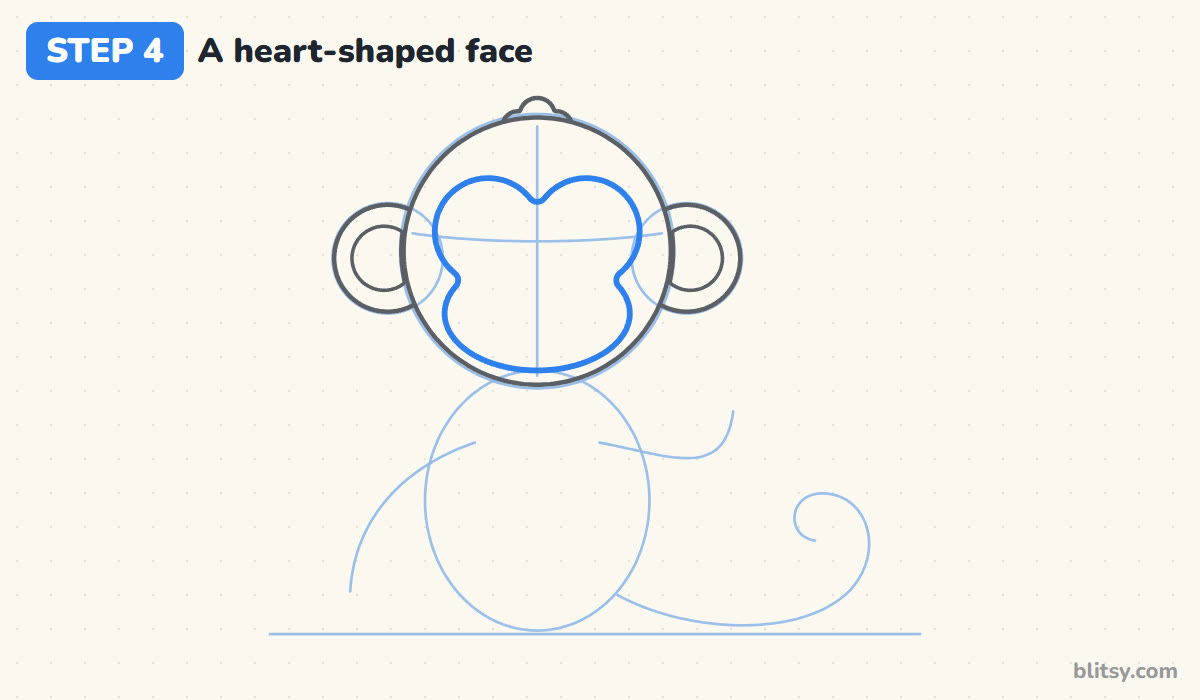
This shape is what turns a brown circle into a monkey. Draw two bumps at the top, one for each eye, with a small dip between them right on the center line. From the sides of those bumps, let the line pinch in a little and then swing out into a wide rounded chin. It should look like a heart with a very round bottom.
💡 Tip: Leave a strip of brown head all the way around the face. If the face touches the head outline, the monkey loses its fur frame.
Step 5: Outline the body and a round belly
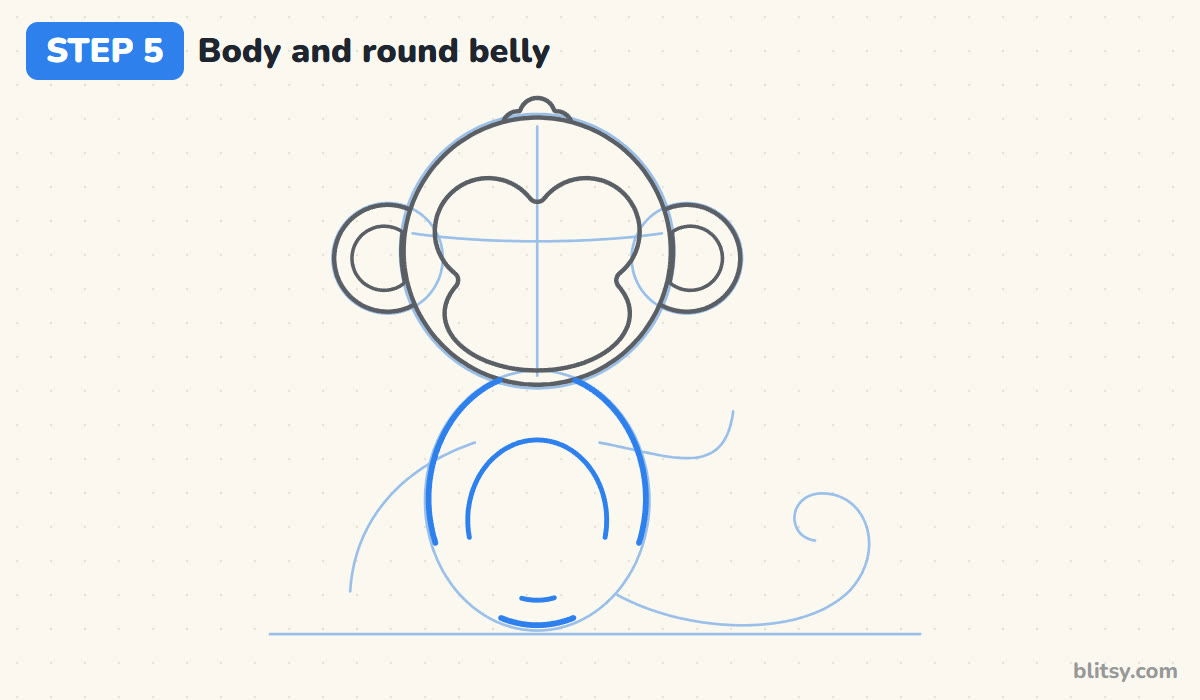
Follow the body oval with a smooth line, starting right under the head. Inside it, draw a smaller oval for the belly, a little lower than center. Leave the bottom open for now; the legs cover most of it next.
💡 Tip: Make the belly about two thirds as wide as the body. Too small and it looks like a button.
Step 6: Add bent legs and big feet
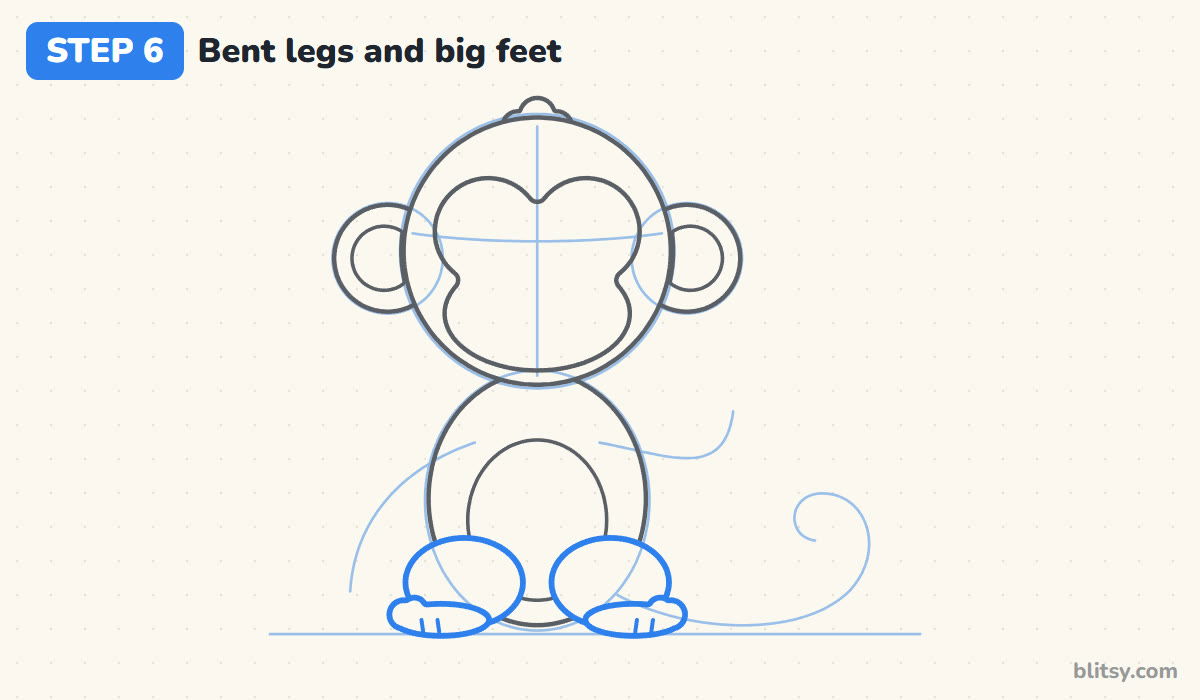
Draw two wide, flat ovals at the bottom of the body for the bent legs, one on each side. They overlap the belly a little. Under each one, add a long foot lying on the ground line with two small bumps for toes on the outer end, plus two short toe lines.
💡 Tip: I draw the feet longer than seems right. Monkeys have big grabbing feet, and long feet make the pose look steady.
Step 7: Draw the long arm and its hand
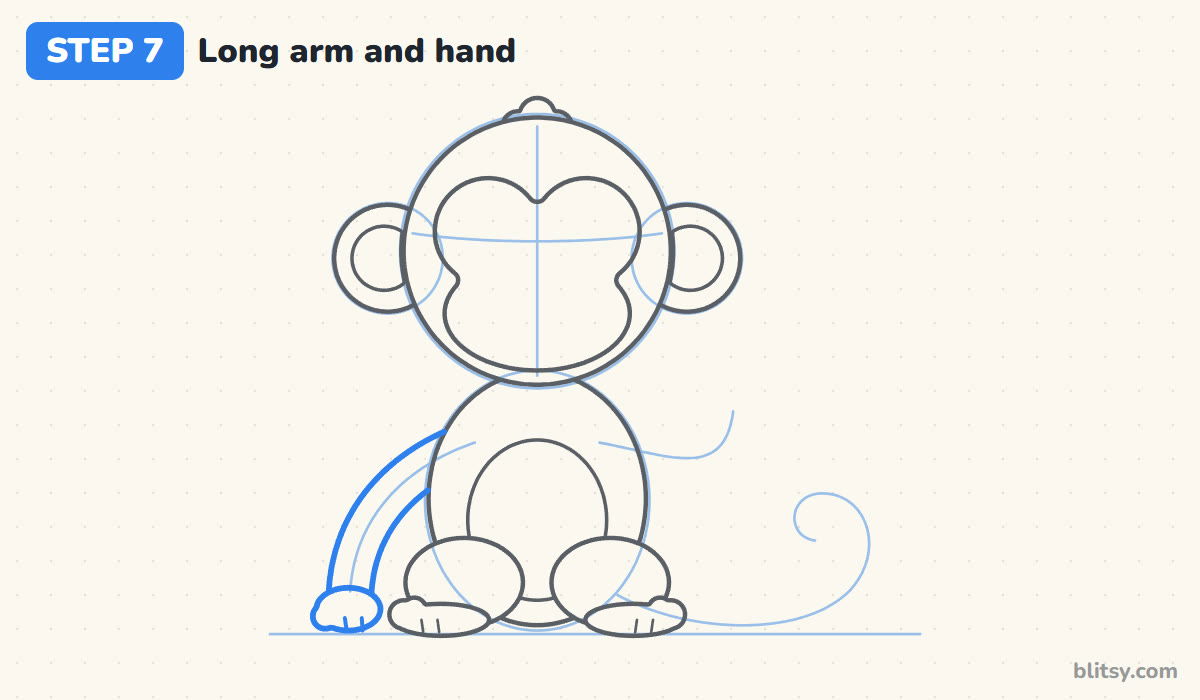
Use the left arm guide as the middle of a thick tube. Draw one line on each side of it, from the shoulder at the side of the body all the way down to the ground. Finish it with a rounded hand resting on the ground, with a small thumb bump and two finger lines.
💡 Tip: Keep both arm lines the same distance apart the whole way down. A tube that gets thinner and thinner looks like a noodle.


Step 8: Draw the other arm holding a banana
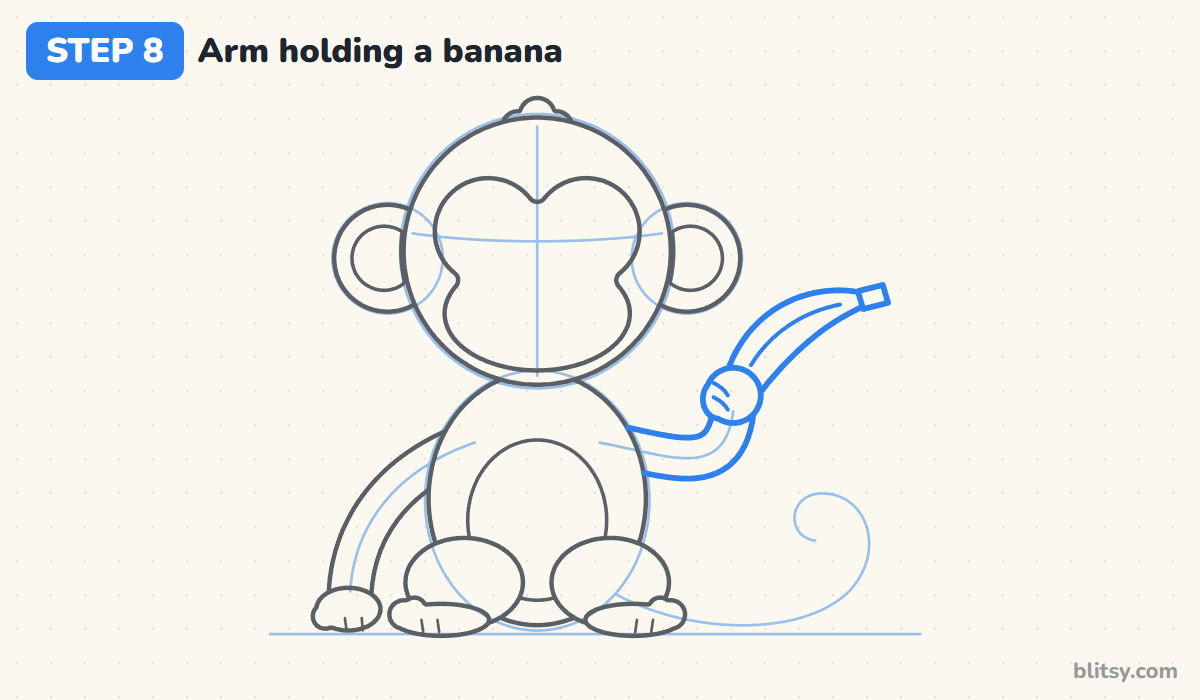
Draw the right arm as a tube that bends at the elbow and comes back up. At the top, draw a round hand with two curved finger lines. Now the banana: a long crescent coming out of the top of the hand, wide in the middle and narrow at the tip, with a small square stem at the end and one line down its length.
💡 Tip: Draw the hand over the banana, not the other way round. Seeing the fingers wrap around it is what makes the grip believable.
Step 9: Give it a long curly tail
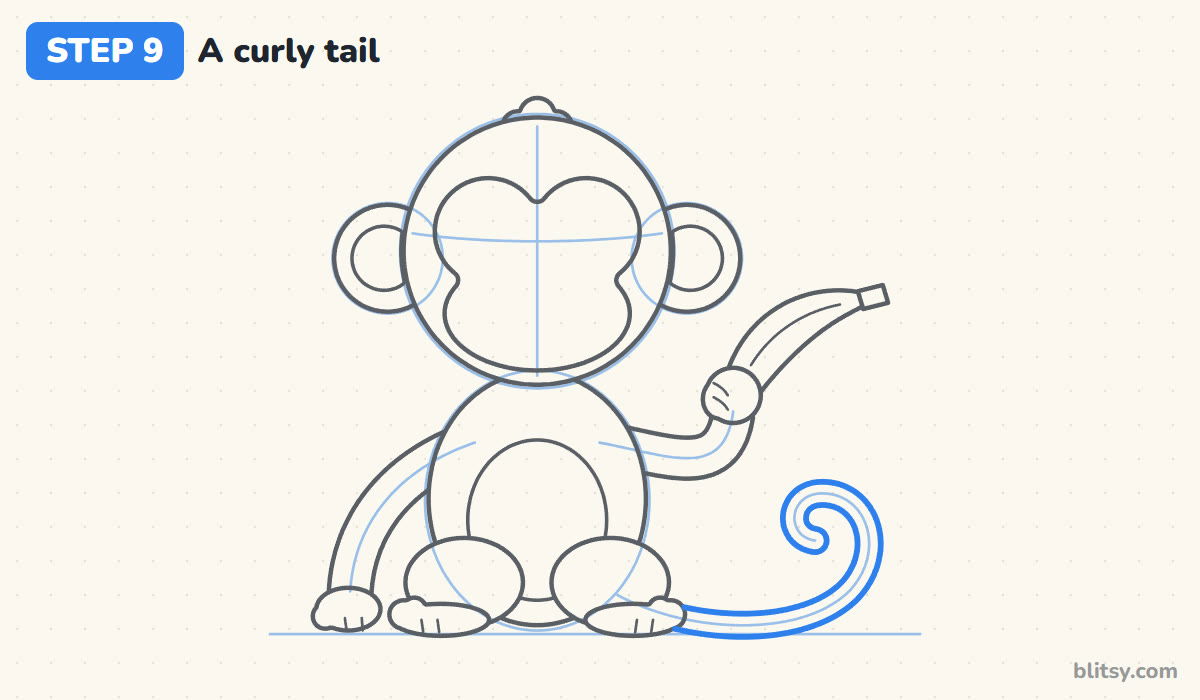
Starting behind the right foot, draw the tail as another tube, a little thinner than the arms. It runs along the ground, rises up, and then rolls into a small curl at the end.
💡 Tip: Draw the outer line of the curl first, then the inner one. It's much easier to keep the width even that way.
Step 10: Add the eyes, nose and a big smile
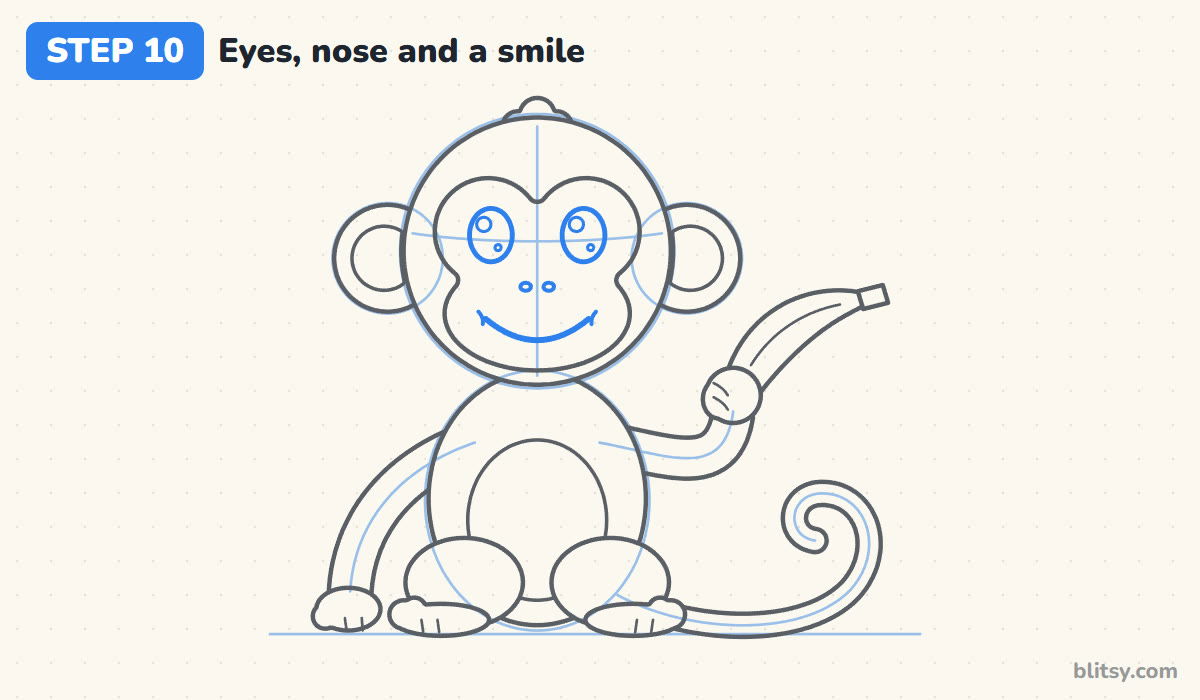
Place a tall oval eye inside each top bump of the face, with a white circle for the shine and a tiny dot below it. Under the eyes, add two small nostril dots close together. Then draw a wide smile curve across the lower face, with a short tick at each end for dimples.
💡 Tip: Put both shine dots on the same side of the eyes. If they point different ways, the monkey looks cross-eyed.
Step 11: Ink the lines and erase the guides
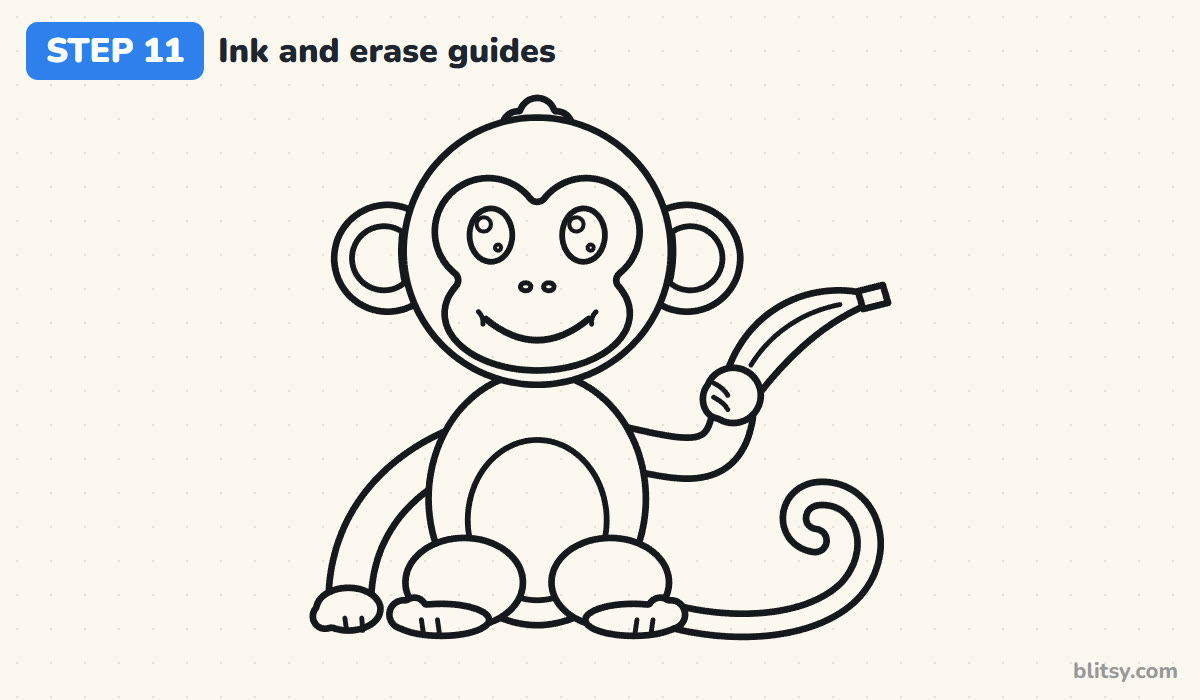
Trace every keeper line with your black marker. Wait until the ink is dry, then erase the circle, the oval, the cross lines and all the curved guides.
💡 Tip: Ink the face first while your hand is fresh. Small shaky lines show most around the eyes and smile.


Step 12: Color your monkey
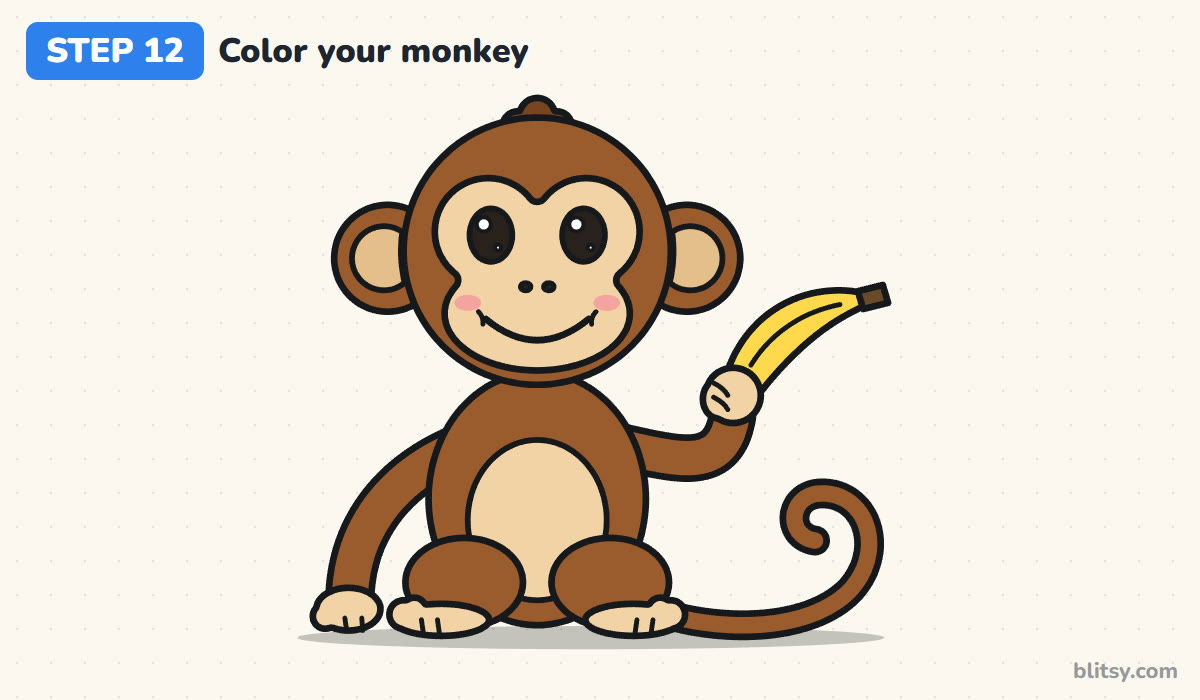
Color all the fur brown, with a darker brown for the hair tuft. The face and belly get tan, the hands and feet too, and the inside of the ears a slightly deeper tan. Fill the banana with yellow and its stem with dark brown, then add two soft pink cheeks.
💡 Tip: Color the big brown areas with light, even strokes going one direction. Going over them a second time makes the color rich without streaks.
Monkey Mix-Ups That Make a Bear
- A round face instead of a heart. A simple circle face reads as a bear or a puppy. The dip between the two eye bumps is the monkey's signature, so don't skip it.
- Short arms. Monkey arms should be long enough to reach the ground while sitting. Short arms make it look like a teddy.
- Ears placed on top of the head. Monkey ears sit on the sides, level with the eyes.
- A straight tail. A stiff line looks like a stick glued on. Give it a soft swoop and a curl at the end.
- Eyes too small and far apart. Big eyes close to the center line keep the face cute and friendly.
Swinging Ideas for Your Next Monkey
Once you're comfortable with this pose, try a bigger, heavier cousin in my gorilla drawing tutorial, which uses the same long arms but a much bulkier body. You can also flip the pose so the monkey hangs from a branch by its tail, swap the banana for a coconut, or draw a smaller baby monkey sitting next to this one. Younger kids can leave out the fingers and toes and it still looks great. For another slow, friendly tree animal, have a go at the sloth drawing step by step lesson next.
Free Monkey Coloring Page and Step Guide
The free monkey coloring page shows the colored monkey at the top as a model, a small color key, and a big outline underneath with plenty of room to add jungle leaves or vines. The step-by-step PDF guide has all 12 steps with pictures and tips. Both print on Letter or A4.
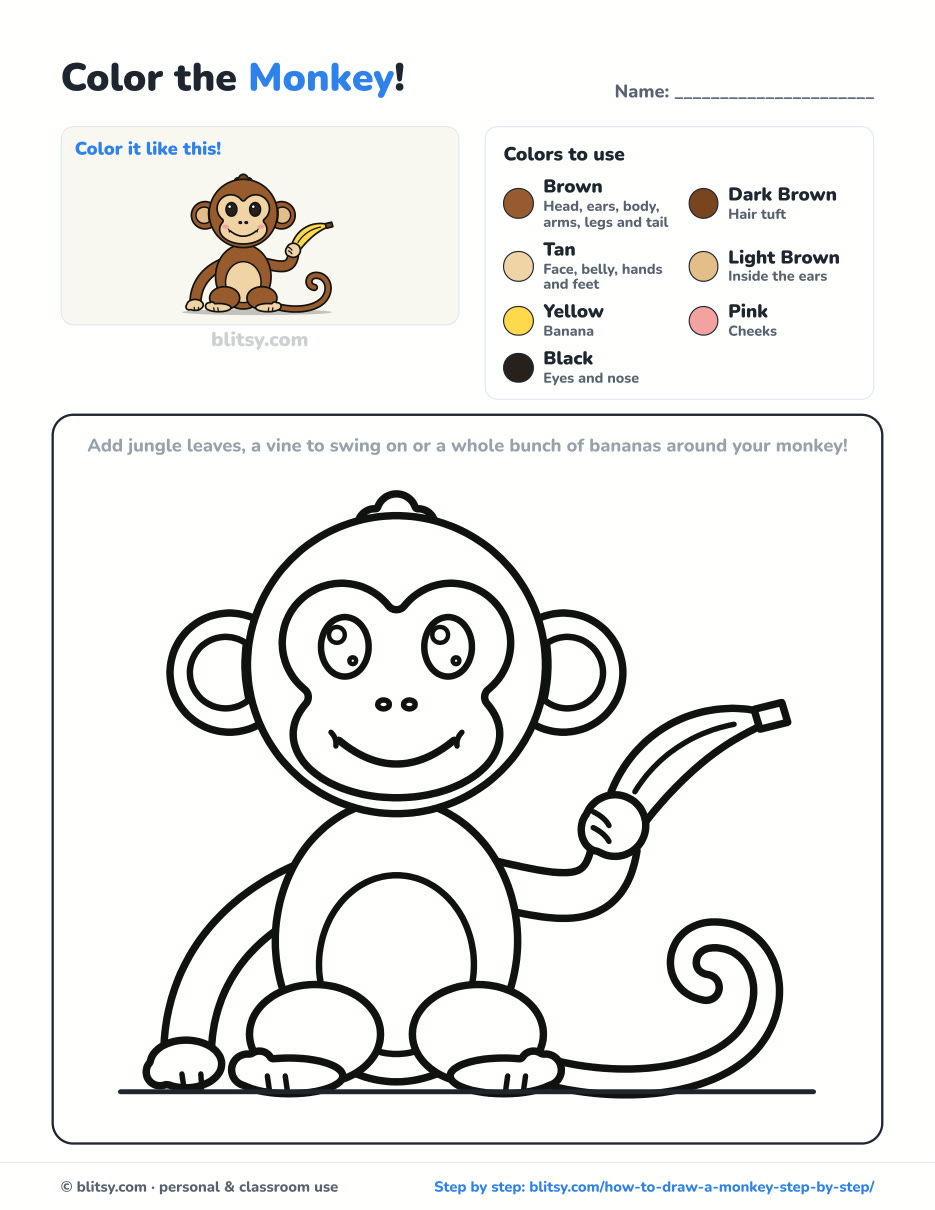
Black outlines with a colored example and the color names at the top. Ready to print and color.
⬇️ Download Coloring PageEvery step picture with its instructions and tips, to keep beside your paper while you draw.
⬇️ Download Drawing Guide📱 On a phone? Tap a download button, then open the file and choose Share → Save to Files or Print. On a computer, the PDF opens or saves straight to your Downloads folder.
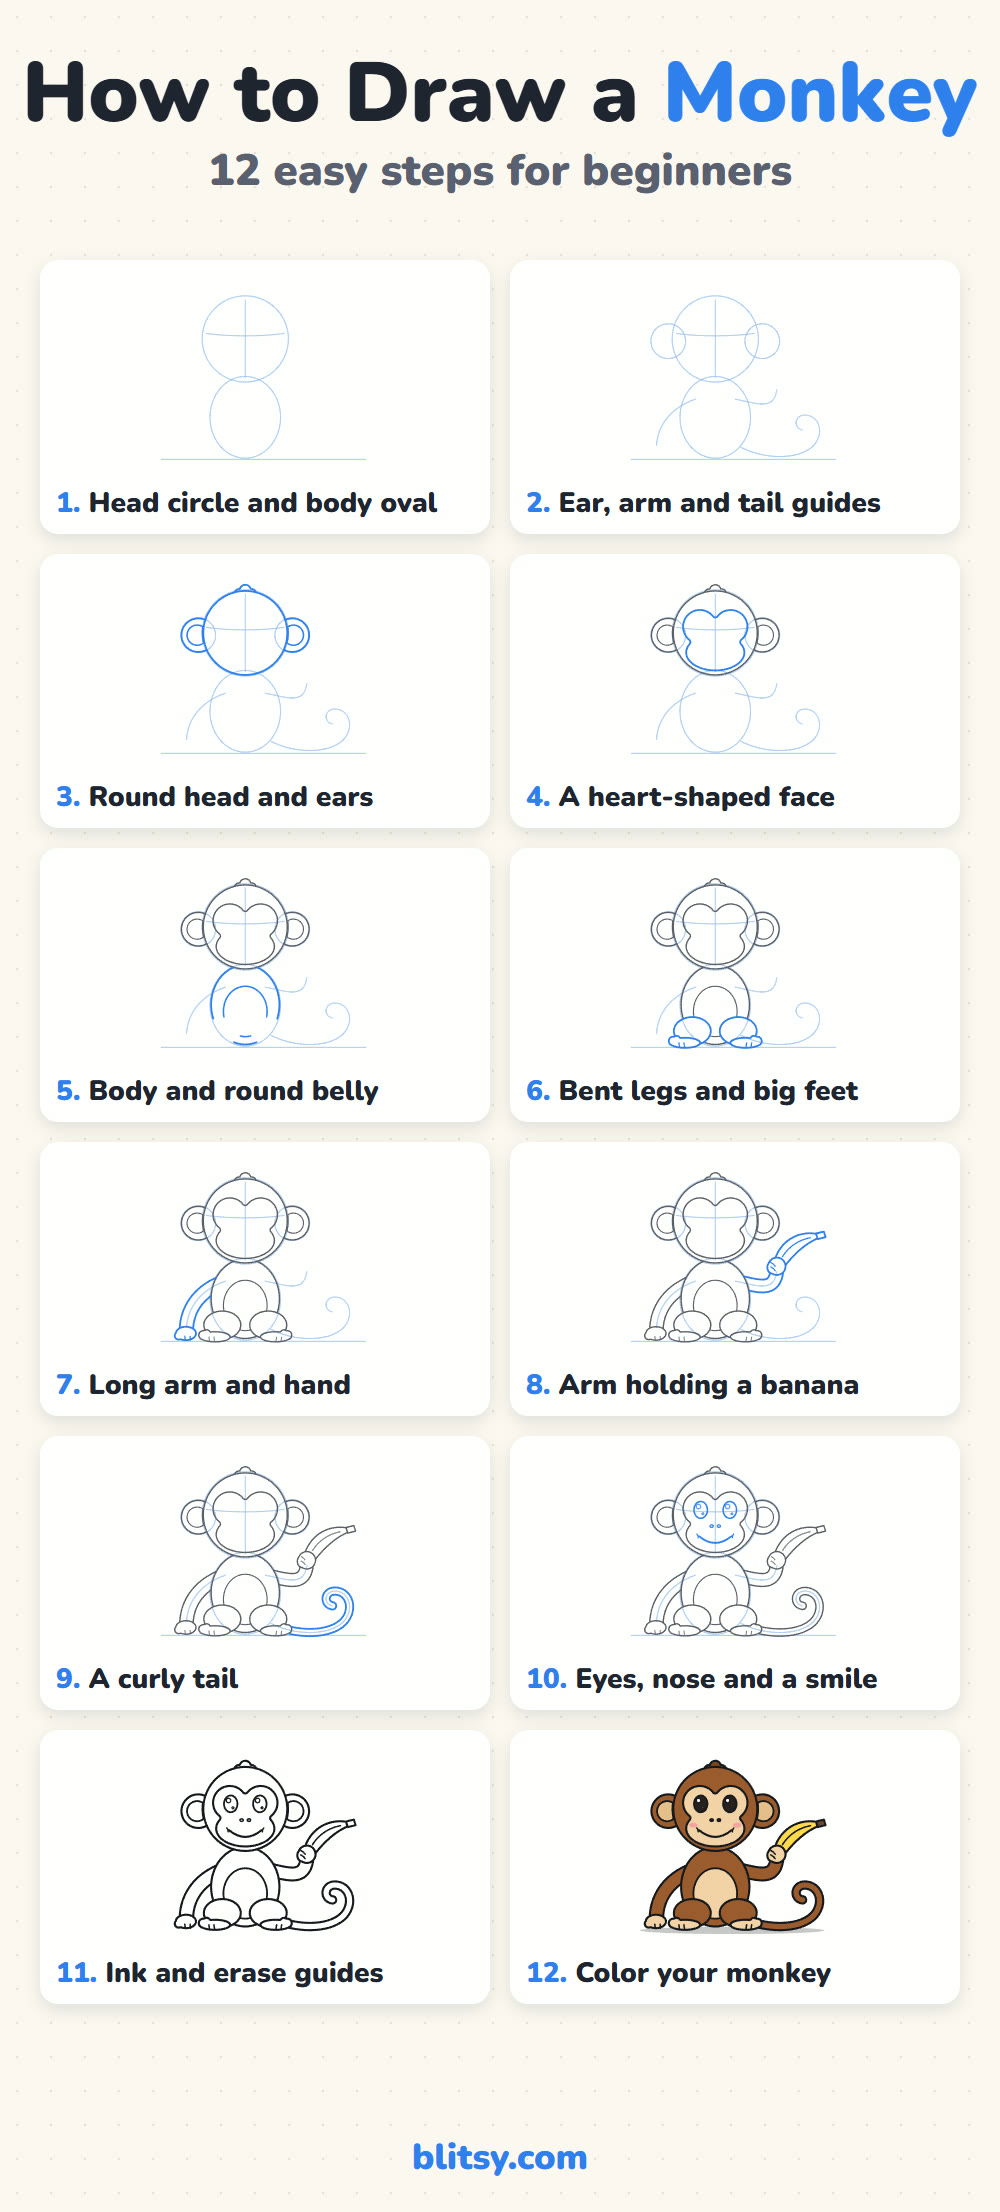
Twelve Monkey Steps on One Pin
More Animals to Draw Once Your Monkey Is Done
Each of these is a full lesson with a picture for every step, built from the same easy shapes you just practiced.
- Gorilla Drawing: A calm sitting gorilla with a banana in this how to draw a gorilla step by step lesson.
- Sloth Drawing: A sleepy, smiling sloth hanging out in this sloth drawing tutorial.
- Lion Drawing: A friendly sitting lion with a scalloped mane in the how to draw a lion step by step guide.
- Elephant Drawing: Draw a big-eared elephant with a curling trunk in this elephant drawing tutorial.
- Parrot Drawing: Add a bright jungle bird to your monkey's world with this parrot drawing step by step lesson.
Monkey Drawing Questions Kids Often Ask
What is the easiest way to draw a monkey?
Start with a big circle for the head and an oval for the body. Add round ears on the sides, a heart-shaped face, long tube arms and a curly tail. The heart-shaped face is what makes it look like a monkey.
How do you draw a monkey face?
Draw two rounded bumps at the top for the eye areas, with a dip between them, then a wide rounded chin. Inside, add two big eyes, two nostril dots and a wide smile.
What colors do I need for a monkey?
Brown for the fur, tan or light orange for the face and belly, black for the eyes and nose, and yellow if you add a banana.
How long does it take to draw a monkey?
Most beginners finish the drawing in about 15 to 20 minutes and need another 10 to 15 for coloring.
Now hand your monkey a snack, give it a name, and maybe draw a whole jungle around it next time. 🐒🍌
Related posts:
 How to Draw a Car Step by Step (Easy Drawing for Beginners)
 How to Draw a Whale Step by Step (Easy for Beginners)
 How to Draw an Arctic Fox Step by Step (Easy for Beginners)
 How to Draw a Shark Step by Step (Easy for Beginners)
 How to Draw a Chicken Step by Step (Easy for Beginners)
 How to Draw a Fish Step by Step (Easy Goldfish for Beginners)
 How to Draw a Snowman Step by Step (Easy for Beginners)
 How to Draw Hands Step by Step (Easy Palm View for Beginners)
 How to Draw an Airplane Step by Step (Easy Jet for Beginners)
 How to Draw a Mouse Step by Step (Easy for Beginners)
 How to Draw the Joker Step by Step (Easy Chibi for Beginners)
 How to Draw a T-Rex Step by Step (Easy for Beginners)

