
Koi look fancy, but from above they are one of the friendliest fish to draw. You only see the back, so there's no gill line, no side profile and just a hint of each eye. This lesson shows you how to draw a koi fish step by step, starting with a single wavy line and ending with a classic white and orange koi gliding through a pond. The secret is the curve, and I'll show you how to get it right before any detail goes on.
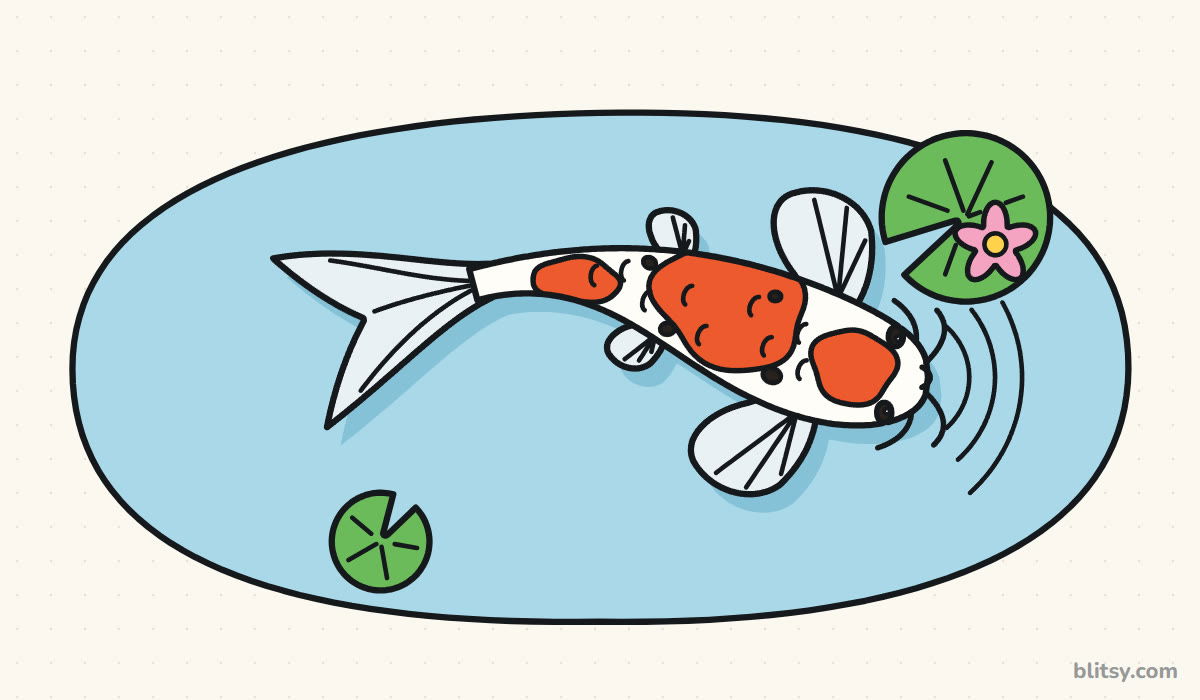
Koi pictures below use two shades: blue for the lines you add now, gray for the finished ones. Copy the blue, compare, then move on.
Quick overview
⏱️ Time: about 40 minutes with coloring
🎯 Level: easy to medium, good for kids from about 8 up
✏️ Steps: 12
🐟 You'll draw: a kohaku koi seen from above in a lily pad pond
Supplies for a Calm Koi Pond Sketch
- A pencil with a light touch (HB works well)
- A soft eraser that won't smudge
- A black fineliner or thin marker for the final lines
- Colored pencils: orange red and black for the fish, light blue for the water, green and pink for the lily pads, plus a yellow
- Plain white paper, turned sideways
Leave the body uncolored or use a very light gray, because the paper itself makes the best white koi skin.
How to Draw a Koi Fish Step by Step
Step 1: Draw a pond oval and an S-curve line
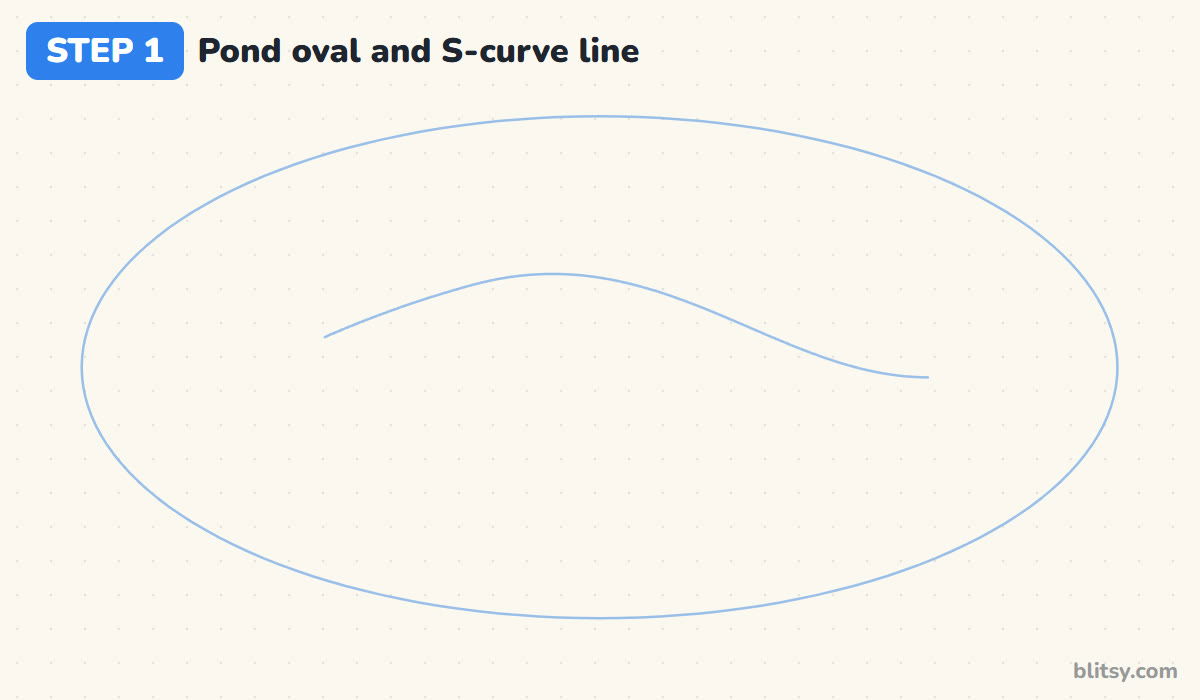
Sketch a wide, flat oval that fills most of the page. This is the pond. Inside it, draw one soft wavy line from left to right that rises a little in the middle and dips near the right end. That line is the koi's backbone, and every other shape hangs on it.
💡 Tip: Keep the wave gentle. A deep zigzag makes the fish look like it's wriggling in panic.
Step 2: Add a head circle, tail lines and fin marks
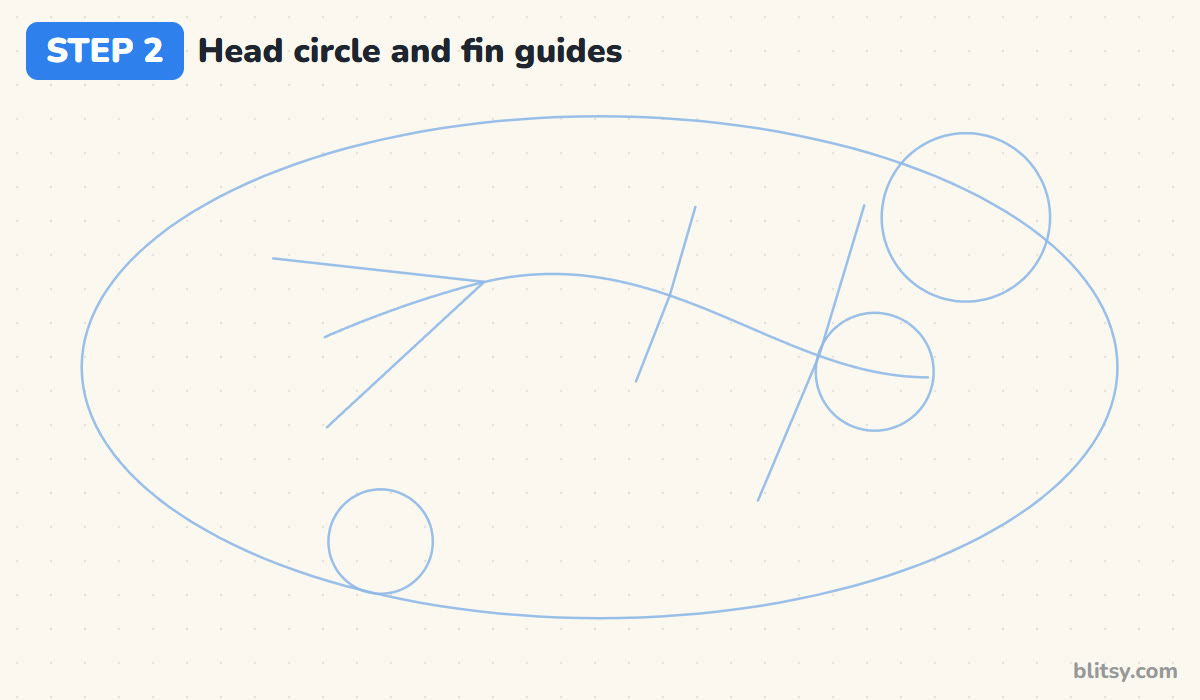
At the right end of the curve, draw a circle for the head. At the left end, add two lines that open out like a V for the tail. Then put short slanted marks across the curve in two places: a longer one just behind the head for the front fins and a shorter one about halfway back. Finish with two circles where the lily pads will float.
💡 Tip: Place the big lily pad circle so it doesn't touch the head circle. The ripples need that space later.
Step 3: Draw the long curved body
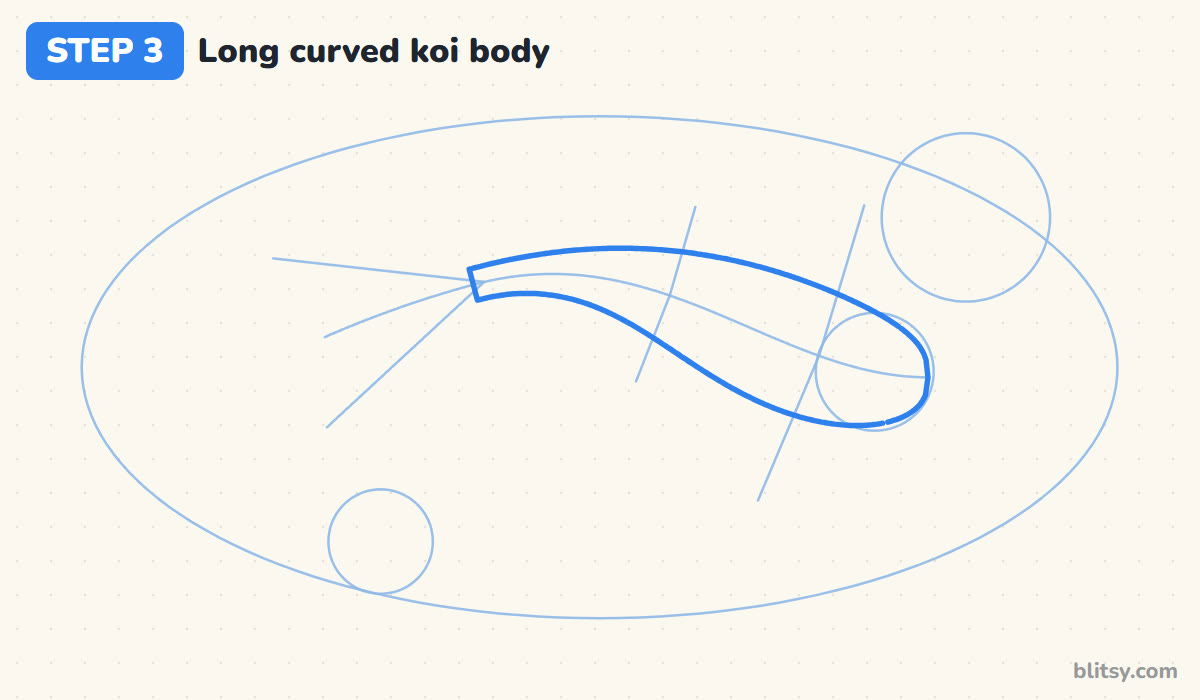
Now wrap the body around the backbone. Start at the nose with a blunt, rounded tip, widen it through the head circle, and keep the widest part just behind the head. From there both sides slowly come closer together until they're only a finger apart at the tail end, where you close the body with a short line.
💡 Tip: Draw the top edge first, then the bottom edge, and check that both follow the same bend.



Step 4: Add the flowing two-lobed tail
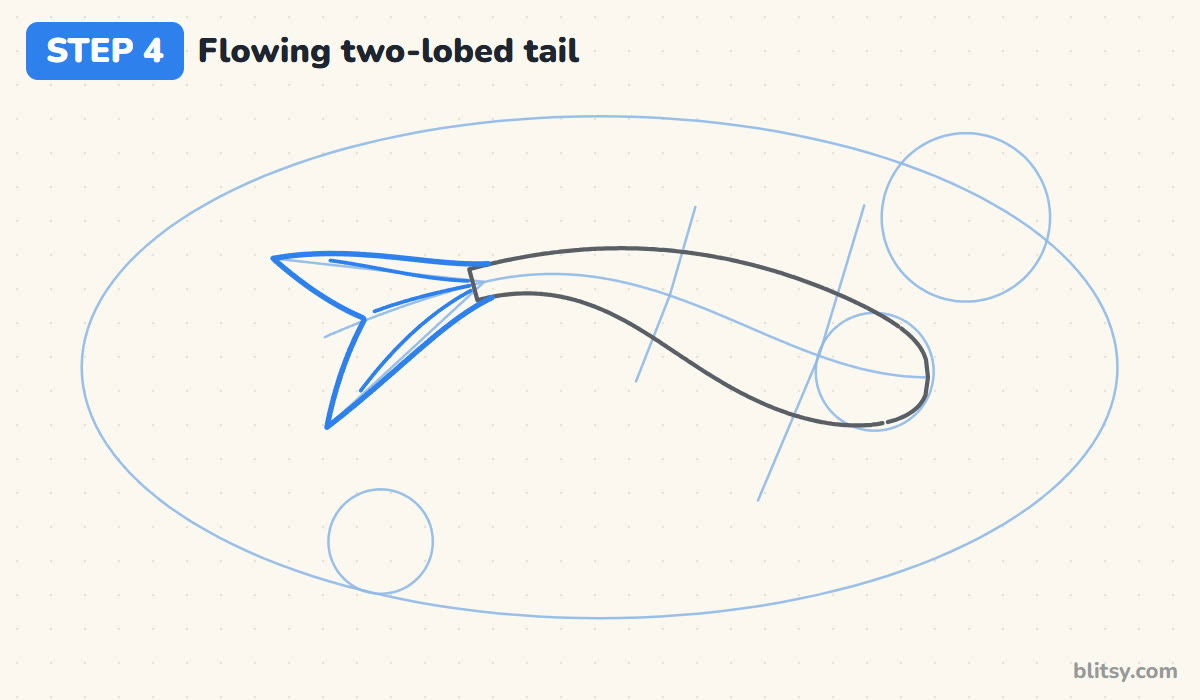
Use the V lines to draw the tail. Each lobe is a long, pointed leaf shape, and the two meet in a soft notch in the middle. I let the tail bend a little the opposite way from the body, because that tiny counter-curve is what makes the koi look like it's swimming. Draw three thin lines inside for the fin rays.
💡 Tip: Make the tail almost as long as the head and front fins together. Koi tails trail behind.
Step 5: Draw two fan-shaped pectoral fins
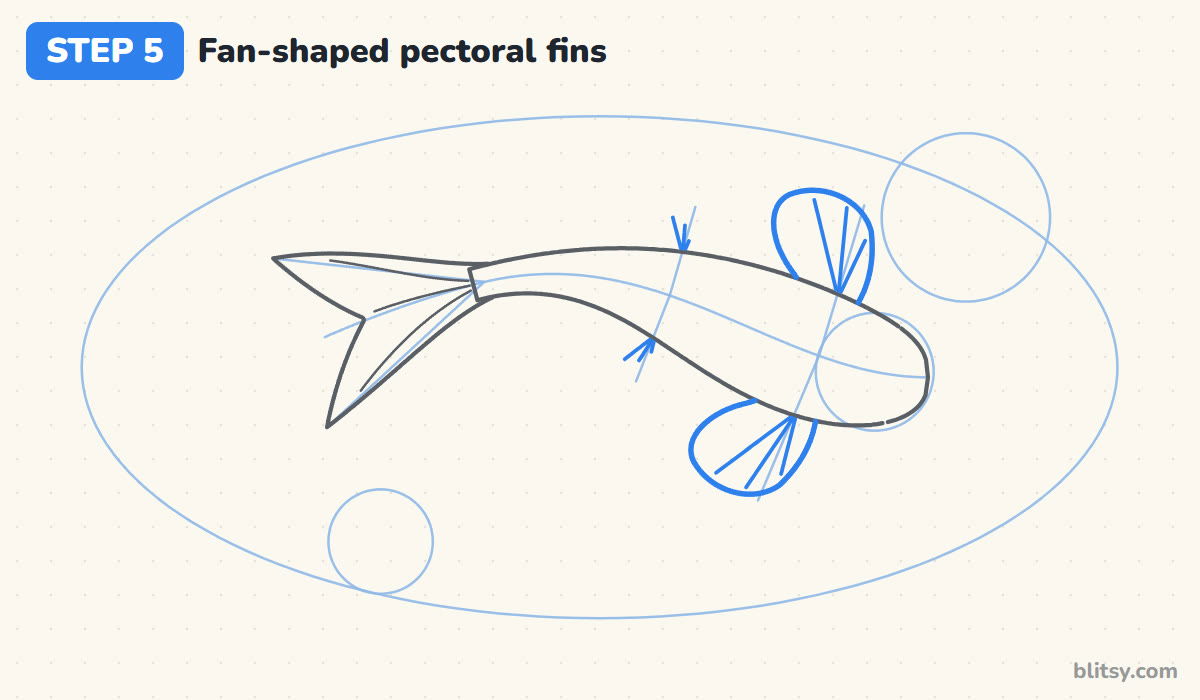
On the front fin marks, draw one rounded fan on each side of the body. They start narrow where they tuck under the body and spread out wide, a bit like an open hand. Add three thin rays inside each fan, all starting from the body edge.
💡 Tip: Sweep the fins slightly backward. Fins that point straight out sideways look stiff.
Step 6: Add two small pelvic fins
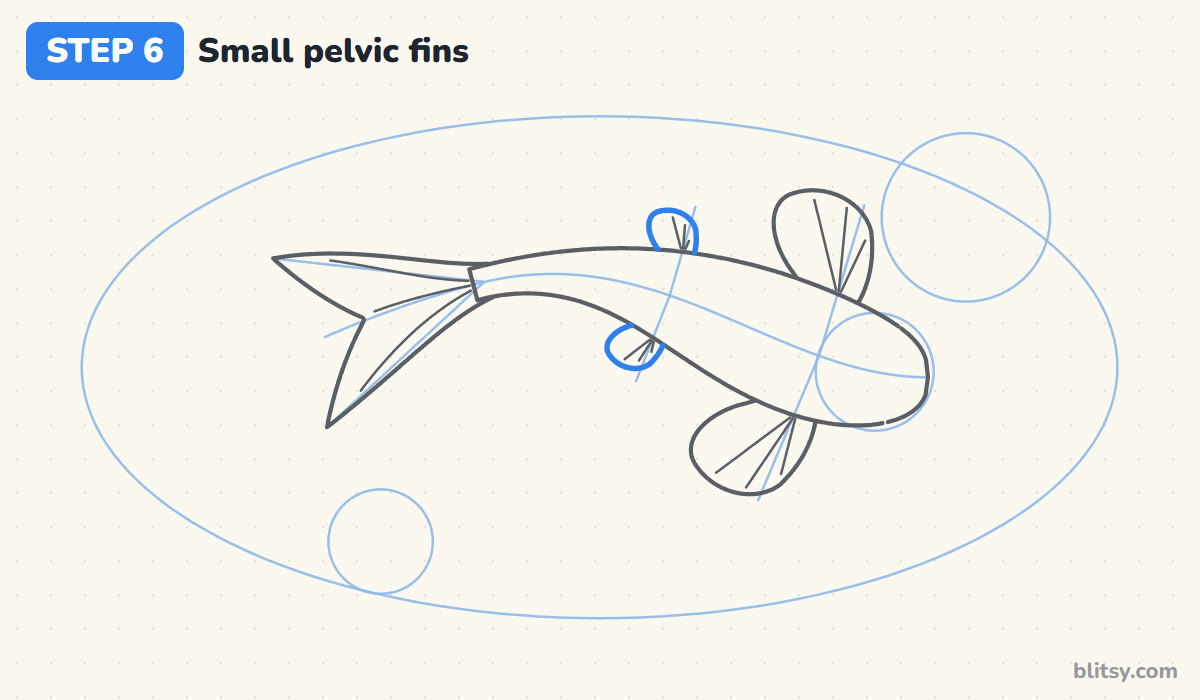
On the second set of marks, halfway down the body, draw two much smaller fans. They are the same shape as the front fins, just about half the size. Small kids can skip these and the koi still reads clearly.
💡 Tip: Size matters here. If the back fins grow as big as the front ones, the fish looks like it has four wings.
Step 7: Draw the eyes, mouth and whiskers
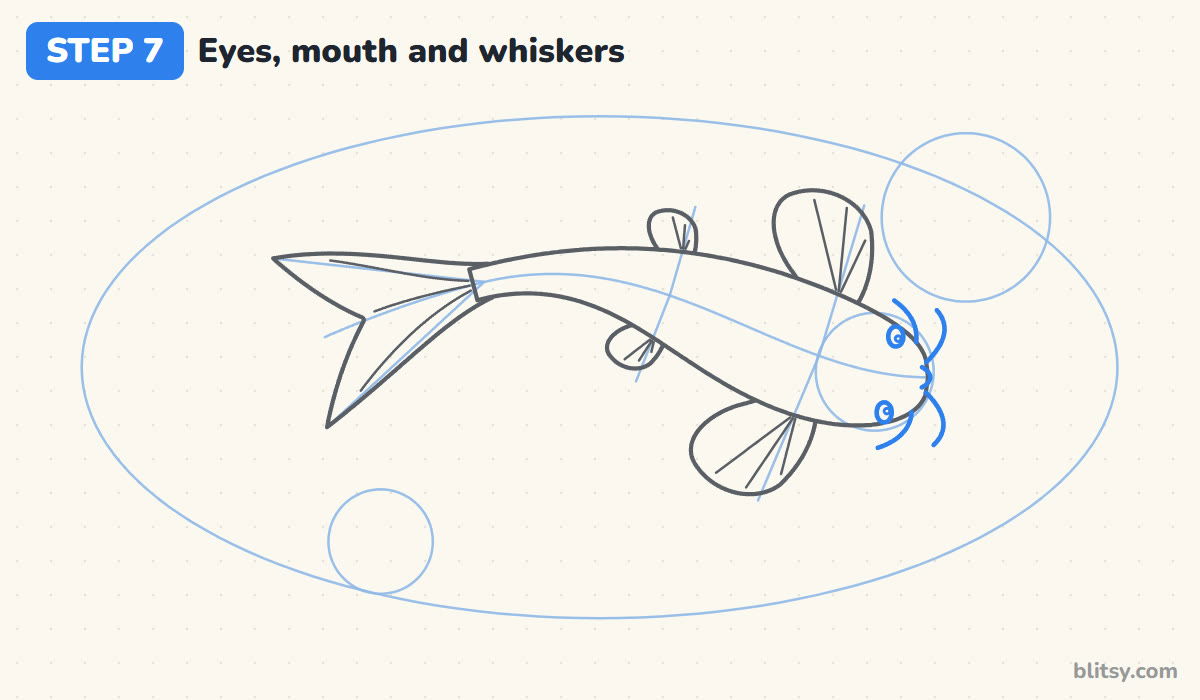
From above, a koi's eyes sit right at the edges of the head, so draw a small oval on each side, close to the outline, with a tiny shine dot. Add a little curved mouth at the very tip of the nose. Then the barbels: two short curling whiskers on each side of the mouth, poking outward.
💡 Tip: Whiskers are what tell people this is a koi and not a goldfish, so don't leave them out.



Step 8: Add the patches, spots and scale marks
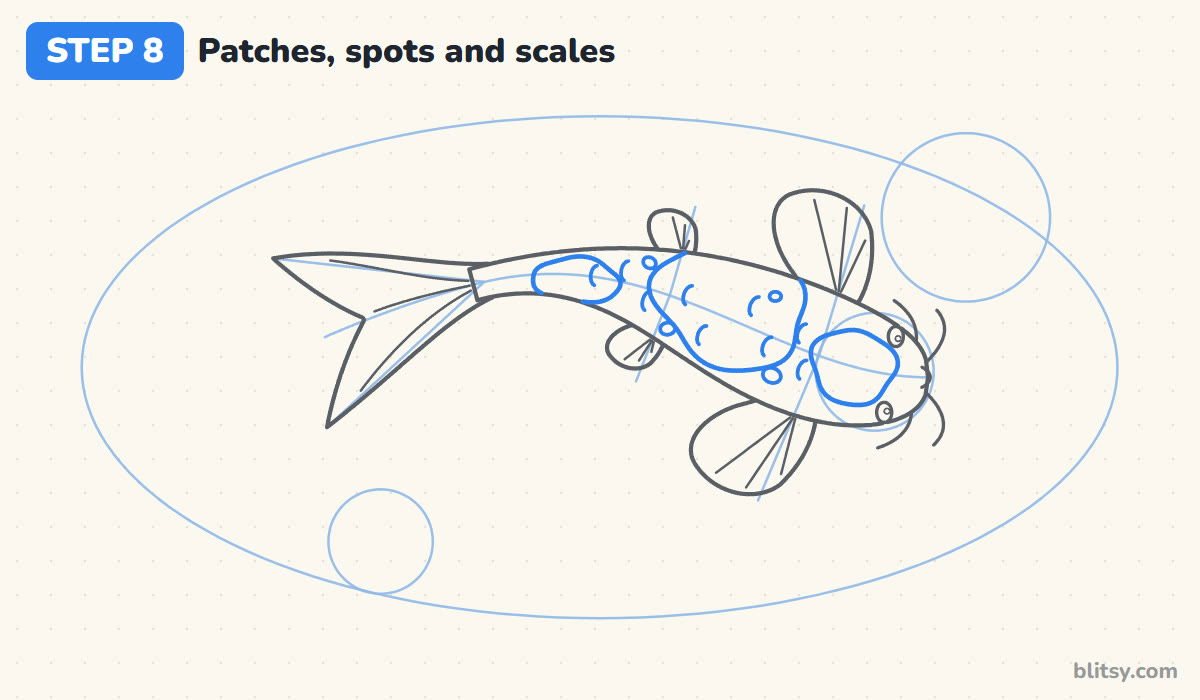
Kohaku koi have big orange red patches on a white body. Draw a rounded patch on top of the head between the eyes, a large wavy one across the middle of the back, and a smaller one near the tail. Add four small spots scattered along the sides. Finish with a few tiny curved marks for scales, like little bent smiles.
💡 Tip: Let one patch run right off the side of the body. Real koi patterns wrap around, so it looks more natural.
Step 9: Draw lily pads and a flower
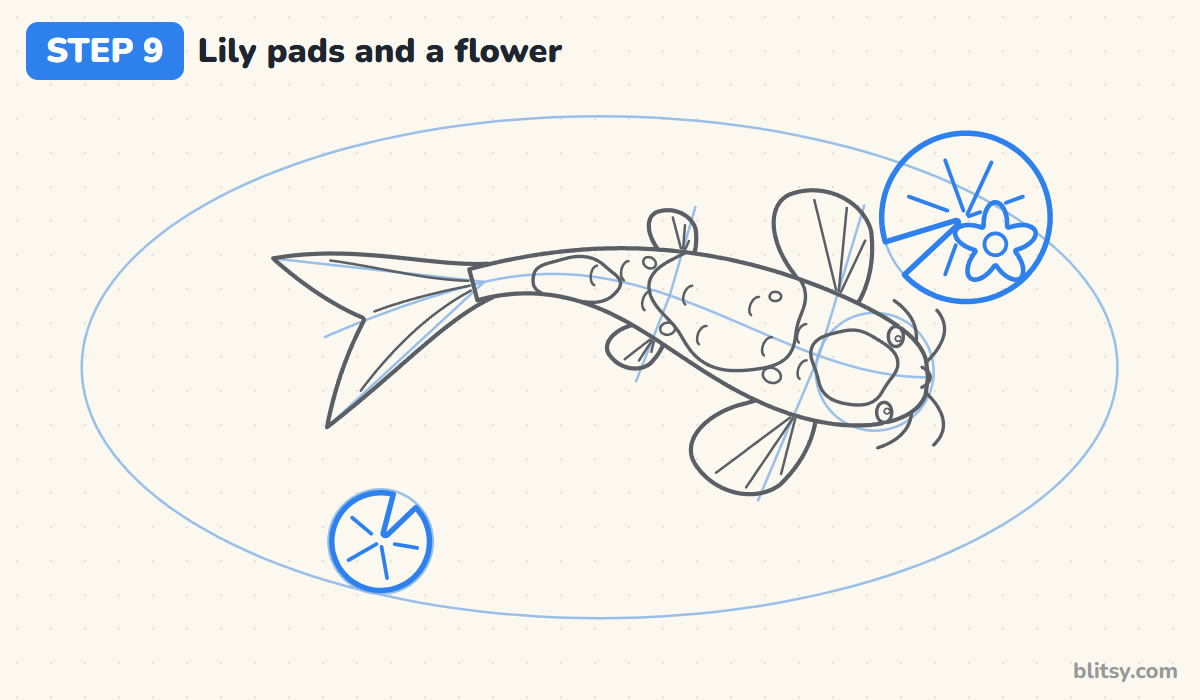
Turn each lily pad circle into a round leaf with a narrow wedge cut out of it, like a pie with one slice missing. Draw a few lines from the center toward the edge for the veins. On the big pad, add a small five-petal flower with a round center.
💡 Tip: Point the wedge cuts in different directions so the two pads don't look copied.
Step 10: Outline the pond edge and the ripples
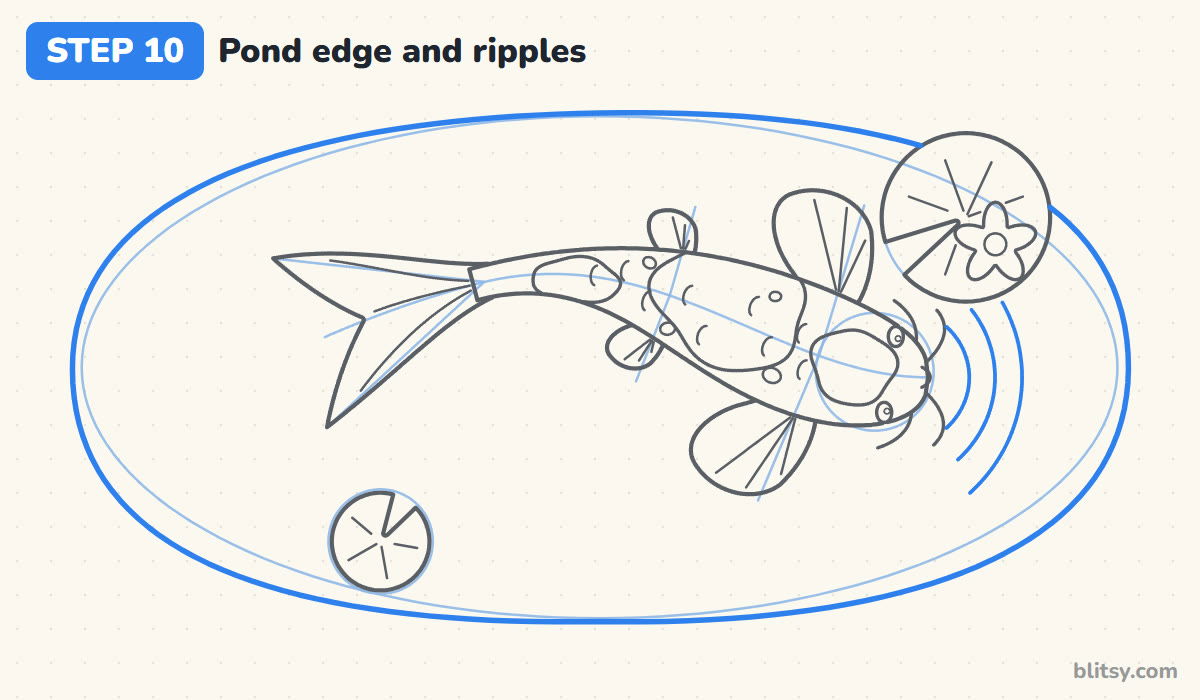
Trace the pond oval with a smoother, firmer line. In front of the koi's nose, draw three curved ripple lines, each a little bigger than the last, as if the fish just touched the surface. Stop each ripple where it meets the fins or the lily pad.
💡 Tip: Space the ripples evenly. Uneven gaps make them read as random scribbles.
Step 11: Ink the koi and erase the guides
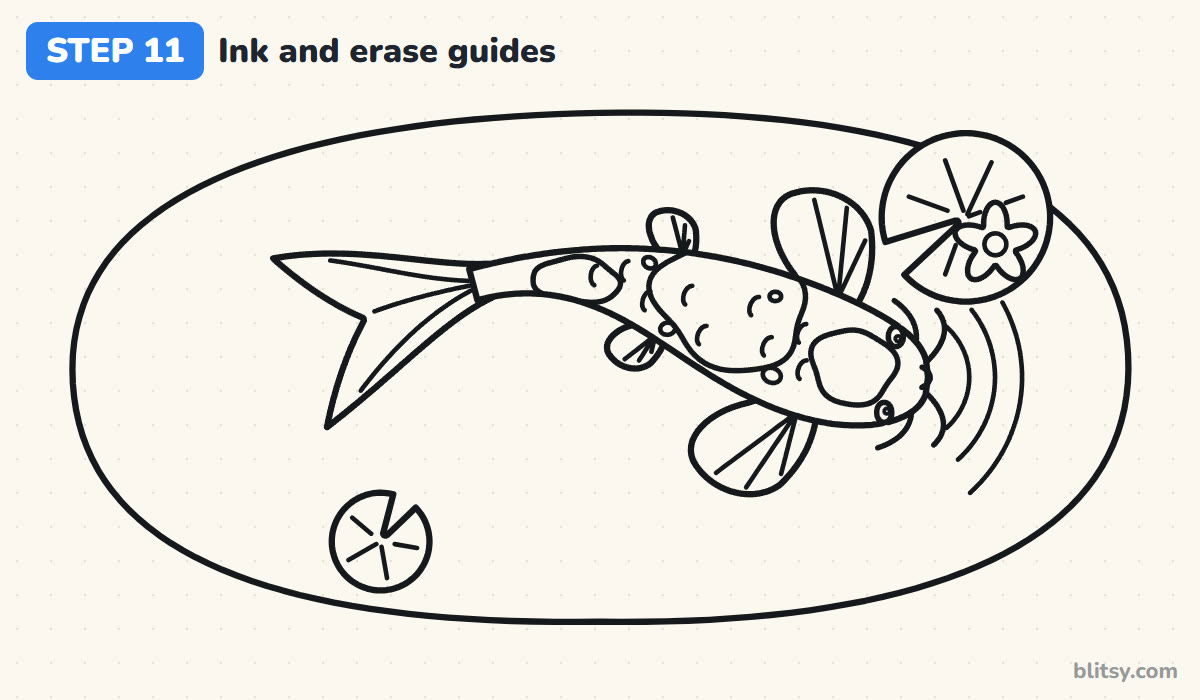
Go over the keeper lines with your fineliner. I start with the body outline, then the tail and fins, and save the tiny scale marks and whiskers for last when my hand is warmed up. Skip the S-curve, the circles and the fin marks. Wait for the ink to dry before you erase.
💡 Tip: Ink the fin rays with a lighter hand than the outline, so the fins stay soft and see-through.

Step 12: Color your koi
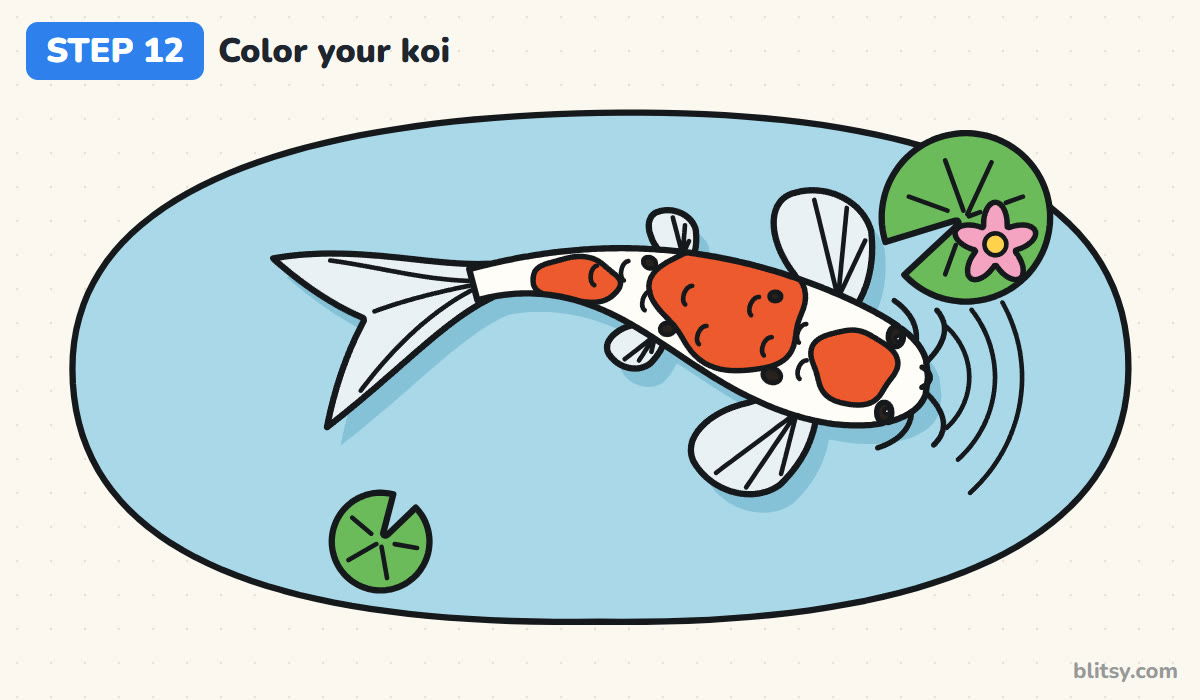
Color the pond light blue, and add a slightly darker blue shadow just below and to the right of the fish so it seems to float. Leave the body white. The patches are orange red, the spots and eyes black, and the fins and tail a very pale gray. Finish the lily pads in green with a pink flower and a yellow center.
💡 Tip: Color the water around the fish with strokes that follow the pond's curve, never across the koi.
Where Koi Sketches Tend to Go Off Course
- A straight body. A koi drawn stiff and straight looks like a sardine. Start with the S-curve and stick to it.
- A pointy nose. Koi have blunt, rounded heads. A sharp tip turns them into a pike or a shark.
- Eyes in the middle of the head. From above the eyes are on the sides. Push them out to the edge of the outline.
- Orange everywhere. If the whole fish is orange, it reads as a goldfish. Keep plenty of white between the patches.
- A short, stubby tail. The long trailing tail gives the koi its graceful look, so let it flow.
Two Koi, Black Koi and Other Pond Variations
Once the curve feels easy, try two koi circling each other, one white and orange and one golden yellow, so their bodies form a loose yin-yang shape. You can also swap the kohaku pattern for an all-black koi with orange fins, or add lots of black spots for a three-color look. If you want a simpler fish from the side first, my fish drawing tutorial is a good warm-up. Older kids who like the lily pad flower can grow it into a whole bloom with this flower drawing step by step guide, and the wave drawing lesson is great practice for water lines.
Free Koi Fish Coloring Page and Printable Steps
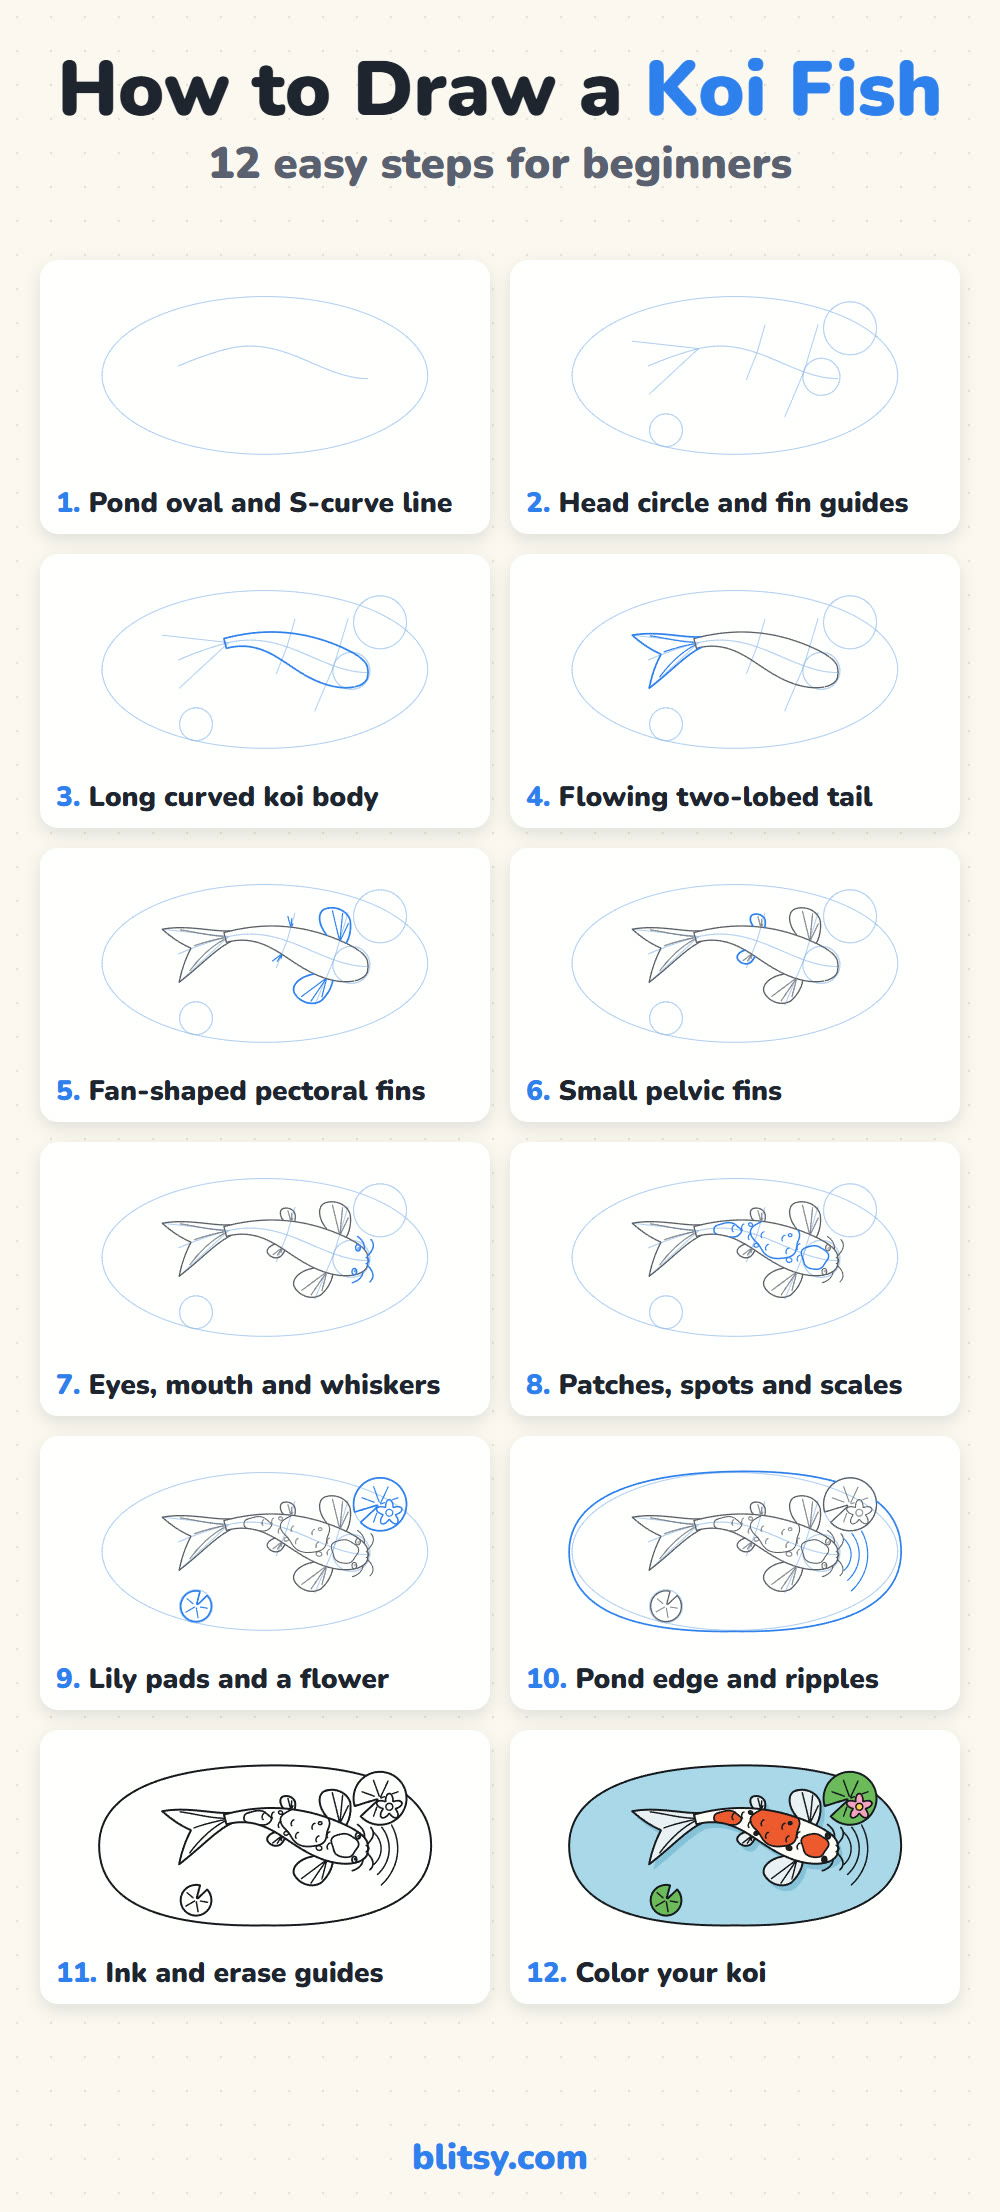
The free koi fish coloring page puts a colored model koi at the top, a key that matches each color to its part, and a large outline below to color yourself. The step-by-step PDF guide has all 12 steps with pictures and tips, handy for drawing away from a screen. Both print on Letter or A4 paper.
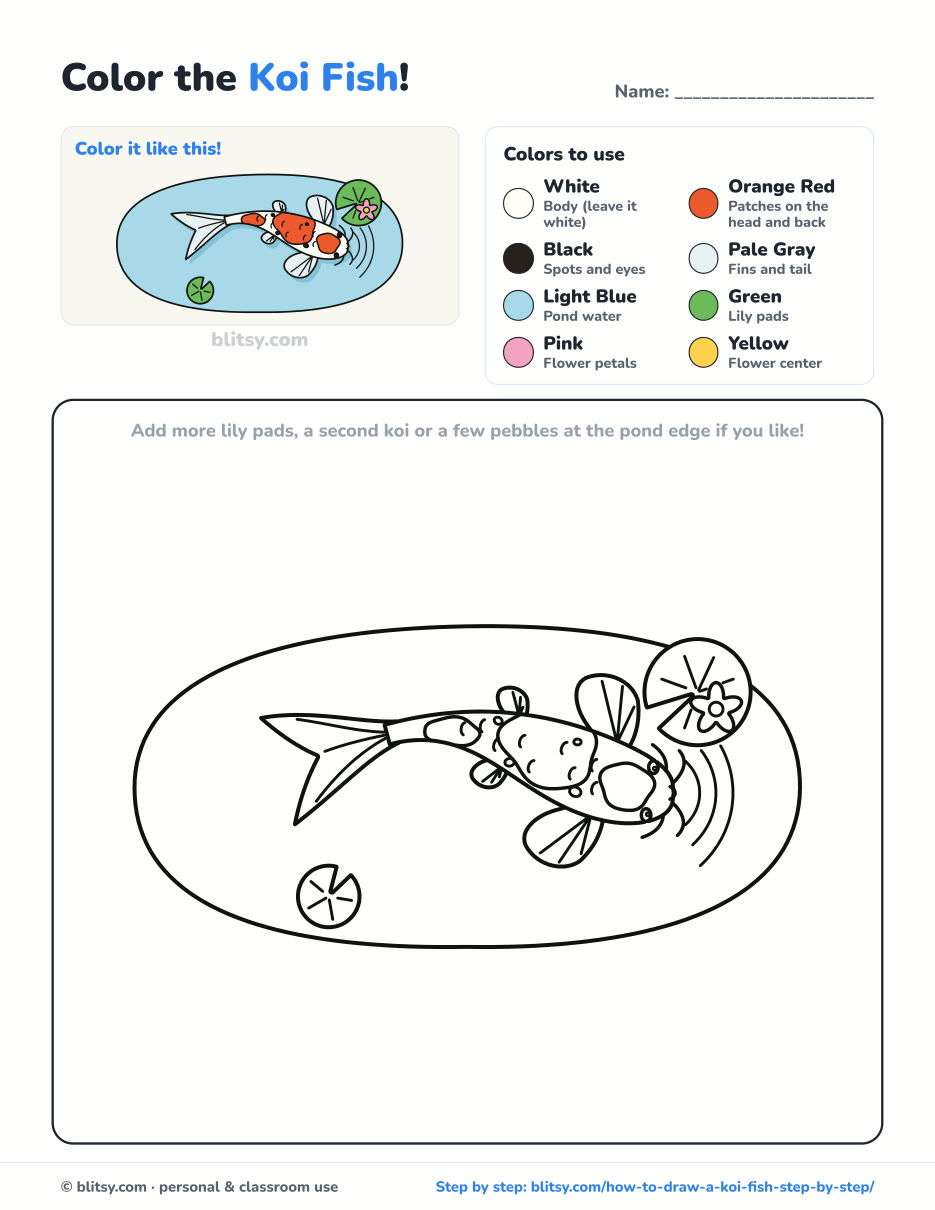
Black outlines with a colored example and the color names at the top. Ready to print and color.
⬇️ Download Coloring PageEvery step picture with its instructions and tips, to keep beside your paper while you draw.
⬇️ Download Drawing Guide📱 On a phone? Tap a download button, then open the file and choose Share → Save to Files or Print. On a computer, the PDF opens or saves straight to your Downloads folder.
Pin the Koi Pond Steps for Later
More Pond and Sea Creatures to Draw
Each of these is a full step-by-step tutorial with a picture for every stage.
- Fish Drawing: A plump goldfish with a fan tail and rows of scallop scales starts as one oval in this how to draw a fish step by step lesson.
- Frog Drawing: A smiling cartoon frog sits on a mossy log with big bulging eyes in this frog drawing tutorial.
- Turtle Drawing: Draw a sea turtle with a hexagon shell and spotted flippers in this turtle drawing step by step guide.
- Jellyfish Drawing: A pink jellyfish with frilly arms and long tentacles floats next to a tiny baby jelly in this jellyfish drawing tutorial.
- Magnolia Flower Drawing: A pink and white magnolia bloom opens on a knobby branch in this magnolia flower drawing lesson.
Koi Drawing Questions Worth Answering
How do you draw a simple koi fish?
Draw one gently curved line and wrap a long body around it with a rounded head. Then add a long tail and two fan fins. Whiskers and a few orange patches finish it.
What is the difference between drawing a koi and a goldfish?
Koi have longer, slimmer bodies, whiskers at the mouth and big white areas between the colors. Goldfish are rounder, have no whiskers and are usually orange all over.
Why draw a koi from above?
That's how people see koi in a pond, and it shows off the curved body and the patches on the back. It is also easier, since you don't need a side profile or gills.
What colors are koi fish?
The classic kohaku koi is white with orange red patches. Others are black, gold, yellow or blue gray, often with spots in a second or third color.
Grab a blue pencil for the water and let your koi take its first slow swim across the page. 🐟✏️
Related posts:
 How to Draw a Fish Step by Step (Easy Goldfish for Beginners)
 How to Draw a Car Step by Step (Easy Drawing for Beginners)
 How to Draw a Whale Step by Step (Easy for Beginners)
 How to Draw a Chicken Step by Step (Easy for Beginners)
 How to Draw a Snowman Step by Step (Easy for Beginners)
 How to Draw an Airplane Step by Step (Easy Jet for Beginners)
 How to Draw a Mouse Step by Step (Easy for Beginners)
 How to Draw a T-Rex Step by Step (Easy for Beginners)
 How to Draw a Pig Step by Step (Easy for Beginners)
 How to Draw a Minion Step by Step (Easy for Beginners)
 How to Draw a Notebook Step by Step (Easy for Beginners)
 How to Draw Yoda Step by Step (Easy Chibi for Beginners)

