
Spider-Man looks busy on paper because of all those web lines, but underneath he's just a big egg-shaped head on a small body. Once you see that, the web becomes the last, fun layer instead of the scary part. Here I'll walk you through how to draw Spider-Man step by step as a chibi hero, ending with his hand up in the famous web-shooting pose. This is my own simple fan-art version for practice, not a copy of any official Marvel drawing.
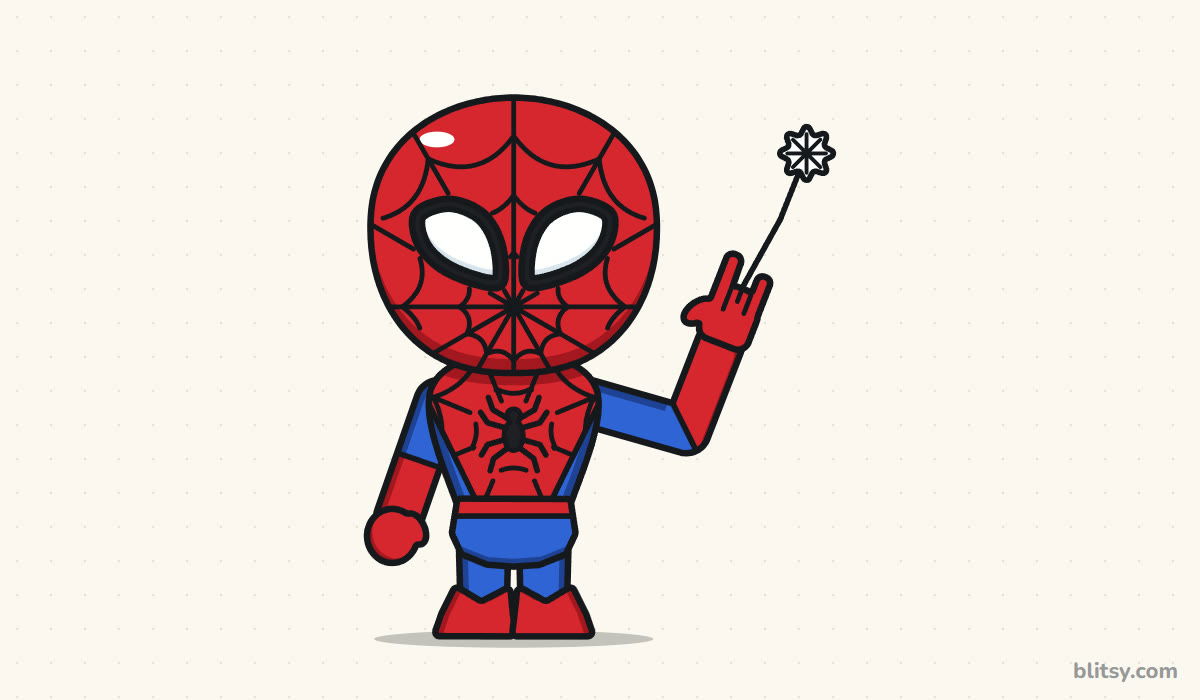
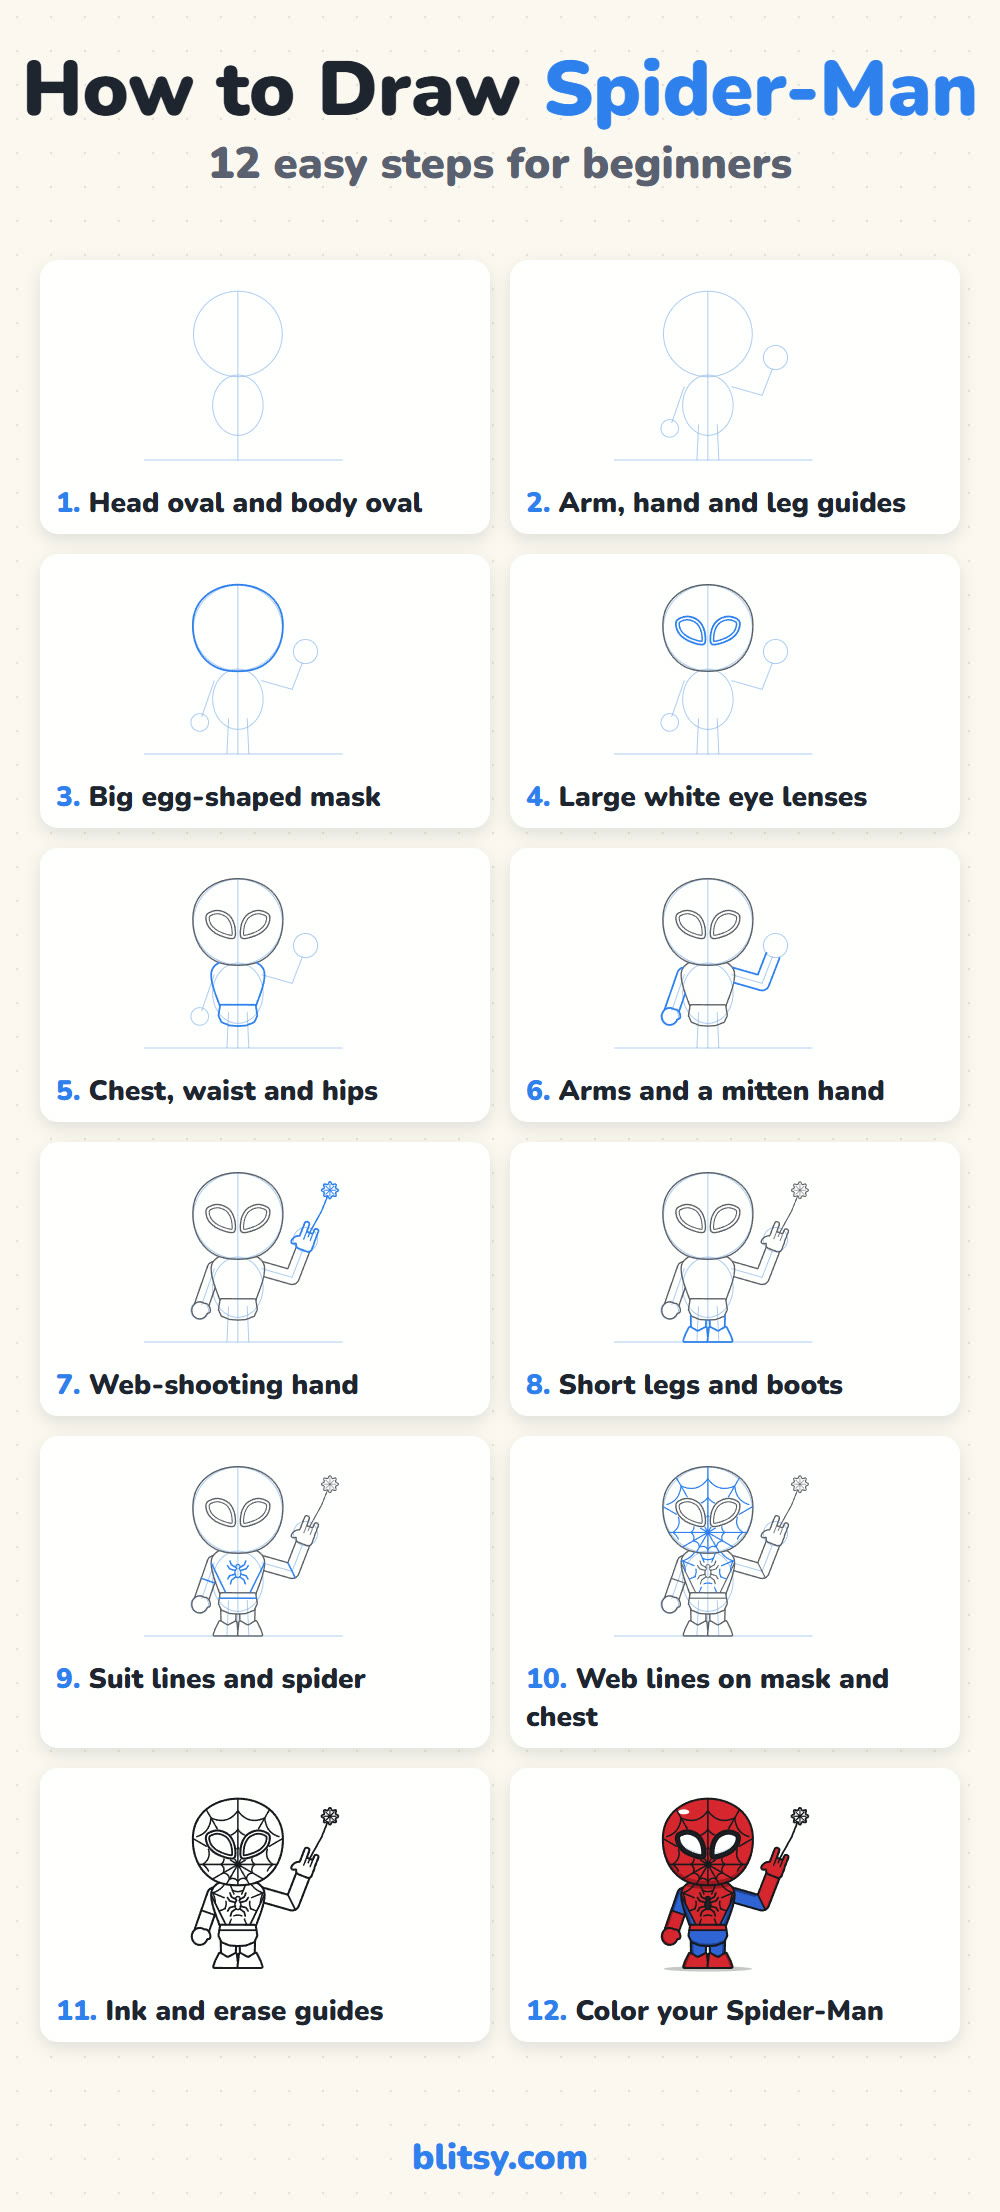
Look for the strong blue lines in every picture; those are your next marks. Anything gray is already drawn, and the faint guide shapes from the first steps vanish once you ink.
Quick overview
⏱️ Time: about 40 to 50 minutes with coloring
🎯 Level: easy to medium, fine for kids around 7 and up
✏️ Steps: 12
🕷️ You'll draw: a chibi Spider-Man shooting a web from one raised hand
Gear for Your Web-Slinger Sketch
- A pencil you can press lightly, such as HB
- A clean eraser
- A black fineliner or thin marker for the outlines and web
- Red and blue markers or colored pencils, plus a darker shade of each
- A black marker for the eye frames and the spider emblem
- Plain white paper
A thin pen matters most, since a thick one turns the web into a dark blob.
How to Draw Spider-Man Step by Step
Step 1: Sketch a big head oval and a small body oval
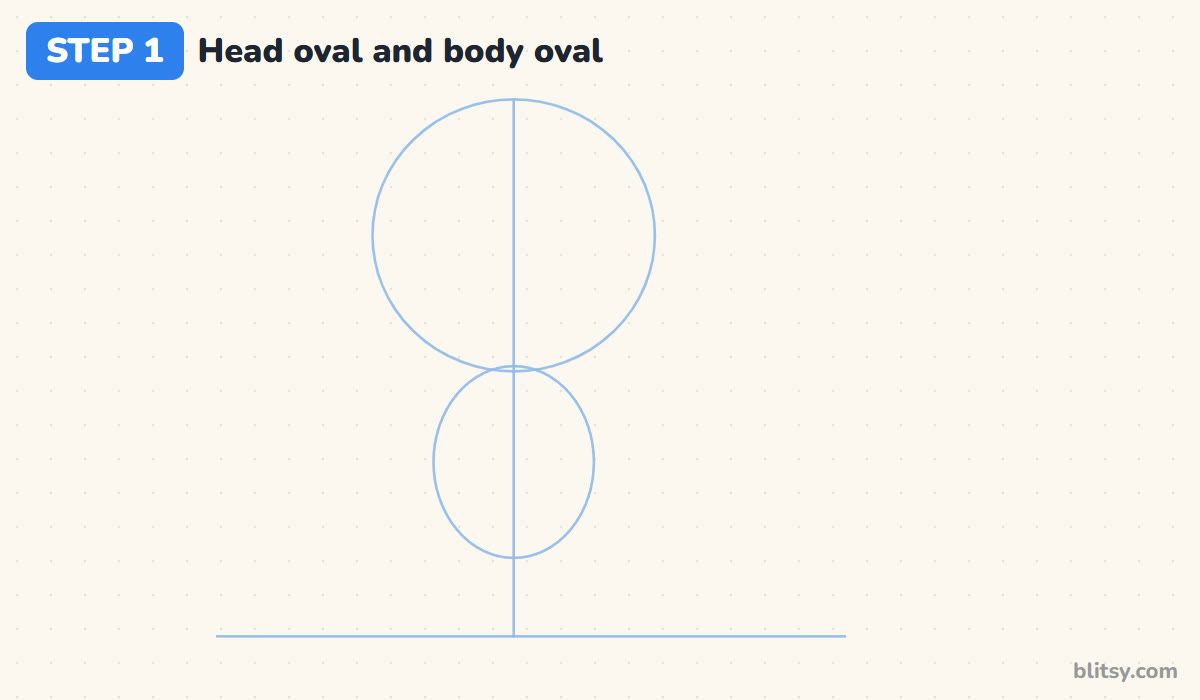
Draw a ground line near the bottom of the paper and a light line up the middle. On the upper half, draw a large oval for the head, then a much smaller oval just below it for the body. The head should be about as tall as the body and legs together, because that big-head look is what makes him chibi.
💡 Tip: Press so lightly that you can barely see the lines. You'll erase every one of them later.
Step 2: Add guide lines for the arms and legs
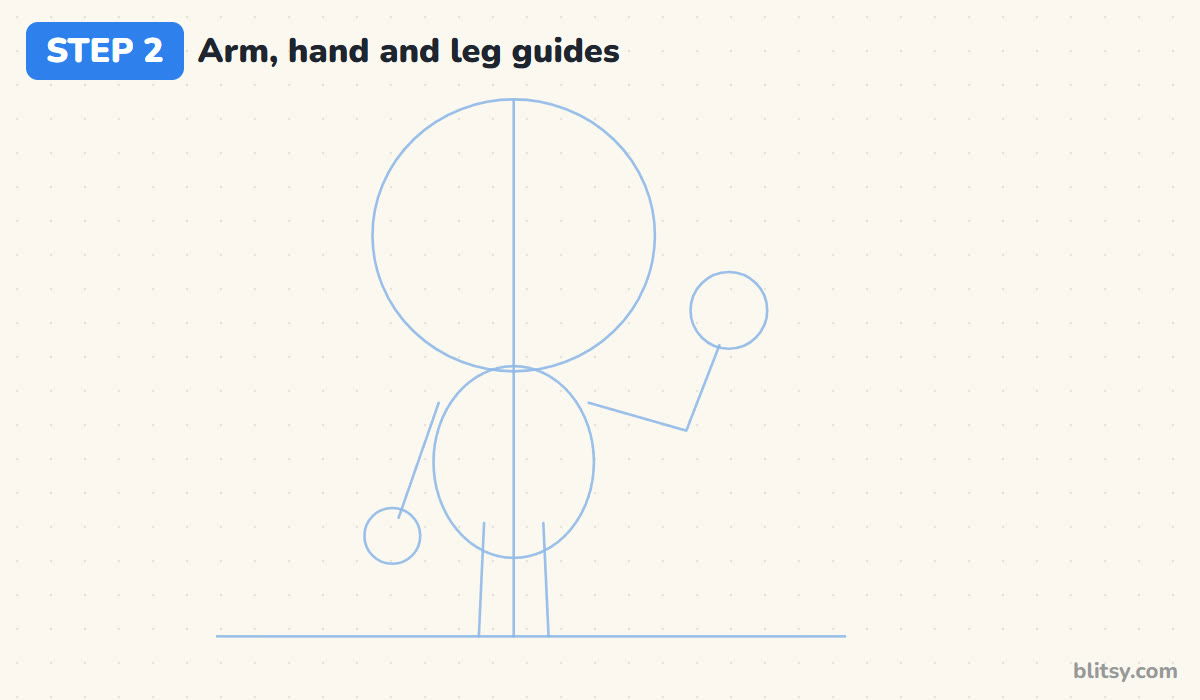
On the left, draw a line slanting down and out from the body, with a small circle at the end for the hand. On the right, draw a line out to an elbow point, bend it straight up, and finish with a circle for the raised hand. Two short lines from the body to the ground mark the legs.
💡 Tip: Keep the raised hand circle away from the head. If they touch, the hand will look glued to his ear.
Step 3: Draw the big egg-shaped mask
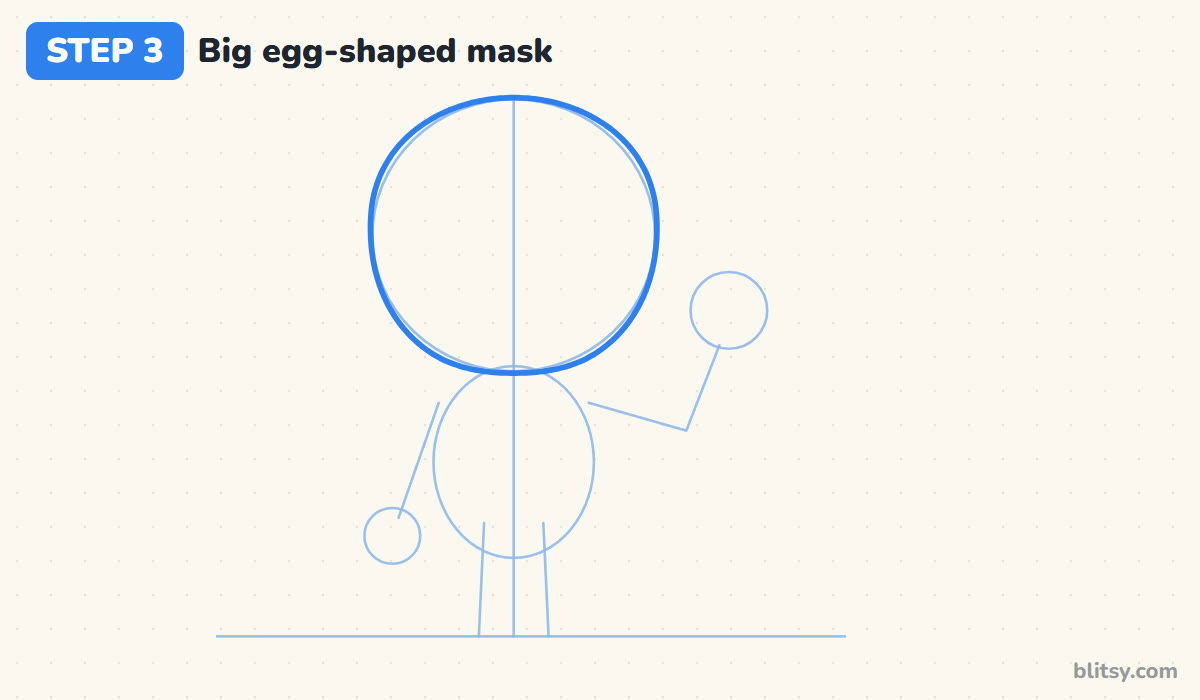
Go around the head oval with a smooth line. Keep the top wide and round, then let the sides curve in toward a slightly narrower chin. I picture an upside-down egg here. With no neck, the mask sits right on the body.
💡 Tip: Turn your paper as you draw the curve. Your hand stays in its comfortable position and the line comes out rounder.

Step 4: Draw the large eye lenses
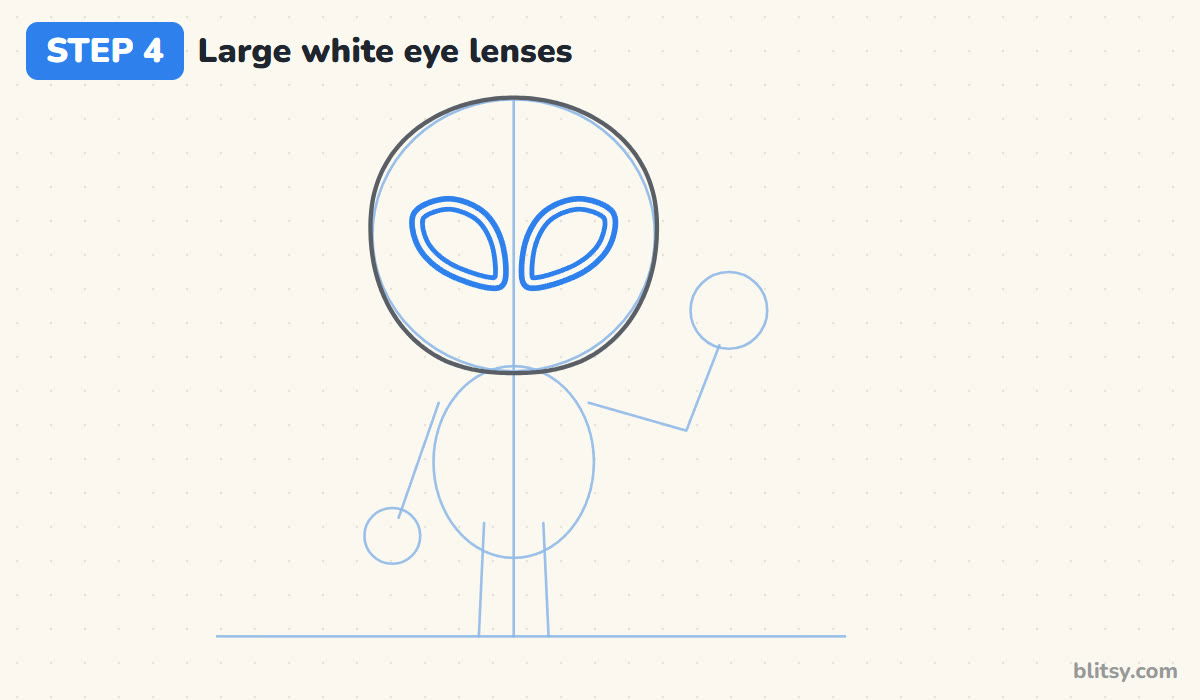
These eyes are what everyone recognizes, so take your time. Each one is wide at the top outer corner and narrows to a soft point near the middle line, like a tilted teardrop. Leave a small gap between the points, then draw a second line inside each eye to make a thick frame.
💡 Tip: Draw one eye, then check the other against it from a step back. Matching eyes matter more than perfect ones.
Step 5: Shape the chest and the hips
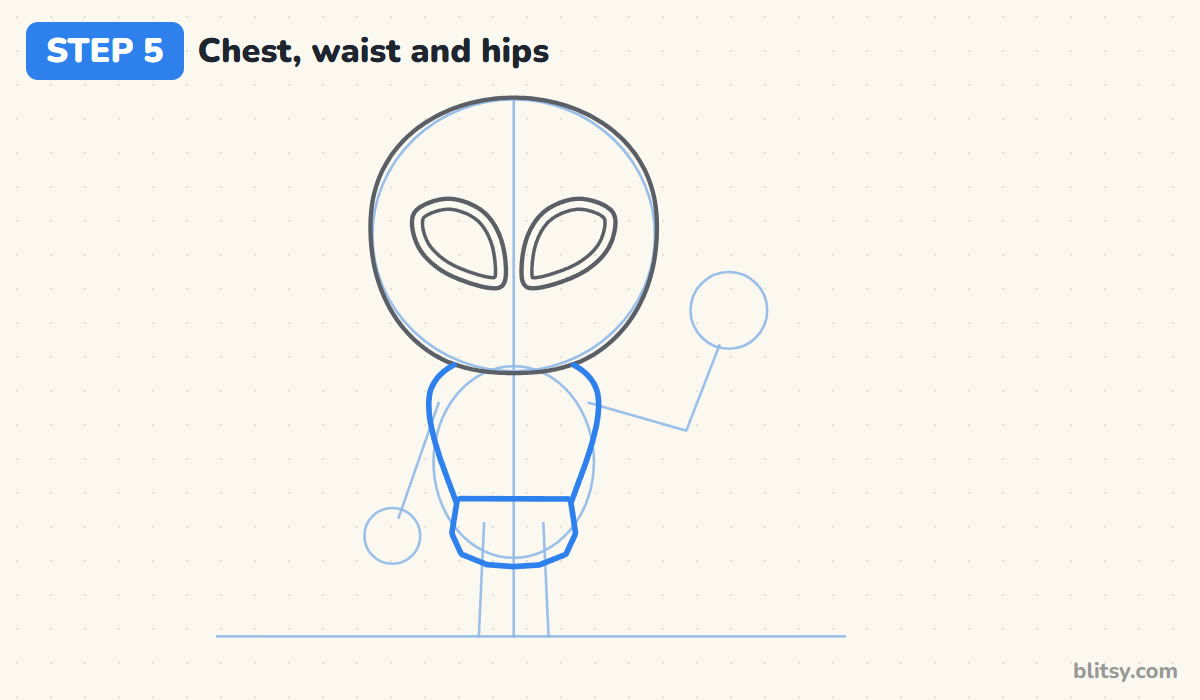
From under the chin, draw the shoulders curving out, then bring both sides in toward a narrower waist. Across the bottom, add a wide band for the belt and hips. Keeping the chest narrower than the head keeps him small and cute.
💡 Tip: Let the chest top disappear behind the mask, with no line where they meet.
Step 6: Draw both arms and the left mitten hand
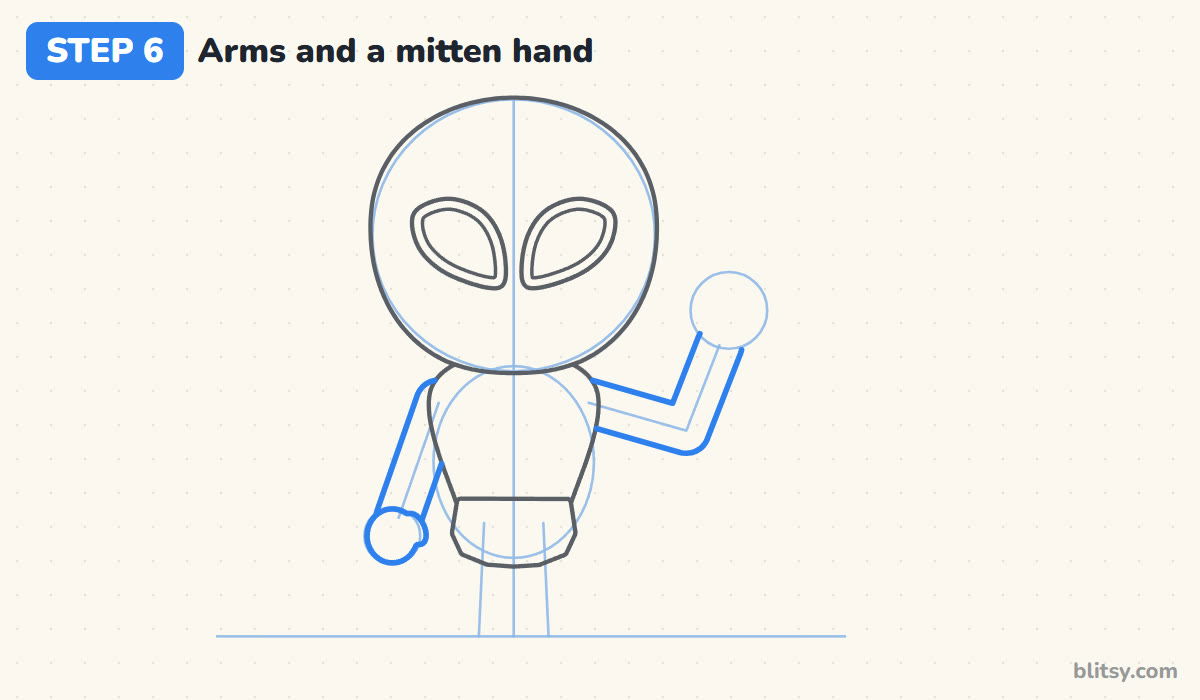
Draw each arm as a soft tube along the guides. The left arm goes straight down to a round mitten hand with a little thumb bump facing the body. The right arm goes out to the elbow and bends upward. Give the arms real width; stick arms make him look like a scarecrow.
💡 Tip: Round off the elbow corner on the bent arm. A sharp corner looks like a broken pipe.
Step 7: Draw the web-shooting hand and a web
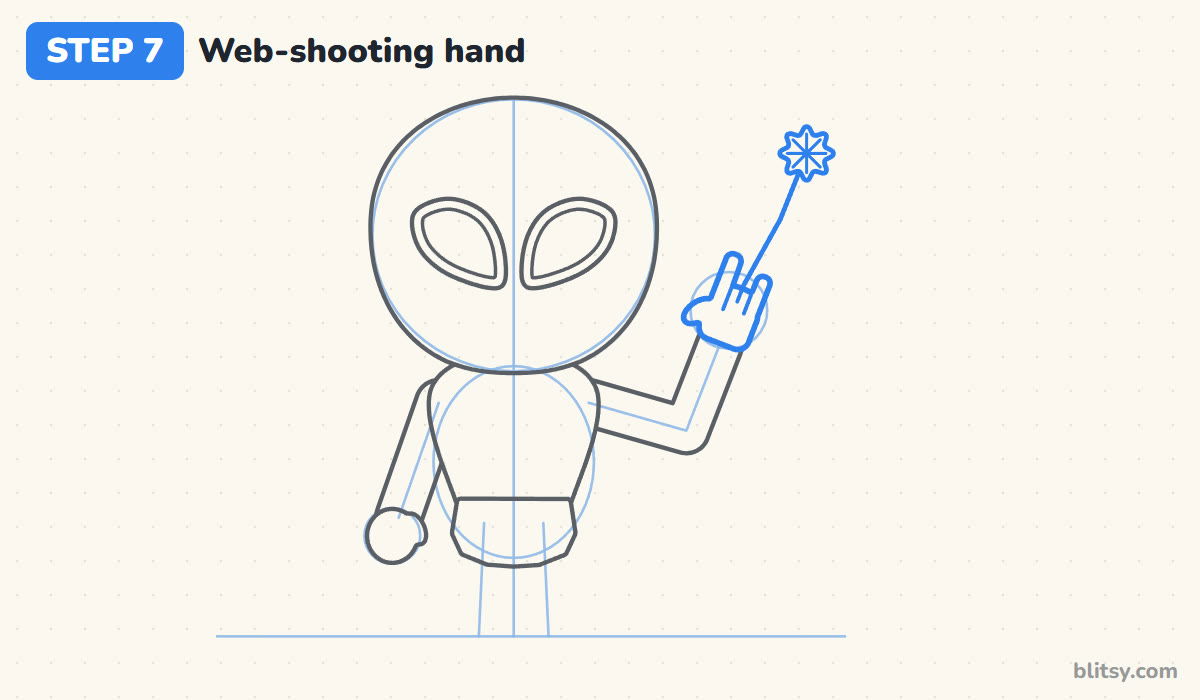
At the top of the bent arm, draw a rounded palm. Add a tall pointer finger on the side near his head and a shorter pinky on the far side. Between them goes a low bump for the two folded middle fingers, with the thumb sticking out sideways. Then draw a thin web line going up to a small star-shaped splat.
💡 Tip: I keep these fingers simple and rounded, like a mitten with two fingers poking up. Knuckle lines only make it messy.



Step 8: Add short legs and boots
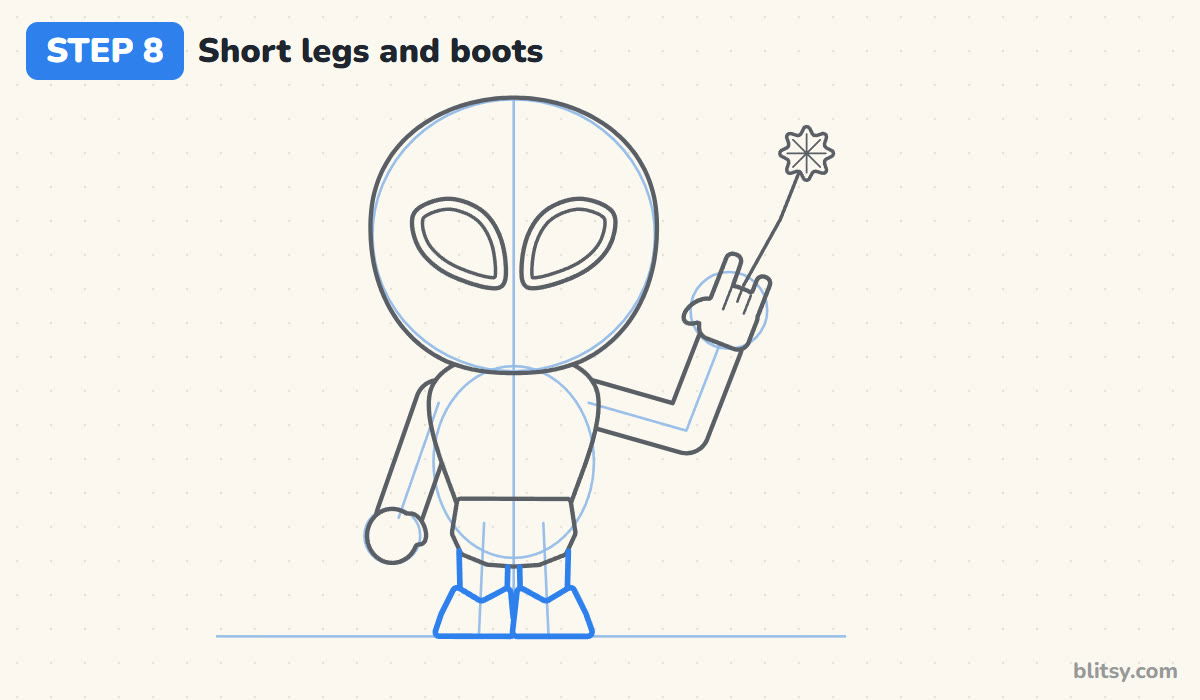
Under the hips, draw two short legs with a small gap between them. Each one ends in a boot a little wider than the leg, with a shallow V on top and a flat sole on the ground line.
💡 Tip: Short legs are fine. Long ones would fight the big head.
Step 9: Draw the suit lines and the spider emblem
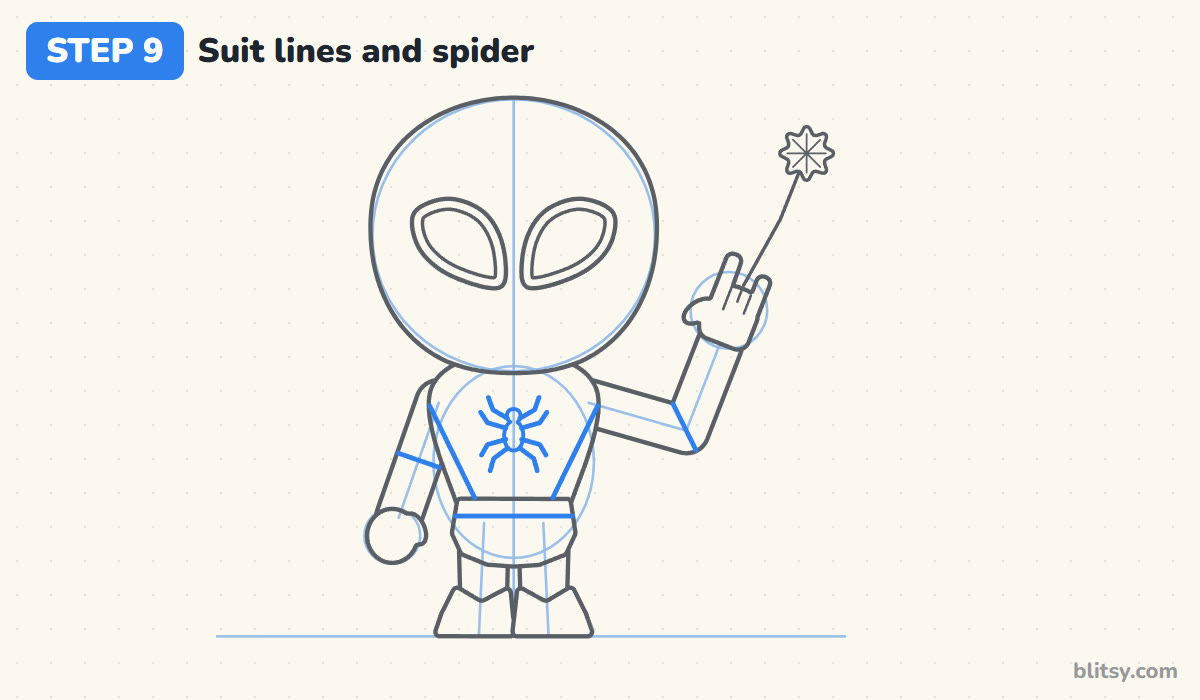
Draw a line from each armpit down to the middle of the belt, making a V on the chest. The V will be red and the strips beside it blue. Add a line along the belt and one across each arm where blue meets red. In the center of the chest, draw a tiny spider with a round head, an oval body and four bent legs per side.
💡 Tip: I make the spider small, about as tall as one eye lens. A huge spider crowds out the web lines.
Step 10: Add the web lines on the mask and chest
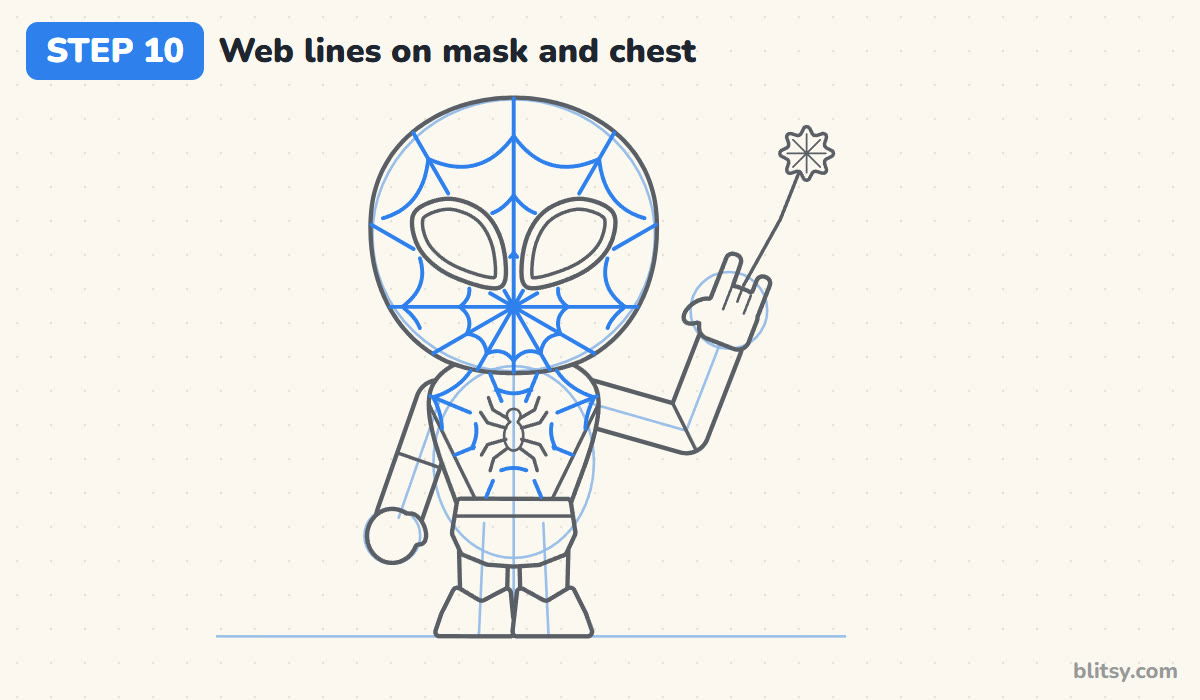
Pick a point on the mask just below and between the eyes. Draw straight lines spreading out from it to the edge, like pizza slices, stopping at the eye frames. Connect them with curves that dip toward the center, in three or four rings. Repeat on the red chest panel, starting from the spider.
💡 Tip: Make every connecting curve sag inward. Curves that bulge outward look like a soccer ball instead of a web.
Step 11: Ink the drawing and erase the guides
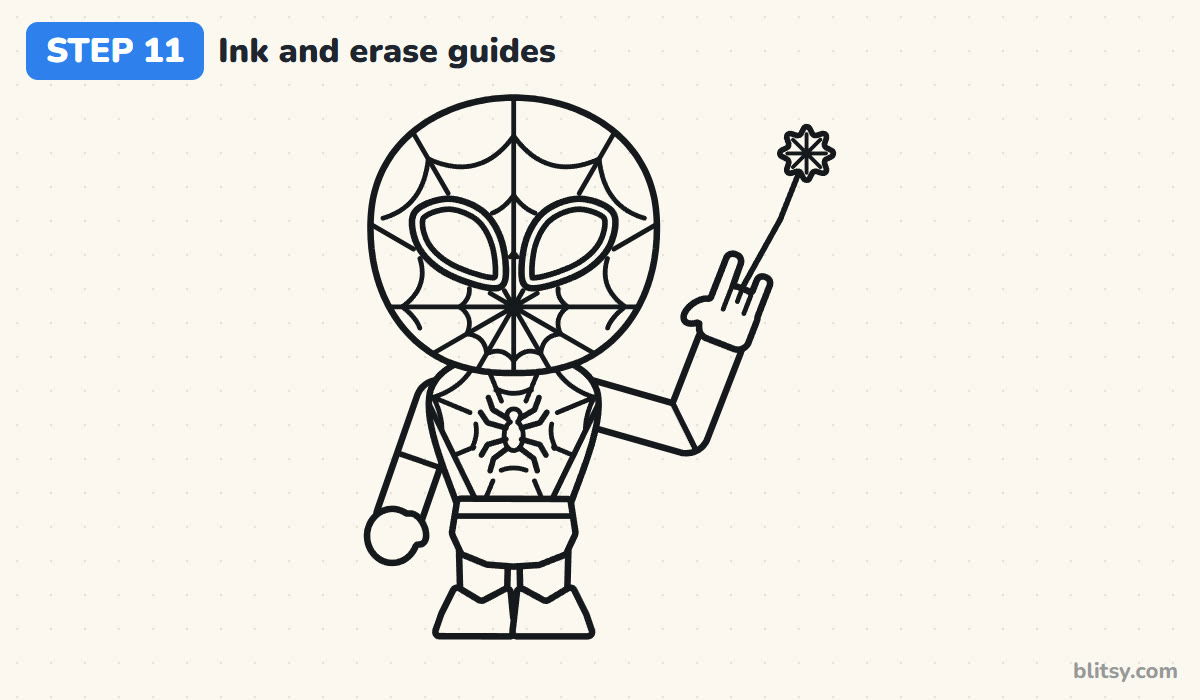
Trace every line you want to keep with your black pen. I ink the big outlines first and save the web for last, using quick, thin strokes. Skip the guides, and once the ink is dry, erase all the pencil.
💡 Tip: Rest your hand on a scrap of paper while inking so the web doesn't smudge.



Step 12: Color your Spider-Man red and blue
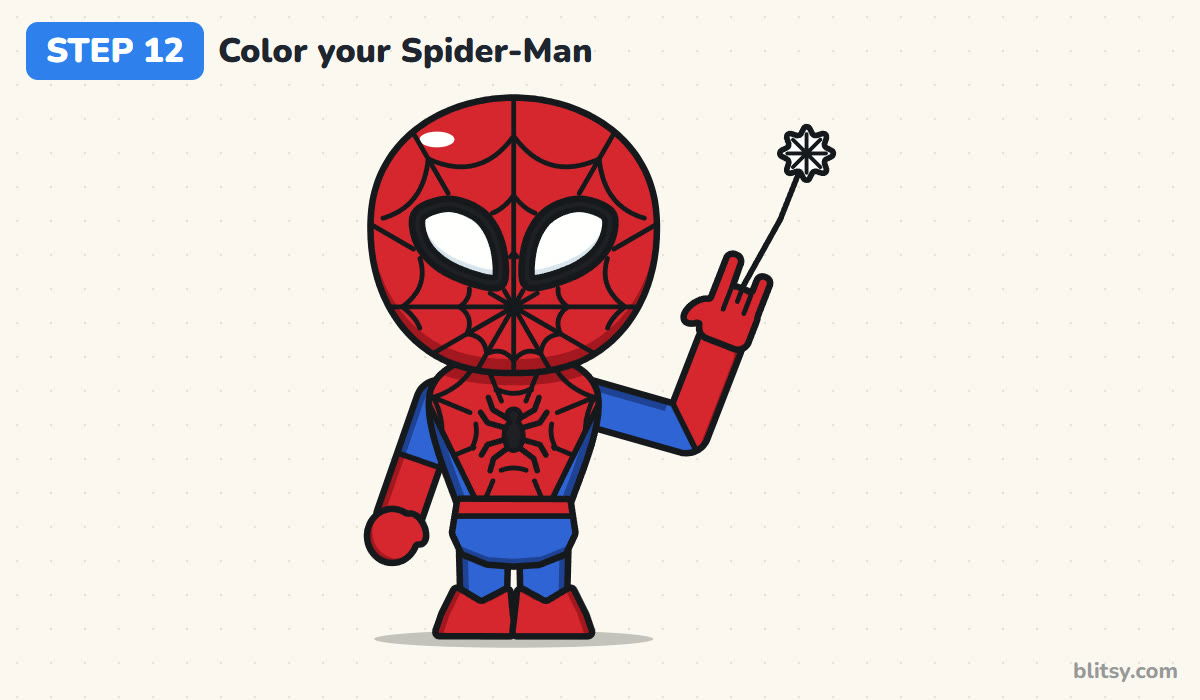
Color the mask, chest V and belt red, then the forearms and hands and both boots. The body sides and upper arms are blue, like the hips and legs. Fill the eye frames and spider with black and leave the lenses and splat white. Add darker red and blue along the outer edges, plus a white shine on the mask.
💡 Tip: Color around the black web lines, not over them. If red covers them, go back over the lines with your pen.
Where Spider-Man Sketches Get Tangled
- Eyes that are too small. Tiny lenses make the mask look blank. Each eye should be almost as wide as a third of the head.
- Web curves bulging outward. That turns the pattern into a ball. Always let the curves dip toward the center point.
- Web lines crossing the eyes. Stop each line at the black eye frame so the lenses stay clean and white.
- Stick-thin arms and legs. Thin limbs look fragile under a big head. Draw them as soft tubes with real width.
- Too many fingers on the raised hand. Two fingers up, two folded and a thumb is all you need to show the web pose.
Swing Into New Spider-Man Poses
When this pose feels easy, try him hanging upside down from a web line or crouched low on the ground. A black suit with a big white spider is a fun swap too. Younger artists can skip the chest web and still get a clear Spider-Man, because the eyes and the mask web do most of the work. If you'd like a teammate for him, the Iron Man drawing tutorial uses the same chibi size, and the Hulk drawing tutorial adds a big green friend. For a real spider to sit on his web, try the spider drawing step by step lesson.
Free Spider-Man Coloring Page and 12-Step PDF
For a rainy afternoon or a superhero party, print the free Spider-Man coloring page. A small colored example at the top shows which parts are red and which are blue. The step-by-step PDF guide has all 12 steps with tips, two per page, on Letter or A4 paper.
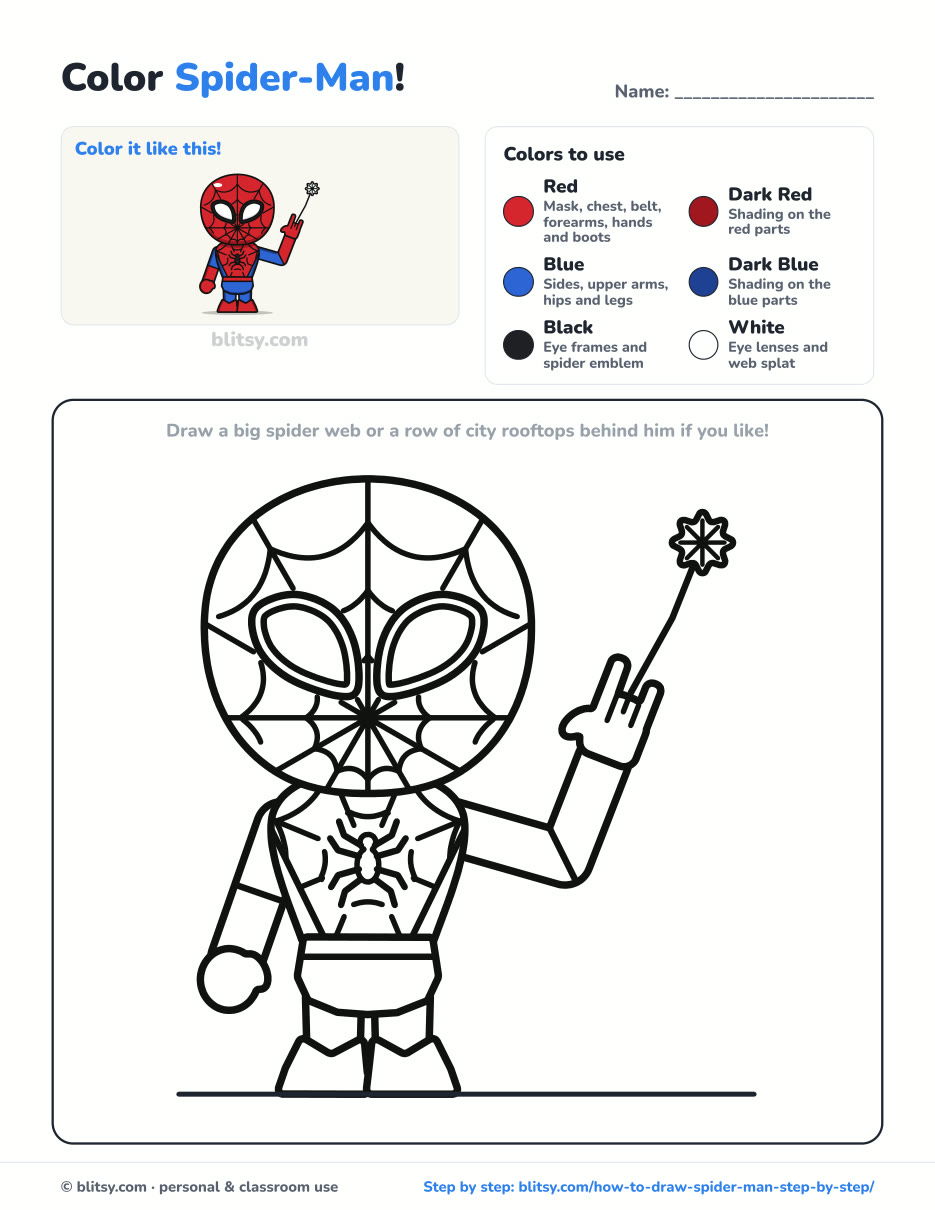
Black outlines with a colored example and the color names at the top. Ready to print and color.
⬇️ Download Coloring PageEvery step picture with its instructions and tips, to keep beside your paper while you draw.
⬇️ Download Drawing Guide📱 On a phone? Tap a download button, then open the file and choose Share → Save to Files or Print. On a computer, the PDF opens or saves straight to your Downloads folder.
Pin Spider-Man's Web Lesson for Later
Spider-Man Done? Heroes and Characters to Draw Next
Each one is a full step-by-step tutorial with a picture for every stage, and most use the same chibi proportions.
- Iron Man Drawing: A red and gold chibi hero with a glowing chest light stands ready in this how to draw Iron Man step by step lesson.
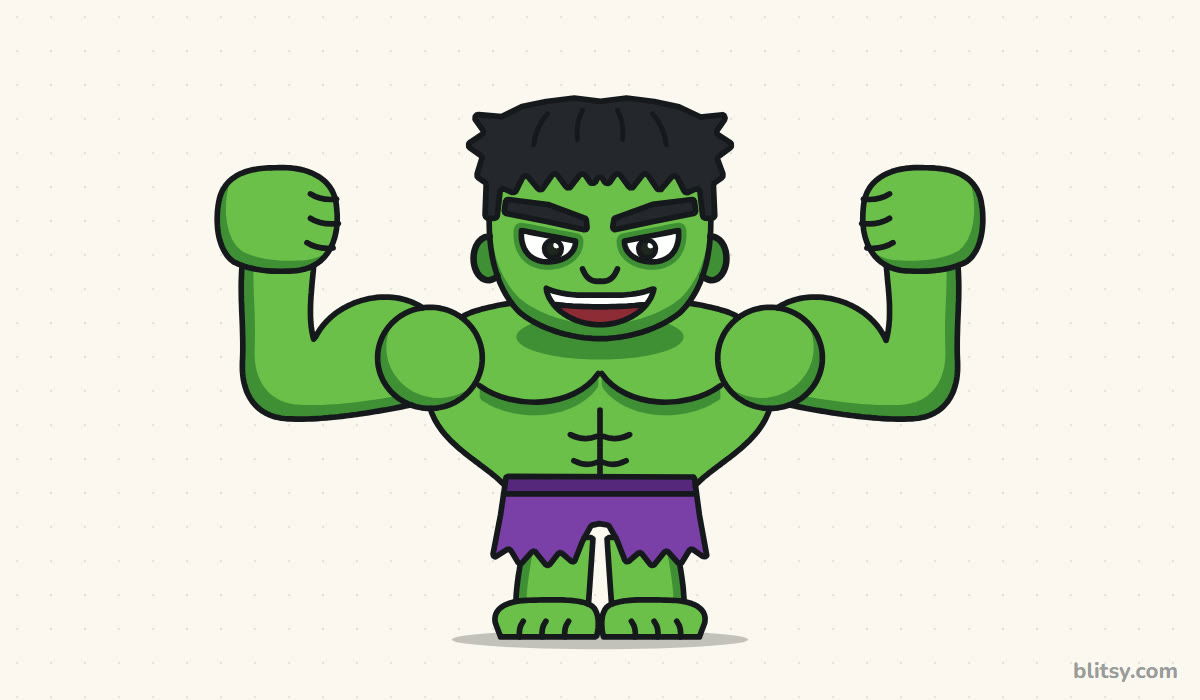
- Hulk Drawing: Draw a small, grinning Hulk flexing both arms with this Hulk drawing tutorial.
- Wonder Woman Drawing: Hands on hips and a golden lasso at her side, she's built from a few guide shapes in this Wonder Woman drawing tutorial.
- Spider Drawing: A friendly purple spider dangles from its silk next to a round web in this spider drawing step by step guide.
- Joker Drawing: Turn the famous villain into a friendly chibi, card in hand, with this how to draw the Joker tutorial.
Spider-Man Drawing Questions Kids Ask Me
What is the easiest way to draw Spider-Man?
Draw him as a chibi from the front. A big egg-shaped head with two large white eyes and a few web lines is enough for anyone to recognize him.
How do you draw the web on Spider-Man's mask?
Draw straight lines spreading out from a point just below the eyes, then join them with curves that dip toward that point. Three or four rings are plenty.
How do you draw Spider-Man's hand shooting a web?
Raise the hand with the palm facing you. Put the pointer finger and pinky up, fold the two middle fingers down, stick the thumb out, and draw a thin line coming from the wrist.
What colors do you need for Spider-Man?
You need red and blue for the suit plus a darker shade of each for shading. Black covers the eye frames and spider, and the white paper shows through for the lenses.
One big head, two white eyes and a web in flight: your Spider-Man is ready to swing off the page. 🕷️
Related posts:
 How to Draw Iron Man Step by Step (Easy Chibi for Kids)
 How to Draw Wonder Woman Step by Step (Chibi for Kids)
 How to Draw the Hulk Step by Step (Easy Chibi for Kids)
 How to Draw Springtrap Step by Step (Cute Chibi for Kids)
 How to Draw Cat Noir Step by Step (Easy Chibi Hero)
 How to Draw Goku Step by Step (Easy Chibi Version)
 How to Draw Freddy Krueger Step by Step (Cute Chibi Version)
 How to Draw Ariana Grande Step by Step (Cute Chibi Fan Art)
 How to Draw Master Chief Step by Step (Easy Chibi Armor)
 How to Draw the Joker Step by Step (Easy Chibi for Beginners)
 How to Draw Tinkerbell Step by Step (Easy Flying Chibi)
 How to Draw a Chibi Step by Step (Easy 2-Head Method)

