
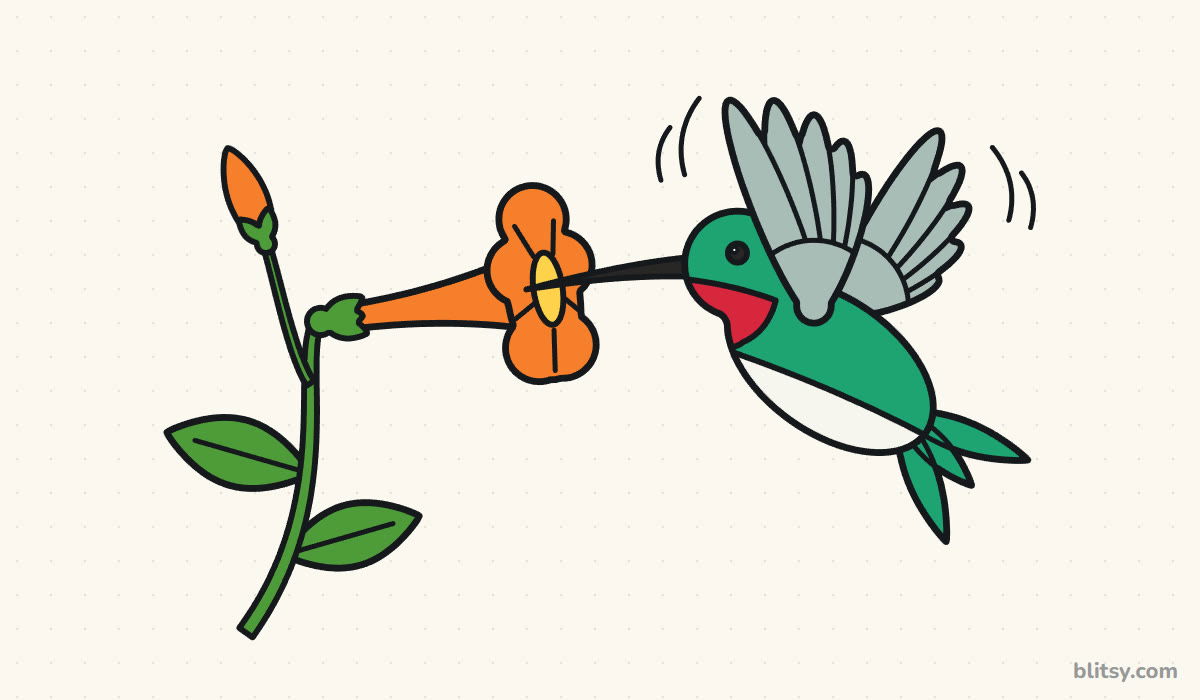
Hummingbirds are tiny, but their shape is surprisingly simple: a small round head, an egg-shaped body and a beak that seems far too long for them. In this lesson I'll show you how to draw a hummingbird step by step, hovering next to an orange trumpet flower with its wings lifted high. If you can draw a circle and an oval, you can draw this bird.
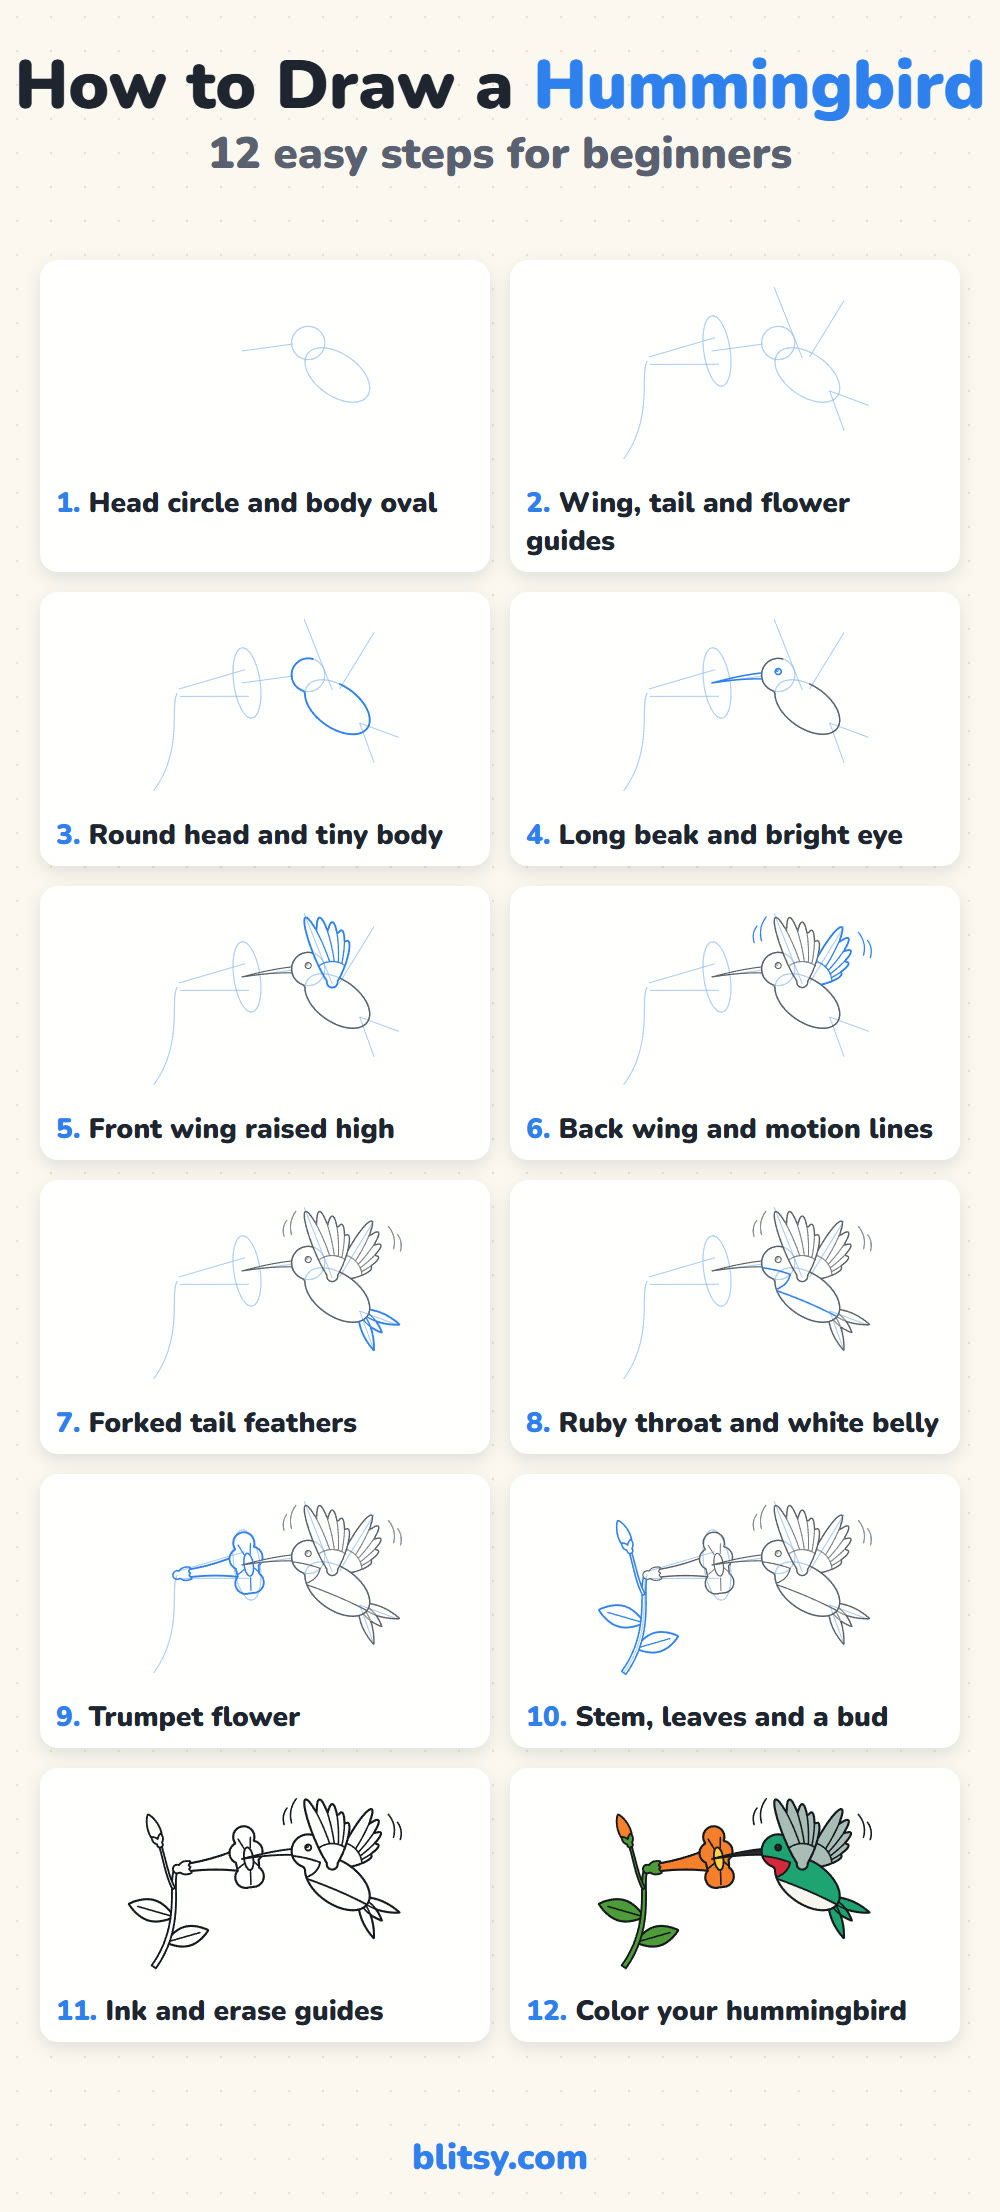
Tiny hummingbird parts are easier when you add only a few lines at a time. Copy just the bright blue lines in each image. Dark gray means already drawn, and pale blue marks the light guides you'll erase.
Quick overview
⏱️ Time: about 30 to 45 minutes
🎯 Level: easy, fine for kids from about 7 years old
✏️ Steps: 12
🐦 You'll draw: a ruby-throated hummingbird sipping from an orange trumpet flower
Hummingbird Supplies: Greens, a Red and a Fine Pen
- An HB pencil for light guide lines
- A soft eraser
- A black fineliner or thin marker for the final lines
- Colored pencils or markers: emerald green, leaf green, red, orange, yellow, light gray and black
- Plain paper, turned sideways so the flower and bird both fit
Use two different greens if you have them, so the bird's shiny back doesn't blend into the leaves.
How to Draw a Hummingbird Step by Step
Step 1: Sketch a head circle and a tilted body oval
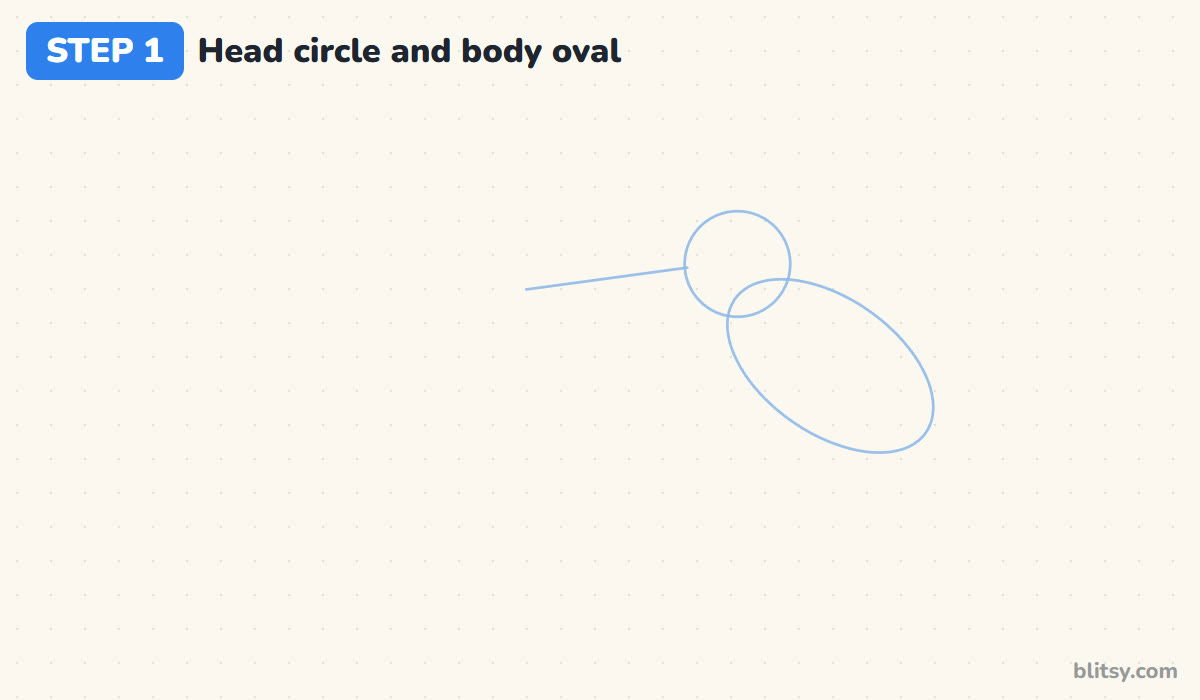
Draw a small circle a little right of the middle of your page. Below and to the right of it, draw an oval that leans downhill, overlapping the circle slightly. From the left side of the circle, draw one long, nearly flat line for the beak. Press lightly, since all three shapes are only guides.
💡 Tip: Keep the oval about twice as long as the circle is wide. A hummingbird's head looks big next to its tiny body, and that is part of its charm.
Step 2: Add guides for the wings, tail and flower
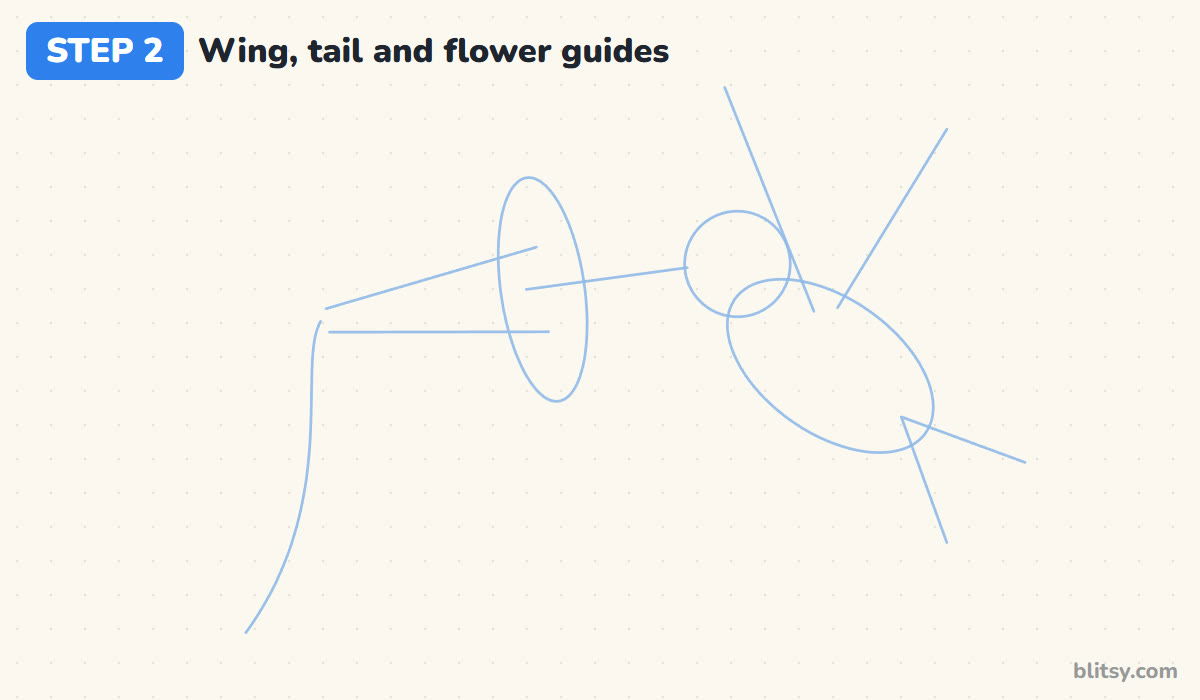
From the top of the body, draw two straight lines going up in a V for the wings. At the bottom of the oval, add two short lines spreading apart for the tail. On the left, sketch a cone ending in a tall, narrow oval at the beak tip, plus a long curve down for the stem.
💡 Tip: Make the wing lines longer than the whole body. Hummingbird wings are long and narrow, and short wings make the bird look like a sparrow.
Step 3: Draw the round head and small body
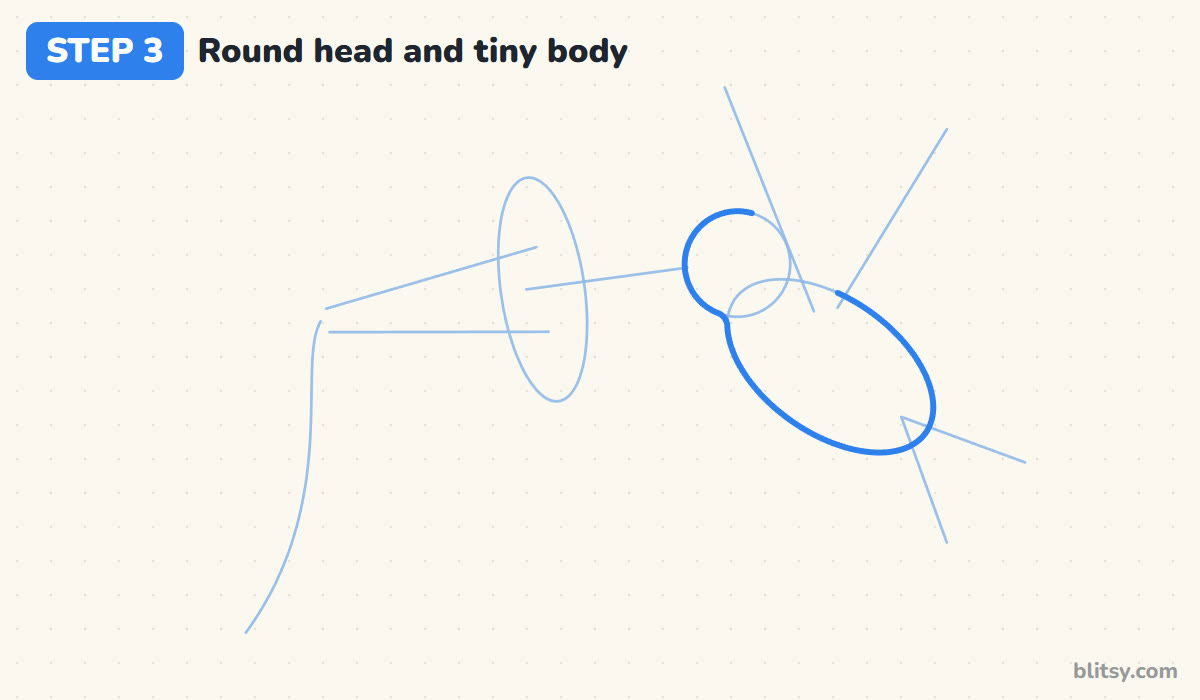
Trace around the head circle, then let the line dip in a little for the neck and swing around the body oval. Leave a gap on the top of the back where the wing will cover it. That gap saves you from erasing later.
💡 Tip: Make the neck curve soft and short. A long neck turns the hummingbird into a tiny heron.




Step 4: Add the long beak and the eye
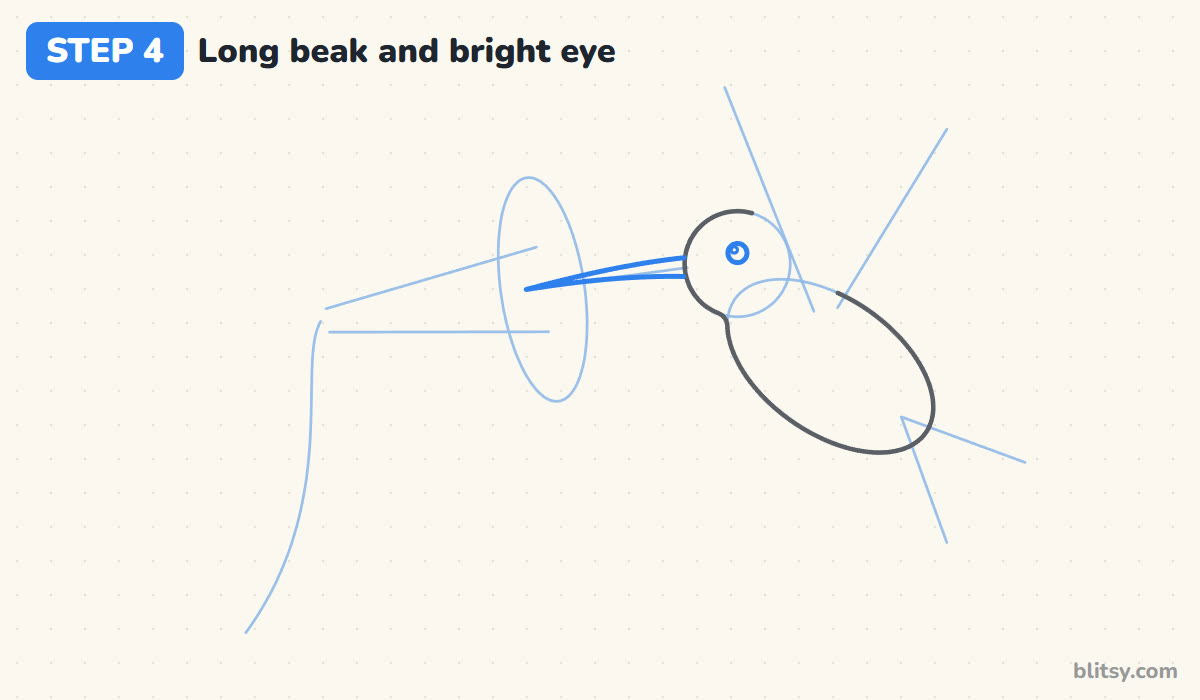
Follow the beak guide with two lines that start apart at the face and meet in a sharp point at the flower. Curve the beak down very slightly. Then draw a small circle for the eye, set high on the head and close to the beak, with a tiny circle inside it for the shine.
💡 Tip: Make the beak about as long as the head and body together are tall. A short beak is the most common giveaway.
Step 5: Draw the front wing raised high
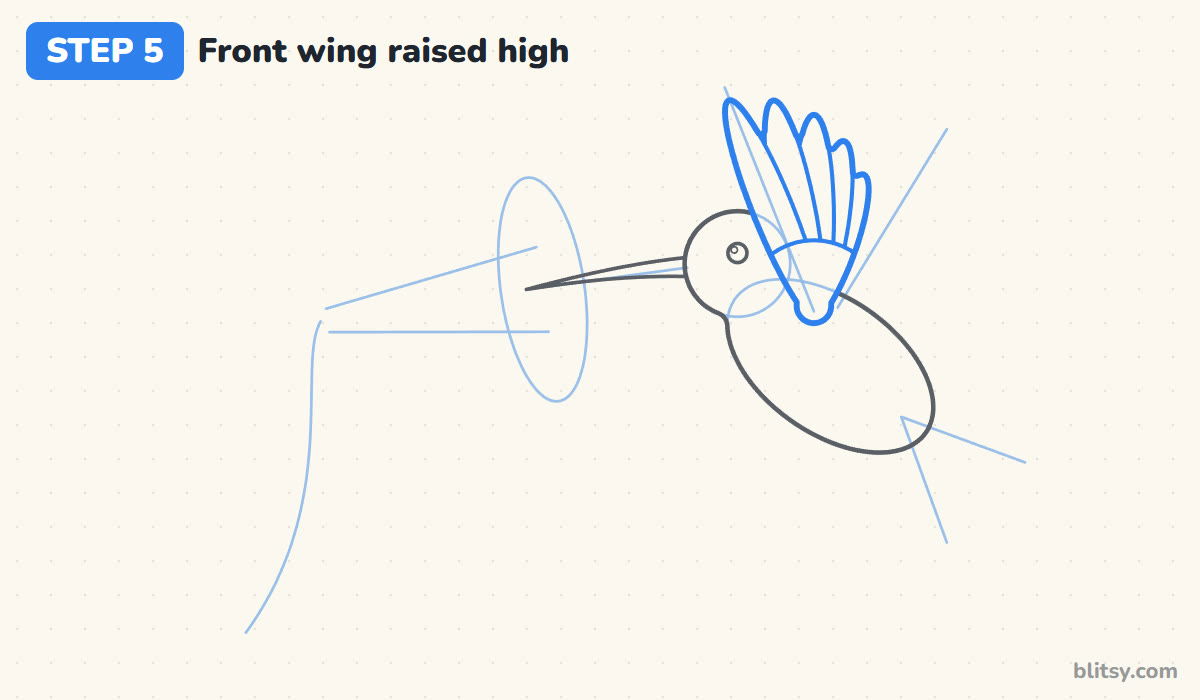
Start at the shoulder on the back and draw five long feathers fanning up along the left wing guide, like spread fingers. The front feather is longest, and each one behind it is a little shorter. A curved line across the base shows the small top feathers.
💡 Tip: Give every feather a rounded tip, not a sharp one. Rounded tips look soft, and they're easier to draw evenly.
Step 6: Add the back wing and motion lines
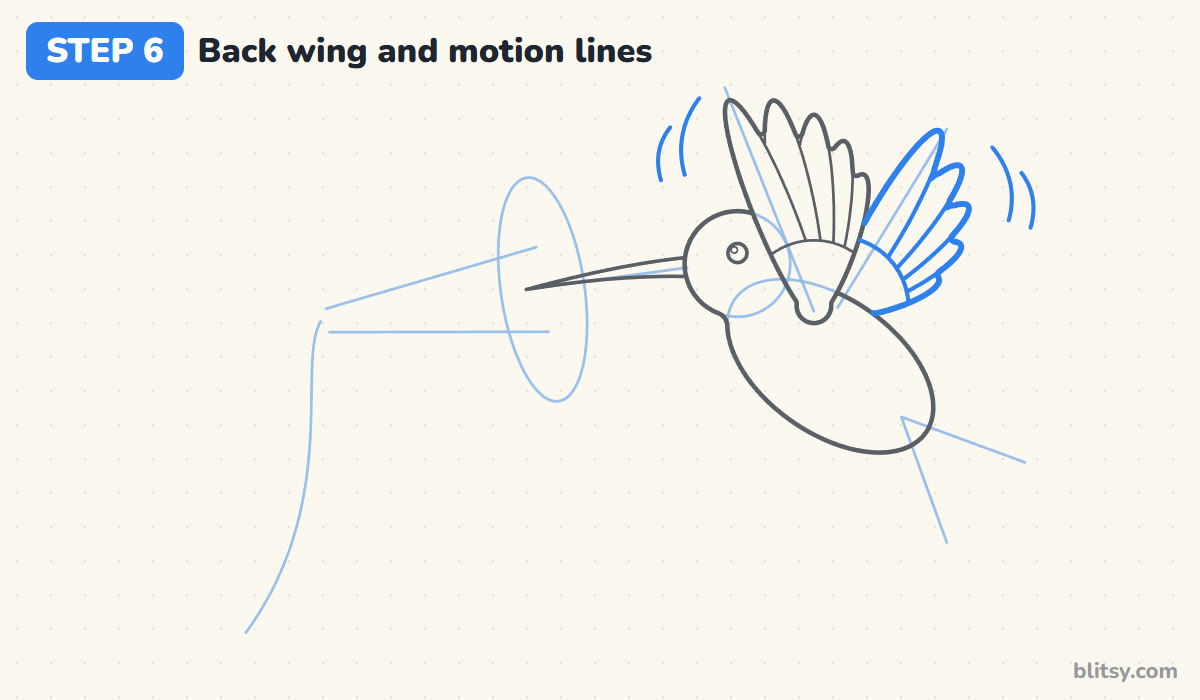
Draw the second wing along the right guide, again as a fan of feathers, stopping each line where it meets the front wing or the body. Then add two small curved lines beside each wing tip to show the wings beating fast.
💡 Tip: Keep the motion lines short and few. Two per side is plenty, and more starts to look like scribbles.
Step 7: Draw the forked tail
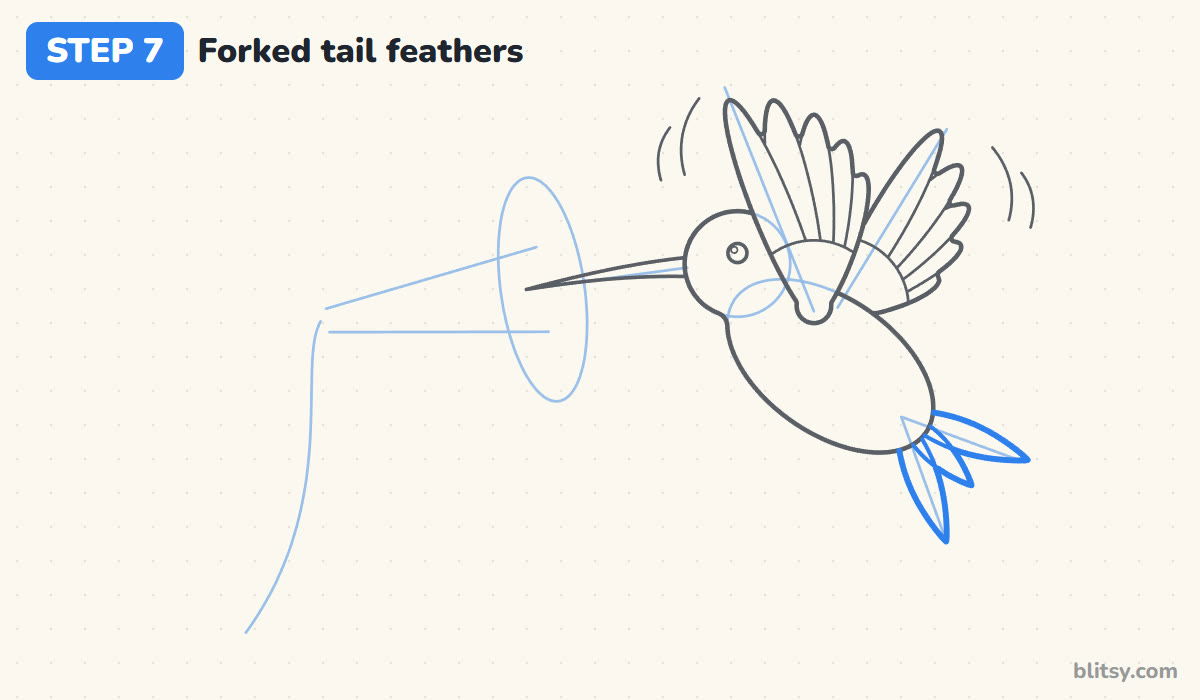
At the end of the body, draw three pointed feathers along the tail guides. Make the two outside feathers long and the middle one shorter, so the tail splits into a clear fork. They start inside the body edge, so you only draw the parts sticking out.
💡 Tip: Spread the two long feathers apart enough to leave a V-shaped notch. That notch is what makes the tail read as forked.


Step 8: Mark the ruby throat and white belly
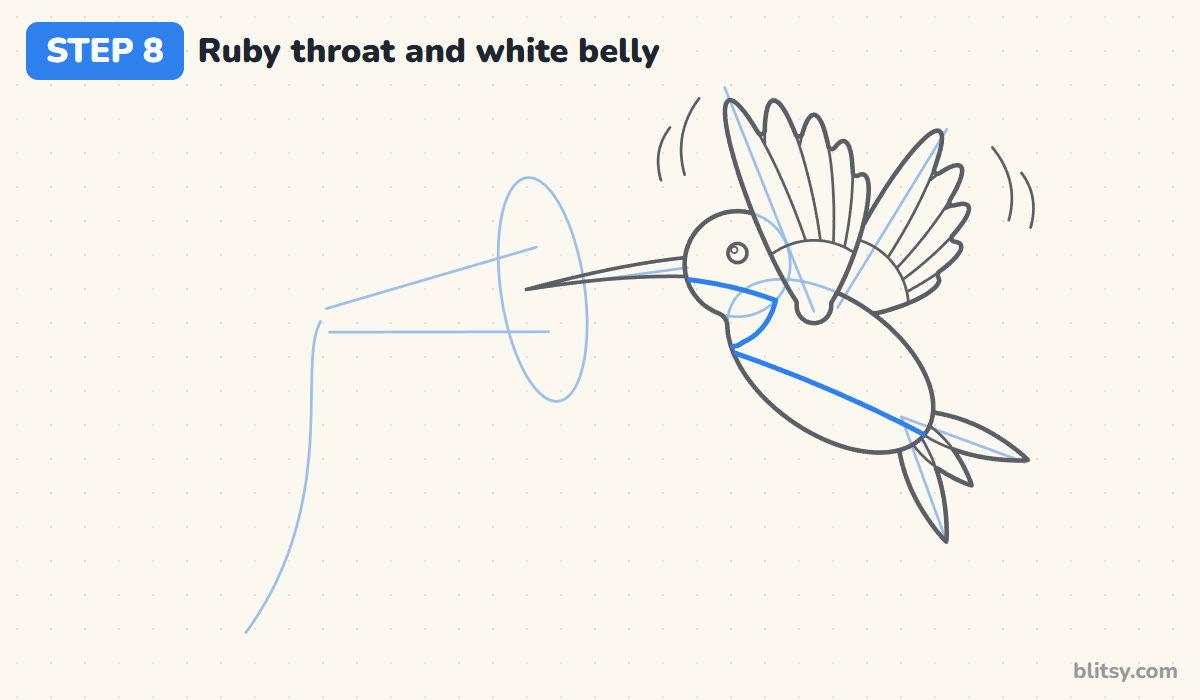
Starting just below the beak, draw a line back under the eye, then bring a slightly bumpy line down and around to close the throat patch. Next, draw one long curve from the throat to the tail to split the white belly from the green back.
💡 Tip: Give the throat patch a wavy bottom edge. Real hummingbird throat feathers look like tiny overlapping scales, and the bumps hint at that.
Step 9: Draw the trumpet flower
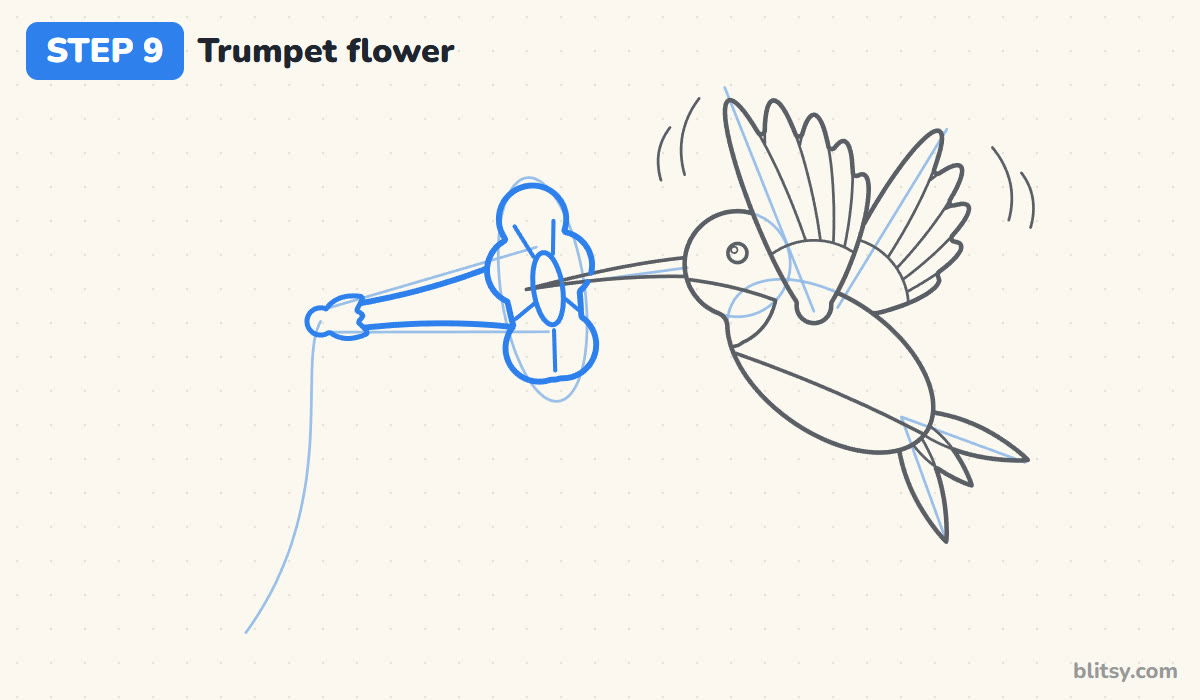
Draw the open flower first: a tall oval with five rounded bumps around it, right where the beak ends. Add a small oval center with a few short lines spreading outward. Then draw the tube narrowing back to the left, ending in a small green cup of pointed sepals.
💡 Tip: Let the beak tip land in the middle of the flower's center. If it stops short, the bird looks like it's pecking at air.
Step 10: Add the stem, leaves and a bud
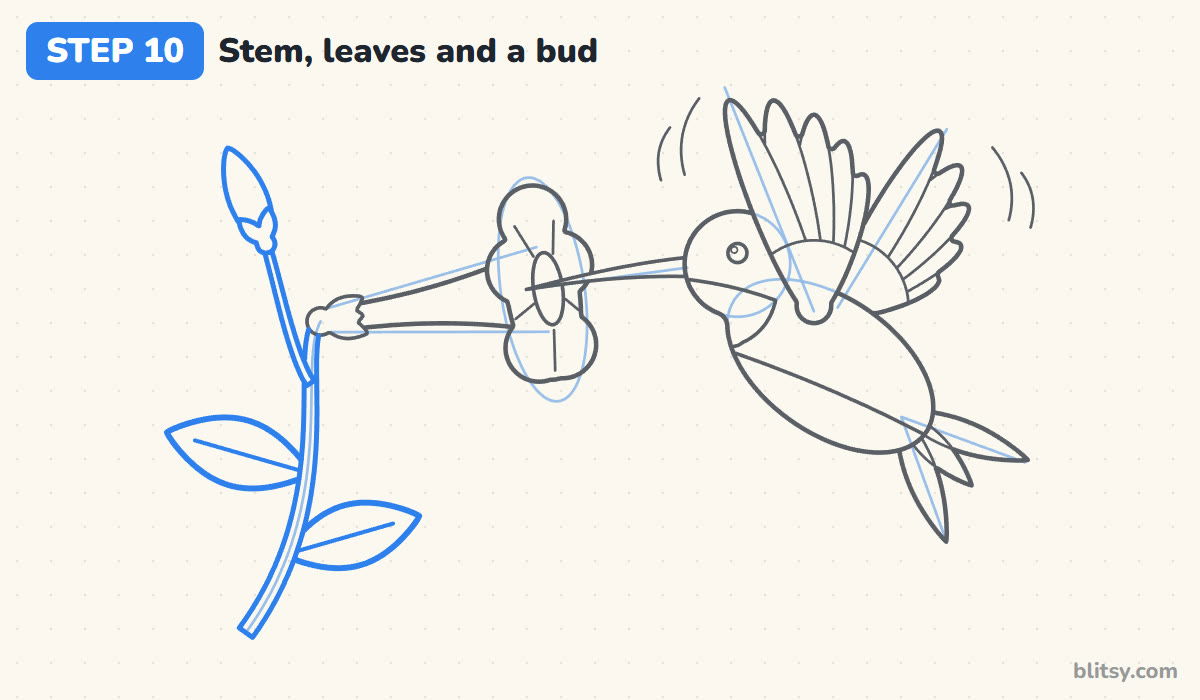
From the sepals, draw a stem with two close lines curving down the page. Put one pointed leaf on each side with a line down its middle, and add a thin side twig near the top holding a long, closed bud.
💡 Tip: Place the leaves at different heights instead of exactly opposite each other. It looks more natural and fills the empty space better.
Step 11: Ink the lines and erase the guides
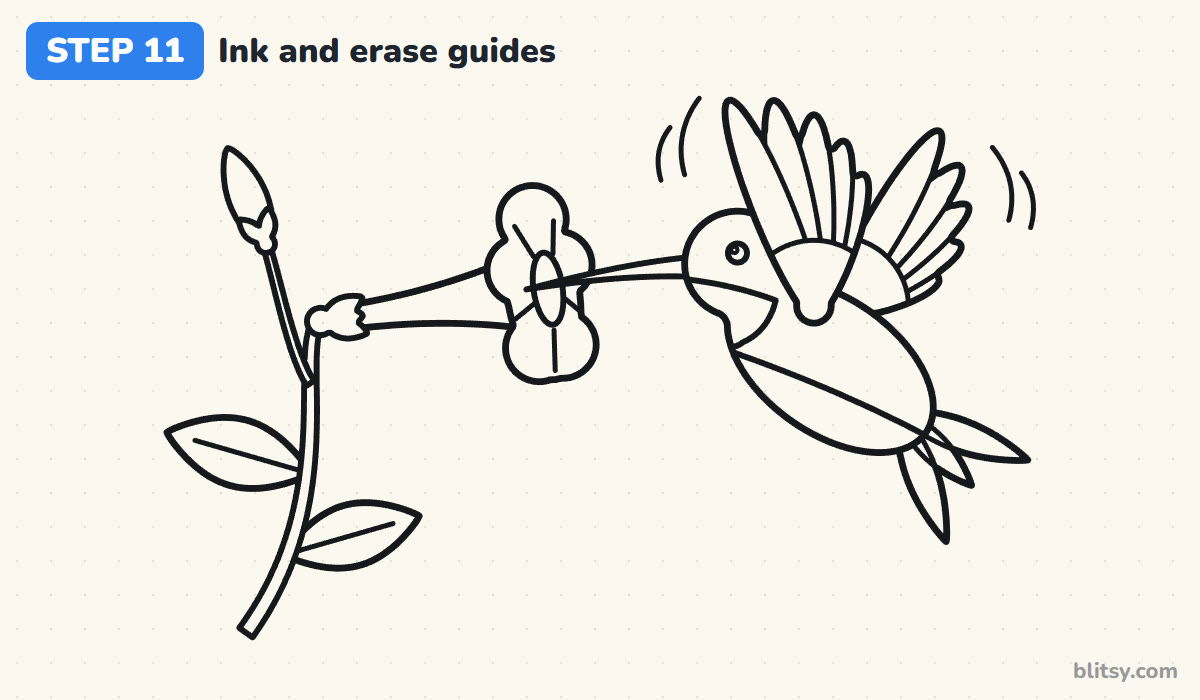
Go over every line you want to keep with the fineliner. I start with the beak and eye while my hand is fresh and save the wings for last. Let the ink dry, then erase the circle, the oval and all the guide lines.
💡 Tip: Turn your paper as you ink the wing feathers. Pulling the pen toward you gives smoother curves than pushing it away.
Step 12: Color your hummingbird
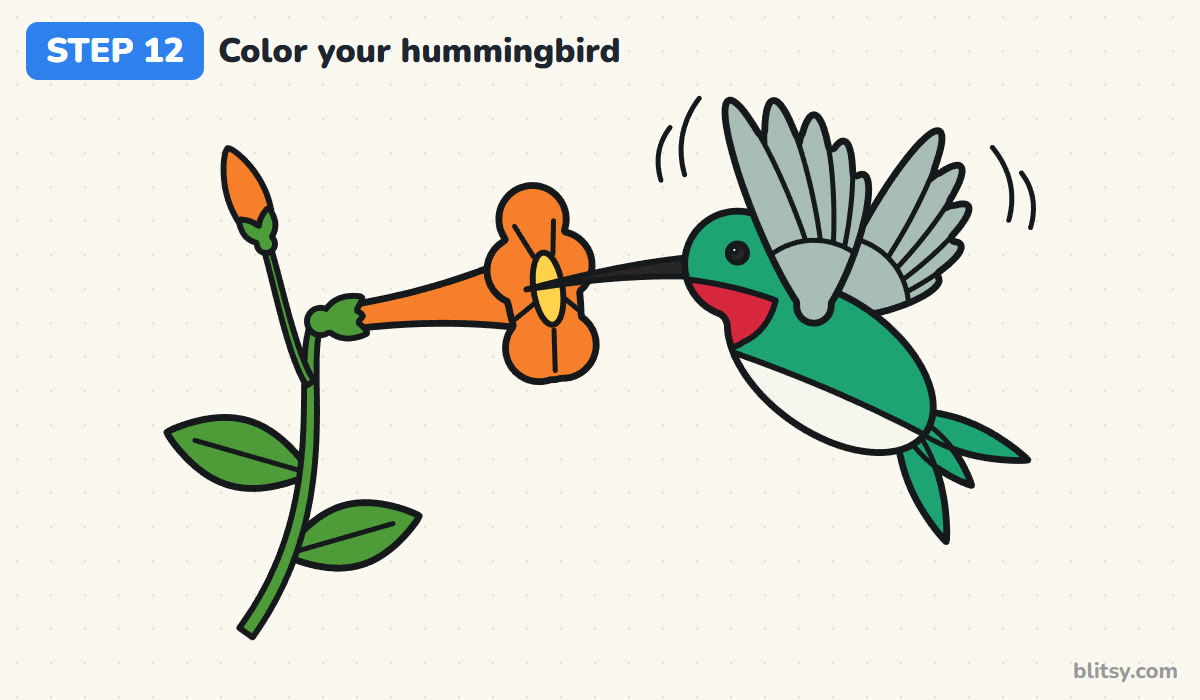
Color the head, back and tail emerald green and the throat patch red, and leave the belly white. The wings get a soft light gray, and the beak and eye are black with the shine left white. Make the flower and bud orange with a yellow center, and the stem and leaves a warmer leaf green.
💡 Tip: Add a little blue over the green back if you want a shiny look. Hummingbird feathers flash between green and blue in the sun.
Little Things That Make a Hummingbird Look Wrong
- A short, thick beak. The bird instantly looks like a finch. Keep the beak long and thin, ending in a fine point.
- Wings folded at the sides. A resting wing hides the best part. Raise both wings above the back in a V, since this bird is hovering.
- A body that's too big. If the oval grows much larger than the head, the bird looks heavy. Keep it small and slightly tilted.
- The throat patch drawn like a mouth. A round red shape right under the beak can look like an open mouth. Run the top edge back under the eye and keep the bottom edge bumpy.
- Forgetting the gap in the tail. Three feathers of equal length make a fan. Shorten the middle one so the tail splits into a fork.
Swap the Flower, Change the Bird
Once this pose feels easy, try other flowers. A pink fuchsia, a red bee balm or a blue morning glory all work, as long as the beak reaches the center. You can also draw a female: she skips the red throat and has a white chin with a few tiny green dots. Younger kids can skip the wing feathers. The bird drawing tutorial uses the same circle and oval start for a bluebird, and the hibiscus drawing tutorial gives you a bigger bloom for your hummingbird to visit. For more coloring after this, the hummingbird coloring pages have plenty of ready outlines.
Free Hummingbird Coloring Page and Printable Guide
Prefer paper? The free hummingbird coloring page has the finished bird at the top with a color key that names each color and where it goes, and a big clean outline underneath. The PDF drawing guide collects all 12 steps with their tips and prints on Letter or A4.
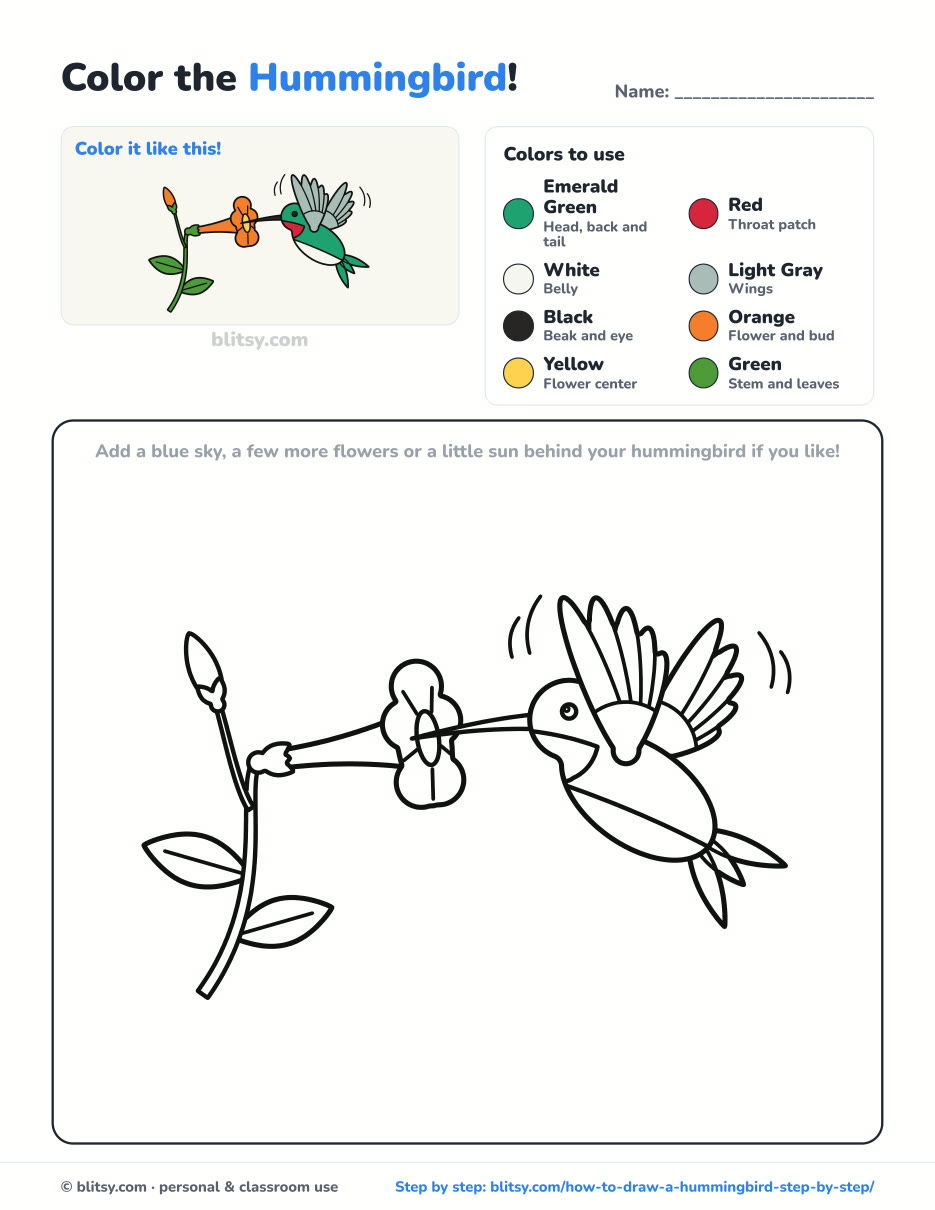
Black outlines with a colored example and the color names at the top. Ready to print and color.
⬇️ Download Coloring PageEvery step picture with its instructions and tips, to keep beside your paper while you draw.
⬇️ Download Drawing Guide📱 On a phone? Tap a download button, then open the file and choose Share → Save to Files or Print. On a computer, the PDF opens or saves straight to your Downloads folder.
Every Hummingbird Step in One Tall Pin
More Birds and Blooms to Draw Next
Each of these is a full step-by-step tutorial with a picture for every stage.
- Bird Drawing: A chubby bluebird sings on a fence post in the bird drawing tutorial.
- Cardinal Drawing: Draw a bright red songbird with a black mask on a winter branch in how to draw a cardinal step by step.
- Parrot Drawing: A scarlet macaw in red, yellow and blue perches on a branch in the parrot drawing tutorial.
- Hibiscus Drawing: A red hibiscus with a long pollen column and a closed bud fills the hibiscus drawing step by step lesson.
- Flower Drawing: Three easy flowers in a little terracotta pot come together in the flower drawing tutorial.
Hummingbird Drawing Questions Kids Often Ask
What is the easiest way to draw a hummingbird?
Start with a small circle for the head and a tilted oval for the body, then add a long thin beak. Those three pieces already look like a hummingbird. Wings in a V and a forked tail finish the shape.
How do you draw hummingbird wings?
Draw each wing as a fan of long feathers with rounded tips, starting from one point on the back. Raise both wings above the body in a V, because hummingbirds hold their wings up while they hover.
What colors is a hummingbird?
The ruby-throated hummingbird here has an emerald green back, a red throat, a white belly, grayish wings and a black beak. Other kinds can be purple, orange or blue, so change the colors freely.
Why do hummingbirds have such long beaks?
Their long, thin beaks reach deep inside tube-shaped flowers for the sweet nectar. That's why the beak goes right into the flower's center.
Pick a flower, lift those wings and let your hummingbird take a sip. I hope it buzzes right off your page. 🐦🌸
Related posts:
 How to Draw a Car Step by Step (Easy Drawing for Beginners)
 How to Draw a Whale Step by Step (Easy for Beginners)
 How to Draw an Arctic Fox Step by Step (Easy for Beginners)
 How to Draw a Chicken Step by Step (Easy for Beginners)
 How to Draw a Snowman Step by Step (Easy for Beginners)
 How to Draw an Airplane Step by Step (Easy Jet for Beginners)
 How to Draw a Mouse Step by Step (Easy for Beginners)
 How to Draw a T-Rex Step by Step (Easy for Beginners)
 How to Draw a Pig Step by Step (Easy for Beginners)
 How to Draw a Minion Step by Step (Easy for Beginners)
 How to Draw a Yorkie Step by Step (Easy for Beginners)
 How to Draw a Notebook Step by Step (Easy for Beginners)

