
Kangaroos look tricky because nothing about them matches a dog or a cat. The back legs are huge, the arms are tiny and the tail works like a third leg. Once you see the body as a tall pear sitting on a long flat foot, though, how to draw a kangaroo step by step turns into a short list of easy shapes. We'll finish with a little joey peeking out of the pouch, which is everyone's favorite part.
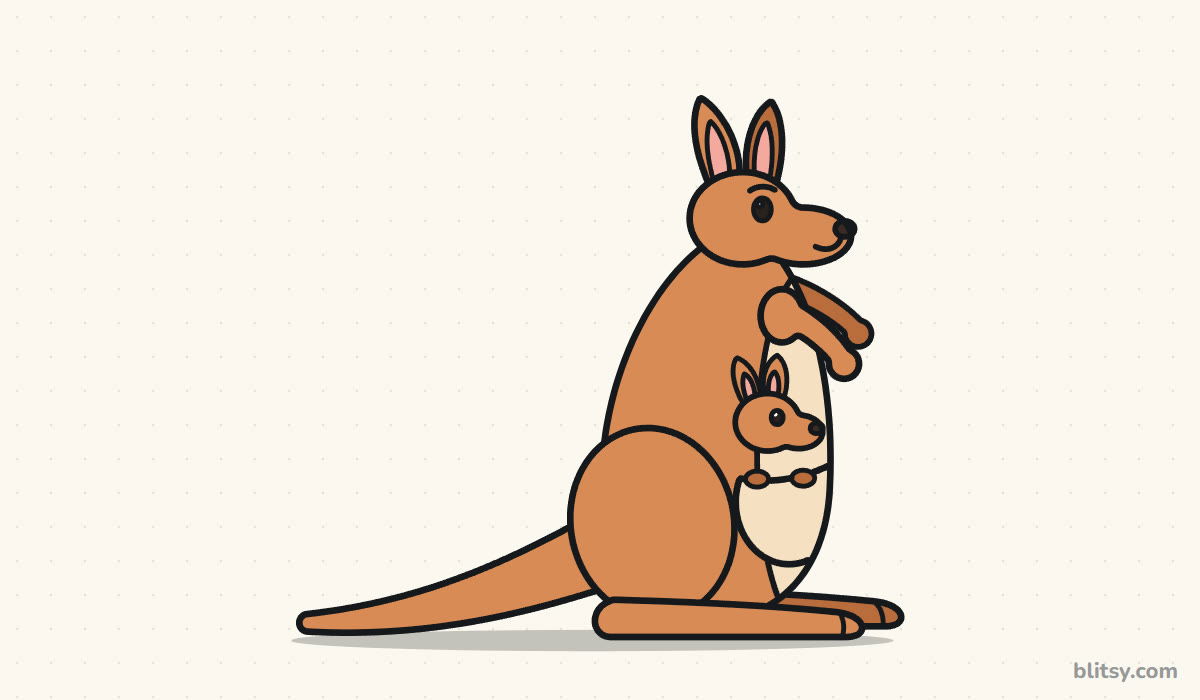
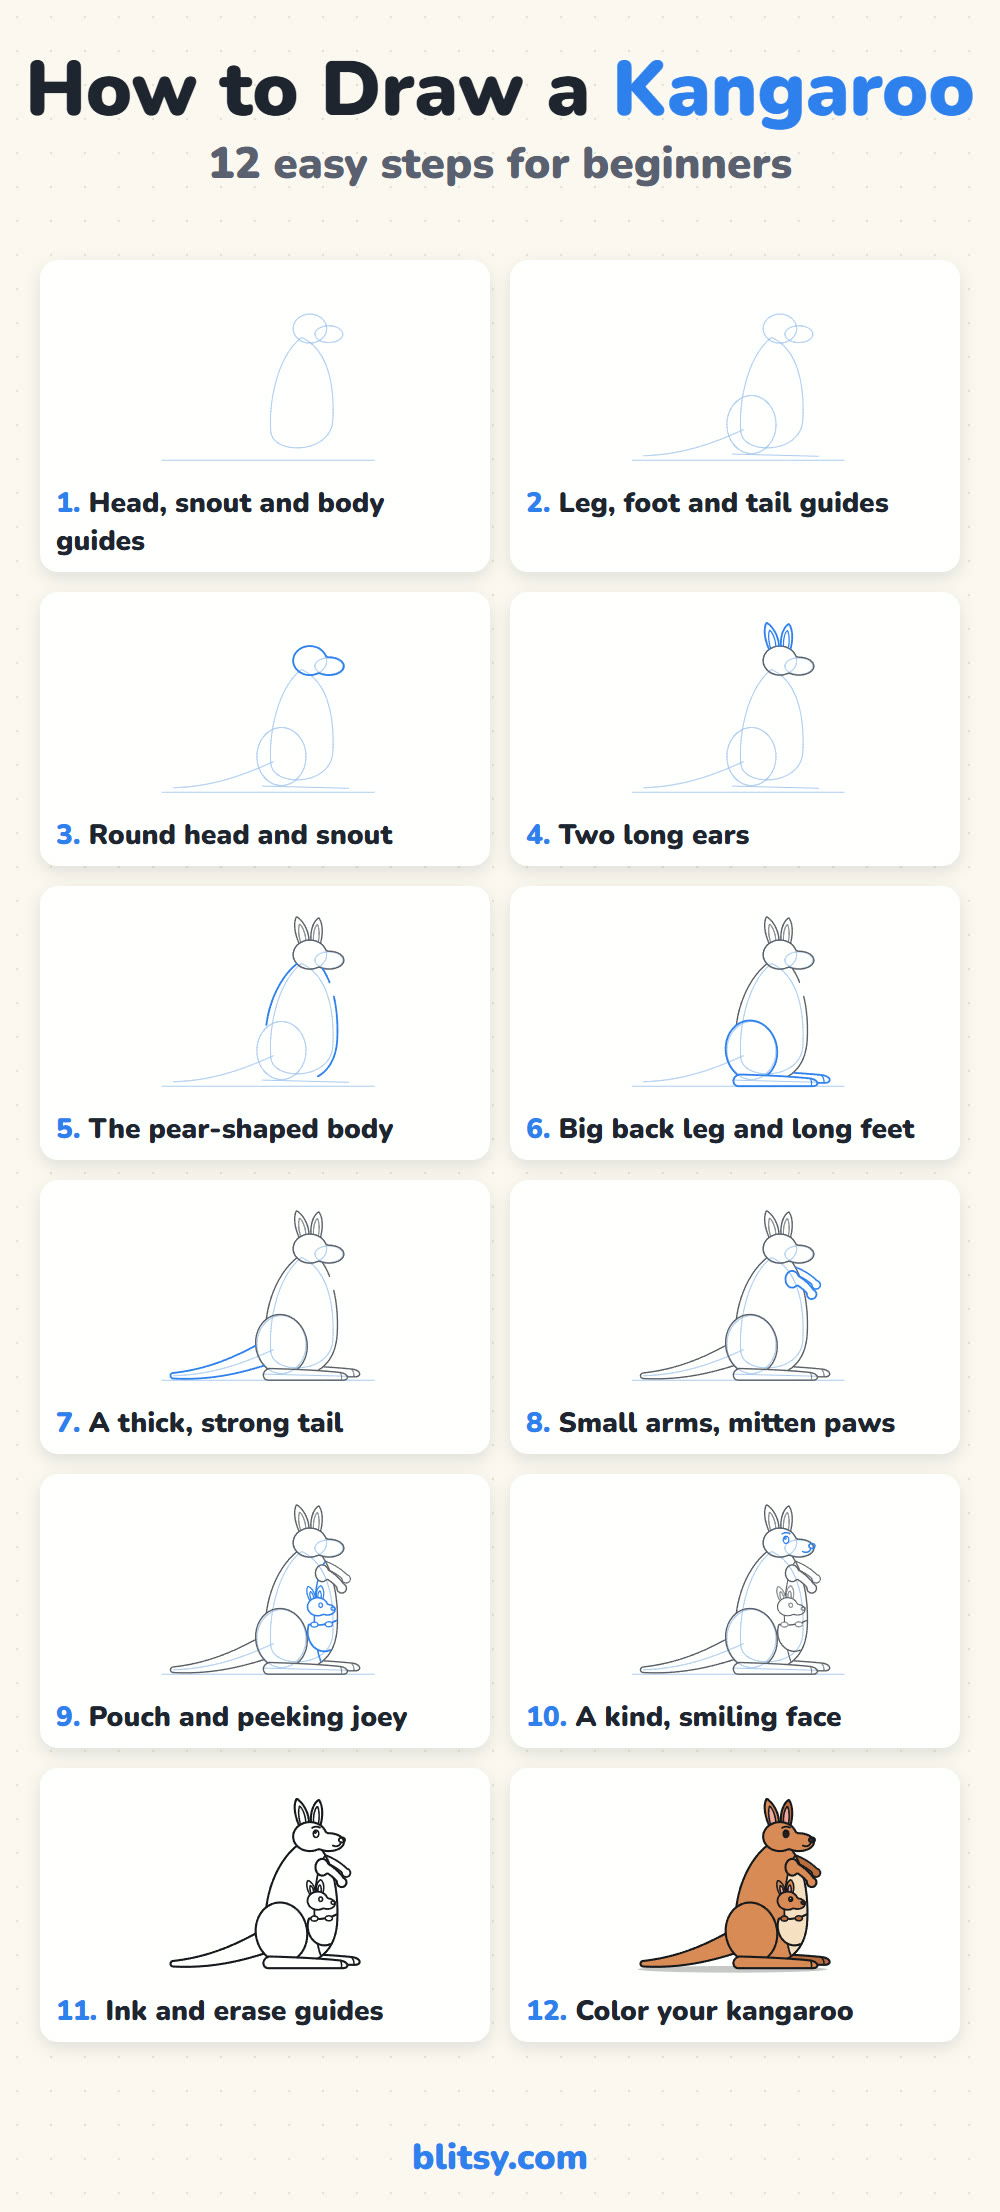
Blue lines in the pictures are the ones to add right now, and gray lines are finished from before. Copy the blue, compare, then keep going.
Quick overview
⏱️ Time: about 30 to 40 minutes with coloring
🎯 Level: easy, fine for kids from about 7 up
✏️ Steps: 12
🦘 You'll draw: a standing kangaroo with a joey in her pouch
Supplies for a Hopping Good Kangaroo
- A pencil you can press lightly with (HB works well)
- A soft eraser
- A black marker or fineliner for the final lines
- Colored pencils or crayons (two browns, cream, pink plus black)
- Plain white paper, turned sideways
The tail stretches far to the left, so start your kangaroo a little right of the middle of the page.
How to Draw a Kangaroo Step by Step
Step 1: Sketch the head, snout and body guides
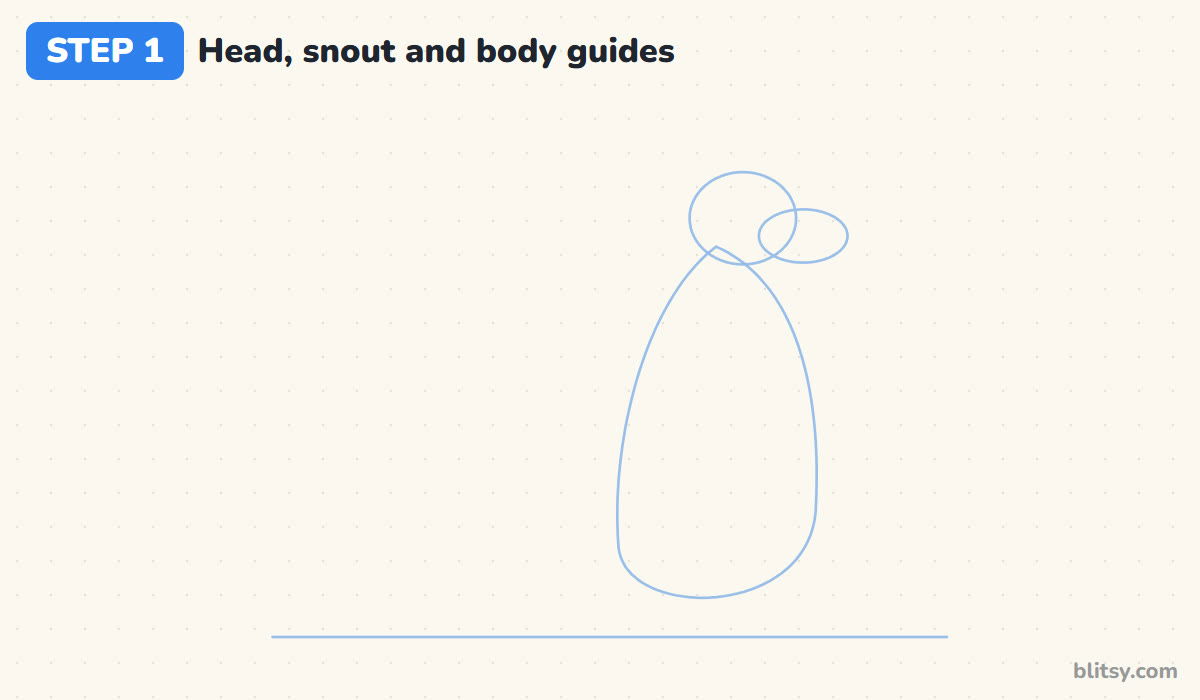
Draw a light ground line near the bottom of the page. High up and right of center, sketch a circle for the head and a flat oval sticking out to its right for the snout. Under the head, draw a tall egg that is narrow at the top and wide at the bottom, resting on the ground line. That egg is the whole body.
💡 Tip: I make the body egg about five head circles tall. Kangaroos have small heads on tall bodies.
Step 2: Add guides for the back leg, foot and tail
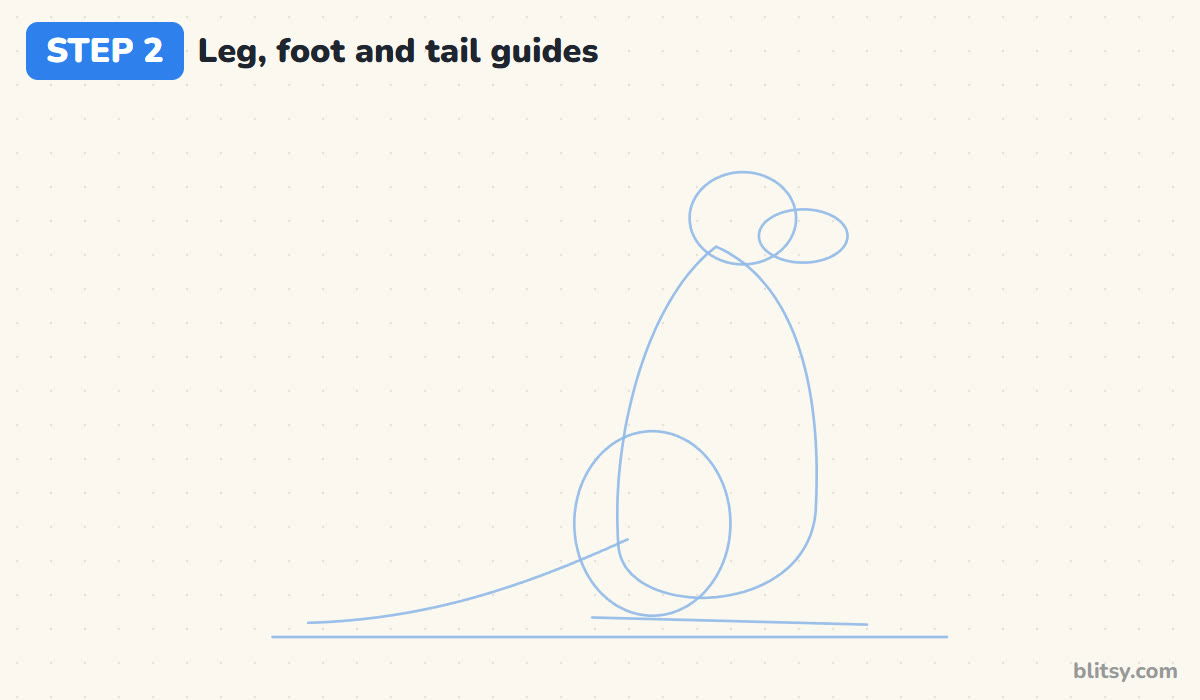
On the lower left of the body, draw a big oval for the back leg. It should be almost as wide as the bottom of the body. Along the ground, add a long straight line for the foot that reaches past the front of the body. Then sweep one curved line from behind the leg out to the left and down to the ground for the tail.
💡 Tip: The foot line should be longer than you expect. Long feet are what kangaroos stand on.
Step 3: Outline the round head and snout
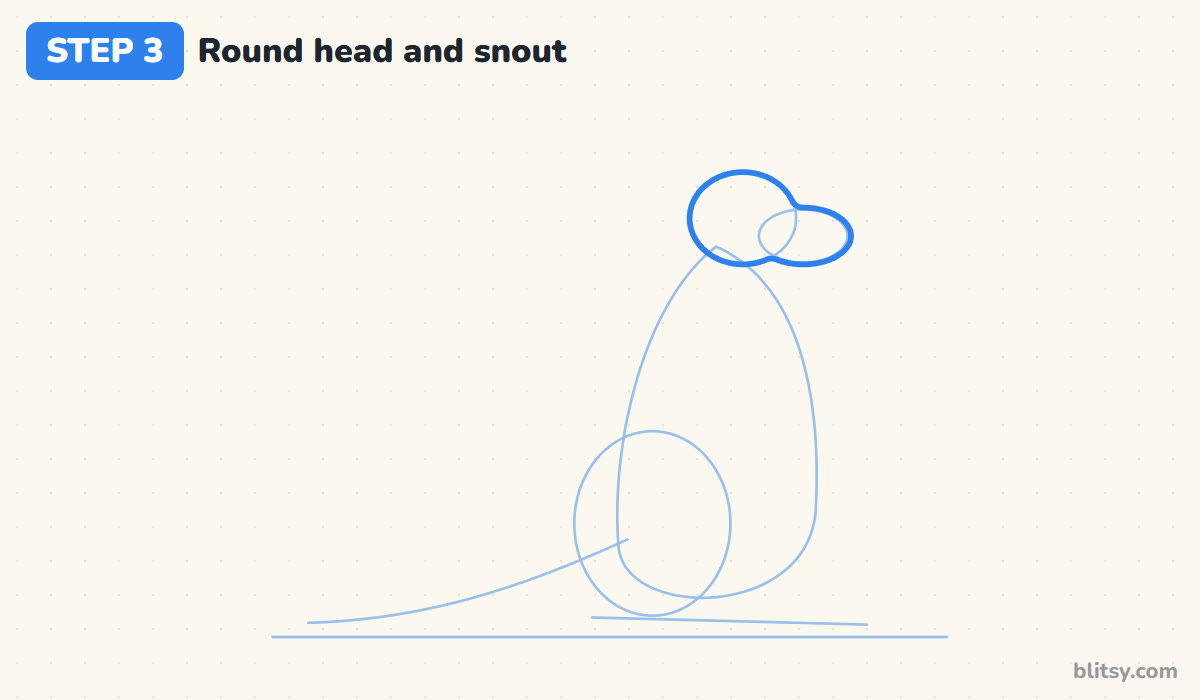
Trace around the head circle and the snout oval as one smooth shape. Where the two meet on top, let the line dip in a little, like a soft forehead. On the underside, round the chin off so the snout blends into the head instead of looking stuck on.
💡 Tip: I keep the snout shorter than the head is wide. A long snout drifts toward a horse.




Step 4: Draw two long ears
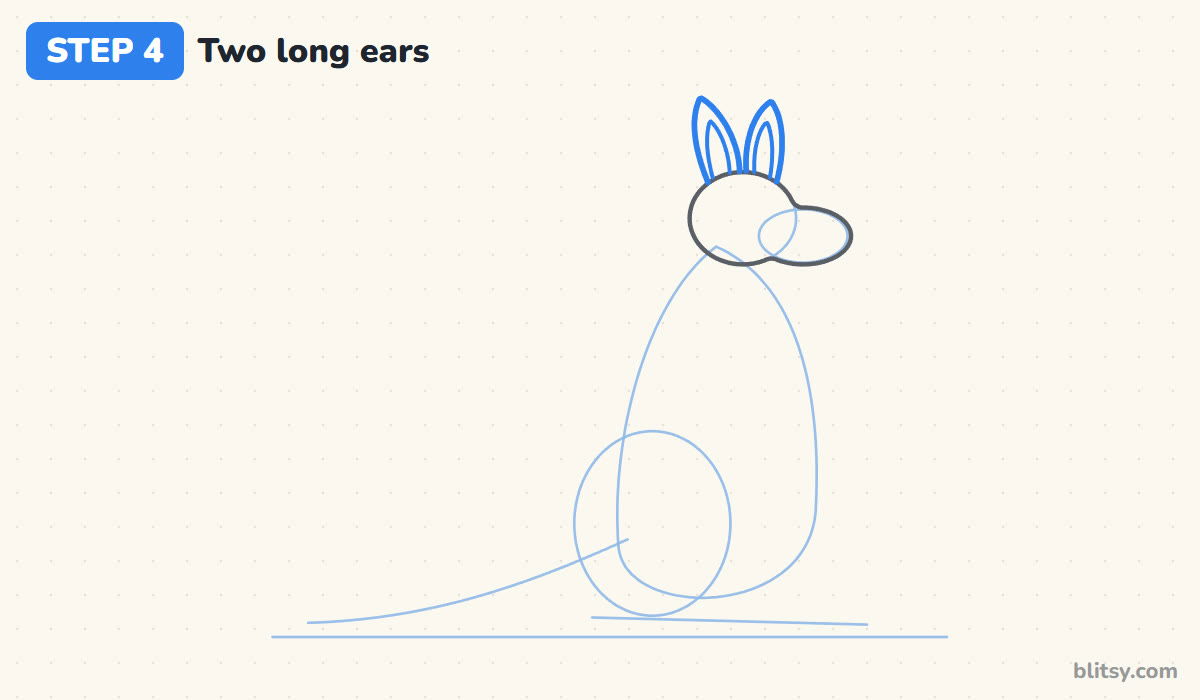
From the top of the head, draw two tall leaf shapes pointing up. The one closer to you sits a bit to the left and leans back slightly, while the far ear stands straighter behind it. Inside each one, draw a smaller leaf for the pink inner ear.
💡 Tip: Let the ears be close to the height of the head itself. Short ears make it look like a mouse.
Step 5: Draw the pear-shaped body
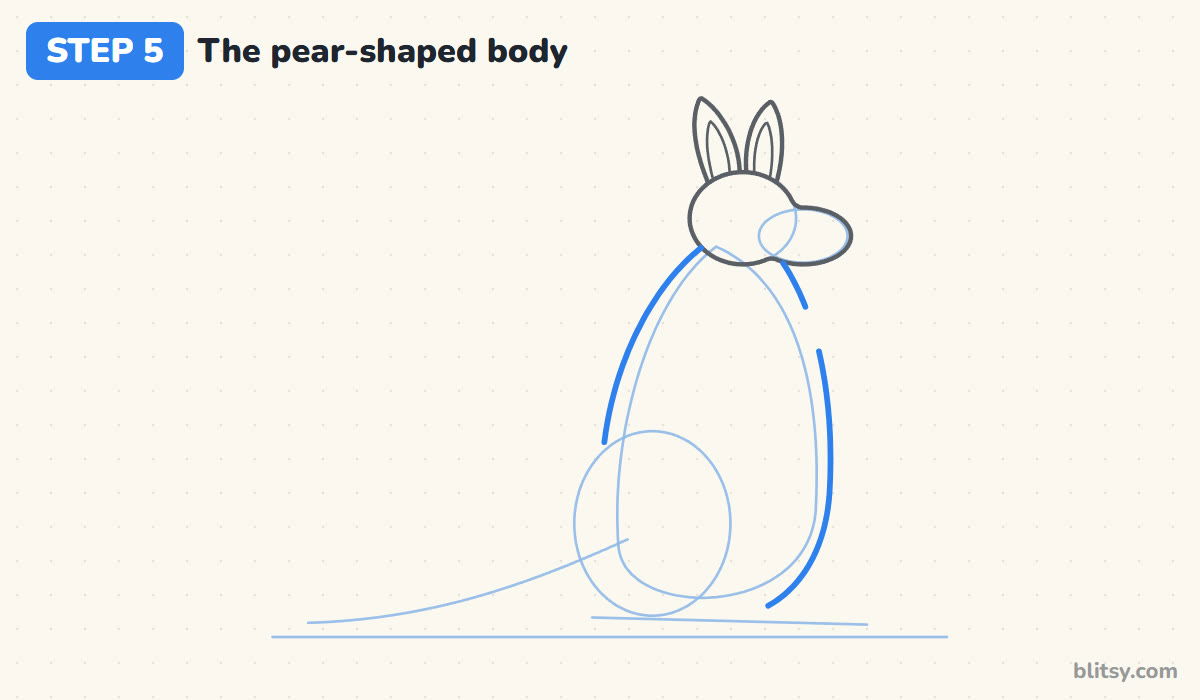
Follow your body guide with a firm line. The back curves down and out from behind the head, swelling wide near the ground. The chest on the right side rounds out more gently. Leave a small gap high on the chest, because the arms go there in a few steps and you won't need to erase anything.
💡 Tip: Lean the back line slightly forward. A kangaroo standing perfectly straight looks stiff.
Step 6: Add the big back leg and long feet
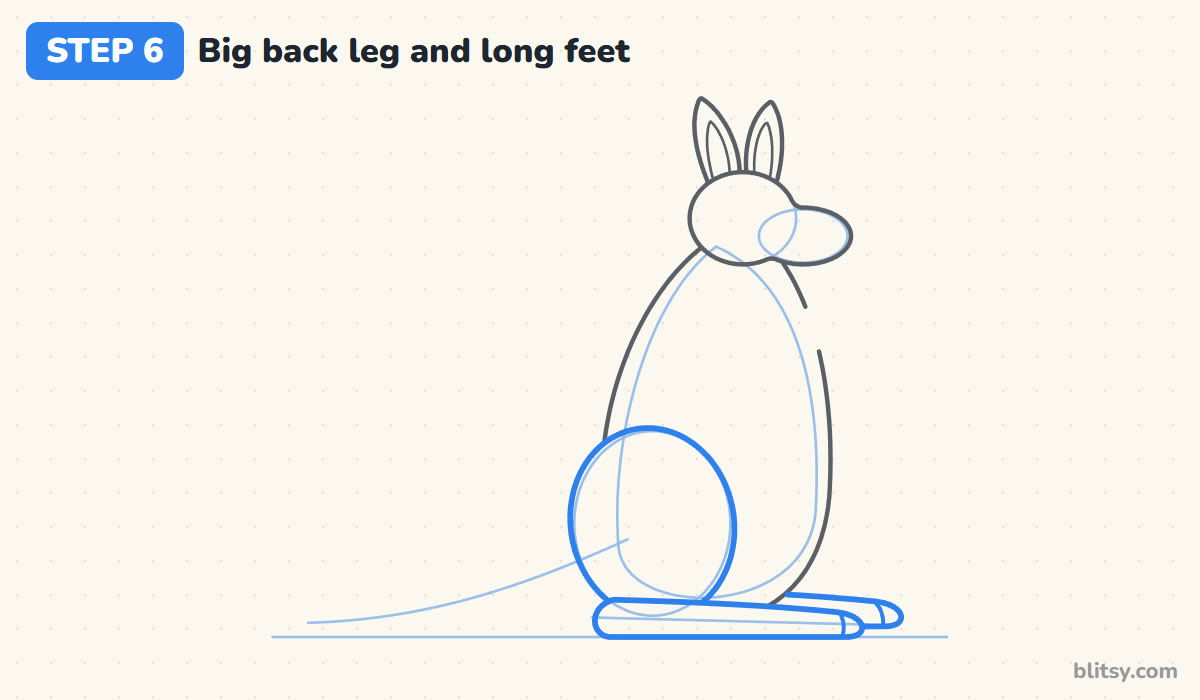
Draw a large oval over the leg guide, tipped a little so the top leans back. This is the strong haunch that does all the jumping. Under it, draw a long flat foot along the ground with a rounded heel at the back. Peeking out just in front, add the tip of the second foot and a small line on each toe.
💡 Tip: Rest the haunch right on top of the foot. If there's a gap between them, the kangaroo floats.
Step 7: Draw a thick, strong tail
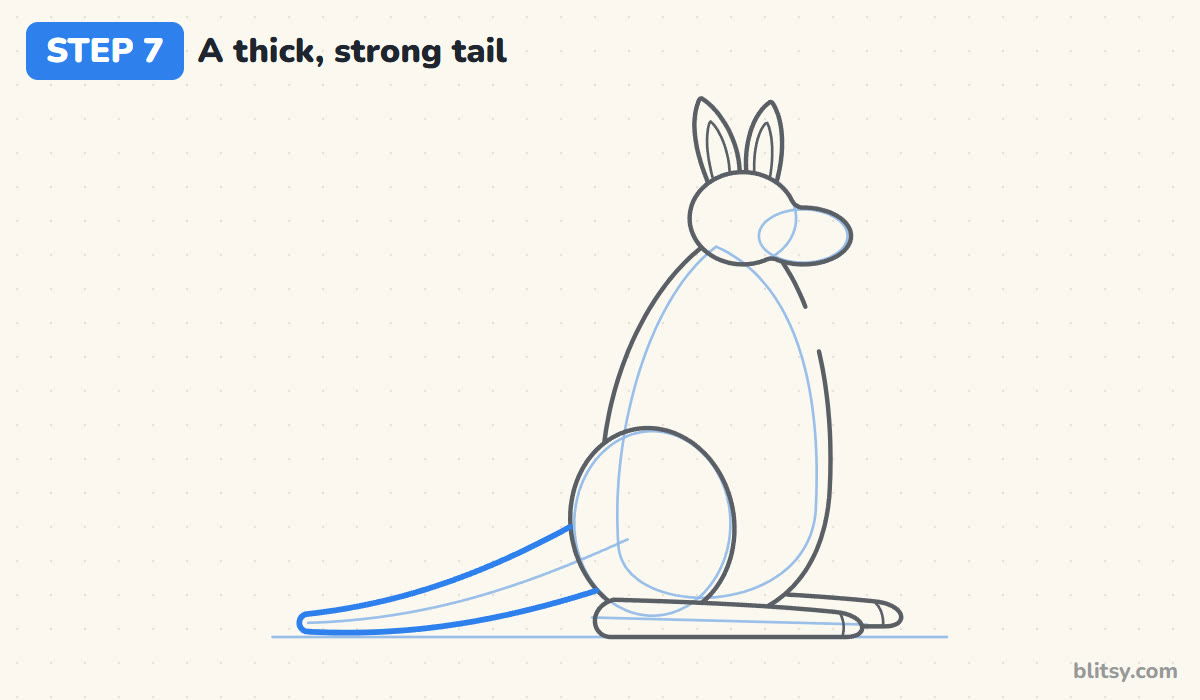
Start the tail behind the haunch, as wide as the leg is thick, and draw two lines that run down and to the left until they meet the ground. Let them get closer and closer as they go, then round off the tip. I let the lower edge lie flat on the ground, since she's leaning her weight on it.
💡 Tip: A thin tail is the slip I see most. Make it chunky at the base, like a heavy rope.


Step 8: Add small arms with mitten paws
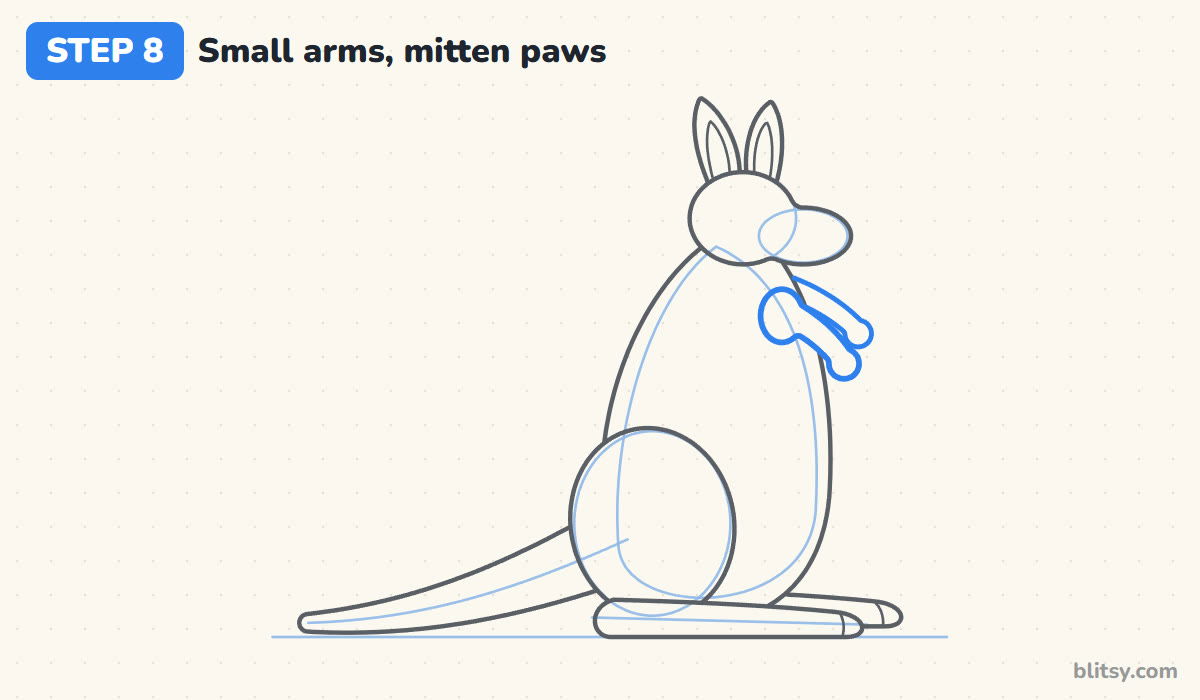
In the gap you left on the chest, draw a short rounded shoulder, then a small arm angling down and forward, ending in a round mitten paw. Just above and behind it, draw the second arm the same way, but only the part that sticks out past the chest. Both paws hang loosely in front of the body.
💡 Tip: Compare the arm with the back leg. The arm should look almost silly small next to it.
Step 9: Draw the pouch and the peeking joey
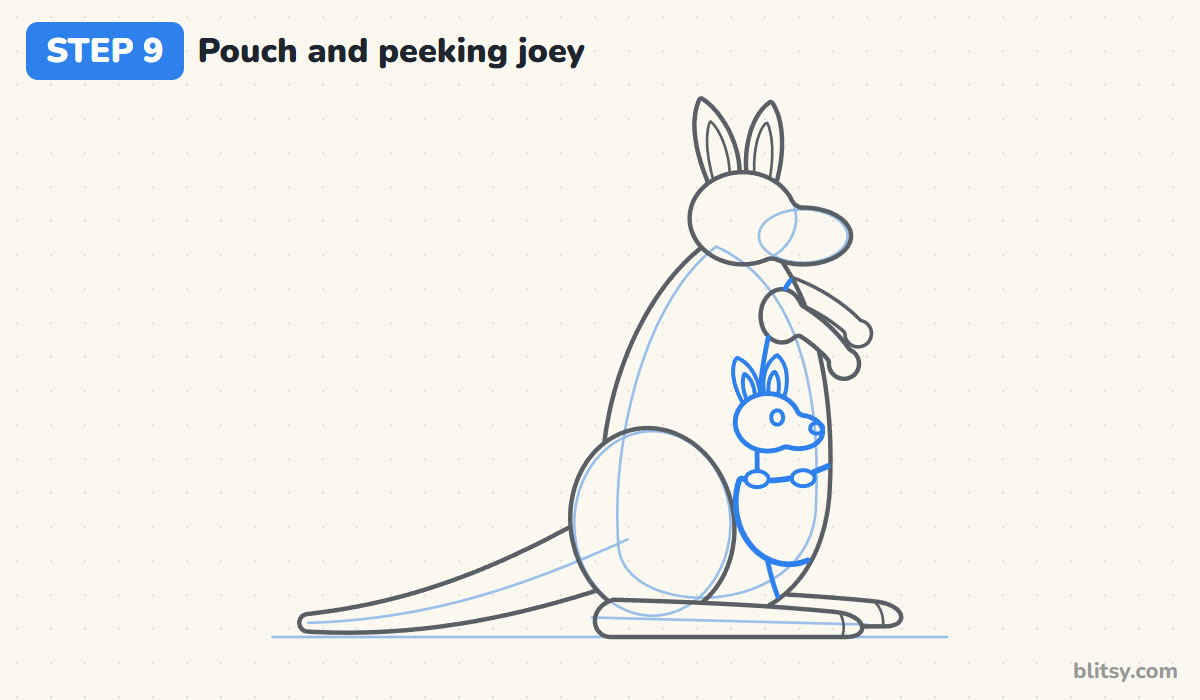
Draw a long oval patch down the front of the belly for the lighter fur. On its lower part, draw the pouch: a gently curved rim with a rounded pocket under it. Just above the rim, sketch a little head with a tiny snout and two small ears, like a smaller copy of the mother. Finish with two small paws hooked over the rim.
💡 Tip: Draw the joey's paws last, on top of the rim line. It makes the joey look like it's holding on.
Step 10: Give her a kind, smiling face
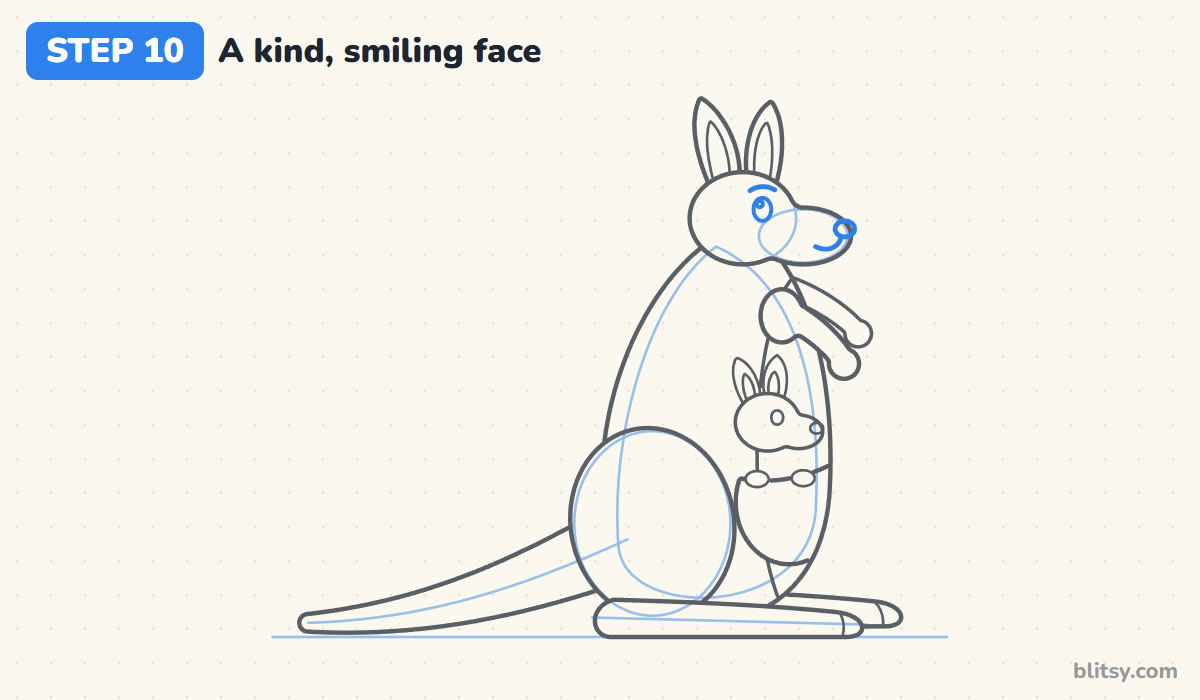
Place an oval eye high on the head, closer to the forehead than to the snout, with a small shine circle near the top. A short curved brow above it softens the look. Add a dark rounded nose at the tip of the snout and a small smile curving back from under it. The joey gets a dot eye and a tiny nose too.
💡 Tip: Put the eye in the head circle, not in the snout. That keeps the face sweet instead of goofy.
Step 11: Ink the kangaroo and erase the guides
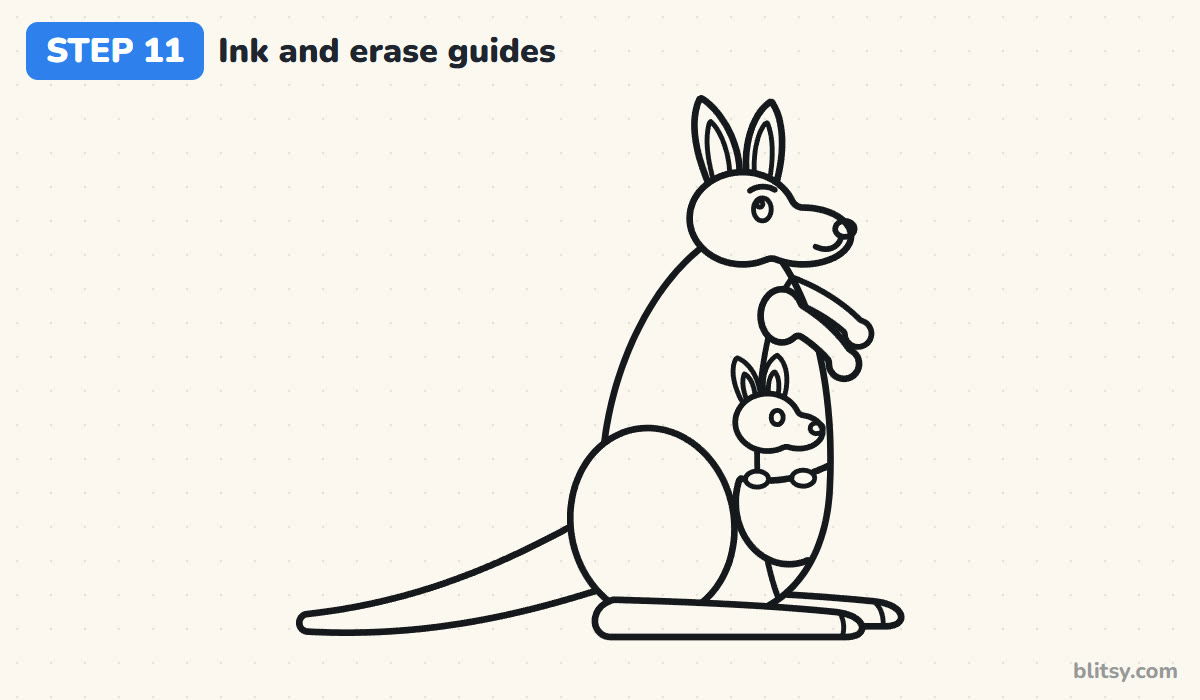
Trace every keeper line with the black marker. I like to do the face and the joey first, while my hand is steady, then the long body lines and the tail. Wait a minute for the ink to dry, then erase all the light guide shapes.
💡 Tip: Turn the page sideways for the tail so you can pull the line toward you in one stroke.


Step 12: Color your kangaroo
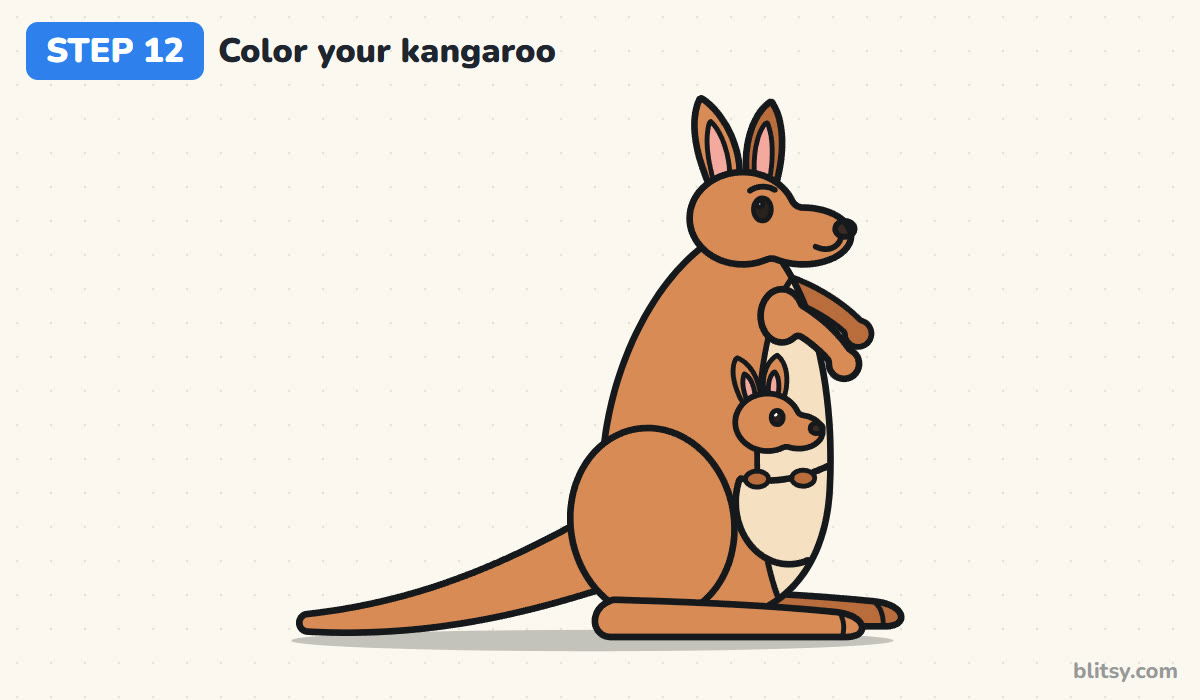
Light reddish brown covers most of the mother and all of the joey. I use a darker brown on the parts farther away, like the far ear and far arm, which pushes them back. The belly and pouch are cream and the inner ears pink. Eyes and noses go black, but leave the shine dots white.
💡 Tip: Press harder along the back and the bottom of the haunch so the shape looks rounder.
Where Kangaroo Sketches Tend to Wobble
- Arms as big as the legs. That turns a kangaroo into a bear. Keep the arms short and thin, with small paws.
- A skinny tail. The tail holds the kangaroo up. Draw it thick where it leaves the body.
- Short feet. If the foot ends under the body, it looks like a rabbit. Stretch it well past the chest.
- The head too big. Big heads read as a baby. Save that look for the joey and keep the mother's head small.
- A joey floating in the belly. Hide the bottom of its head behind the pouch rim so it really sits inside.
Boxing Gloves, Hops and Other Kangaroo Ideas
Leave out the joey and draw a male kangaroo in boxing gloves, or lift the tail and lean the body forward to show one mid-hop. Gray-blue fur turns it into an eastern gray kangaroo. Younger kids can skip the second arm and the far foot and it still reads clearly. Long ears and big back feet are something kangaroos share with rabbits, so the bunny drawing tutorial is a natural next step. For another tall, sitting animal with tiny arms, try the mouse drawing step by step lesson.
Kangaroo Coloring Page and Step Guide PDF
The free kangaroo coloring page has a colored kangaroo at the top as a guide, a key that matches each color to its part, and a big outline to color below. The step-by-step PDF guide holds all 12 steps with pictures and tips, so you can draw without a screen. Both print on Letter or A4 paper.
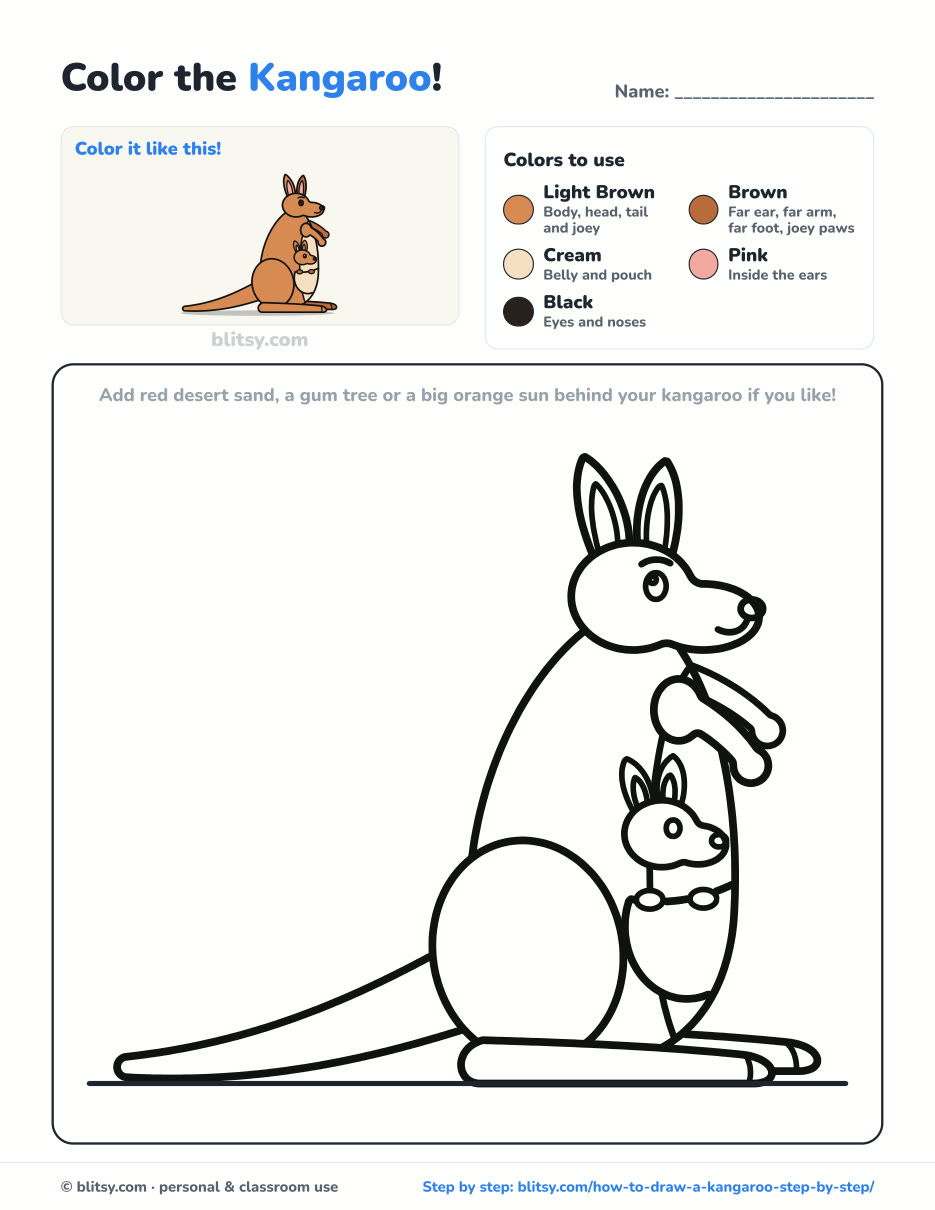
Black outlines with a colored example and the color names at the top. Ready to print and color.
⬇️ Download Coloring PageEvery step picture with its instructions and tips, to keep beside your paper while you draw.
⬇️ Download Drawing Guide📱 On a phone? Tap a download button, then open the file and choose Share → Save to Files or Print. On a computer, the PDF opens or saves straight to your Downloads folder.
Keep the Kangaroo Steps Handy
Other Animals Kids Can Draw Next
Each one below is a full step-by-step tutorial with a picture for every stage and a free coloring page.
- Bunny Drawing: A sitting bunny with long ears, a cotton tail and a carrot to nibble in this bunny drawing tutorial.
- Mouse Drawing: A little field mouse sits up on its back legs with a wedge of cheese in this mouse drawing step by step guide.
- Horse Drawing: Build a friendly chestnut horse from three circles with this how to draw a horse tutorial.
- Elephant Drawing: A gray-blue elephant with a huge ear sprays water from its trunk in this elephant drawing tutorial.
- Bear Drawing: Draw a brown bear walking through the grass with this bear drawing step by step lesson.
Kangaroo Drawing Questions from Kids and Parents
What is the easiest way to draw a kangaroo?
Start with a small head circle on top of a tall egg shape. Add a big oval for the back leg with a long flat foot under it, then add the tail and finish with ears and arms.
How do you draw a kangaroo with a baby in its pouch?
Draw a curved pouch rim low on the belly, then a small head with little ears just above it. Two tiny paws over the rim make the joey look like it's peeking out.
How long does it take to draw a kangaroo?
Most beginners need about 30 to 40 minutes including coloring. The tail and the joey take the most care.
What colors is a kangaroo?
Red kangaroos are a warm reddish brown with a cream belly. Gray kangaroos are gray-brown. For this drawing you only need two browns plus cream and pink.
That small head circle is all it takes to begin, so your kangaroo might be standing on the page before snack time. 🦘✏️
Related posts:
 How to Draw a Car Step by Step (Easy Drawing for Beginners)
 How to Draw a Whale Step by Step (Easy for Beginners)
 How to Draw an Arctic Fox Step by Step (Easy for Beginners)
 How to Draw a Shark Step by Step (Easy for Beginners)
 How to Draw a Chicken Step by Step (Easy for Beginners)
 How to Draw a Fish Step by Step (Easy Goldfish for Beginners)
 How to Draw a Snowman Step by Step (Easy for Beginners)
 How to Draw Hands Step by Step (Easy Palm View for Beginners)
 How to Draw an Airplane Step by Step (Easy Jet for Beginners)
 How to Draw a Mouse Step by Step (Easy for Beginners)
 How to Draw a T-Rex Step by Step (Easy for Beginners)
 How to Draw a Pig Step by Step (Easy for Beginners)

