
Two long ears do half the job. Put them on top of any round head and people already read it as a rabbit, so the rest of the drawing is about making the body feel soft and settled. In this lesson I'll show you how to draw a bunny step by step, sitting side-on with one ear flopped back and a carrot waiting on the ground. If you can draw a circle and an egg shape, you can draw this bunny.
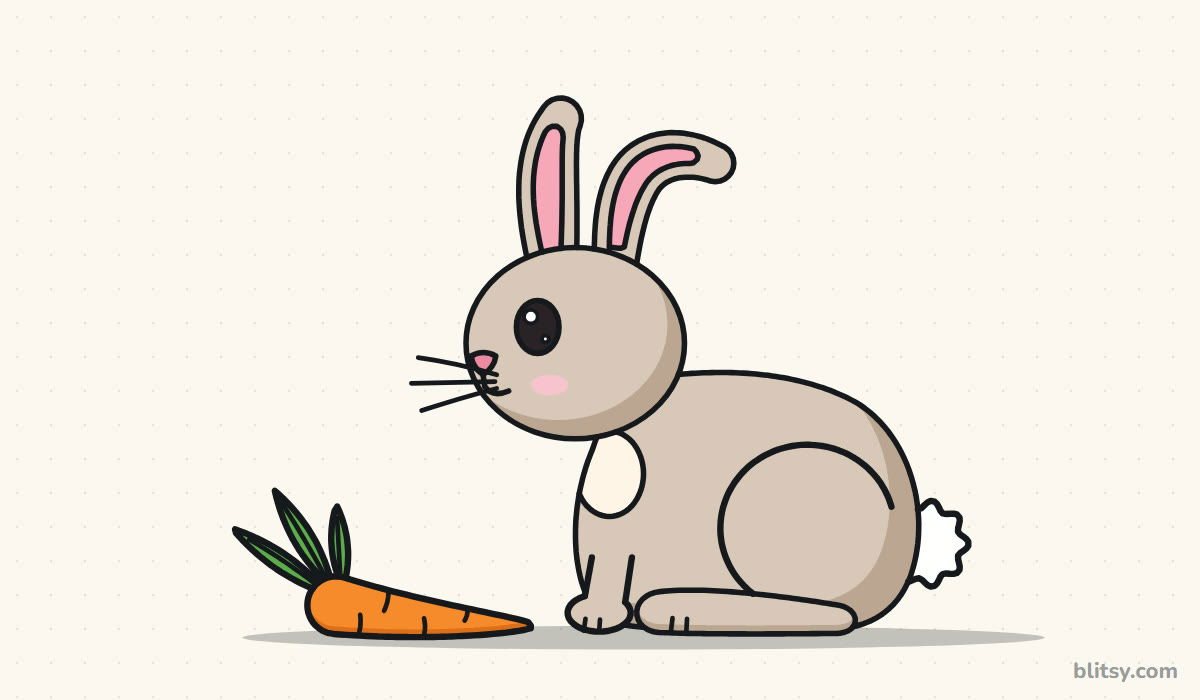
Blue marks the new lines in every picture. Older lines turn gray, so you always know what to add next. Copy the blue part, check it, then move on.
Quick overview
⏱️ Time: about 30 minutes
🎯 Level: easy, fine for kids around 6 and up
✏️ Steps: 12
🐰 You'll draw: a sitting bunny in side view with a carrot on the ground
Bunny Art Supplies From Your Pencil Case
- A pencil (HB, or a softer 2B for the guide shapes)
- A soft eraser
- A black fineliner or felt-tip pen
- Colored pencils or markers (light brown, tan, cream, pink, black, orange plus green)
- Plain white paper, turned sideways
The carrot sits off to the left, so a wide page keeps it from running off the edge.
How to Draw a Bunny Step by Step
Step 1: Sketch the head and body guides
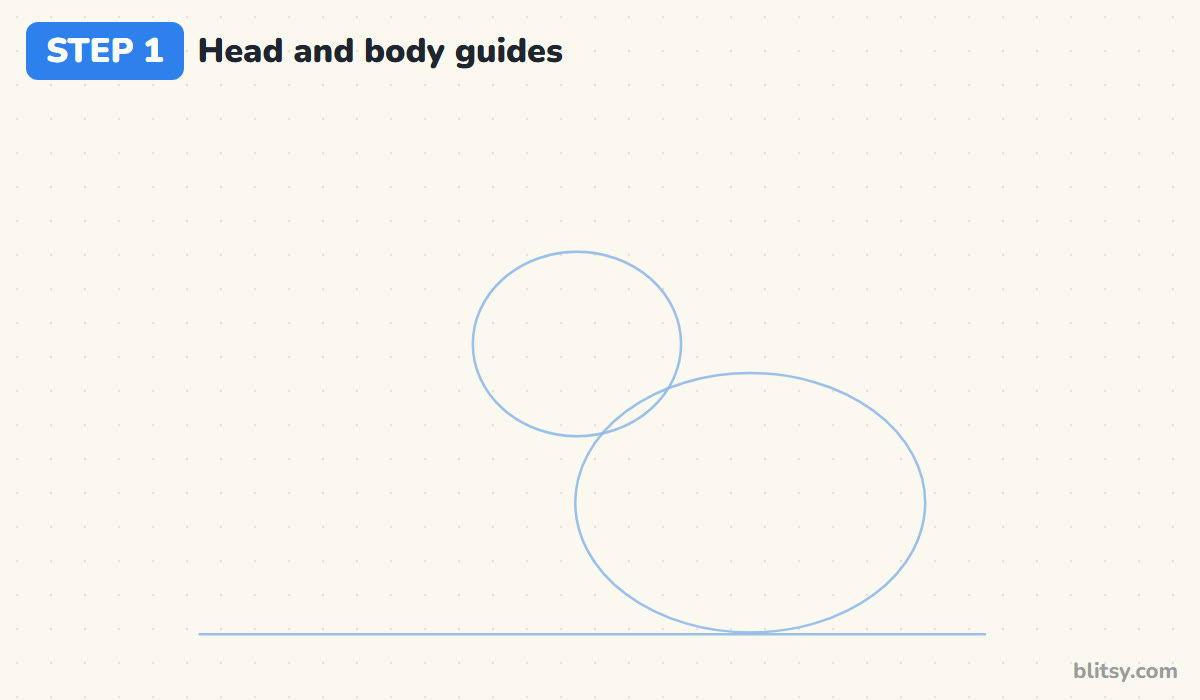
I always begin with a light ground line near the bottom of the page. Sitting on it, sketch a wide egg shape for the body, a bit wider than it is tall. Then add a circle for the head, up on the left side, overlapping the top front corner of the body. The head circle should be roughly half the width of the body.
💡 Tip: Press so lightly that you can barely see the line. These shapes will be erased later.
Step 2: Add ear, foot and carrot guides
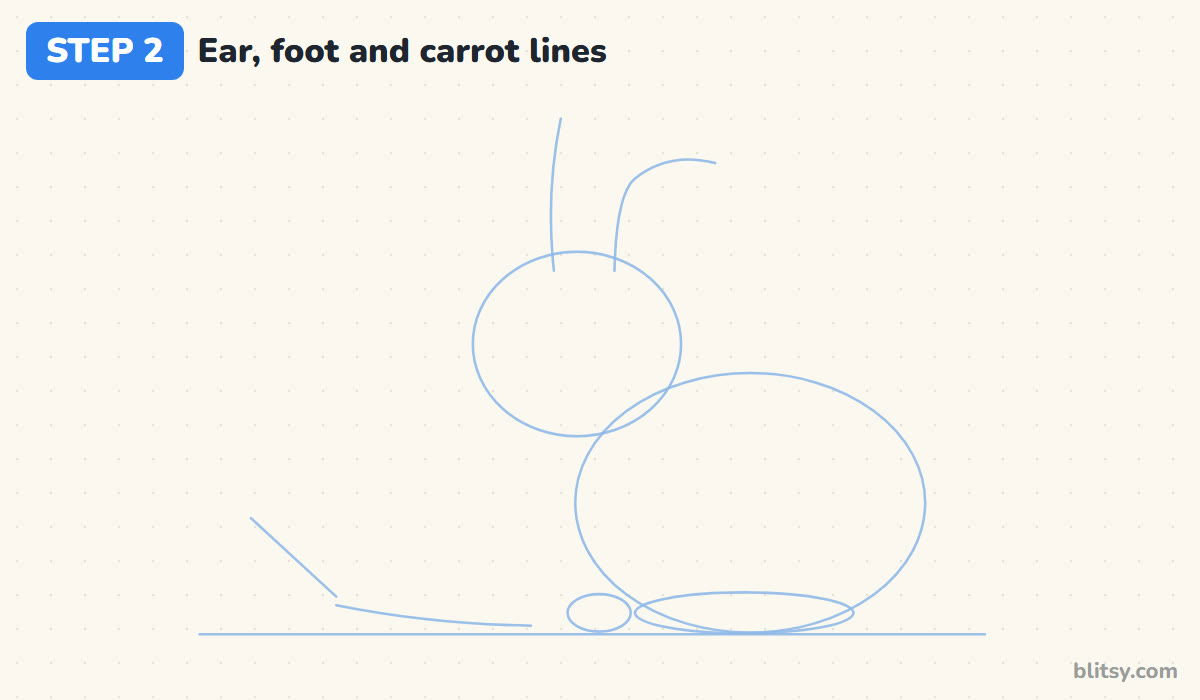
From the top of the head, pull two lines upward for the ears. Keep the front one almost straight. The back one goes up and then bends backward, like it's folding over. On the ground, draw a long flat oval for the hind foot and a small one in front for the paw. Last, sketch a curving carrot line to the left with a short slant for the leaves.
💡 Tip: Make the ear lines about as long as the head is tall. Shorter ones start to look like a cat.
Step 3: Draw the round head
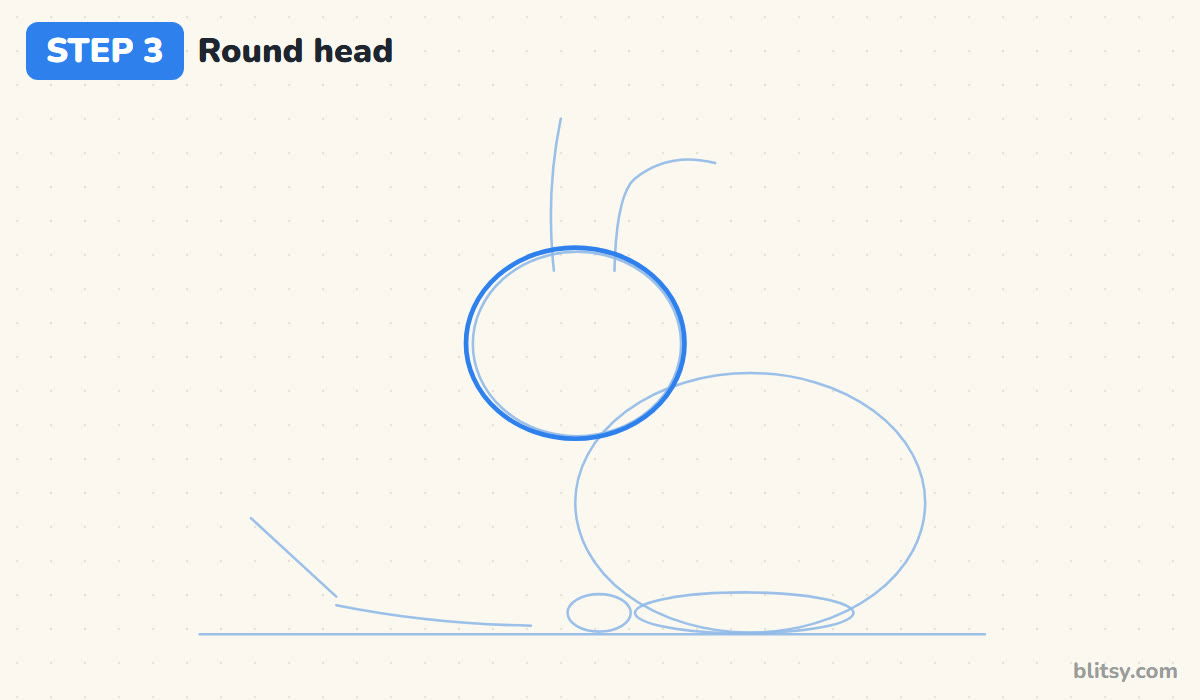
Go over the head circle with a firmer line, letting it come out slightly wider than tall. A slightly chubby face looks softer. I like to draw the head in two half-circle strokes rather than one long loop, because it's easier to keep both sides even.



💡 Tip: If the circle comes out lumpy, draw it again beside the first one and erase whichever looks worse.
Step 4: Shape the two long ears
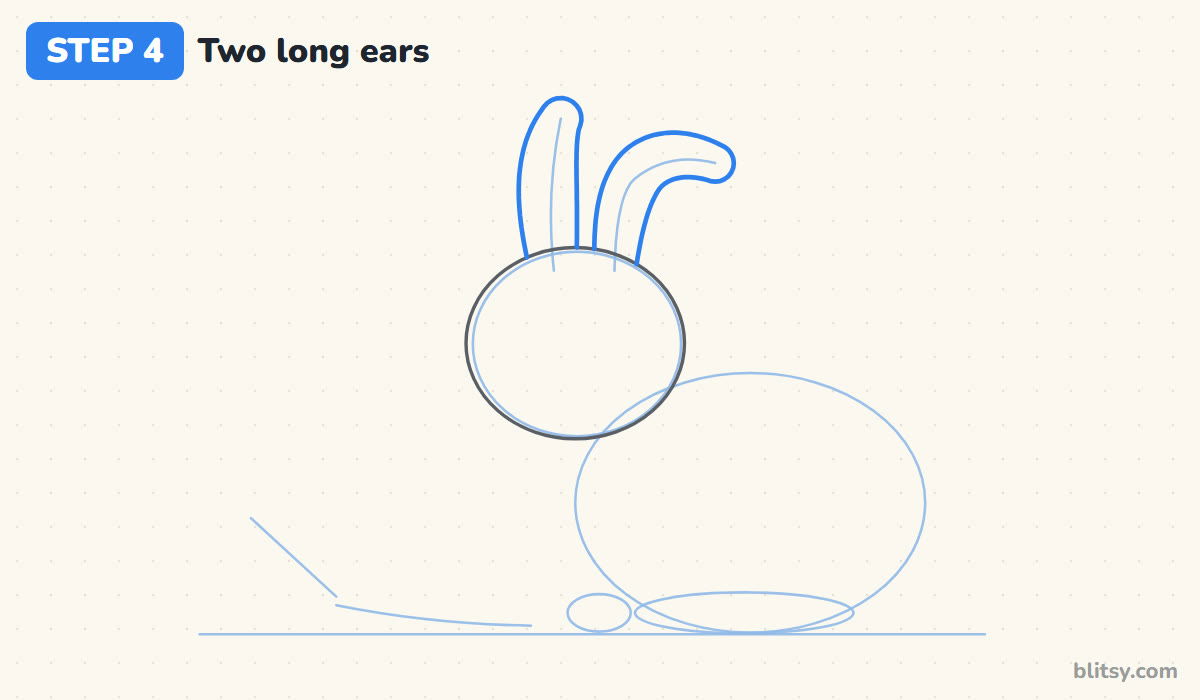
Build each ear around its guide line: a long, narrow shape that's wider in the middle and rounded at the tip. The front ear stands upright. The back ear follows its bent guide, so its top half folds back like a sock flopping over. Stop both ears where they touch the head.
💡 Tip: Draw the bent ear's outer curve first, then the inner one. The outer edge sets the shape.
Step 5: Draw the plump sitting body
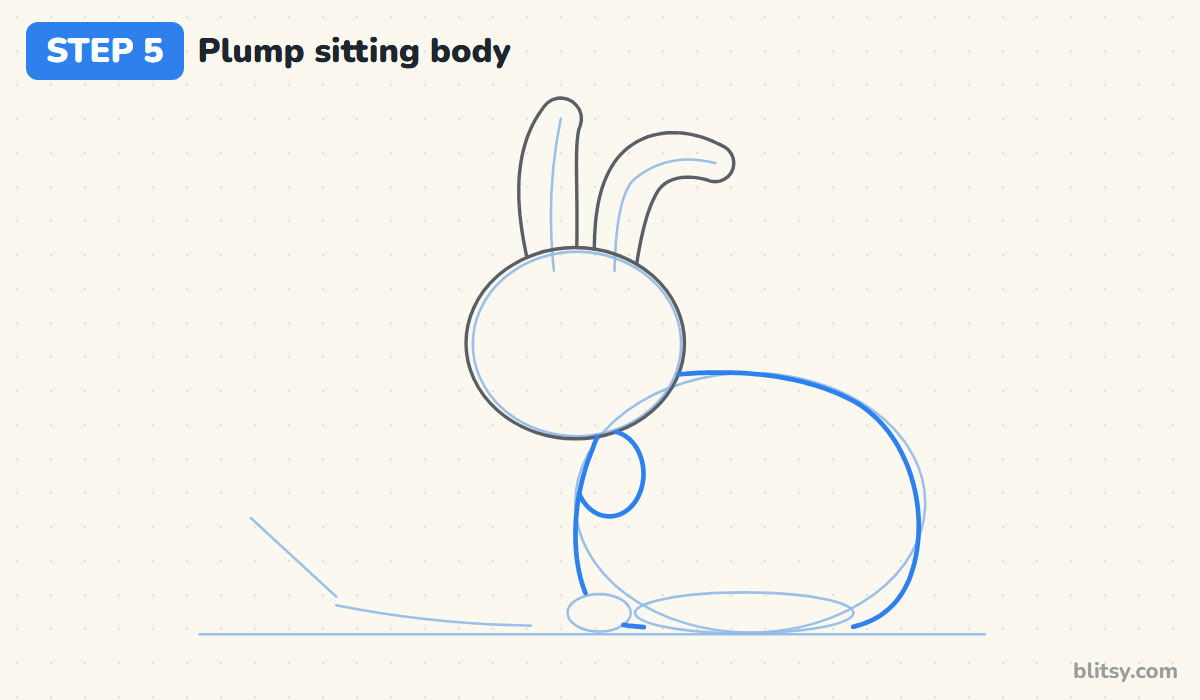
Start at the back of the head and follow the egg guide over the back, round the rump and down to the ground. Then come back to the front and draw the chest, curving down from under the chin. Just below the head, add a small oval for a cream chest patch. I want the body to look heavy at the bottom, the way a sitting rabbit spreads out.
💡 Tip: Let the back hump rise a little higher than the top of the chest. That's what makes it look like it's sitting.
Step 6: Add the big hind foot and front paws
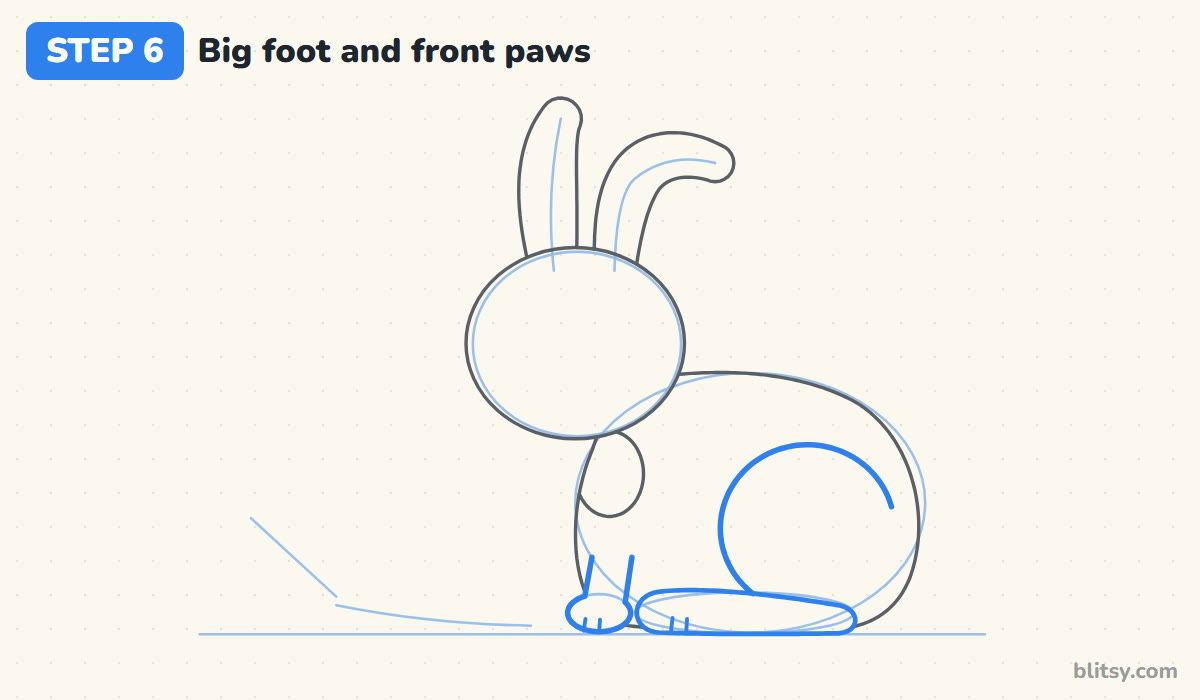
Inside the body, draw a big curved line for the thigh. It starts at the top of the foot, swings up and over, and stops before reaching the back edge. Now trace the long hind foot with a flat bottom and a rounder toe end. At the front, draw two straight lines down from the chest to a small round paw. Finish with two short toe lines on each foot.
💡 Tip: Leave the top of the front leg open. It blends into the fur that way instead of looking stuck on.
Step 7: Draw the fluffy cotton tail
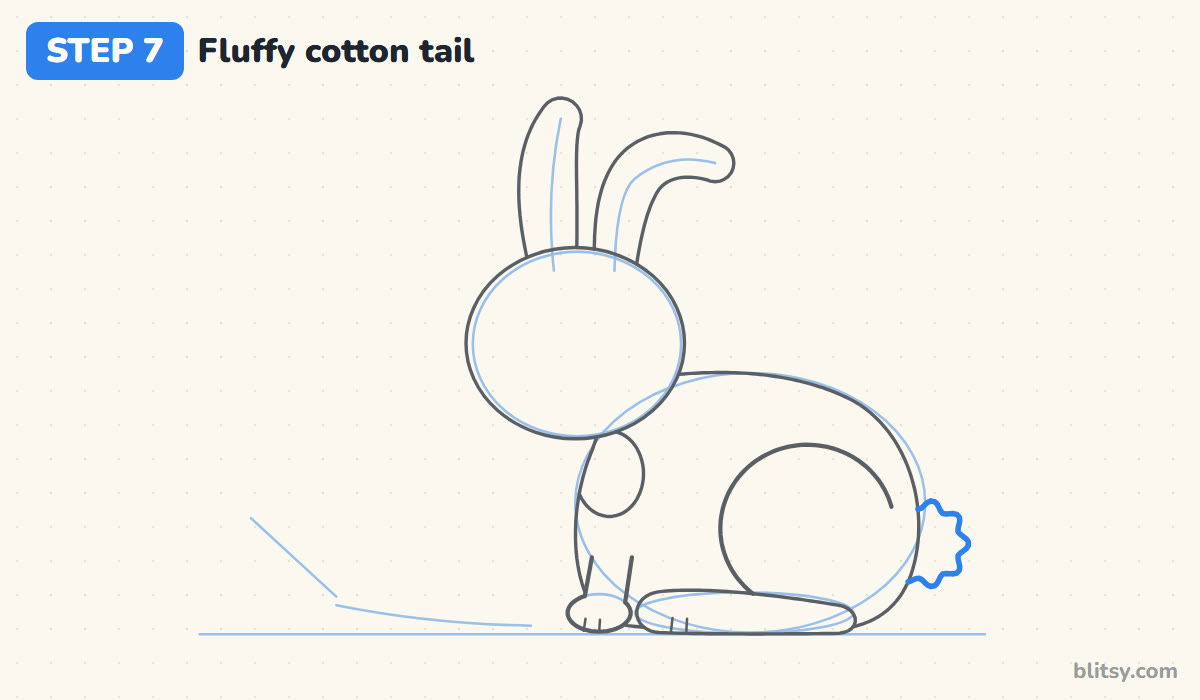
Where the rump curves down, add the tail as a small bumpy cloud poking out from behind the body. Use tiny wavy bumps instead of a smooth circle, and only draw the part outside the body, since most of the tail hides behind the rump.

💡 Tip: Five or six bumps are plenty. More than that and it starts to look like a flower.
Step 8: Give it an eye, a nose and a mouth
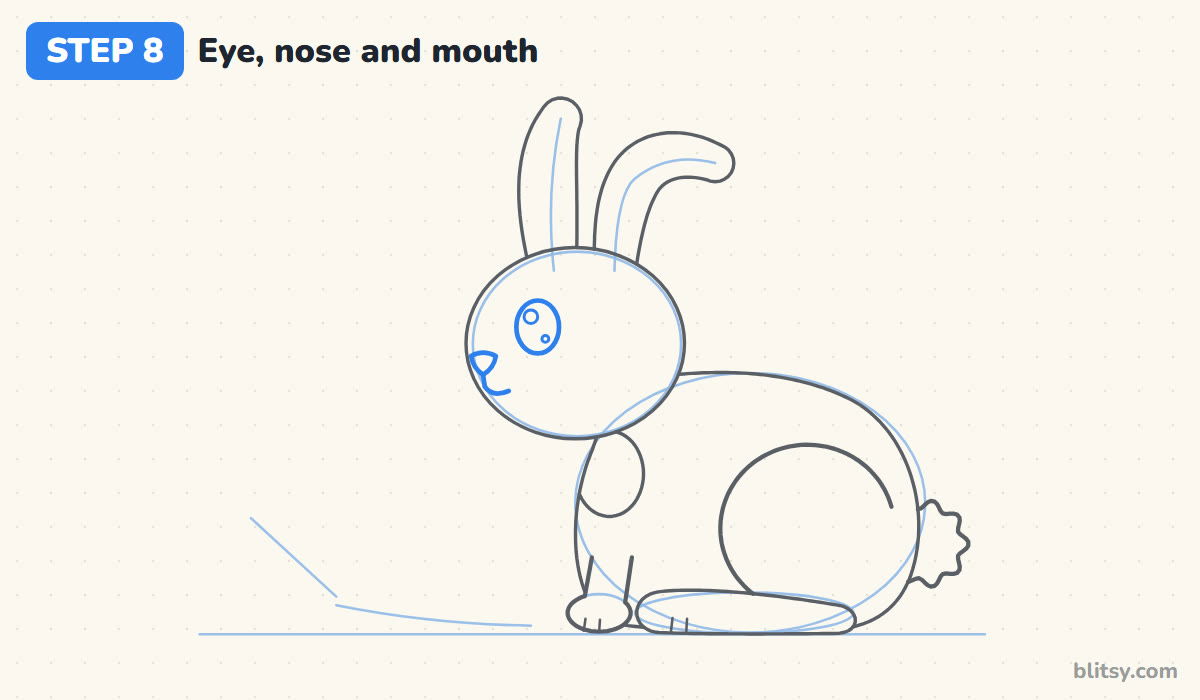
Place a big oval eye a little above the middle of the head and toward the front. Inside it, draw one larger shine circle near the top and a tiny one lower down. At the very front edge of the head, draw a small rounded triangle for the nose, then a short line down from it and a little hook curving back for the mouth.
💡 Tip: Keep the eye big and leave the shines white. Most of the cute comes from that one eye.
Step 9: Draw the inner ears and whiskers
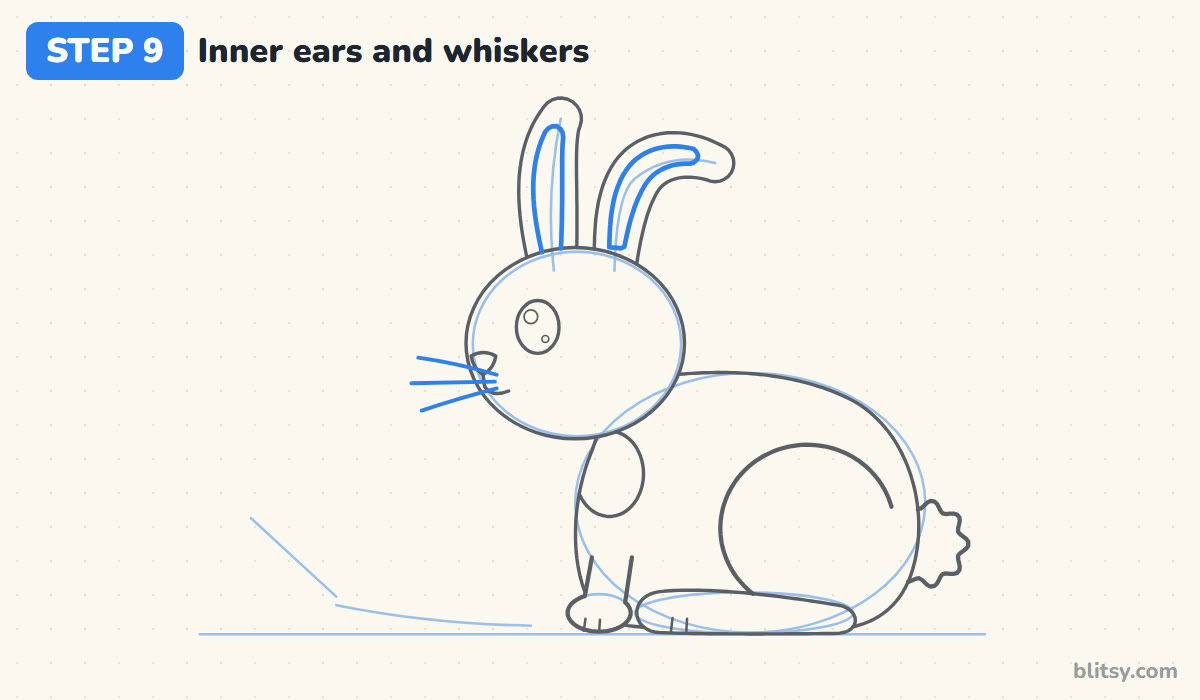
Inside each ear, draw a thinner version of the ear shape, leaving an even rim of fur around it. On the bent ear, let the inner part follow the fold. Then flick three whiskers out from the side of the nose, fanning slightly apart so they don't run parallel. I let them stretch well past the face.
💡 Tip: Pull each whisker away from the face in one fast stroke for a crisp, thin line.
Step 10: Draw a carrot with a leafy top
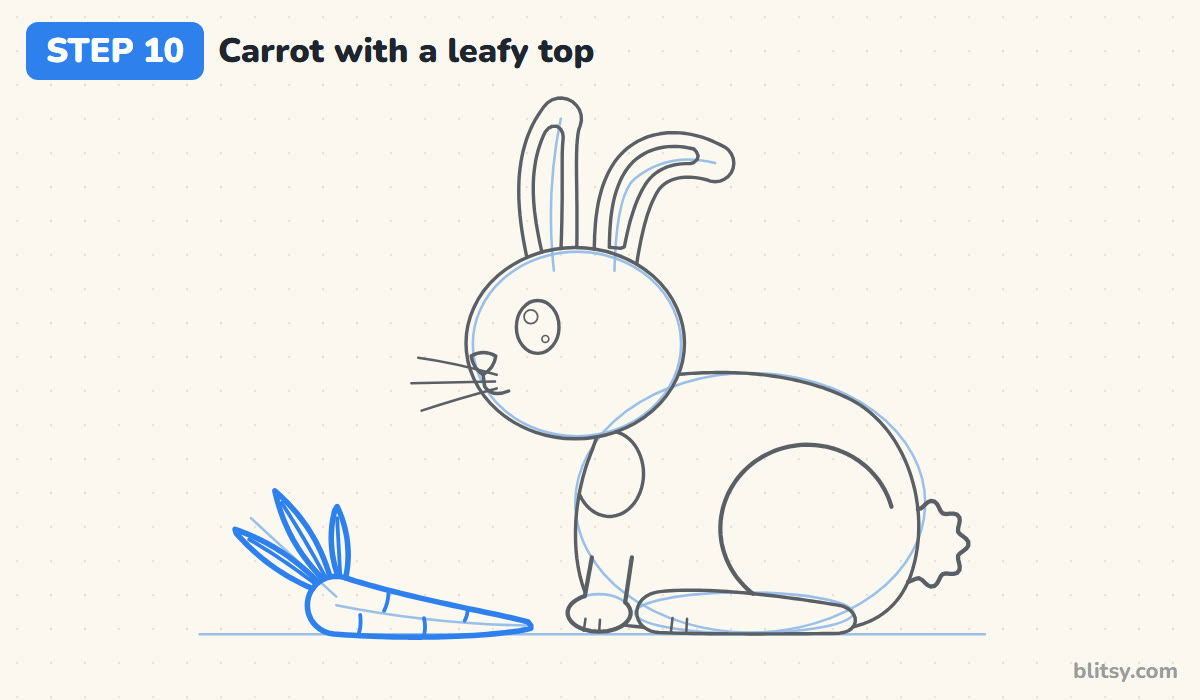
Along the carrot guide, draw a long cone: thick and rounded on the left, narrowing to a point near the bunny's paw. Add a few short curved lines across it for the rings. At the thick end, draw three pointed leaves fanning up and to the left, each with a line down the middle. With the tip pointing at the bunny, dinner looks about to start.
💡 Tip: Overlap the leaves a little. Three separate leaves in a row look stiff.
Step 11: Ink the lines and erase the guides
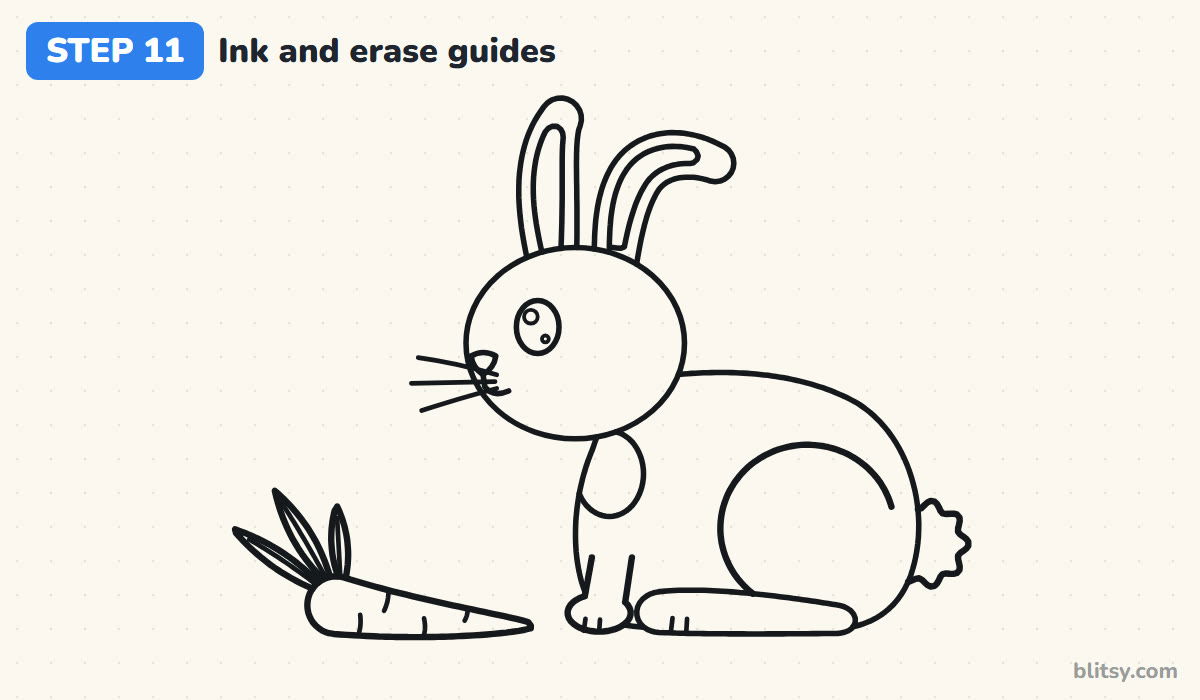
Trace over all your keeper lines with the black pen, including the whiskers and the carrot rings. Skip the circle, the egg, the ovals on the ground and the ear guide lines. Give the ink a full minute to dry, then erase every pencil mark. My own habit is to ink the face first, while my hand is steady.
💡 Tip: Rest the side of your hand on a scrap of paper so you don't smudge fresh ink.
Step 12: Color your bunny
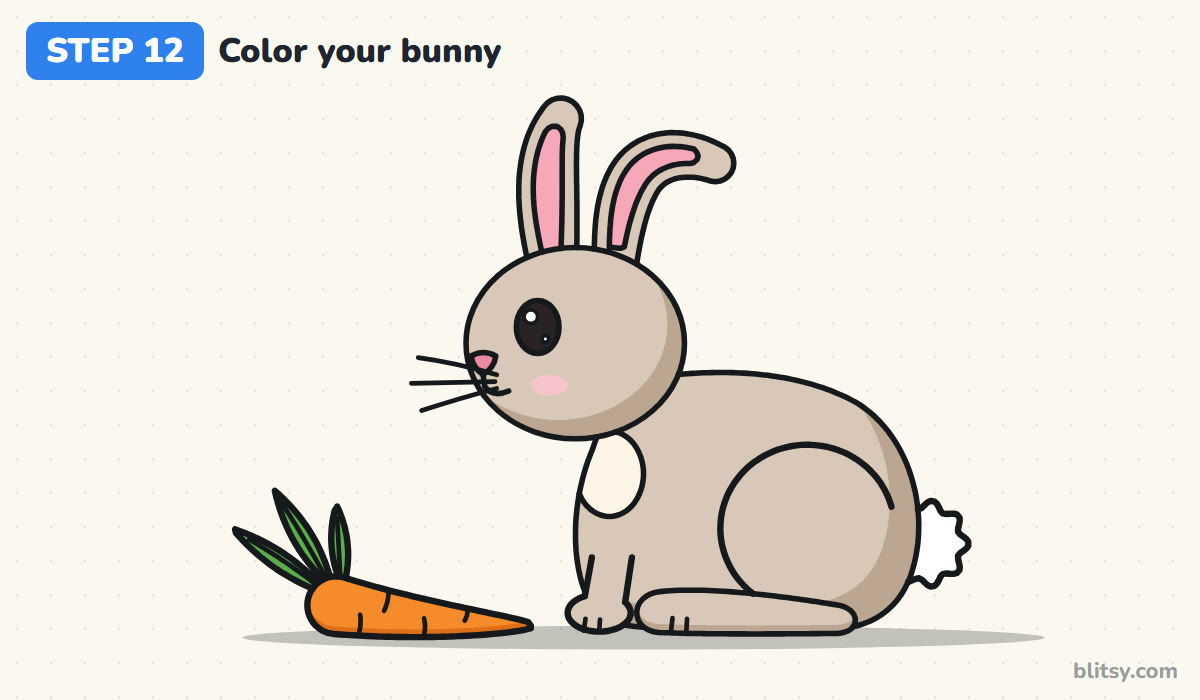
Fill the fur with light brown, including the ears and feet. Use a tan along the back, under the head and along the bottom of the foot for soft shading. The chest patch is cream and the tail stays white. Color the inner ears pink, plus the nose and a small cheek spot, and the eye black around its white shines. Then do the carrot in orange with green leaves.
💡 Tip: Color the shading after the light brown, pressing harder only along the edges.
Where Bunny Sketches Tend to Go Sideways
- Ears that are too short. Short pointed ears turn a bunny into a cat. Make them at least as long as the head is tall.
- A tiny hind foot. Rabbits have long back feet, and a small one makes the pose look tippy. Stretch it along the ground.
- The eye placed too far back. In side view the eye sits toward the front of the head. Too far back and the face looks long.
- A round tail drawn on top of the body. The tail sits behind the rump, so only its outer half shows. Stop the bumps where they meet the body.
- Heavy guide lines. Dark circles won't erase cleanly. Keep the first two steps very light.
Rabbit Variations: Lop Ears, New Colors and More
Once the pose feels comfortable, swap the colors: a pure white bunny with pink eyes, a gray one, or brown with a white patch over the nose. You can also flop both ears for a lop-eared look. Little artists can drop the carrot rings and the toe lines and still get a sweet result. If you'd like another small animal to practice next, try the easy mouse drawing tutorial or the cute animal drawing tutorial, which turns one body into a cat, a bear and a bunny.
Print a Bunny Coloring Page and the Step Guide
The free bunny coloring page has a colored example at the top with a key that names each color and the part it goes on. The step-by-step PDF guide holds all 12 steps with tips, sized for Letter or A4 paper.
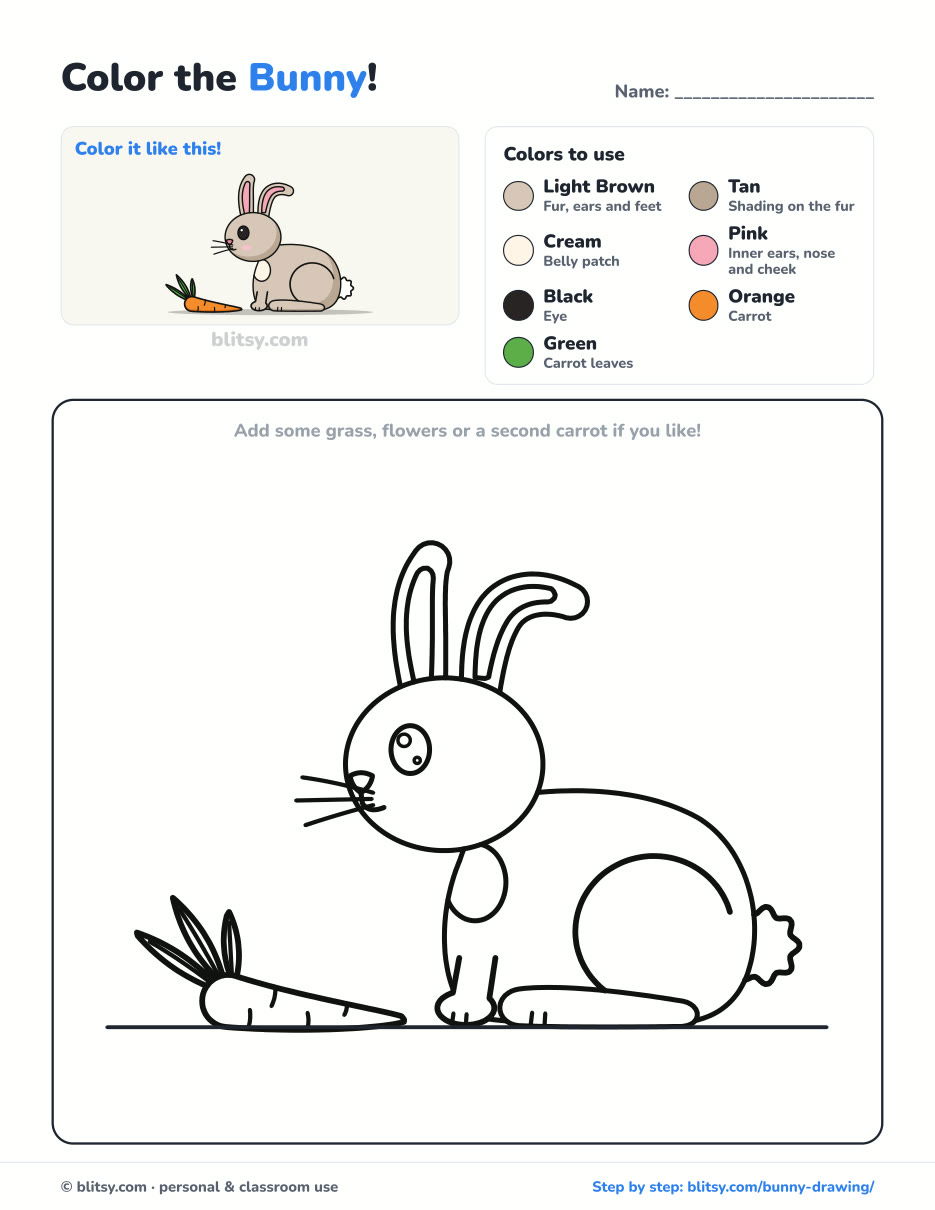
Black outlines with a colored example and the color names at the top. Ready to print and color.
⬇️ Download Coloring PageEvery step picture with its instructions and tips, to keep beside your paper while you draw.
⬇️ Download Drawing Guide📱 On a phone? Tap a download button, then open the file and choose Share → Save to Files or Print. On a computer, the PDF opens or saves straight to your Downloads folder.
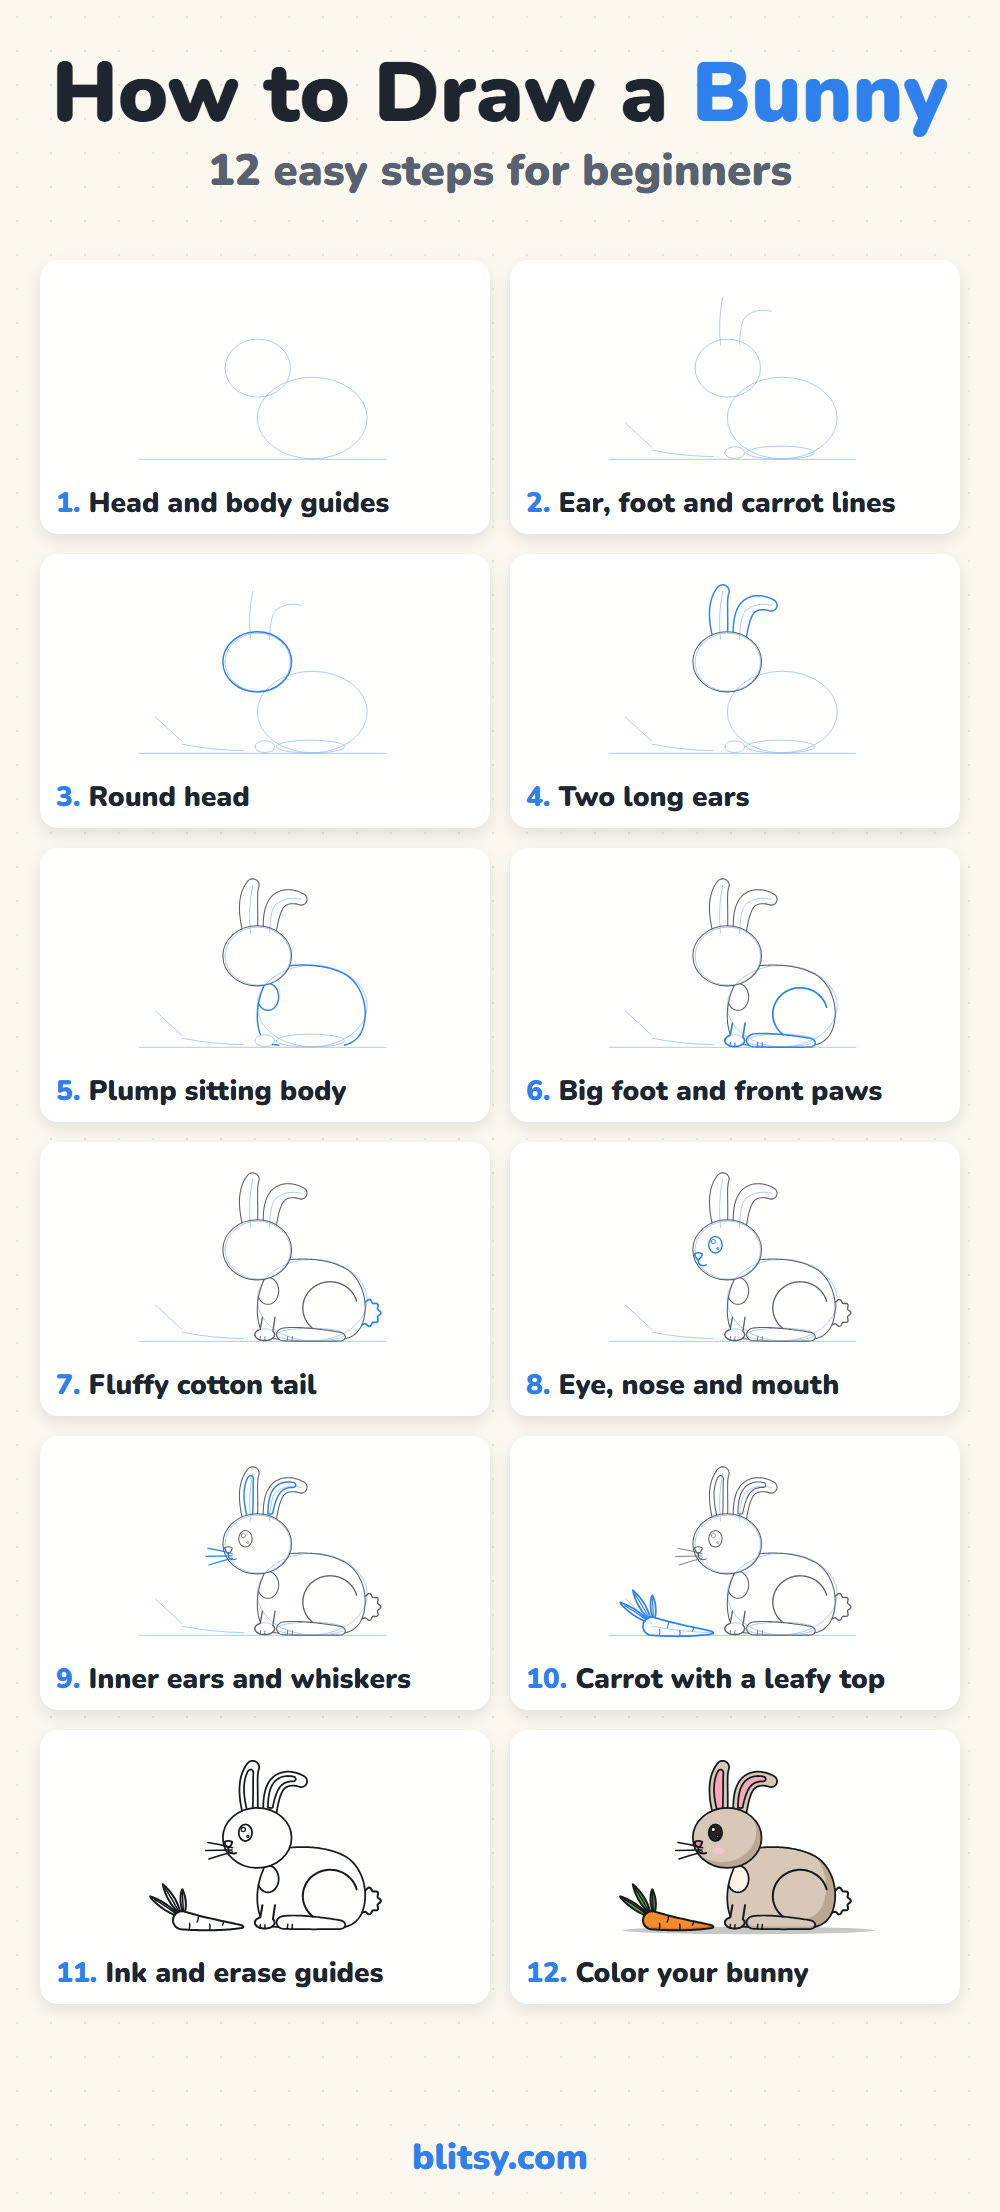
All 12 Bunny Steps on One Pin
Hop Over to These Animal Tutorials
Each link opens one step-by-step animal tutorial, drawn the same way as this bunny, one small shape at a time.
- Snow Leopard Drawing: Draw a snow leopard resting on a mountain rock with the how to draw a snow leopard tutorial.
- Cat Face Drawing: The cat face drawing step by step guide builds a gray tabby looking straight at you.
- Gorilla Drawing: A silverback sitting with a banana, one arm on its knuckles, ends the gorilla drawing tutorial.
- Simba Drawing: Learn how to draw Simba as a curious lion cub, starting from two ovals.
- Parrot Drawing: A scarlet macaw with a striped wing comes together in the parrot drawing step by step lesson.
- Butterfly Drawing: Our butterfly drawing tutorial ends with an orange butterfly, wings spread wide.
- Cat Eye Drawing: Practice slit and round pupils in this short how to draw a cat eye tutorial.
- Polar Bear Drawing: A polar bear with paws up sits on the ice in the easy polar bear drawing tutorial.
- Leopard Drawing: Draw a sitting leopard with amber eyes using this leopard drawing step by step guide.
- Peppa Pig Drawing: One snout, two eyes and a puddle to splash in: the Peppa Pig drawing tutorial is quick for little artists.
- Alligator Drawing: Spikes up and smiling, a walking gator grows from two ovals in the how to draw an alligator tutorial.
Bunny Drawing Questions Answered
What is the easiest way to draw a bunny?
Start with a circle for the head and an egg shape for the body, then add two long ears on top. Once those are in place, everything else is quick.
How do you draw a cute bunny for kids?
Keep the head big, the eye large with a white shine, and the body round. Kids can skip the shading and carrot rings and use a thick marker for the outline.
How long does it take to draw a bunny?
Around 30 minutes including ink and color. The sketch is fast; coloring the fur and shading takes the most time.
Should a bunny's ears go up or down?
Either works. Upright ears look alert. I like one bent ear, as here, because it makes the bunny look relaxed.
Your bunny is waiting on that first faint circle, so tell me what color yours ends up. 🐰🥕
Related posts:
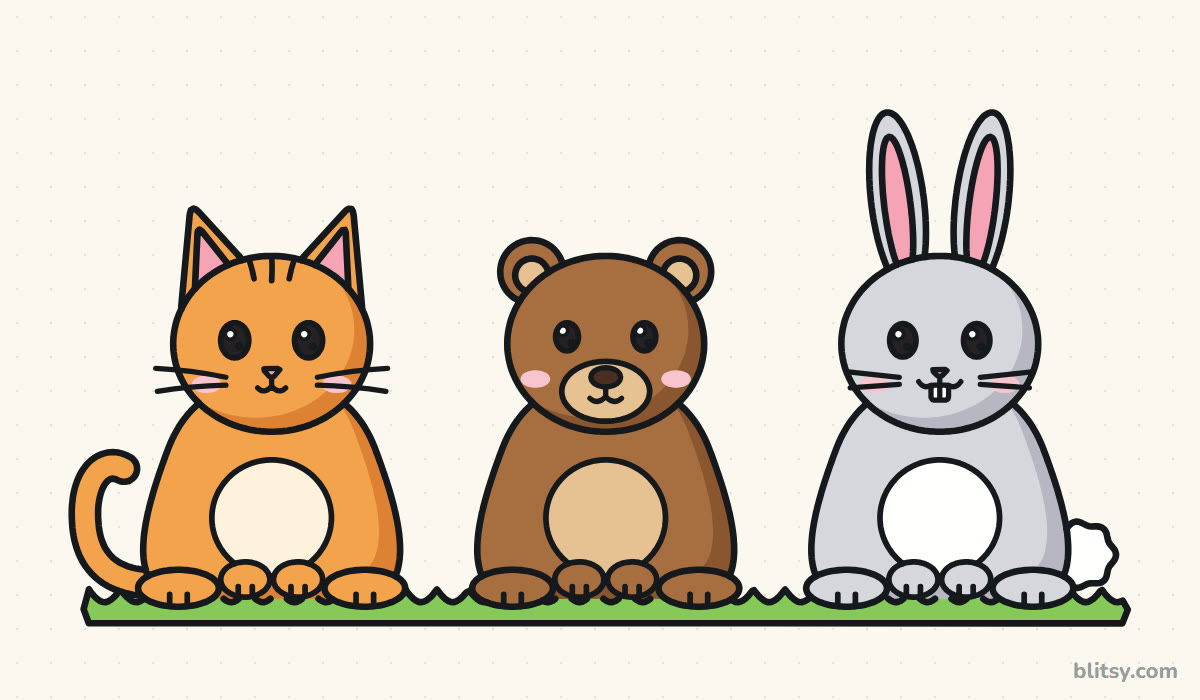 How to Draw Cute Animals Step by Step (Cat, Bear & Bunny)
 How to Draw a Car Step by Step (Easy Drawing for Beginners)
 How to Draw Godzilla Step by Step (Easy Kaiju for Beginners)
 How to Draw a Whale Step by Step (Easy for Beginners)
 How to Draw a Rat Step by Step (Easy for Beginners)
 How to Draw an Arctic Fox Step by Step (Easy for Beginners)
 How to Draw a Shark Step by Step (Easy for Beginners)
 How to Draw a Chicken Step by Step (Easy for Beginners)
 How to Draw a Leopard Step by Step (Easy for Beginners)
 How to Draw a Light Bulb Step by Step (Easy for Beginners)
 How to Draw a Crow Step by Step (Easy for Beginners)
 How to Draw an Eagle Step by Step (Easy for Beginners)

