
A flying saucer is one of the most forgiving things you can draw, because nobody knows what a real one looks like. Below I'll show you how to draw a UFO step by step, starting with one wide oval and ending with a little green alien waving from under a glass dome. The whole ship is built from ovals stacked on top of each other, plus a half circle and a cone of light. If you can draw an egg shape lying on its side, you can draw this.

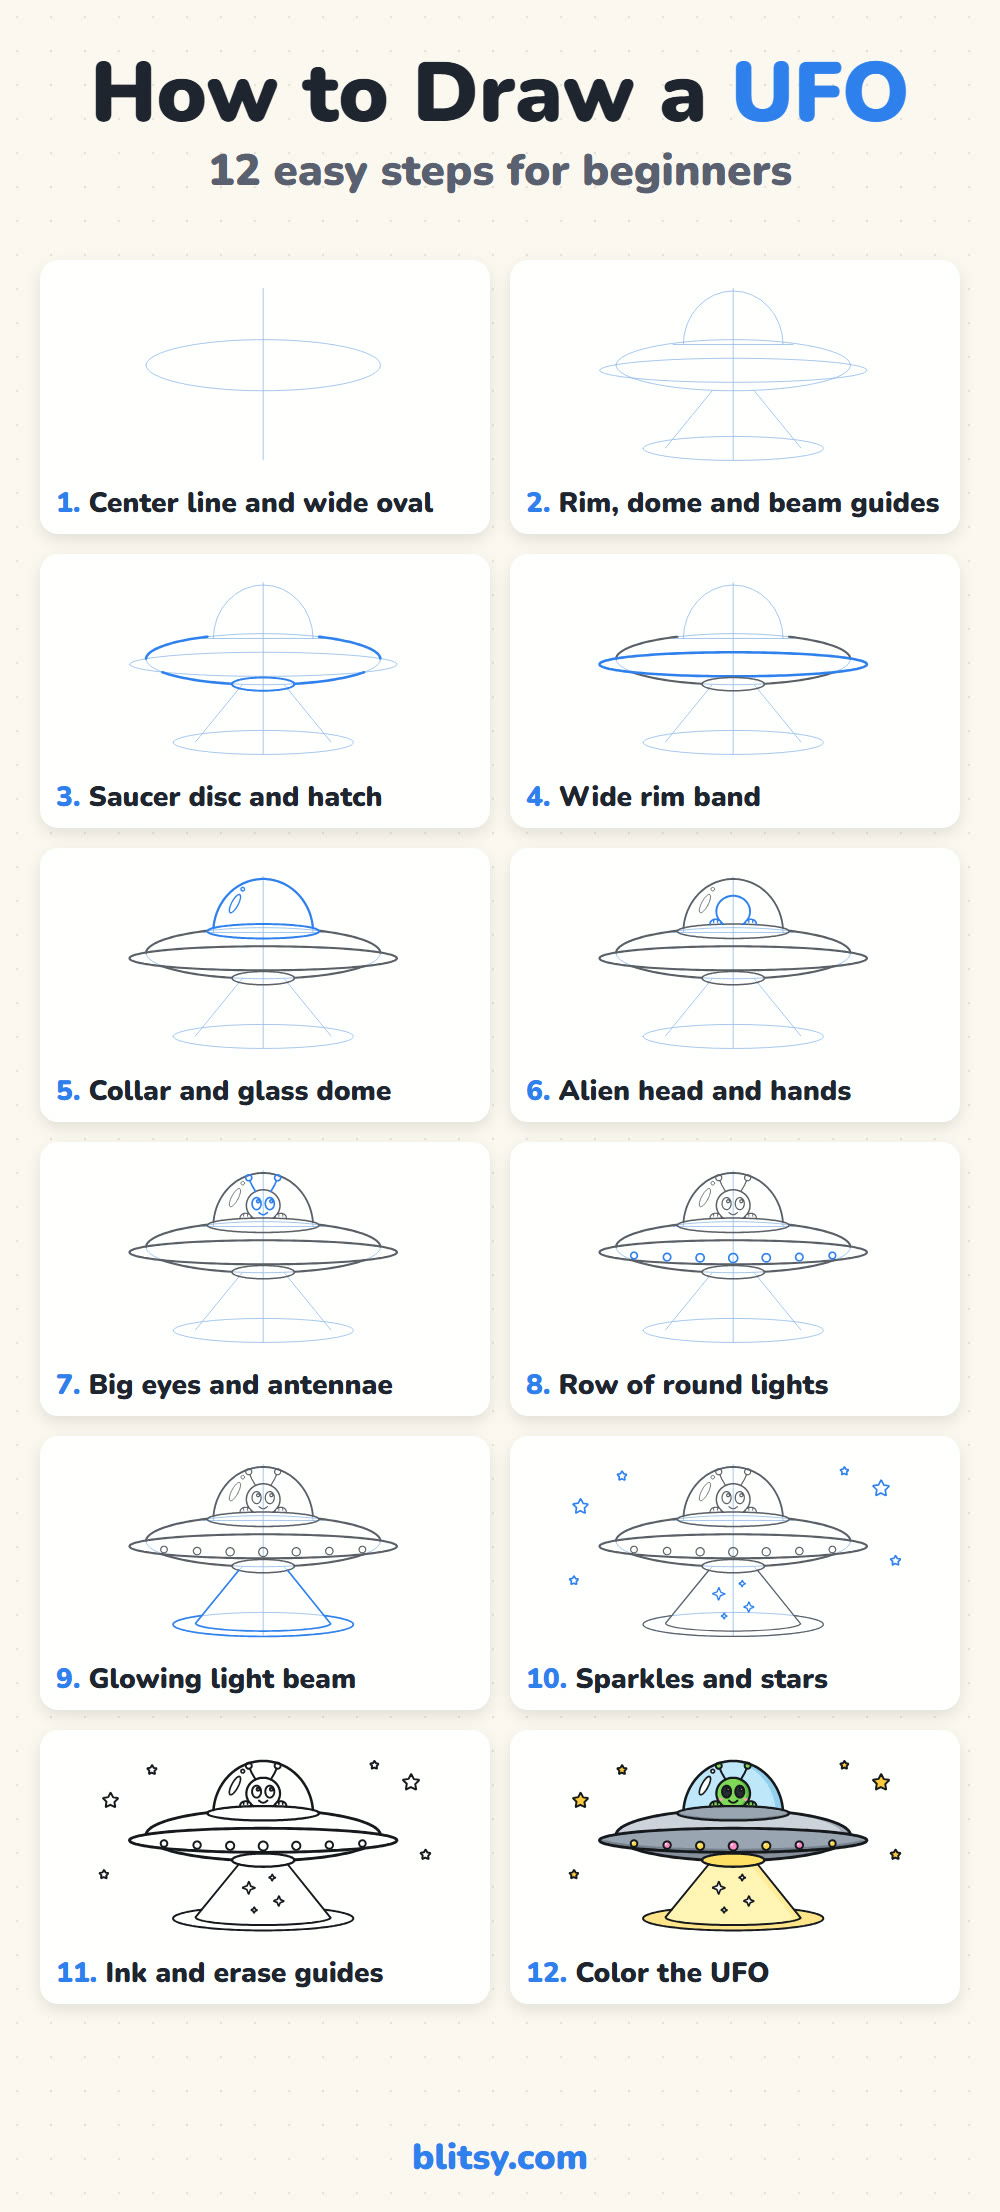
Look for the blue lines: they show what's new in each picture, while gray lines are earlier work. The thin pale blue shapes are construction lines. Sketch them faintly, because they come off with the eraser in step 11.
Quick overview
⏱️ Time: about 20 to 25 minutes
🎯 Level: easy, good for kids around 6 and up
✏️ Steps: 12
🛸 You'll draw: a flying saucer with an alien pilot and a glowing beam
Gear for Your Flying Saucer Sketch
- A pencil you can press lightly with (HB works well)
- A clean eraser
- A black fineliner or thin marker
- Colored pencils or markers in gray, light blue, green, yellow and pink
- A sheet of paper turned sideways
- A ruler for the beam lines (optional)
No gray pencil? Leave the saucer white and shade it with a regular pencil instead.
How to Draw a UFO Step by Step
Step 1: Draw a center line and a wide oval
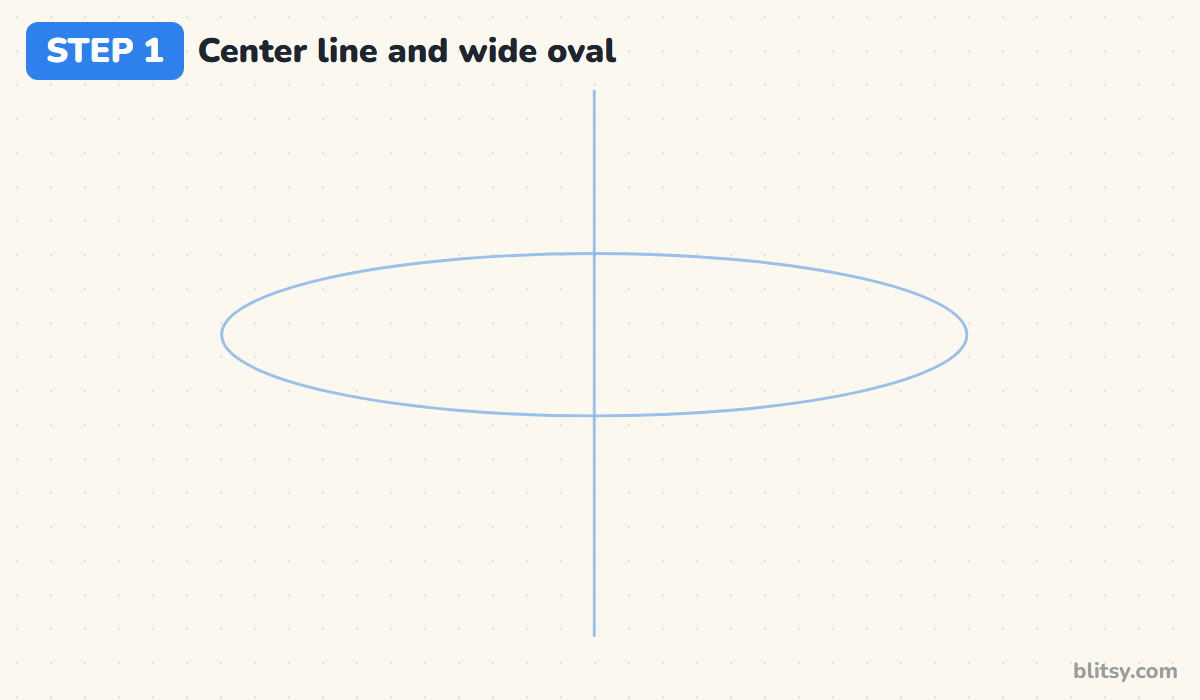
Turn your paper sideways and draw a vertical line down the middle. Across the upper half of that line, draw a long, flat oval that is about four or five times wider than it is tall. This is the body of the saucer, and it sets the size of everything else, so give it most of the page width.
💡 Tip: Sketch the oval in two halves, left then right, meeting on the line.
Step 2: Add guides for the rim, dome and beam
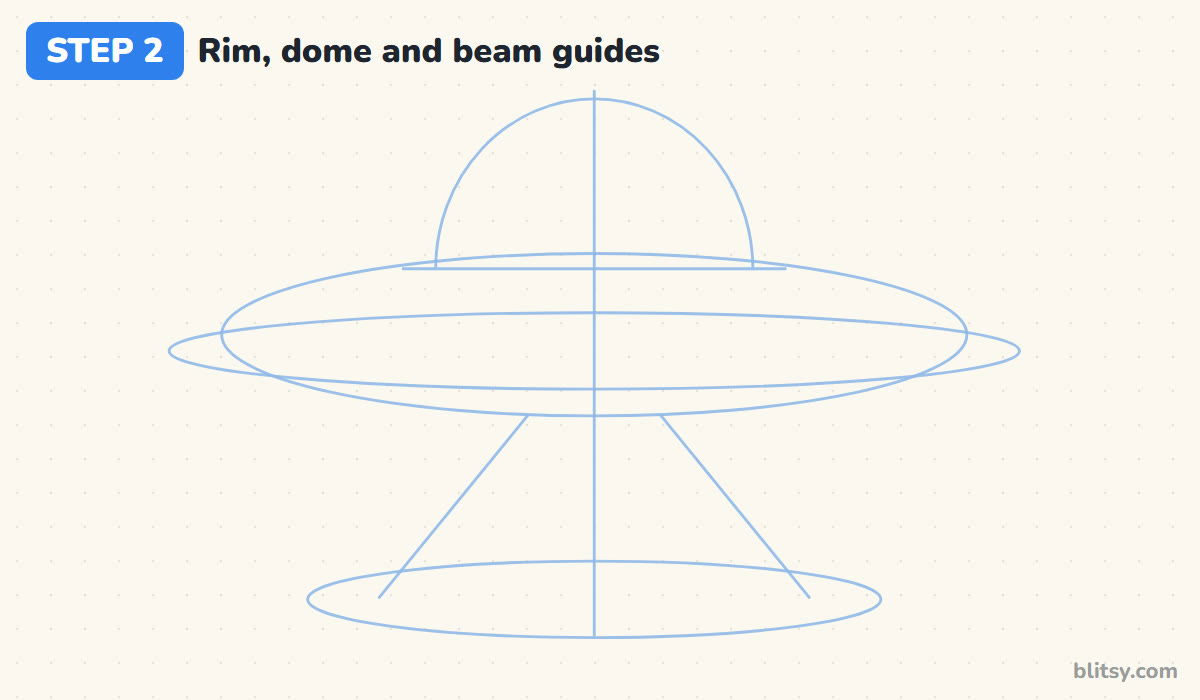
Draw a second oval just a little lower than the first, wider but even flatter. That's the rim that sticks out around the saucer. On top, sketch a half circle sitting on a short flat line for the dome. Then draw two slanted lines spreading down from under the ship and a flat oval on the ground where they end. Together they make a cone of light, and my advice is to keep these extra lines really faint.
💡 Tip: Keep the dome narrower than half of the big oval, or the ship looks top-heavy.
Step 3: Outline the saucer disc and the hatch
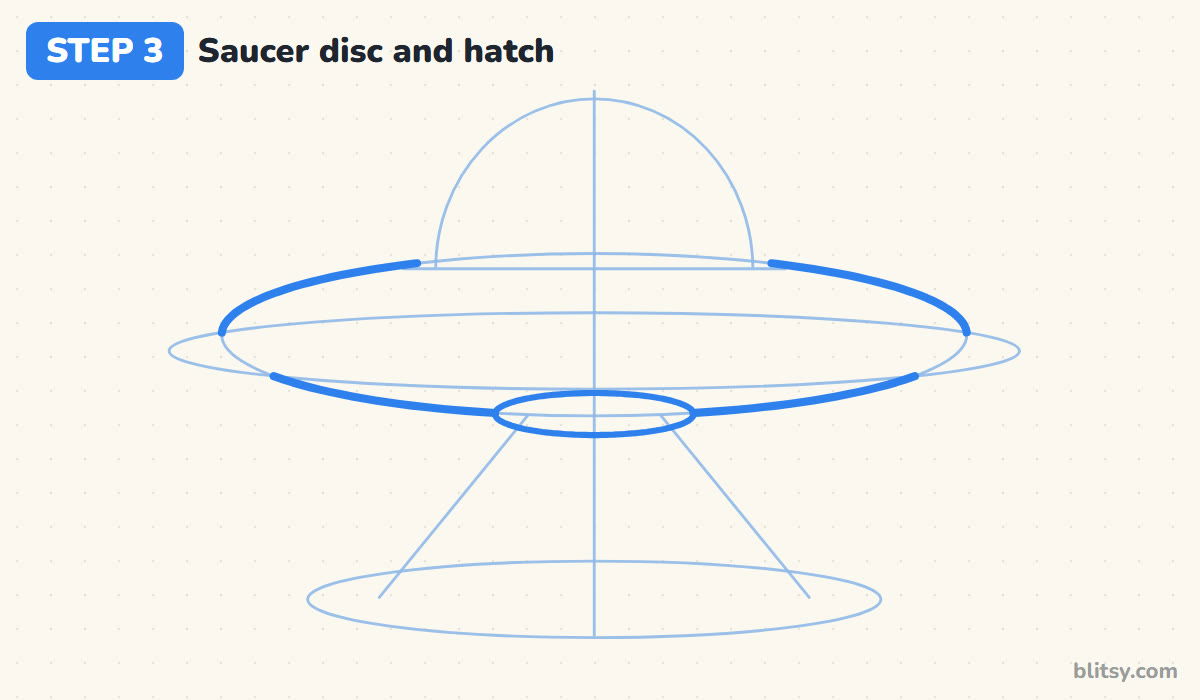
Go over the first oval with a firmer line, but leave two gaps: one at the top where the dome will sit, and one across the middle where the rim covers it. Under the ship, draw a small flat oval on the center line. That's the hatch the light comes out of. I like to place it so it overlaps the bottom of the saucer a little, which makes it look attached.




💡 Tip: Stop the pencil at the guides rather than drawing through them.
Step 4: Draw the wide rim band
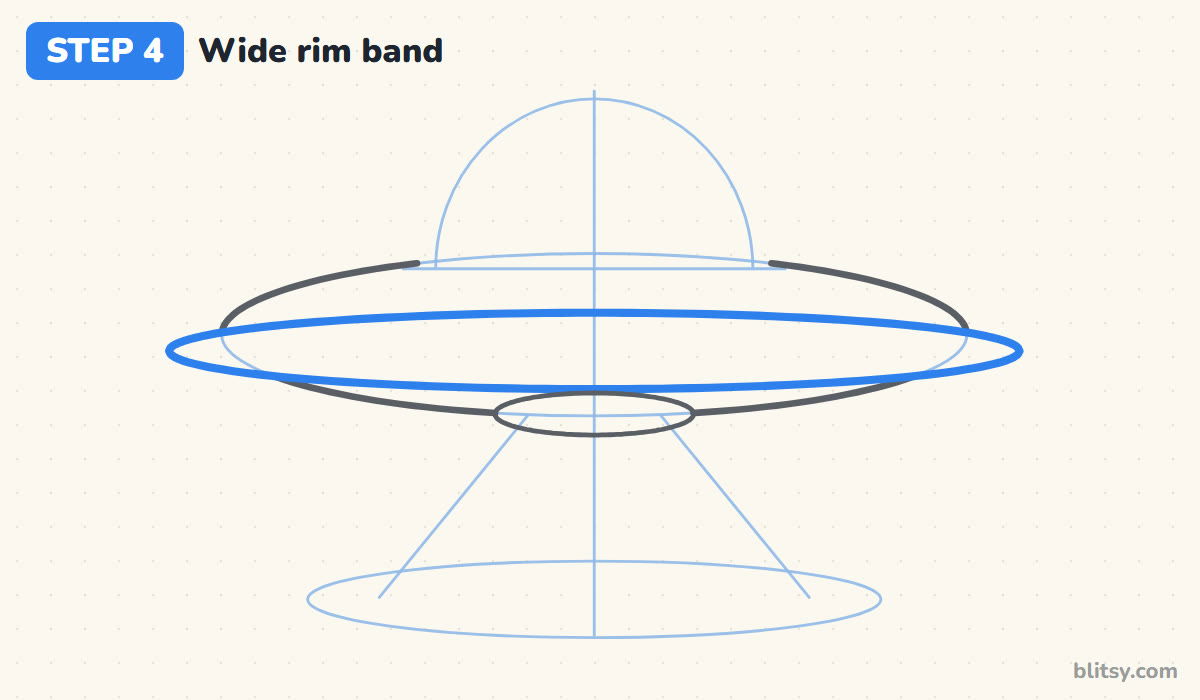
Trace the second, wider oval as one complete loop. Because it's drawn in front of the disc, it doesn't need any gaps. I think of this band as the part that turns a pebble into a flying saucer, so let its ends poke out past the disc on both sides.
💡 Tip: Turn your paper as you go so your hand follows the curve comfortably.
Step 5: Add the collar and the glass dome
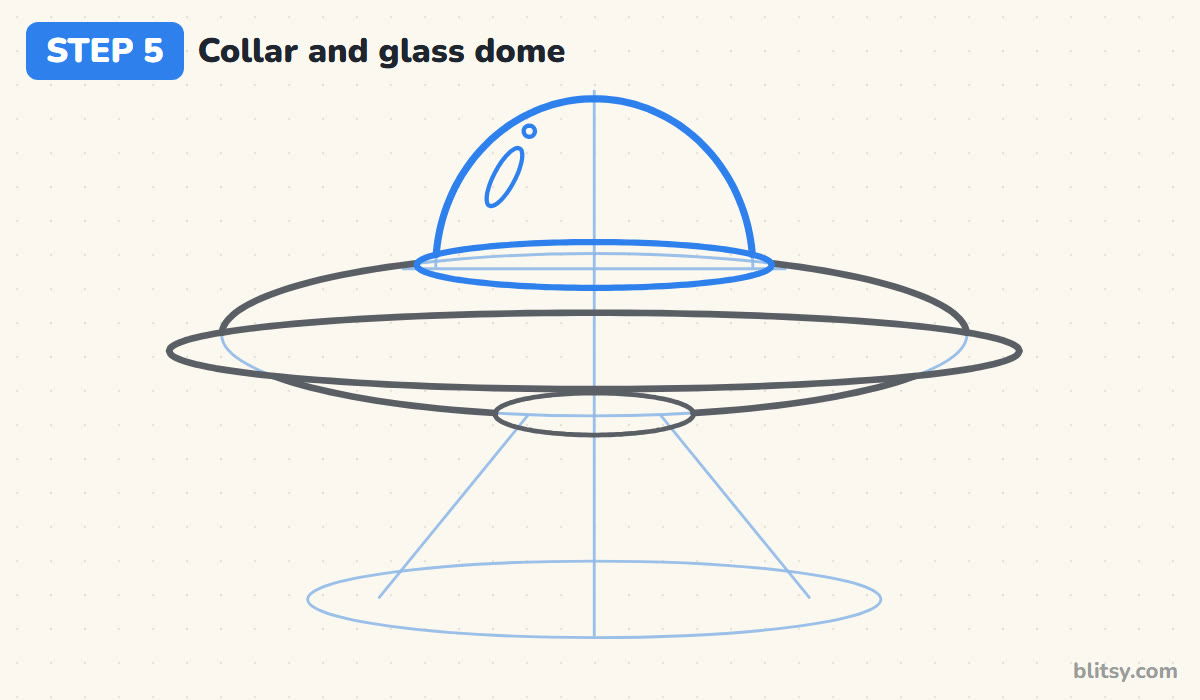
At the top gap, draw a small flat oval for the collar the dome sits in. Then curve the dome up from the collar's ends, using the half circle guide. Inside the glass, near the upper left, add a slanted skinny oval and a tiny circle. Those two marks are the shine, and they're the reason the dome will look like glass later.
💡 Tip: Put the shine on the same side every time you draw glass.
Step 6: Draw the alien's head and hands
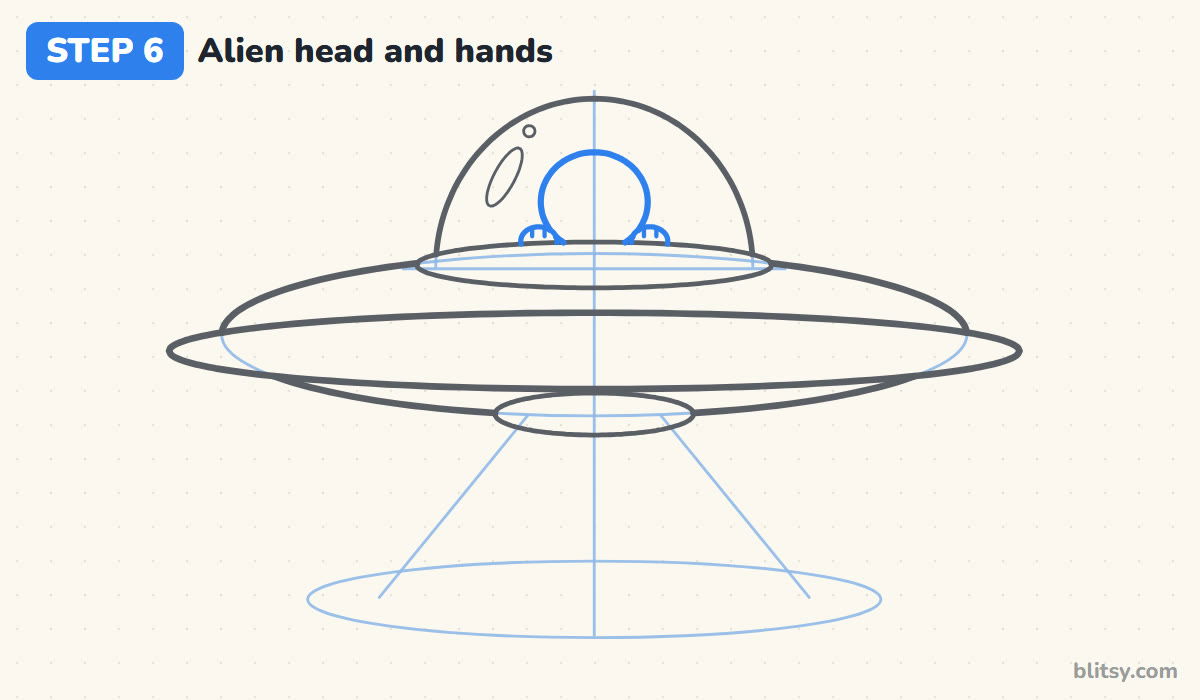
In the middle of the dome, draw a round head that sinks behind the collar at the bottom. On each side of it, add a small rounded bump resting on the collar with two short lines on top for fingers. Keep the head about a third as wide as the dome. Any bigger and the alien looks squashed inside its own ship.
💡 Tip: Hands that overlap the head a little make the alien look like it's leaning forward.
Step 7: Give the alien big eyes and antennae
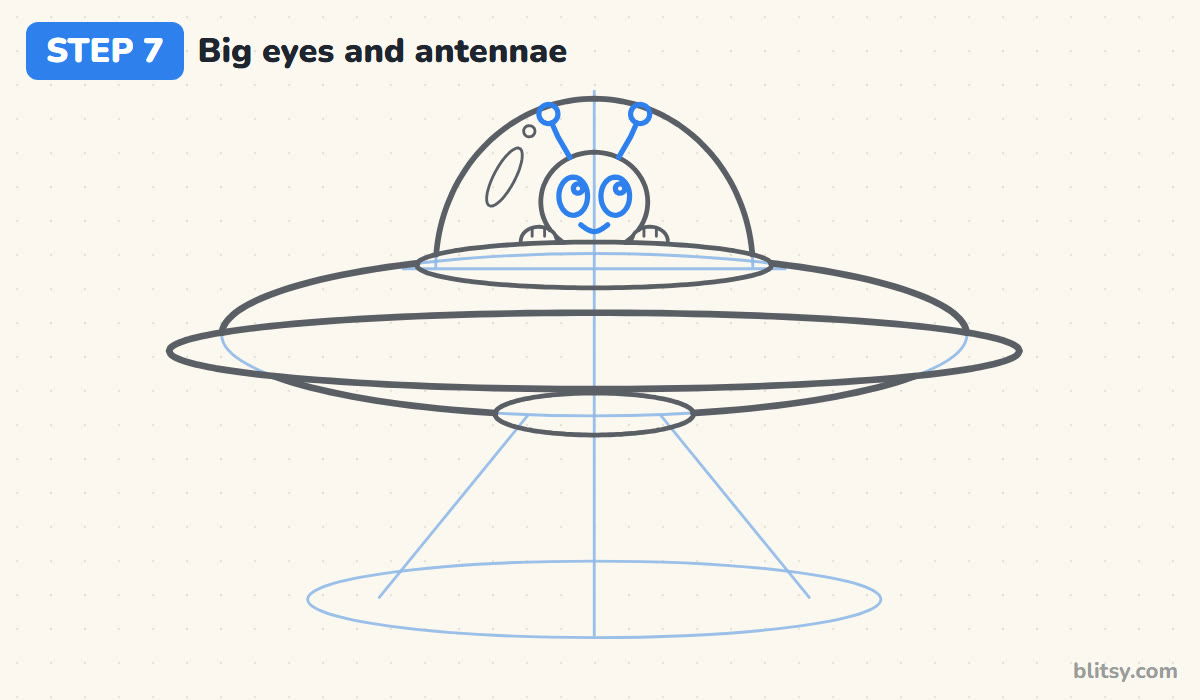
Draw two tall ovals for eyes, close together and a bit above the middle of the head. Add a tiny circle in the top right of each one for the sparkle. A short curved smile goes underneath. Last, draw two thin antennae from the top of the head, leaning outward, with a small ball on each tip.

💡 Tip: Big eyes set low on the face read as friendly, not spooky.
Step 8: Draw a row of round lights
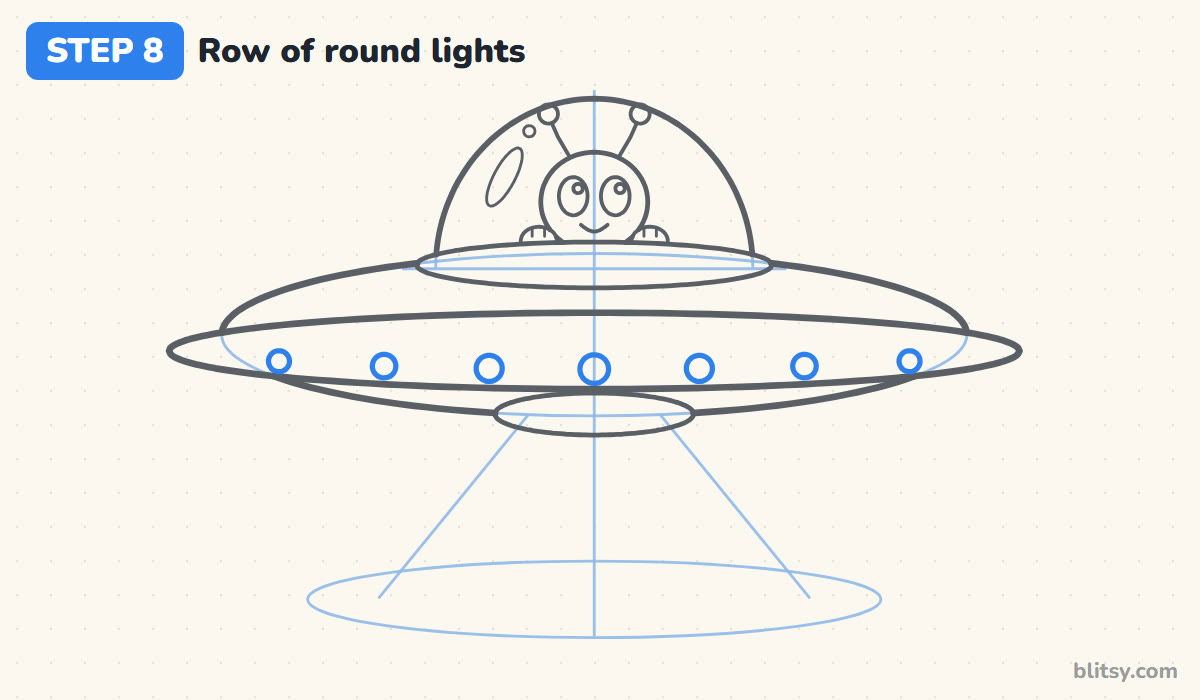
Along the lower half of the rim band, draw seven circles in a gentle curve. Make the middle one the biggest and let them shrink toward the ends. That small change in size makes the rim look like it's wrapping around a round ship. I start with the center light and work outward, so the row stays even.
💡 Tip: Count the spaces between lights, not the lights, to keep them evenly spread.
Step 9: Draw the glowing light beam
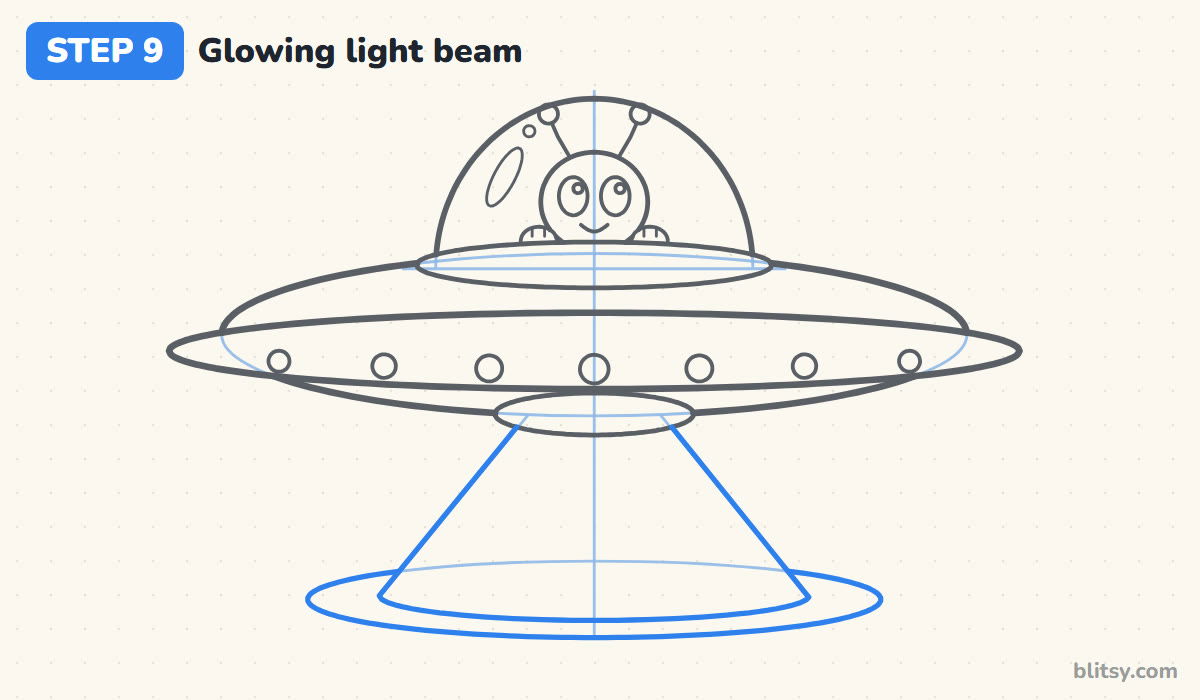
Follow the two slanted guides from the hatch down toward the ground. Join their bottom ends with a curve that dips downward, like the front edge of a circle on the floor. Then trace the ground oval around it, leaving out the part that's hidden inside the beam. Using a ruler for the two straight sides is completely fine.
💡 Tip: Start each beam line right at the edge of the hatch so nothing floats.
Step 10: Add sparkles and stars
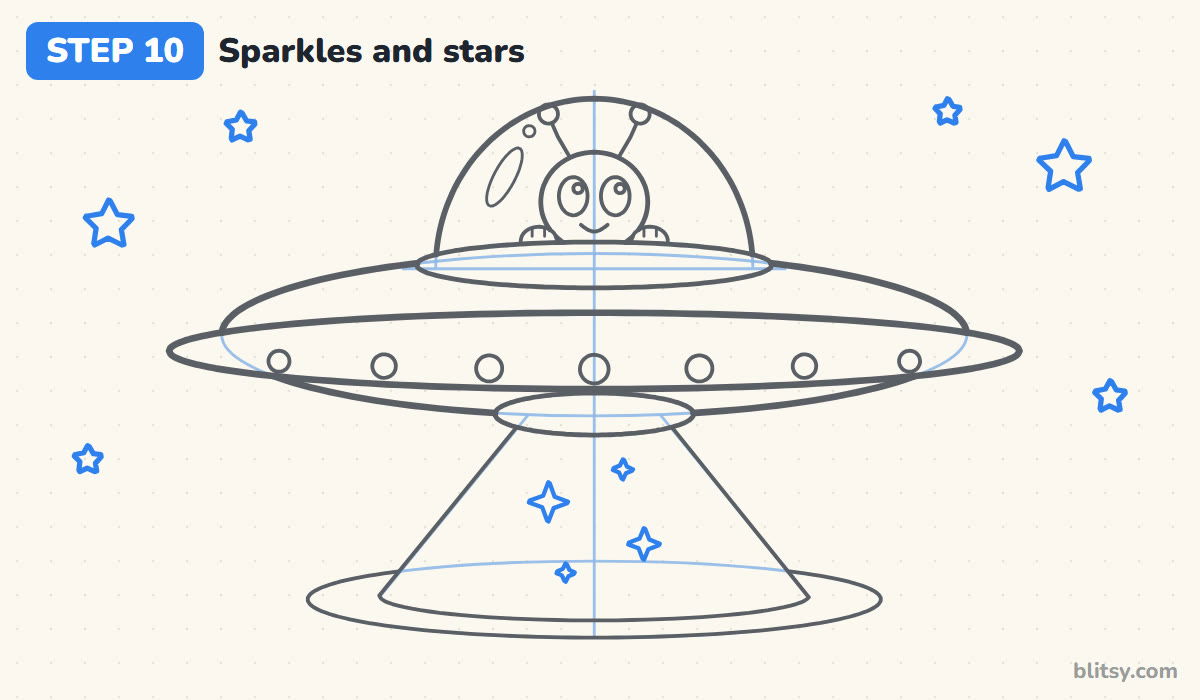
Inside the beam, draw four little sparkles with four pointy tips each, in a mix of sizes. Then scatter six five-pointed stars in the empty sky around the saucer. Honestly, stars are tricky for a lot of people, and younger kids can swap them for dots or small crosses without losing anything.
💡 Tip: Leave a clear gap between every star and the ship.
Step 11: Ink the lines and erase the guides
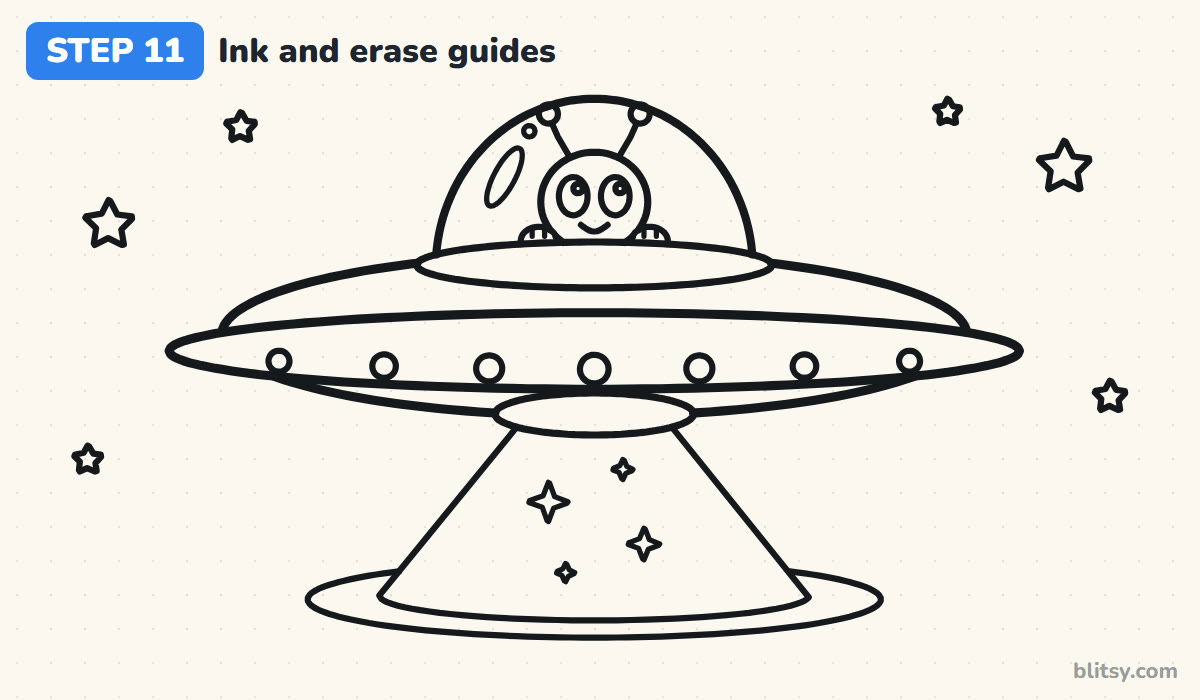
Trace every keeper line with your black fineliner: the disc, rim, collar, dome, alien, lights, hatch, beam, ground glow, sparkles and stars. Wait a minute for the ink to dry. Then erase the center line, all the guide ovals, the half circle and the two slanted beam guides.

💡 Tip: Ink small features like the fingers with a lighter, slower hand.
Step 12: Color the UFO and its beam
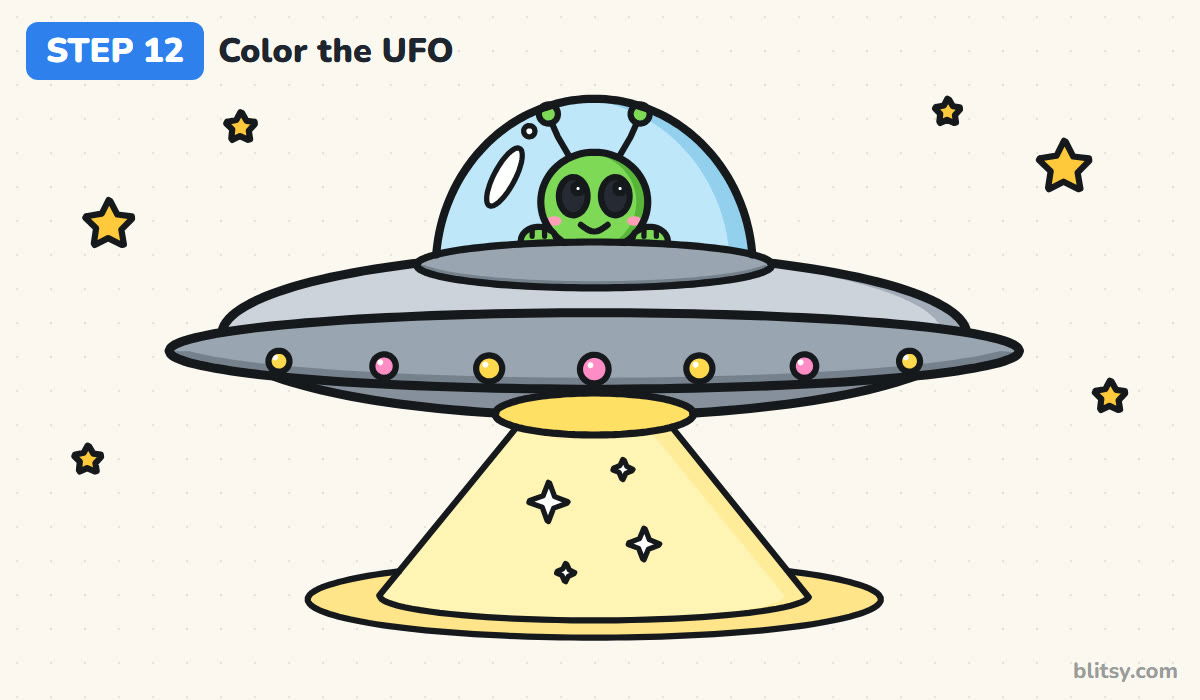
Color the top of the saucer light gray and the rim and collar a darker gray, then press harder along the right edges for shade. The underside below the rim gets the darkest gray. Make the dome light blue but leave the shine white. Your alien is green with dark eyes and pink cheeks. Finish with yellow and pink lights, a pale yellow beam, a deeper yellow hatch and ground glow, and yellow stars.
💡 Tip: Color the beam with soft side-to-side strokes so it looks like light.
Saucer Shapes That Go Wrong (and Quick Repairs)
- A round disc instead of a flat one. A tall oval makes the saucer look like a ball. Keep it at least four times wider than it is tall.
- A rim the same width as the disc. Then the edge disappears into the body. Let the rim band stick out past the disc on both sides.
- Lights sitting in a straight line. A flat row makes the rim look like a ruler. Follow the curve of the band and shrink the outer lights a little.
- An alien too big for the dome. When the head touches the glass, the ship looks crowded. Leave space all around the head and between the antennae and the dome.
- A beam that floats. If the beam starts below the hatch, it looks unattached. Begin both sides right at the hatch edge.
Spin-Offs for Your Alien Spaceship
After a few saucers, start playing with the design. Swap the beam for three short landing legs, or tilt the whole ship so it looks like it's zooming away. A cow floating up the beam is a classic joke kids love, and a crescent moon behind the dome makes it feel like night. Your alien might need neighbors, so how to draw a rocket step by step and the moon drawing tutorial make good next lessons.
Free UFO Coloring Page and Step Guide PDF
Print the UFO coloring page for a quiet table activity. A small colored saucer and a color key sit at the top, and the big outline below is ready for crayons. The printable step guide collects all 12 steps with their tips. Both print on Letter or A4.
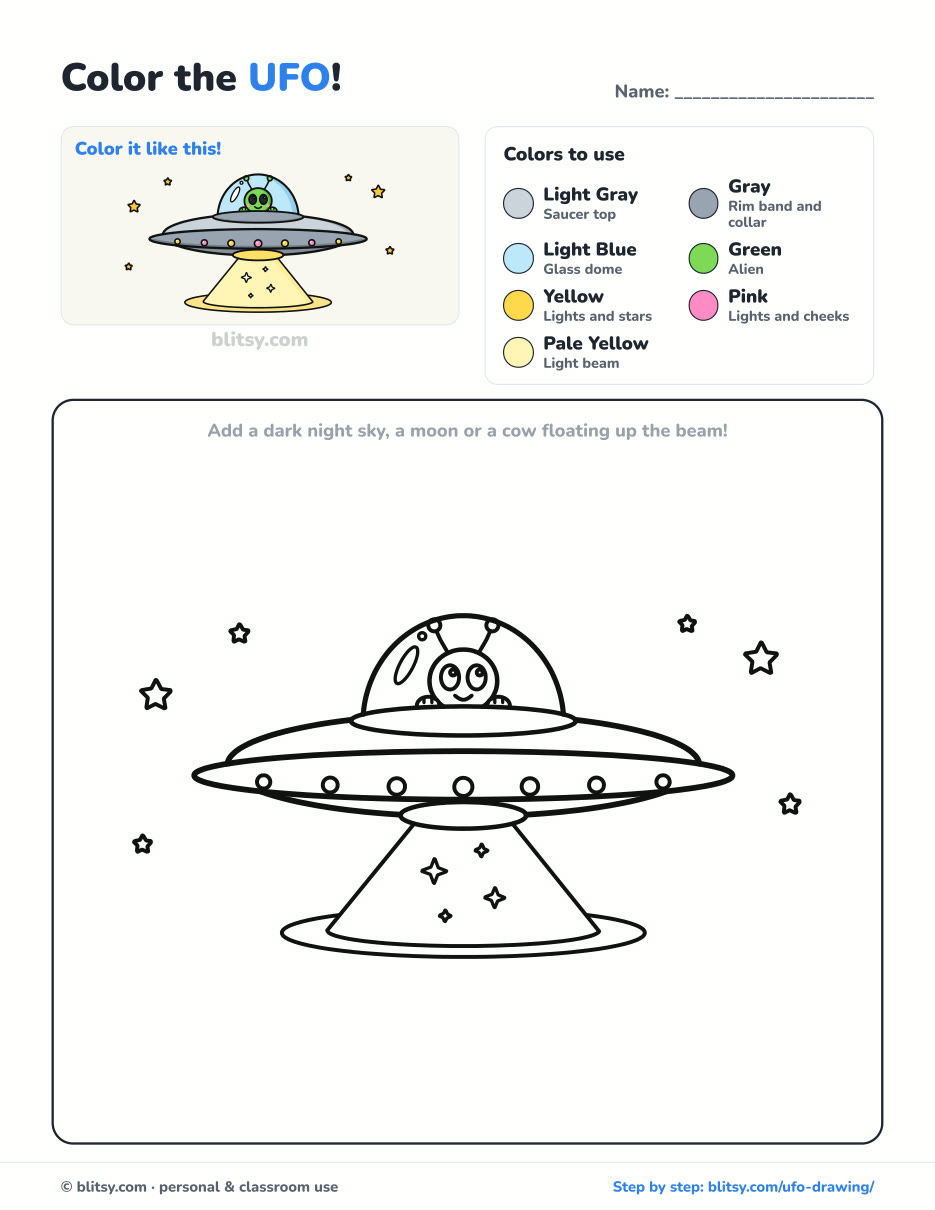
Black outlines with a colored example and the color names at the top. Ready to print and color.
⬇️ Download Coloring PageEvery step picture with its instructions and tips, to keep beside your paper while you draw.
⬇️ Download Drawing Guide📱 On a phone? Tap a download button, then open the file and choose Share → Save to Files or Print. On a computer, the PDF opens or saves straight to your Downloads folder.
Pin the Saucer Lesson for Later
UFO Landed? Vehicles and Objects to Draw Next
These step-by-step tutorials cover more vehicles and objects, plus one shading lesson.
- Bed Drawing: The bed drawing tutorial draws a 3D wooden bed with two pillows and a star duvet.
- Realistic Drawing: Shade one apple under one lamp in the realistic drawing step by step lesson.
- Train Drawing: A red boiler, spoked wheels and puffs of steam: how to draw a train.
- Castle Drawing: Three towers and a drawbridge over the moat make up the castle drawing tutorial.
- Diamond Drawing: Draw a brilliant-cut diamond from straight lines in how to draw a diamond step by step.
- Baseball Bat Drawing: The baseball bat drawing tutorial sets a bat, a glove and a ball into a small still life.
- Monster Truck Drawing: Two circles become a flame-painted truck in monster truck drawing step by step.
- Rocket Drawing: Launch a rocket past a ringed planet with the rocket drawing tutorial.
- Rocks Drawing: Learn how to draw rocks by shading a gray boulder and two smaller neighbors.
- Tank Drawing: The tank drawing step by step guide draws a cartoon tank with a long gray track loop.
UFO Sketching Questions From Young Artists
What is the easiest way to draw a UFO?
Draw a wide flat oval, put a half circle on top for the dome, and add a few circles along the edge for lights. That's already a recognizable UFO.
How do you draw a UFO for kids?
Keep the shapes big and skip the extras. Younger children can leave out the hands, the sparkles and the ground glow, and draw the alien as a round face with two eyes.
How long does it take to draw a UFO?
Plan on 20 to 25 minutes with coloring. The ovals go fast, and the lights and stars take the most care.
What colors is a UFO usually drawn in?
Cartoon saucers are usually silver or gray with a blue glass dome, colored lights and a yellow or green beam. Since it's an imaginary craft, you can paint it any color you like.
Your saucer is ready for takeoff, so try a second one hovering over your house next. 🛸
Related posts:
 How to Draw a Tooth Step by Step (Cute and Easy for Kids)
 How to Draw a Ghost Step by Step (Cute and Easy)
 How to Draw an Owl Step by Step (Cute Night Owl)
 How to Draw an Axolotl Step by Step (Cute and Easy)
 How to Draw Cute Animals Step by Step (Cat, Bear & Bunny)
 How to Draw an Octopus Step by Step (Cute and Easy)
 How to Draw a Frog Step by Step (Cute Frog on a Log)
 How to Draw a Jellyfish Step by Step (Cute, Easy Guide)
 How to Draw a Grim Reaper Step by Step (Cute Halloween)
 How to Draw a Care Bear Step by Step (Cute Fan Art for Kids)
 How to Draw Cerberus Step by Step (Cute and Easy)
 How to Draw a Monster Step by Step (Cute and Easy)

