
A suit looks complicated because of all the little parts, but it's really two simple shapes with matching pieces on each side. In this lesson you'll learn how to draw a suit step by step, laid out flat the way designers sketch clothes: a two-button jacket with the trousers beside it. One center line does most of the hard work, because whatever you draw on one side, you copy on the other.
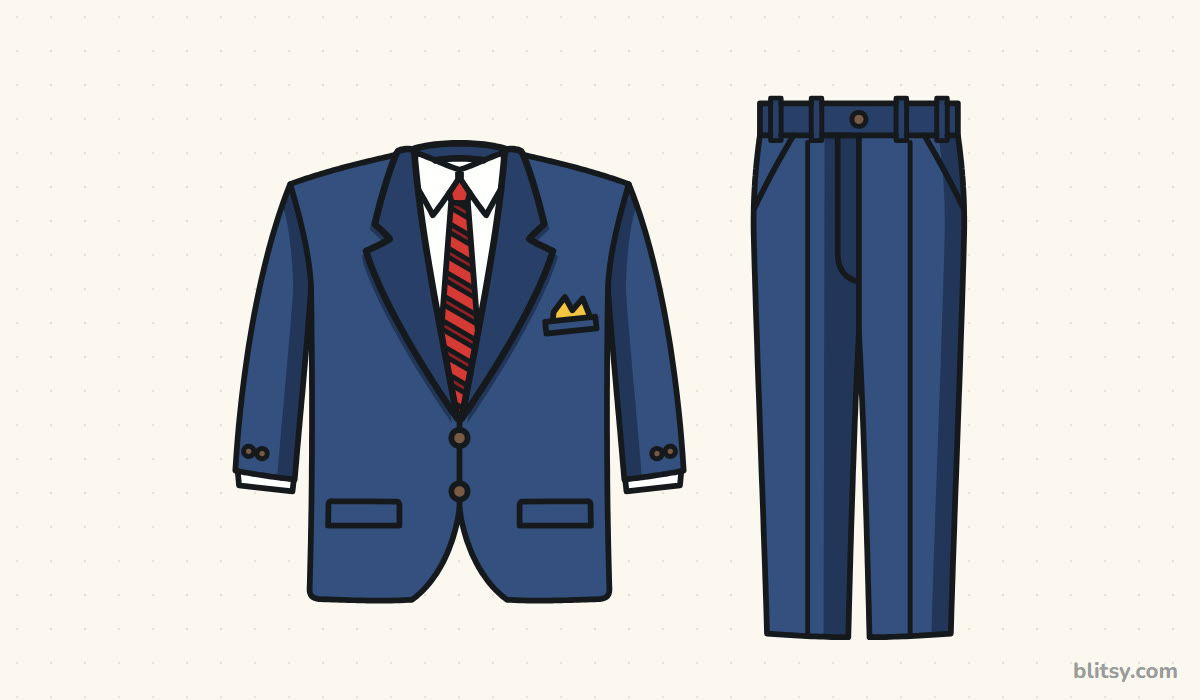
Every picture adds one part of the suit in blue, and the gray lines are what you already drew. The light blue boxes and center lines are only helpers, so sketch them softly; they get erased in step 11.
Quick overview
⏱️ Time: roughly 30 to 40 minutes with coloring
🎯 Level: easy, good for kids around 8 and up
✏️ Steps: 12
👔 You'll draw: a navy two-button suit jacket with shirt and tie, plus the matching trousers
Tools for a Neat, Tailored Sketch
- An HB pencil for the light guide boxes
- An eraser that doesn't smudge
- A ruler for the center lines and the trouser creases
- A black fineliner or felt-tip pen
- Colored pencils or markers: navy, dark blue, red, dark red, yellow and brown
- A sheet of paper turned sideways, so both pieces fit
A ruler is optional, but it makes the trousers look properly pressed.
How to Draw a Suit Step by Step
Step 1: Draw the center lines and guide boxes
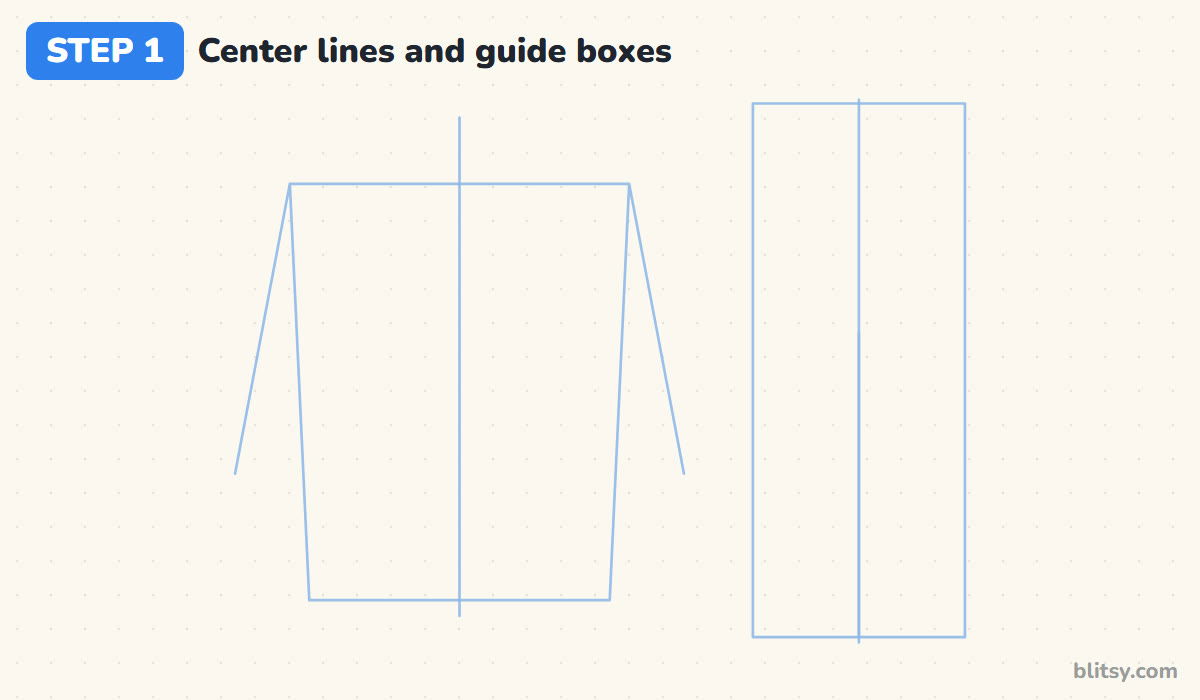
Turn the paper sideways. On the left, draw a tall box that's slightly wider at the top for the jacket, plus two slanted lines from its top corners for the sleeves. On the right, draw a narrow upright rectangle for the trousers. Finish with a straight line down the middle of each shape, since everything after this gets mirrored across them.
💡 Tip: Leave a gap of about two finger widths between the jacket and the trousers.
Step 2: Outline the jacket body
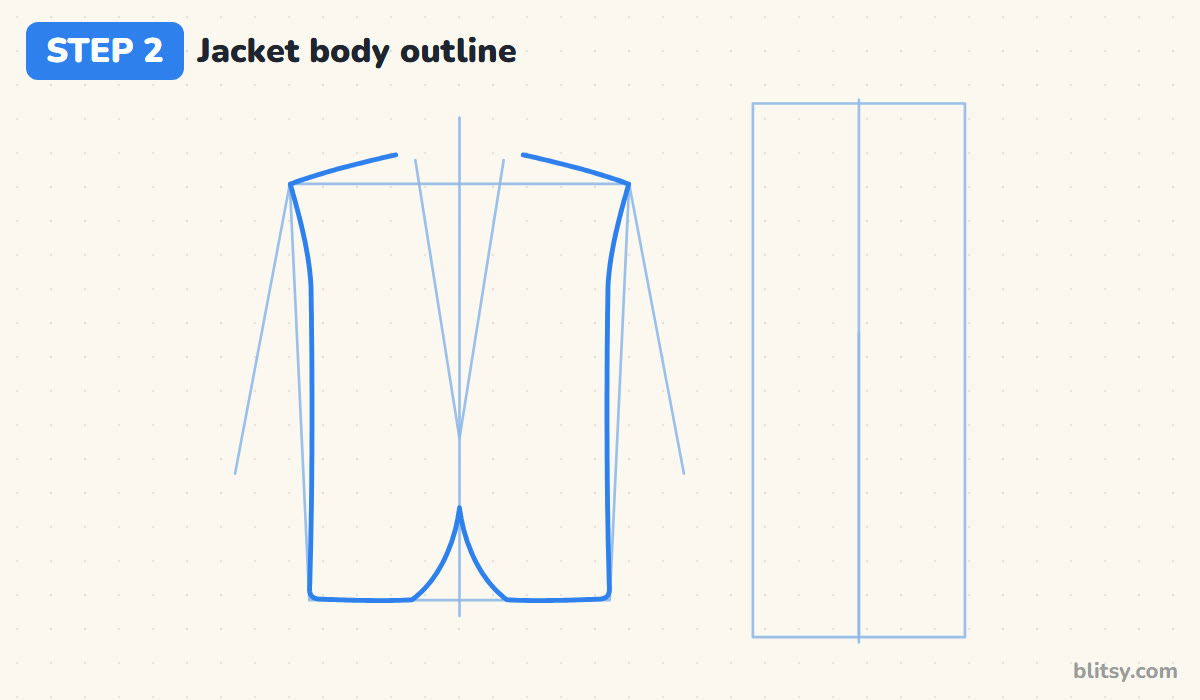
First sketch a soft V from the neck down to a point on the center line, about halfway down the box. That's where the top button will go. Now draw the shoulders sloping gently outward, run the sides straight down and flatten the bottom. Just above the hem, curve both front edges up into an upside-down U.
💡 Tip: Keep the shoulder line a little curved; dead straight shoulders look like a box.
Step 3: Add two hanging sleeves
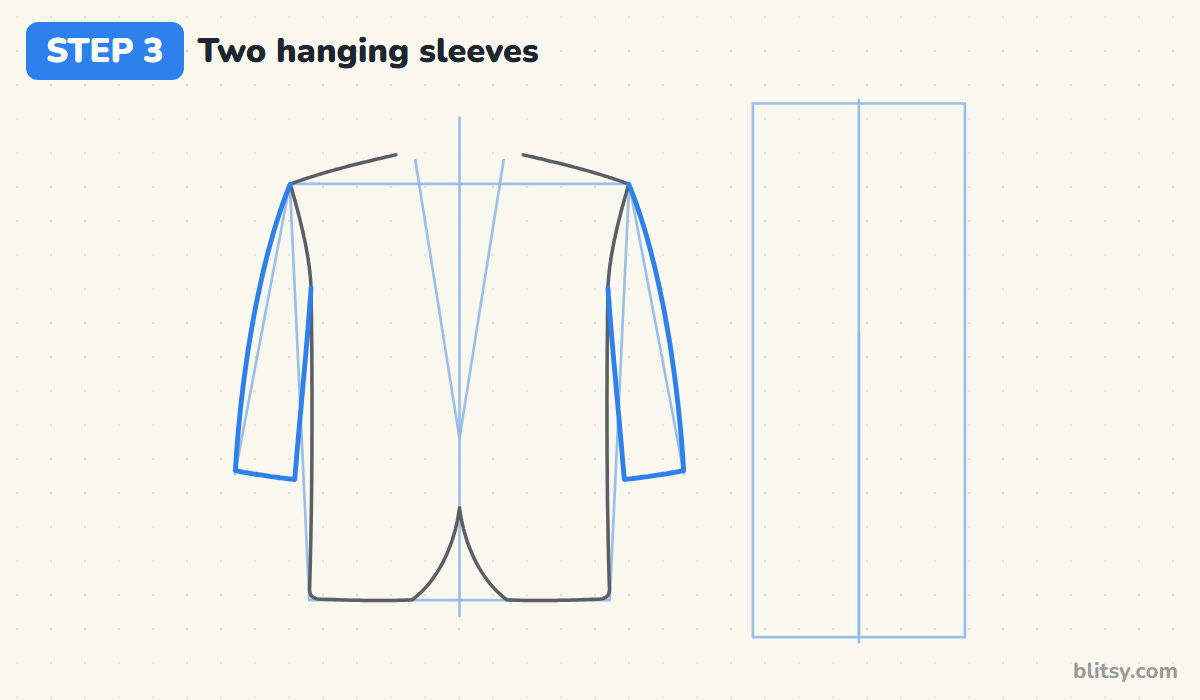
From each shoulder corner, follow the slanted guide down and slightly outward. Stop the sleeves around the height of the pocket area, then draw a short, flat cuff edge and bring the inner sleeve line back up to the armpit. I leave a thin sliver of space between each sleeve and the body, because that tiny gap is what makes the arms look like they hang.




💡 Tip: Check that both cuffs end at the same height before you go on.
Step 4: Draw the notched lapels and the collar
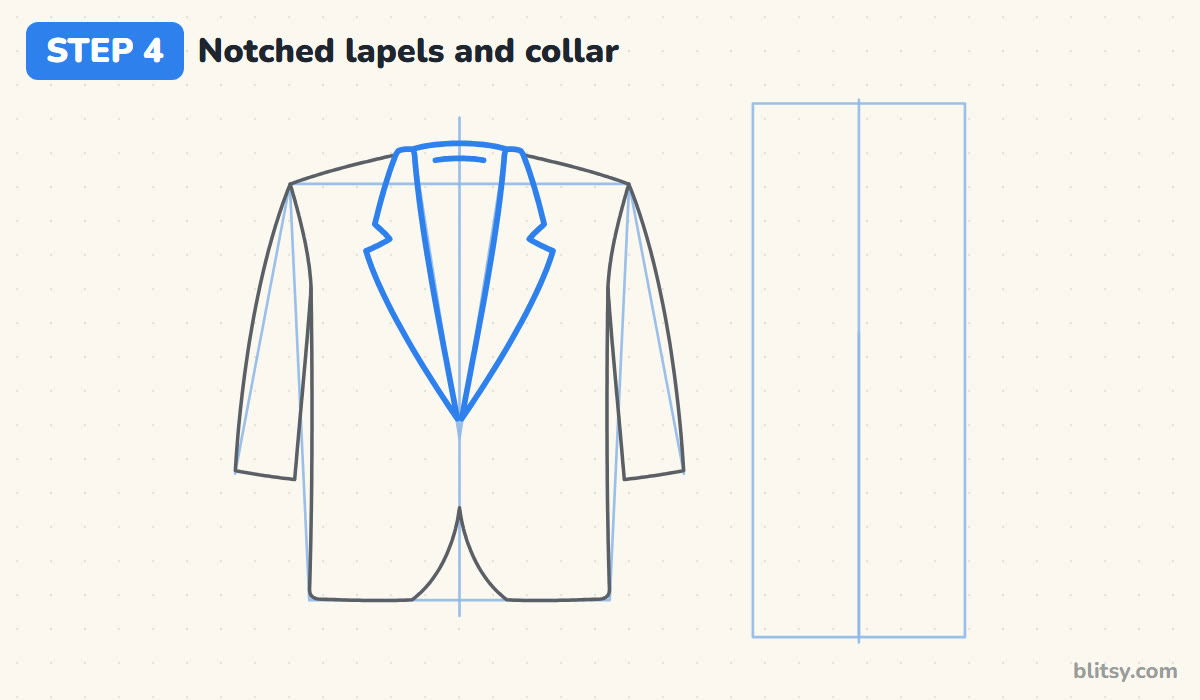
This is the step that turns a coat into a suit. Starting at the top button, draw each lapel widening as it climbs to a sharp point near the shoulder. Above that point, cut a small sideways notch and let the collar continue around the back of the neck. I always draw the left lapel first, then copy it on the right by measuring from the center line.
💡 Tip: Make the notch a small triangle that opens outward, never inward toward the tie.
Step 5: Add the shirt collar points
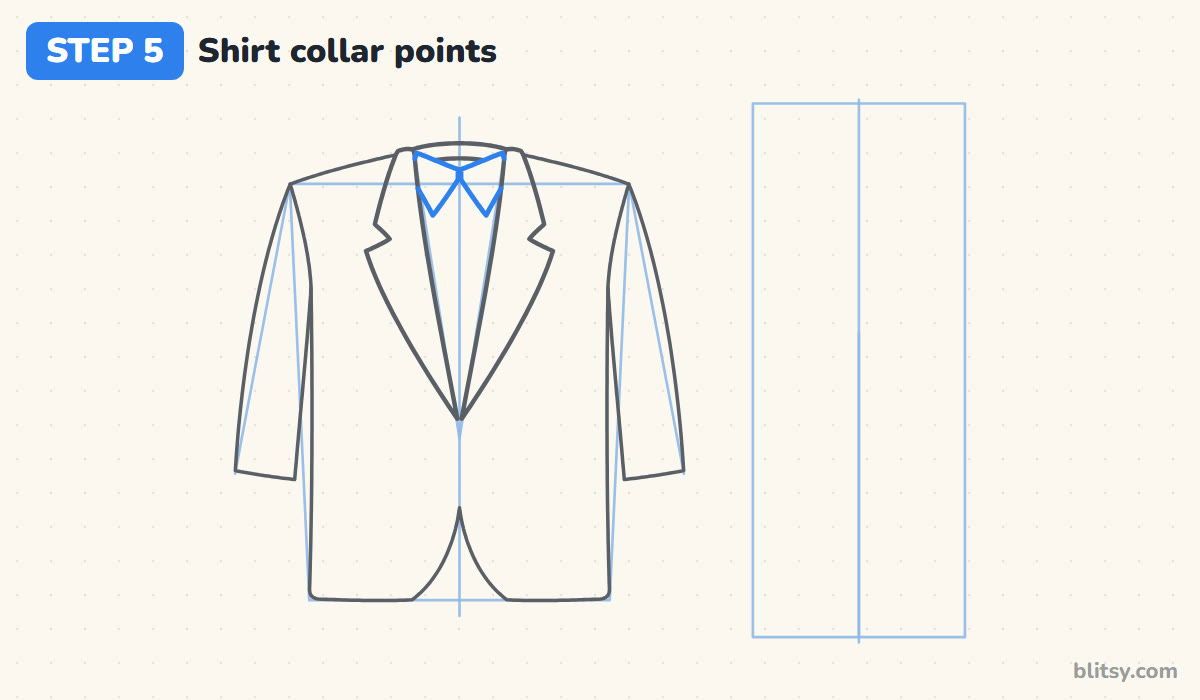
Inside the V, two little pointed flaps sit right under the jacket collar. Start each one near the side of the neck and bring it down to a point that leans toward the center line. The two flaps meet in the middle, leaving a small gap underneath for the tie knot.
💡 Tip: Short collar points look smart; long ones droop and look like a pajama shirt.
Step 6: Draw the tie knot and stripes
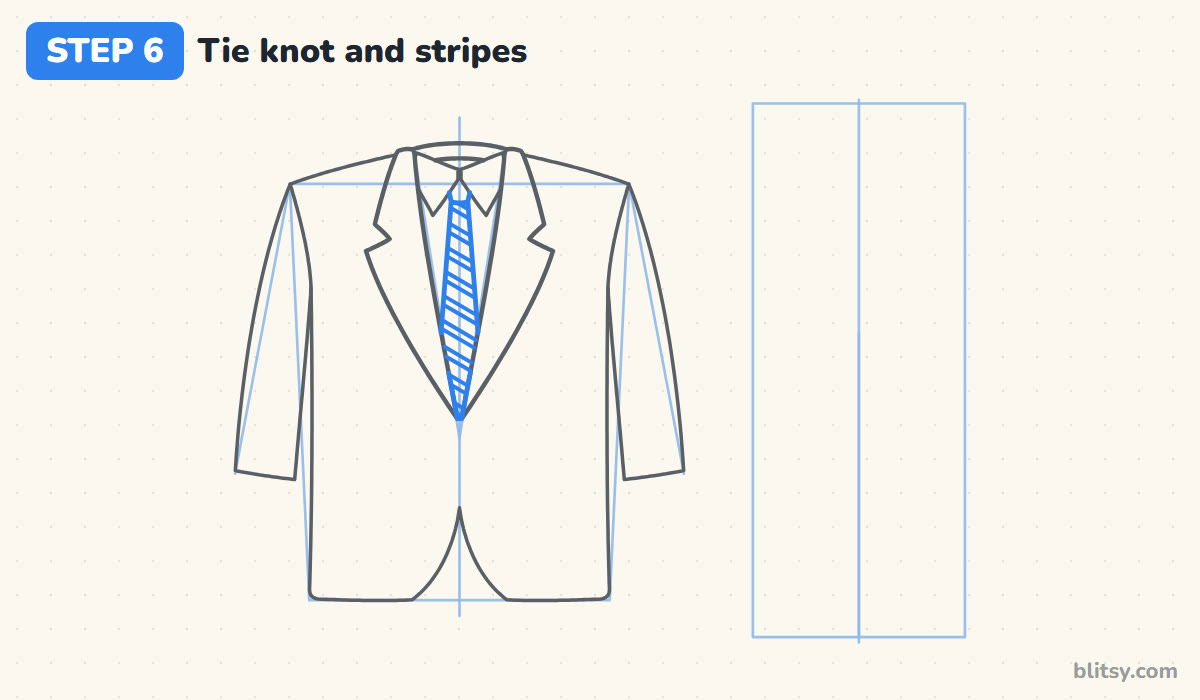
Tuck a small knot, a rounded trapezoid, just under where the collar points meet. From the knot, draw the tie blade widening as it goes down until it disappears behind the lapels. Then add slanted stripes across it, all leaning the same way and spaced evenly. Small kids can leave the stripes out and color a plain tie instead.
💡 Tip: The knot should be narrower than the gap between the collar points.
Step 7: Add the buttons and flap pockets
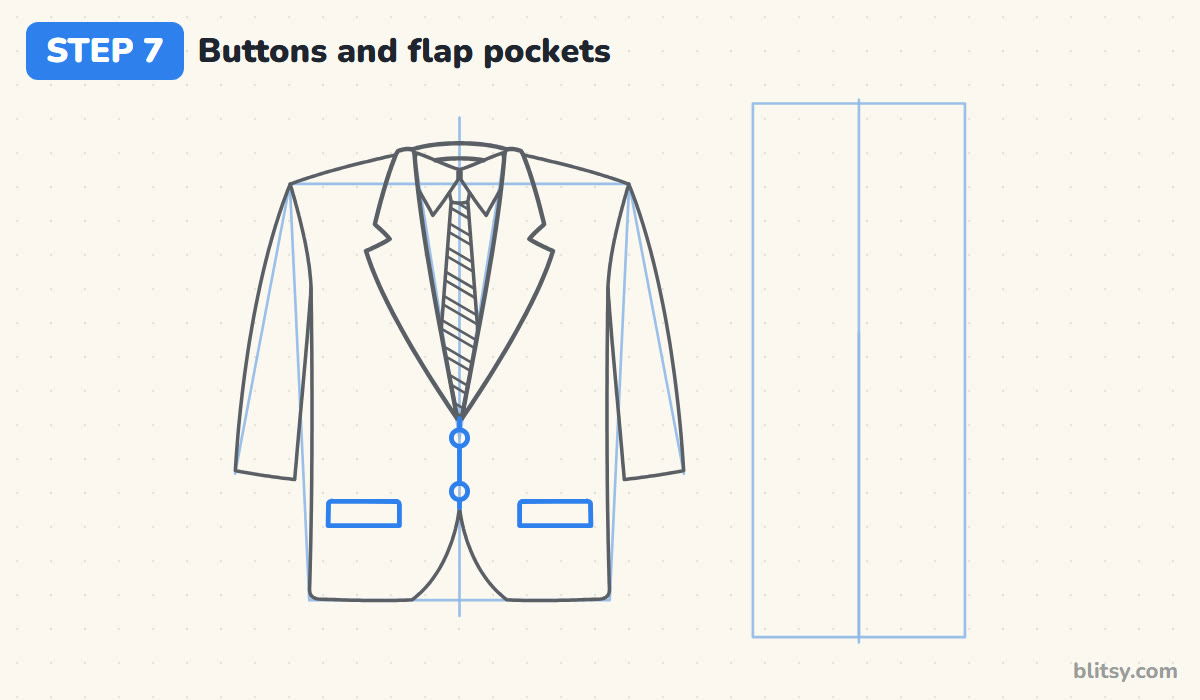
Put the first button exactly where the lapels meet and the second a little lower, both on the center line, joined by a short line down to the opening. Near the bottom of the jacket, draw a flat rounded rectangle on each side for the pocket flaps, level with each other.




💡 Tip: Draw buttons as tiny circles first; you can always make them bolder later.
Step 8: Draw the pocket square and the cuffs
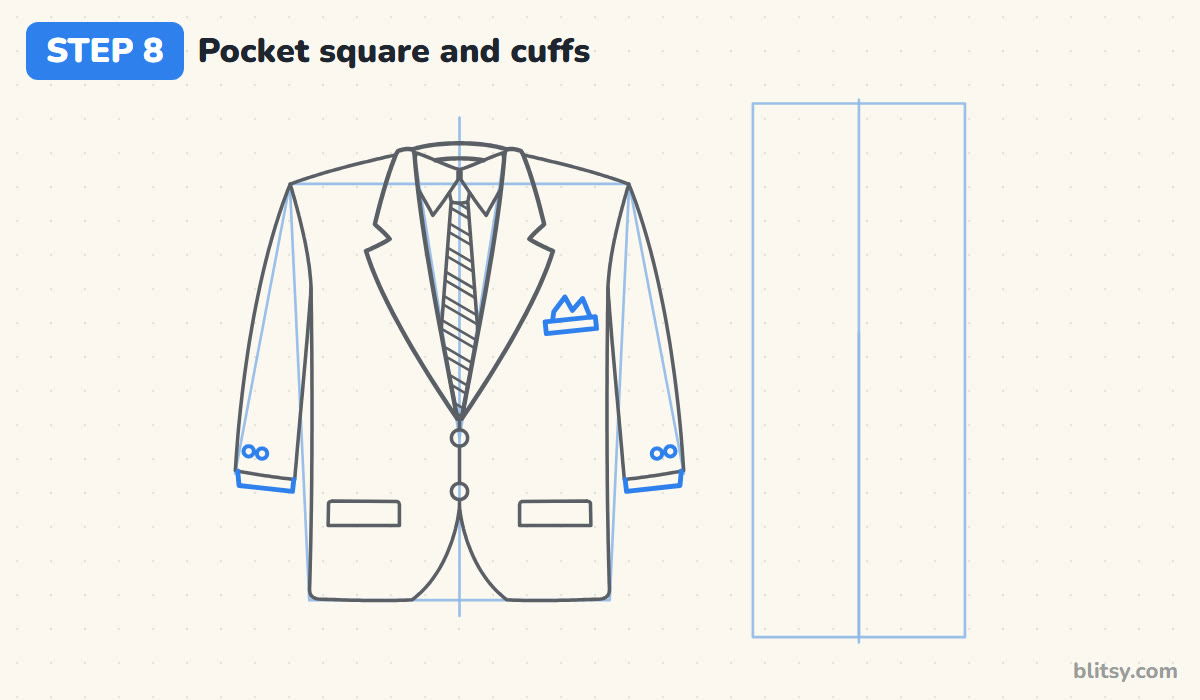
On your right side of the chest, below the lapel, draw a thin tilted rectangle for the breast pocket, with a pocket square peeking out in two soft points. Under each sleeve, add a narrow strip of white shirt cuff and two small buttons near the outer edge. My favorite part of the lesson, because these tiny details make it look real.
💡 Tip: Keep the pocket square small, about as wide as the breast pocket itself.
Step 9: Outline the trouser waist and legs
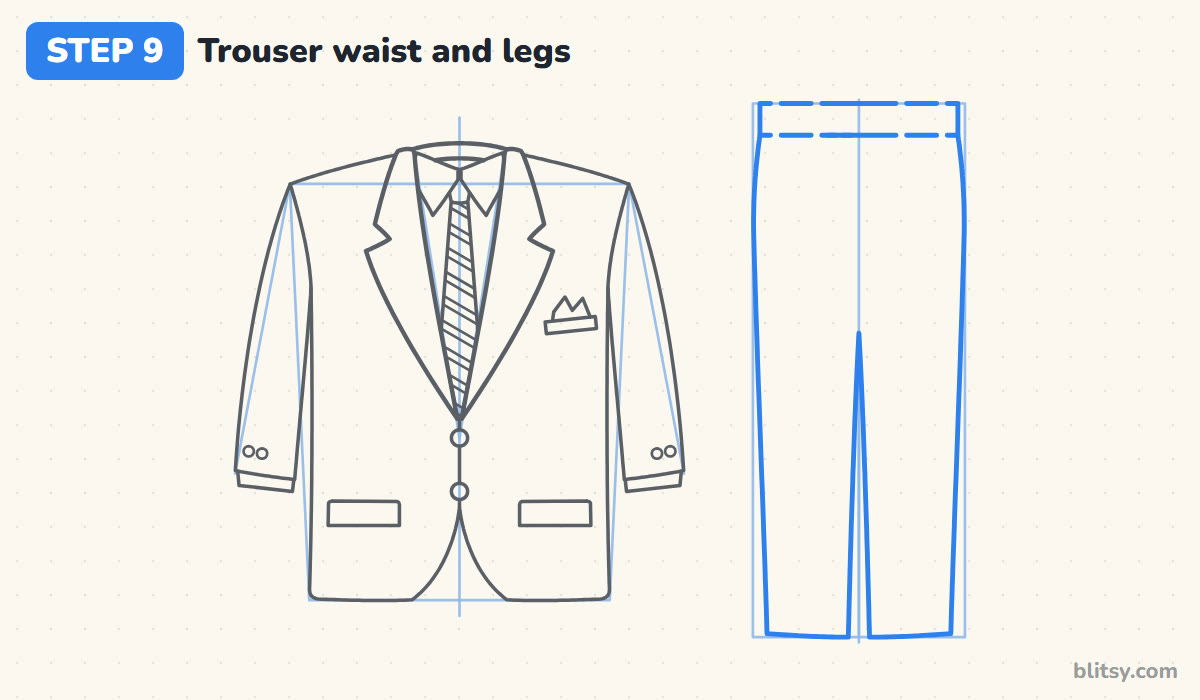
Draw a long thin band across the top of the trouser box for the waistband. Under it, bring the outer leg lines down the sides, bulging out just a hair at the hips. Mark the crotch on the center line about a third of the way down, then draw each inner leg line from there to a flat hem.
💡 Tip: If the crotch sits too low, the trousers look like baggy shorts, so keep it high.
Step 10: Add the fly, the pockets and the creases
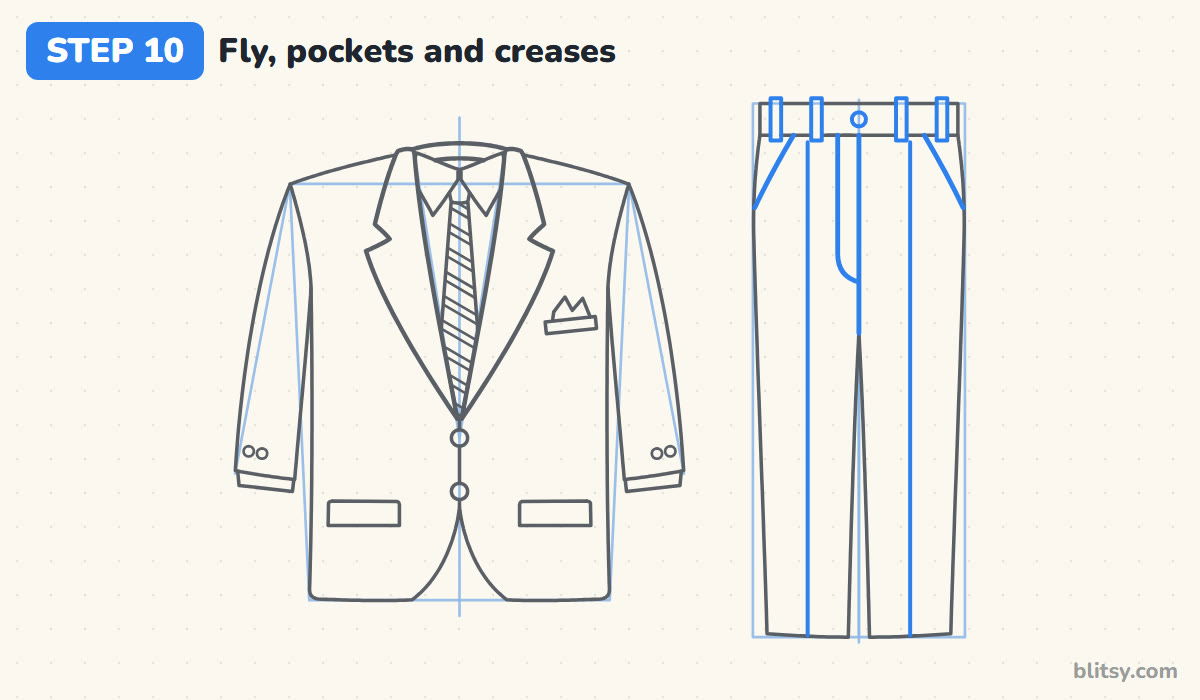
Continue the center line from the waistband to the crotch, and beside it draw a J-shaped stitch line for the fly. Two slanted lines near the hips make the side pockets. Add four small belt loops and a button on the waistband. Last, rule a crease down the middle of each leg; it's what makes them suit trousers and not jeans.
💡 Tip: Use the ruler for the creases and let them run all the way to the hem.
Step 11: Ink the lines and erase the guides
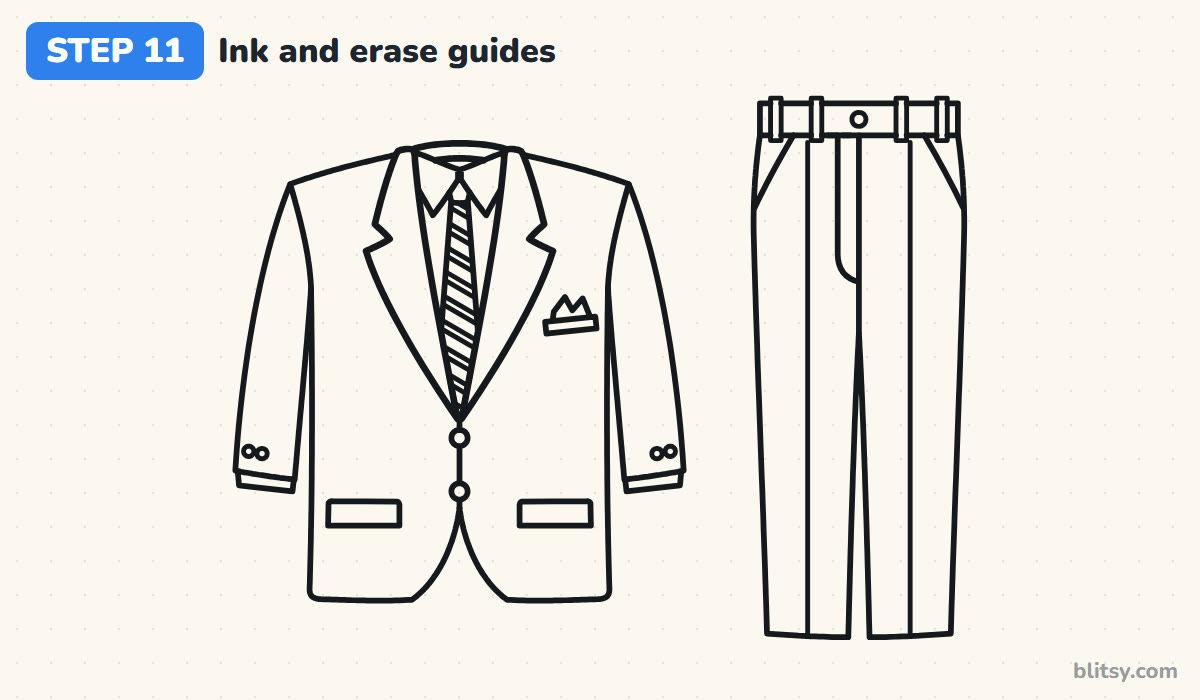
Trace every keeper line with your pen. I start with the long outlines and then switch to a lighter hand for the tie stripes and the cuff buttons. Leave the guide boxes, center lines and the V alone. Wait a minute for the ink to dry, then erase all the pencil underneath.




💡 Tip: Ink the left lapel and then the right one straight away, so they match in thickness.
Step 12: Color your suit
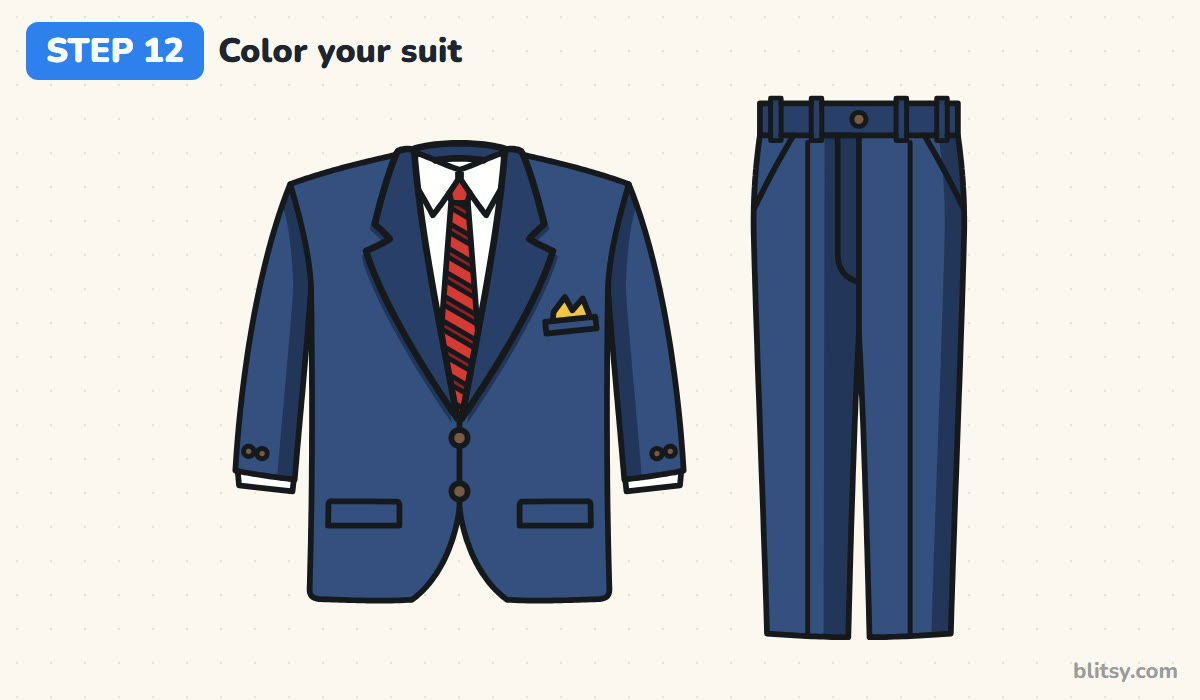
Navy goes on the jacket, sleeves and trousers. A darker blue on the lapels, the waistband, the inner sleeves and one side of each leg makes the fabric look solid. Keep the shirt and cuffs white. The tie is red with dark red stripes, the pocket square yellow and the buttons brown.
💡 Tip: Press lightly with navy first and add a second layer; one heavy layer turns patchy.
Where Suit Drawings Start Looking Off
- Lapels that don't match. One wide and one thin makes the jacket look crooked. Measure each point from the center line before you ink.
- No notch in the lapel. A smooth lapel reads as a cardigan or a lab coat. Add the small sideways cut near the top.
- A tie that's too wide. If it fills the whole V, you lose the white shirt. Keep it about a third of the V's width.
- Buttons off the center line. Even a small shift makes the jacket look buttoned wrong. Put them right on the line.
- Trouser legs that flare. Wide hems look like a costume. Keep the legs nearly straight and add the crease for a pressed look.
Restyling the Suit in Other Colors and Cuts
Once the navy version feels easy, swap the colors: a charcoal suit with a blue tie looks businesslike, and a tan one with a green tie feels like a summer wedding. I like turning the tie into a bow tie, which is just two small triangles touching at the knot. To practice the shirt on its own, try the shirt drawing tutorial, and how to draw a hoodie is a relaxed change after all that tailoring.
Free Suit Coloring Page and Step Guide PDF
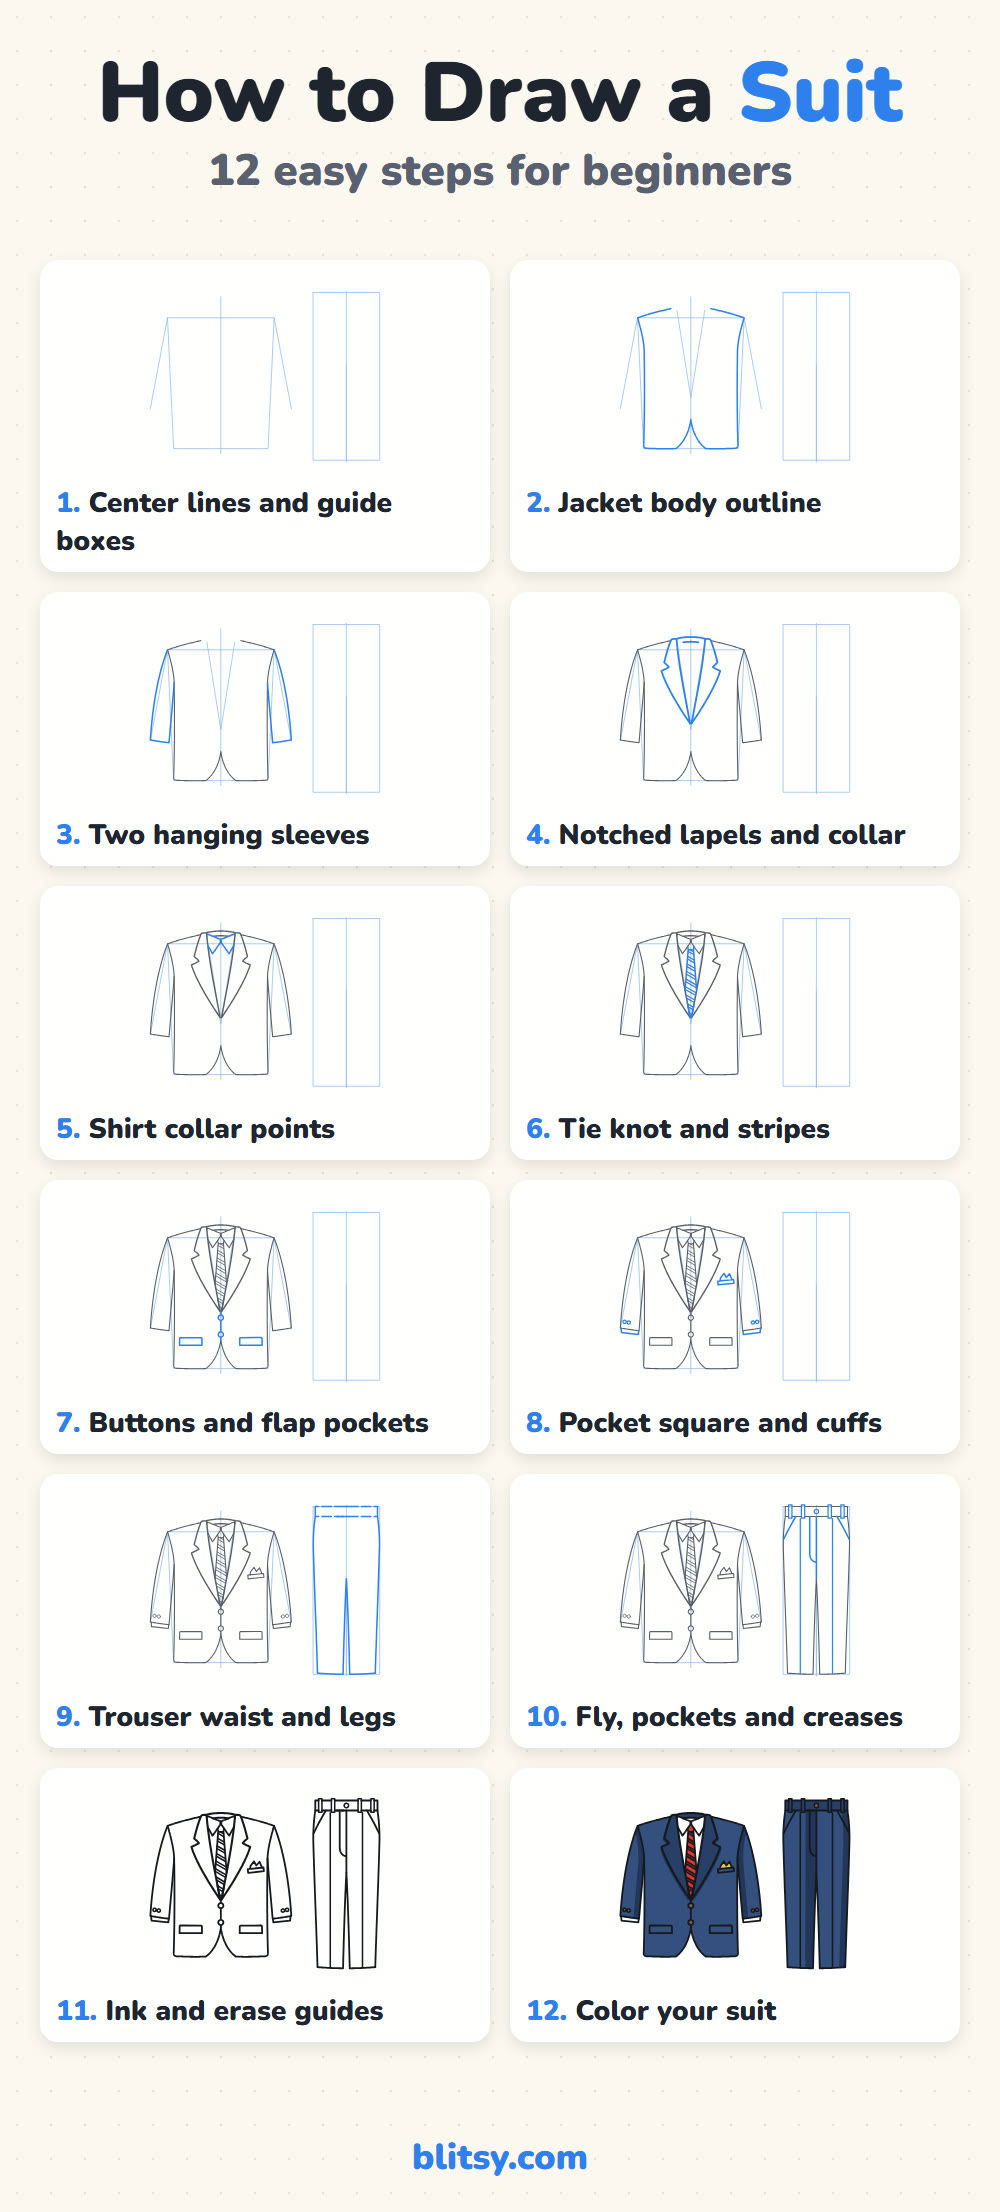
Print the suit coloring page to try new color combinations; it has bold outlines plus a colored example and a key at the top. The printable step-by-step guide holds all 12 steps with their tips and fits Letter or A4 paper.
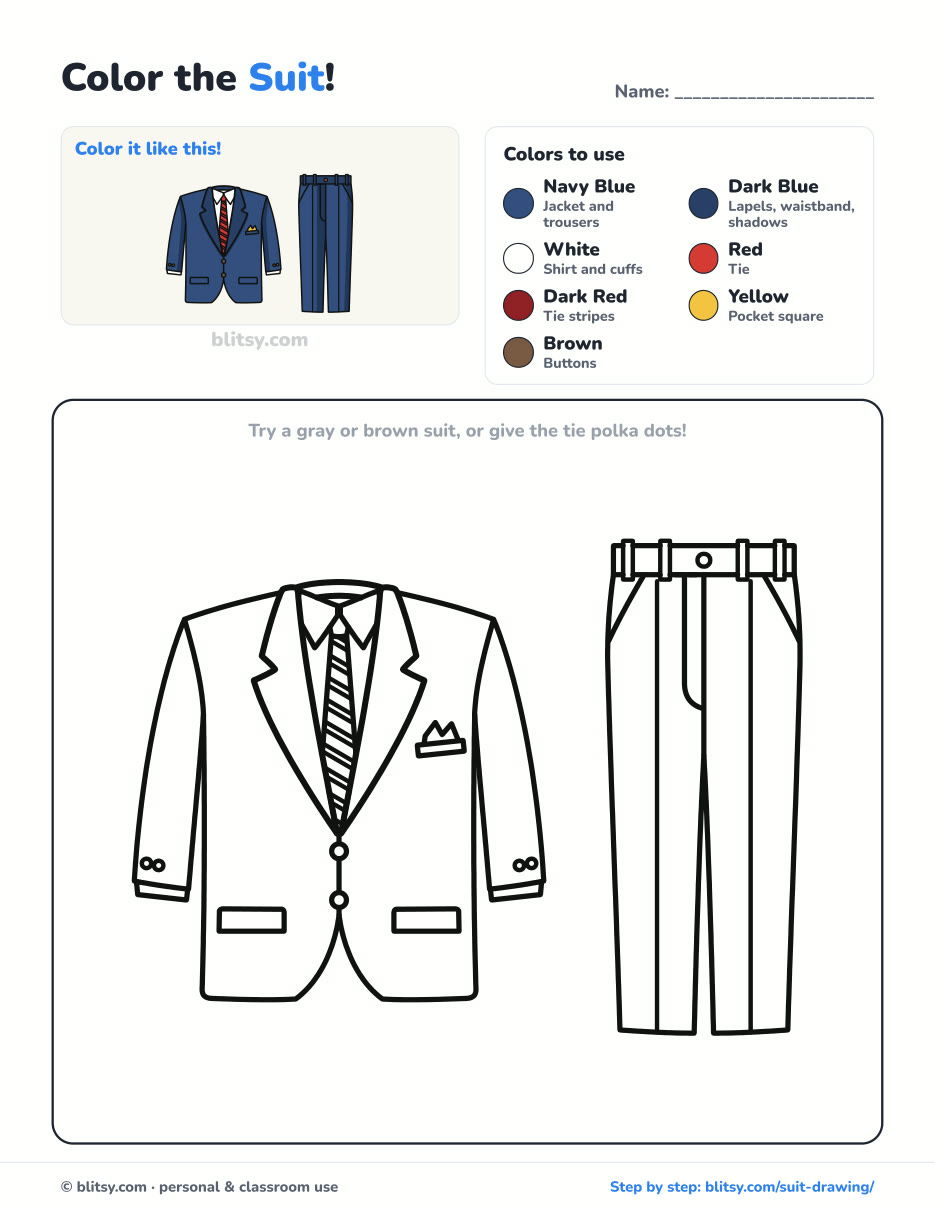
Black outlines with a colored example and the color names at the top. Ready to print and color.
⬇️ Download Coloring PageEvery step picture with its instructions and tips, to keep beside your paper while you draw.
⬇️ Download Drawing Guide📱 On a phone? Tap a download button, then open the file and choose Share → Save to Files or Print. On a computer, the PDF opens or saves straight to your Downloads folder.
Twelve Suit Steps on a Single Pinterest Image
Suit Finished? Try These Step-by-Step Lessons
More step-by-step tutorials are linked below, from other clothes to a few lessons that stretch your shading.
- Shoes Drawing: Pair the suit with something casual: the shoes drawing tutorial covers a red high-top and a low-top sneaker.
- Feather Drawing: Learn how to draw a feather from one curved line and a leaf shape, in teal and orange.
- Family Drawing: Draw four people, a puppy and a red balloon with the family drawing step by step portrait.
- Hoodie Drawing: See a sage green hoodie from the front and the back in this hoodie drawing tutorial.
- Dress Drawing: A twirly pink party dress and a lavender sundress on a hanger share the page in the dress drawing tutorial.
- Realistic Drawing: Practice light and shadow on a single shiny apple with the realistic drawing step by step lesson.
- Chalk Art: Head outdoors with the chalk art tutorial for a hopscotch grid, a rainbow and a sun.
- Mask Drawing: Draw a purple masquerade mask with gold trim, pearls and feathers in this how to draw a mask tutorial.
- Shirt Drawing: Draw a coral tee and a plaid button-up with rolled sleeves in the how to draw a shirt step by step guide.
Questions People Ask About Drawing Suits
What is the easiest way to draw a suit?
Draw it flat from the front, with a center line. Each side of a single-breasted jacket mirrors the other, so you only have to work out one lapel and one pocket, then copy them.
How do you draw suit lapels?
Start at the top button and widen each lapel as it rises to a point near the shoulder. Cut a small notch above the point, then let the collar continue around the neck.
Can kids draw a suit?
Yes. Kids around 8 can follow every step here. Younger ones can skip the tie stripes and the belt loops and still end up with a suit anyone recognizes.
What colors should I use for a suit drawing?
Navy, charcoal and black are the classic choices. Pair them with a white shirt and one bright accent, like a red tie or a yellow pocket square.
Grab your navy pencil, set up that center line and see how sharp you can make the lapels. Then try a second suit in gray. 👔✏️
Related posts:
 How to Draw a Whale Step by Step (Easy for Beginners)
 How to Draw Lungs Step by Step (Easy Science Diagram)
 How to Draw a Pineapple Step by Step (Easy Crown and Slice)
 How to Draw Iron Man Step by Step (Easy Chibi for Kids)
 How to Draw a Hoodie Step by Step (Front and Back View)
 How to Draw a Parrot Step by Step (Easy Scarlet Macaw)
 How to Draw a Police Car Step by Step (Easy for Kids)
 How to Draw a Volcano Step by Step (Easy Erupting Volcano)
 How to Draw a Crow Step by Step (Easy for Beginners)
 How to Draw a Tiger Step by Step (Easy Walking Pose)
 How to Draw a Heart Step by Step (Even, Symmetric Shape)
 How to Draw a Jellyfish Step by Step (Cute, Easy Guide)

