
Most first rock drawings come out looking like pillows or loaves of bread, and the fix is surprisingly simple. Here you'll learn how to draw rocks step by step by building them from flat sides with sharp corners, the way real stone breaks. We'll draw one big boulder in front, a gray rock and a tan rock behind it, a few pebbles and some grass, then shade every rock so the sun clearly hits its top.
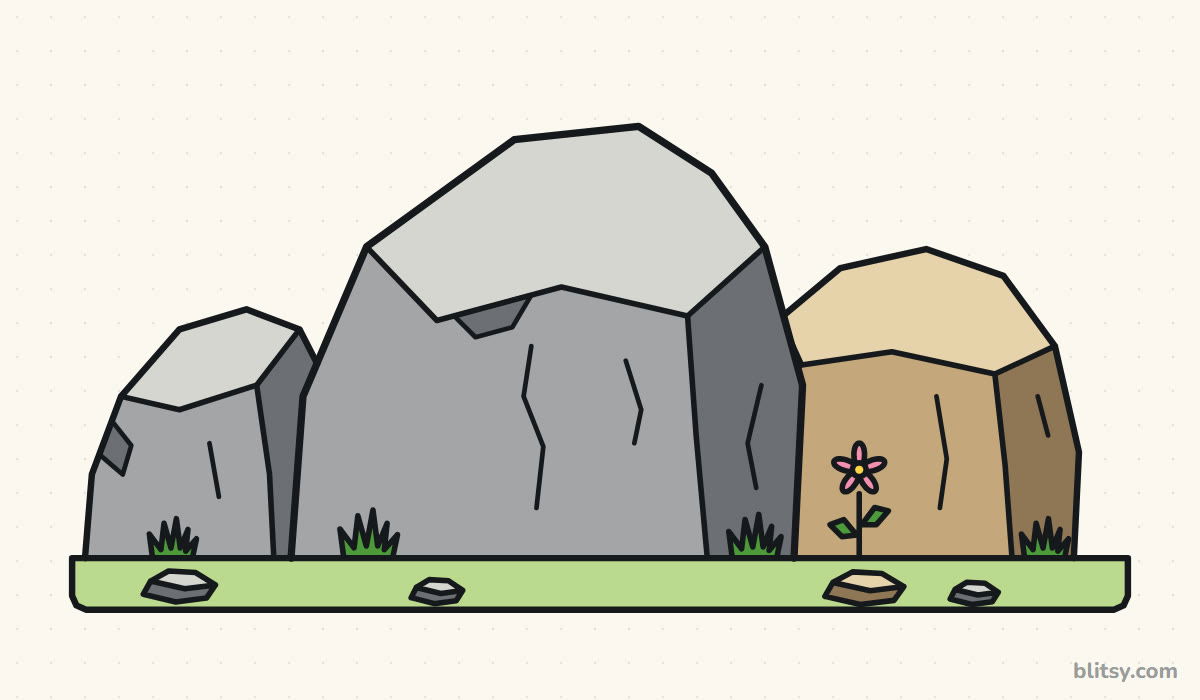
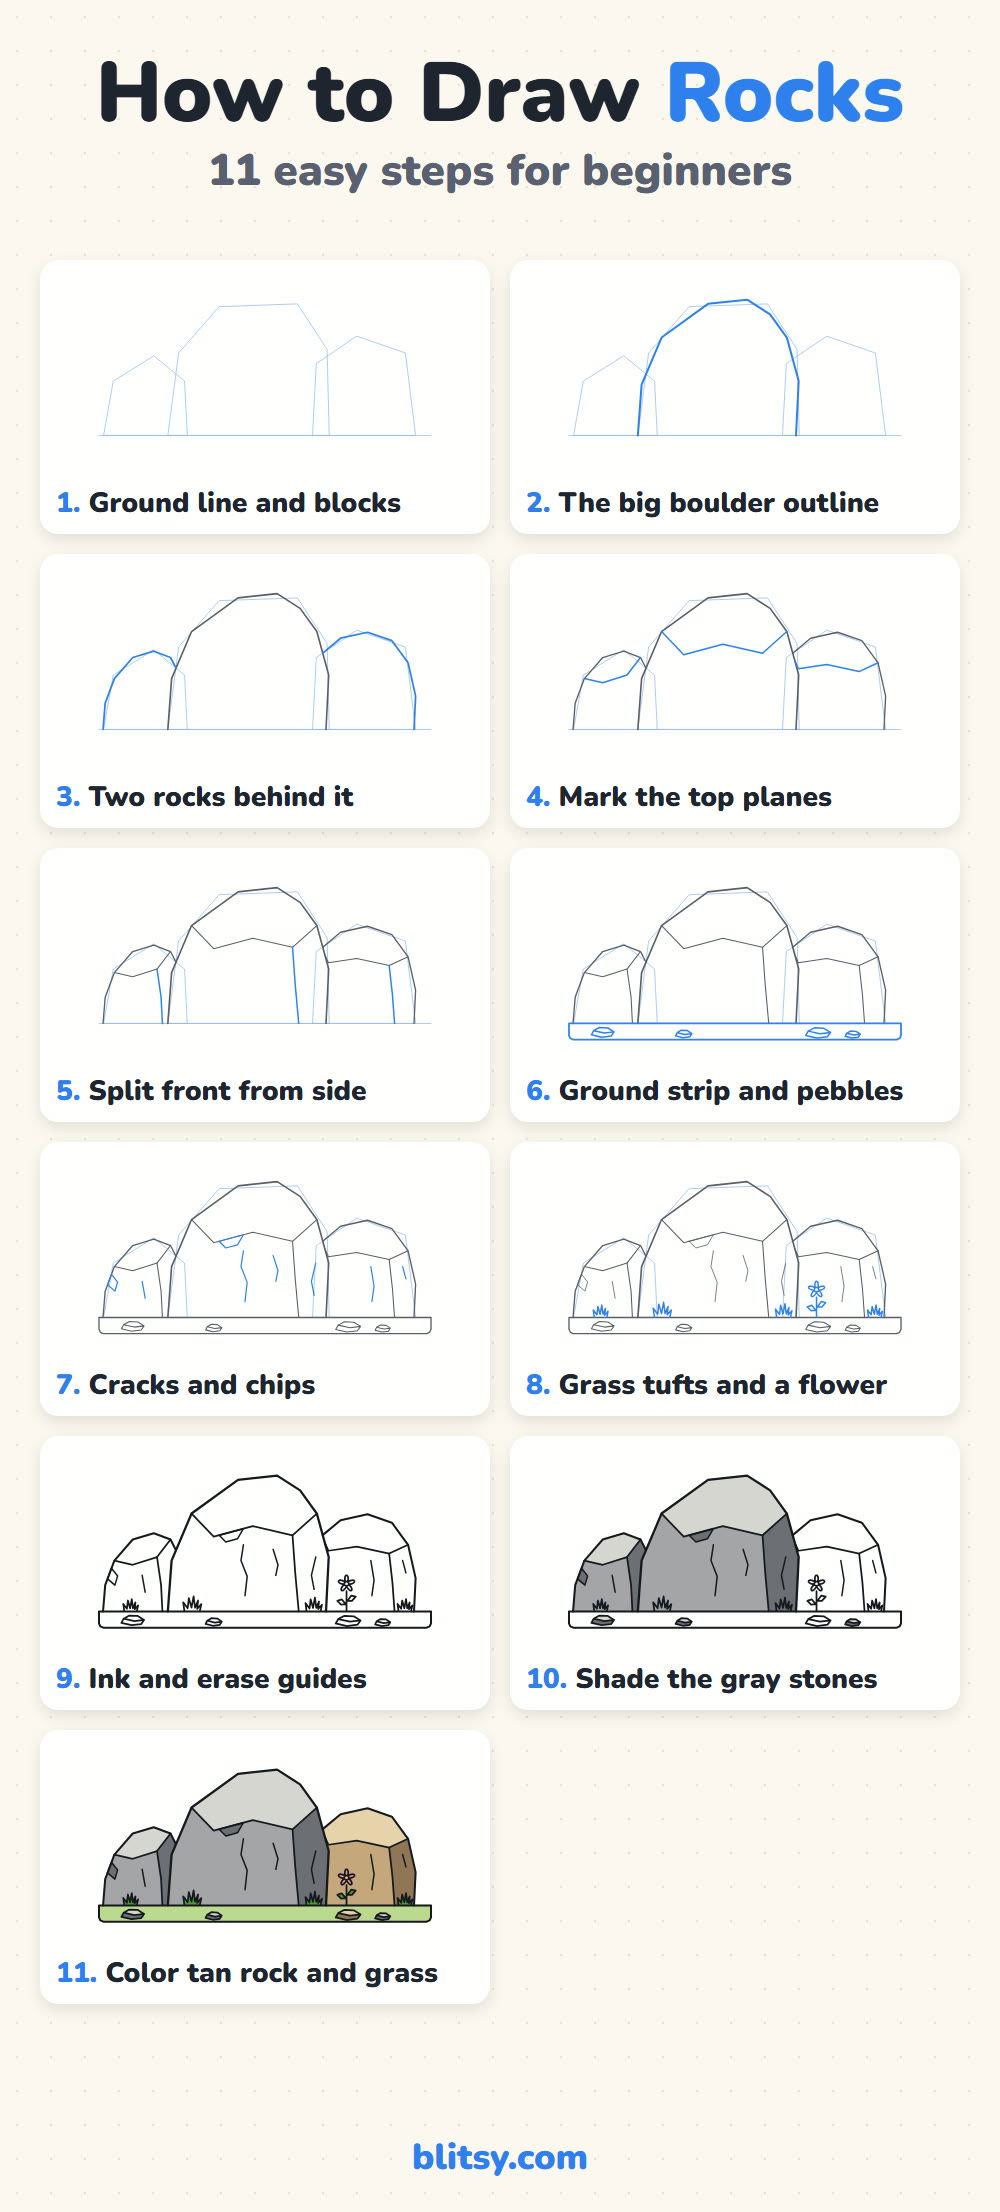
Stone by stone, the pictures add only a few lines at a time: bright blue marks what's new in that step, gray shows what you drew before. The very pale blue blocks in step 1 are helpers you'll rub out later, so keep your pencil soft for them.
Quick overview
⏱️ Time: about 25 minutes for the lines, 15 more for shading
🎯 Level: beginner; kids around 7 and up manage it fine, and it's a solid warm-up for adults
✏️ Steps: 11
🪨 You'll draw: one big angular boulder, two medium rocks behind it, four pebbles, grass tufts and a small flower
Pencils and Grays for Solid-Looking Stone
- A regular pencil for sketching, held loosely for the first light blocks
- An eraser that doesn't smudge
- A black fineliner or thin marker for the final lines
- Colored pencils: light gray, gray, dark gray, tan, two greens, pink and yellow
- A sheet of paper turned sideways, since the rock group is much wider than it is tall
No gray pencils? A single graphite pencil works too: press lightly for the tops, medium for the fronts and hard for the shadow sides.
How to Draw Rocks Step by Step
Step 1: Sketch a ground line and three blocks
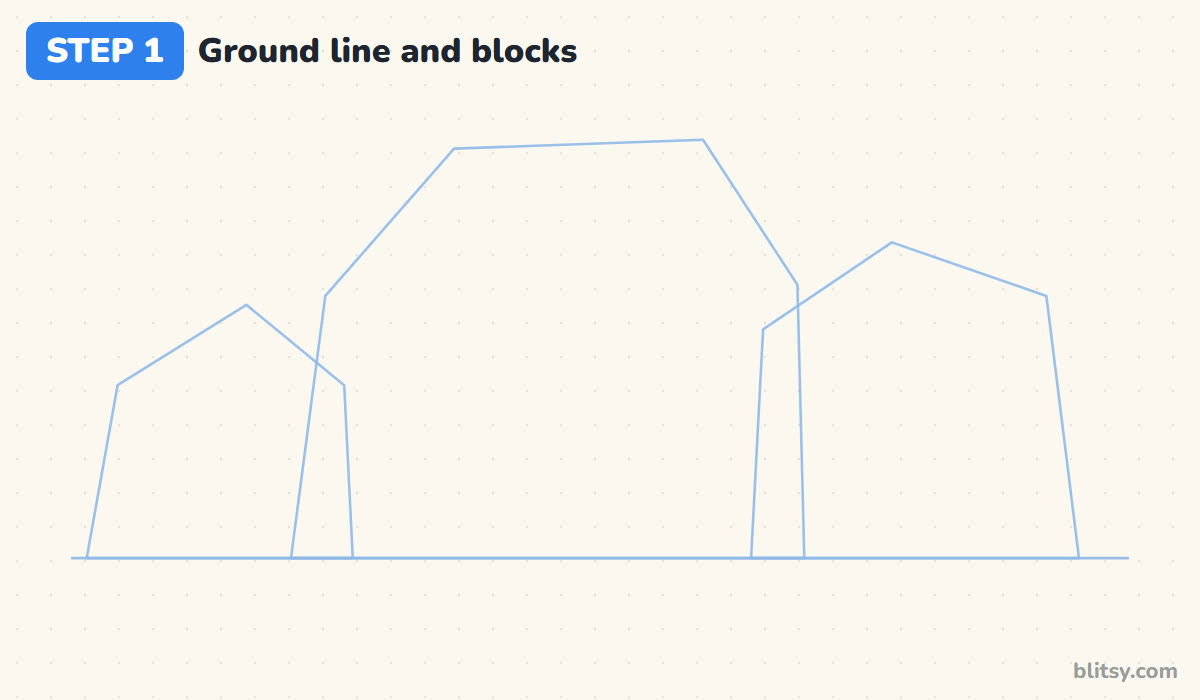
Draw one long, level line across the lower part of the page. On it, sketch three rough blocks with straight sides: a tall one in the middle, a short one on the left and a medium one on the right. Let the side blocks overlap the middle one a little. I always start rocks as boxy shapes, because a box already has corners, and corners are what make stone look hard.
💡 Tip: If any block looks round at this stage, straighten its sides before moving on.
Step 2: Outline the big boulder
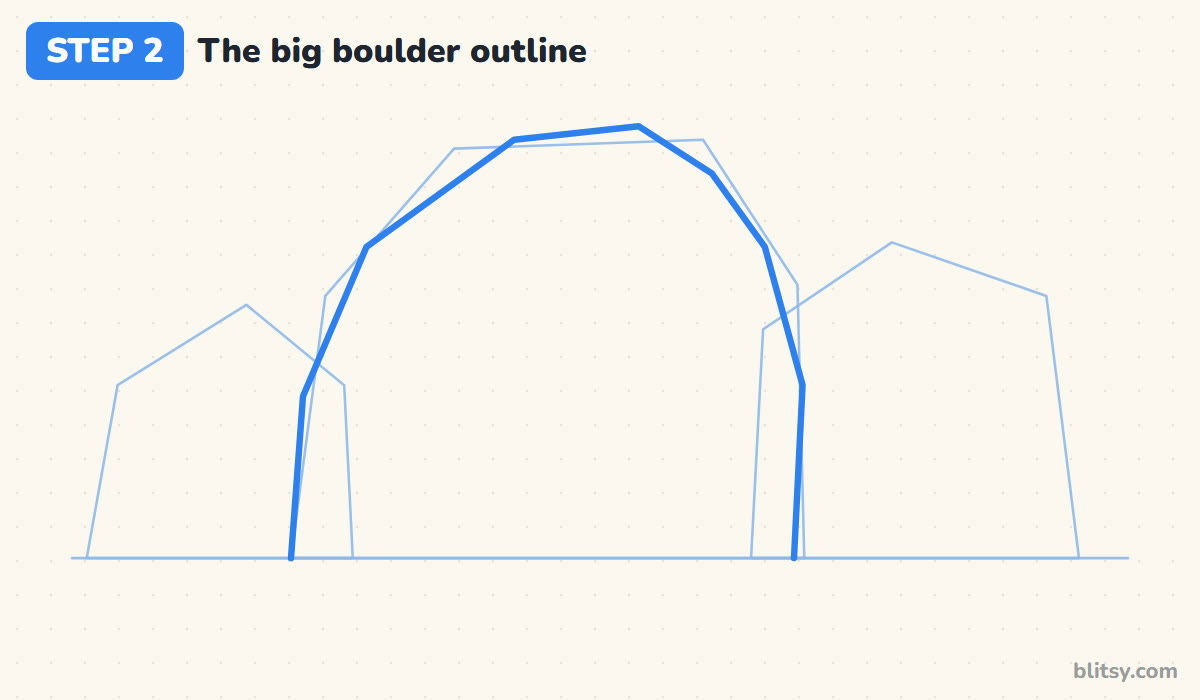
Inside the middle block, draw the boulder's outline with short straight lines that meet at clear angles. Think of a gem that has been rolled around for a while: wide at the base, narrower at the top, with six or seven corners along the way. Both sides should land on the ground line.
💡 Tip: Count your corners. Fewer than five and the boulder starts to look like a bubble.
Step 3: Add the two rocks behind it
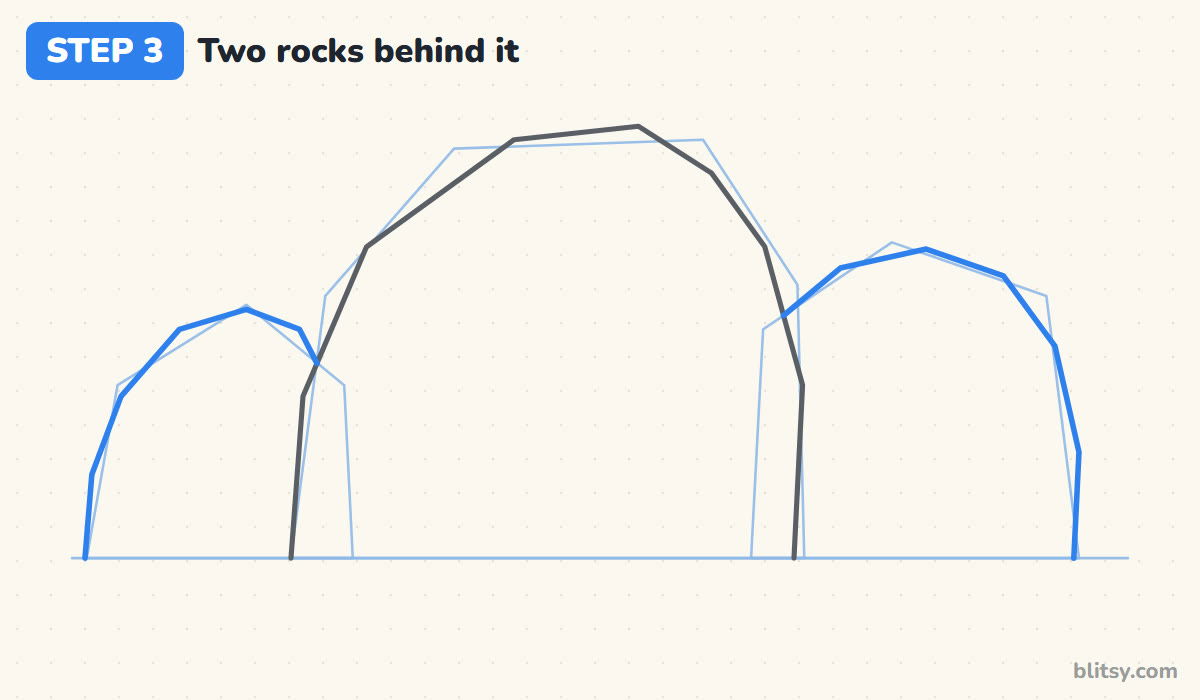
Now outline the left and right rocks the same angular way. Their inside edges stop as soon as they reach the boulder, because they sit behind it. That single overlap is what tells the eye which rock is closer. Keep both a bit lower than the big one so it stays the hero of the picture.




💡 Tip: Trace the back edge with your finger first, and lift the pencil the moment it touches the boulder.
Step 4: Mark the top plane on each rock
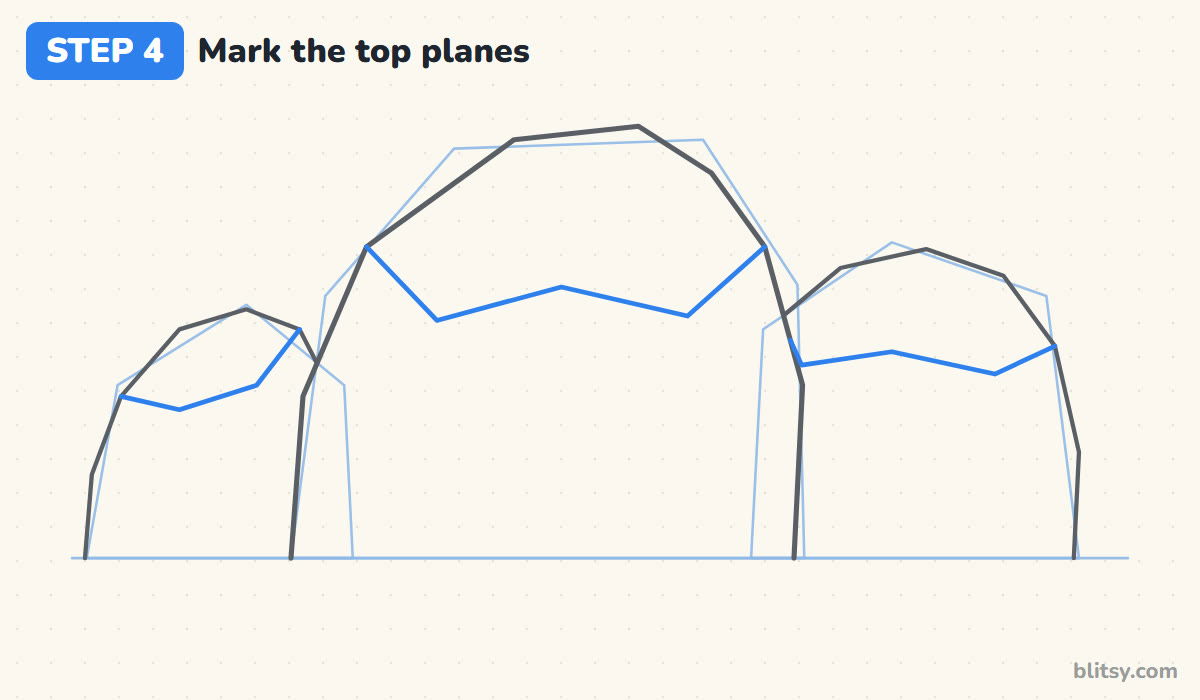
Here's the step that changes everything. Across the upper part of each rock, draw a zig-zag line from one side of the outline to the other. The area above it is the flat top of the rock, which faces the sky. On the big boulder this top takes up roughly the upper third. When I skip this line, my rocks instantly go back to looking soft.
💡 Tip: Let the line dip and rise a little. A perfectly level top edge looks like a lid.
Step 5: Split the front from the side
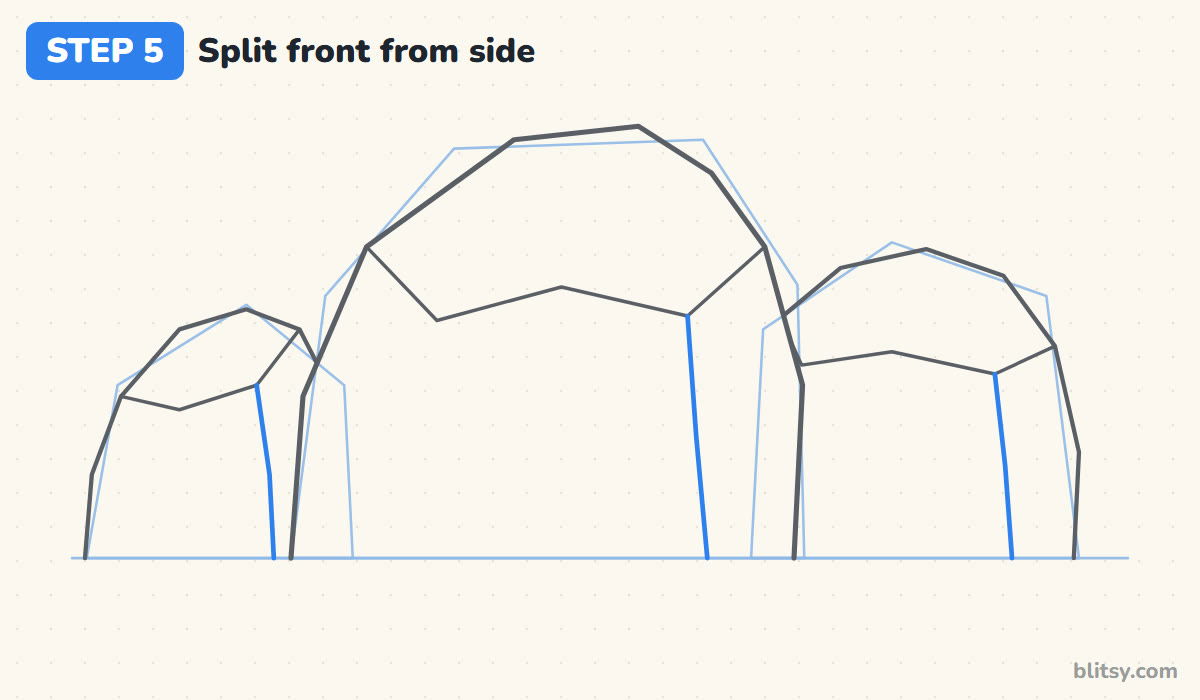
From the right end of each top line, drop an almost vertical line down to the ground. Everything left of it is the front of the rock; everything right of it is the side. You now have three flat planes per rock. Picture the sun up on the left: the top gets the most light, the front a bit less, and the side sits in shadow.
💡 Tip: Put this line about two thirds of the way across, not in the exact middle.
Step 6: Draw the ground strip and pebbles
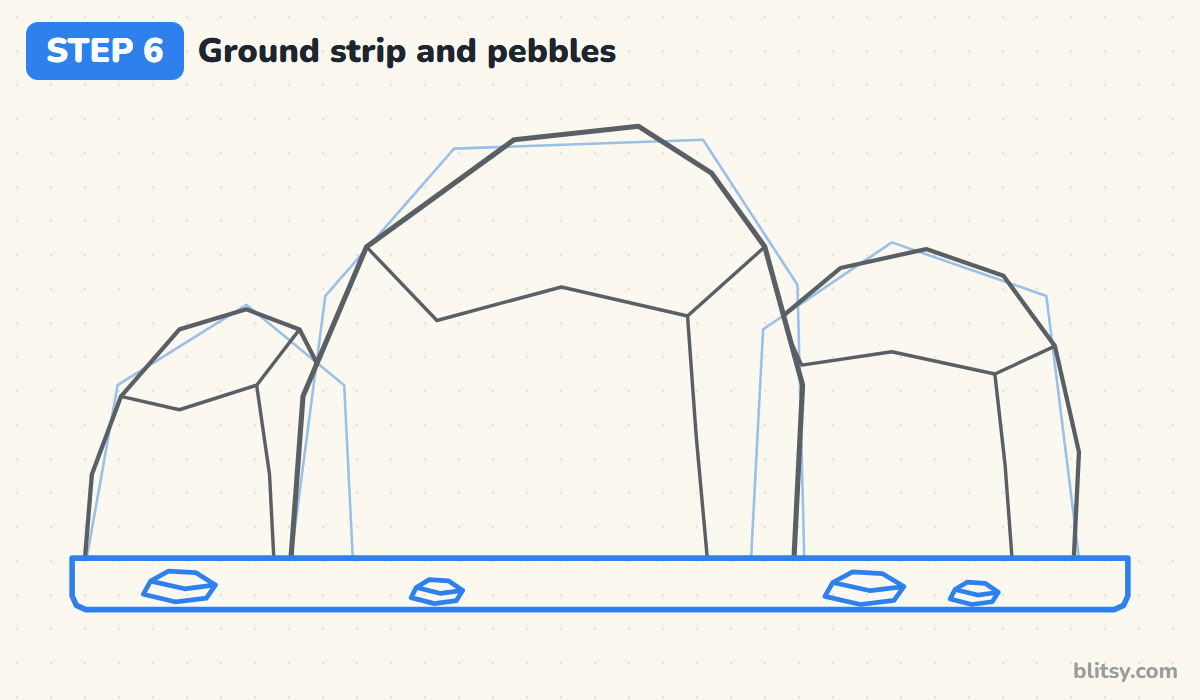
Trace the ground line firmly and close a shallow band underneath it, rounding the two bottom corners. Then scatter four pebbles inside the band. Each pebble is a tiny version of the big rocks: a flat, angular outline plus one line that separates its top from its lower side.
💡 Tip: Vary the pebble sizes and gaps so they don't sit in a neat row like buttons.
Step 7: Add cracks and chips
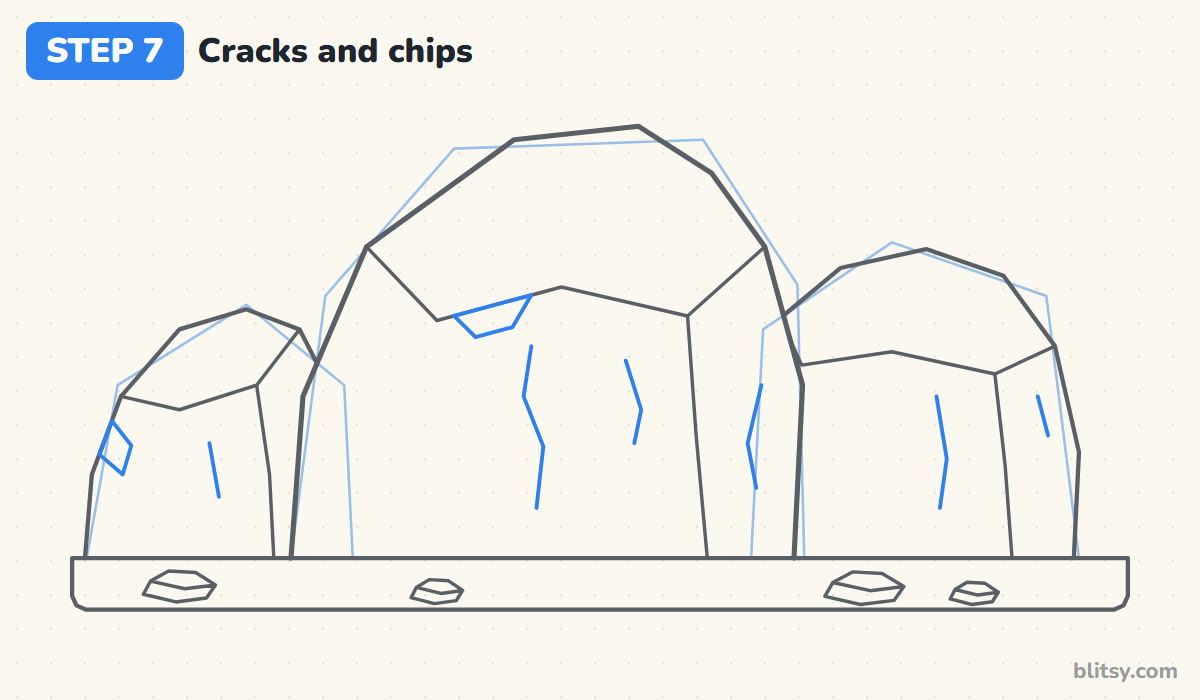
Give each rock one or two cracks: short lines that wiggle and change direction once or twice. Then draw a chip, a small four-sided patch where a piece of stone has broken off an edge. I put one under the boulder's top edge and one on the left rock's outline. A couple is plenty; too many and the rock looks shattered.




💡 Tip: Run cracks mostly up and down. Real stone tends to split along its height.
Step 8: Grow some grass and a little flower
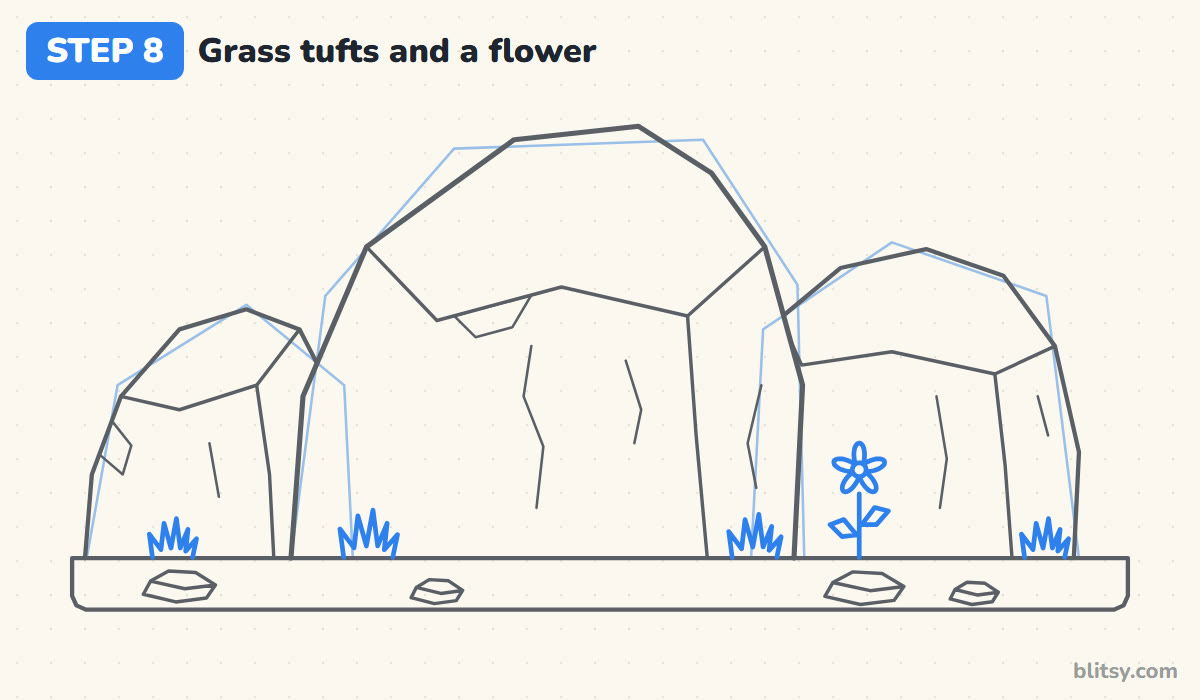
At the foot of the rocks, draw small grass tufts: a row of thin spikes of different heights that rest on the ground line. Place them on the rock faces, away from the corner lines. Then add a five-petal flower on a straight stem in front of the tan rock, with a leaf on each side. Living things next to stone make the rocks feel heavy and still by contrast.
💡 Tip: Younger artists can draw each tuft as three simple strokes in a fan.
Step 9: Ink the lines and erase the guides
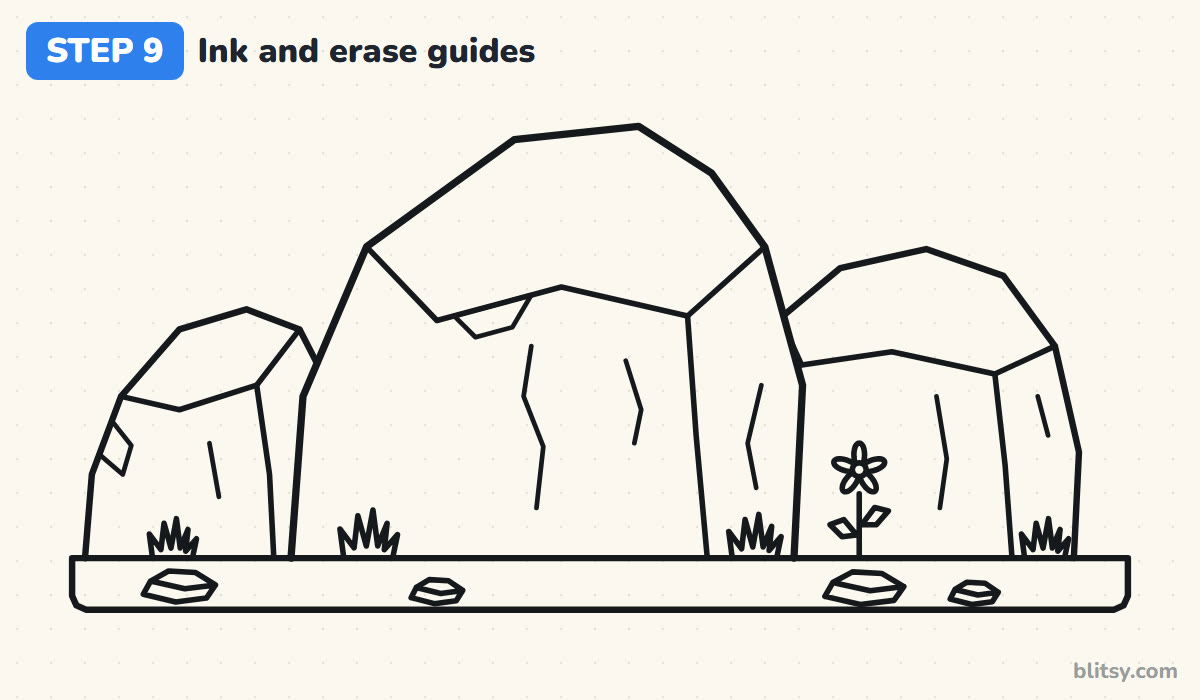
Go over every line you want to keep with the black fineliner. I use a slightly heavier hand on the outer outlines and a lighter one on the cracks, which helps the big shapes read first. Wait a minute for the ink to dry, then erase the pale blocks from step 1 along with the ground guide.
💡 Tip: Turn the paper as you ink so you're always pulling the pen toward you.
Step 10: Shade the gray stones
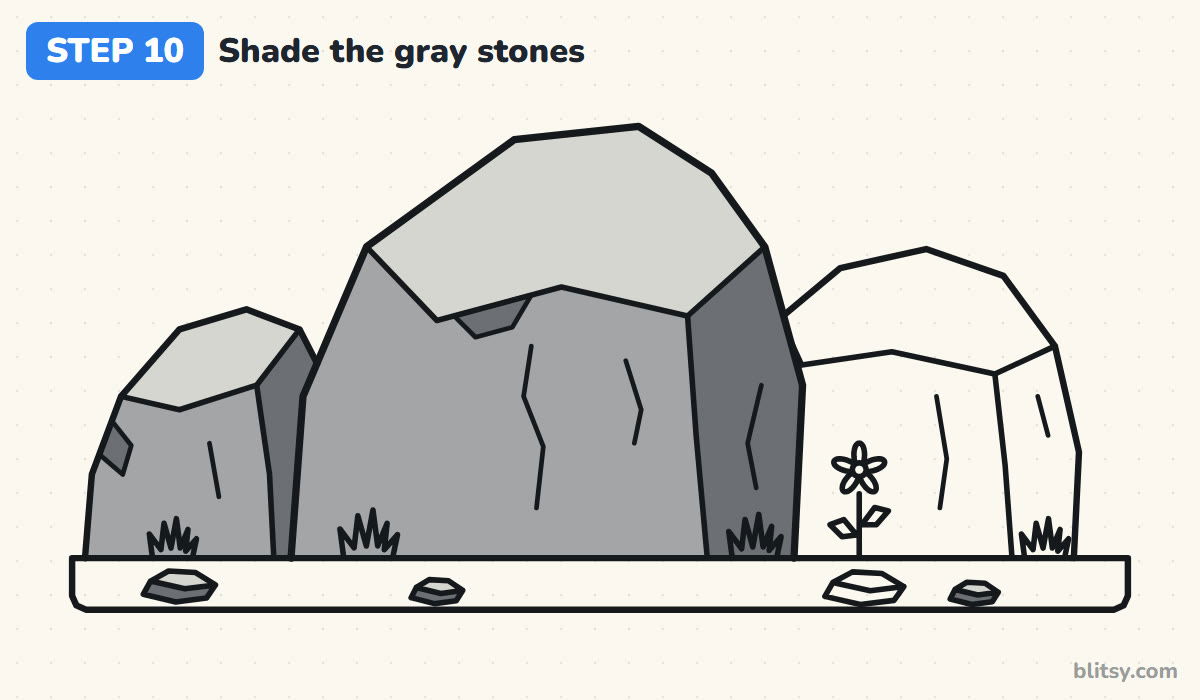
Color the top planes light gray, the fronts a medium gray and the right-hand sides dark gray. Fill the chips with dark gray too, since a broken spot faces away from the light. Do the same on the gray pebbles: pale top, dark underside. Honestly, this is where the drawing turns from lines into stone.
💡 Tip: Keep the same light direction on every rock. One rock lit from the other side breaks the whole scene.
Step 11: Color the tan rock, grass and flower
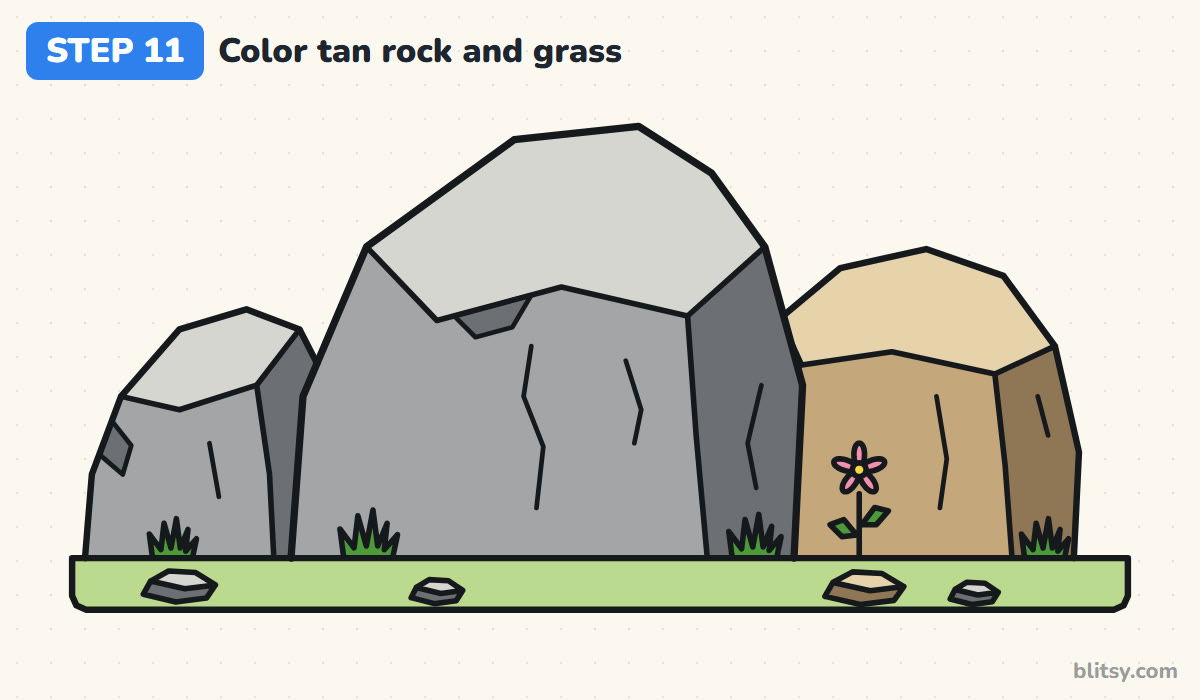
The right rock gets warm tan: pale on top, medium on the front, and a darker brown-tan on its side. The same goes for the tan pebble. Fill the ground strip light green and the tufts and leaves a deeper green. Finish with pink petals around a yellow middle.



💡 Tip: Press harder with the same tan pencil to get the dark side if you only own one brown.
Why Rock Drawings End Up Looking Like Pillows
- Round, smooth outlines. Curves make stone look soft and stuffed. Use straight segments that meet at real corners.
- No top plane. Without the line that marks the top, there's nowhere for the light to land. Add it before any shading.
- Shadow on every side. Decide where the sun is and darken only the sides facing away from it. The top stays the lightest.
- Rocks lined up at the same size. Three equal rocks in a row look like loaves on a shelf. Make one clearly bigger and tuck the others behind it.
- Too many cracks. A rock covered in lines just looks busy. Two cracks and one chip per rock read better than ten.
Mossy, Wet or Cartoon: Remixing Your Boulder Group
Once the planes make sense, I like to push the scene somewhere new. Paint the rocks with a blue-gray shadow side and add a strip of water to make a riverbank, or pile smaller rocks into a cairn. Moss is easy too: a few patches of olive green on the top planes only, where rain sits. For a cartoon version, give the boulder two eyes on its front plane and a grumpy eyebrow. The same flat-side trick drives the crystal drawing tutorial, and if you want a bigger backdrop, try the mountain drawing step by step lesson.
Boulder Coloring Page and a Rock Drawing PDF
Want to jump straight to the shading part? Print the rocks coloring page. The small colored example at the top shows which gray goes on which side, and the thick outline below leaves room above for a sky. The step-by-step guide PDF collects all 11 steps with their tips, two per page, on Letter or A4 paper.
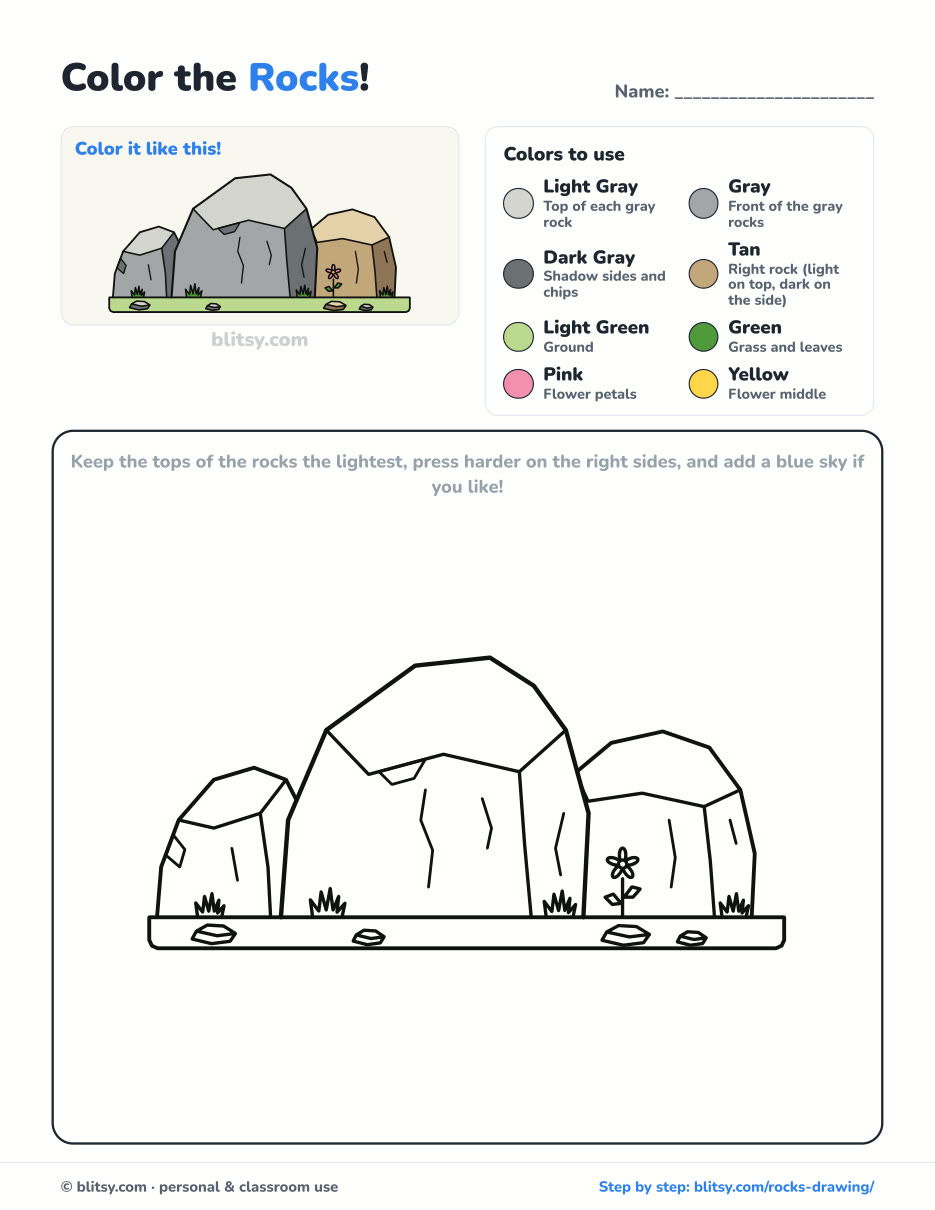
Black outlines with a colored example and the color names at the top. Ready to print and color.
⬇️ Download Coloring PageEvery step picture with its instructions and tips, to keep beside your paper while you draw.
⬇️ Download Drawing Guide📱 On a phone? Tap a download button, then open the file and choose Share → Save to Files or Print. On a computer, the PDF opens or saves straight to your Downloads folder.
All 11 Rock Steps on a Single Pin
Rocks Mastered? Try These Solid Shapes Next
These step-by-step tutorials build objects from boxes, ovals and flat sides, so the planes you just practised come in handy.
- UFO Drawing: A few ovals make a friendly saucer with a peeking alien and a yellow beam in this how to draw a UFO step by step lesson.
- Castle Drawing: The castle drawing tutorial stacks rectangles and triangles into three towers, a gate and a drawbridge.
- Train Drawing: Draw a red and blue steam engine pulling a coal tender with this train drawing step by step guide.
- Baseball Bat Drawing: A wooden bat, a stitched ball and a glove start from one slanted line in the baseball bat drawing tutorial.
- Realistic Drawing: Take light and shadow further with the realistic drawing step by step lesson on a glossy red apple.
- Diamond Drawing: Flat facets do all the work in this diamond drawing tutorial, which adds a heart gem and an emerald cut.
- Bed Drawing: Learn how to draw a bed from one light box in perspective, then soften it with pillows and a starry duvet.
- Tank Drawing: An olive cartoon tank with five road wheels and a round turret comes from the tank drawing step by step guide.
- Monster Truck Drawing: Draw a lifted red pickup with flames on giant tires in this monster truck drawing tutorial.
- Rocket Drawing: The how to draw a rocket tutorial launches a cartoon rocket through puffy smoke, with three fins and a three-color flame.
Stone and Pebble Questions Beginners Ask Me
How do you make rocks look 3D in a drawing?
Split each rock into flat planes, a top, a front and a side, and give each plane its own value. Light on top, medium front, dark side is enough to make stone look solid.
What is the easiest way to draw a rock for kids?
Start with a box-like shape with a few straight sides, add one line across the top, and color the top lighter than the rest. Kids can skip the cracks and chips.
What colors do you use for rocks?
Three grays cover most rocks. A warm tan or brown makes sandstone, and a hint of blue in the shadow side suits rocks near water.
How long does it take to draw rocks?
The line drawing takes about 25 minutes, and shading adds another 15. A single boulder on its own can be done in ten.
Pick up a real pebble on your next walk, find its top plane, and you'll see why this method works. 🪨
Related posts:
 How to Draw a Car Step by Step (Easy Drawing for Beginners)
 How to Draw a Rocket Step by Step (Easy Blast-Off Drawing)
 How to Draw Flames Step by Step (Easy Campfire Drawing)
 How to Draw a Scarecrow Step by Step (Easy Fall Drawing)
 Oil Pastel Drawing Step by Step (Easy Sunset for Beginners)
 Summer Drawing Step by Step (Easy Beach Scene for Beginners)
 Halloween Drawing Step by Step (Cute Haunted House for Kids)
 Realistic Drawing Step by Step (Shade a Shiny Apple)
 Love Drawing Step by Step: Two Hugging Bears (Easy)
 How to Draw a Whale Step by Step (Easy for Beginners)
 How to Draw Lungs Step by Step (Easy Science Diagram)
 How to Draw a Pineapple Step by Step (Easy Crown and Slice)

