
Giant tires, a body perched way up high and flames down the side: a monster truck is pure fun to draw, and it's much easier than it looks. Here you'll learn how to draw a monster truck step by step, beginning with two big circles and a long box. The trick is all in the proportions. Once the wheels are bigger than the truck itself, everything else falls into place, and you'll have a red flame-painted truck kicking up dust by the end.
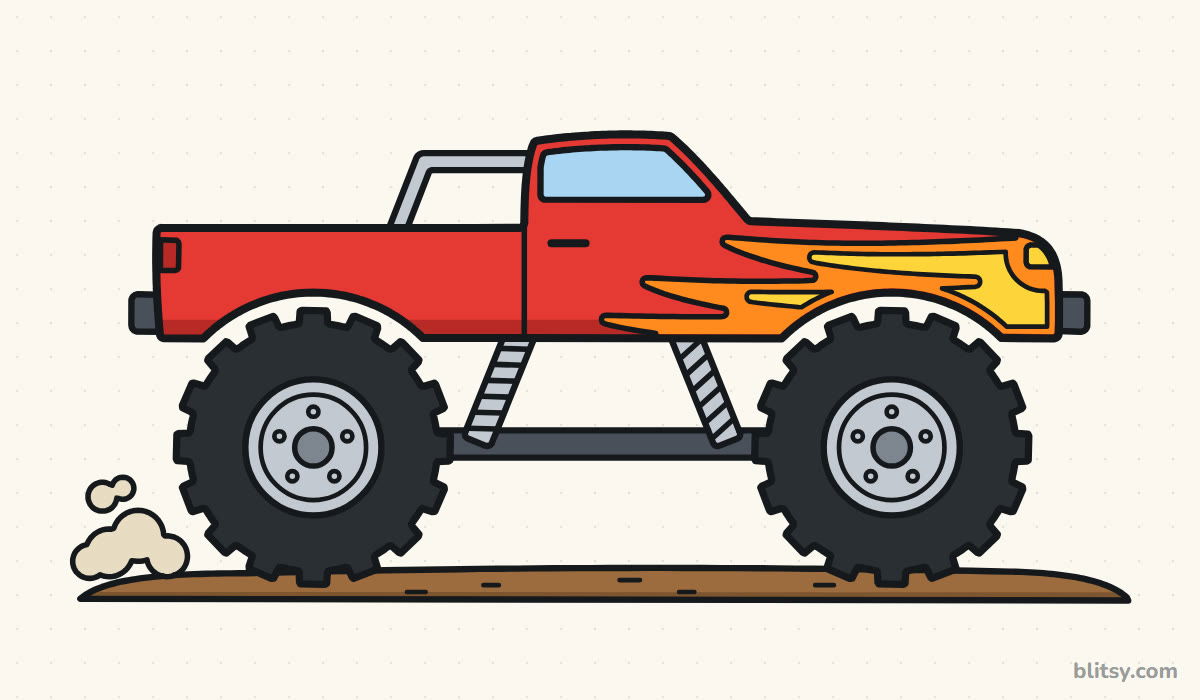
Truck pictures below use a simple color code: blue marks the lines to add in that step, gray marks what's already done. Keep the pale guide shapes from the first two steps faint; the eraser takes them away in step 11.
Quick overview
⏱️ Time: around 35 minutes with coloring
🎯 Level: easy, suits kids from about 7
✏️ Steps: 12
🛻 You'll draw: a lifted red monster truck with flames, spring shocks and huge tires
Pit Crew Supplies for This Truck
- A pencil you can press lightly with
- An eraser that won't smear
- A black fineliner or thin marker
- Colored pencils or markers in red, orange, yellow, light blue, brown and black, plus silver or light gray
- A sheet of paper turned sideways
- A cup or roll of tape to trace the wheel circles (optional)
No silver pencil? Light gray works just as well for the rims and springs.
How to Draw a Monster Truck Step by Step
Step 1: Draw a ground line and two big wheel circles
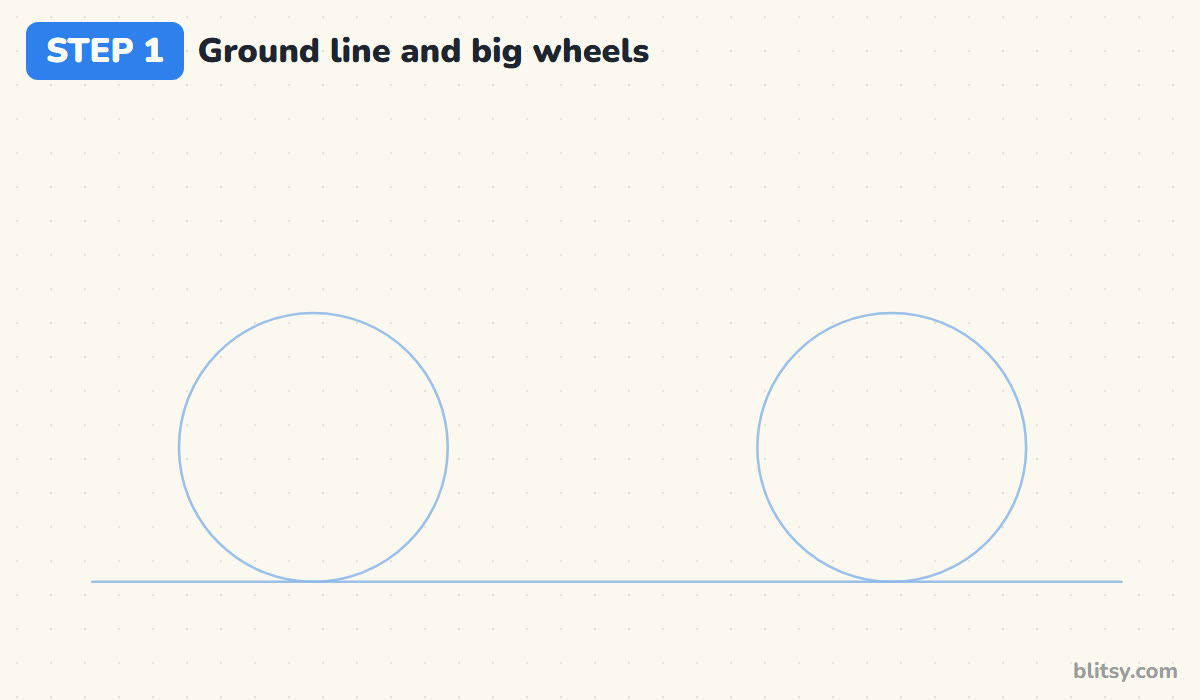
Start with a long, straight line near the bottom of your page. Sit two large circles on it, leaving a gap between them about one and a half circles wide. I make these wheels about half as tall as the whole drawing will be. If they look too large right now, they're probably just right.
💡 Tip: Trace around a cup if your circles keep coming out lopsided.
Step 2: Sketch the body box, the cab and two lift lines
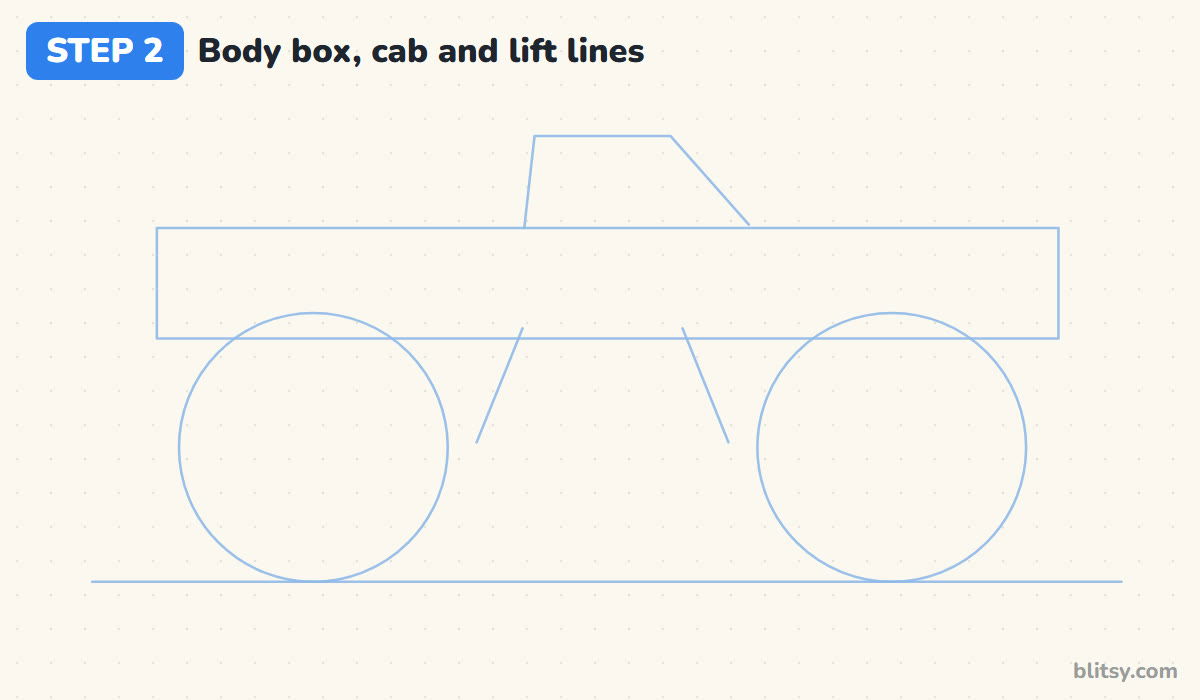
Draw a long, flat rectangle that floats above the wheels; its bottom edge should just touch the tops of the circles. On top of it, a little right of the middle, sketch the cab: a short upright line at the back, a flat roof and a slanted line down at the front. Then add two short slanted lines under the box, one inside each wheel. They mark where the springs will go.
💡 Tip: Press so lightly that you can barely see these lines.
Step 3: Trace the pickup body outline
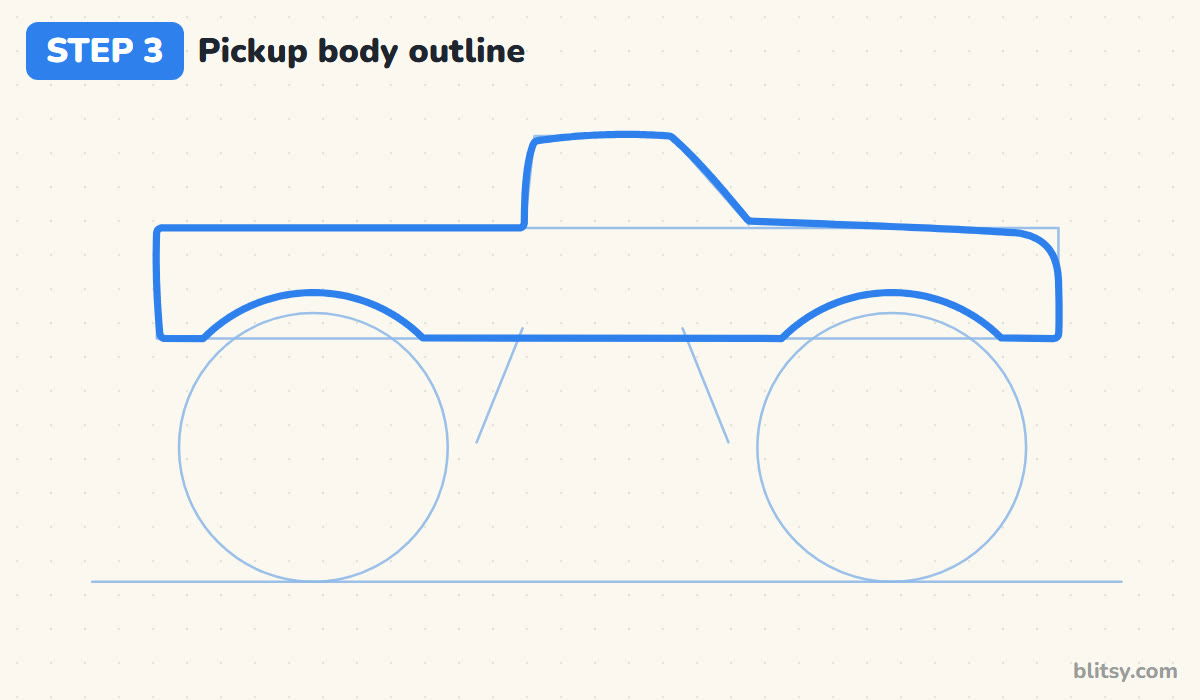
Go around the guides with one confident outline. Begin at the tailgate, run along the flat bed, climb the back of the cab and cross the roof. Slide down the windshield, stretch the long hood forward and round off the nose. Along the bottom, curve up over each wheel in a big arch. I leave a clear gap between each arch and its circle, because the tread blocks fill part of it later.



💡 Tip: Draw each arch in one smooth swing of your wrist.
Step 4: Turn the circles into chunky tires
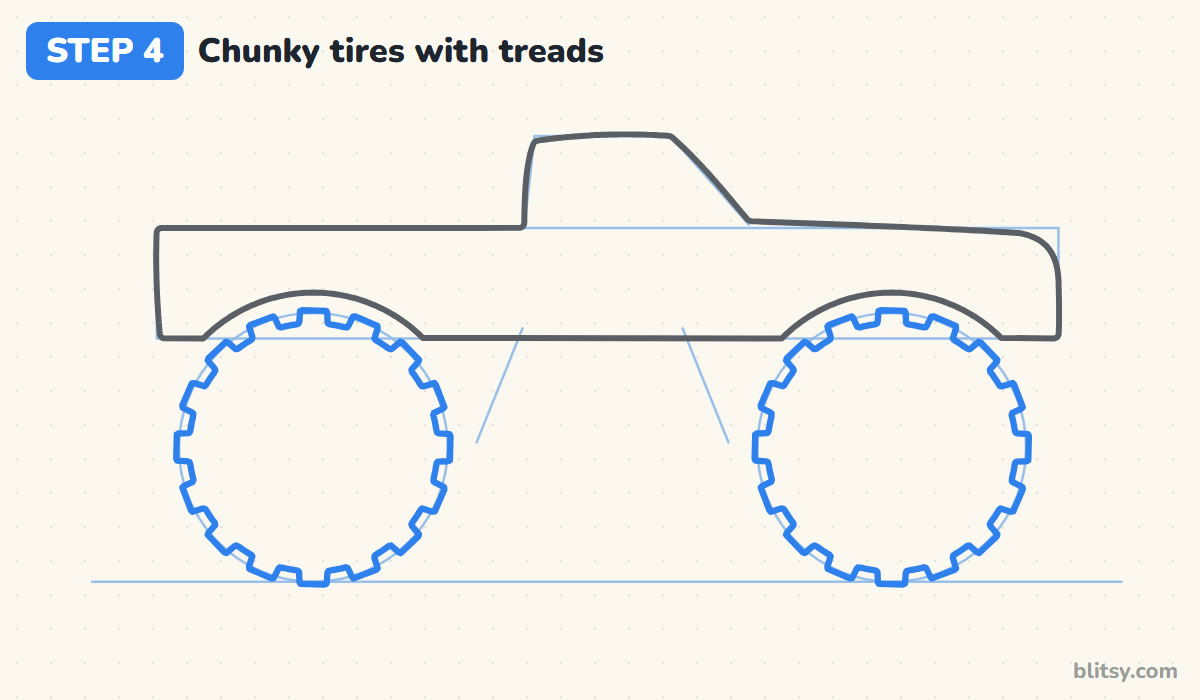
This is the part that makes it a monster truck. Go around each wheel and add square tread blocks that stick out from the edge, like the teeth on a gear. I place four first, at the compass points, then fill the spaces between them so the blocks end up evenly spread.
💡 Tip: Leave a gap about one block wide between neighboring treads.
Step 5: Add the rims, hubs and bolts
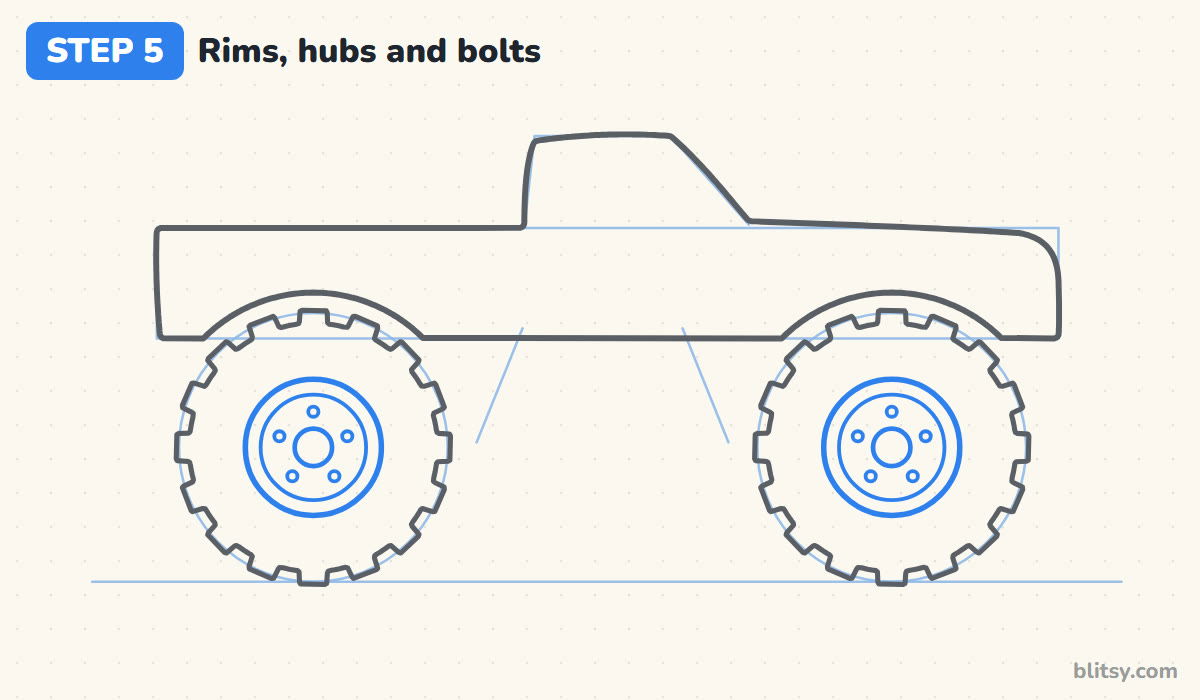
Inside each tire, draw a circle about half its width for the rim, a slightly smaller ring just inside it, and a small circle in the middle for the hub. Add five tiny bolt dots around the hub. Keeping the rims small leaves a thick band of rubber all around, which makes the tires look heavy.
💡 Tip: Place the hub first and measure the rim out from it.
Step 6: Draw the frame and the spring shocks
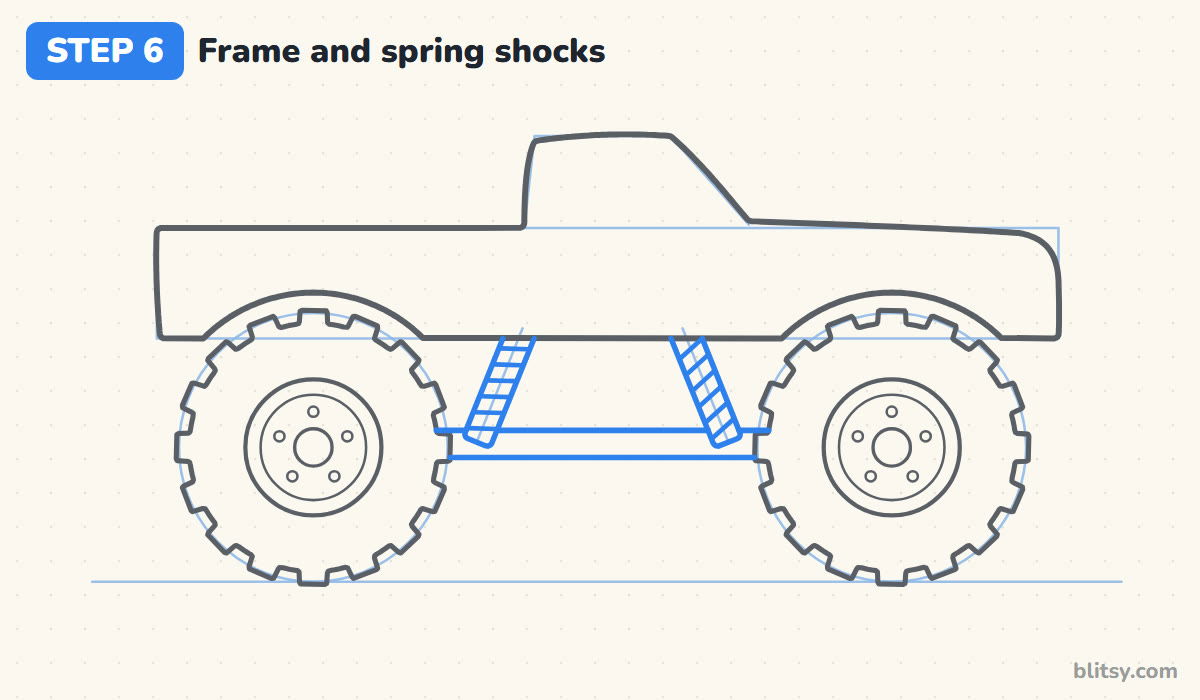
Between the wheels, draw a long flat bar that tucks behind both tires. Over each slanted guide line, draw a narrow tube from the bottom of the body down to the bar, then cross it with five or six short slanted lines for the coils. Kids often skip the springs, but they explain how a body can float that high.
💡 Tip: Slant every coil line in the same direction.
Step 7: Draw the window, the cab line and the roll bar
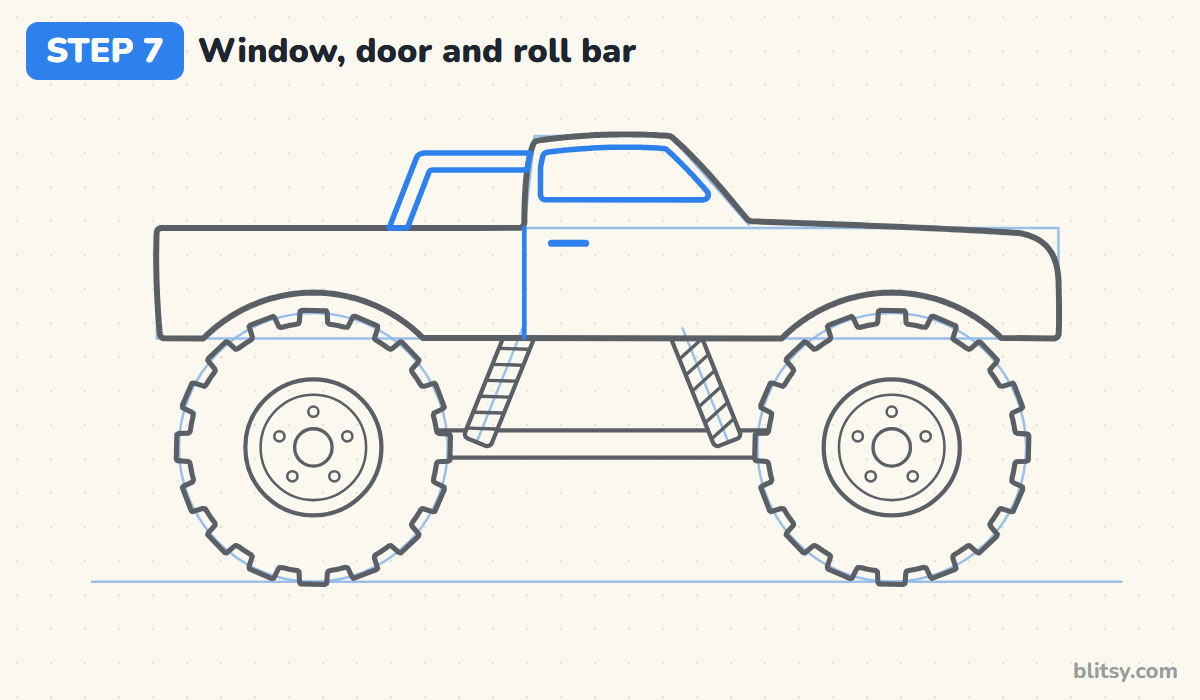
Inside the cab, draw a window that follows the roof and windshield about a finger's width in from the outline. Run a line straight down from the back of the cab to the bottom of the body, where the cab meets the bed, and add a short handle below the window. Behind the cab, draw a thick roll bar that leans back from the bed.




💡 Tip: Draw the roll bar as two parallel lines with rounded corners.
Step 8: Paint on the flame decals
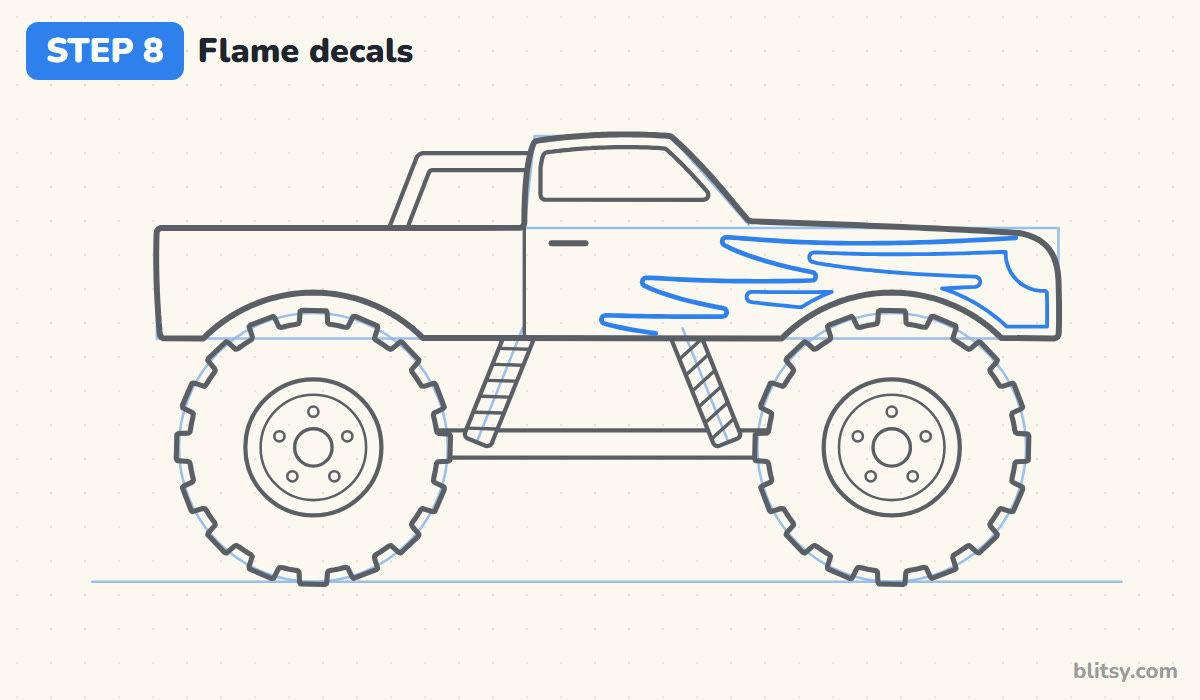
Starting at the nose, draw three long flame tongues that lick back along the hood and door. Make each one fat near the front and let it thin out to a point, with the middle tongue reaching back the farthest. Inside the top two, draw smaller copies for the yellow centers. Flames are the trickiest shape in this lesson, so younger kids can draw simple zigzag stripes instead.
💡 Tip: Curve each flame tip slightly upward, like it's catching the wind.
Step 9: Add the lights and bumpers
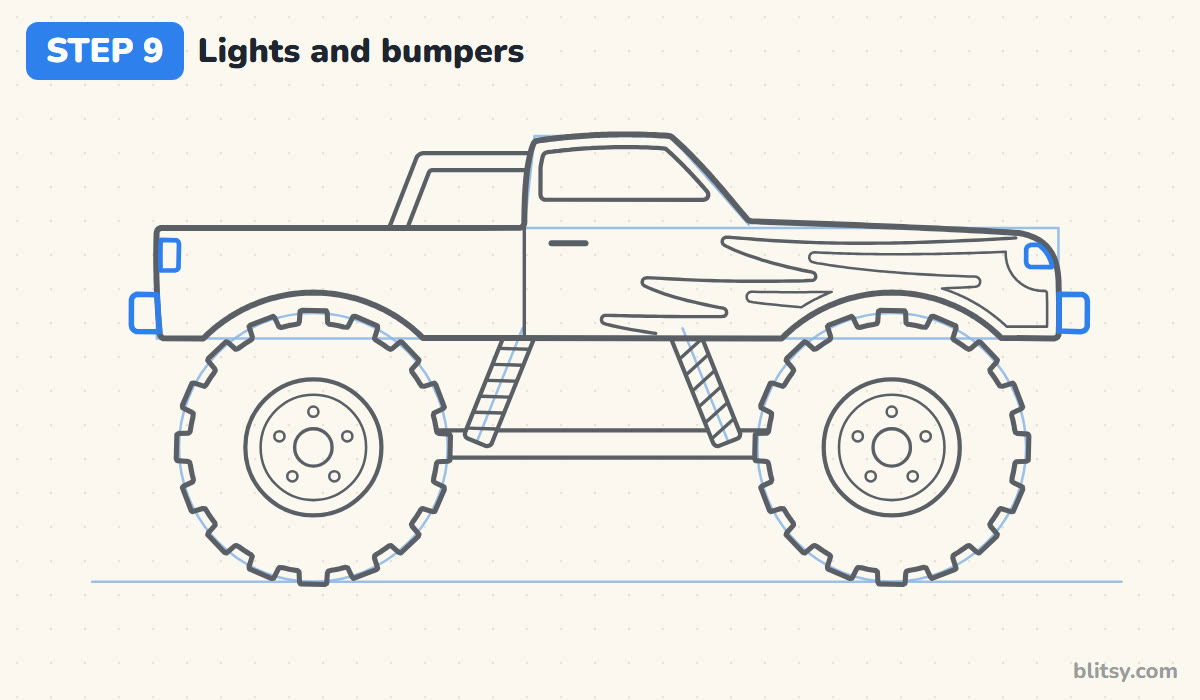
Put a small rounded headlight at the top of the nose and a narrow tail light on the tailgate. Then draw a short, thick bumper on each end, sitting low near the bottom of the body. I like them a little chunky. Thin bumpers would look odd next to tires that big.
💡 Tip: Keep both bumpers at the same height.
Step 10: Draw a dirt mound and dust puffs
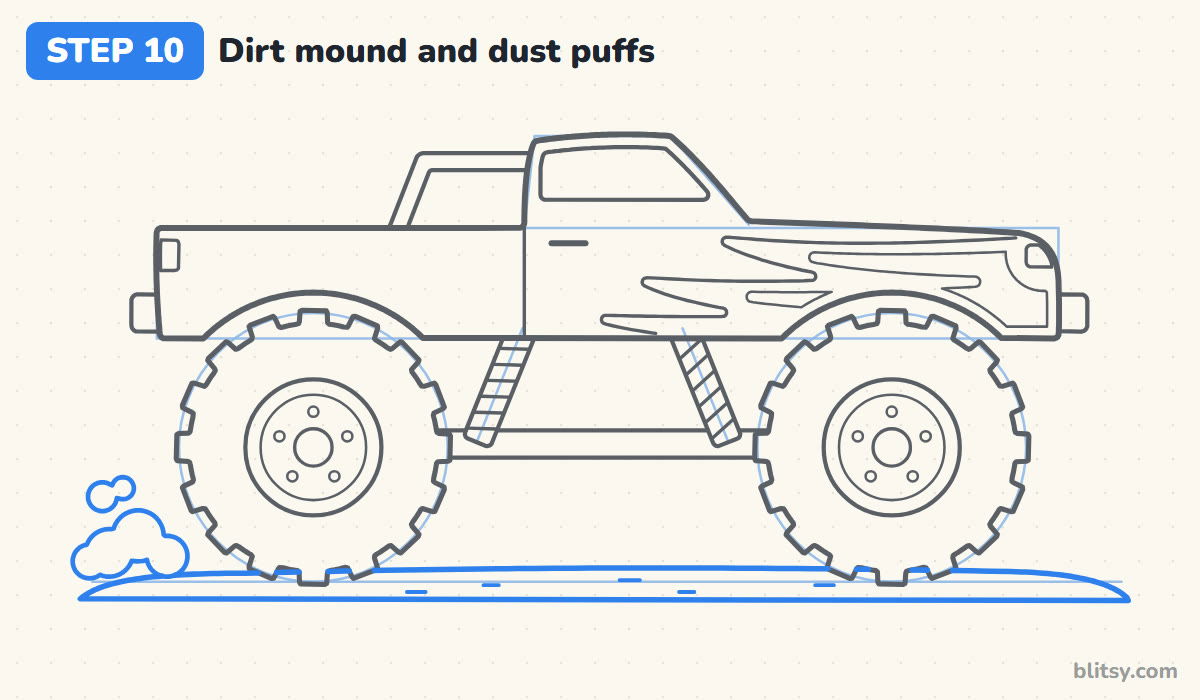
Give the truck something to drive on. Draw a long, low mound of dirt under the wheels, with the ends dipping down, and sprinkle in a few short dashes for pebbles. Behind the back tire, draw a couple of bumpy little clouds; those dust puffs hint that the truck is moving.
💡 Tip: Build each dust cloud from three or four overlapping bumps.
Step 11: Ink the lines and erase the guides
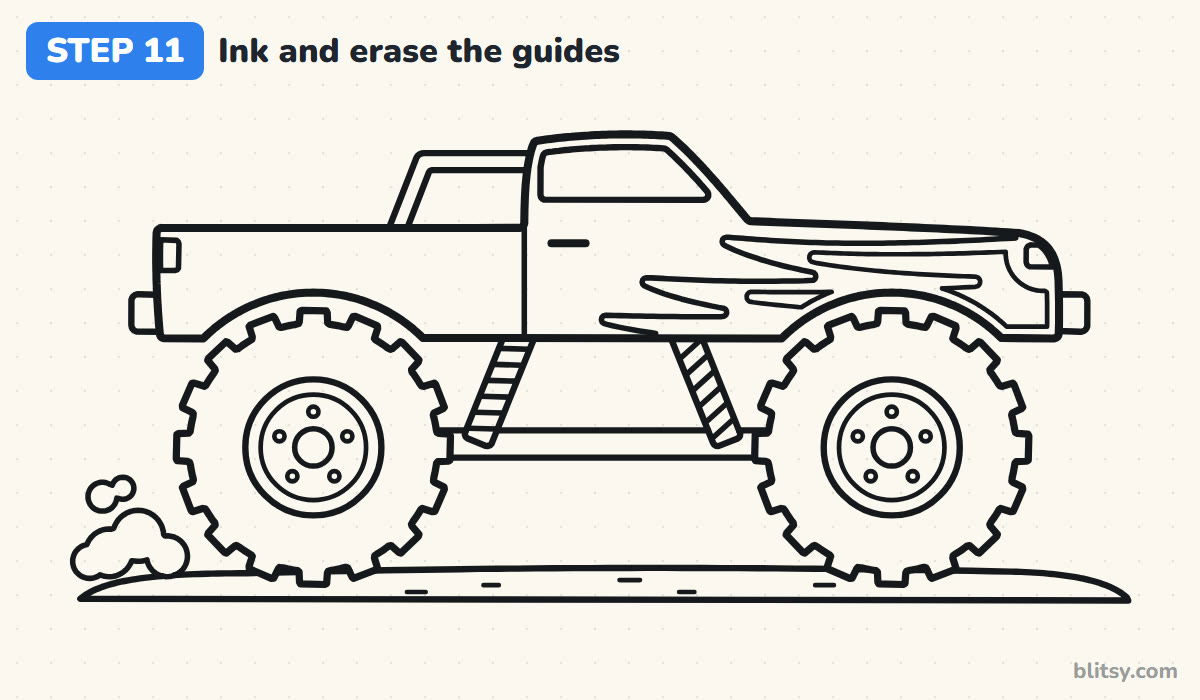
Go over every line you're keeping with your fineliner. I ink the body first, then the details on its side, and save the tires for last because the tread blocks take the most patience. Let the ink dry for a minute. Then erase the box, the cab guide, the lift lines, the ground line and the original wheel circles.

💡 Tip: Turn the paper as you ink the treads so your hand never crosses wet lines.
Step 12: Color the monster truck
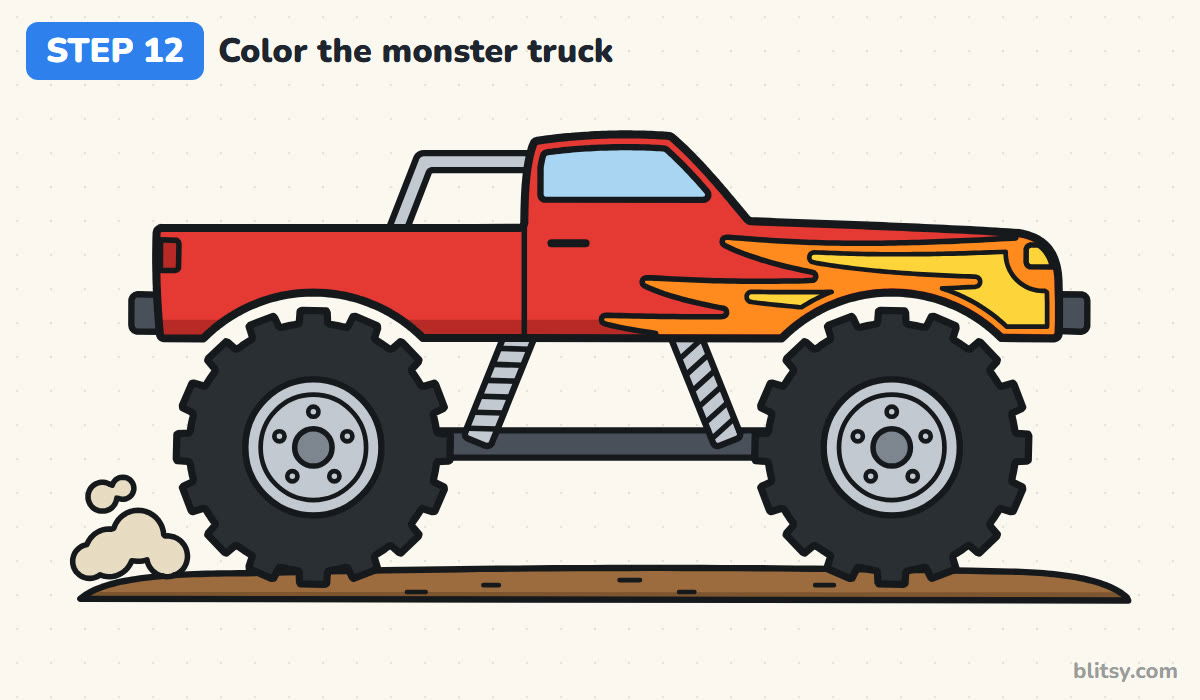
Color the body bright red, pressing a bit harder along the bottom edge for a darker shadow strip. Fill the flames orange with yellow centers, and make the headlight yellow too. The window goes light blue. Use black for the tires and silver for the rims and springs, then dark gray for the frame and bumpers. Finish with brown dirt and pale tan dust.
💡 Tip: Color the black tires last so dark wax doesn't smudge onto the red.
Trouble Spots in Monster Truck Sketches
- Wheels that are too small. The truck turns into an ordinary pickup. Make each tire taller than the body itself.
- A body sitting right on the tires. Without a gap it looks squashed. Lift it up and show the springs and frame in the open space underneath.
- Tread blocks bunched on one side. The tire looks broken. Place the first four blocks at the compass points, then fill in between.
- Flames that look like plain stripes. They need a fat end and a pointed end. Start each tongue wide at the nose and taper it toward the back.
- Pressing hard on the guides. Dark guide lines won't erase cleanly. Keep the first two steps feather light.
Remix Ideas for Your Crusher Truck
Once you've got the basic truck down, change its personality. Swap the red for lime green or purple, trade the flames for tiger stripes or lightning bolts, or tip the whole truck up on its back wheels for a wheelie. My favorite challenge for older kids is drawing it mid-jump, with the wheels hanging lower on their springs. Kids who enjoyed the flames will probably love the race car drawing tutorial next, and the car drawing lesson is handy for practicing a lower, everyday vehicle.
Free Monster Truck Coloring Page and PDF Steps
Want to keep a rainy afternoon busy? The monster truck coloring page shows a colored example and a color key at the top, then a big bold outline underneath with plenty of space for a crowd or a ramp. The step-by-step PDF guide has all 12 steps with their tips. Both print fine on Letter or A4 paper.
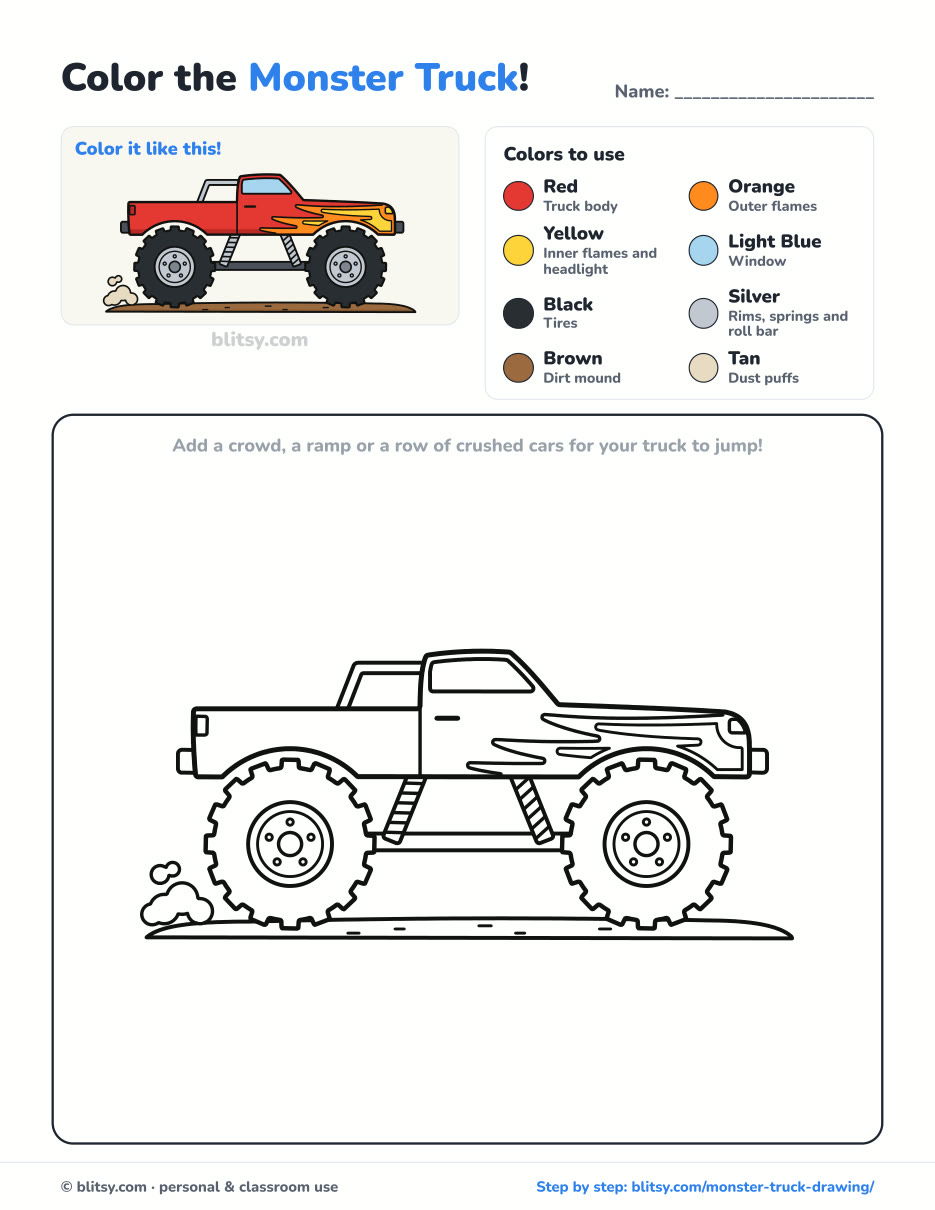
Black outlines with a colored example and the color names at the top. Ready to print and color.
⬇️ Download Coloring PageEvery step picture with its instructions and tips, to keep beside your paper while you draw.
⬇️ Download Drawing Guide📱 On a phone? Tap a download button, then open the file and choose Share → Save to Files or Print. On a computer, the PDF opens or saves straight to your Downloads folder.
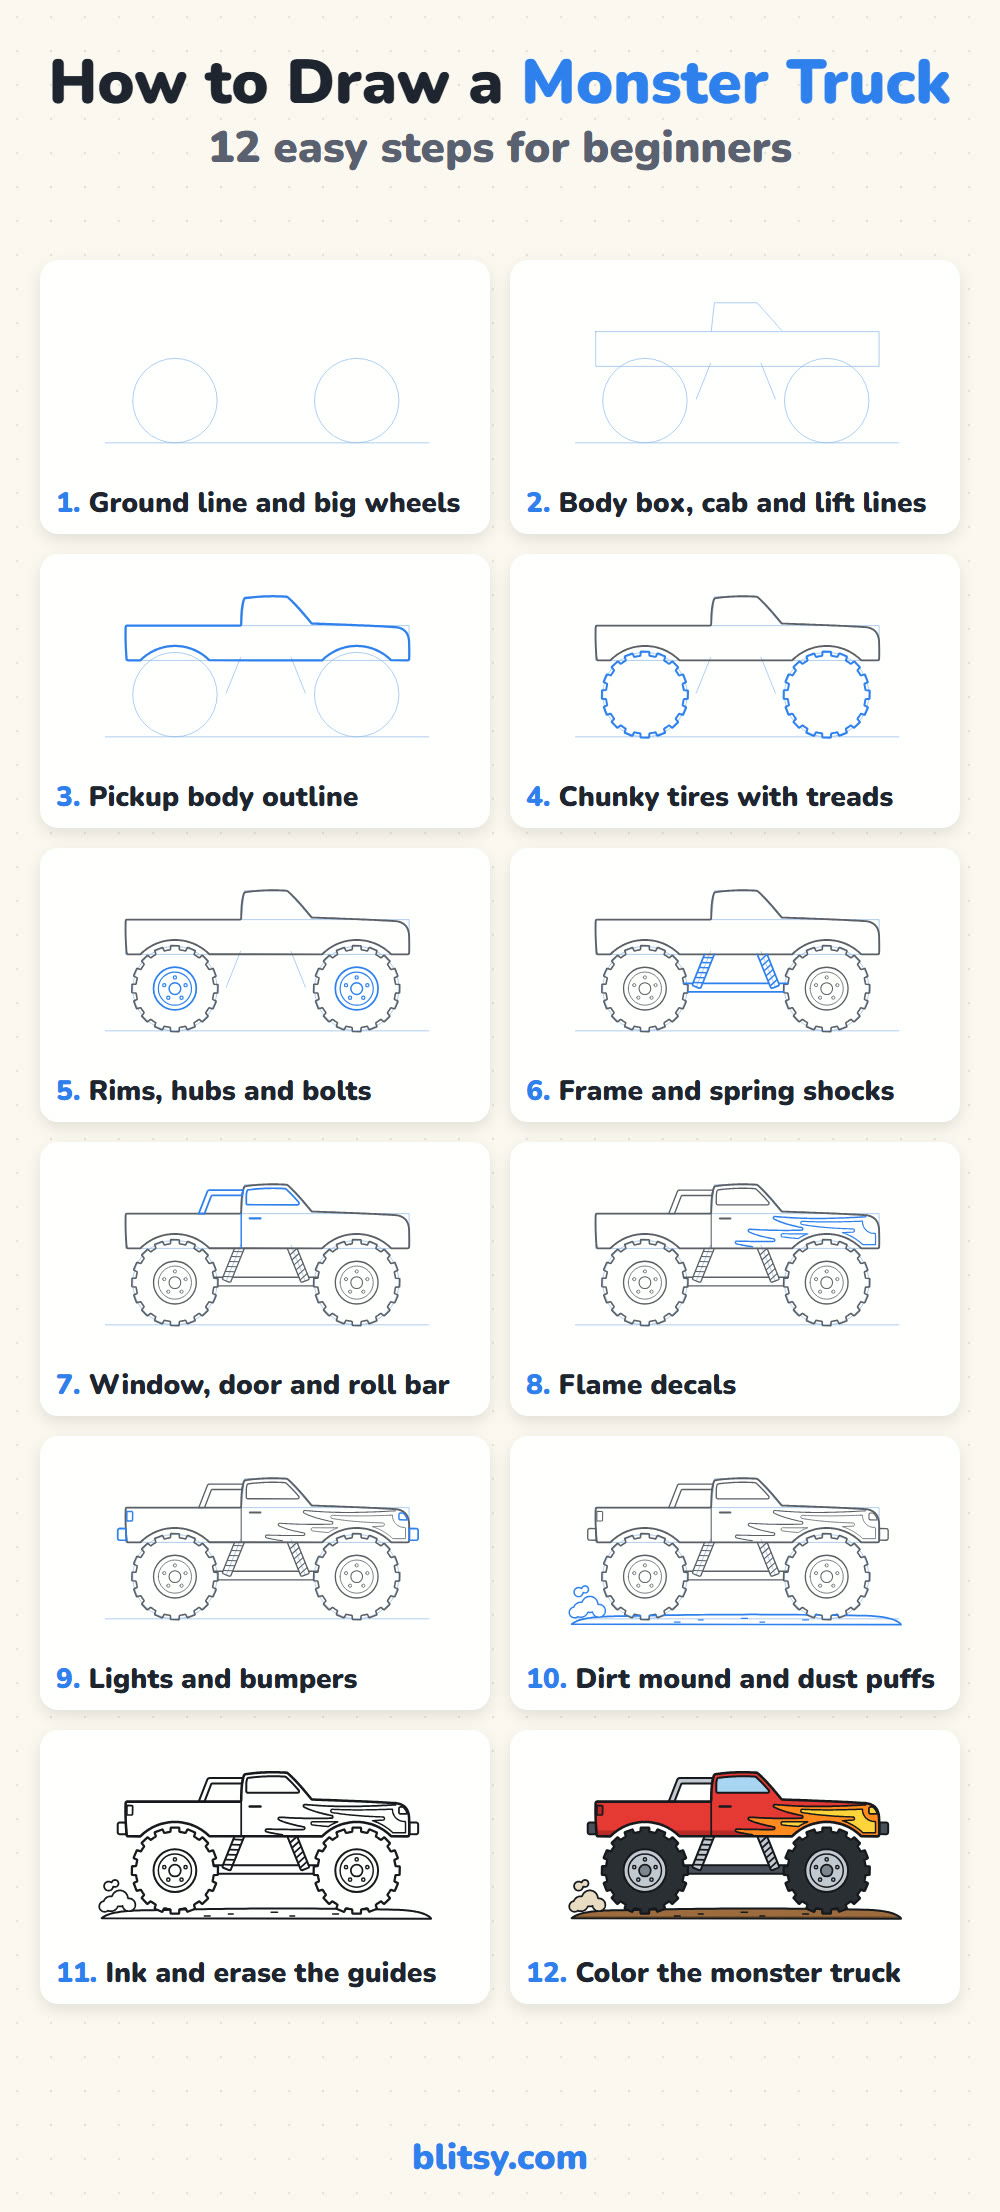
Keep the Truck Steps Handy on Pinterest
Big Wheels and Bold Shapes: What to Draw After the Monster Truck
These are step-by-step tutorials with one picture per stage, most of them built from the same boxes and circles you used here.
- UFO Drawing: A flying saucer with a peeking green alien and a soft yellow beam is built from ovals in this UFO drawing tutorial.
- Bed Drawing: Draw a cosy double bed from one light box in perspective with this how to draw a bed step by step lesson.
- Castle Drawing: Three towers, a portcullis gate and a drawbridge over the moat fill this castle drawing tutorial.
- Baseball Bat Drawing: A wooden bat, a ball with red stitches and a glove start from one slanted line in this baseball bat drawing step by step guide.
- Train Drawing: A red and blue steam engine pulls its coal tender along the rails in this train drawing tutorial.
- Rocket Drawing: Blast a cartoon rocket off through puffy smoke with this how to draw a rocket lesson.
- Realistic Drawing: Leave cartoons for a moment and shade a glossy apple with real light and shadow in this realistic drawing step by step tutorial.
- Rocks Drawing: Build a group of boulders from flat-sided blocks so they look solid in this rocks drawing tutorial.
- Tank Drawing: An olive cartoon tank with road wheels and a long track loop takes 12 steps in this tank drawing step by step lesson.
- Diamond Drawing: Draw a faceted gem from one trapezoid and one V with this diamond drawing tutorial.
Monster Truck Drawing Questions Kids Ask
What is the easiest way to draw a monster truck?
Draw two big circles, then a small pickup shape floating above them, and connect the two with a couple of springs. Add square bumps around the tires and you already have a recognizable monster truck.
How do you make a monster truck drawing look big?
Make the tires taller than the body and leave a clear gap under the truck. The bigger the wheels look next to the cab, the more powerful the truck feels.
How long does it take to draw a monster truck?
Plan on about 35 minutes with coloring. The tread blocks and flames take the longest.
What colors should I use for a monster truck?
Any bright body color works: red, blue, green or purple all look great. Keep the tires black and the rims silver, then pick flames or stripes that stand out against the body.
Give your truck a name, write it on the door, and see how high you can make it jump in the next drawing. 🛻
Related posts:
 How to Draw a Fire Truck Step by Step (Easy for Kids)
 How to Draw a Monster Step by Step (Cute and Easy)
 How to Draw a Tooth Step by Step (Cute and Easy for Kids)
 How to Draw a Mother and Daughter Step by Step (Easy for Kids)
 How to Draw Wonder Woman Step by Step (Chibi for Kids)
 How to Draw the Hulk Step by Step (Easy Chibi for Kids)
 How to Draw Iron Man Step by Step (Easy Chibi for Kids)
 How to Draw a Police Car Step by Step (Easy for Kids)
 How to Draw a Mermaid Step by Step (Easy Cartoon for Kids)
 How to Draw a Boat Step by Step (Easy Sailboat for Kids)
 How to Draw a Care Bear Step by Step (Cute Fan Art for Kids)
 How to Draw Hello Kitty Step by Step (Easy for Kids)

