
The whale shark is the biggest fish in the sea, and it's a shark, not a whale, even with that name. What gives it away on paper is the head: wide and flat, with the mouth right at the very front. Here I'll show you how to draw a whale shark step by step, from one long light oval to a smiling giant covered in stripes and white spots. The spots take patience, but every shape is easy.
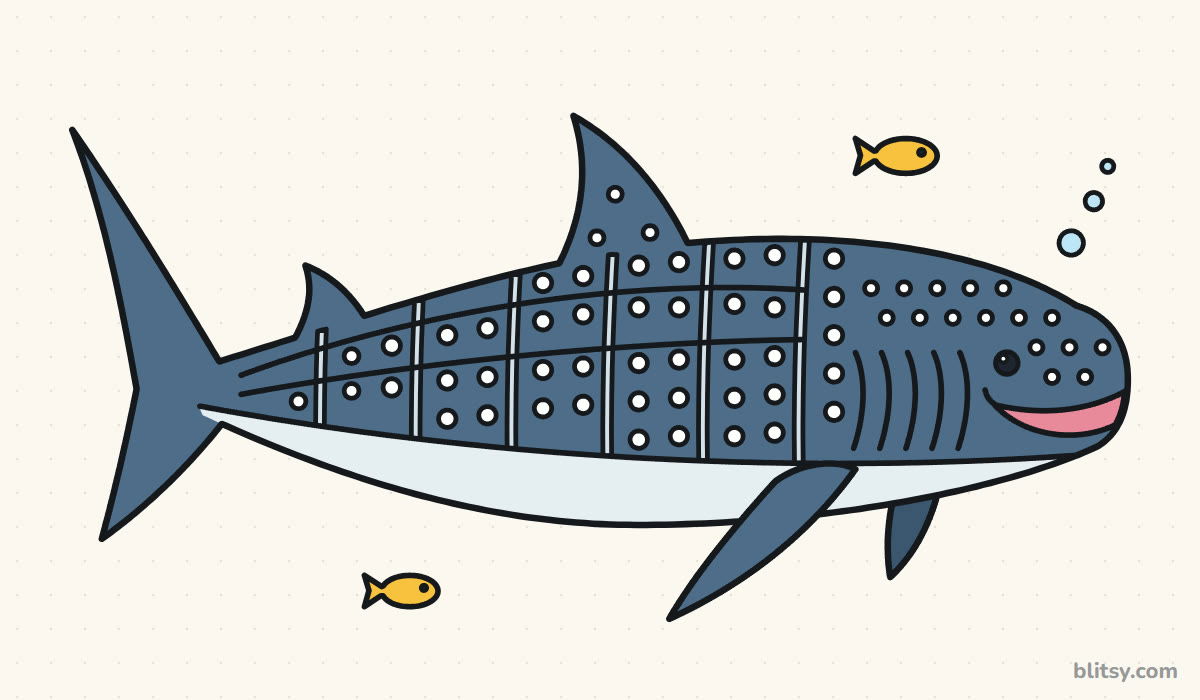
Each picture adds a few new lines, drawn in blue, while everything from earlier steps turns gray. Copy only the blue, compare, then go on.
Quick overview
⏱️ Time: about 40 minutes, coloring included
🎯 Level: easy, fine for kids around 7 and up
✏️ Steps: 12
🦈 You'll draw: a spotted whale shark swimming to the right
Gear for a Spotted Ocean Giant
- A pencil you can press softly (HB works well)
- A clean eraser
- A black marker or fineliner for the final outline
- Colored pencils or crayons: dark blue gray, light gray, pink, yellow and light blue
- A sheet of plain white paper, turned sideways
A white gel pen or white crayon helps with the spots if you color the body first, but my own copies usually skip it.
How to Draw a Whale Shark Step by Step
Step 1: Sketch a long body oval
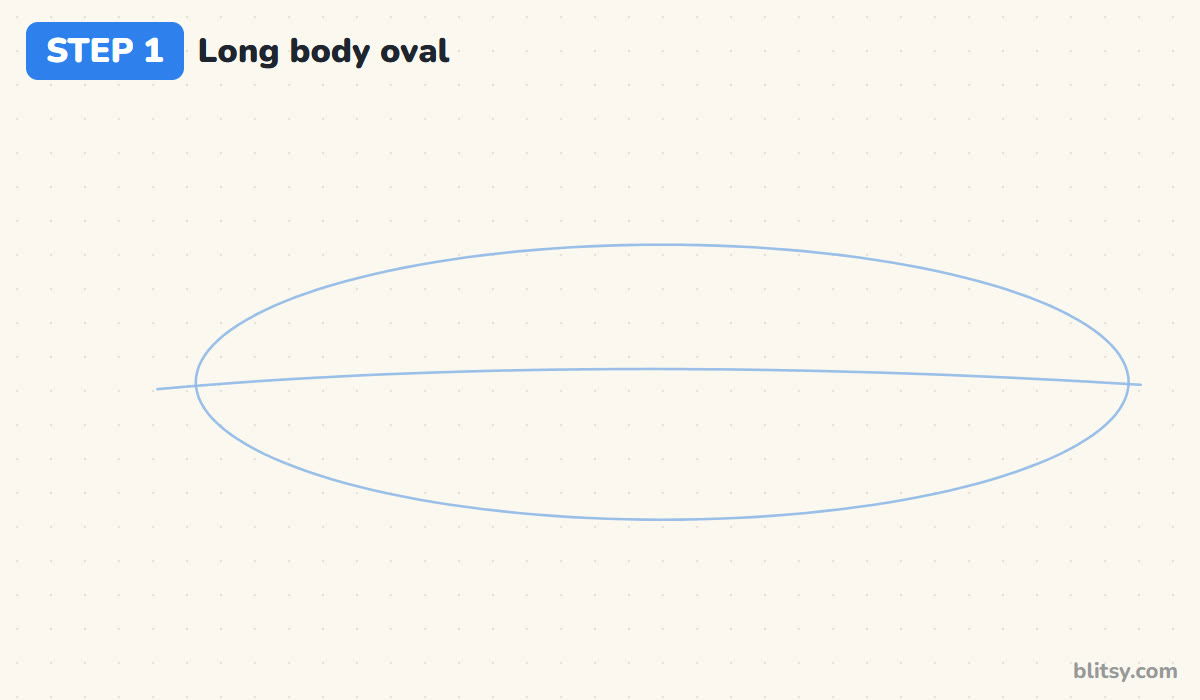
Draw one long, flat oval across the middle of the page, about four times as wide as it is tall. Leave room on the left for the tail. Then run a light center line through it from end to end, which keeps the stripes and ridges level later.
💡 Tip: Press so lightly that the line almost disappears. Every guide in this drawing gets erased.
Step 2: Add guides for the fins and the tail
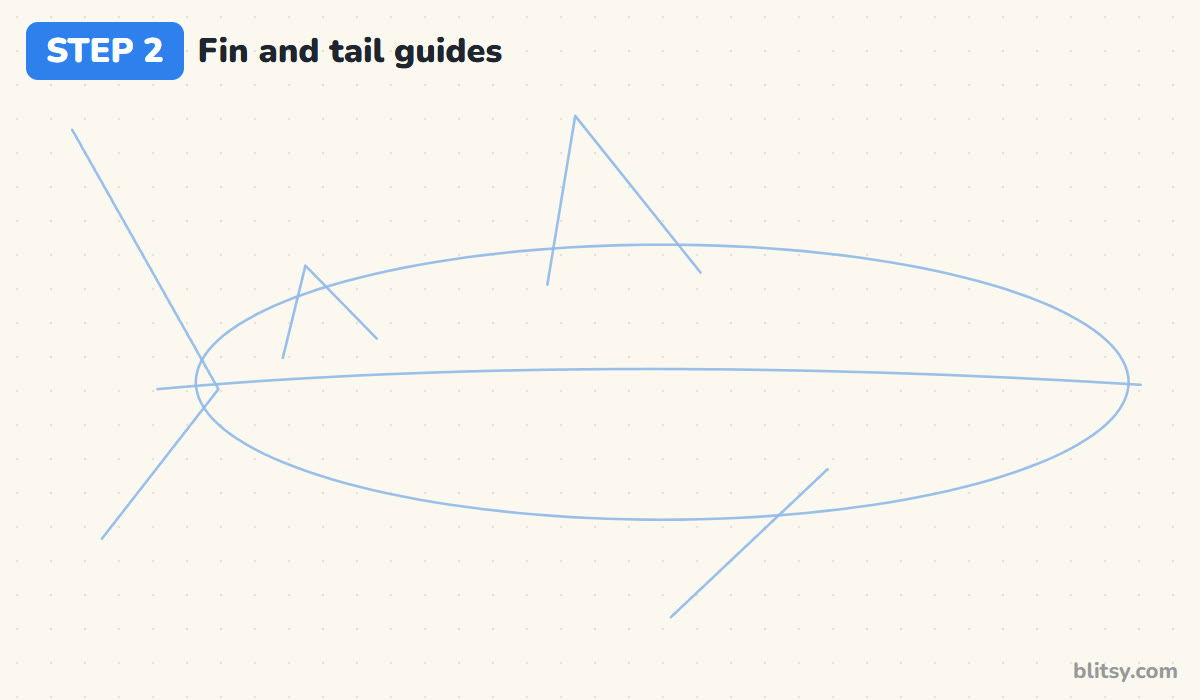
On top of the oval, draw a tall triangle a bit left of the middle for the big dorsal fin and a much smaller one near the left end. At the left tip, draw a sideways V for the tail. One slanted line under the front half marks the pectoral fin.
💡 Tip: Make the tail V point up and down, never flat. That upright tail is what makes it a shark and not a whale.
Step 3: Draw the wide flat head and the body
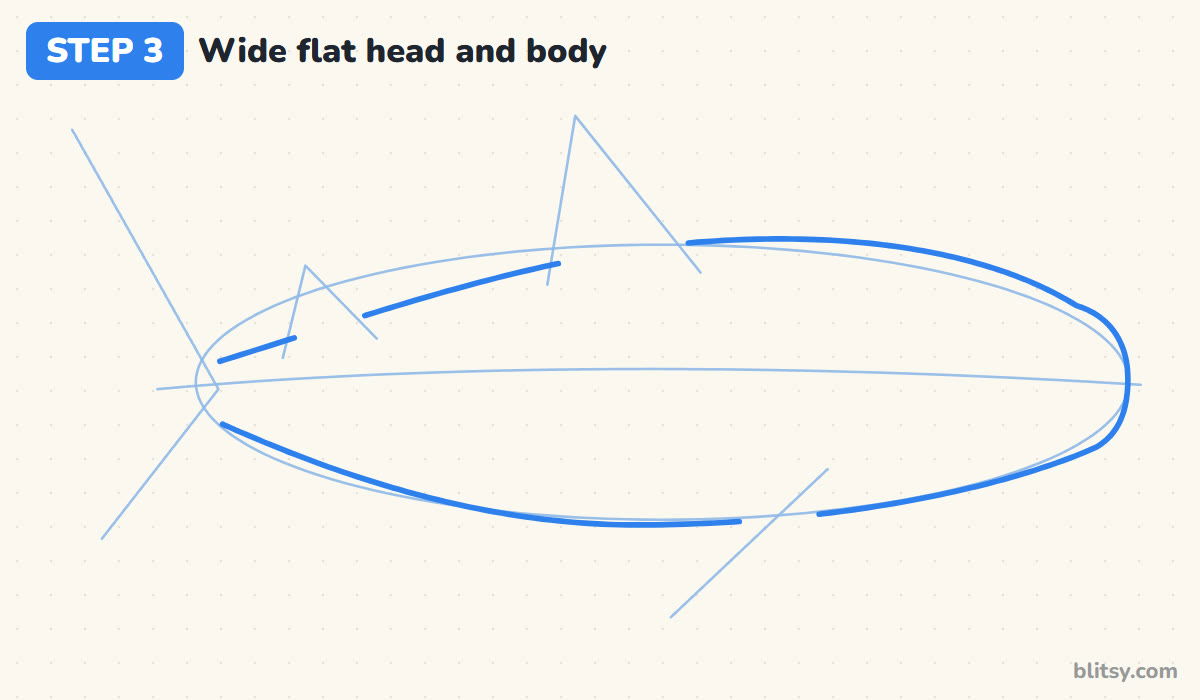
Now trace the real outline over the oval. On the right, I square off the front into a broad, blunt snout, because a whale shark's head is flat and wide like a shovel. The back rises gently toward the fin and slopes down into a narrow tail stalk. Leave gaps where the fins will join.
💡 Tip: If the front comes out pointy, round it off and widen it. A sharp nose turns it into a regular shark.



Step 4: Draw the two dorsal fins
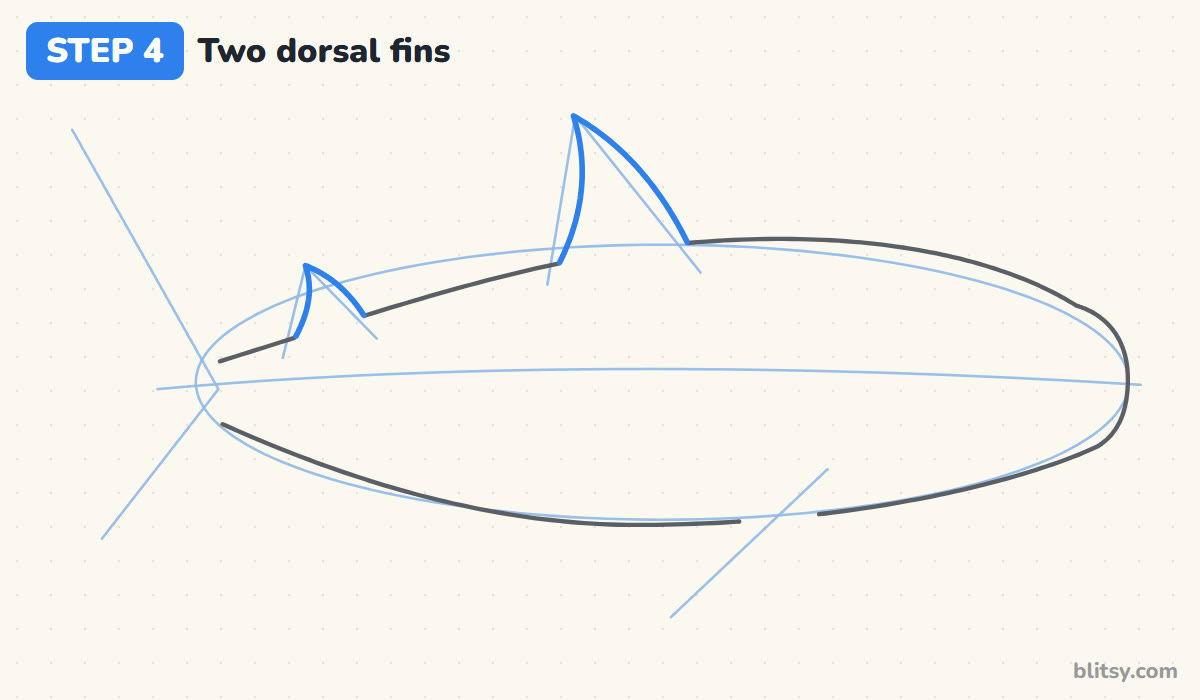
Follow the tall triangle guide with a fin that has a curved front edge and a slightly hollow back edge, so its tip leans backward. Then draw the little second fin near the tail the same way. I like the big fin quite tall here, since it balances that long body.
💡 Tip: Start each fin from the back line and pull your pencil upward. The curve looks smoother that way.
Step 5: Add the crescent tail
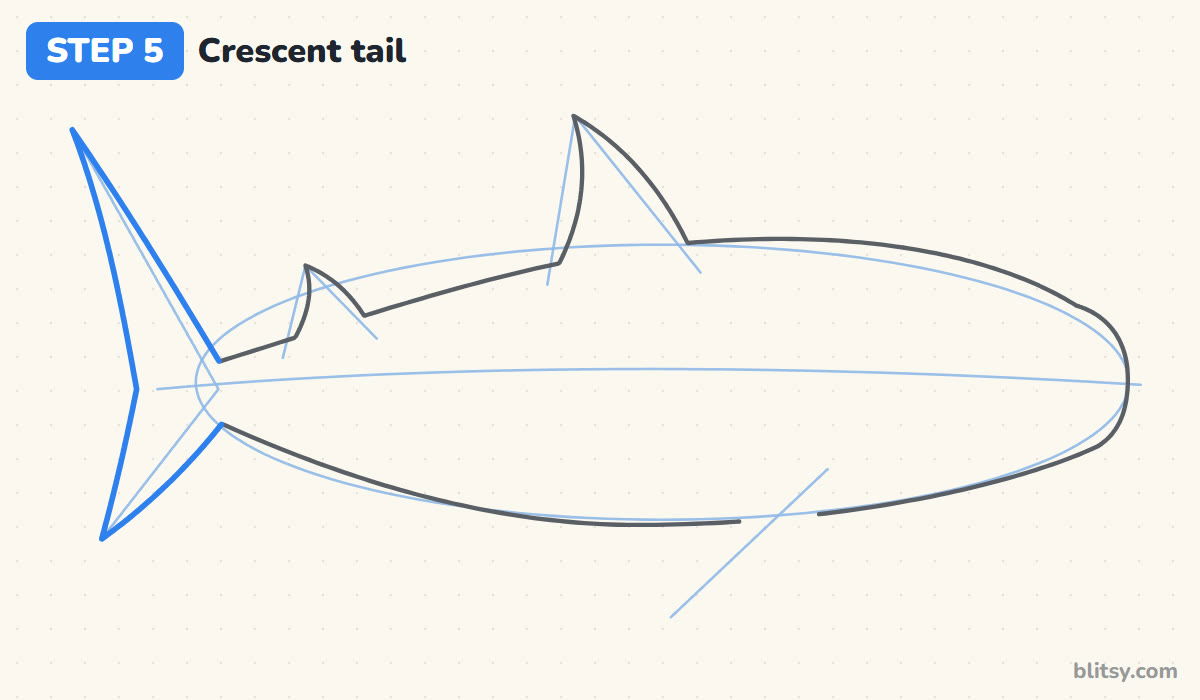
From the tail stalk, draw an upper lobe that sweeps far up and back, then come down into a notch and out to a shorter lower lobe. Together they make a moon shape. The top part should clearly be bigger than the bottom one.
💡 Tip: Keep the notch close to the body. If it drifts far out, the tail looks like it's coming off.
Step 6: Draw the two pectoral fins
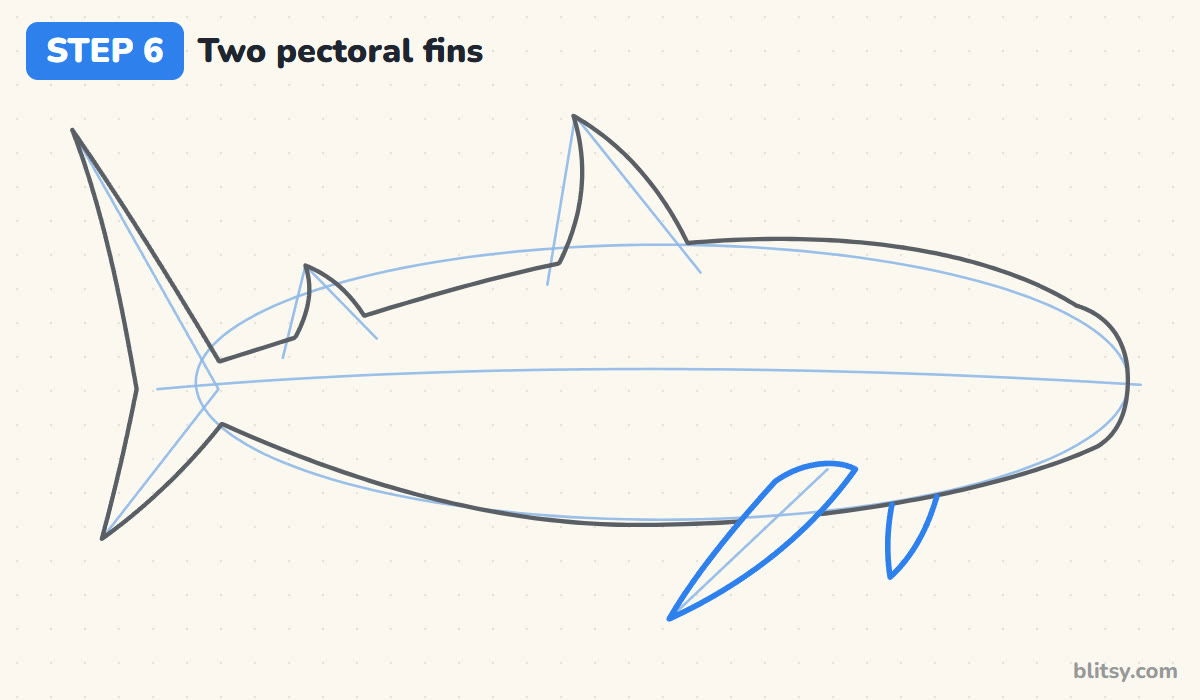
Under the front of the body, draw a long fin that starts just behind the head and swings back and down to a point. A bit further forward, add a short, rounded fin peeking out below the belly. That's the fin on the far side, so only its tip shows.
💡 Tip: Angle the big fin backward, as if the water is pushing it. A fin sticking straight down looks stiff.
Step 7: Give it a big smile and a tiny eye
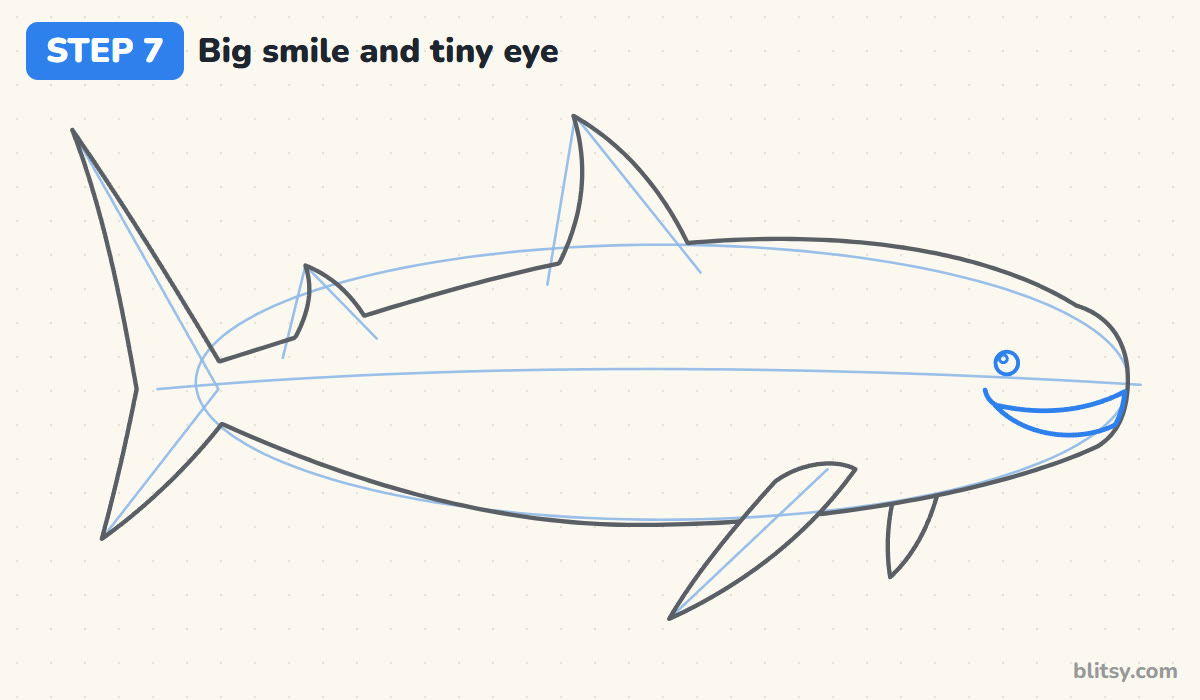
Right at the front of the snout, draw a wide, curved mouth that runs back along the head and turns up at the corner. Add a lower lip curve underneath it so the mouth has some thickness. Just above and behind the corner, draw a small round eye with a dot of shine.
💡 Tip: Keep the eye small. Whale sharks really do have tiny eyes, and the small size makes the face look calm.



Step 8: Draw the gill slits and the side ridges
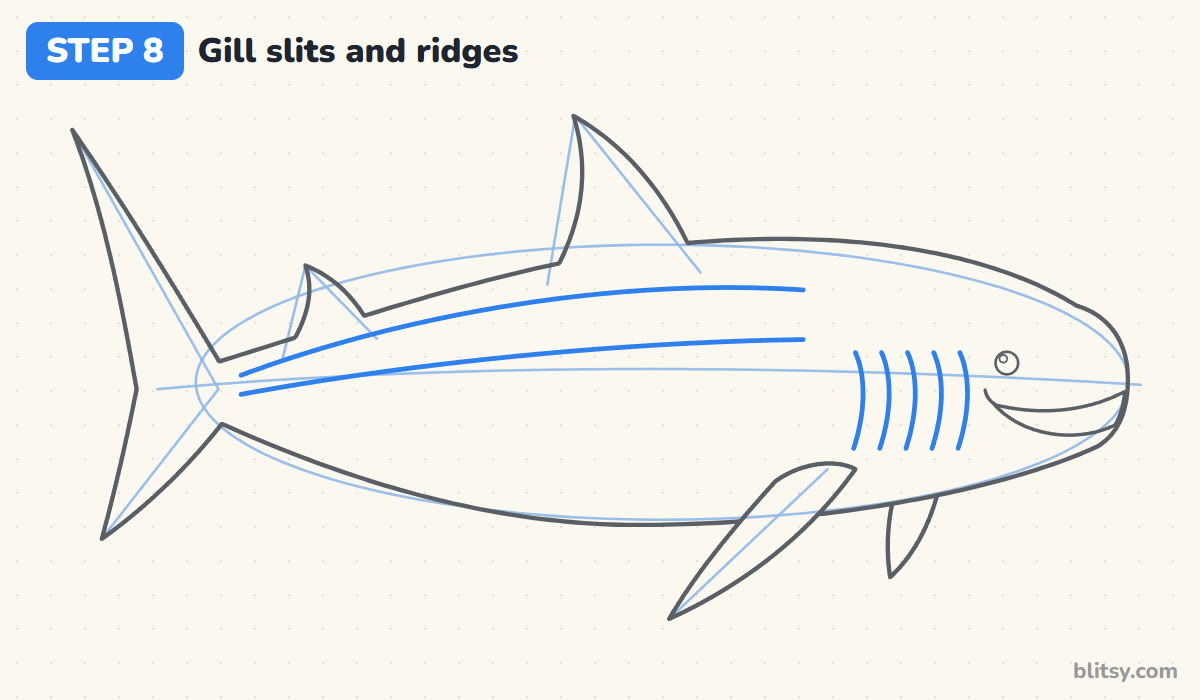
Behind the eye, draw five curved lines side by side for the gill slits. They breathe through these, like any other shark. Then add two long lines from behind the gills back toward the tail, following the body's curve. Those are the raised ridges on its side.
💡 Tip: Space the gill slits evenly, about a finger width apart, so they read as a neat set.
Step 9: Add the belly line and the pale stripes
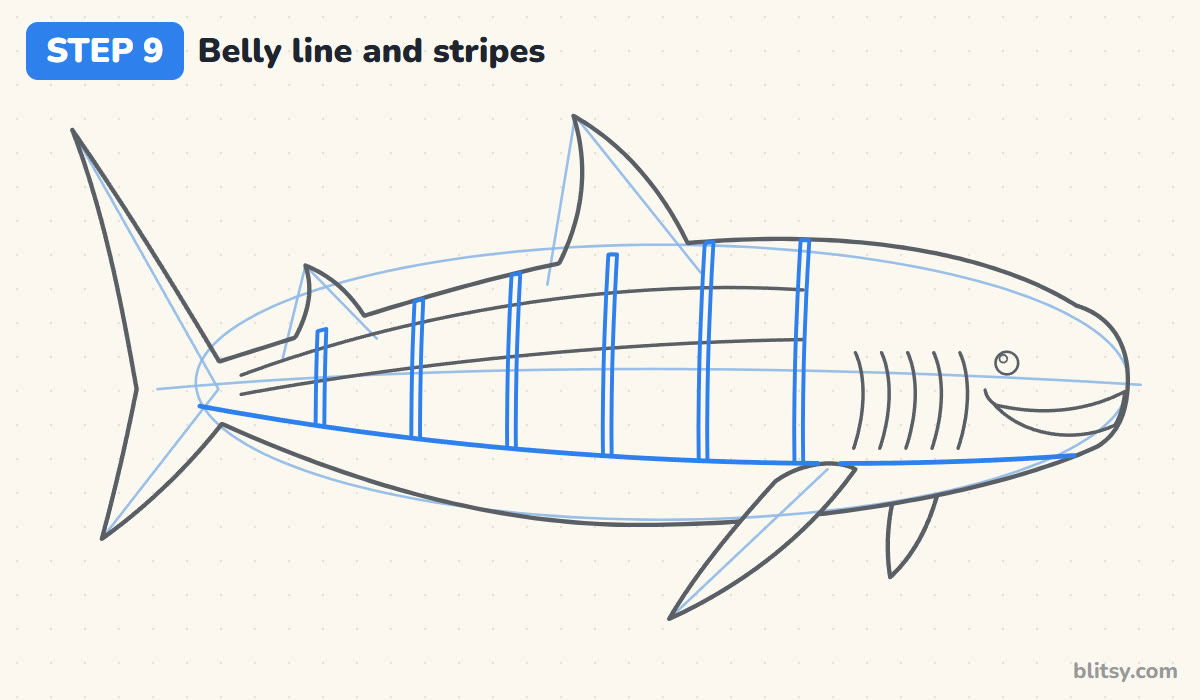
Draw a smooth line from under the mouth to the tail stalk to split the dark back from the light belly. Then add six thin vertical stripes from the back down to that line, evenly spaced. Each stripe is just two lines close together, and with the ridges they form a checkerboard.
💡 Tip: Let each stripe bend a tiny bit with the body. Perfectly straight stripes look like fence posts.
Step 10: Fill in the spots, the fish and the bubbles
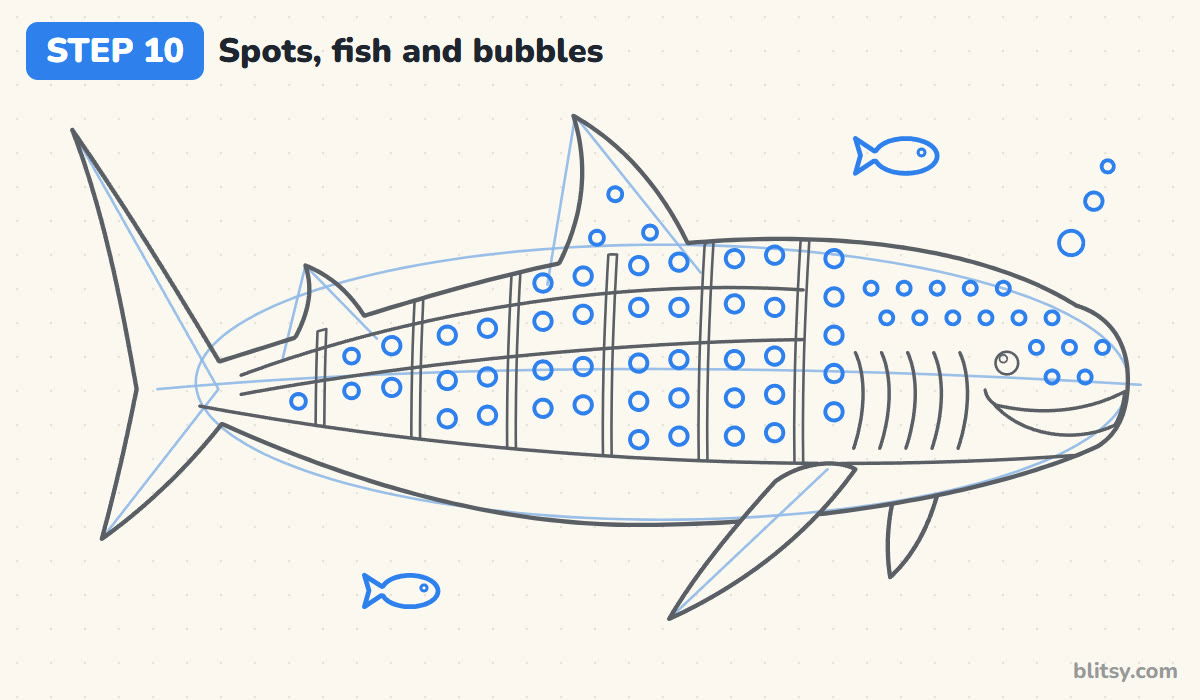
Put one or two round spots in each box of the checkerboard, plus a few on the big fin, and rows of smaller dots on the head. My trick is to finish all the spots before anything else. Then draw two little fish and three bubbles rising from the snout. Younger kids can draw fewer spots and it still works.
💡 Tip: Draw the spots in rows, working from the head toward the tail, so you don't lose your place.
Step 11: Ink the outline and erase the guides
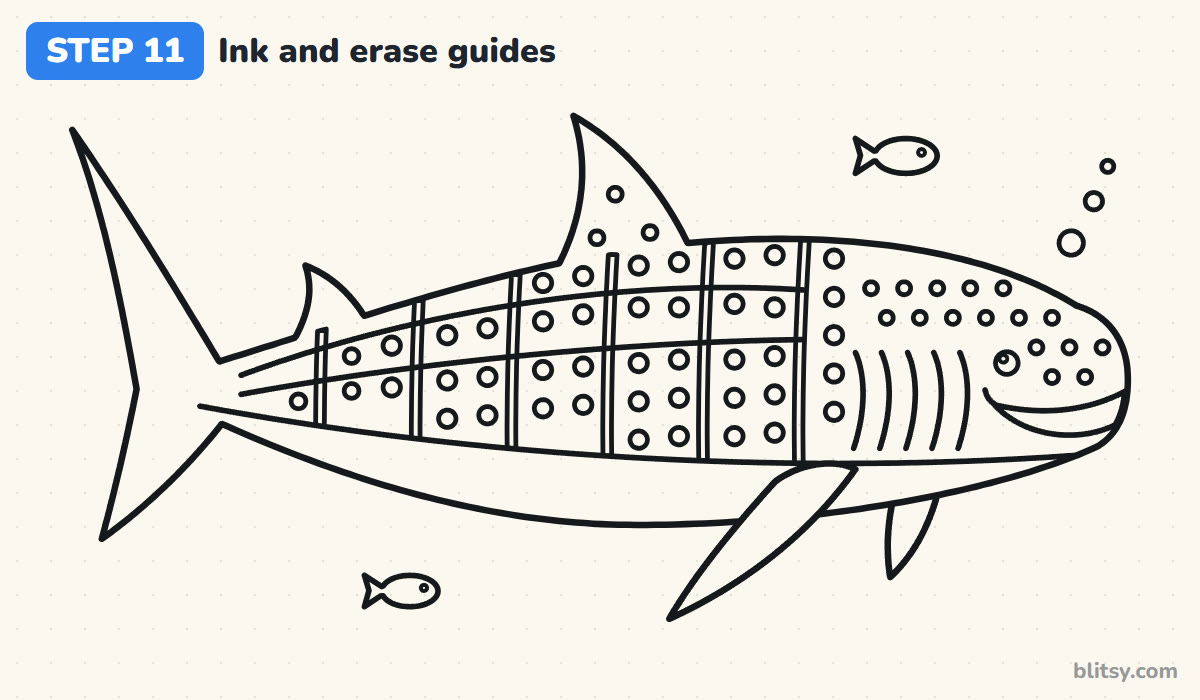
Trace every keeper line with the black marker. I do the big outline first, then the fins, and the spots last, because they take the longest. Leave the oval and the guide lines alone. When the ink is completely dry, erase all the pencil.
💡 Tip: Turn the paper while you ink the spots. Small circles are easier when your hand moves the same way each time.


Step 12: Color your whale shark
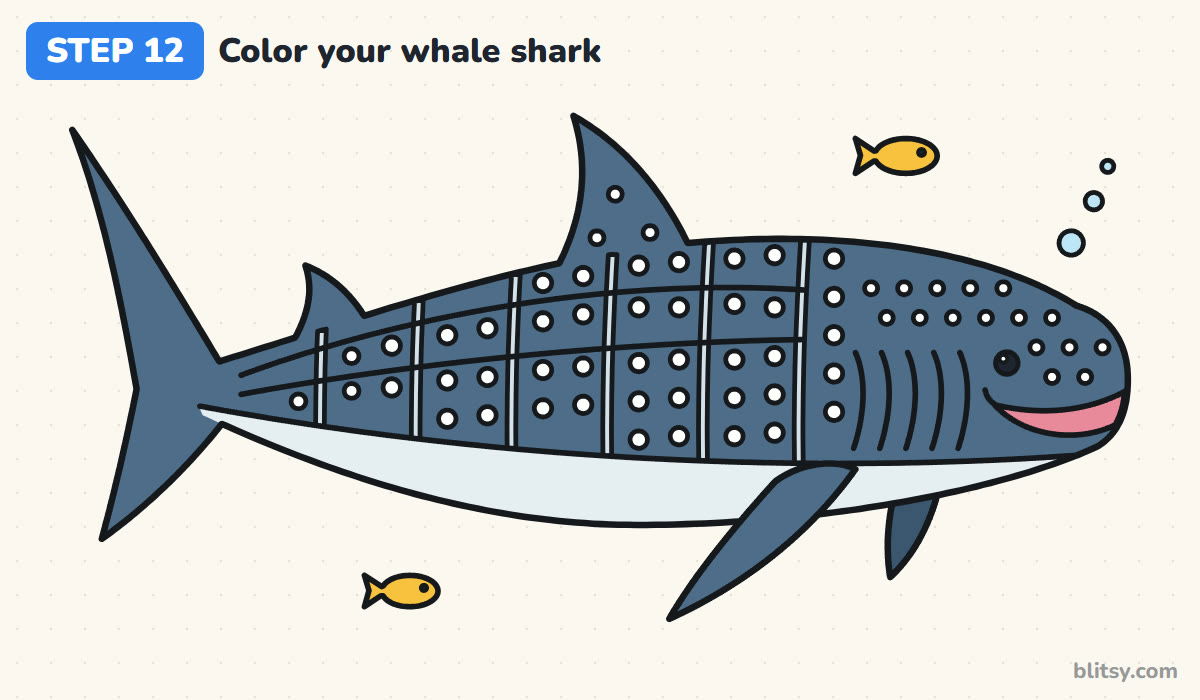
Color the back, fins and tail dark blue gray, and use a slightly darker shade on the far fin. The belly is a very light gray. Leave the spots and stripes white, or go over them with a white crayon. The mouth is pink, the eye black, the little fish yellow and the bubbles light blue.
💡 Tip: Color around the spots instead of over them. It's slower, but the white stays bright.
How a Whale Shark Turns Into a Whale by Accident
- A flat, sideways tail. Whales have horizontal flukes. A whale shark's tail stands up and down like any shark's, so keep the upper lobe pointing up.
- A pointed nose. That gives you a great white. Make the front wide, blunt and squared off.
- The mouth under the head. Most sharks have it underneath, but here it sits right at the front, across the tip of the snout.
- Spots in the stripes. When spots touch the stripe lines, the pattern turns into a mess. Keep each spot inside its own box.
- A huge eye. A big eye makes it look like a cartoon fish. A small eye suits this gentle giant much better.
Ideas for a Bigger Ocean Scene
Once the basic shape feels easy, try drawing it from slightly below, with the belly showing, or add a whole school of tiny fish swimming along under its chin. A snorkeler or a sea turtle next to it makes the size really obvious. Small kids can skip the stripes and keep only the spots. If you want to compare it with a classic shark, the shark drawing step by step lesson shows the pointed snout and sharp fin it doesn't have. And since people mix it up with whales all the time, the whale drawing tutorial shows the real difference: a whale has a blowhole and a flat tail. For coloring time afterwards, there are more pages in these free shark coloring pages.
Free Whale Shark Coloring Page and PDF Step Guide
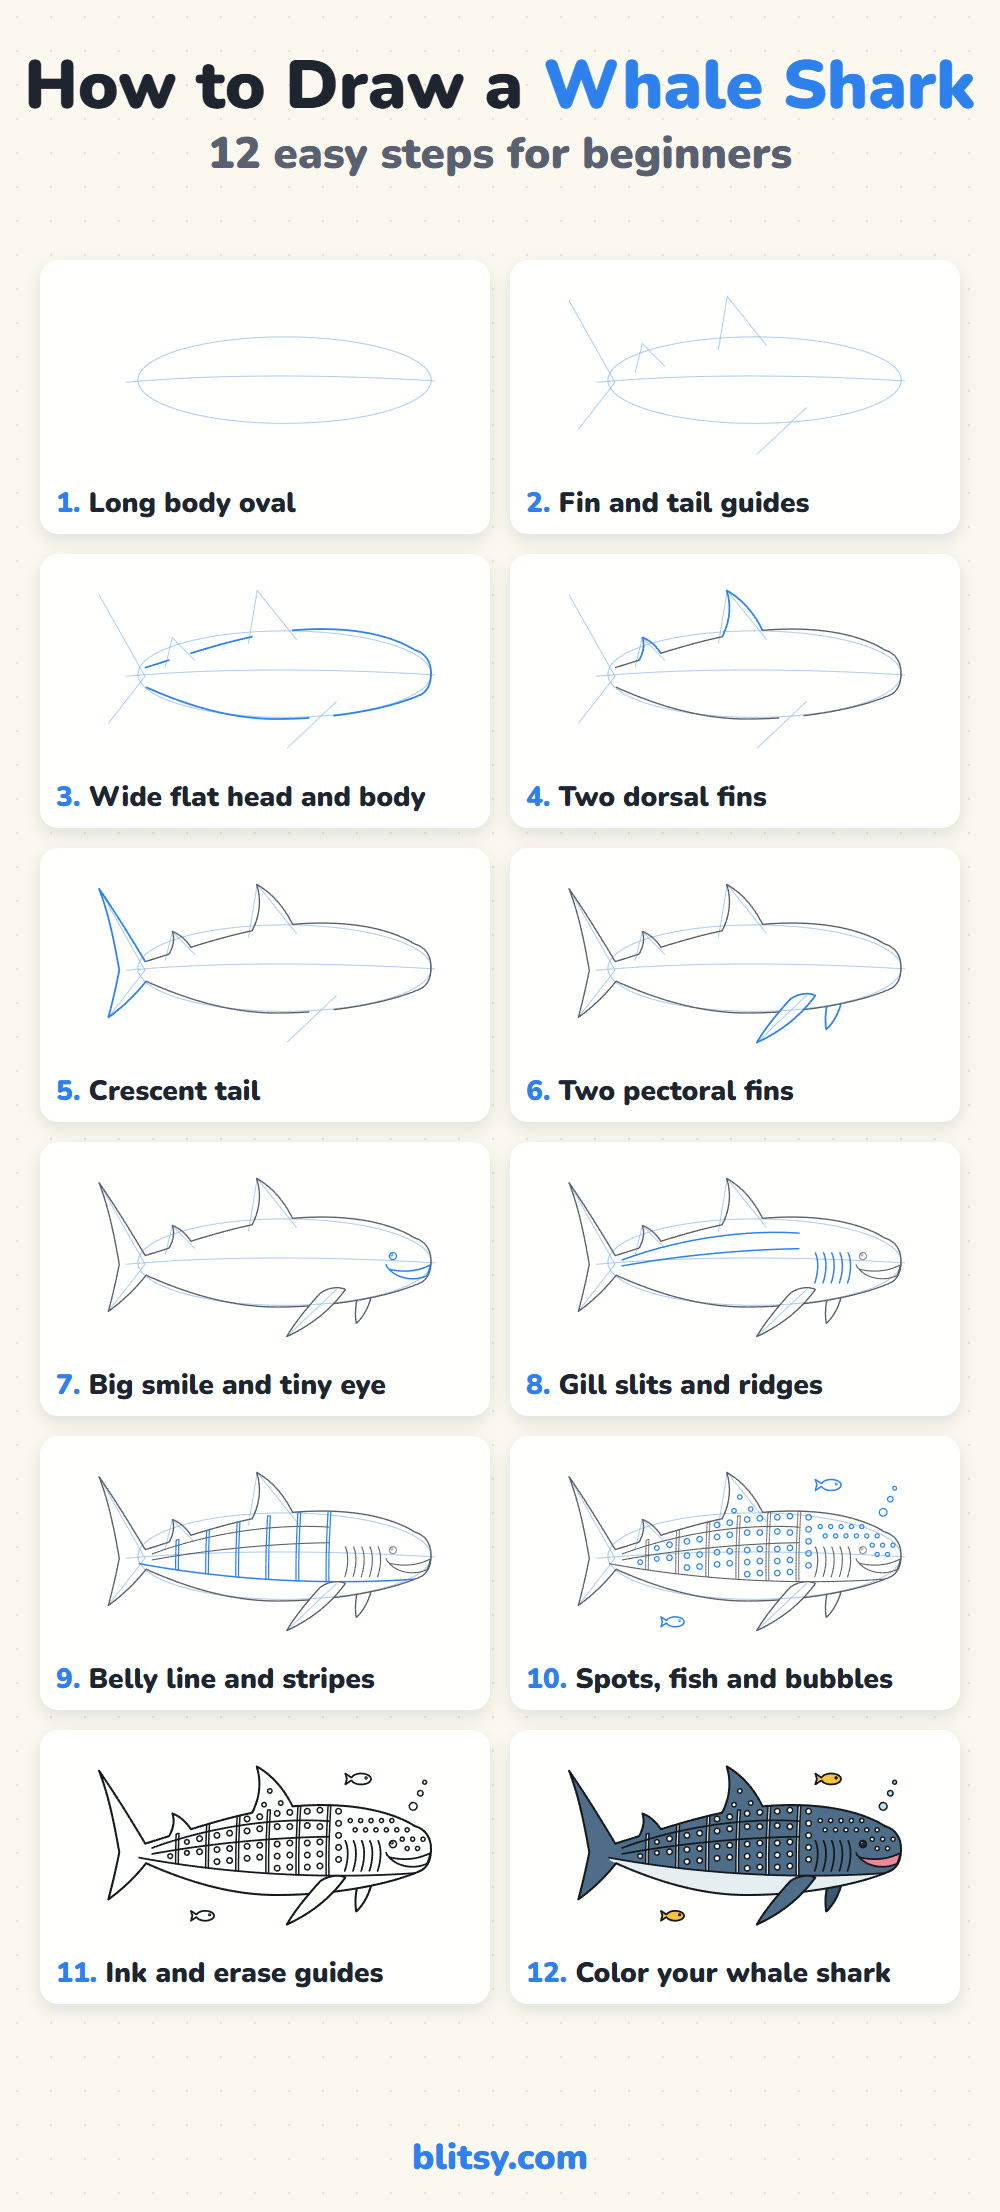
The free whale shark coloring page has a colored example at the top so kids can see which color goes where, a small key with the color names, and a big outline below to color. The step-by-step PDF guide holds all 12 steps with pictures and tips, so you can draw without a screen. Both print well on Letter or A4 paper.
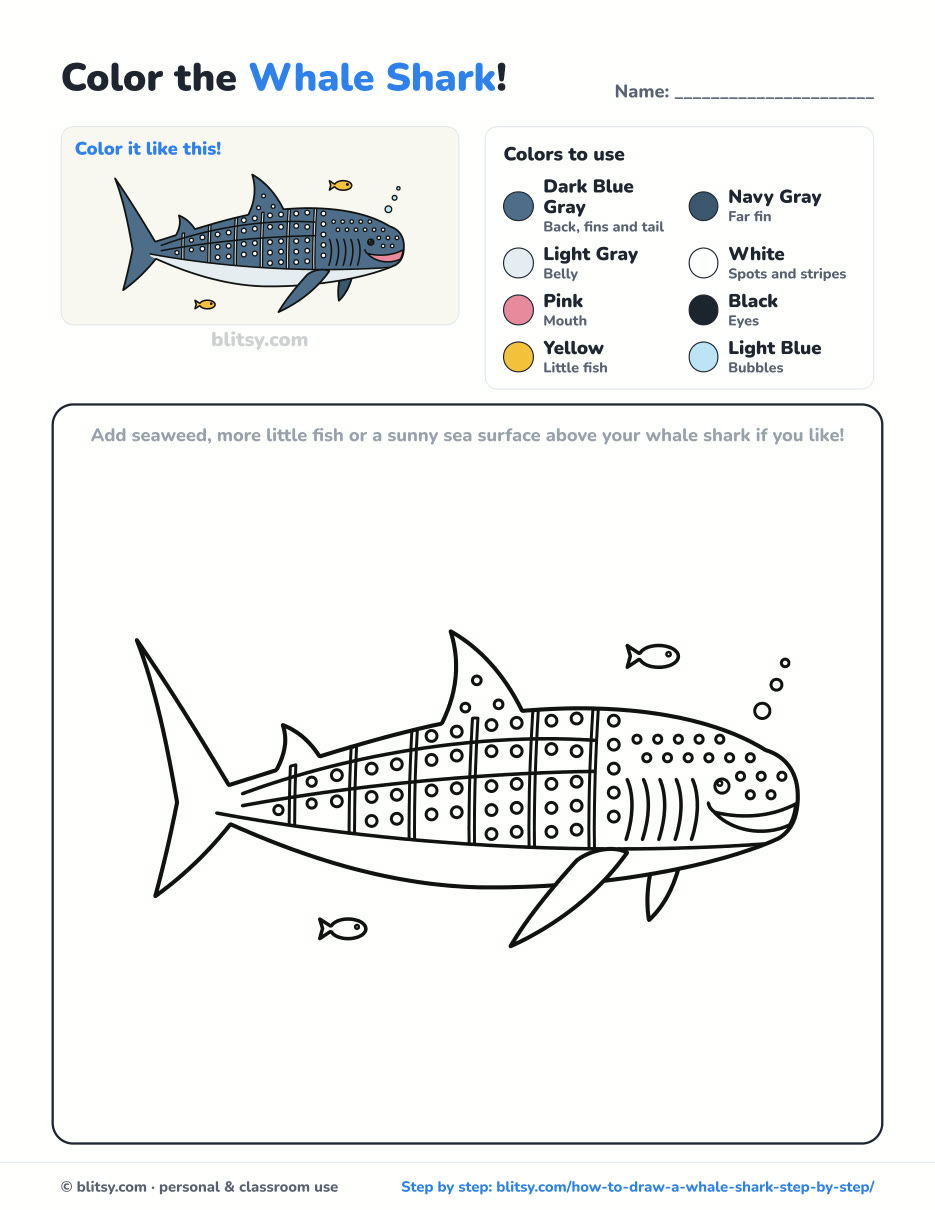
Black outlines with a colored example and the color names at the top. Ready to print and color.
⬇️ Download Coloring PageEvery step picture with its instructions and tips, to keep beside your paper while you draw.
⬇️ Download Drawing Guide📱 On a phone? Tap a download button, then open the file and choose Share → Save to Files or Print. On a computer, the PDF opens or saves straight to your Downloads folder.
Save the Spotted Giant for Later
More Sea Creatures to Draw After This One
Every link below is a full step-by-step tutorial with a picture for each stage.
- Shark Drawing: A smiling great white with a tall dorsal fin and a crescent tail grows from one long oval in this shark drawing step by step lesson.
- Whale Drawing: Draw a friendly blue whale with a curving tail and a splashy spout in this how to draw a whale tutorial.
- Fish Drawing: A plump goldfish with a flowing fan tail and rows of scallop scales makes a quick warm-up in this fish drawing step by step guide.
- Turtle Drawing: A smiling sea turtle with a hexagon shell and spotted flippers paddles along in this turtle drawing tutorial.
- Octopus Drawing: Eight curling arms come together one line at a time in this how to draw an octopus lesson.
Whale Shark Drawing Questions, Answered
Is a whale shark a whale or a shark?
It's a shark, and the largest fish in the world. It got the name because it's as big as some whales and eats tiny food like plankton the way many whales do.
What is the easiest way to draw a whale shark?
Start with one long oval, add a wide flat head with the mouth at the front, then fins and an upright tail. The spots and stripes come last.
How do you draw whale shark spots?
Draw the stripes and side ridges first so they make little boxes, then put one or two round spots in each box and smaller dots on the head.
What colors is a whale shark?
Dark blue gray on the back and fins, a light gray or white belly, and white spots and stripes on top. A pink mouth and black eye finish it.
That long oval is all it takes to begin, so find a quiet corner and let your own spotted giant swim across the page. 🦈✏️
Related posts:
 How to Draw a Whale Step by Step (Easy for Beginners)
 How to Draw a Shark Step by Step (Easy for Beginners)
 How to Draw a Tooth Step by Step (Cute and Easy for Kids)
 How to Draw Wonder Woman Step by Step (Chibi for Kids)
 How to Draw Iron Man Step by Step (Easy Chibi for Kids)
 How to Draw a Police Car Step by Step (Easy for Kids)
 How to Draw a Care Bear Step by Step (Cute Fan Art for Kids)
 How to Draw Hello Kitty Step by Step (Easy for Kids)
 How to Draw a Valentine Step by Step (Easy Card Set for Kids)
 How to Draw a Vampire Step by Step (Easy and Friendly for Kids)
 How to Draw a Bat Step by Step (Cute Cartoon Bat for Kids)
 How to Draw a Rainbow Step by Step (Easy for Kids and Beginners)

