
SpongeBob is basically a box with a face, and that makes him one of the friendliest cartoon characters to start with. The wavy edges and the holes do most of the work, so you never need a perfect straight line. In this lesson you'll learn how to draw spongebob step by step, starting from a light rectangle and ending with the full grin, tie, square pants and striped socks. It's my own simple fan-art version for practice, not official Nickelodeon artwork, so change anything you like.
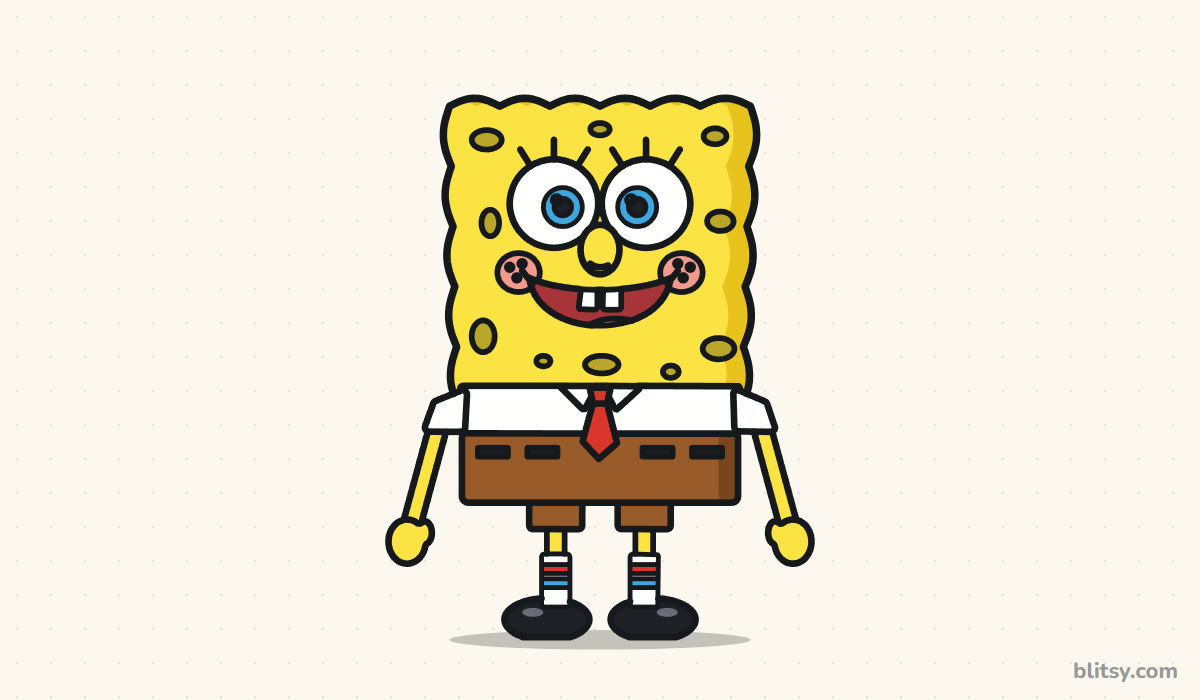
Every picture adds something new in blue, and that's the only part to copy. Gray means you drew it in an earlier step. The faint pale lines are helpers you erase near the end.
Quick overview
⏱️ Time: about 30 minutes, coloring included
🎯 Level: easy, good for kids from about 6 up
✏️ Steps: 12
🧽 You'll draw: SpongeBob standing and smiling, from his wavy top to his shiny shoes
Supplies for a Square Yellow Sponge
- A pencil you can press gently (HB works well)
- A soft eraser for the guide lines
- A black marker or fineliner for the final outline
- Crayons or colored pencils: yellow, olive green, brown, red, light blue, pink, plus black
- A sheet of plain white paper, turned upright
A ruler helps with the first box, but a wobbly freehand box is fine because the edges turn wavy anyway.
How to Draw SpongeBob Step by Step
Step 1: Draw a tall box and guide lines
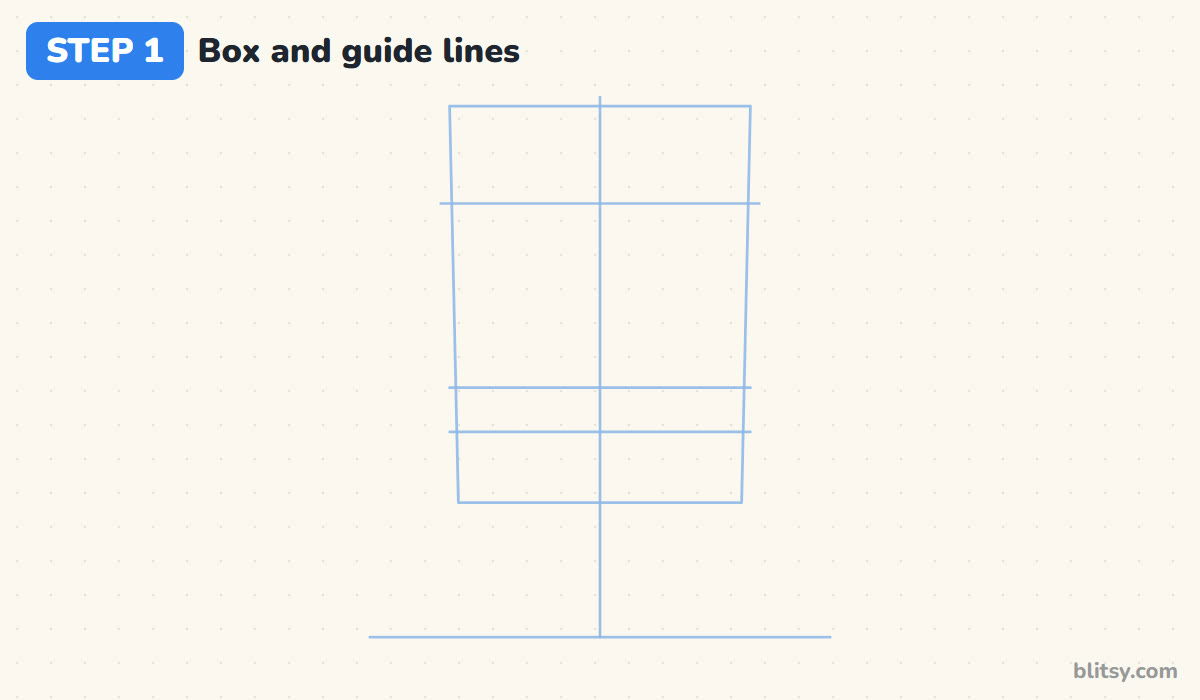
Draw a light ground line near the bottom of the page and a center line straight up from it. Above the ground, leaving room for the legs, draw a tall box that's a little narrower at the bottom. Add one line across the upper part for the eyes and two lines near the bottom: the shirt starts at the first, the pants at the second.
💡 Tip: Keep the box a touch taller than it is wide. A perfect square makes him look squashed.
Step 2: Add guides for eyes and limbs
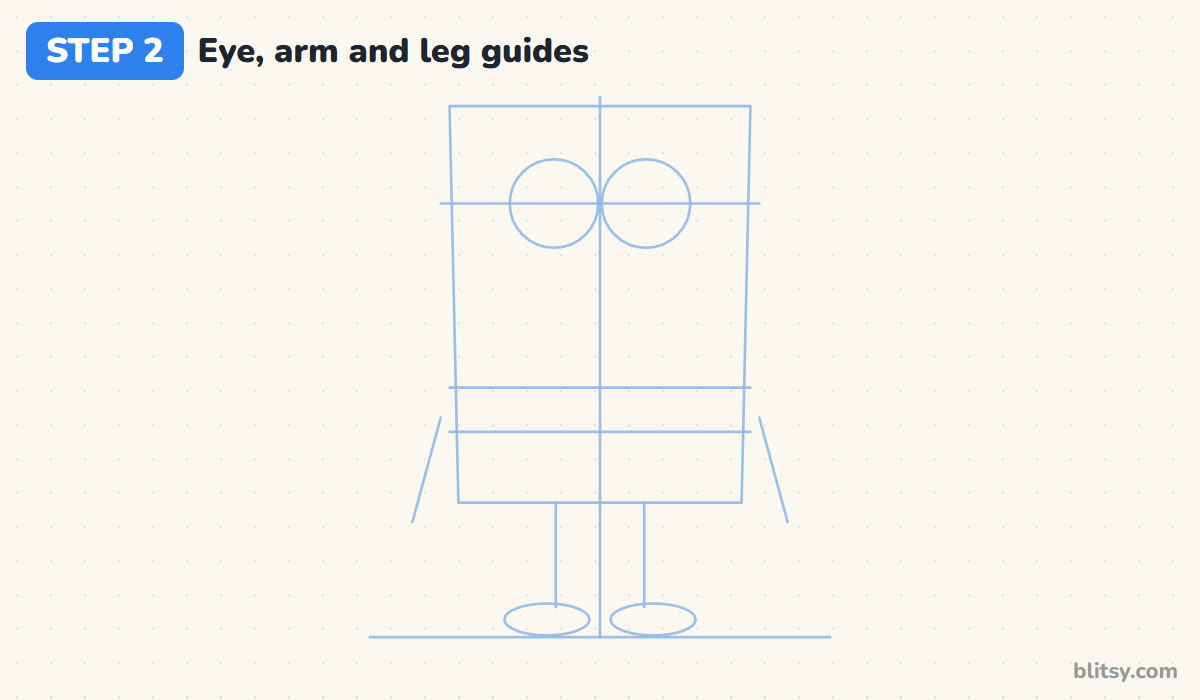
Put two circles side by side on the eye line, touching at the center line. Together they take up more than half the width of the box. Then sketch a slanted line down from each side for the arms, two straight leg lines below the box, and a flat oval at the bottom of each leg for the shoes.
💡 Tip: If the eye circles feel too large, they're probably right. Small eyes are the most common reason a SpongeBob looks off.
Step 3: Make the wavy sponge body
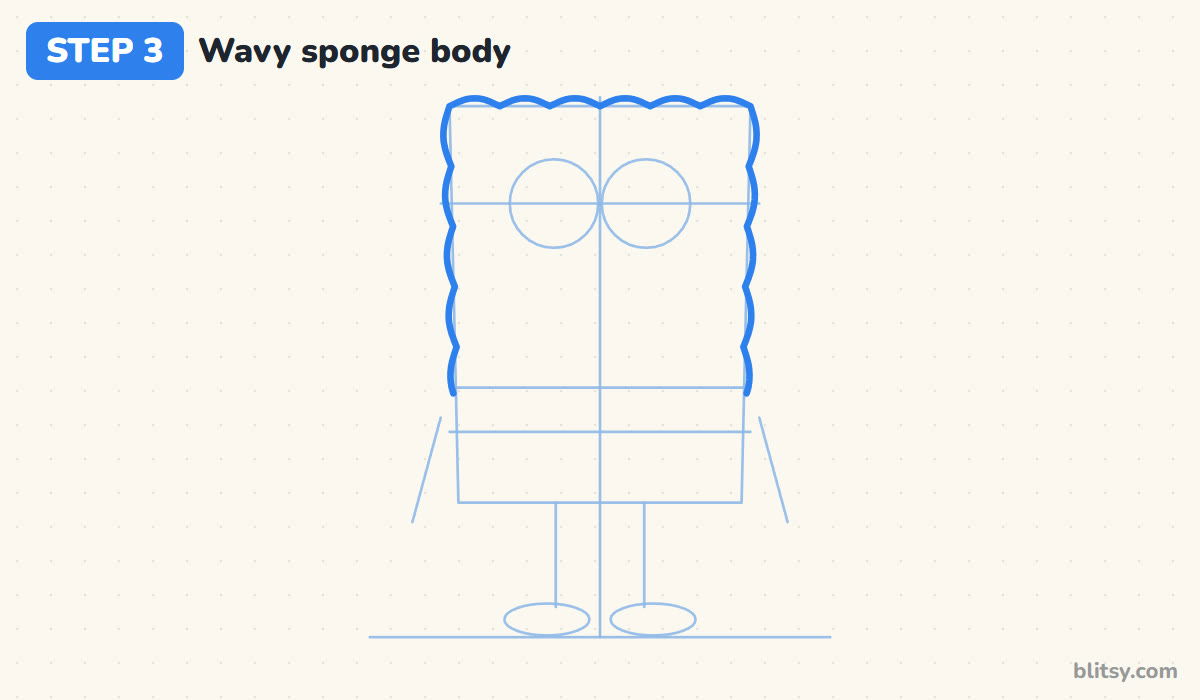
Now trace over the top part of the box, but turn every edge into a row of soft bumps, like a cloud with flat sides. Six bumps across the top and five down each side look about right. Stop the outline at the shirt line, since the shirt covers the bottom edge.
💡 Tip: Make the bumps small and even. Deep, pointy waves turn the sponge into a bush.




Step 4: Draw big eyes and a round nose
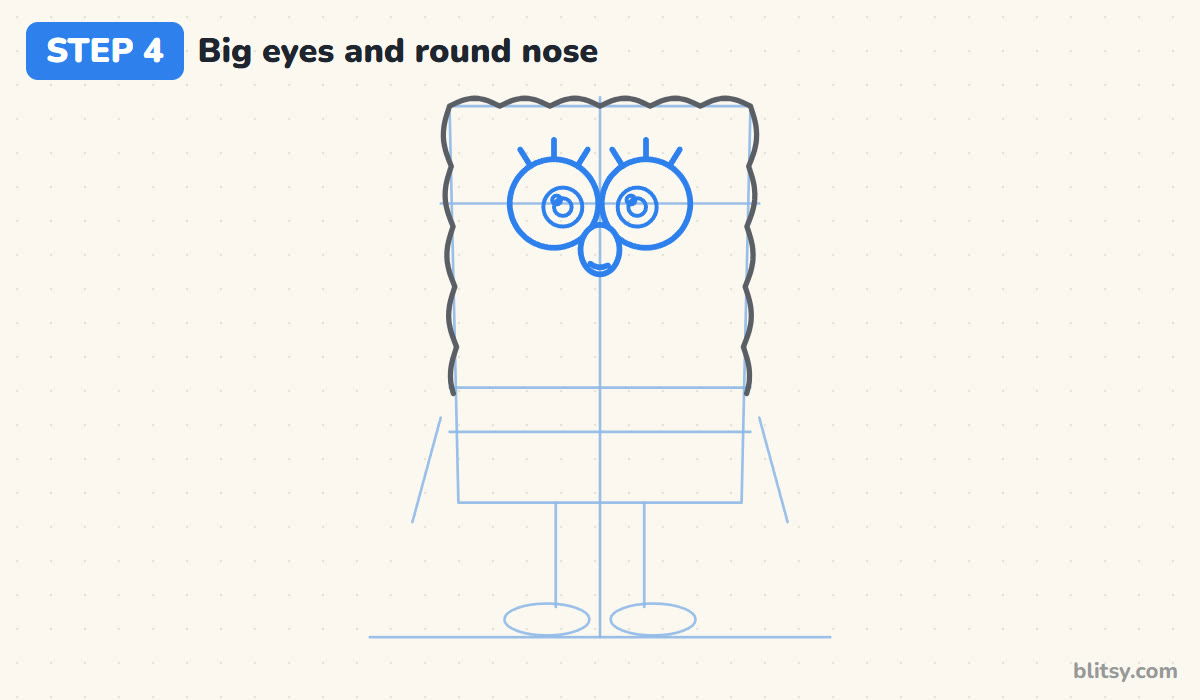
Go over the two eye circles with a firmer line. Inside each, draw a round iris leaning slightly toward the middle, a small pupil and a tiny shine circle. Three short lashes fan out from the top. Between the eyes and a bit lower, draw an oval nose that overlaps both eyes.
💡 Tip: I draw the nose right after the eyes because it sits in front of them. Erase the bits of eye circle hidden behind it.
Step 5: Add the wide buck-tooth smile
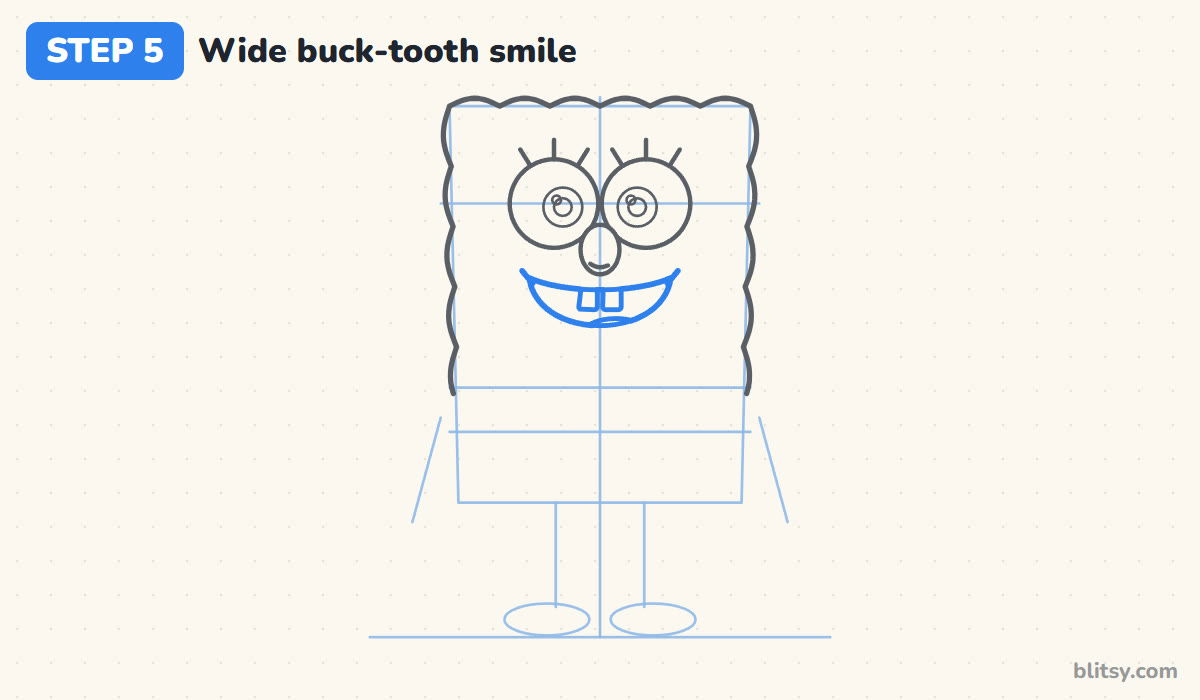
Under the nose, draw a wide smile: a gentle curve on top and a much deeper, rounder curve below. It should stretch almost as wide as the two eyes. Two small rectangles hang from the middle of the top line for the famous buck teeth, and a soft curve near the bottom marks the tongue.
💡 Tip: Give the corners of the mouth a tiny upward flick. It pushes the grin into the cheeks.
Step 6: Draw rosy cheeks and sponge holes
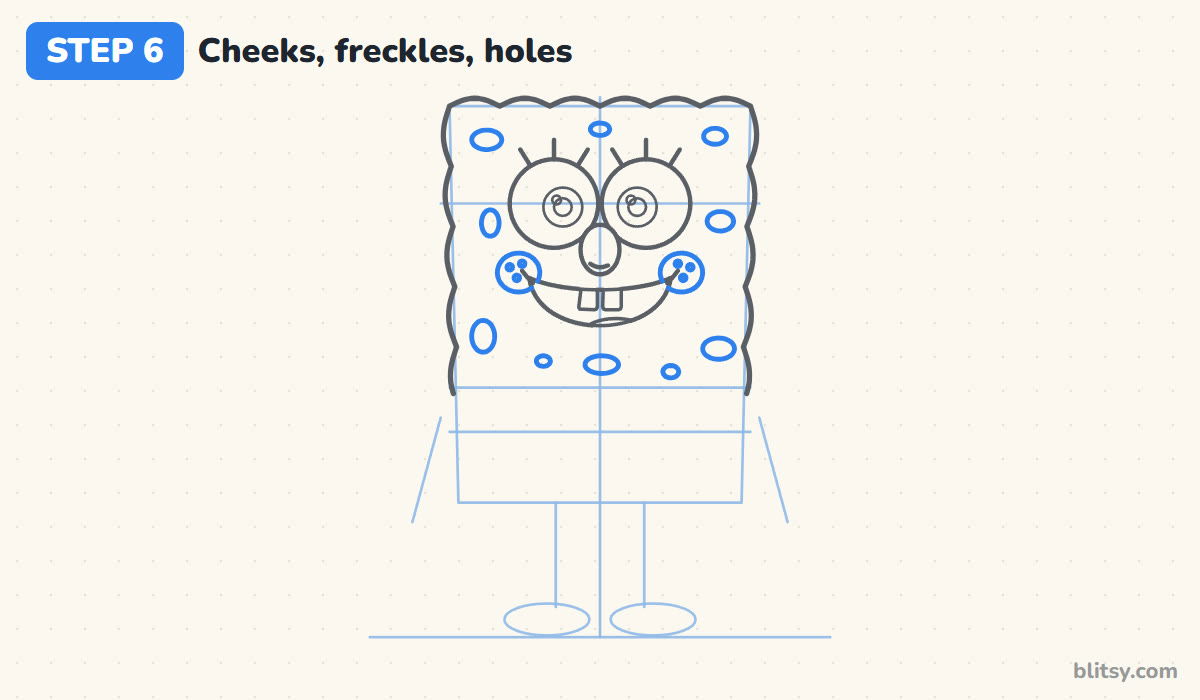
At each end of the smile, draw a round cheek with three little freckle dots. Then scatter sponge holes over the body, mostly near the corners and the sides, with a few below the mouth. Mix big and small ones and tilt some of them.
💡 Tip: Keep the holes away from the eyes and mouth. The face needs clear space around it to stay easy to read.
Step 7: Draw the shirt band and red tie
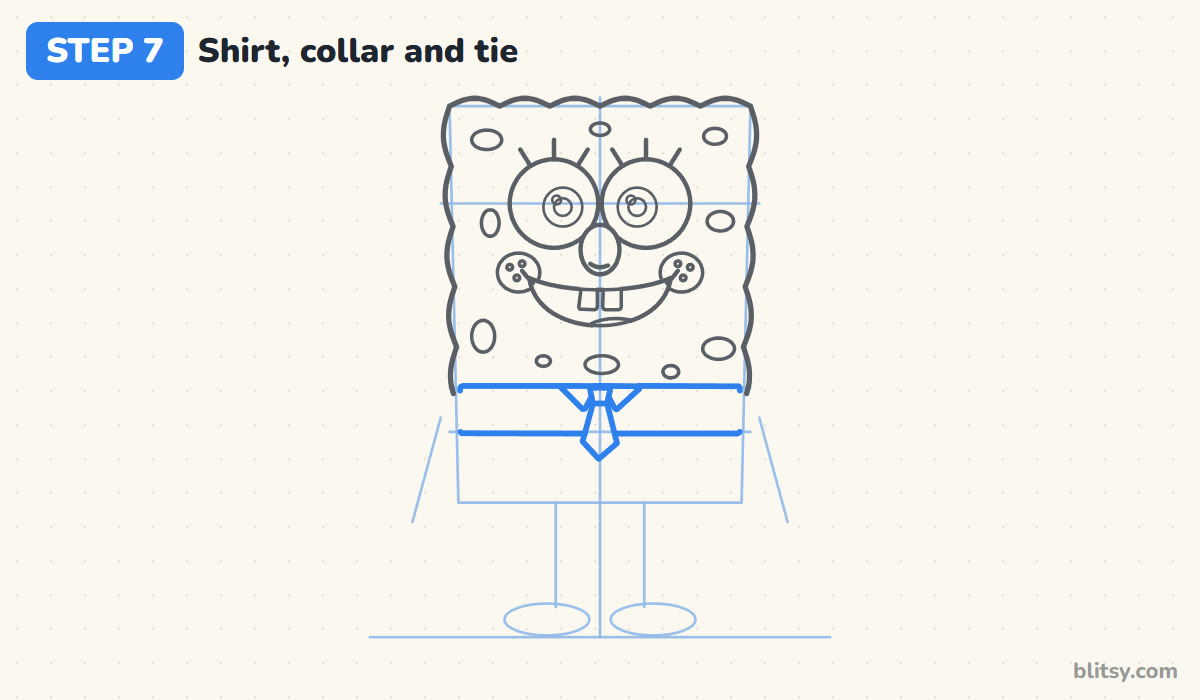
Between the shirt line and the pants line, draw a band across the body for the white shirt. In the middle, add two small triangle collar points. Under them comes a little knot and a narrow tie that hangs down past the shirt and ends in a point.
💡 Tip: Keep the tie short and skinny. That small tie on a big body is part of what makes him funny.


Step 8: Add square pants and a belt
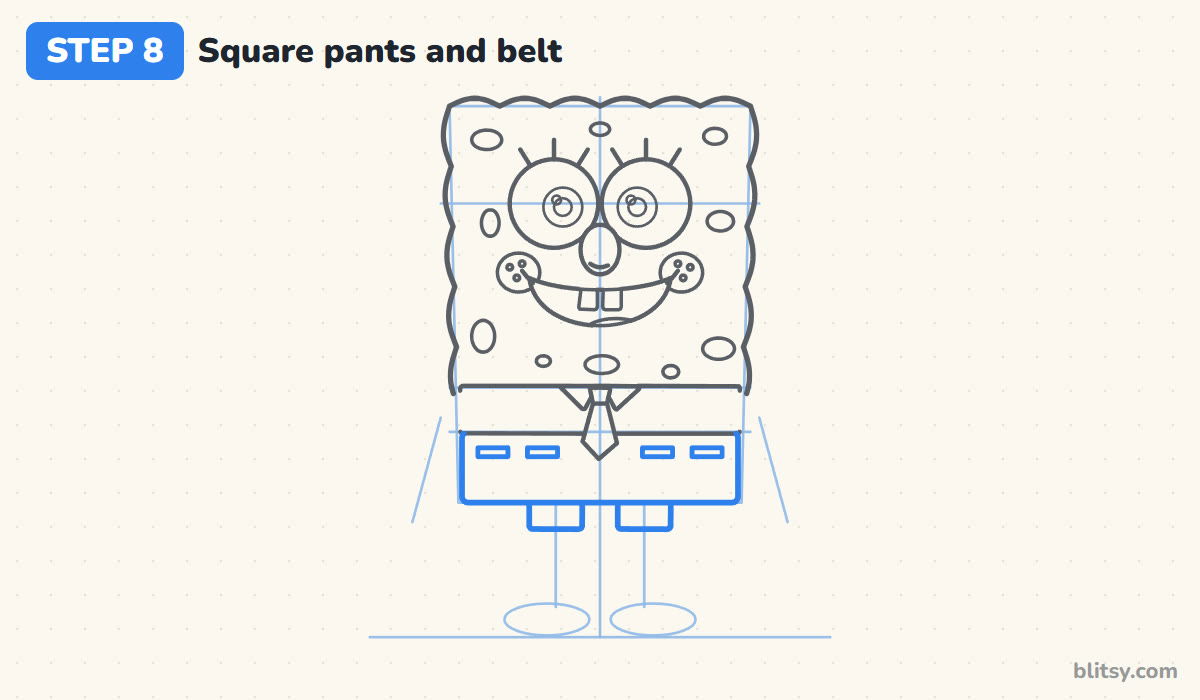
Below the shirt, draw the pants as a wide box with slightly rounded bottom corners. Inside the top edge, add four short belt dashes, two on each side of the tie. Under the pants, draw two short pant legs around the leg guides.
💡 Tip: Make the pants about as tall as the shirt band plus a little more. Taller pants make his body look stretched.
Step 9: Draw sleeves and mitten hands
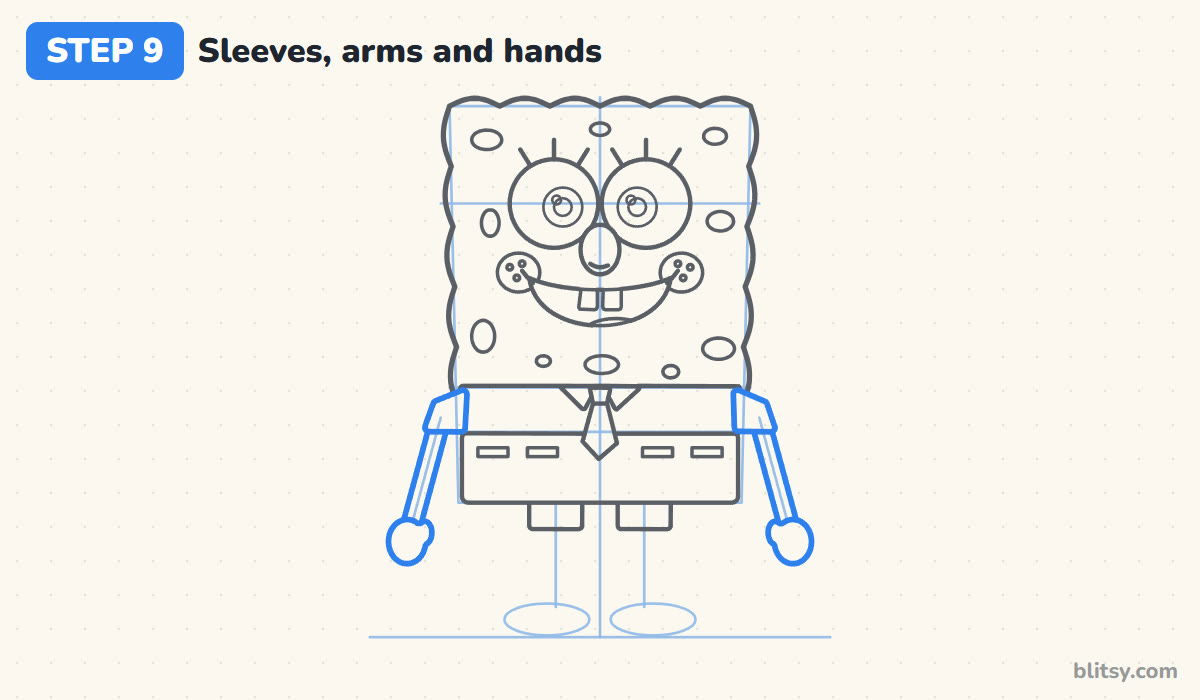
From each end of the shirt band, draw a short white sleeve that flares out. Thin arms come out of the sleeves and follow the slanted guides, but give each one two lines so it has a little width. Finish with round mitten hands and a small thumb bump pointing toward the body.
💡 Tip: SpongeBob's arms are skinny, not sticks. Leave a gap about the width of a pencil between the two lines.
Step 10: Add thin legs and striped socks
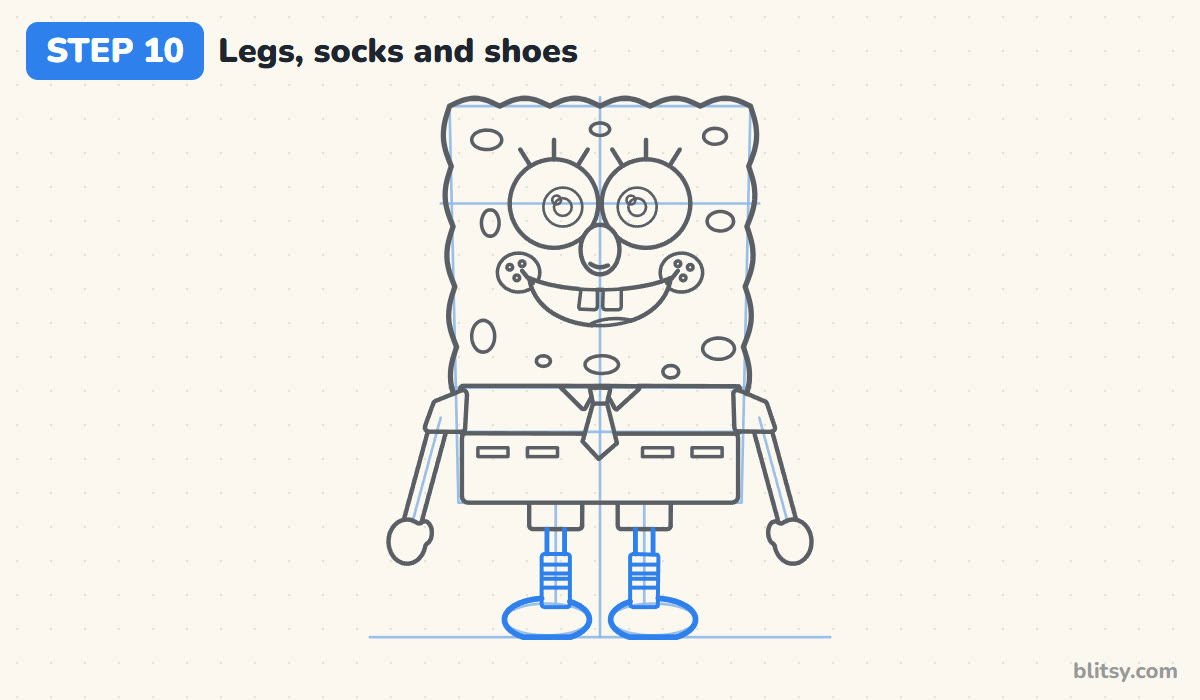
Draw two thin legs under the pant legs, then a tall sock over the lower half of each leg. Two lines across each sock mark the stripes. The shoes are round and shiny: trace the guide ovals as wide rounded shapes that sit flat on the ground line.
💡 Tip: Draw the shoes much wider than the legs. Big shoes on skinny legs give him that bouncy cartoon look.
Step 11: Ink the outline and erase the guides
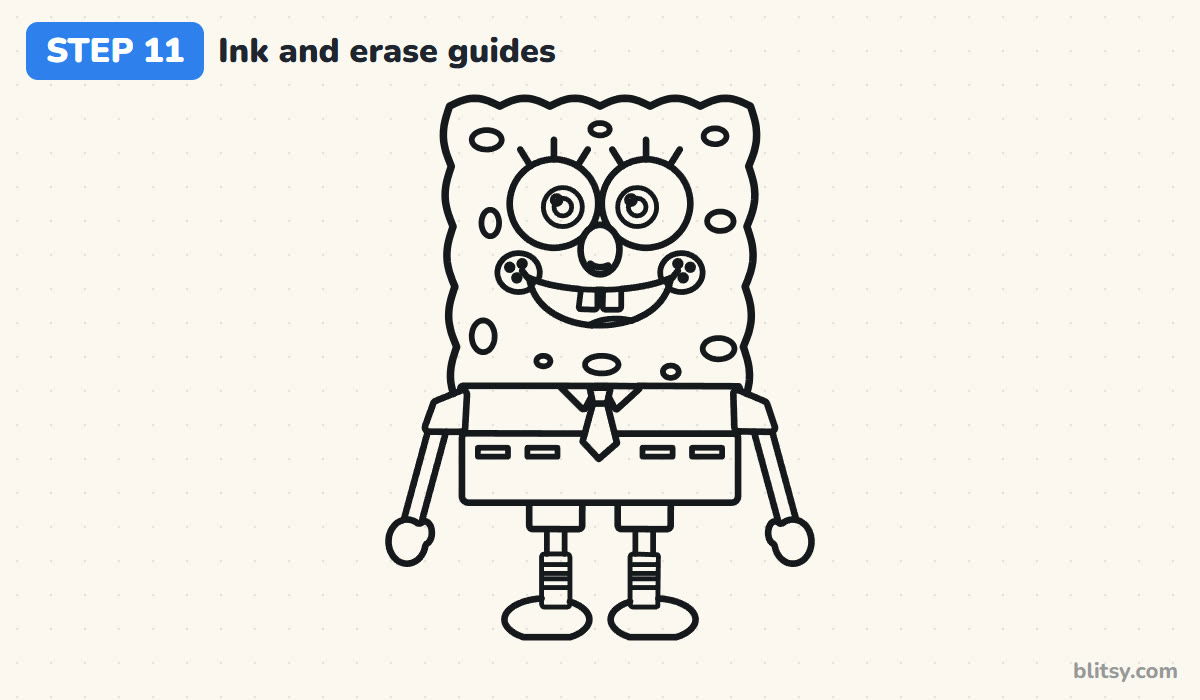
Trace every keeper line with your marker. I start with the eyes and the smile, because those decide the whole expression, then the body, the clothes and the legs. Wait a minute for the ink to dry before you erase the box, the center line and the other light guides.
💡 Tip: Don't ink the center line or the eye line. They were only helpers, and inked guides are hard to hide.


Step 12: Color SpongeBob
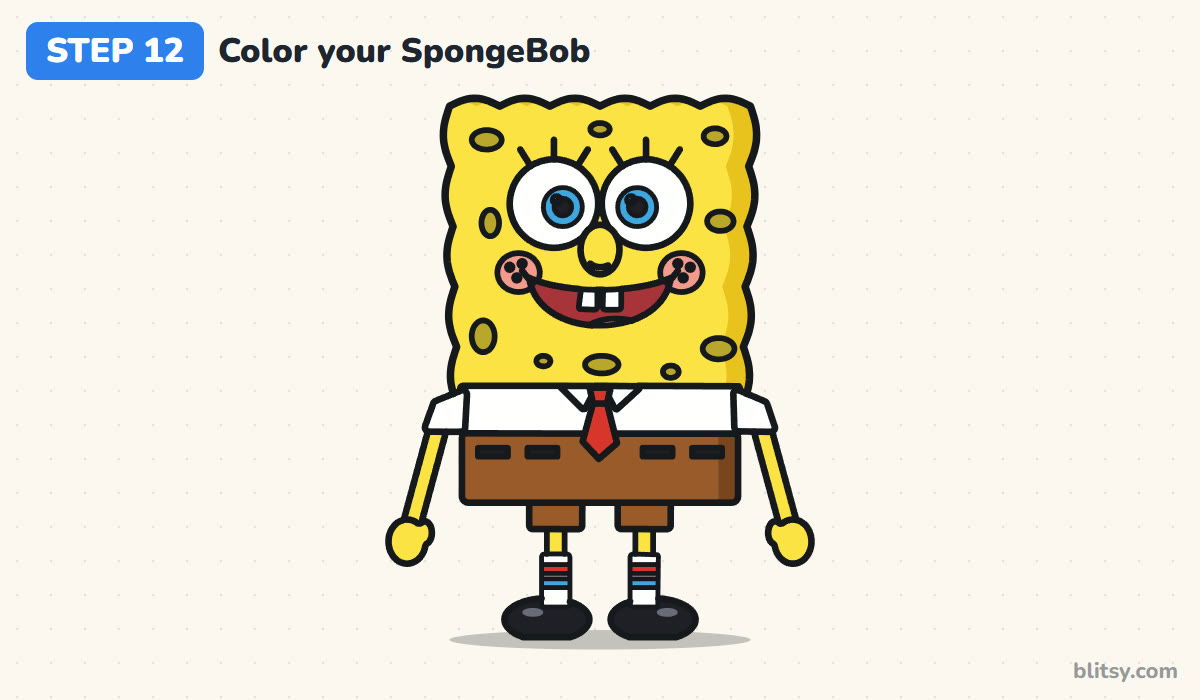
Bright yellow goes on the sponge plus the arms and legs, with olive green in the holes. The irises are light blue, the cheeks pink, the mouth dark red with a pink tongue. The shirt, teeth and socks stay white. Make the tie red, the pants brown with black belt dashes, the shoes black, and color one sock stripe red and the other light blue.
💡 Tip: Add a little darker yellow down the right side of the sponge. It gives the flat box some thickness.
Where SpongeBob Drawings Slip Up
- A body that's too square or too short. He reads more like a cracker. Make the box a bit taller than wide and slightly narrower at the bottom.
- Eyes that are too small. Little eyes make him look sleepy and strange. Let the two circles touch in the middle and fill over half the width.
- Sharp, zig-zag edges. Pointy waves look like a saw or a bush. Use small, round bumps all along the outline.
- Holes all over the face. Spots near the eyes and mouth get confusing. Keep them near the edges and below the smile.
- Stick arms and legs. Single lines look stiff on a cartoon. Draw both sides of each limb, even if they're close together.
Giving Your SpongeBob a New Look
Once the basic pose works, put a spatula in one hand or a bubble floating up from his mouth. Lower the brows for a surprised face, or close one eye for a wink. Younger kids can skip the freckles and sock stripes and he still reads clearly. For another famous yellow cartoon character drawn from simple shapes, try my Bart Simpson drawing step by step lesson next. The Peppa Pig drawing tutorial suits small kids, and the Mario drawing guide is a nice step up.
Free SpongeBob Coloring Page and Step Guide PDF
The free SpongeBob coloring page has a colored example and a color key at the top, with a big clean outline below for your own crayons. The step-by-step PDF guide puts all 12 steps with pictures and tips on paper, so you can draw away from the screen. Both print fine on Letter or A4.
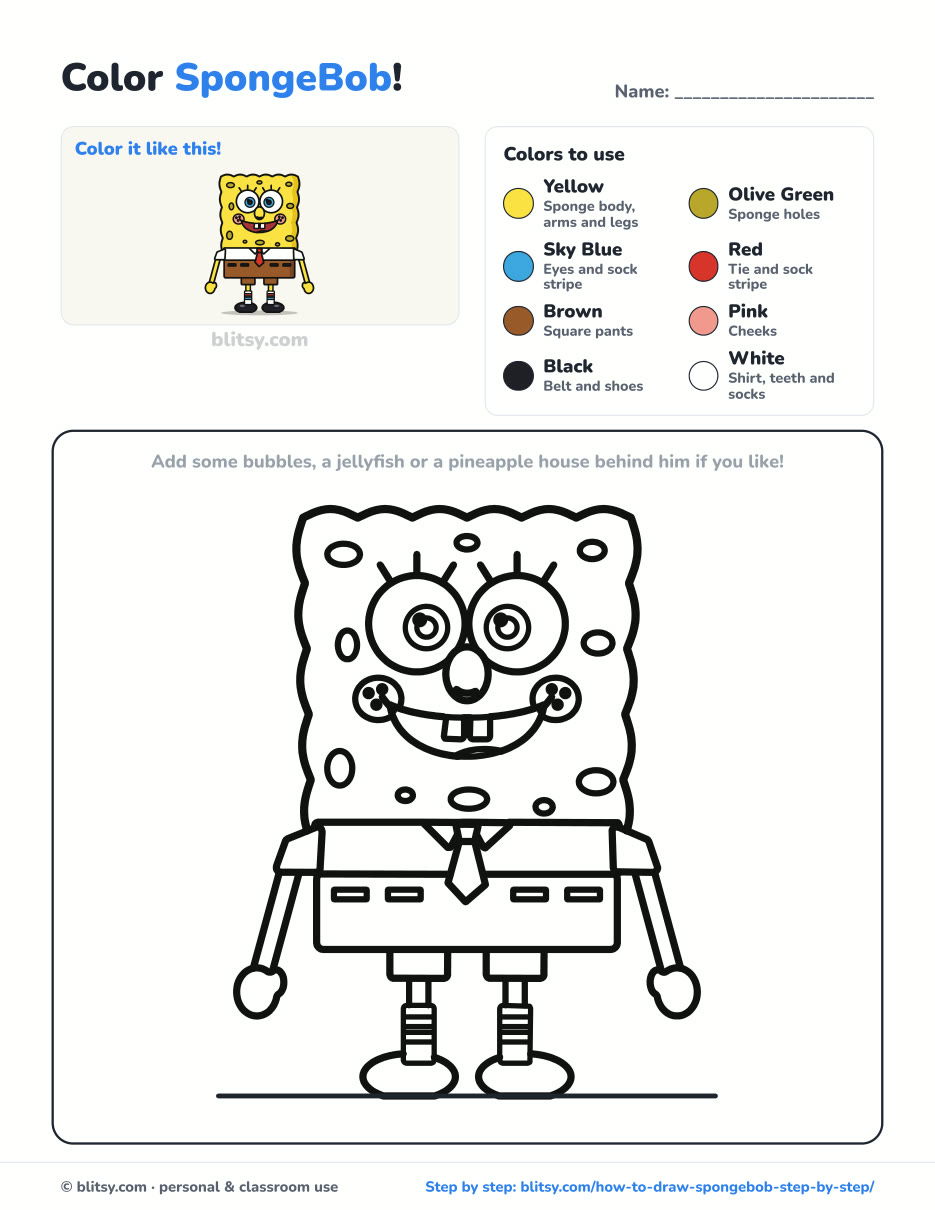
Black outlines with a colored example and the color names at the top. Ready to print and color.
⬇️ Download Coloring PageEvery step picture with its instructions and tips, to keep beside your paper while you draw.
⬇️ Download Drawing Guide📱 On a phone? Tap a download button, then open the file and choose Share → Save to Files or Print. On a computer, the PDF opens or saves straight to your Downloads folder.
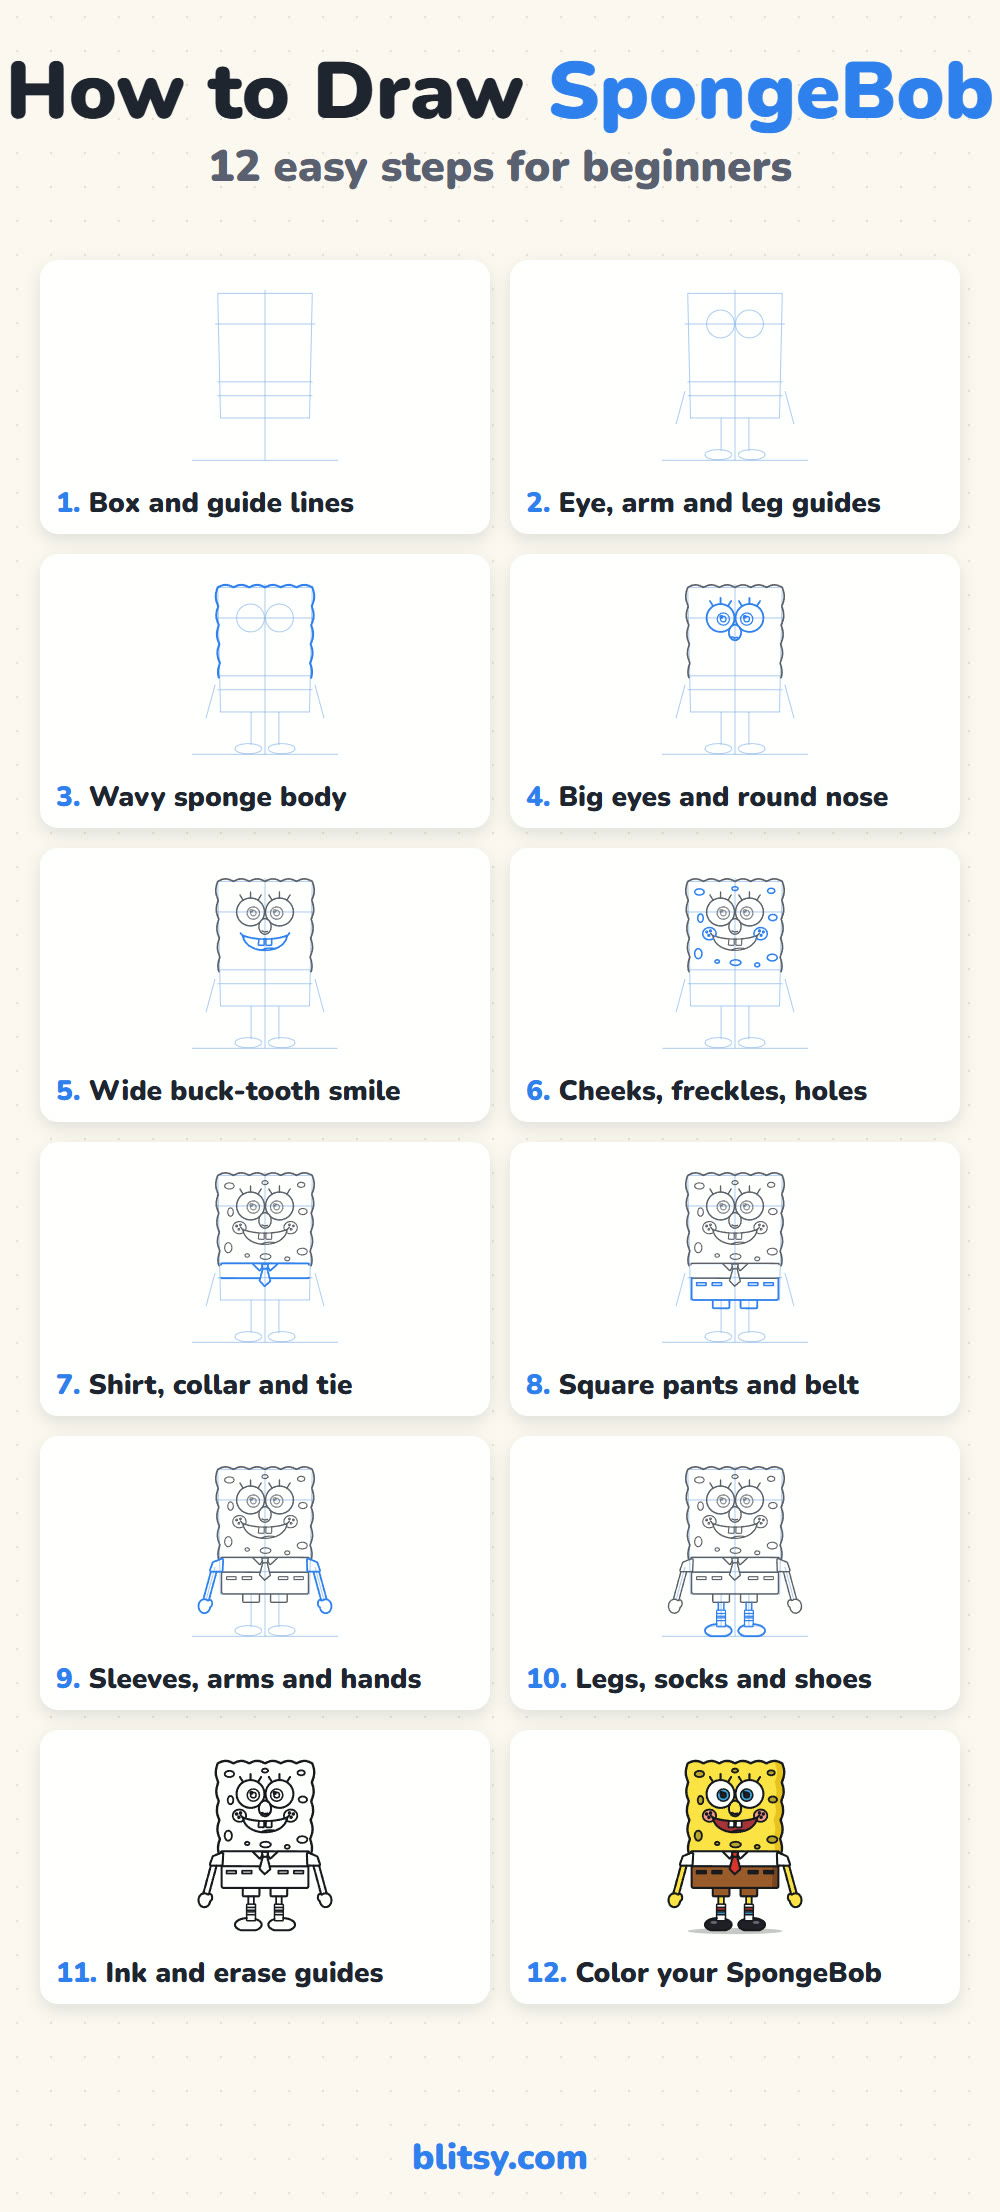
Every SpongeBob Step on One Tall Pin
More Cartoon Characters to Practice Next
Each lesson below is a full step-by-step tutorial with a picture for every stage, built on the same simple shapes you just used.
- Bart Simpson Drawing: A spiky-haired yellow cartoon kid in a red T-shirt, drawn from one tall box in this Bart Simpson drawing tutorial.
- Peppa Pig Drawing: Draw the famous little pig in her red dress from a few round shapes with this how to draw Peppa Pig step by step lesson.
- Mario Drawing: A waving hero with a red cap, a big mustache and blue overalls in this Mario drawing tutorial.
- Pikachu Drawing: Round cheeks, long ears and a lightning tail come together in this Pikachu drawing step by step guide.
- Hello Kitty Drawing: A wide oval head, a bow and a simple body make this Hello Kitty drawing tutorial great for little kids.
SpongeBob Drawing Questions From Young Artists
What is the easiest way to draw SpongeBob?
Start with a tall box and turn its edges into small waves. Add two big touching eyes, a round nose and a wide smile with two teeth, then a shirt band and brown pants at the bottom.
Is this SpongeBob drawing easy enough for kids?
Yes. Most of it is boxes and circles with a few curves, so children from about six can follow along. Younger kids can leave out the freckles and the sock stripes.
What colors do you need for SpongeBob?
Yellow for the sponge, olive green for the holes, light blue for the eyes, pink for the cheeks, white for the shirt and socks, red for the tie, brown for the pants and black for the belt and shoes.
How many holes does SpongeBob have?
There's no fixed number in a drawing. Eight to ten holes in different sizes look right, as long as you keep them away from the eyes and the mouth.
Grab the brightest yellow you own and give your sponge the widest grin under the sea. 🧽✏️
Related posts:
 How to Draw a Car Step by Step (Easy Drawing for Beginners)
 How to Draw a Whale Step by Step (Easy for Beginners)
 How to Draw an Arctic Fox Step by Step (Easy for Beginners)
 How to Draw a Shark Step by Step (Easy for Beginners)
 How to Draw a Chicken Step by Step (Easy for Beginners)
 How to Draw a Fish Step by Step (Easy Goldfish for Beginners)
 How to Draw a Snowman Step by Step (Easy for Beginners)
 How to Draw an Airplane Step by Step (Easy Jet for Beginners)
 How to Draw a Mouse Step by Step (Easy for Beginners)
 How to Draw a T-Rex Step by Step (Easy for Beginners)
 How to Draw a Pig Step by Step (Easy for Beginners)
 How to Draw a Minion Step by Step (Easy for Beginners)

