
Lizards look tricky because of all those little toes, yet the body itself is just one long wavy line with some thickness around it. Get that line right and everything else hangs off it. In this lesson I'll show you how to draw a lizard step by step, ending with a cheerful green gecko-style lizard strolling across a sunny rock. Kids and grown-up beginners can both follow along.
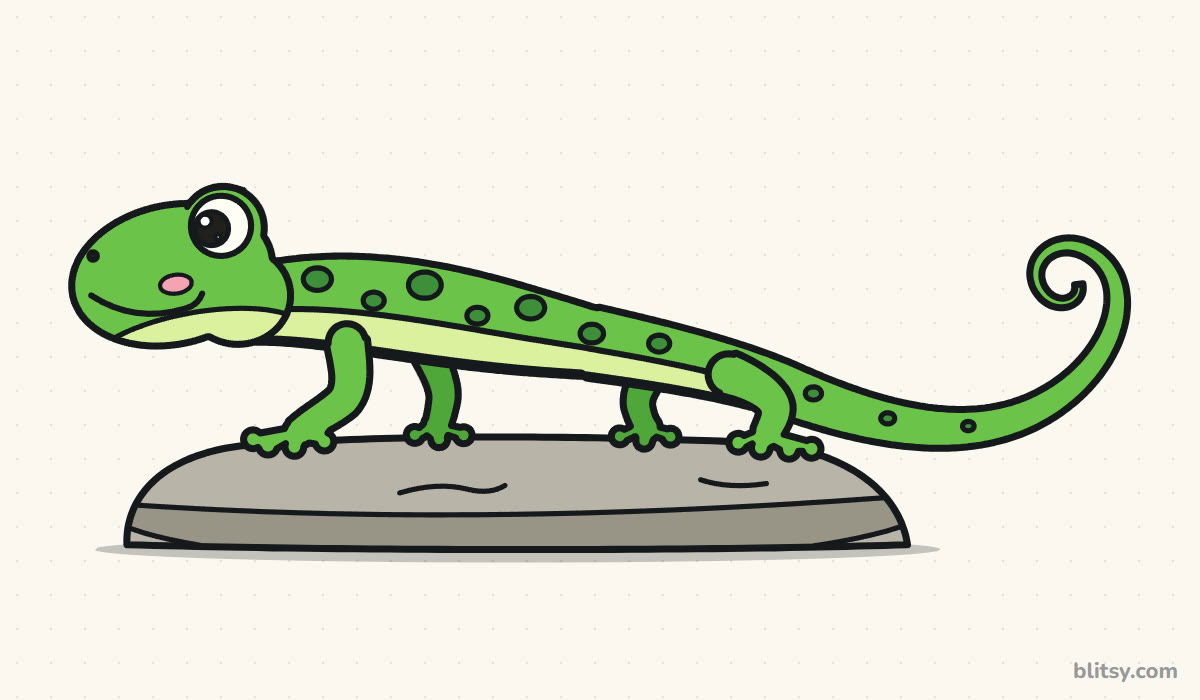
In every picture the fresh lines show up in blue and older ones fade to gray. Copy only the blue, compare, then go on.
Quick overview
⏱️ Time: around 30 minutes, coloring included
🎯 Level: easy, fine for kids aged 6 and up
✏️ Steps: 11
🦎 You'll draw: a side-view cartoon lizard on a rock
Supplies for a Sunny Lizard Sketch
- A regular pencil that you can press very lightly
- A soft eraser that doesn't smear
- A black marker or fineliner for inking
- Colored pencils, markers or crayons in two greens, pale yellow, gray and pink
- Plain white paper, turned sideways
The tail runs a long way to the right, so start your lizard's head close to the left edge of the paper.
How to Draw a Lizard Step by Step
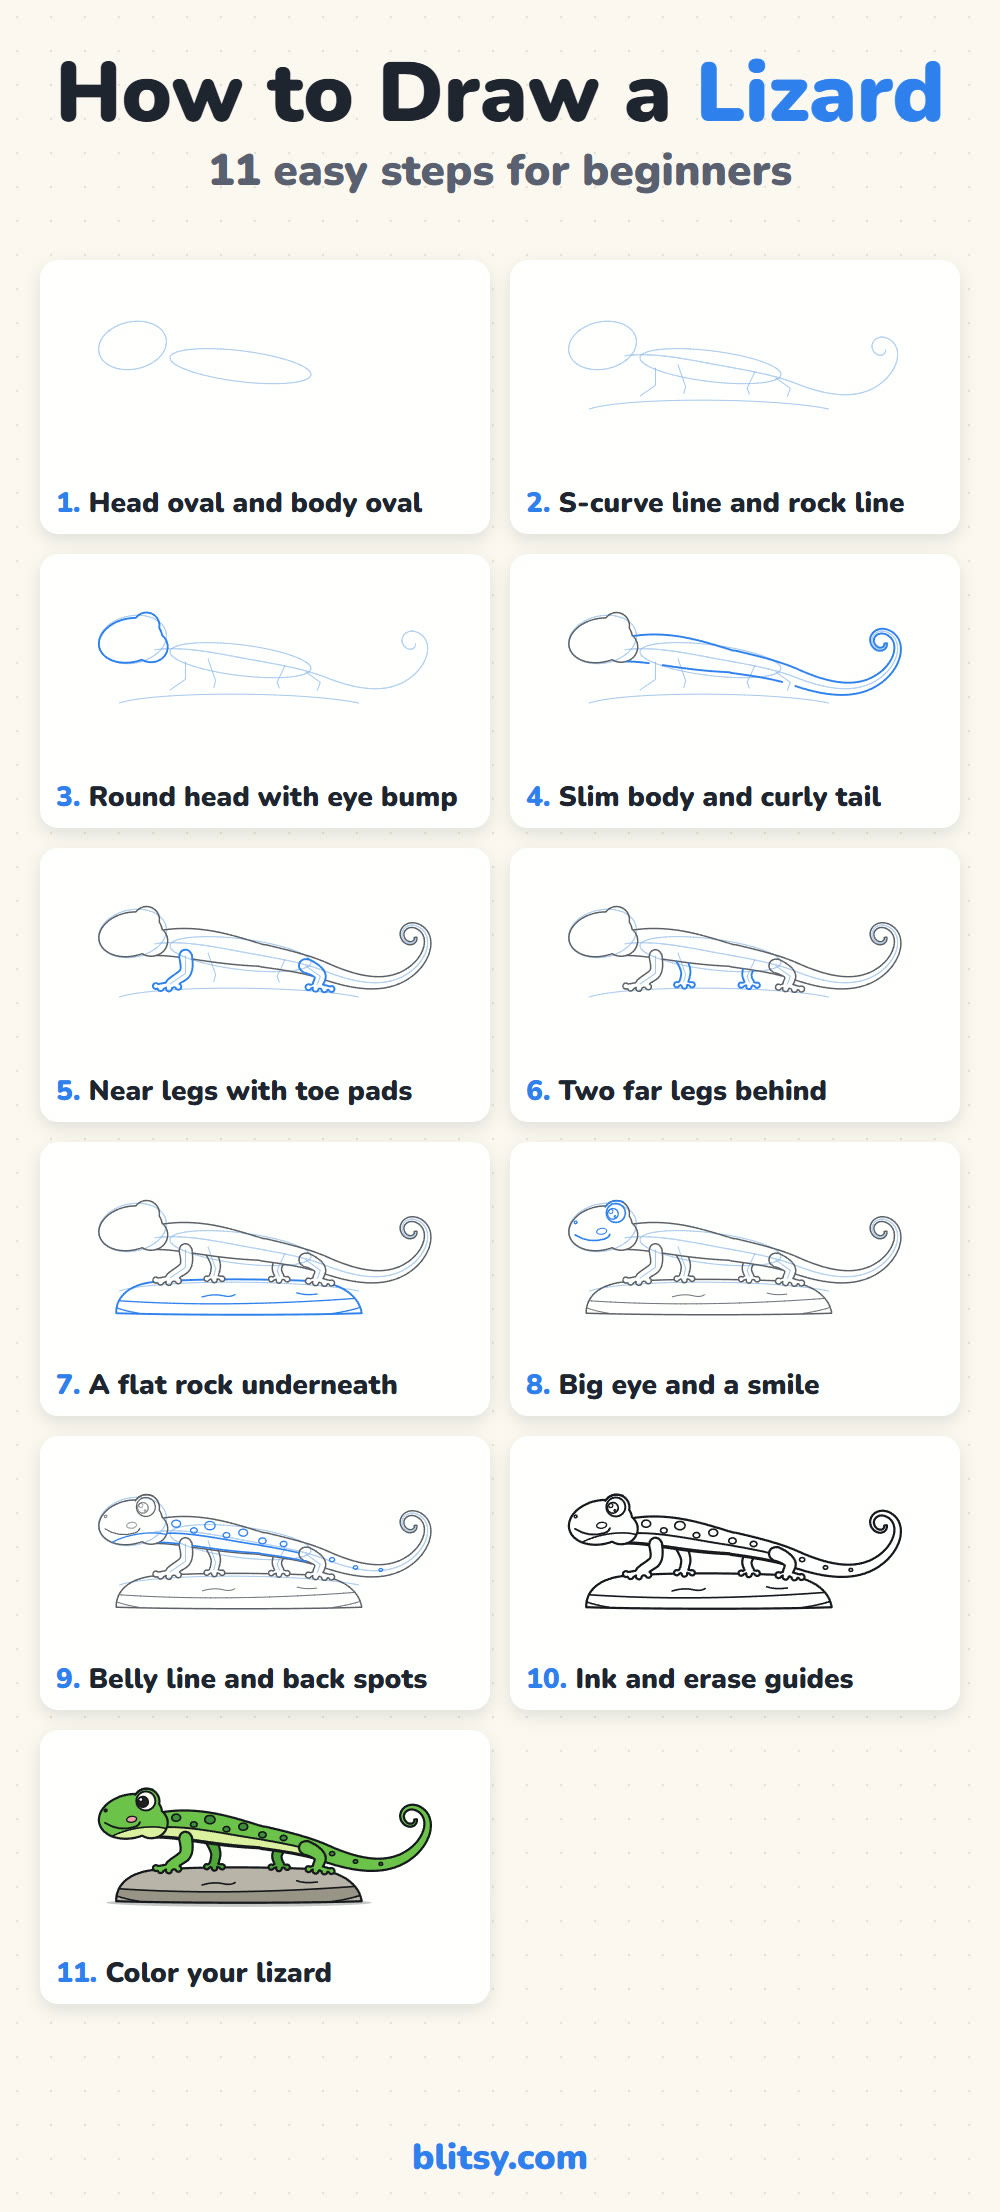
Step 1: Sketch a head oval and a long body oval
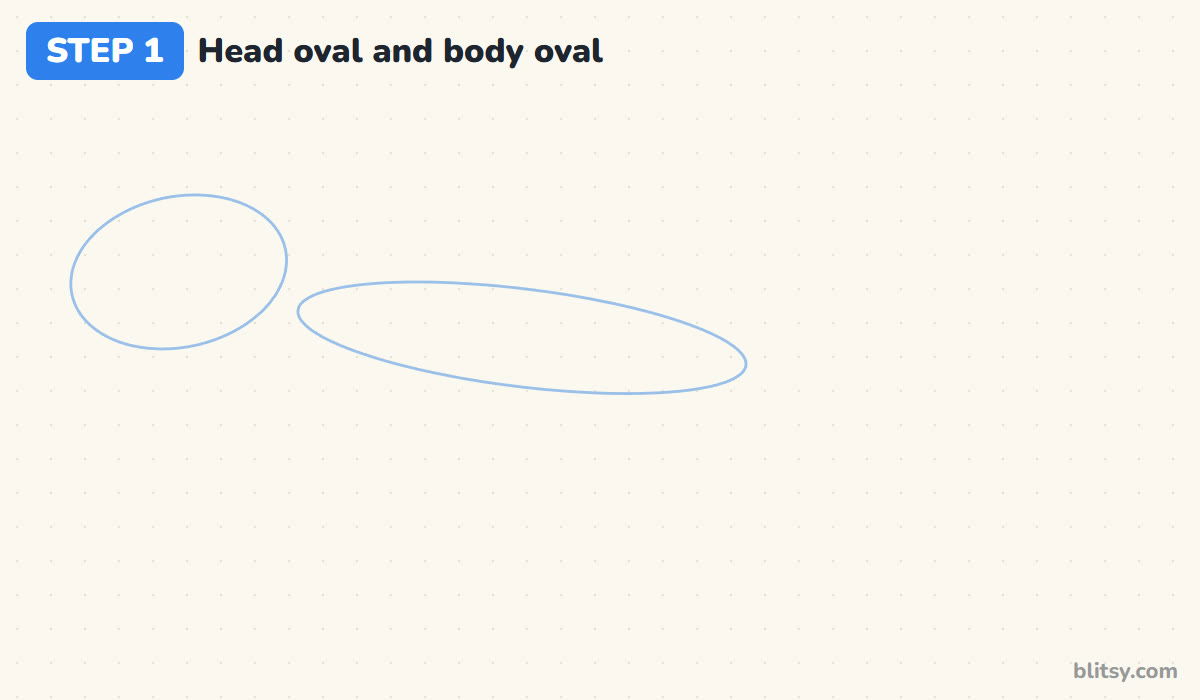
Near the left side of the page, draw a fat oval for the head, tilted so the front points slightly up. Right next to it, sketch a long, thin oval for the body, about twice as long as the head. The two shapes should just touch. Keep everything very light, because these are only helpers. When I teach this, I always remind people that the ovals vanish later.
💡 Tip: Your body oval should be skinny. A plump oval turns the lizard into a frog or a salamander.
Step 2: Add the S-curve, a rock line and leg lines
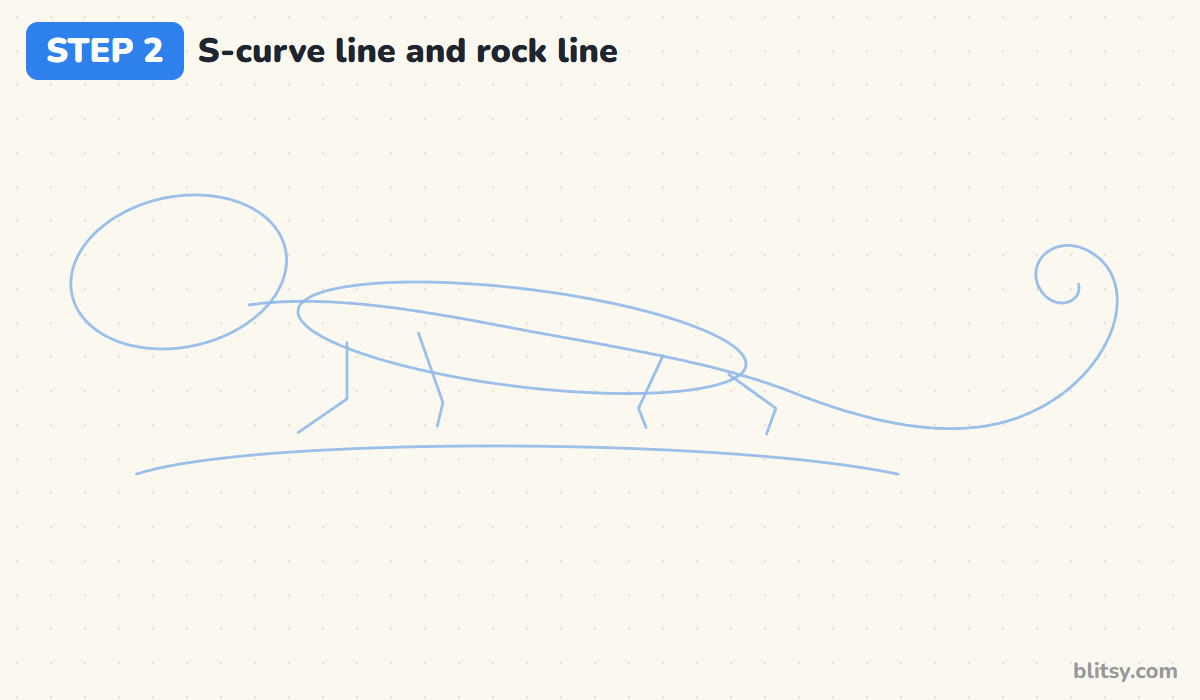
Draw one flowing line from the back of the head through the middle of the body oval, then let it dip down and swing back up into a little spiral on the right. That wave is the whole spine and tail. Under the body, add a long, gently curved line for the top of the rock, plus four short bent lines where the legs will stand.
💡 Tip: Draw the S-curve in one smooth sweep from your elbow, not your fingers. It wobbles less.
Step 3: Draw the round head with an eye bump
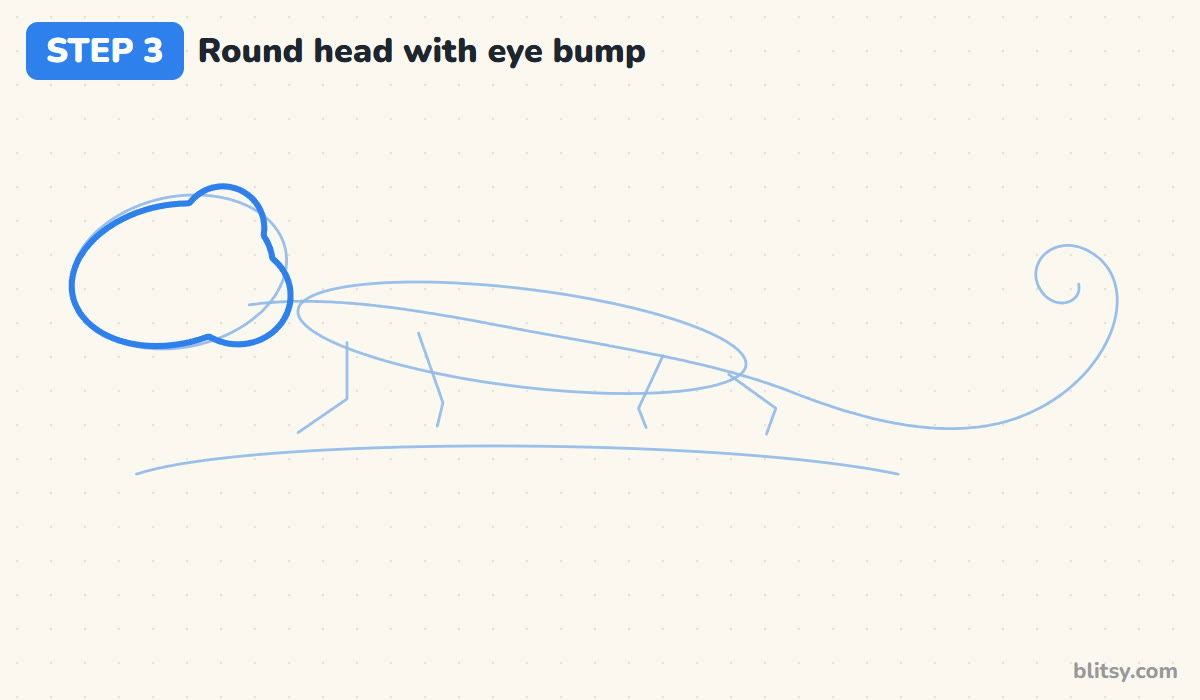
Trace around the head oval with a firmer line, rounding the snout at the front. On top, toward the back, add a round bump that pokes up above the head line. That's where the big eye sits. I make the bump fairly large on purpose, since cartoon lizards get most of their charm from that eye.
💡 Tip: Keep the snout blunt and round. A pointy snout starts to look like a crocodile.




Step 4: Outline the slim body and the curly tail
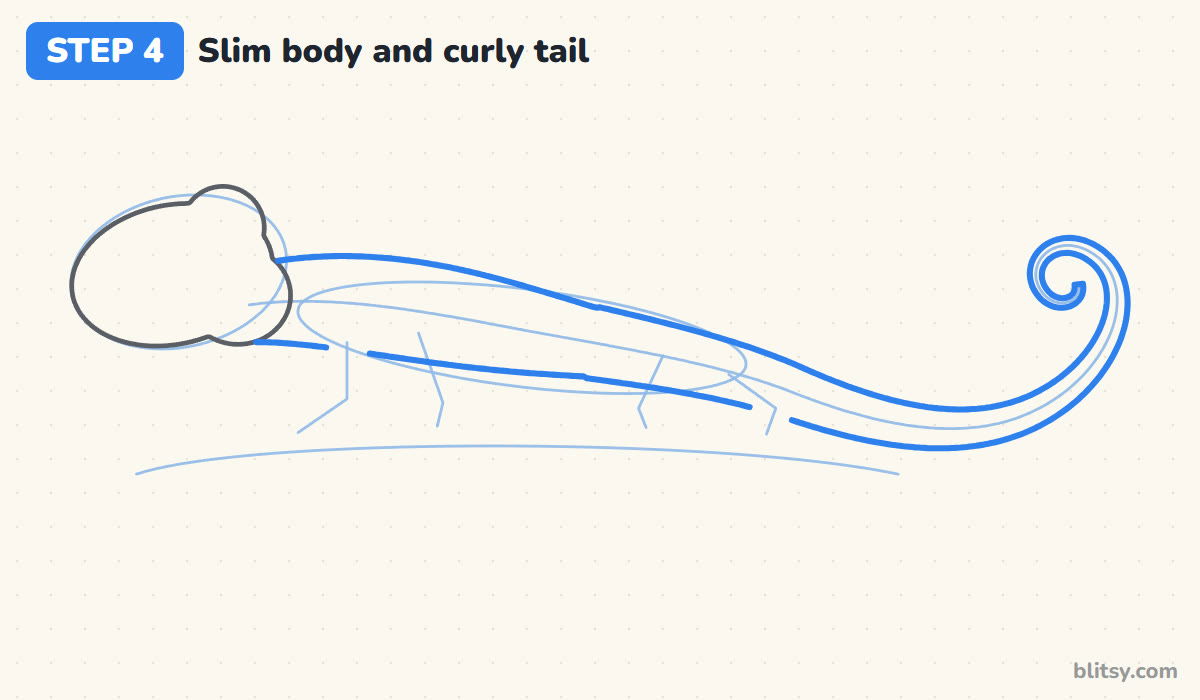
Draw a line along the top of the S-curve and another along the bottom, starting at the neck. Keep them close at the neck, widest in the middle of the body, then let them slowly come together along the tail until they meet at the tip of the spiral. Leave small gaps on the belly side where the two near legs will join.
💡 Tip: If the tail looks like a sausage, it isn't tapering enough. Squeeze the two lines a bit closer every few centimeters.
Step 5: Draw the two near legs with toe pads
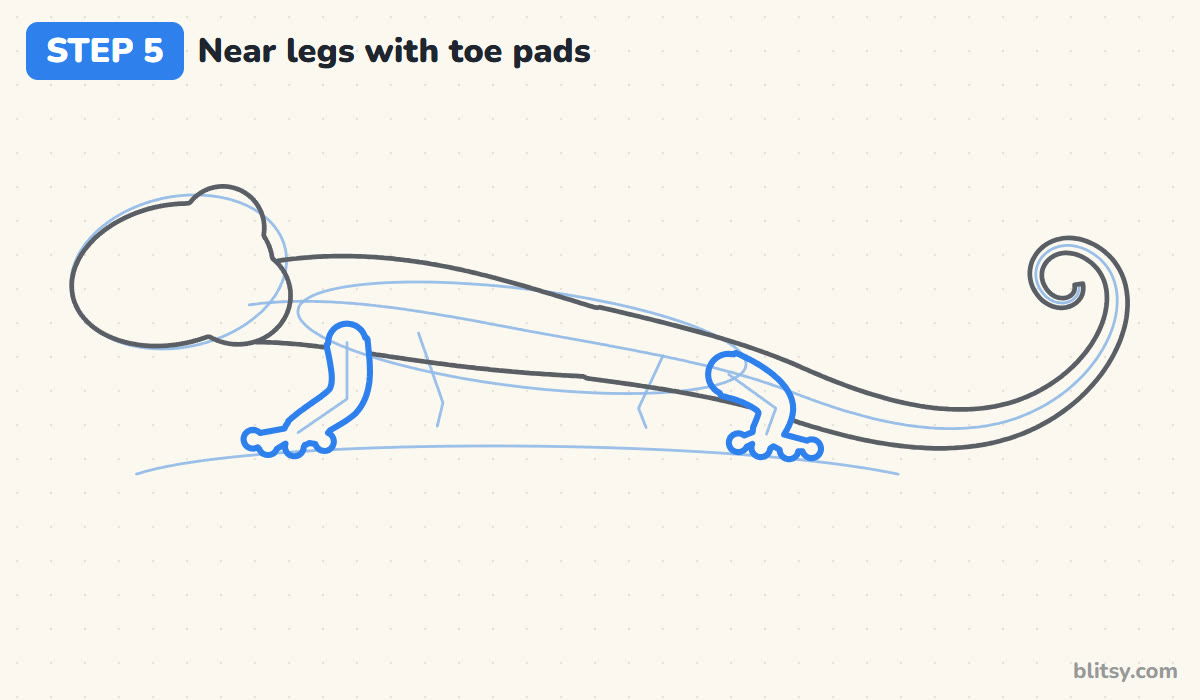
These legs are closest to you, so they overlap the body. The front leg comes down from the shoulder and bends at the elbow, and the back leg starts with a round thigh at the hip. At the bottom of each, fan out four short toes and give every toe a little round pad, like tiny balloons on sticks.
💡 Tip: I make the round toe pads a little bigger than feels natural, because they are what makes a gecko look like a gecko.
Step 6: Add the two far legs behind the body
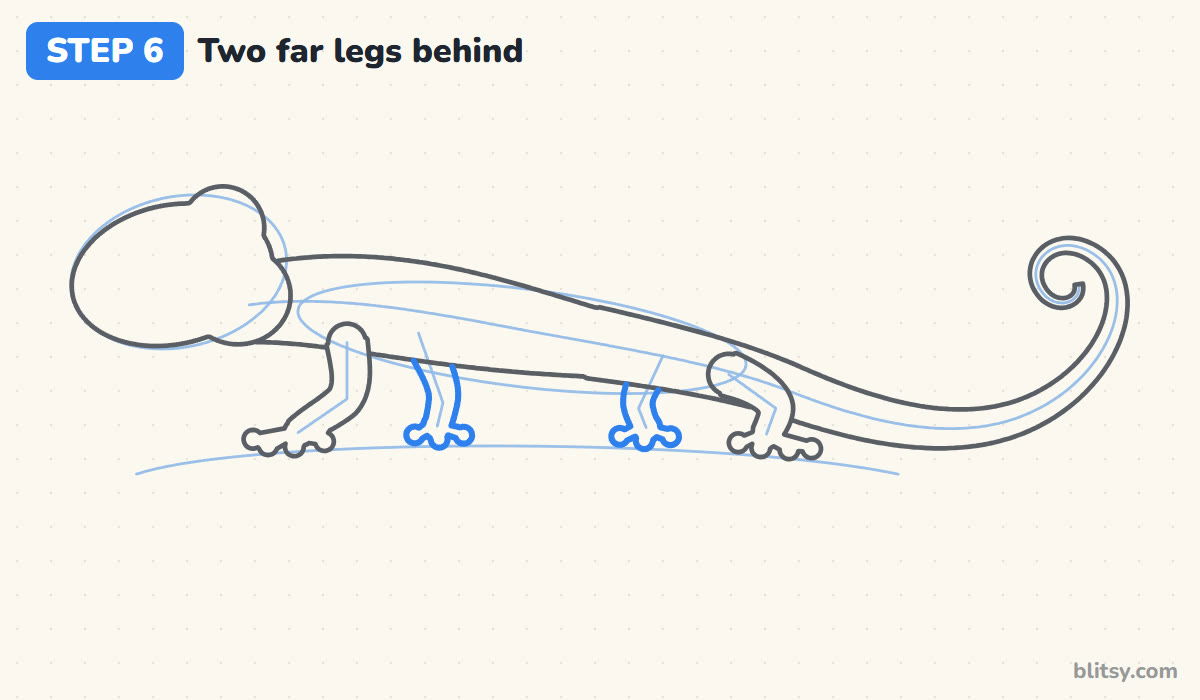
Between the near legs, draw two thinner legs that seem to come from behind the belly. Their tops disappear behind the body line, which is exactly what makes them look farther away. Give each one three toes with pads. Later they get a slightly darker green, and that helps the depth too.
💡 Tip: Stop each far leg at the belly line. Drawing it over the body flattens the whole lizard.
Step 7: Draw a flat rock underneath
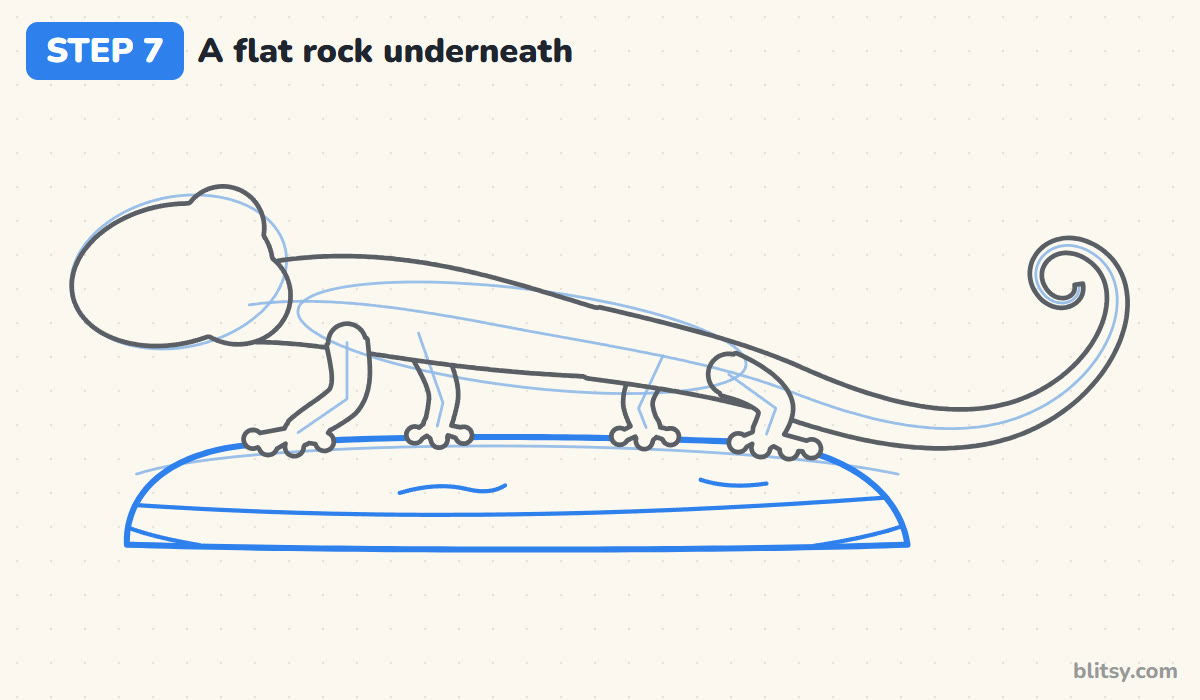
Follow the rock guide with a firm line that runs under every foot, then curve it down at both ends and close the bottom with a flat line. Add a second line near the bottom for the shaded side, plus two short wavy cracks on top. Your lizard now has somewhere warm to sunbathe.
💡 Tip: Make the rock wider than the lizard's body. A small rock makes him look like he's about to fall off.


Step 8: Add the big eye, nostril and smile
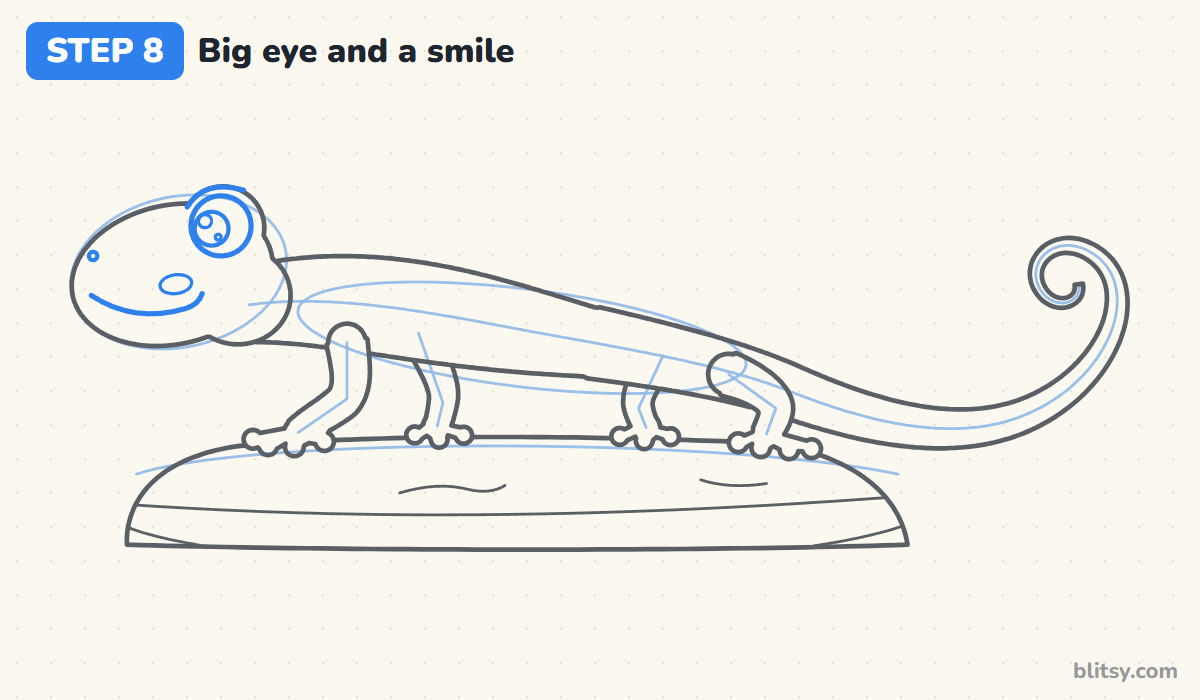
Inside the eye bump, draw a circle for the eye and a smaller dark pupil leaning toward the snout, so he looks where he's walking. Leave two shine dots white. Add a curved eyelid line above, a dot for the nostril, and a long smile along the side of the head with a little upturn at the end. A small oval cheek above the smile end adds a friendly blush.
💡 Tip: I point the pupil the way the lizard is facing. Pupils in the middle of the eye make him look startled.
Step 9: Draw the belly line and the back spots
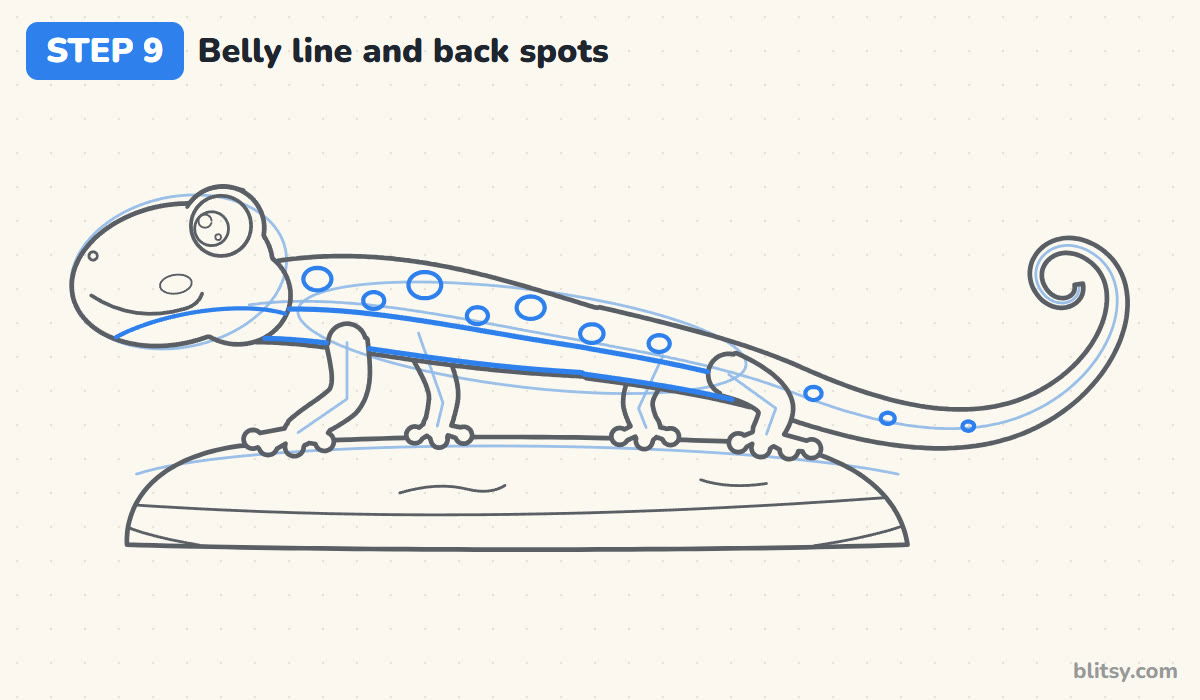
Run a line just above the bottom edge of the body, from the neck to where the tail begins, to mark off the pale belly. Add a short curve under the head for the throat too. Then scatter oval spots along the back, bigger near the shoulders and smaller as you move down the tail.
💡 Tip: Shrinking the spots toward the tail tip is a simple trick that makes the tail look longer.
Step 10: Ink the keeper lines and erase the guides
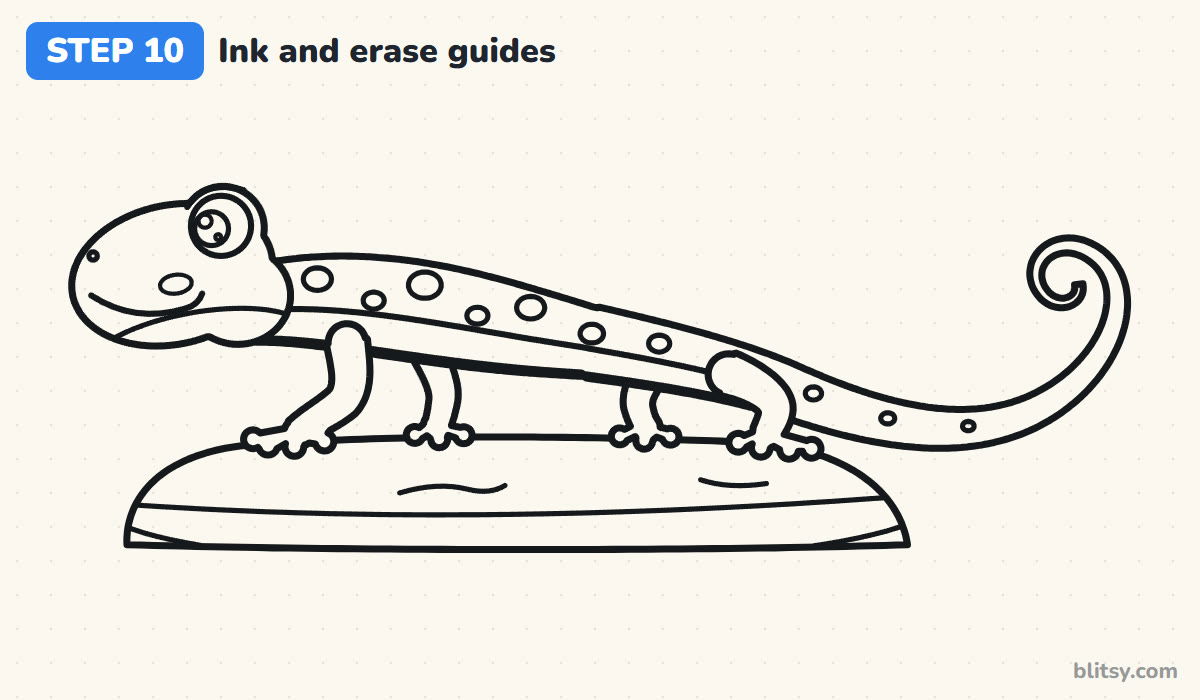
Go over every line you want to keep with your marker or fineliner. Take your time around the toe pads, since they're small and close together. I let the ink dry for a minute, then erase all the pencil guides, including the ovals, the S-curve and the leg lines.
💡 Tip: Ink the spiral at the tail tip by turning the paper slowly instead of twisting your wrist.
Step 11: Color your lizard
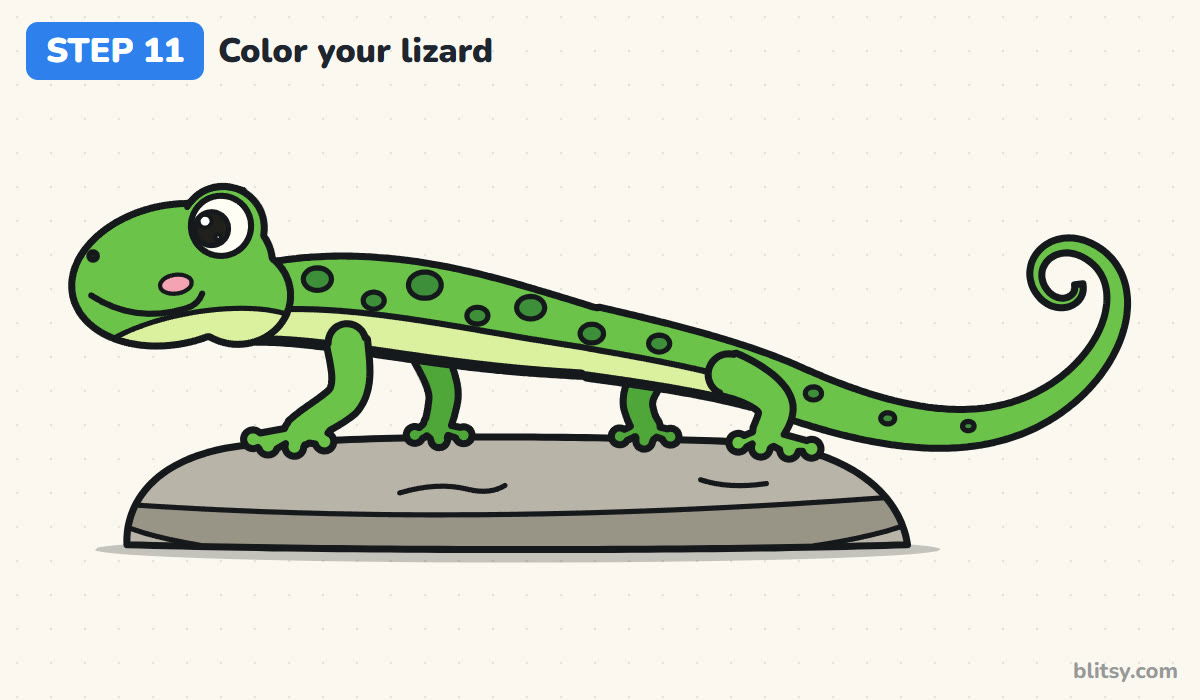
Color the head, body, tail and near legs bright green. The far legs get a slightly deeper green, the spots a dark green, and the belly and throat a pale yellow. Make the rock gray with a darker band along the bottom, then add pink to the cheek and black to the pupil and nostril.
💡 Tip: Color the big green areas first with light, even strokes. Spots go on top afterward, so they stay crisp.


Where Lizard Drawings Tend to Slip
- The body is too thick. Lizards are slender. If yours looks like a sock, bring the top and bottom body lines closer together.
- The tail ends in a blunt stump. Taper it all the way to a fine point at the end of the spiral. The thin tip is what makes it read as a tail.
- Legs stand straight down like a table. Give every leg a bend at the elbow or knee and let the feet splay out. Lizards walk low to the ground.
- The far legs are drawn on top of the body. Stop them at the belly line so they look like they're behind, then color them a touch darker.
- The eye is tiny. A small eye makes the face hard to read. I make mine nearly as tall as the head bump.
Giving Your Lizard a New Look
Once the basic shape feels easy, try a few changes. Swap green for orange and brown to turn him into a desert gecko, or add stripes along the back in place of spots. You can give him a tiny frill behind the head, or add a buzzing fly for him to watch. If you liked the low, sprawling legs, this alligator drawing step by step uses the same trick on a much bigger reptile. The long flowing body in this snake drawing tutorial is good practice for the S-curve, and the big friendly eyes in this frog drawing lesson pair nicely with a lizard on the same page.
Free Lizard Coloring Page and Printable Step Guide
The free lizard coloring page has a finished color example at the top, a small key showing which color goes where, and a large outline below for coloring. The step-by-step PDF guide holds all 11 steps with their pictures and tips, so kids can draw away from a screen. Both print well on Letter or A4 paper.
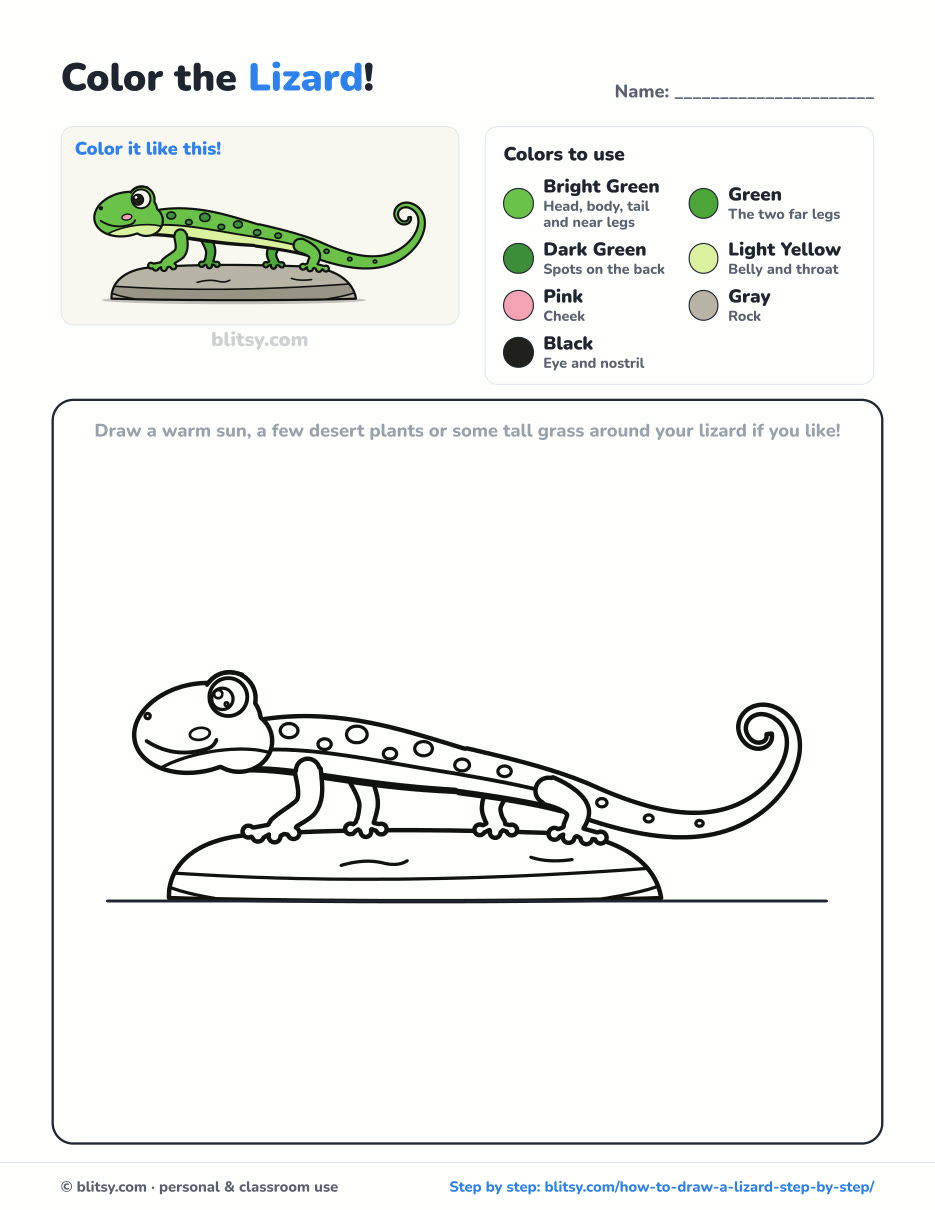
Black outlines with a colored example and the color names at the top. Ready to print and color.
⬇️ Download Coloring PageEvery step picture with its instructions and tips, to keep beside your paper while you draw.
⬇️ Download Drawing Guide📱 On a phone? Tap a download button, then open the file and choose Share → Save to Files or Print. On a computer, the PDF opens or saves straight to your Downloads folder.
Keep the Lizard Steps on Pinterest
More Reptiles and Animals to Draw Next
Each one is a full step-by-step tutorial with a picture for every stage.
- Alligator Drawing: A smiling cartoon alligator walks along in side view, starting from two ovals and a tail curve, in this how to draw an alligator lesson.
- Snake Drawing: Build a friendly green snake with a loop in its body from one flowing line in this snake drawing step by step guide.
- Turtle Drawing: A smiling sea turtle with a hexagon shell pattern grows from one oval in this turtle drawing tutorial.
- Frog Drawing: Draw a cartoon frog with bulging eyes and webbed feet sitting on a mossy log in this frog drawing step by step lesson.
- Dragon Drawing: A friendly green dragon with bat wings and a puff of fire stands on four legs in this how to draw a dragon tutorial.
Lizard Drawing Questions From Beginners
What is the easiest way to draw a lizard?
Start with one wavy line for the spine and tail, then draw a thin body around it. Add a round head, four bent legs and a big eye. That order keeps the proportions right.
How do you draw a lizard for kids?
Use simple shapes: an oval head, a long skinny oval body and a curly tail. Younger kids can skip the far legs and the spots and still end up with a clear lizard.
How do you draw a gecko's feet?
Draw a short bent leg, then fan out four or five little toes and put a round pad at the end of each one. Those pads are the gecko's signature.
What colors are lizards?
Many are green, brown or gray, but geckos can be orange, yellow or spotted. For a cartoon lizard, bright green with a pale yellow belly and darker spots looks cheerful.
That first wavy line is all it takes, so pick up a pencil and give your lizard a warm rock of his own. 🦎✏️
Related posts:
 How to Draw a Car Step by Step (Easy Drawing for Beginners)
 How to Draw a Whale Step by Step (Easy for Beginners)
 How to Draw an Arctic Fox Step by Step (Easy for Beginners)
 How to Draw a Shark Step by Step (Easy for Beginners)
 How to Draw a Chicken Step by Step (Easy for Beginners)
 How to Draw a Fish Step by Step (Easy Goldfish for Beginners)
 How to Draw a Snowman Step by Step (Easy for Beginners)
 How to Draw an Airplane Step by Step (Easy Jet for Beginners)
 How to Draw a Mouse Step by Step (Easy for Beginners)
 How to Draw a T-Rex Step by Step (Easy for Beginners)
 How to Draw a Pig Step by Step (Easy for Beginners)
 How to Draw a Minion Step by Step (Easy for Beginners)

