
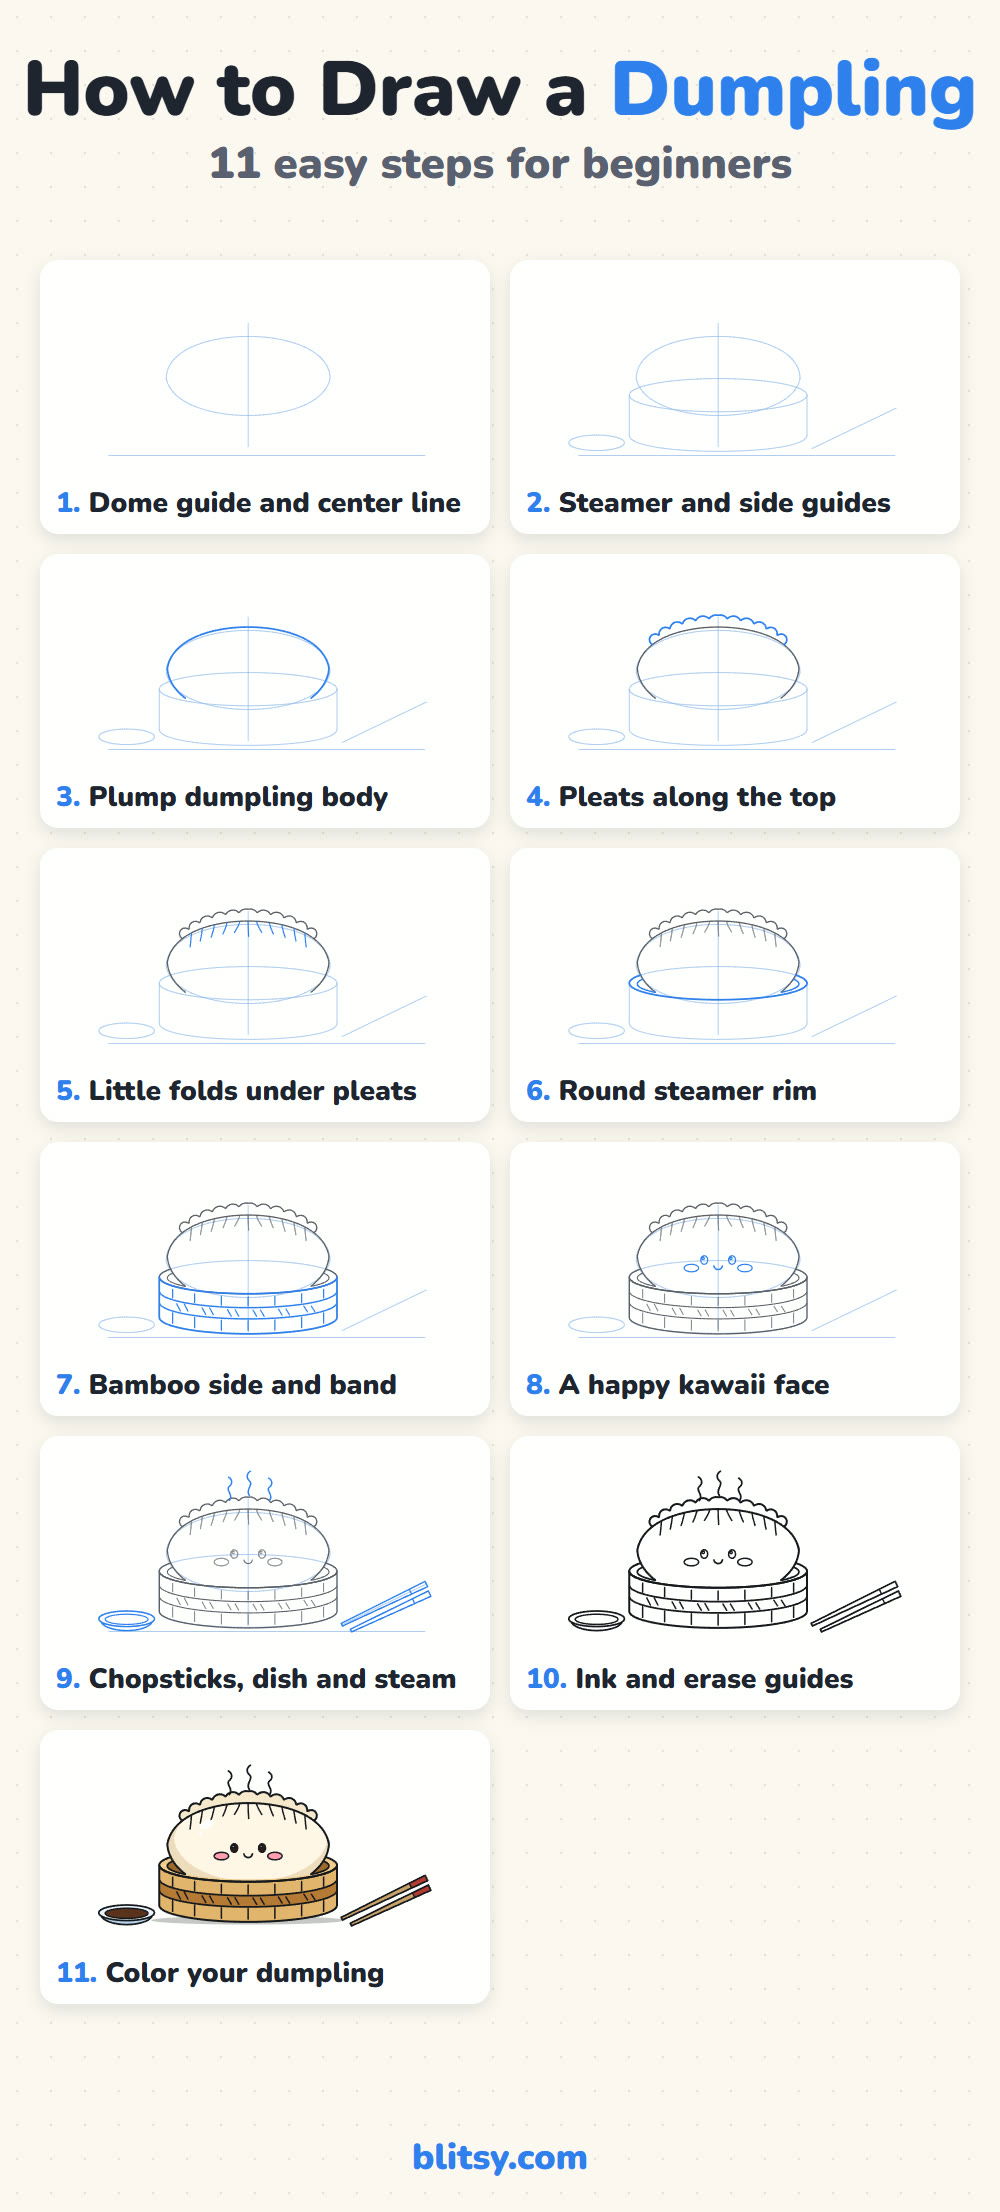
A squishy little dumpling with a shy smile is one of the easiest cute foods you can draw, and it looks great in a sketchbook margin. Here I'll walk you through how to draw a dumpling step by step, from one soft oval to a finished dumpling resting in a bamboo steamer beside chopsticks and soy sauce. The trick is the row of pleats along the top. Get those right and nobody will mistake it for a bun.
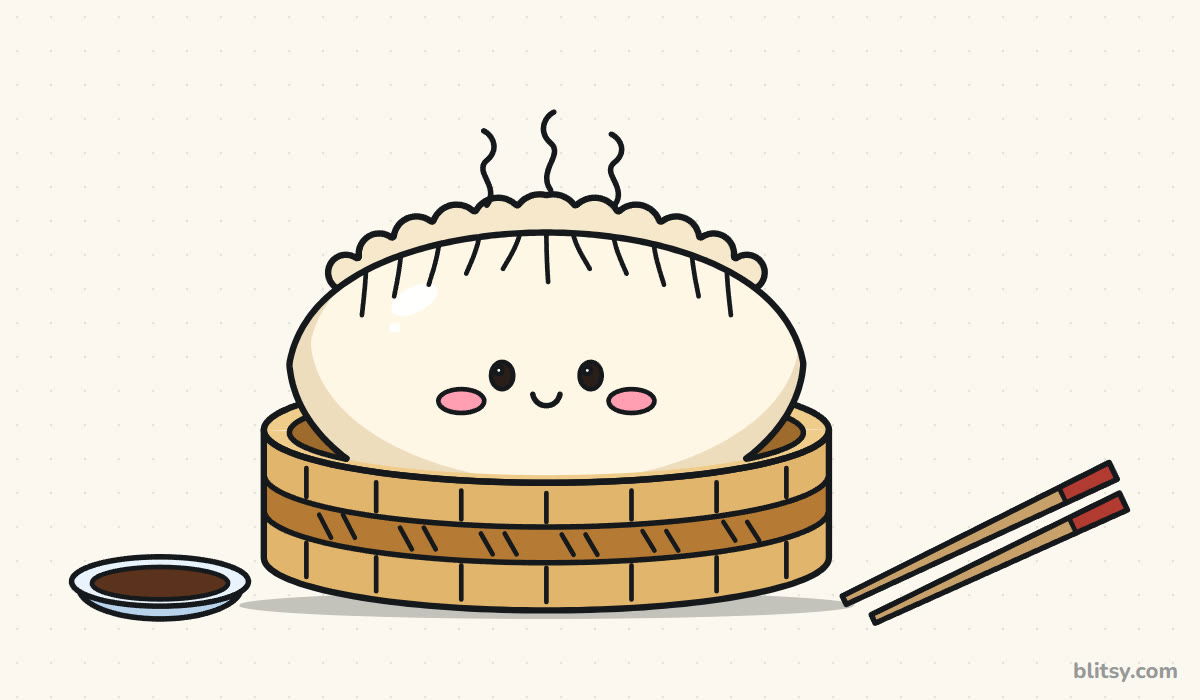
Follow the blue: it's the only part you add in that picture. Anything gray was drawn earlier. Keep the pale blue helper shapes faint, since step 10 erases them.
Quick overview
⏱️ Time: about 25 minutes, plus 10 for coloring
🎯 Level: easy, fine for kids from about 6
✏️ Steps: 11
🥟 You'll draw: a kawaii dumpling in a bamboo steamer with chopsticks and a sauce dish
Dumpling Doodle Supplies
- A pencil you can press very lightly
- A clean eraser
- A black fineliner or thin marker
- Colored pencils or markers: cream, tan, two browns, pink, red and light blue
- Plain paper turned sideways
White paper works fine for the dough, so if you don't own a cream pencil, just shade the edges with tan and leave the middle bare.
How to Draw a Dumpling Step by Step
Step 1: Sketch a wide oval and a center line
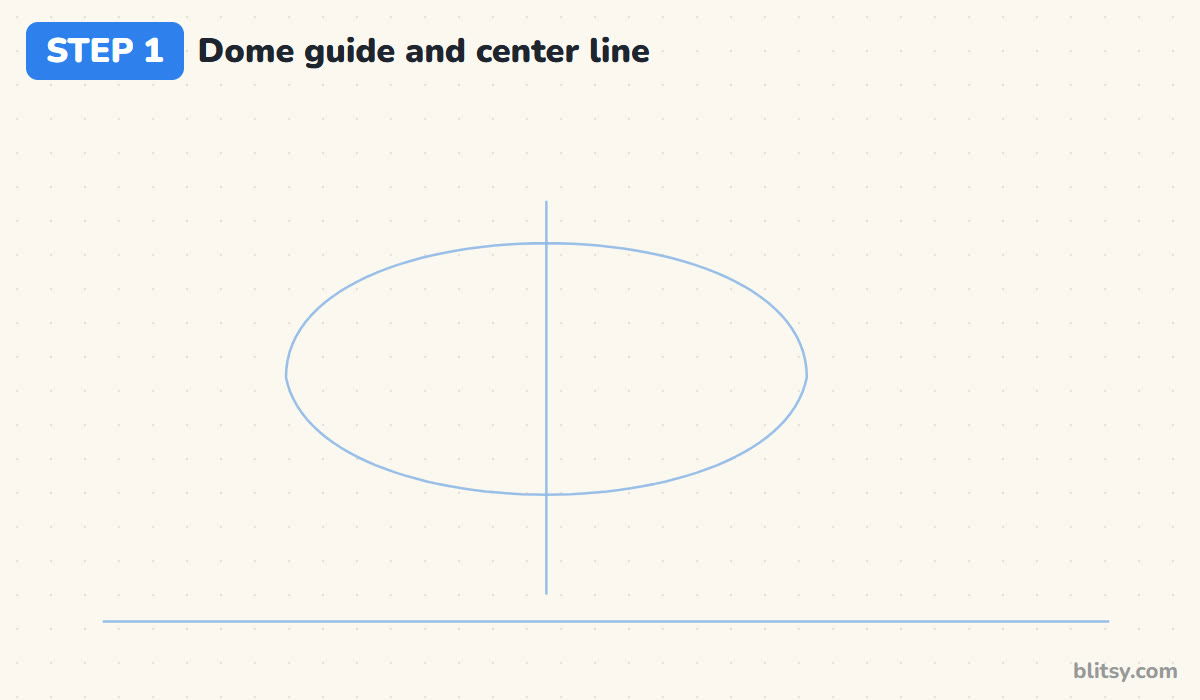
Draw a light vertical line a little left of the middle of your page. Around it, sketch a wide oval roughly twice as wide as it is tall, and add a long flat table line underneath. I keep this oval big, because a small one leaves no room for the face later.
💡 Tip: Hold the pencil far back from the tip. Your lines come out softer and easier to erase.
Step 2: Add guides for the steamer and extras
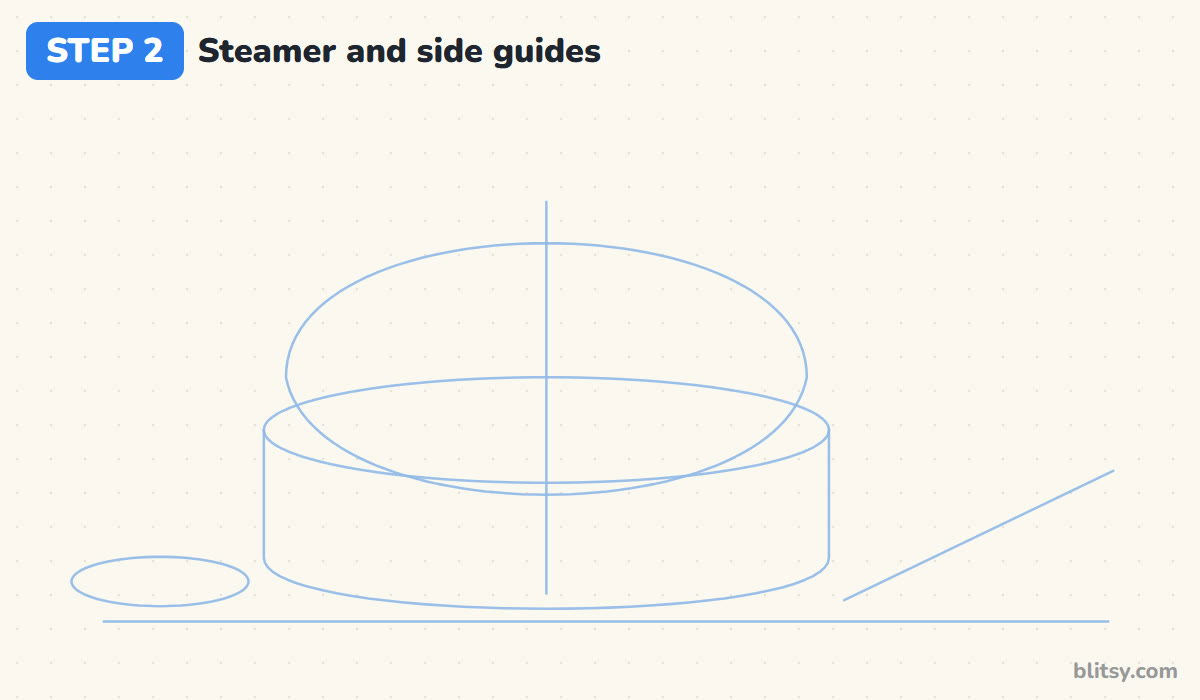
Draw a second wide oval that cuts across the lower part of the first one. That's the top of the steamer. Drop two short straight lines from its ends and join them with a curve at the bottom, so you get a short, round box. On the left, sketch a small flat oval for the sauce dish, and on the right a slanted line for the chopsticks.
💡 Tip: Make the steamer oval wider than the dumpling oval, so the dumpling looks like it's sitting inside.
Step 3: Draw the plump dumpling body
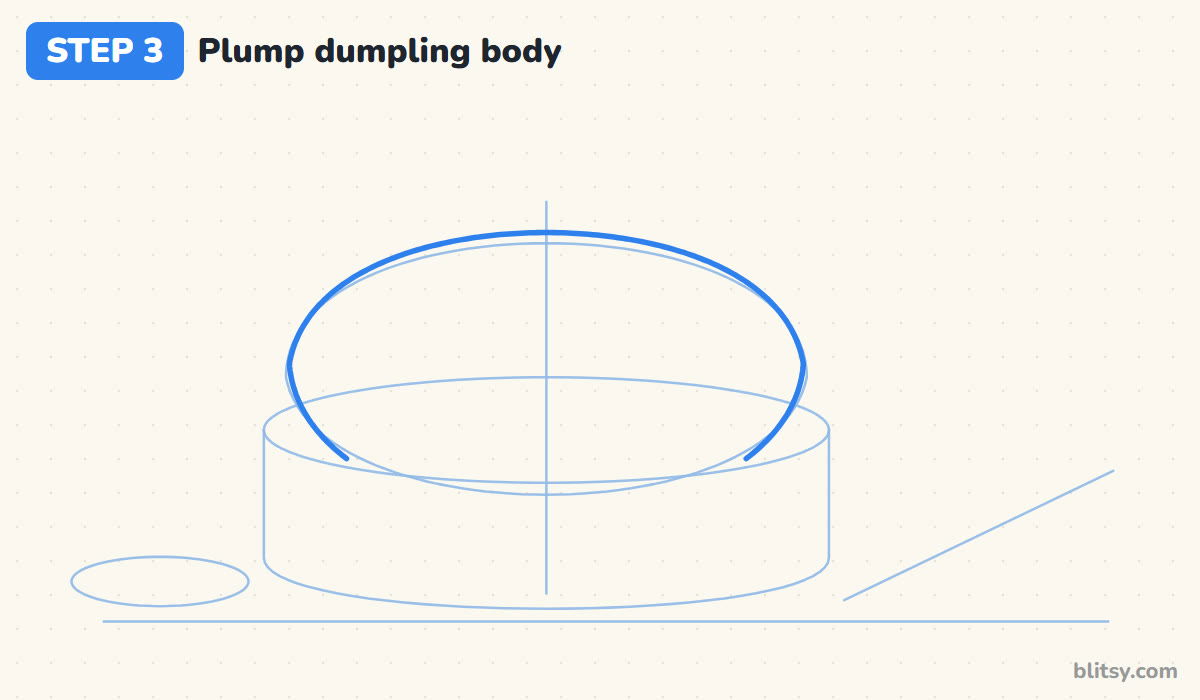
Now trace the dumpling's outline over the first oval. Start at the left tip, curve up over the top and down to the right tip, letting both tips point slightly upward like a smile. Stop where the lines reach the steamer, because the bottom of the dumpling hides inside it. Those upturned tips are what make it read as a dumpling and not a bread roll.
💡 Tip: Keep the top curve smooth and round. A flat top makes the dumpling look deflated.


Step 4: Add the pleats along the top
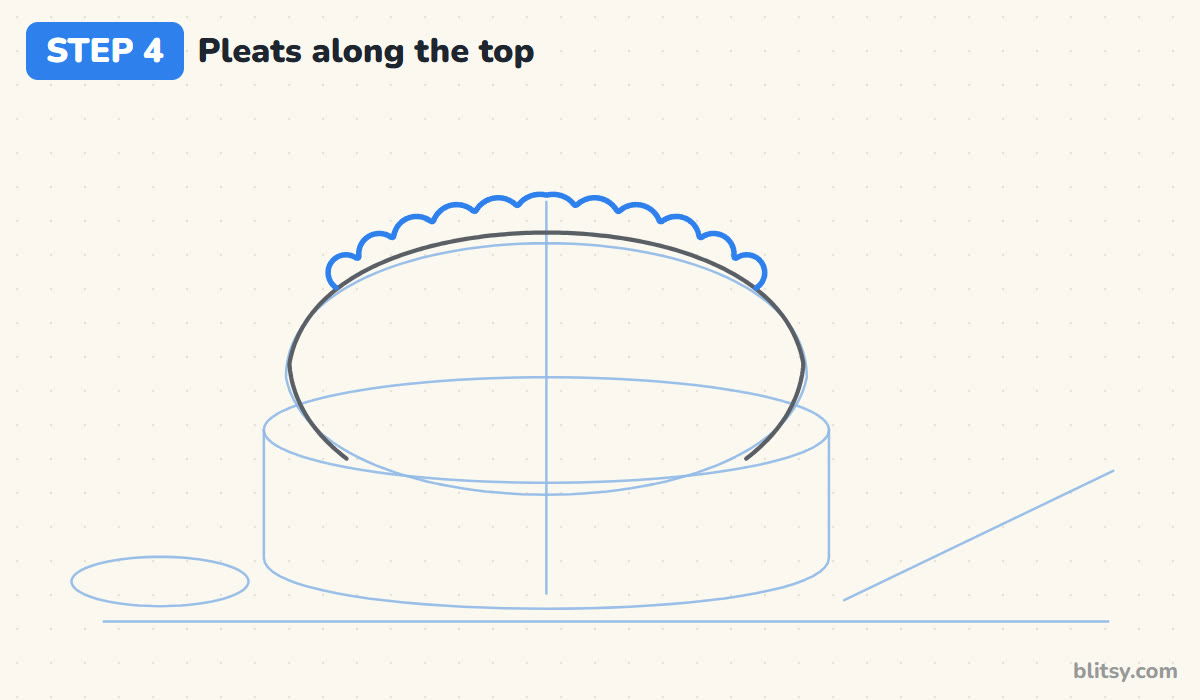
Draw a row of small rounded bumps that sit on the top curve, like a little ruffled crest. Make the bumps biggest in the middle and smaller toward the tips. This is the folded seam where the dough was pinched shut. When I teach this, I tell kids to think of a row of tiny clouds holding hands.
💡 Tip: Start in the middle with one bump, then work outward on each side so the row stays even.
Step 5: Draw little folds under the pleats
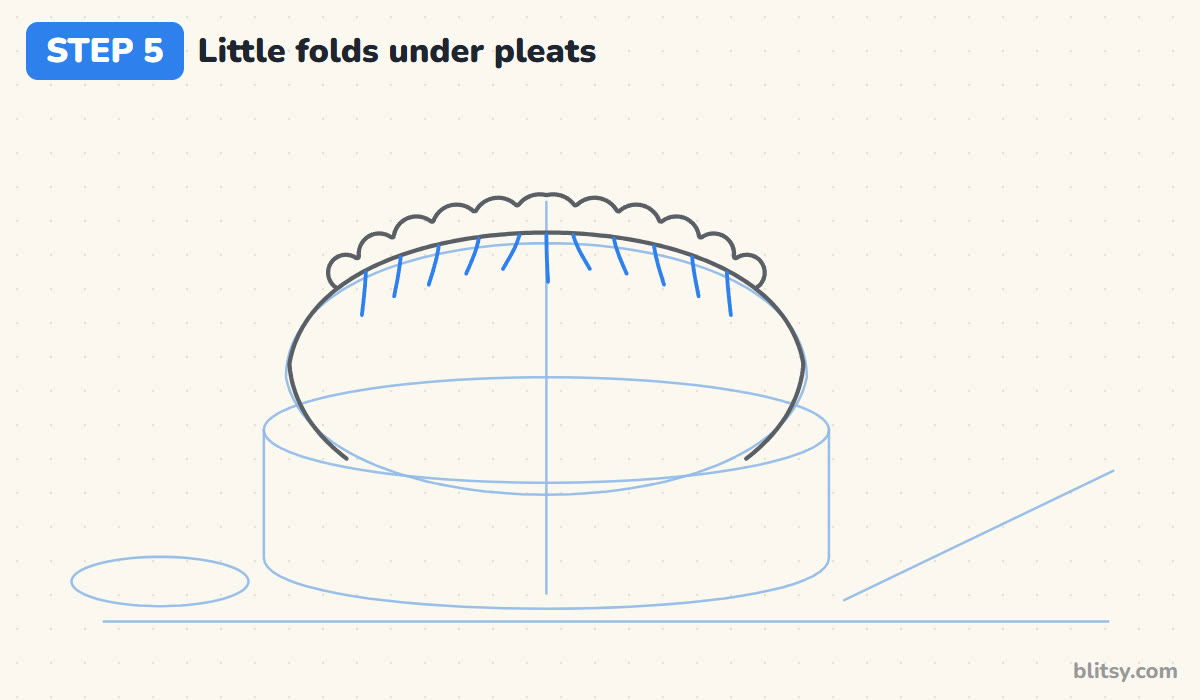
From each dip between two bumps, pull a short curved line down onto the body. The middle folds can hang straight, while the outer ones lean gently toward the tips. Short lines work best. If you stretch them halfway down the dumpling, they collide with the face and the whole thing starts to look striped.
💡 Tip: Lift your pencil at the end of each fold so the lines taper instead of ending in a dot.
Step 6: Outline the round steamer rim
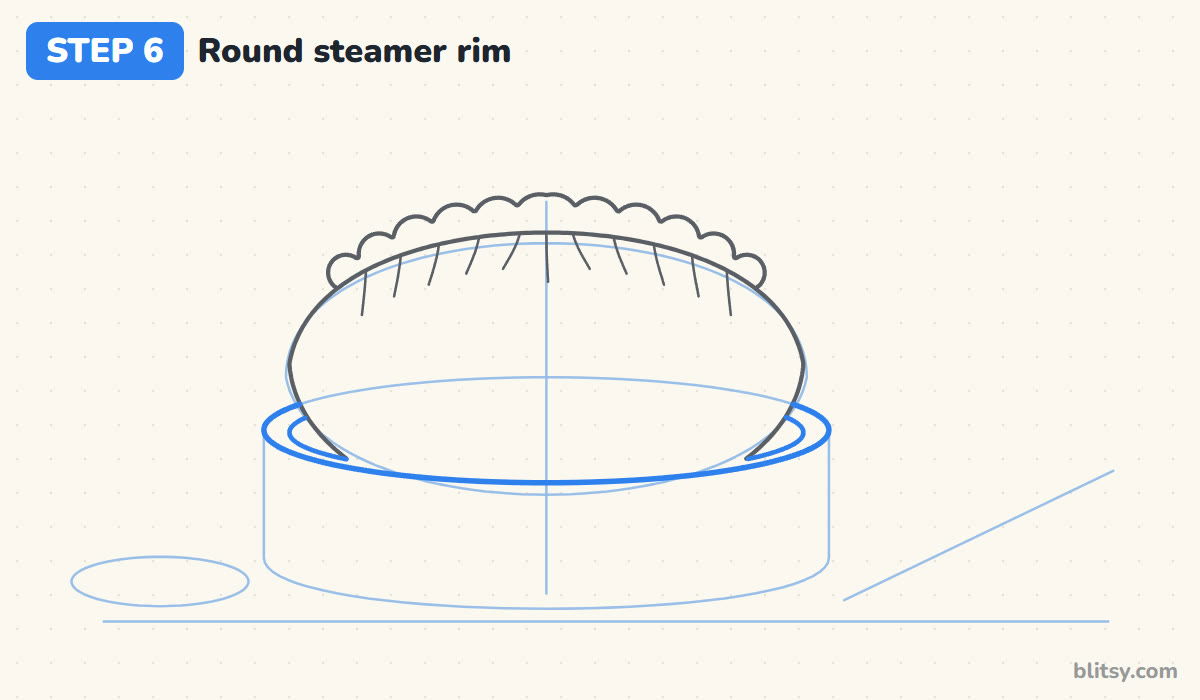
Go over the steamer oval, but only on the parts you can see. The back of the rim disappears behind the dumpling, and the front passes in front of its bottom. Then draw a slightly smaller oval inside the first to show how thick the bamboo rim is. Most beginners draw the rim straight across the dumpling, so stop and check where the dumpling should cover it.
💡 Tip: Keep the gap between the two rim ovals about the same all the way around.
Step 7: Draw the bamboo side and band
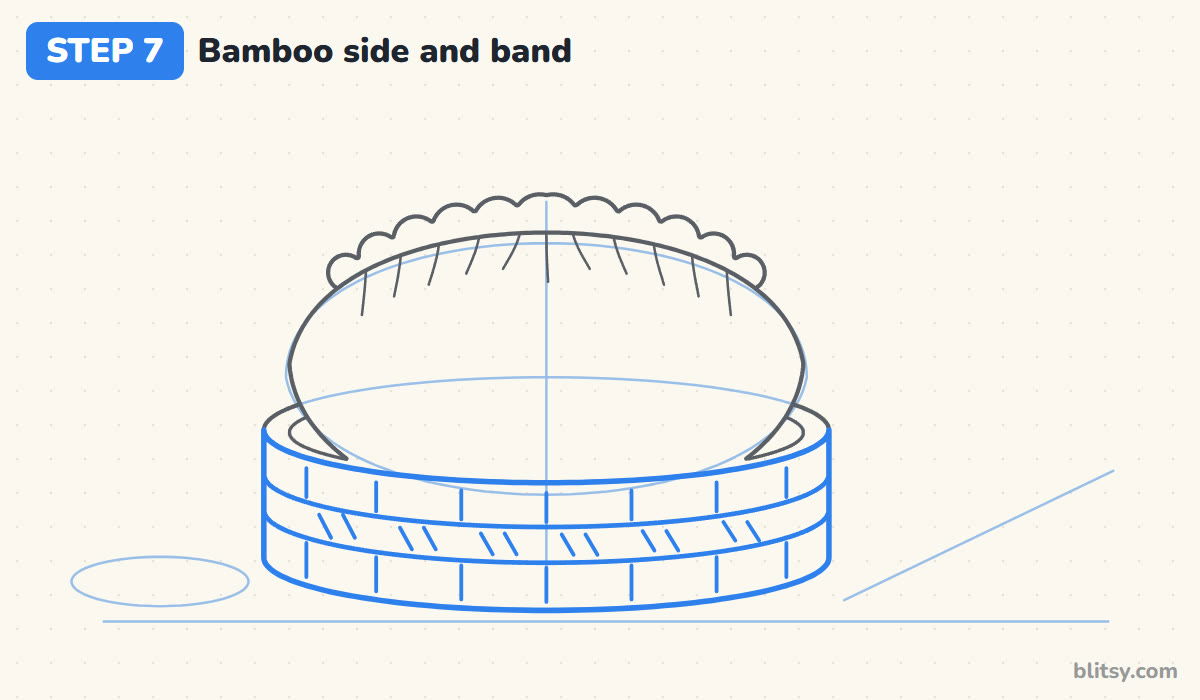
Trace the sides and curved bottom of the steamer. Across the middle of the side, draw two curved lines that follow the shape of the bottom: that's the woven band. Fill it with pairs of short slanted stitches. Above and below the band, add a few short upright lines for the bamboo strips.
💡 Tip: Space the upright strips a little closer near the edges. It helps the side look like it bends away from you.



Step 8: Give it a happy kawaii face
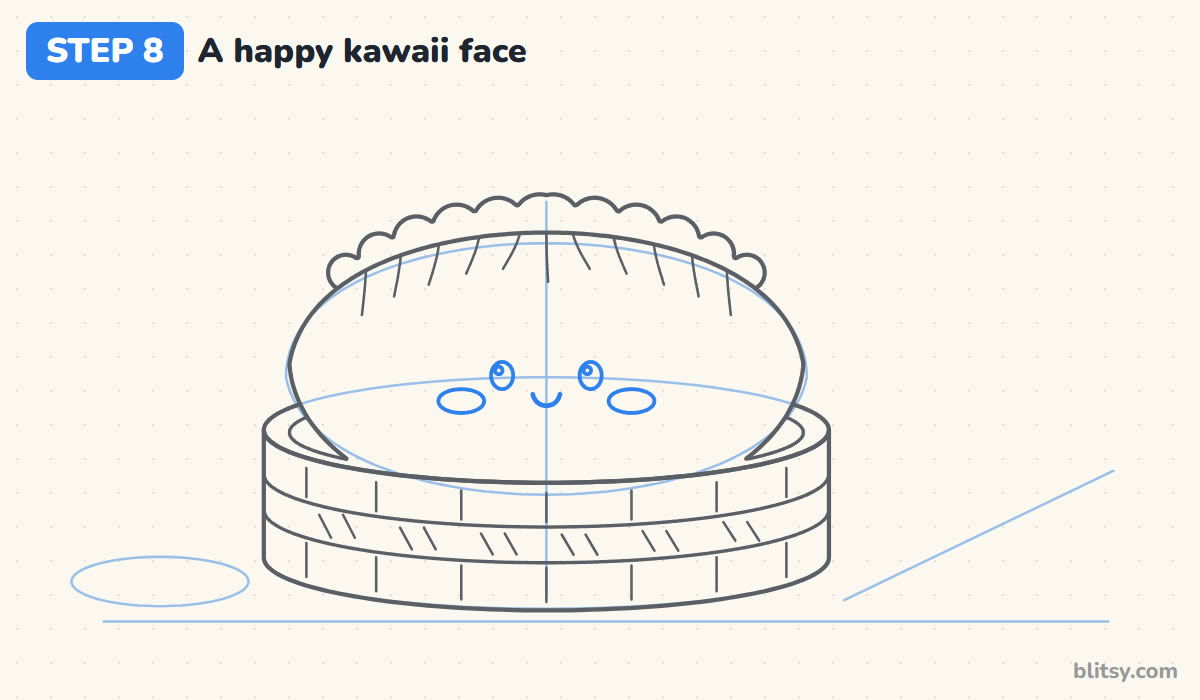
Place the face low on the body, a bit below the middle. Draw two small upright ovals for eyes with a tiny circle in each for the shine, then a little U smile between them. Add a flat oval cheek just outside and below each eye. Low, close-set features are the secret to kawaii food. Put them too high and the dumpling looks surprised.
💡 Tip: Keep both shine circles on the same side of the eyes, as if one lamp lights them.
Step 9: Add chopsticks, a dish and steam
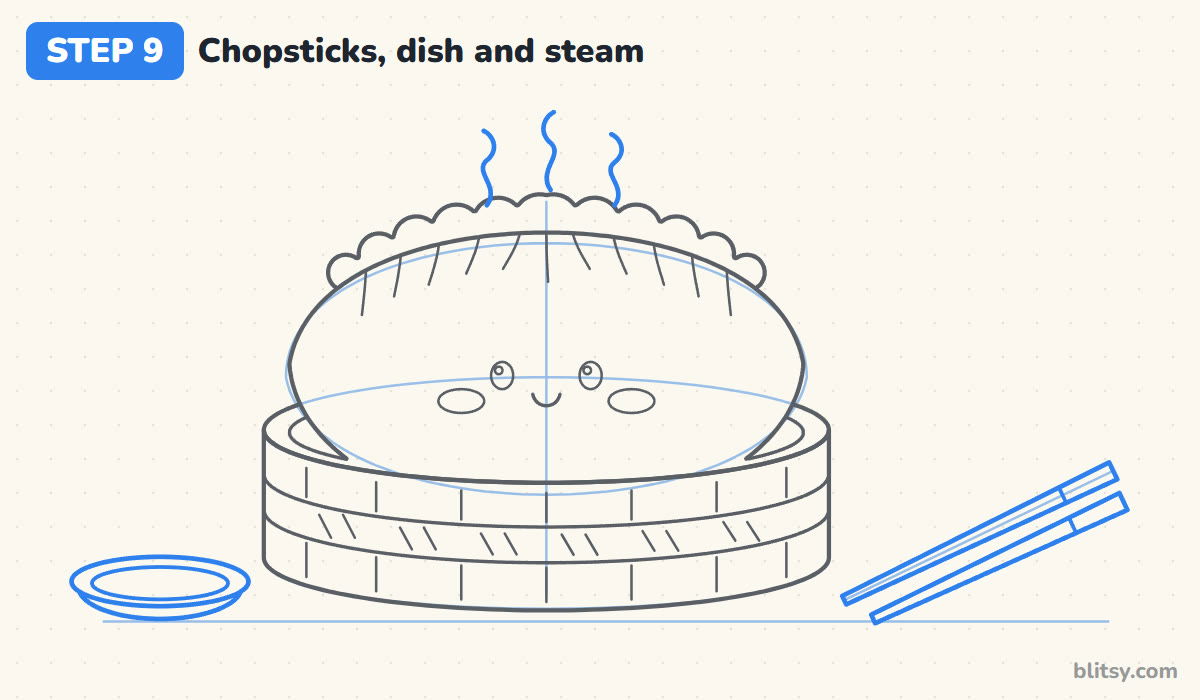
Over the slanted guide, draw two long, thin chopsticks that get a little wider at the far end, with a short line across each one near the end for the colored tip. Turn the left oval into a shallow dish with a curved base and a smaller oval inside for the sauce. Finally, draw three wiggly steam lines rising from the pleats. Small kids can skip the dish if their page is getting crowded.
💡 Tip: Make the middle steam curl the tallest. Three equal curls look like a fence.
Step 10: Ink your lines and erase the guides
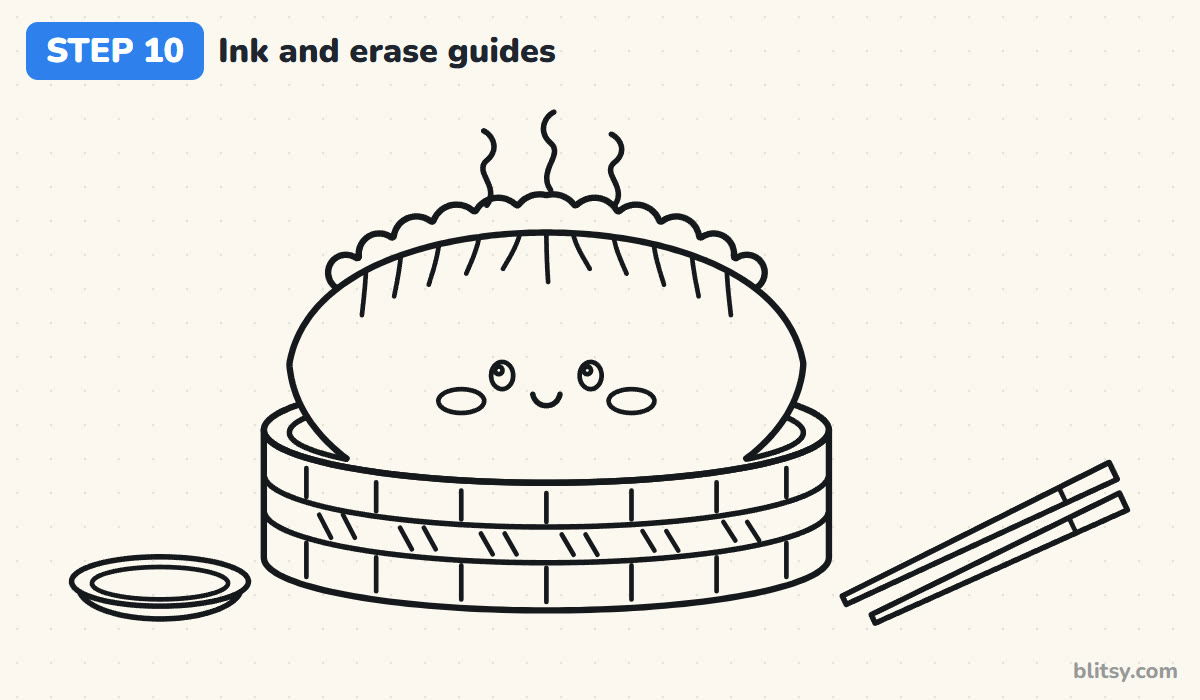
Trace all the keeper lines with your black pen and give the ink a minute to dry. Then erase the ovals, the center line and the table line. I ink the big outline with a bit more pressure and the folds and stitches lighter, which keeps the dumpling as the star.
💡 Tip: Rotate the paper as you ink the curves so your hand always pulls the pen toward you.
Step 11: Color your dumpling
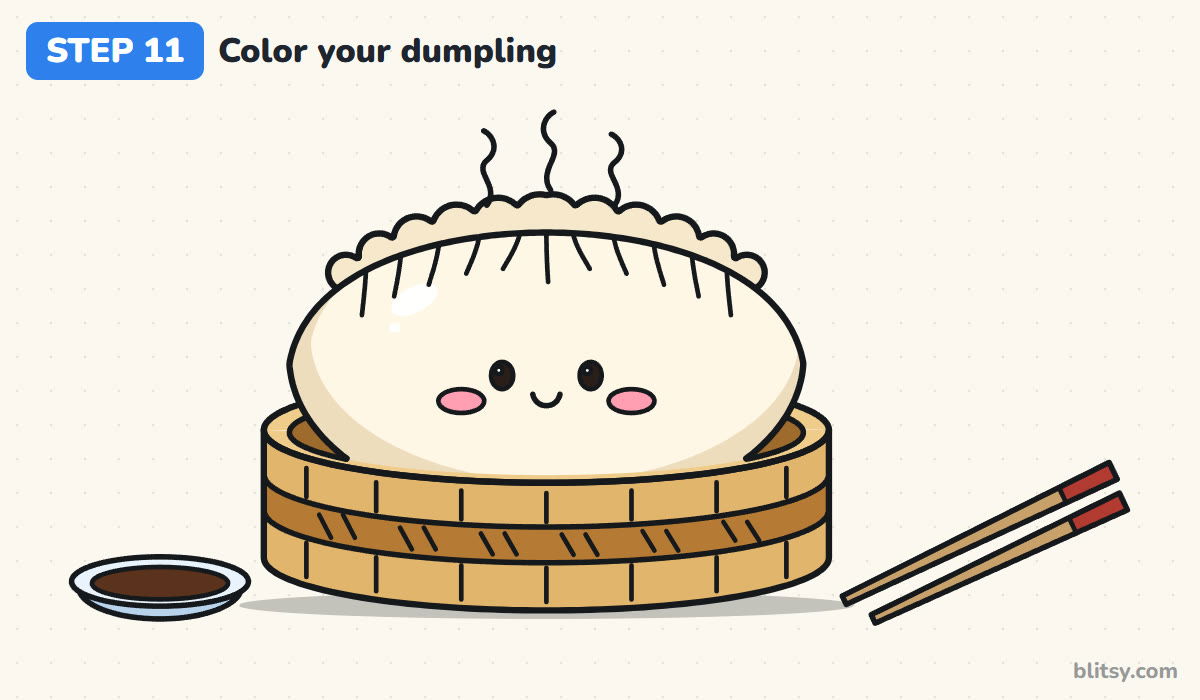
Color the dough a soft cream and add tan along the bottom and the far edges to make it look puffy. Leave a small white shine on the upper left. The pleats get a slightly warmer cream. Make the steamer light brown with a darker brown band and inside, then the cheeks pink, the chopstick tips red, the dish light blue and the sauce dark brown.
💡 Tip: Press very lightly on the dough. Pale, gentle color is what makes it look soft and squishy.


Lumpy Dumpling Trouble Spots
- A dumpling that looks like a bread roll. A plain oval reads as a bun. Turn the tips up a little and add the row of pleats on top.
- Pleats that are all the same size. Identical bumps look like a stamp. Make the middle ones the biggest and let them shrink toward the tips.
- Fold lines that run too far. Long folds cut into the face. Keep them short, about the height of one pleat or a little more.
- The steamer rim drawn over the dumpling. Then the dumpling seems to float. Erase the back of the rim wherever the dumpling covers it.
- Coloring the dough too dark. Heavy tan makes it look burnt. Keep the middle pale and save the darker shade for the edges.
Fresh Fillings for Your Own Version
Once you've drawn one, try a family. Put two or three dumplings in the steamer, each with a different face: one sleeping with curved closed eyes, one winking, one with a tiny open mouth. You can tint a dumpling pale green for a vegetable filling or pink for a shrimp one, or swap the steamer for a simple round plate. For more cute food practice, my taco drawing tutorial uses the same kawaii face on a crunchy shell, the pizza drawing lesson is great for practicing ovals, and the cupcake drawing step by step gives your dumpling a sweet dessert to sit next to.
Dumpling Coloring Page and Printable Steps
Need a quiet activity? The dumpling coloring page shows a small colored example and a color key at the top, with a big bold outline of the dumpling, the steamer, the chopsticks and the sauce dish below. The step-by-step guide PDF has all 11 steps with their tips, so kids can draw it away from a screen. Both print on Letter or A4 paper.
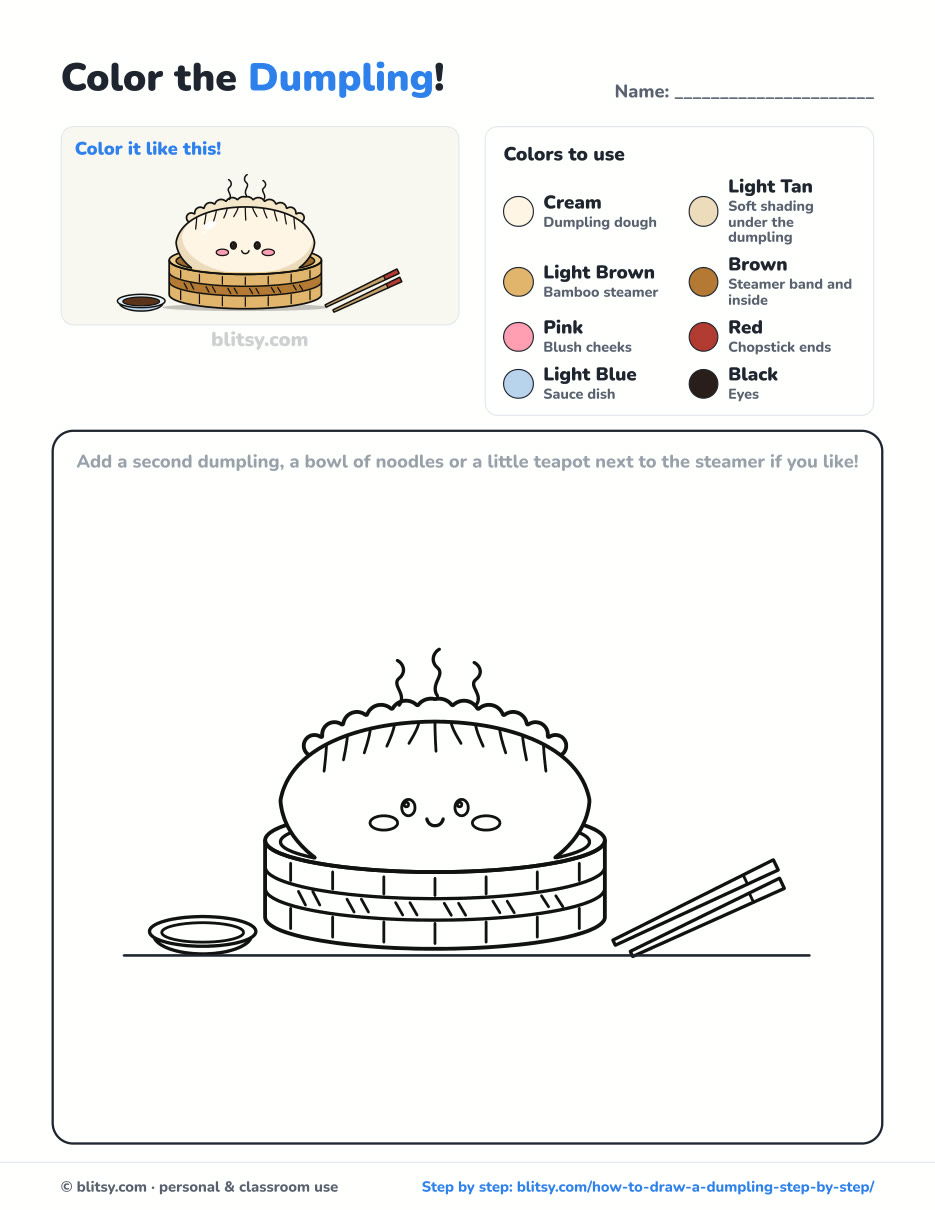
Black outlines with a colored example and the color names at the top. Ready to print and color.
⬇️ Download Coloring PageEvery step picture with its instructions and tips, to keep beside your paper while you draw.
⬇️ Download Drawing Guide📱 On a phone? Tap a download button, then open the file and choose Share → Save to Files or Print. On a computer, the PDF opens or saves straight to your Downloads folder.
Dumpling Steps for Your Pinterest Board
More Snacks and Treats to Draw Next
Each of these tutorials has a picture for every step, just like the dumpling, so you can keep the cute food streak going.
- Taco Drawing: A smiling hard-shell taco with crunchy toppings and a lime wedge in this how to draw a taco step by step lesson.
- Pizza Drawing: A whole pepperoni pizza with one cheesy slice pulled aside starts as a flat oval in this pizza drawing tutorial.
- Cupcake Drawing: A big kawaii cupcake with a frosting swirl, a cherry and a pleated liner fills this cupcake drawing step by step guide.
- Avocado Drawing: An avocado cut in half, one side keeping a smiling pit, grows from two circles in this avocado drawing tutorial.
- Strawberry Drawing: A plump berry with a leafy cap and seeds sits beside a cut half in this how to draw a strawberry lesson.
Dumpling Drawing Questions From Beginners
What is the easiest way to draw a cute dumpling?
Draw a wide oval with the tips turned up a little, add a row of small bumps along the top for pleats, then put two dot eyes, a tiny smile and pink cheeks low on the body.
How do you draw dumpling pleats?
Draw small rounded bumps along the top edge, biggest in the middle, then pull a short curved line down from each dip between them. Those short lines make the folds.
How long does it take to draw this dumpling?
About 25 minutes for the drawing and another 10 for coloring. Drawing only the dumpling without the steamer takes around 10 minutes.
Is this dumpling drawing good for kids?
Yes. Children from about 6 can follow every step. Younger kids can leave out the bamboo stitches and the sauce dish and still end up with a happy dumpling.
Draw a whole steamer full of dumplings next time, and give every one of them its own mood. 🥟
Related posts:
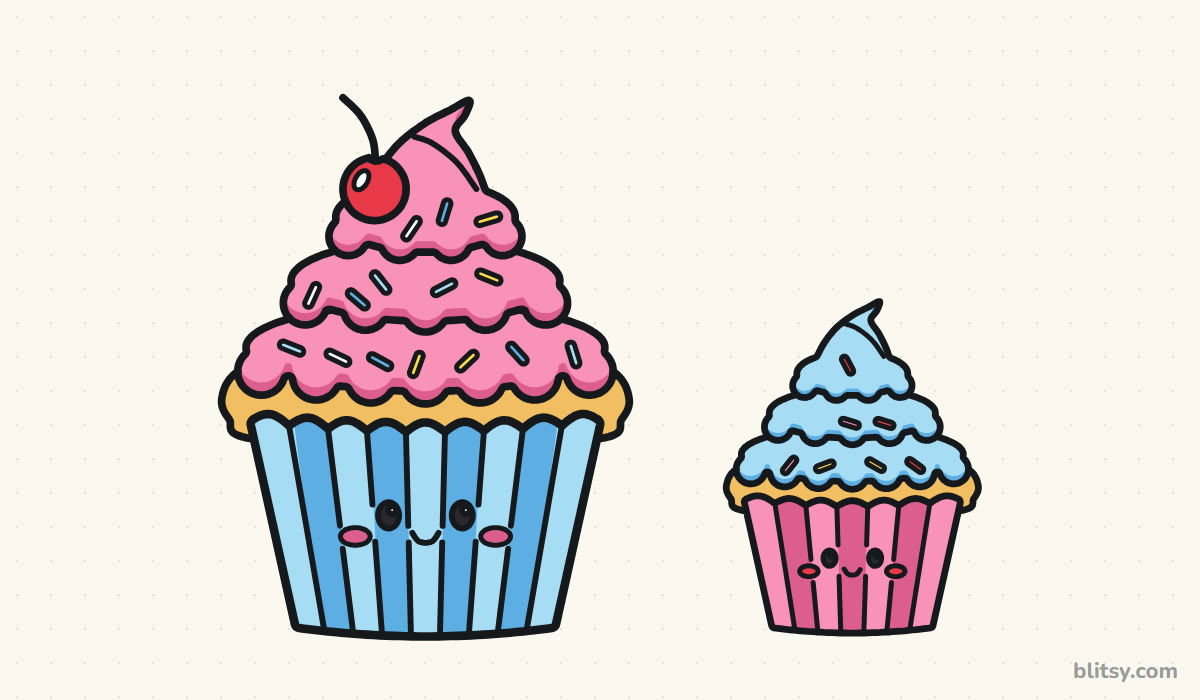 How to Draw a Cupcake Step by Step (Easy Kawaii Cupcake)
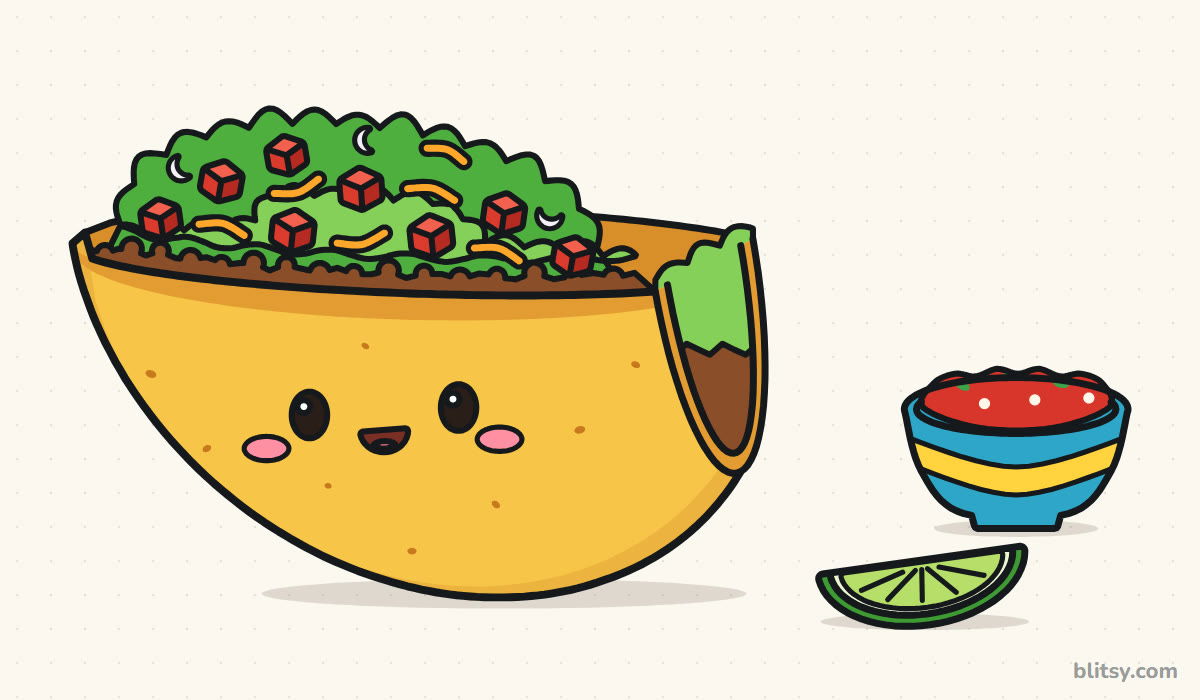 How to Draw a Taco Step by Step (Easy Kawaii Taco)
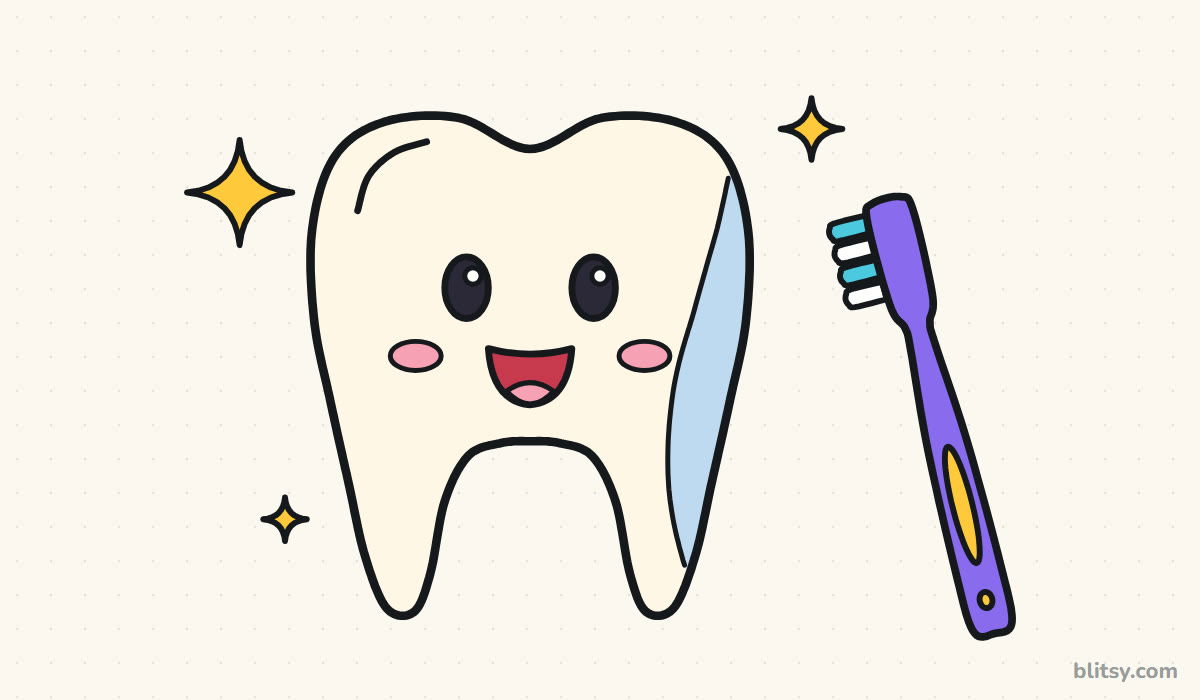 How to Draw a Tooth Step by Step (Cute and Easy for Kids)
 How to Draw a UFO Step by Step (Cute Alien Saucer)
 How to Draw an Astronaut Step by Step (Cute and Easy)
 How to Draw Freddy Krueger Step by Step (Cute Chibi Version)
 How to Draw a Jellyfish Step by Step (Cute, Easy Guide)
 How to Draw Ariana Grande Step by Step (Cute Chibi Fan Art)
 How to Draw Cerberus Step by Step (Cute and Easy)
 How to Draw a Bat Step by Step (Cute Cartoon Bat for Kids)
 How to Draw a Yeti Step by Step (Easy and Cute for Kids)
 How to Draw an Alien Step by Step (Cute and Easy for Kids)

