
Cold fingers, a warm mug, and a pencil. That's my favorite kind of afternoon. In this lesson you'll learn how to draw hot chocolate step by step, starting from two simple ovals and ending with a fluffy cream swirl, curls of steam and a chocolate chip cookie. It's gentle enough for kids, and grown-ups tend to enjoy the relaxing rhythm of it too.
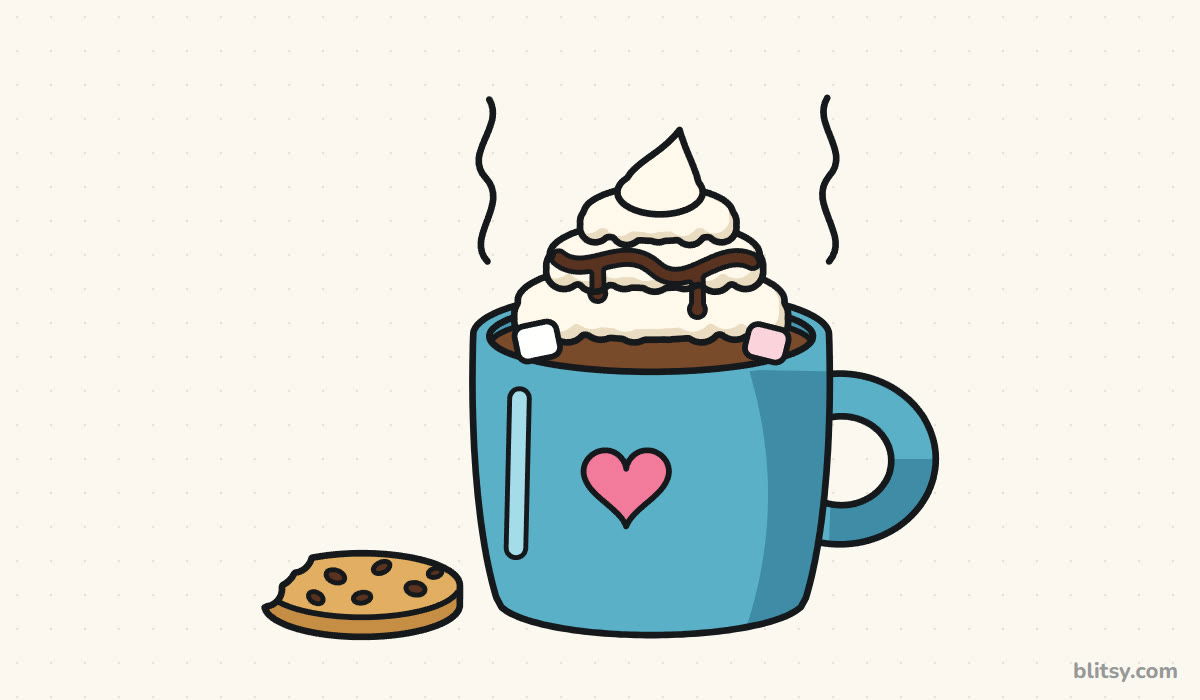
Watch for the color blue as you go: those lines belong to the current step, while gray marks what you already drew. Copy only the new blue part each time.
Quick overview
⏱️ Time: about 25 minutes with coloring
🎯 Level: easy, good for kids from around 6
✏️ Steps: 11
☕ You'll draw: a mug of hot cocoa with whipped cream, marshmallows, steam and a cookie
Tools for a Warm Mug Sketch
- A pencil you can press lightly
- A soft eraser that won't smudge
- A black fineliner or marker for inking
- Colored pencils, crayons or markers in light blue, pink, brown, dark brown and light brown
- A cream or very pale yellow for the whipped cream
- Plain white paper
Turn the paper sideways, because the mug, its handle and the cookie make a wide picture.
How to Draw Hot Chocolate Step by Step
Step 1: Sketch two ovals for the mug
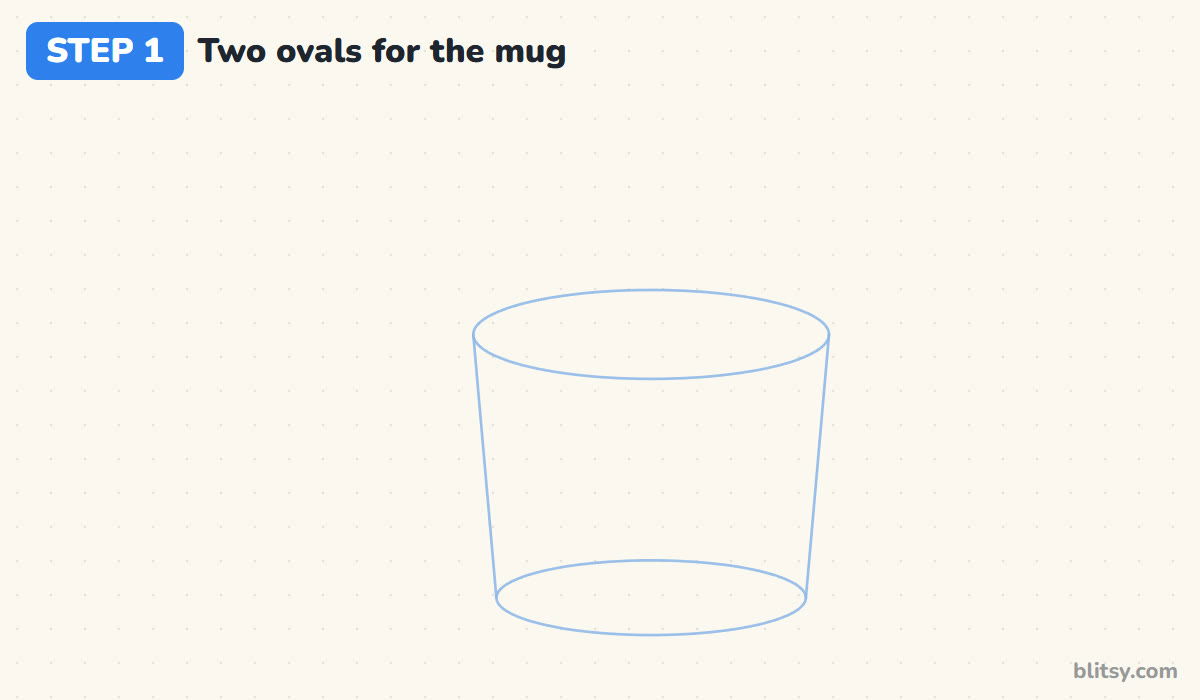
Draw a wide, flat oval for the top of the mug. Below it, add a slightly smaller oval for the bottom, then join their ends with two lines that lean in a little. The top oval being wider is what makes the mug look like it's sitting on a table and seen from slightly above.
💡 Tip: Keep both ovals flat. A round circle on top makes the cup look like it's tipping toward you.
Step 2: Add guides for the handle, cream and cookie
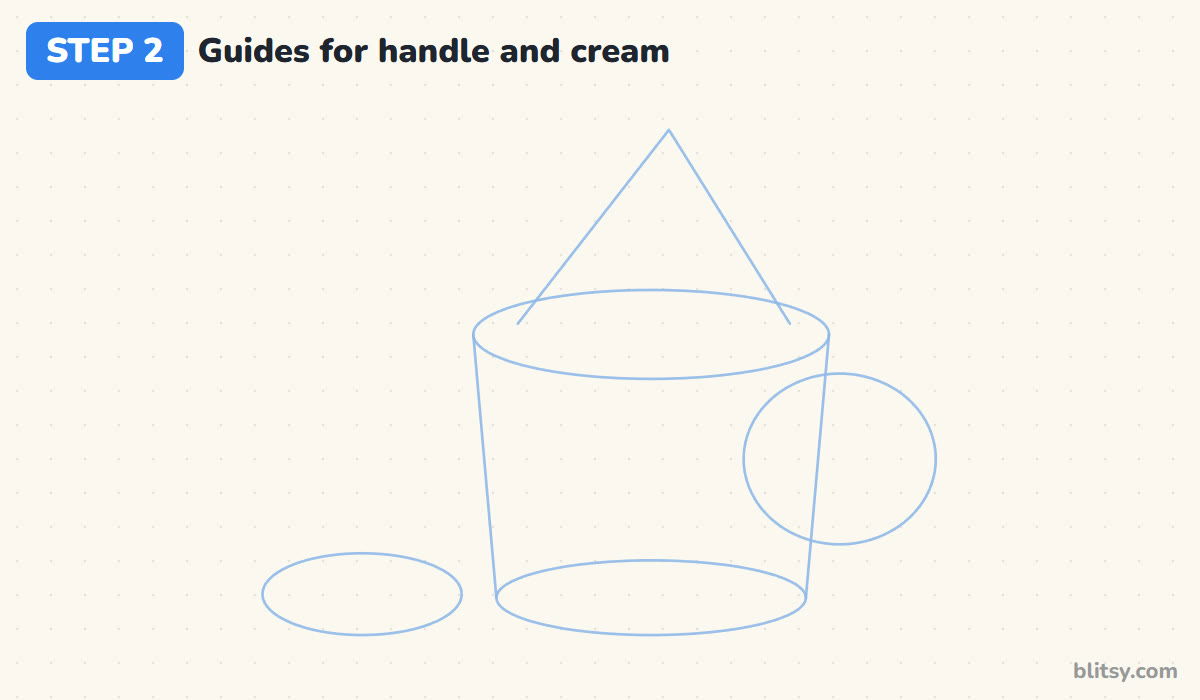
On the right side, draw a circle that overlaps the mug wall for the handle. Above the top oval, sketch a tall triangle; the cream swirl will fit inside it. Finally, a small flat oval to the left of the mug marks where the cookie will lie.
💡 Tip: Let the cream triangle be wider at the bottom than the cocoa is narrow. Cream that spills a bit looks generous.
Step 3: Outline the mug

Go over the back half of the top oval, both side lines and the front curve of the bottom with a firmer line. Bend the sides outward very slightly so the mug feels rounded instead of like a bucket. Skip the front edge of the top oval for now.
💡 Tip: Round off the two bottom corners. Sharp corners make the mug look like a paper cup.




Step 4: Draw the rim and the cocoa surface

Just inside the top oval, draw a second oval a little smaller. That gap is the thickness of the mug wall. Then add a curve a bit lower inside it for the cocoa, so a thin strip of the inside wall shows at the back. Leave small breaks where the cream and marshmallows will cover the lines.
💡 Tip: The cocoa sits below the rim, never level with it. That tiny drop makes the cup look full but not overflowing.
Step 5: Add the curved handle

Trace the outside of the handle circle where it shows past the mug, then draw a smaller oval inside it for the hole. The handle should be thick and chunky. When I teach this, most beginners draw a thin loop, and the mug suddenly looks fragile.
💡 Tip: Make the handle about half as tall as the mug. Too small and it looks like a teacup.
Step 6: Pile on a swirl of whipped cream

Build the cream from the bottom up in three rings, each one smaller than the last. Give every ring a puffy top and a wavy, bumpy lower edge that overlaps the ring under it. Finish with a little curl at the top that leans to one side, like a soft-serve tip.
💡 Tip: Draw the bumps on each ring about the same size. Mixing tiny and huge bumps makes the cream look lumpy.
Step 7: Drizzle chocolate and drop in marshmallows

Draw a wavy ribbon across the middle of the cream, following its curve, with two short drips hanging down. Draw the ribbon as two lines close together so you can color it later. Then add two small rounded squares on the cocoa at each side of the cream for marshmallows.
💡 Tip: Keep the drips short and uneven. Long, matching drips turn into stripes.




Step 8: Draw a heart and curly steam

Place a heart on the front of the mug, a little left of the middle. Because the mug turns slightly, its center is not exactly halfway across. Add a thin rounded stripe near the left edge as a shine, then draw two wavy steam lines rising on each side of the cream.
💡 Tip: Draw the steam with quick, loose wiggles. Slow, careful steam ends up looking like worms.
Step 9: Add a cookie on the side

Inside the small oval, draw the cookie as a flat top oval with a thin band underneath for its thickness. Take a bite out of one edge with a few bumpy curves. Scatter six or so little ovals on top for chocolate chips.
💡 Tip: The bite is what tells people it's a cookie and not a coaster, so don't skip it.
Step 10: Ink the lines and erase the guides

Trace all your keeper lines with a black fineliner: the mug, rim, cocoa, handle, cream, drizzle, marshmallows, heart, steam and cookie. Wait until the ink is fully dry, then erase the ovals, the triangle and the side guides.
💡 Tip: Ink the steam and the drizzle a touch thinner than the mug outline so the cup stays the star.
Step 11: Color your hot chocolate

Color the mug and handle light blue, pressing harder on the right side for shadow. The heart is pink, the cocoa brown and the drizzle dark brown. Keep the cream pale with a soft beige along each ring's lower edge. One marshmallow can stay white and the other light pink. The cookie is light brown with a darker side and dark chips.
💡 Tip: Leave the shine stripe on the mug almost white. That single light line makes the mug look glossy.




Where Mug Drawings Usually Wobble
- A round top instead of an oval. The rim has to be a flat oval, or the mug looks like it's tipping over. Squash it more than you think.
- Cocoa filling the rim to the very edge. Drop the cocoa line slightly below the rim so the wall thickness shows.
- A skinny handle. Thin loops look wiry. Draw the handle chunky, with a clear hole in the middle.
- Cream with smooth sides. Without the bumpy lower edges it reads as a scoop of ice cream. Keep the piped bumps on every ring.
- Steam touching the cream. Leave a small gap between the steam and everything else, so it looks like it's floating up.
Toppings and Mug Designs to Try
Once the basic cup feels easy, change the mug. Stripes, polka dots or a little snowflake on the front all work in place of the heart. You can skip the cream and float a pile of mini marshmallows instead, or swap the cookie for a spoon resting beside the cup. Younger kids can leave out the drizzle and just color the cream. If you liked piping the cream swirl, the cupcake drawing step by step tutorial uses the same bumpy frosting rings. For another sweet treat, try the birthday cake drawing lesson, or draw a strawberry to sit next to your mug.
Free Hot Chocolate Coloring Page and Step Guide
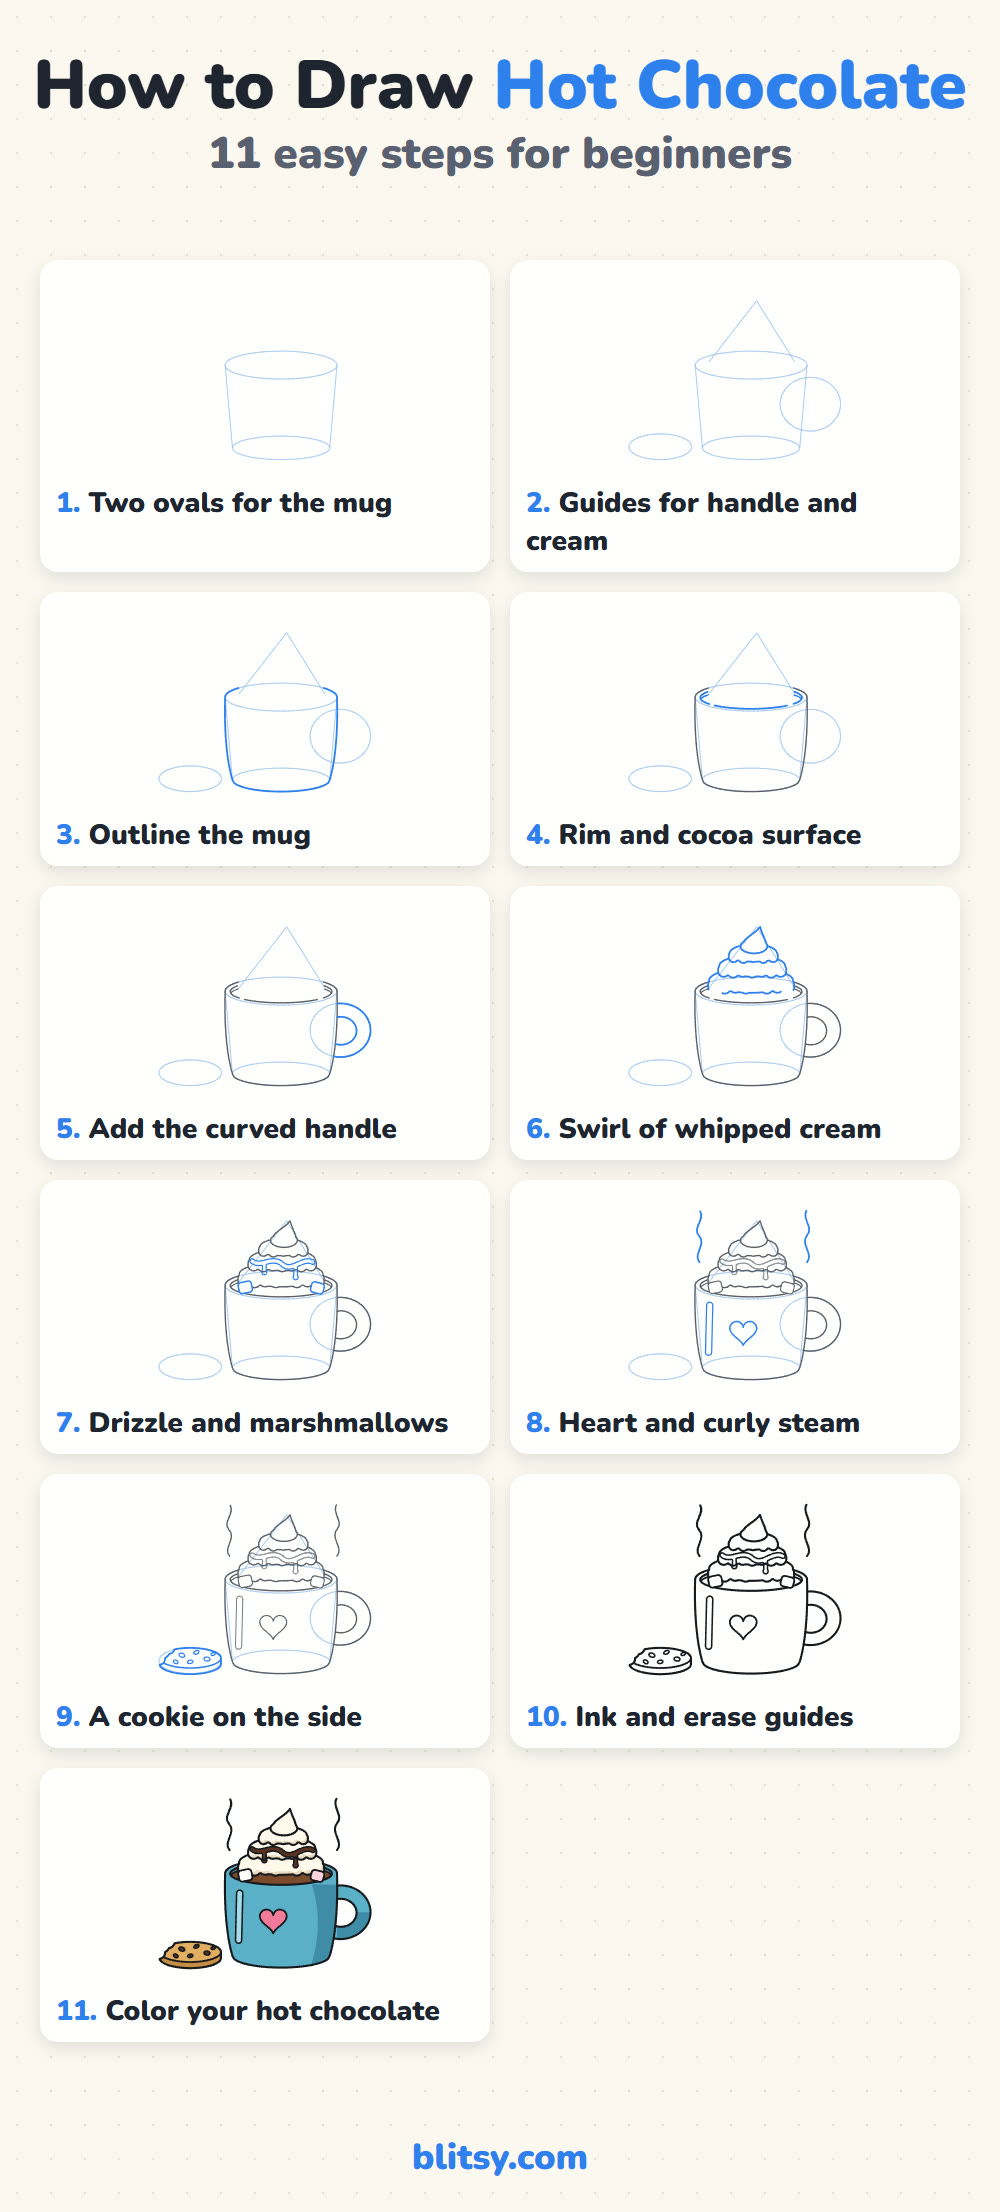
The free hot chocolate coloring page shows the finished mug in color at the top with a small key that matches each color to its part, and a big outline below for coloring. The step-by-step PDF guide holds all 11 steps with pictures and tips, so you can draw away from a screen. Both print on Letter or A4 paper.

Black outlines with a colored example and the color names at the top. Ready to print and color.
⬇️ Download Coloring PageEvery step picture with its instructions and tips, to keep beside your paper while you draw.
⬇️ Download Drawing Guide📱 On a phone? Tap a download button, then open the file and choose Share → Save to Files or Print. On a computer, the PDF opens or saves straight to your Downloads folder.
Pin the Cozy Mug Steps
More Sweet Things to Draw Next
Each of these lessons builds one subject with a picture for every step, just like this cozy mug.
- Cupcake Drawing: A frosting swirl with sprinkles sits on a striped liner in this cupcake drawing tutorial.
- Birthday Cake Drawing: A two-tier party cake with frosting drips and lit candles stands on a cake stand in this birthday cake drawing step by step lesson.
- Strawberry Drawing: A plump berry with a leafy cap sits beside a cut half in this strawberry drawing tutorial.
- Pizza Drawing: A whole pepperoni pizza with one slice pulled aside starts from a flat oval in this pizza drawing guide.
- Penguin Drawing: A friendly bird for a chilly day, drawn from simple shapes in this penguin drawing tutorial.
Hot Cocoa Drawing Questions Answered
How do you draw a simple hot chocolate mug?
Draw a flat oval for the rim and a smaller one for the base, join them with two slightly curved lines, and add a chunky handle on one side. A wavy cream swirl on top finishes it.
How do you draw steam coming off a cup?
Draw two or three loose wavy lines rising above the cup, with a small gap between them and the drink. Quick, light wiggles look the most natural.
How do I draw whipped cream on top of a drink?
Stack three rings that get smaller as they go up, each with a bumpy lower edge, then add a little curled tip on top.
What colors do I need to color hot chocolate?
Brown for the cocoa, cream or pale yellow for the whipped cream, dark brown for the drizzle, and any color you like for the mug.
Now grab a real cup of something warm and draw yours while it's still steaming. ☕✏️
Related posts:
 How to Draw a Door Step by Step (Cozy Cottage Door)
 How to Draw a Whale Step by Step (Easy for Beginners)
 How to Draw Lungs Step by Step (Easy Science Diagram)
 How to Draw a Pineapple Step by Step (Easy Crown and Slice)
 How to Draw Iron Man Step by Step (Easy Chibi for Kids)
 How to Draw a Dress Step by Step (Easy Party Dress)
 How to Draw a Chicken Step by Step (Easy for Beginners)
 How to Draw a UFO Step by Step (Cute Alien Saucer)
 How to Draw Flames Step by Step (Easy Campfire Drawing)
 How to Draw a Moon Step by Step (Sleepy Crescent + Phases)
 How to Draw a Sunflower Step by Step (Big and Bright)
 How to Draw a Fall Leaf Step by Step (Maple, Oak and Birch)

