
A box turned so its corner points at you looks tricky, yet it comes down to one upright line and two slants. In this lesson I'll show you how to draw a gift box step by step, from that first corner to a bright birthday present with teal sides, an overhanging lid, a pink ribbon, a big bow and a tag waiting for a name.

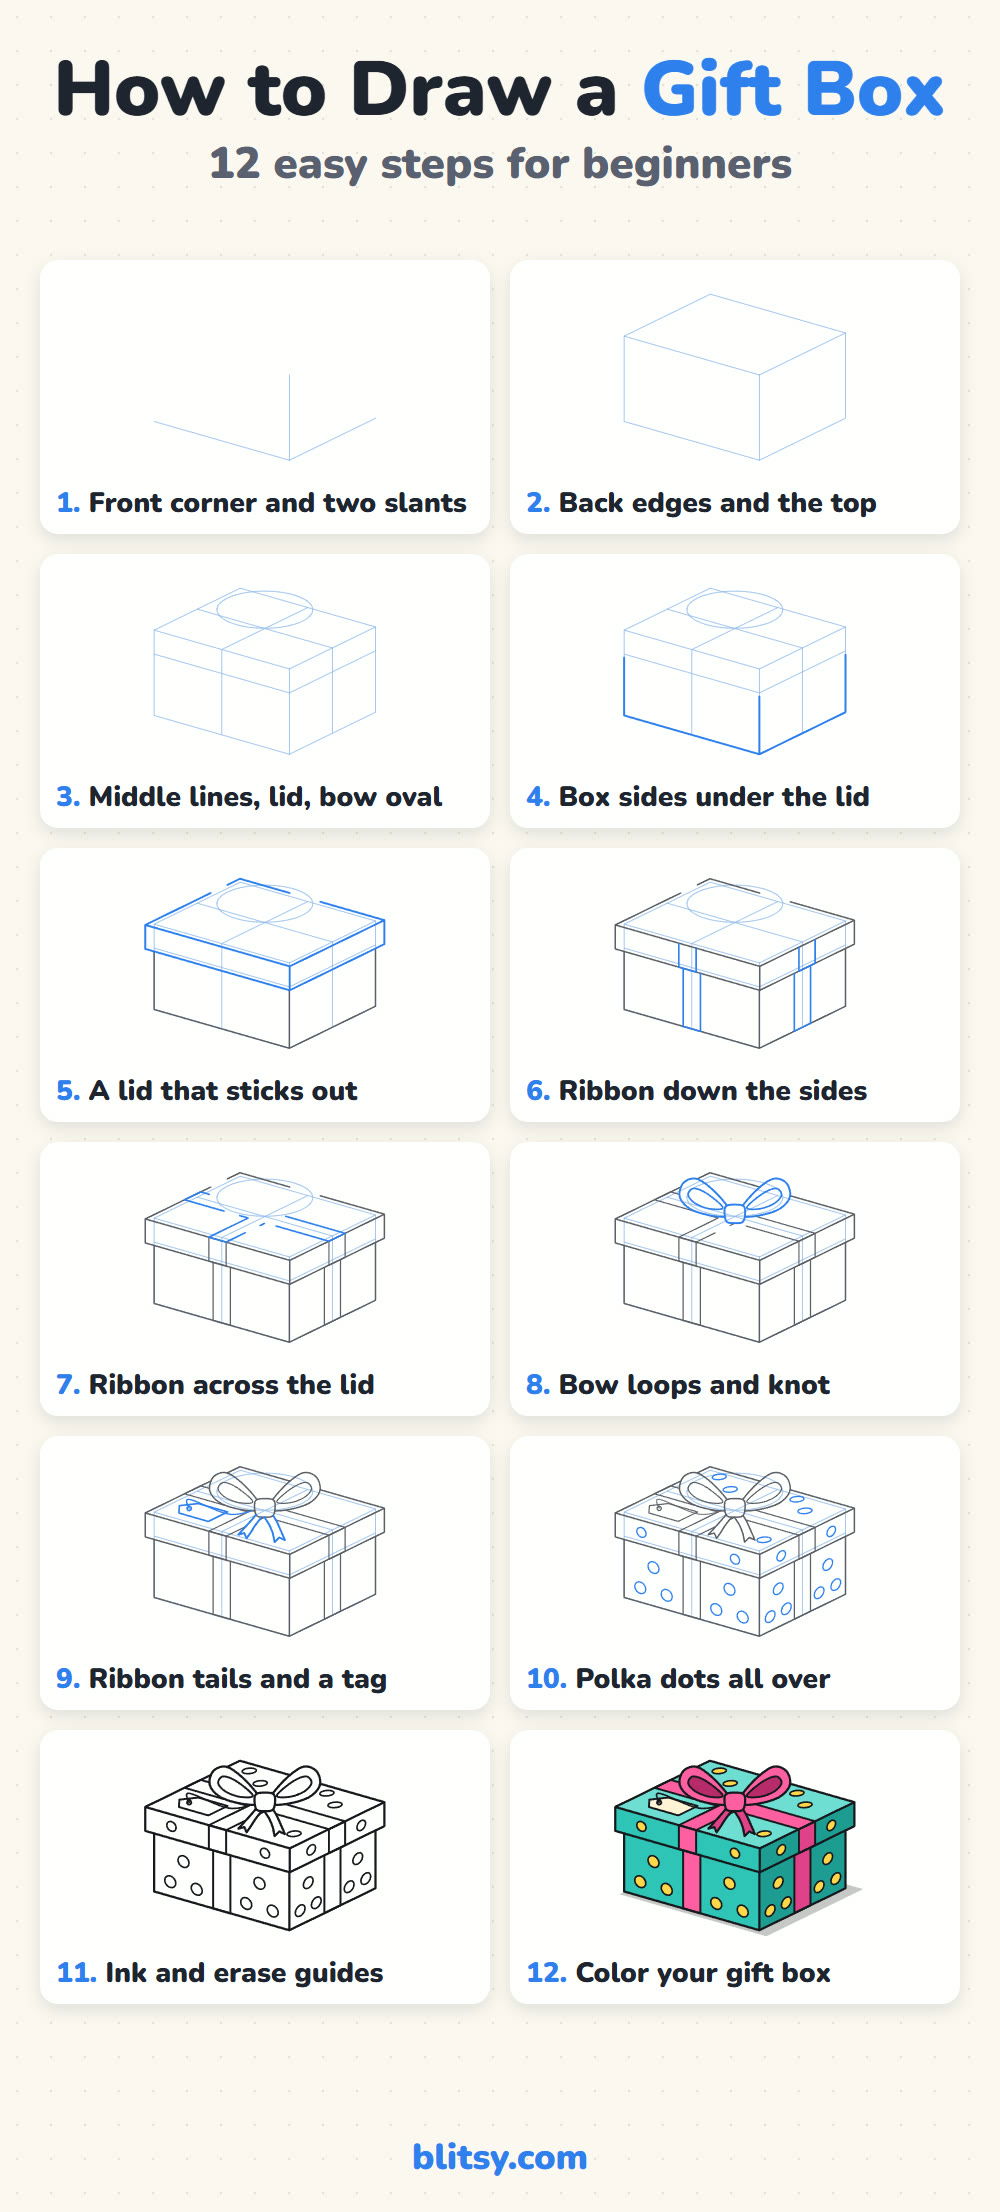
Wrapping a present happens in layers, and so do these pictures: today's new lines are blue, while gray ones are already on your paper.
Quick overview
⏱️ Time: about 30 minutes, coloring included
🎯 Level: easy, fine for kids around 7 and older
✏️ Steps: 12
🎁 You'll draw: a 3D birthday present with a lid, ribbon, bow and tag
Gift Box Drawing Supplies
- A pencil you can press lightly (HB works well)
- A ruler, if you like straight edges (optional)
- An eraser
- A black marker or fineliner for the final outline
- Colored pencils, crayons or markers in teal, pink, yellow and cream
- Plain white paper
I like a ruler for the box edges, but slightly wobbly freehand lines look friendly too.
How to Draw a Gift Box Step by Step
Step 1: Draw the front corner and two slants
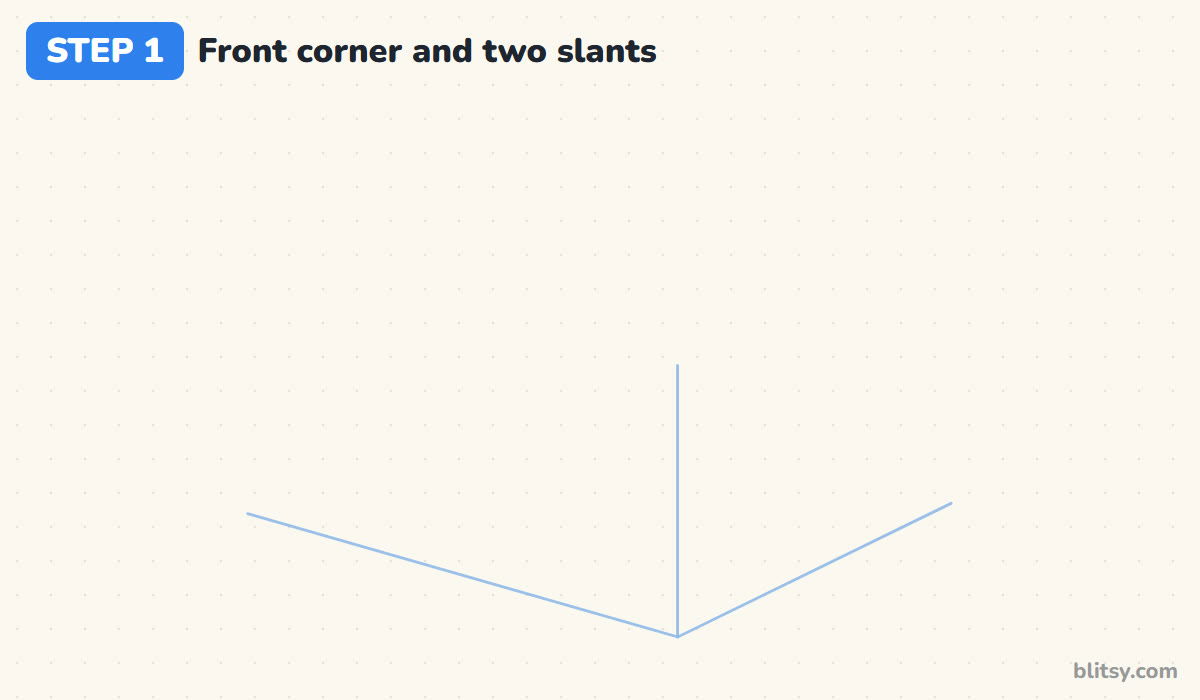
Near the bottom middle of the page, draw a short vertical line. That's the edge closest to you. From its bottom, draw one slant up to the left and one up to the right. I make the left one longer and flatter, so the box turns slightly toward us instead of sitting square.
💡 Tip: Keep these lines very light. Every guide you draw today gets erased at the end.
Step 2: Add the back edges and the top
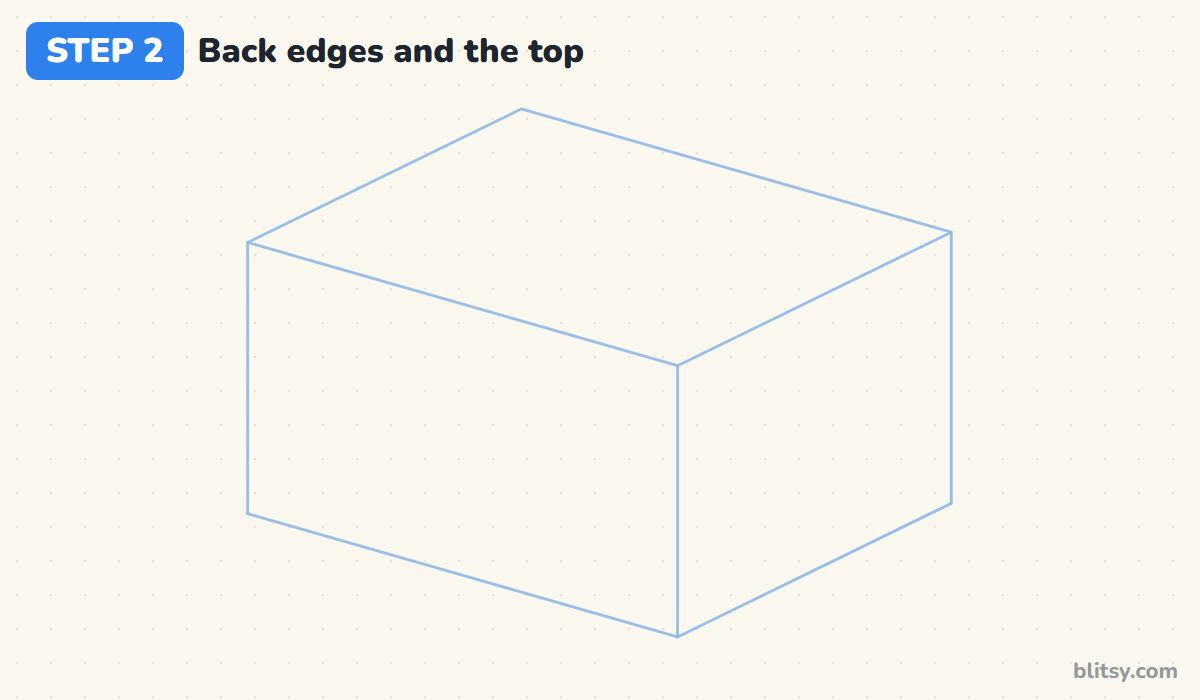
At the end of each slant, draw a vertical line as tall as the front corner. Join the tops with two lines that copy the slants, then close a flat diamond on top. This is the rule I repeat most when I teach boxes: vertical lines stay vertical, and lines that run the same way stay parallel.
💡 Tip: Hold your pencil against the bottom slant, then slide it up to check the top edge leans the same way.
Step 3: Mark the middle lines, the lid line and a bow oval
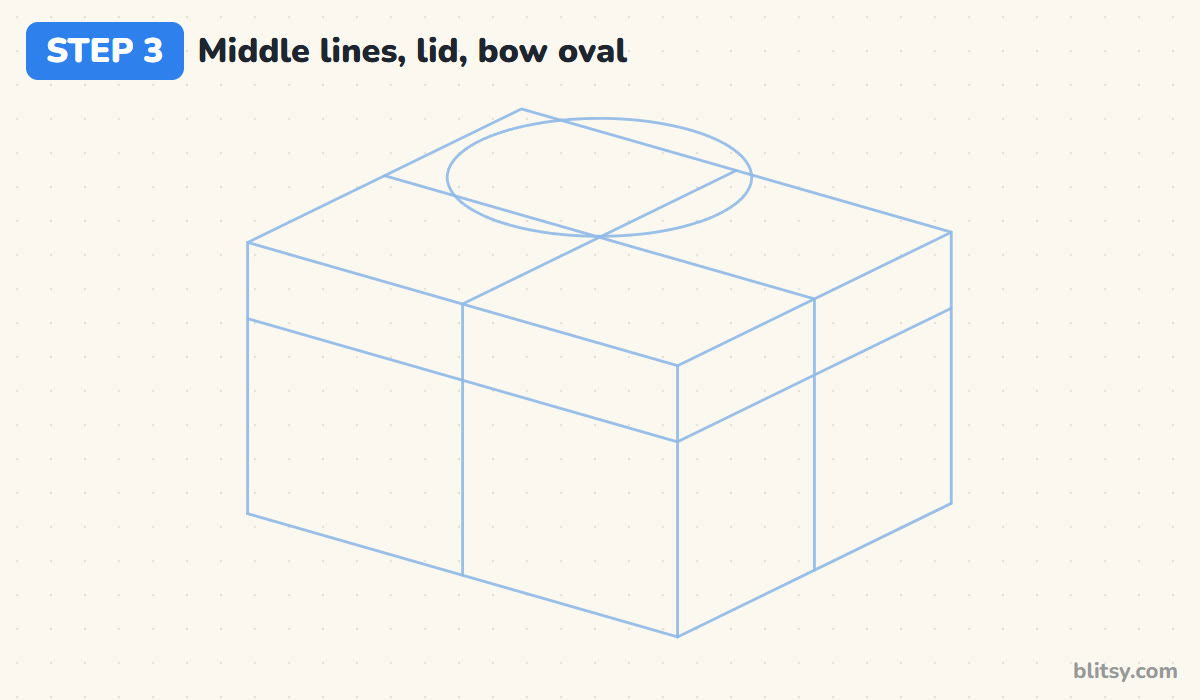
Draw a line down the middle of each side and two lines across the top that cross in its center. That's where the ribbon goes. A little below the top, draw a slanted line on both sides for the bottom of the lid. Then sketch a wide oval above the crossing to save room for the bow.
💡 Tip: To find a middle quickly, eyeball the halfway point at the top and at the bottom of a side, then join the two dots.




Step 4: Outline the box sides under the lid
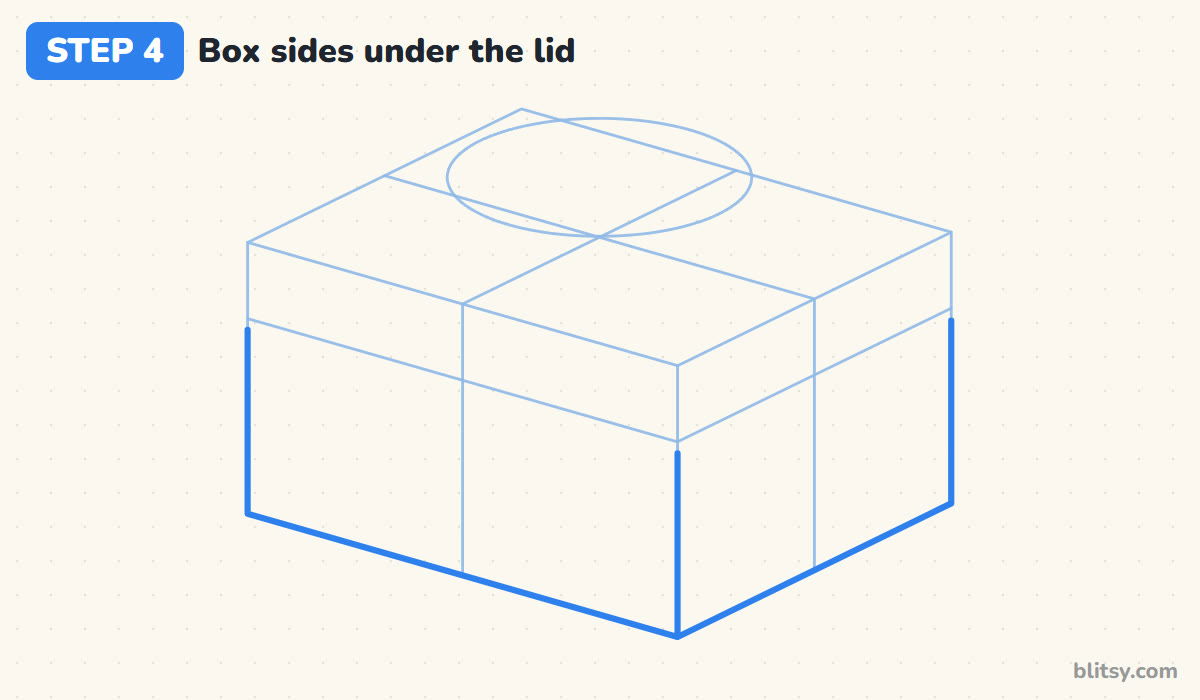
Trace the front corner, the two back edges and the two bottom slants with a firmer line, but only up to the lid line. The lid will cover the rest.
💡 Tip: Press a little harder here than on the guides, so you can tell keeper lines apart from helper lines.
Step 5: Draw a lid that sticks out
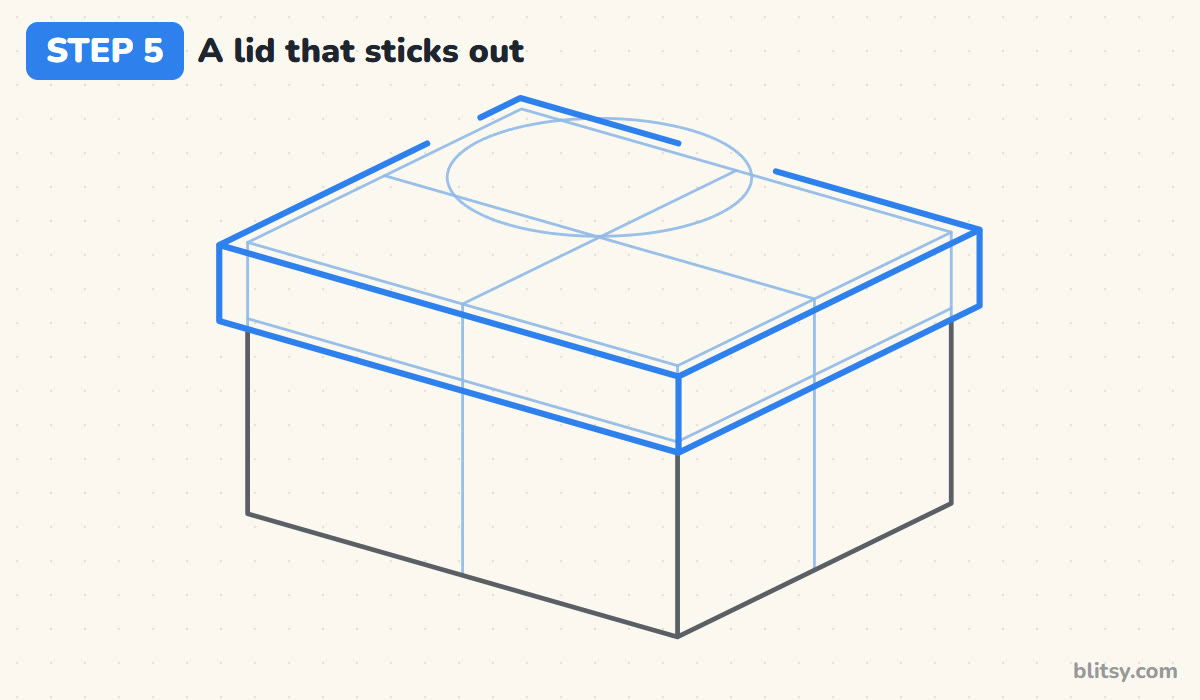
A lid is just a thin, slightly wider box on top. Draw its bottom edge a little outside the box sides so it hangs over on the left, right and front. Add short verticals at the corners and finish with a top diamond a touch bigger than the guide. Leave small gaps in the back edges where the bow oval sits.
💡 Tip: Keep the overhang small. If the lid sticks out too far, the box starts to look like a table.
Step 6: Run the ribbon down the sides
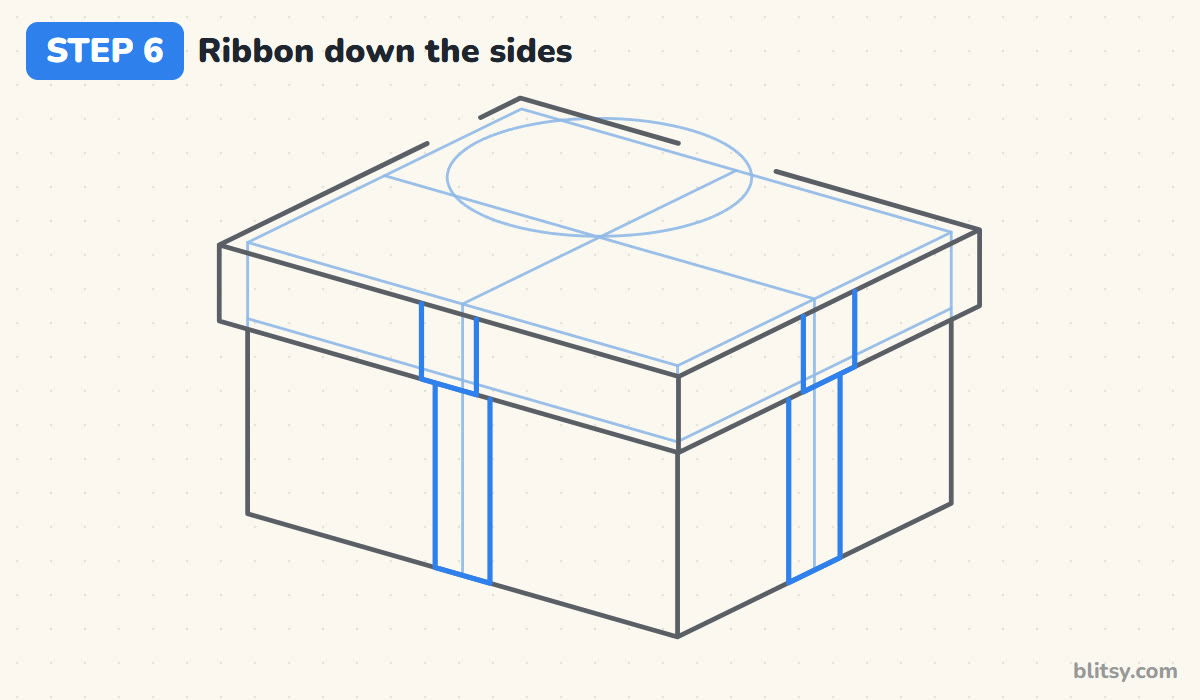
On each side, draw two vertical lines close together around the middle guide, and line up two more on the lid edge. The ribbon on the right looks narrower because that side turns away from us. That small change is perspective doing its job.
💡 Tip: Measure the ribbon width with your thumbnail and use the same width every time.
Step 7: Carry the ribbon across the lid
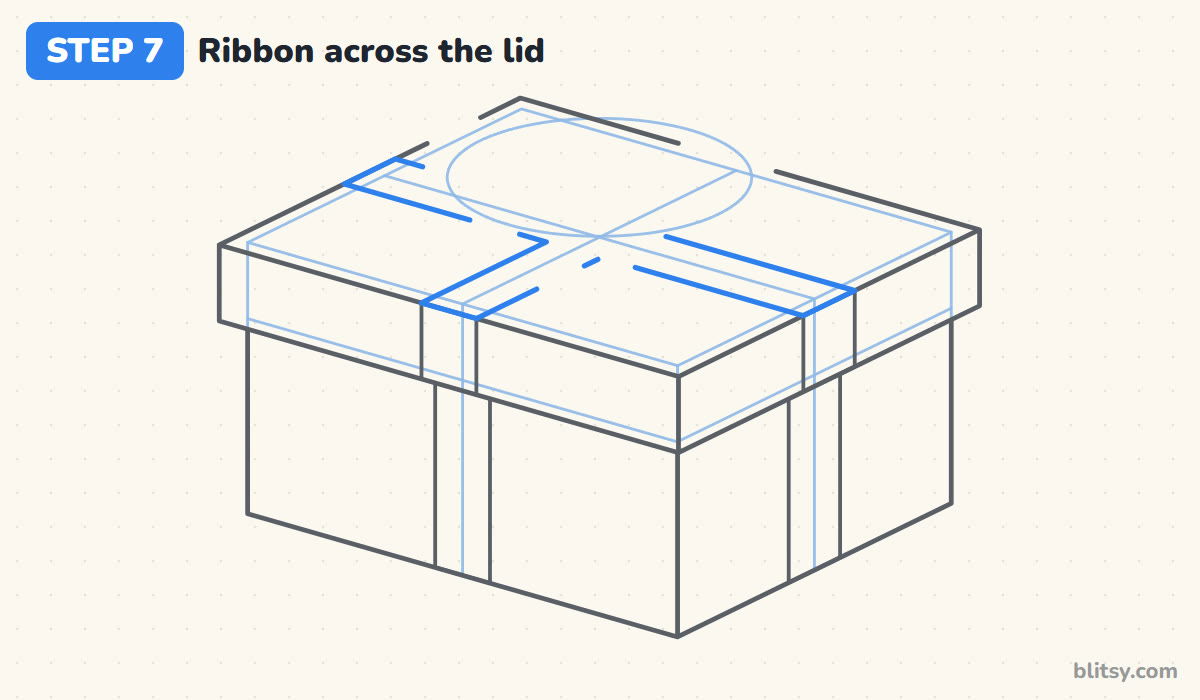
Each ribbon band climbs over the edge and runs across the top. Draw a band along each cross guide, parallel to the lid edges, and stop at the bow oval. The bow will hide the crossing.
💡 Tip: Check that each band on top starts exactly where the band on the side ends. A step there looks like a broken ribbon.


Step 8: Draw the bow loops and knot
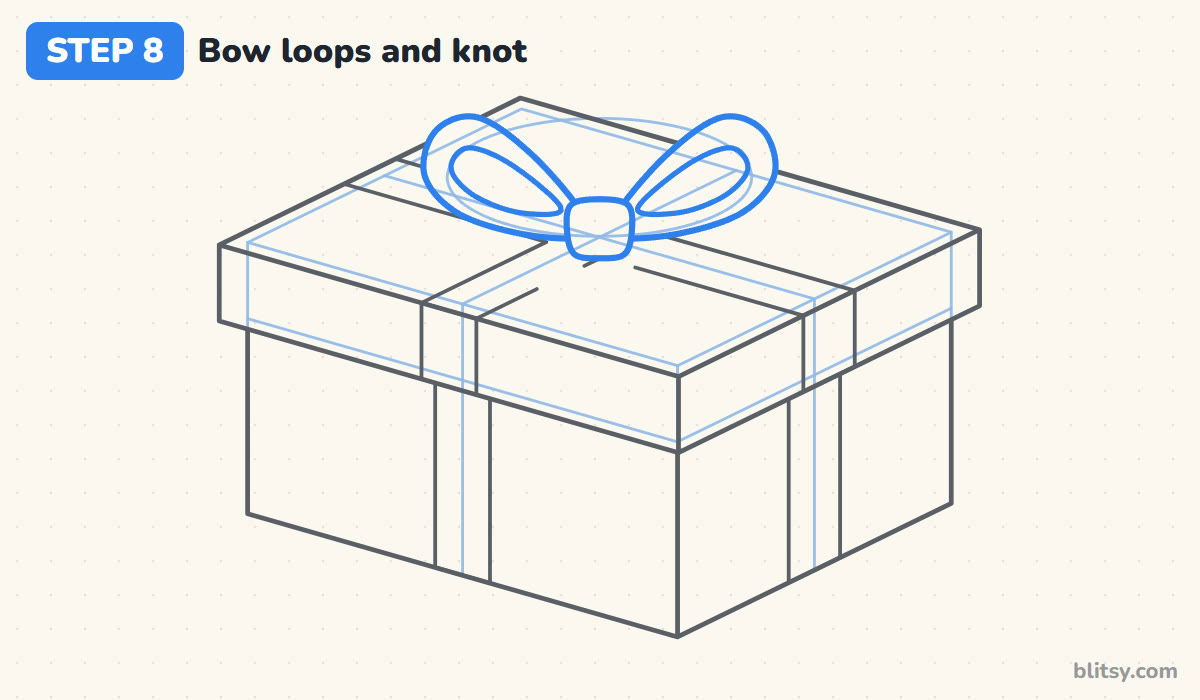
In the middle of the oval, draw a small rounded square for the knot. From each side, pull out a big loop that rises and bends back down, like a teardrop lying on its side, with a smaller curve inside for the opening. I make the loops nearly as wide as the oval, because a tiny bow on a big box looks shy.
💡 Tip: Draw one loop, then turn the page upside down to check the second one matches it.
Step 9: Add the ribbon tails and a gift tag
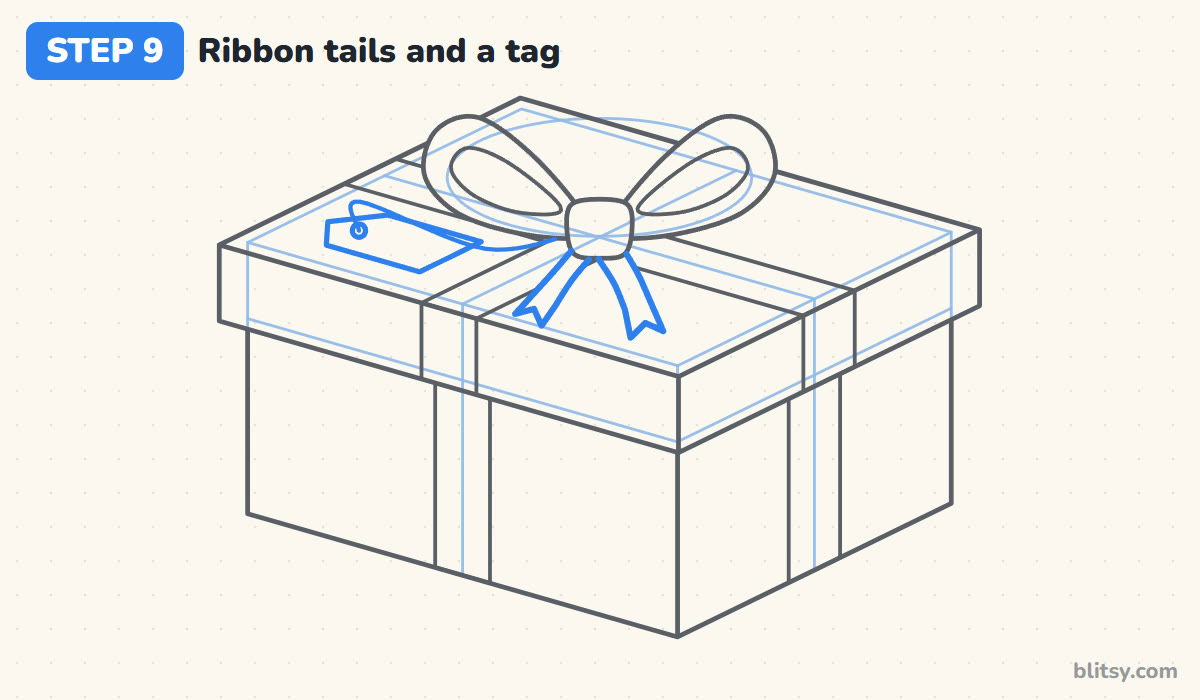
Below the knot, draw two tails that fall forward onto the lid like an upside-down V, each with a small notch at the end. On the left of the lid, add a tag: a rectangle with one pointed end and a hole. It lies flat, so it follows the slant of the lid edges. A thin wavy string ties it to the knot.
💡 Tip: Younger kids can skip the tag. The present still reads fine without it.
Step 10: Scatter polka dots all over
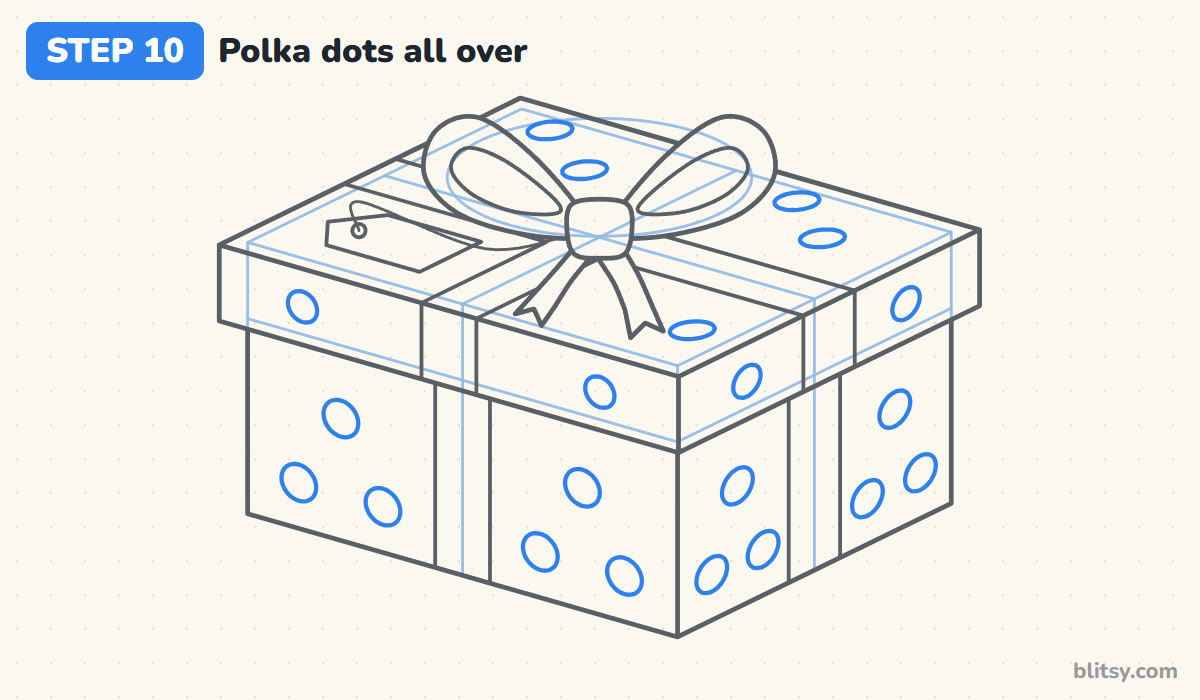
Fill the empty spaces with dots. On the sides they become squashed ovals that lean with the box, and on the lid they get flatter still. That squashing keeps the pattern stuck to the surface. Keep the dots off the ribbon and leave space between them.
💡 Tip: Space the dots in loose rows that follow the bottom edge. Random clumps make the box look spotty, not patterned.
Step 11: Ink the box and erase the guides
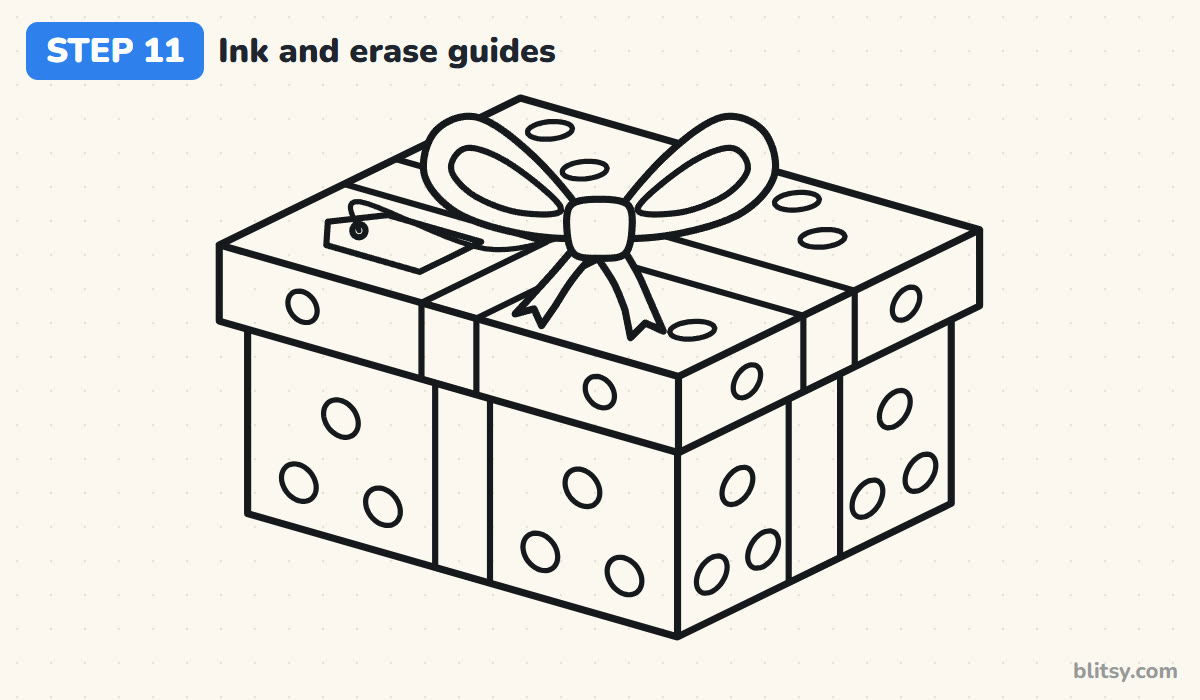
Go over every keeper line with the black marker, but skip the middle lines and the bow oval. When the ink is dry, erase the pencil until only the clean outline is left.
💡 Tip: Ink the bow first while your hand is steady. The straight box edges are more forgiving.


Step 12: Color your gift box
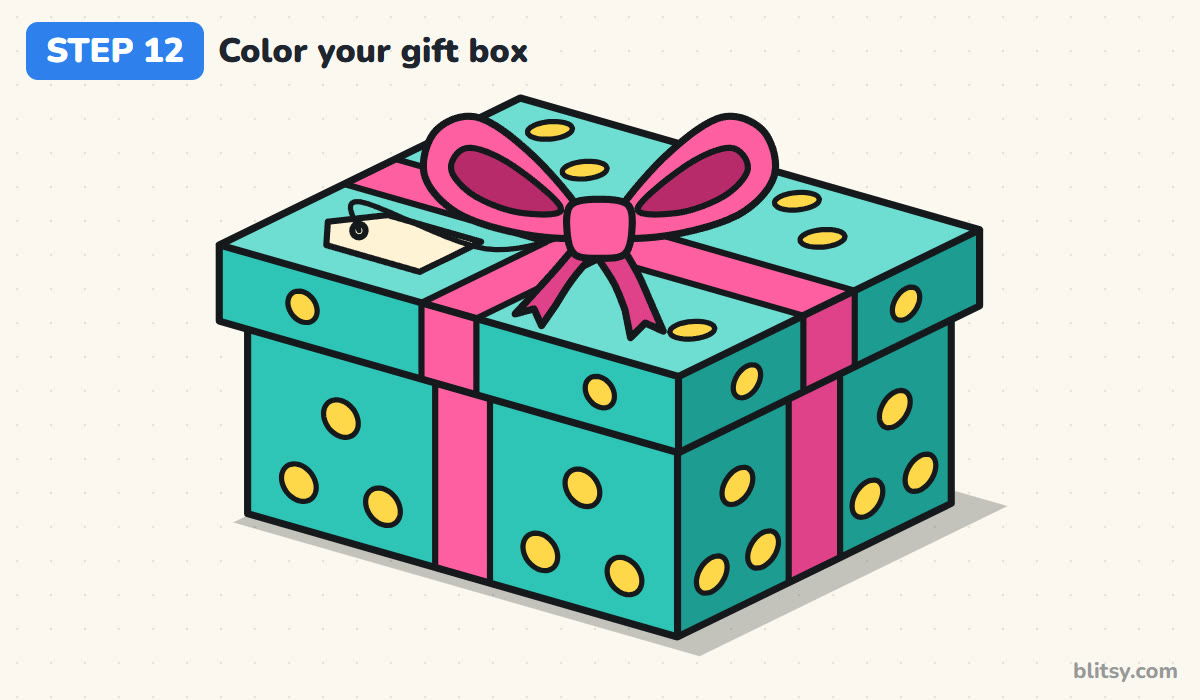
Color the left side and lid edge teal and the right side a darker teal, since it's in shade. The lid top gets a lighter teal where the light lands. Make the ribbon and bow hot pink, with darker pink on the shady ribbon, the tails and inside the loops. Add yellow dots, a cream tag and a soft gray shadow.
💡 Tip: Use the same three shades of one color for top, light side and shady side on any box you draw. It makes it look 3D right away.
Why Present Drawings Look Lopsided
- Slanted vertical edges. If the corner lines lean, the box looks like it's falling over. Keep every upright edge straight up and down.
- Top lines that don't match the bottom. The top edges must lean the same way as the bottom slants. Check them with your pencil held along both.
- A ribbon off center. Draw the middle guides first, so the ribbon really splits each side in half.
- Round dots on a slanted side. Perfect circles look pasted on. Squash them a little so they follow the side they sit on.
- A tiny bow. The bow is the star of a present. Let its loops reach almost as wide as the ribbon cross.
Wrapping Ideas for Your Next Present
Swap the dots for stripes that follow the slant of each side, or try stars and hearts. A stack of three boxes in different sizes is my favorite perspective practice, and writing a name on the tag turns the drawing into a birthday card. Set your present next to the birthday cake drawing step by step for a party scene, float a bunch from the balloon drawing tutorial above it, and add a treat with the how to draw a cupcake lesson.
Gift Box Coloring Page and Printable Step Guide
The free gift box coloring page has a colored present at the top as a guide, a key that matches each color to its part, and a big outline below ready to color. The step-by-step PDF guide holds all 12 steps with pictures and tips, so you can draw without a screen. Both print on Letter or A4 paper.
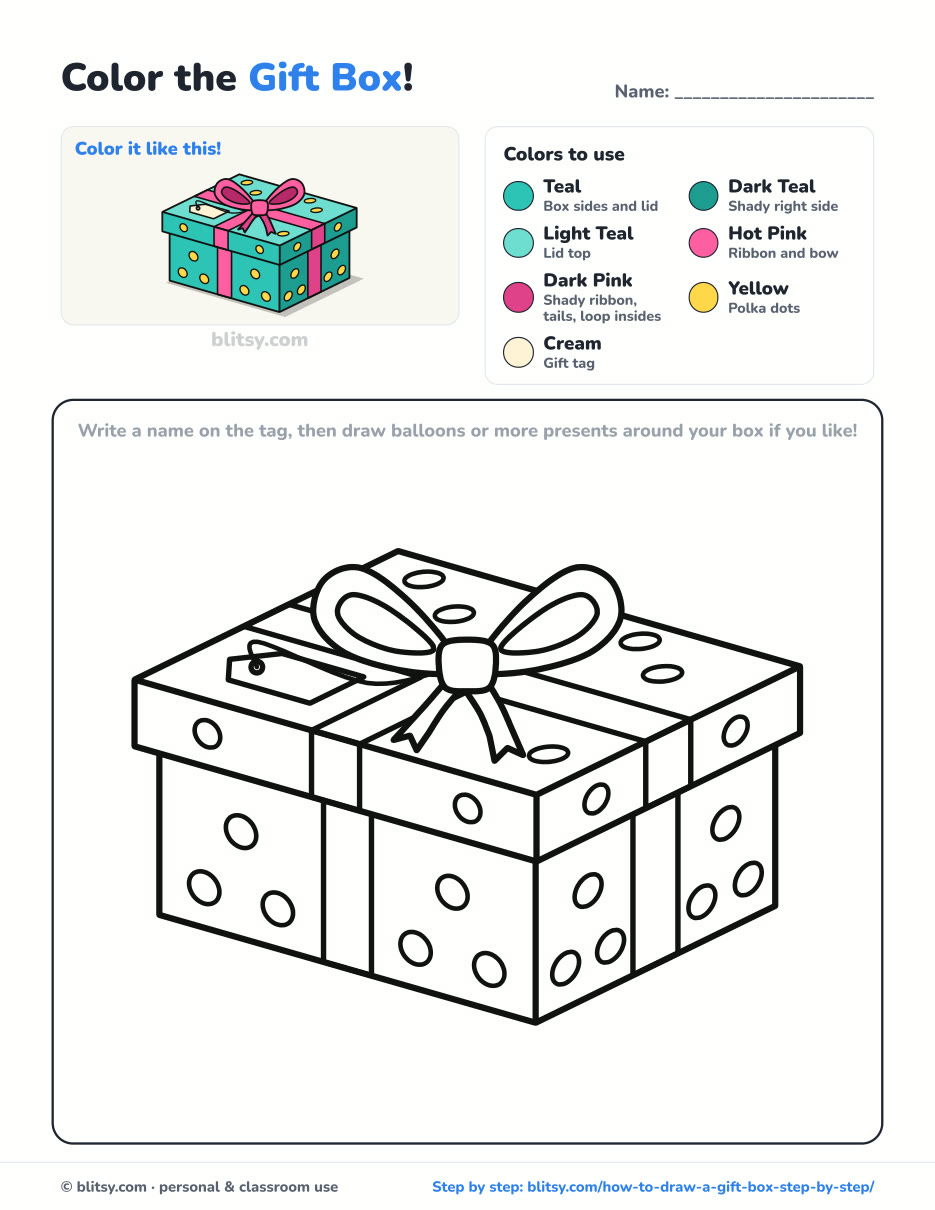
Black outlines with a colored example and the color names at the top. Ready to print and color.
⬇️ Download Coloring PageEvery step picture with its instructions and tips, to keep beside your paper while you draw.
⬇️ Download Drawing Guide📱 On a phone? Tap a download button, then open the file and choose Share → Save to Files or Print. On a computer, the PDF opens or saves straight to your Downloads folder.
Keep the Present Steps on Pinterest
Party Drawings to Pair With Your Present
These are full step-by-step lessons too, each with a picture for every stage, so you can build a whole birthday scene.
- Birthday Cake Drawing: A two-tier cake with dripping frosting, sprinkles and three lit candles on a stand, in this how to draw a birthday cake step by step lesson.
- Balloon Drawing: Five party balloons and a gold star tied under one bow, from this balloon drawing tutorial.
- Cupcake Drawing: A kawaii cupcake with a swirl of frosting, a cherry and a pleated liner in this cupcake drawing step by step guide.
- Unicorn Drawing: A chibi unicorn with a golden horn and a pastel mane prancing on a cloud, in this unicorn drawing tutorial.
- Star Drawing: Build an even five-point star on two circles and shade it like a gem with this how to draw a star lesson.
Your Gift Box Drawing Questions
How do you draw a 3D gift box easily?
Start with one vertical line for the front corner and two slants from its bottom. Add matching back edges, close the top with lines parallel to the slants, and you have a solid 3D box to wrap.
How do you draw a bow on a present?
Draw a small rounded knot first, then a loop on each side that looks like a teardrop lying down. Add two tails under the knot with notched ends.
How long does it take to draw a gift box?
I'd plan on about 30 minutes with coloring. The box goes quickly; the bow and dots take the most care.
What colors look good on a birthday present drawing?
Pick one main color and one bright ribbon color that stand apart, like teal with pink, purple with yellow or blue with orange. Then use a darker shade of the box color on the shady side.
One corner line is all it takes to start, so pick up your pencil and wrap somebody a hand-drawn birthday surprise. 🎁✏️
Related posts:
 How to Draw a Car Step by Step (Easy Drawing for Beginners)
 How to Draw a Whale Step by Step (Easy for Beginners)
 How to Draw an Arctic Fox Step by Step (Easy for Beginners)
 How to Draw a Chicken Step by Step (Easy for Beginners)
 How to Draw a Snowman Step by Step (Easy for Beginners)
 How to Draw an Airplane Step by Step (Easy Jet for Beginners)
 How to Draw a Mouse Step by Step (Easy for Beginners)
 How to Draw a T-Rex Step by Step (Easy for Beginners)
 How to Draw a Pig Step by Step (Easy for Beginners)
 How to Draw a Minion Step by Step (Easy for Beginners)
 How to Draw a Yorkie Step by Step (Easy for Beginners)
 How to Draw a Notebook Step by Step (Easy for Beginners)

