
Notebooks look simple until you try the spiral. Twelve little rings in a row, all the same size and spacing, will show every wobble. In this lesson I'll show you how to draw a notebook step by step, starting with a slanted box and a few tick marks that keep those rings even. You'll end with a bright spiral notebook on a desk, a doodled label and a sharpened pencil on top.

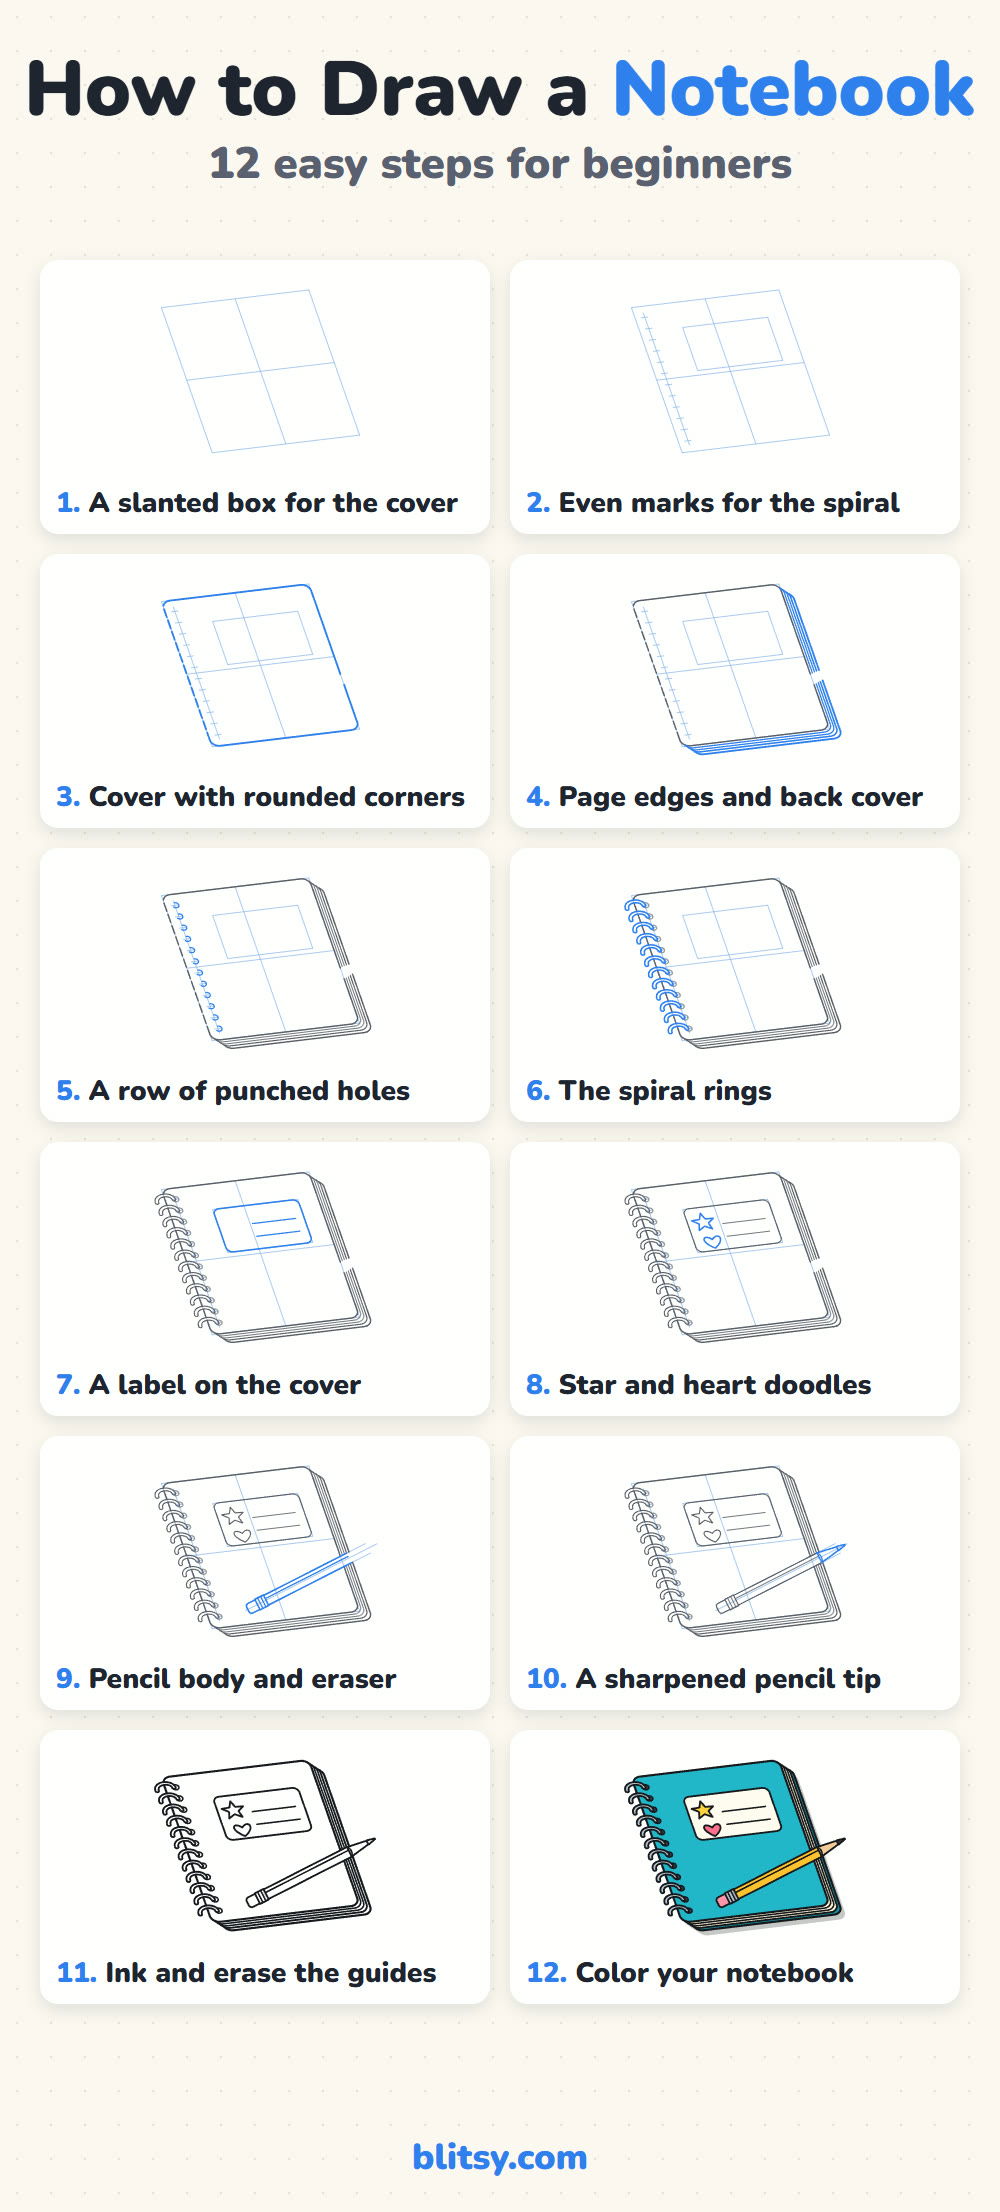
Blue marks the lines added in that picture, while gray shows everything from earlier steps. Copy only the blue each time.
Quick overview
⏱️ Time: about 30 minutes, coloring included
🎯 Level: easy, fine for kids from about 6 up
✏️ Steps: 12
📓 You'll draw: a closed spiral notebook in a slight ¾ view, with a pencil on top
Desk Supplies for This Notebook Sketch
- A pencil you can press lightly (HB works well)
- A soft eraser
- A ruler for the slanted box and the spiral marks
- A black marker or fineliner for the final lines
- Colored pencils or markers: turquoise, cream, gray, yellow, pink, tan and black
- A sheet of plain white paper
The ruler isn't strictly needed, but it makes the spiral marks far easier to space evenly.
How to Draw a Notebook Step by Step
Step 1: Draw a slanted box for the cover
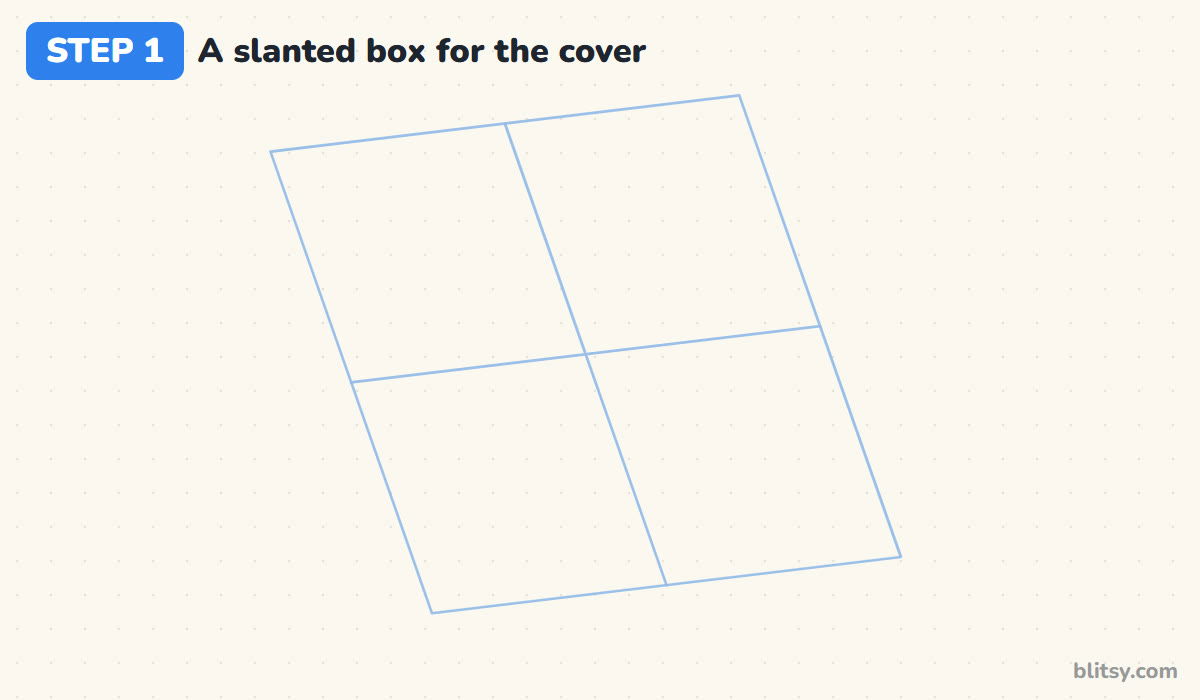
Instead of a straight rectangle, draw a box that leans. The top edge rises a little to the right, and the two side edges tilt to the right as they go down. That lean is what makes the notebook look like it's lying on a desk and not standing up. Add one line down the middle and one across the middle to split the box into four parts.
💡 Tip: Keep opposite edges parallel. If the left and right sides lean by different amounts, the cover looks twisted.
Step 2: Mark even spots for the spiral
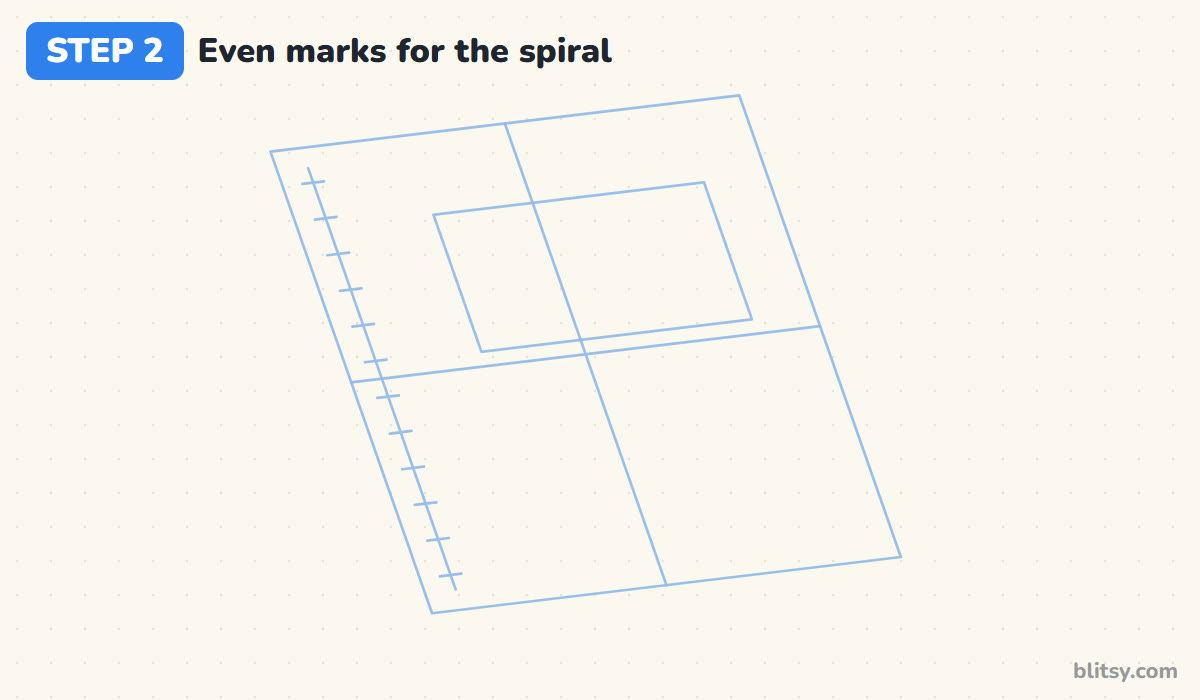
Close to the left edge, draw a light line that runs the same direction as that edge. Put twelve short tick marks across it, from near the top to near the bottom. I place the first and last ticks, then the middle one, then fill each half. Sketch a smaller slanted box in the upper half for the label too.
💡 Tip: Measure with a ruler: if the line is 12 cm long, a tick every centimeter does the job.
Step 3: Outline the cover with rounded corners
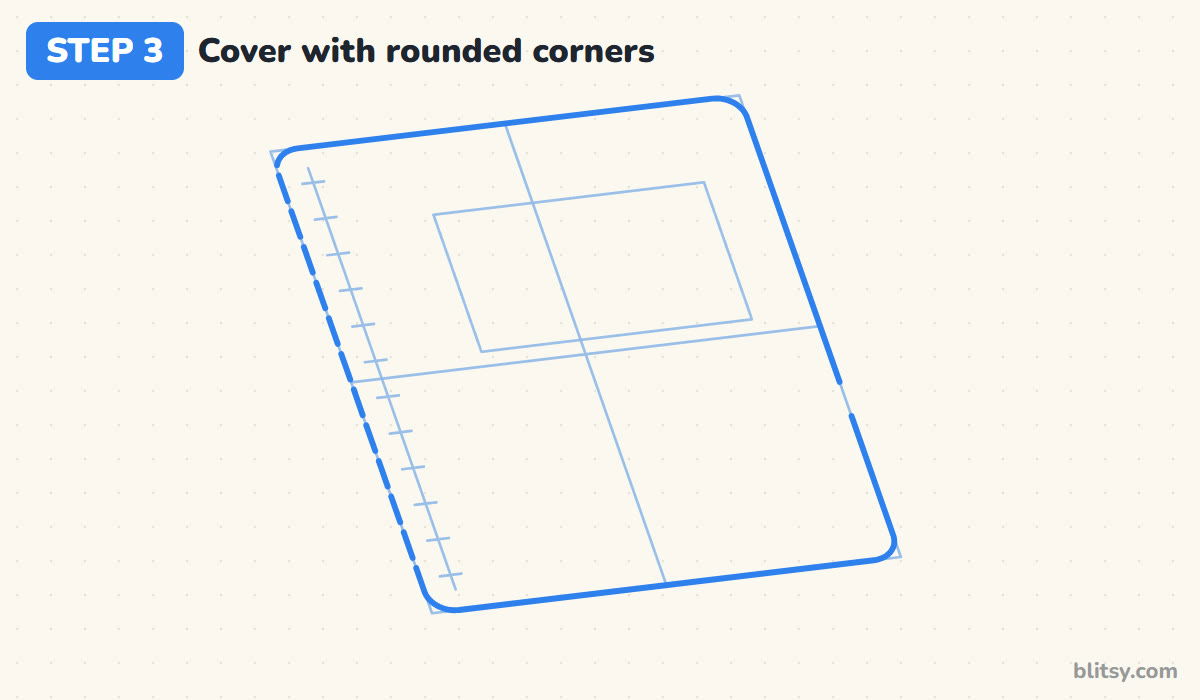
Trace over the big box with a firmer line, rounding off all four corners. Real notebook covers are never sharp at the corners, and the soft curve makes it look like a real object. Along the left side, leave tiny gaps at each tick mark, where the rings will cross the edge.
💡 Tip: Draw each rounded corner as one smooth stroke instead of several short ones.




Step 4: Add the page edges and back cover
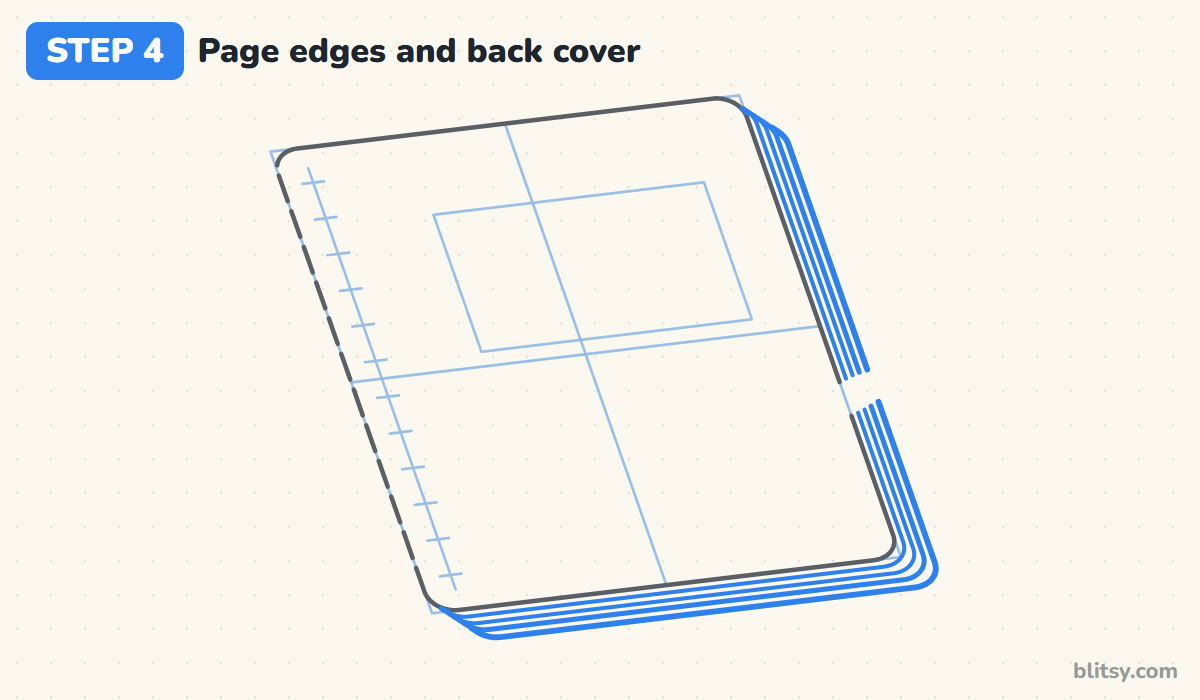
Below the bottom edge and along the right side, draw a few lines that copy the cover's outline, each one a little lower and further right than the last. These are the stacked pages. The outermost line is the back cover. Stop the lines where the cover's left corner hides them, so they only peek out on two sides.
💡 Tip: Three or four page lines are plenty. More than that turns into a gray smudge once you ink it.
Step 5: Draw a row of punched holes
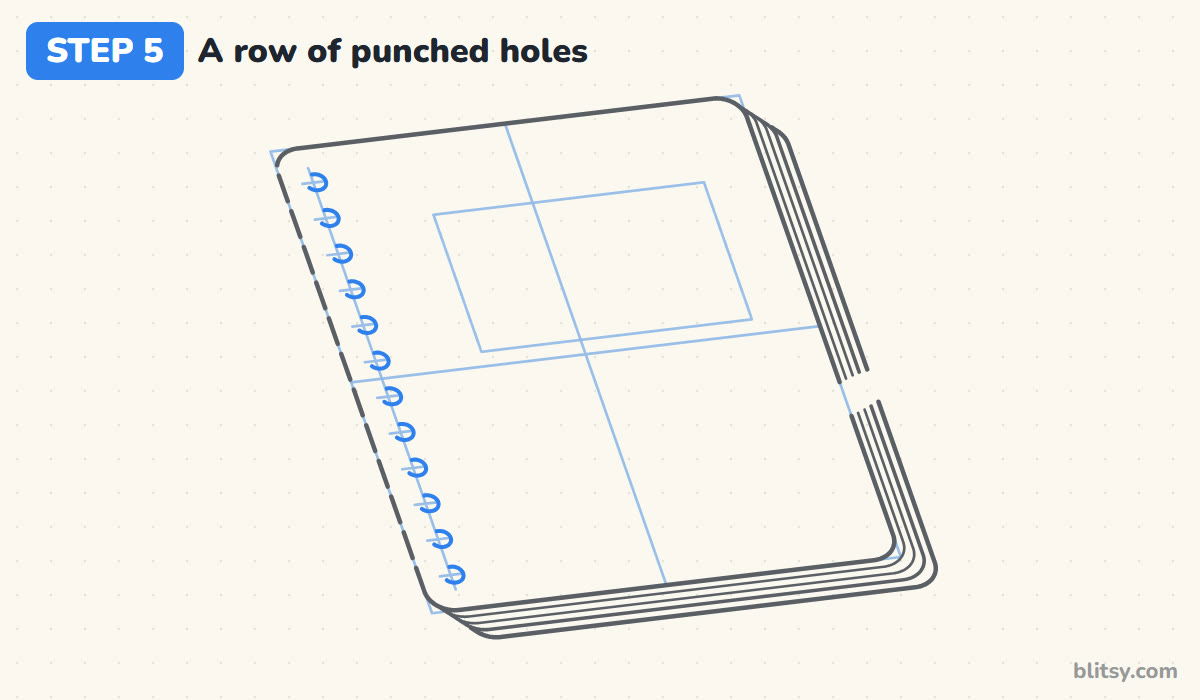
On each tick mark, draw a small circle just to the right of the guide line. These are the holes the wire goes through. Keep every hole the same size, since an odd one is easy to spot later.
💡 Tip: Tiny circles are easier if you turn the paper so you draw them with a comfortable wrist motion.
Step 6: Draw the evenly spaced spiral rings
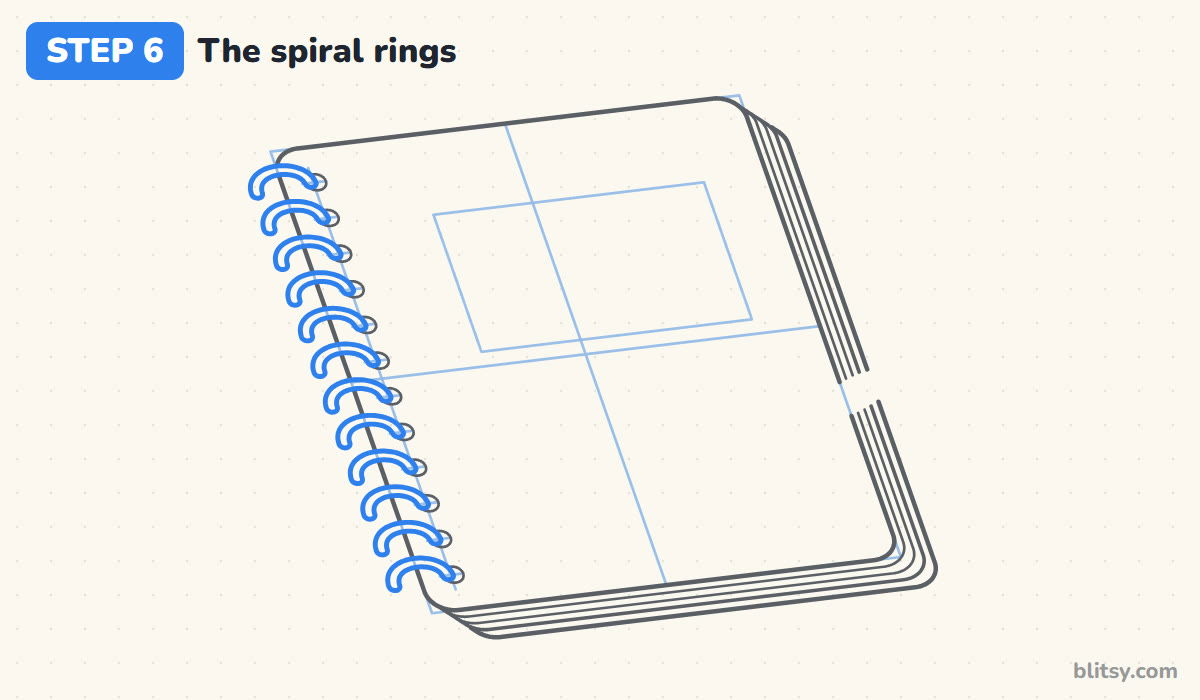
From each hole, draw a thick curved loop that arches up and over the left edge of the cover, like a little upside-down letter C lying on its side. Each ring is two curved lines a pencil width apart, joined round at the ends. Copy the very same curve twelve times, using the tick marks so the gaps between rings stay equal.
💡 Tip: Draw all the outer curves first, then go back for the inner ones. Repeating one motion keeps the rings matching.
Step 7: Add a label to the cover
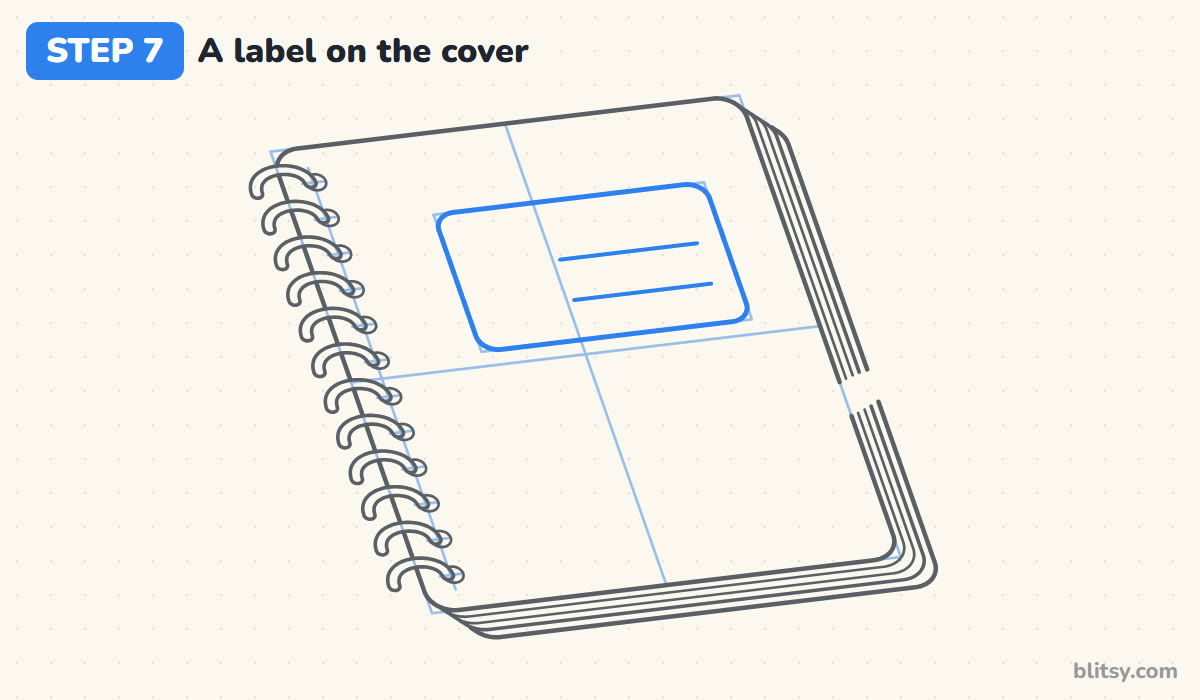
Inside the small guide box, draw a rectangle with rounded corners, leaning the same way as the cover. Place two straight lines in its right half for writing a name or a subject. The label should sit in the upper part of the cover, which leaves the lower part open for the pencil.
💡 Tip: Check that the label's top edge is parallel to the notebook's top edge before you go on.



Step 8: Doodle a star and a heart
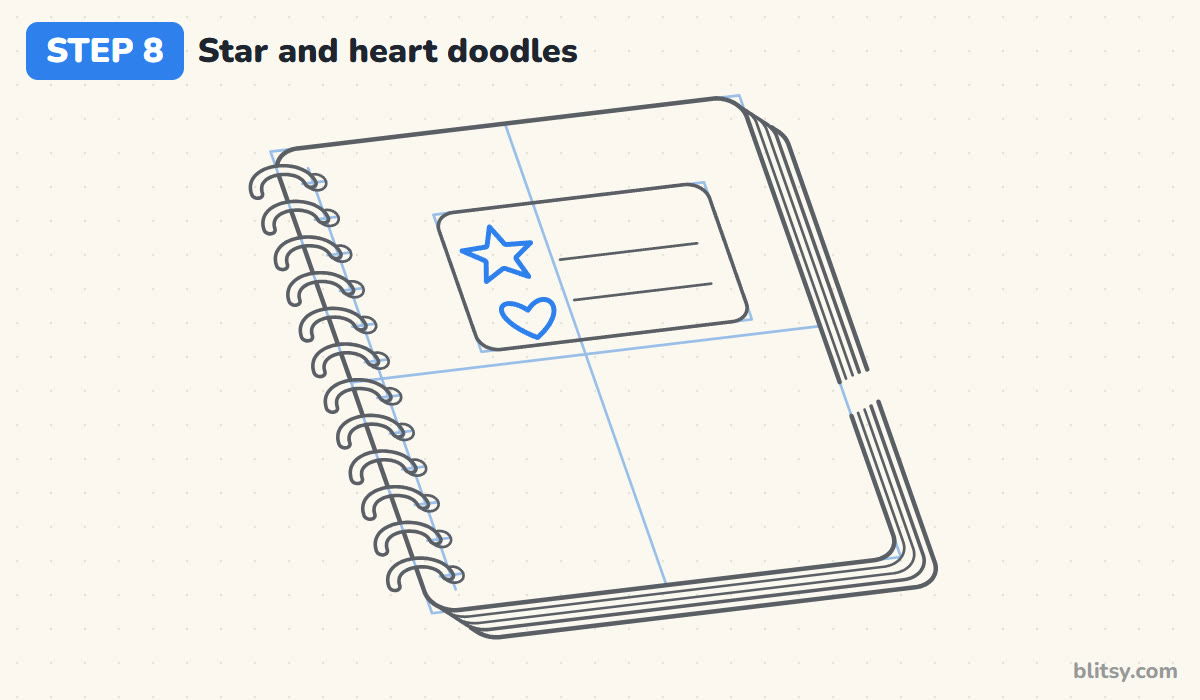
In the empty left part of the label, draw a five-point star and a small heart under it. They're the kind of doodles kids put on their own notebooks. A smiley face or your initials work just as well.
💡 Tip: For the star, draw it in one continuous line without lifting the pencil, then tidy the points.
Step 9: Draw the pencil body and eraser
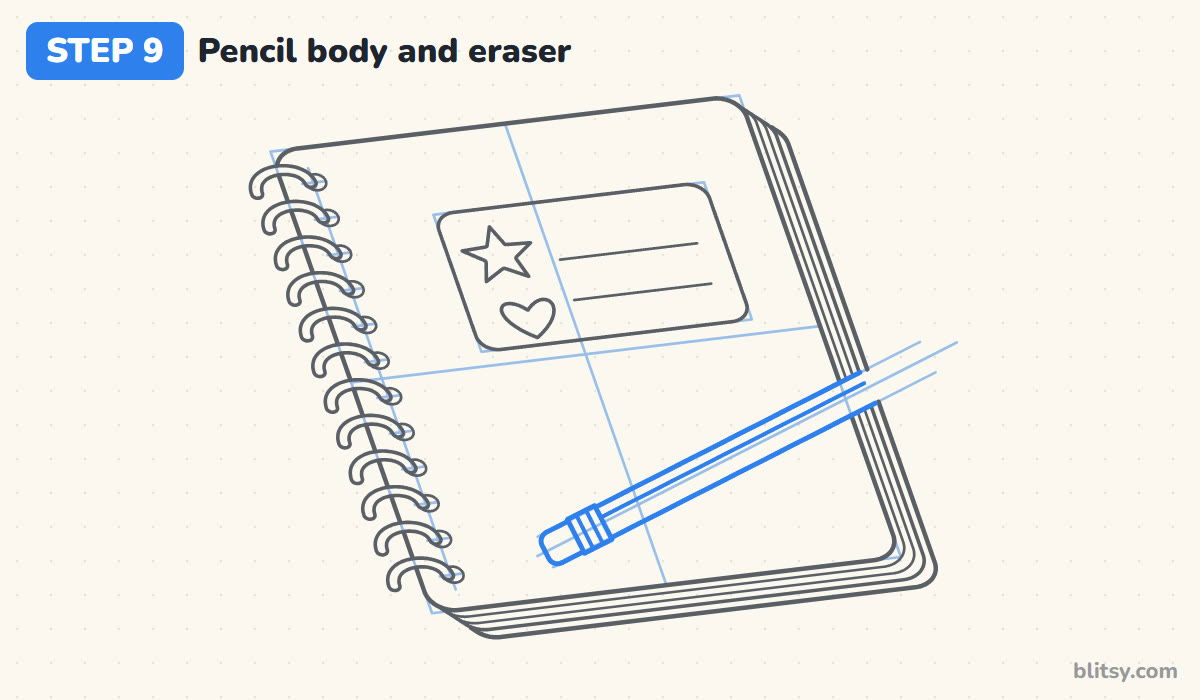
Lay a light guide line diagonally across the lower right of the cover, rising toward the right and running past the edge. Draw two long parallel lines along it for the pencil's body. At the lower end, add a short band with two little lines across it for the metal part, and a rounded pink eraser beyond it. A thin line down the body shows one of the pencil's flat sides.
💡 Tip: Let the pencil hang over the notebook's edge. It looks more natural than a pencil that fits perfectly inside.
Step 10: Sharpen the pencil tip
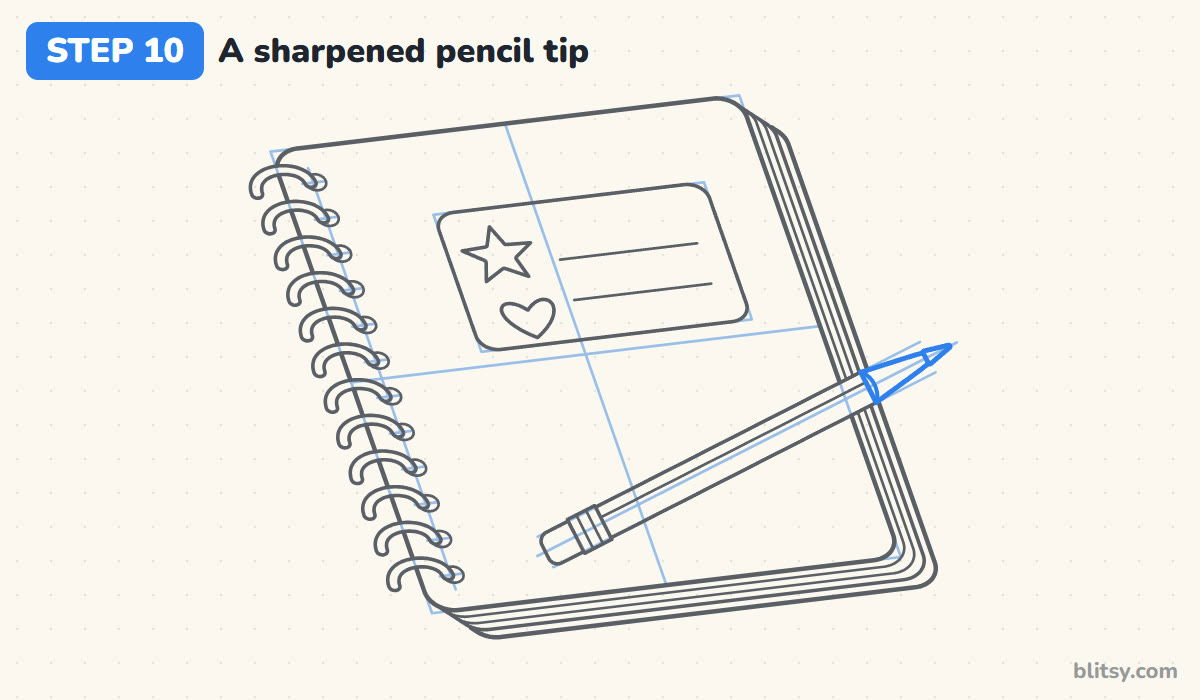
At the upper end, taper the body into a cone of bare wood, with a slightly wavy line where the paint stops. Finish it with a small dark triangle for the lead. A long thin tip looks more like a needle, so keep the cone short.
💡 Tip: Make the cone about twice as long as the pencil is wide.
Step 11: Ink the lines and erase the guides
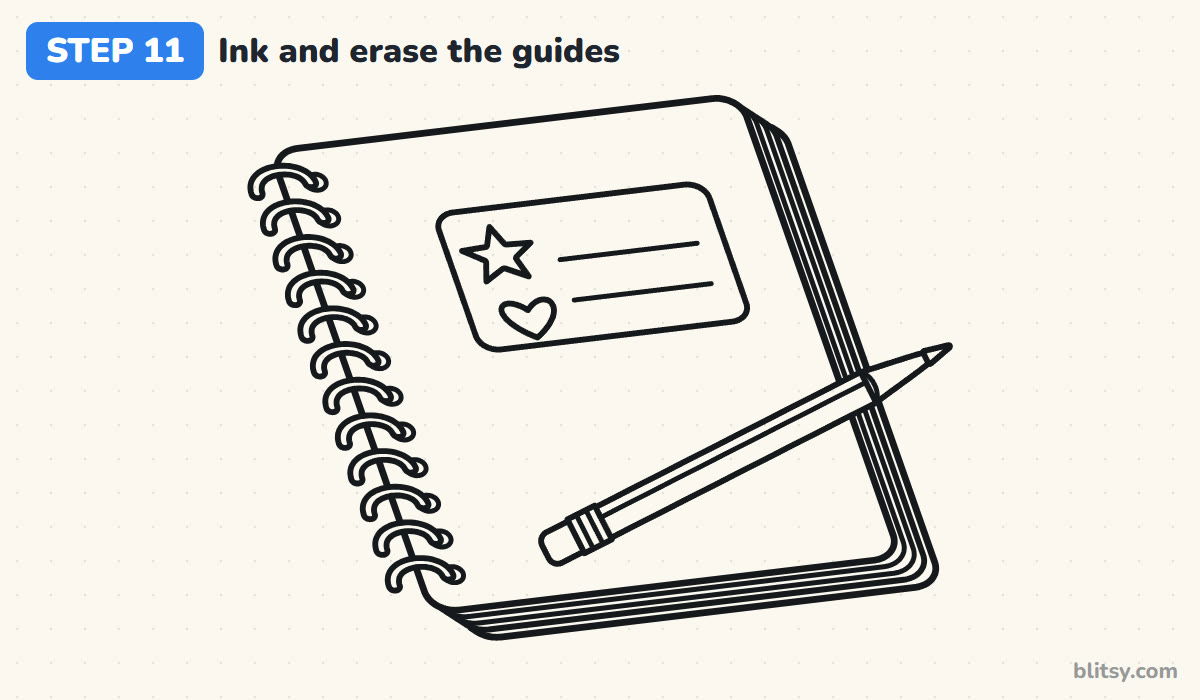
Trace every keeper line with a black marker. I start with the rings while my hand is steady, then the cover, page edges, label and pencil. Skip the light guide box, the cross lines and the tick marks. When the ink is fully dry, erase all the pencil so only the clean outline stays.
💡 Tip: Wait a minute before erasing. Fresh marker smears and drags across the cover.


Step 12: Color your notebook
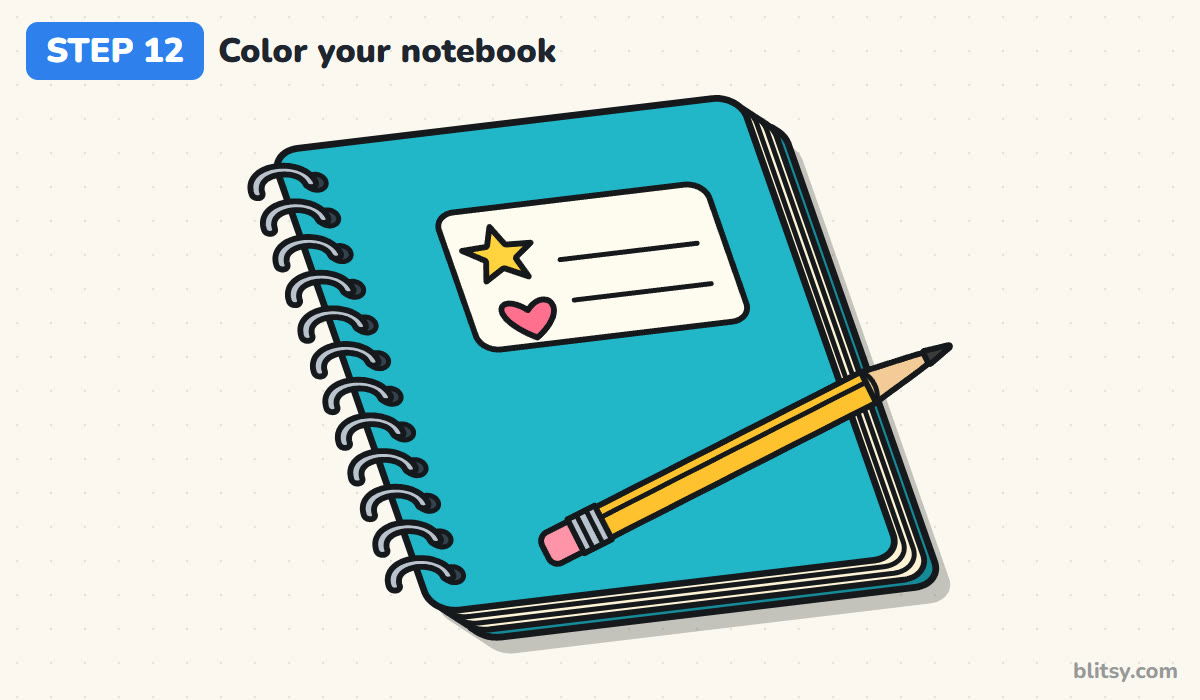
Fill the cover with turquoise and use a darker turquoise for the thin back cover strip. Color the pages and the label cream. The spiral rings and the pencil's metal band are gray, and the holes are black. Give the pencil a yellow body, a tan wooden tip, a black lead and a pink eraser. Finish with yellow on the star and pink on the heart.
💡 Tip: Leave a narrow white strip along the top of each ring to make the metal look shiny.
Where Notebook Drawings Usually Slip
- Rings of different sizes. One fat ring among thin ones ruins the pattern. Use the tick marks and copy the same curve every time.
- Uneven gaps in the spiral. Rings that bunch up at the bottom look squashed. Measure the marks with a ruler before drawing any ring.
- A flat, straight rectangle. A plain upright box reads as a sheet of paper. Tilt the sides to show it lying on a desk.
- Page edges on all four sides. In this view you only see pages at the bottom and the right. Lines on the top or left make the notebook look flat.
- A pencil drawn through the cover lines. The pencil lies on top, so erase any cover line that crosses it.
Giving Your Spiral Notebook a New Look
Turn the cover into a back-to-school scene, with the notebook resting on a desk in front of the building from this how to draw a school step by step lesson. Swap the turquoise for purple polka dots or stripes, write a subject like Math on the label, or open the cover a little and draw lined pages inside. Smaller kids can skip the page edges and draw just six rings. For a doodle that fits right on the label, the light bulb drawing tutorial makes a nice idea sticker, and a shiny red fruit from the apple drawing step by step guide sits well beside the notebook as a teacher's apple.
Free Notebook Coloring Page and Printable Steps
The free notebook coloring page shows a colored notebook at the top as a model, a color key for each part and a large outline to color underneath. The step-by-step PDF guide holds all 12 steps with pictures and tips, so you can practice away from a screen. Both print on Letter or A4 paper.
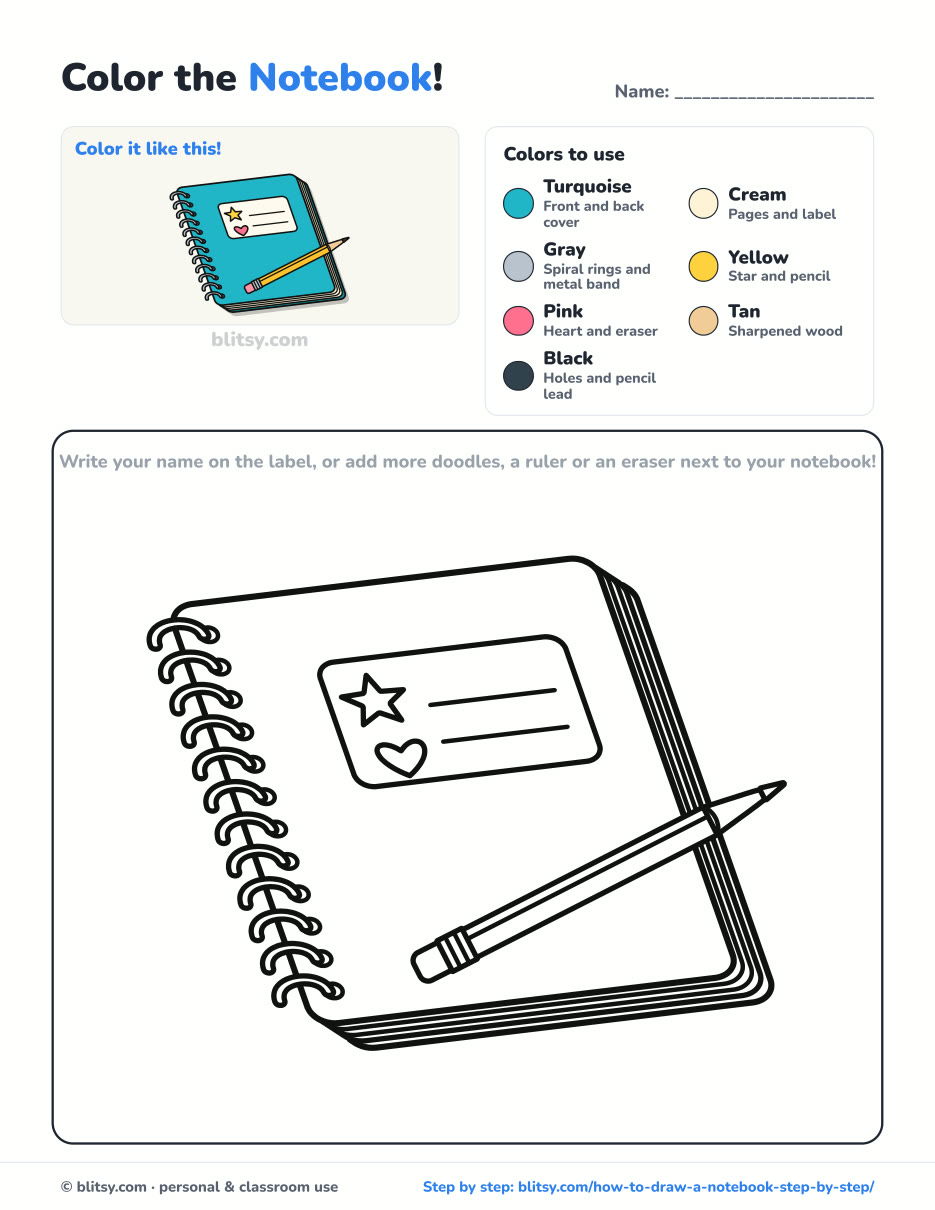
Black outlines with a colored example and the color names at the top. Ready to print and color.
⬇️ Download Coloring PageEvery step picture with its instructions and tips, to keep beside your paper while you draw.
⬇️ Download Drawing Guide📱 On a phone? Tap a download button, then open the file and choose Share → Save to Files or Print. On a computer, the PDF opens or saves straight to your Downloads folder.
Keep the Notebook Steps on Your Pinboard
Next Lessons for a Back-to-School Sketchbook
Each of these tutorials uses the same picture-for-every-step method, so the next drawing feels familiar right away.
- School Drawing: A red-brick school with a clock, a bell tower and a picket fence grows from three boxes in this how to draw a school step by step lesson.
- Light Bulb Drawing: An old-style bulb with a curly filament and a ridged base starts from one circle in this light bulb drawing tutorial.
- Apple Drawing: Two overlapping circles become a shiny apple with a stem and a leaf in this apple drawing step by step guide.
- Star Drawing: Build an even five-point star on two circles, then shade it like a gem, in this star drawing tutorial.
- Heart Drawing: Two circles and a V make a glossy heart in this how to draw a heart step by step lesson.
Notebook Drawing Questions From Young Artists
How do you draw a notebook easily?
Start with a slanted box for the cover, round the corners, then add page lines along the bottom and right side. A row of rings on the left and a label on the front finish it.
How do you draw a spiral on a notebook?
Draw a light line near the left edge and mark it with evenly spaced ticks. At each tick, draw a small hole and a curved loop over the edge, using the same shape every time.
How do you make a notebook drawing look 3D?
Tilt the cover so it leans, then show the thickness with a few stacked page lines on two sides. A soft shadow under the bottom and right edges adds even more depth.
What colors should I use for a notebook drawing?
Any bright color works for the cover. Cream for the pages, gray for the spiral and a yellow pencil keep it looking like a real school notebook.
Grab a pencil, line up those twelve little rings, and your notebook will be ready for its first doodle. 📓✏️
Related posts:
 How to Draw a Car Step by Step (Easy Drawing for Beginners)
 How to Draw a Whale Step by Step (Easy for Beginners)
 How to Draw an Arctic Fox Step by Step (Easy for Beginners)
 How to Draw a Shark Step by Step (Easy for Beginners)
 How to Draw a Chicken Step by Step (Easy for Beginners)
 How to Draw a Snowman Step by Step (Easy for Beginners)
 How to Draw an Airplane Step by Step (Easy Jet for Beginners)
 How to Draw a Mouse Step by Step (Easy for Beginners)
 How to Draw a T-Rex Step by Step (Easy for Beginners)
 How to Draw a Pig Step by Step (Easy for Beginners)
 How to Draw a Minion Step by Step (Easy for Beginners)
 How to Draw a Yorkie Step by Step (Easy for Beginners)

