
Three things make a fox look like a fox: tall pointed ears, a white face mask and a big bushy tail. Here I'll show you how to draw a fox step by step, the classic orange red fox, sitting neatly with its tail curled around its black-socked feet. When I teach this one, kids are always surprised how fast the fox appears once the tail goes in.
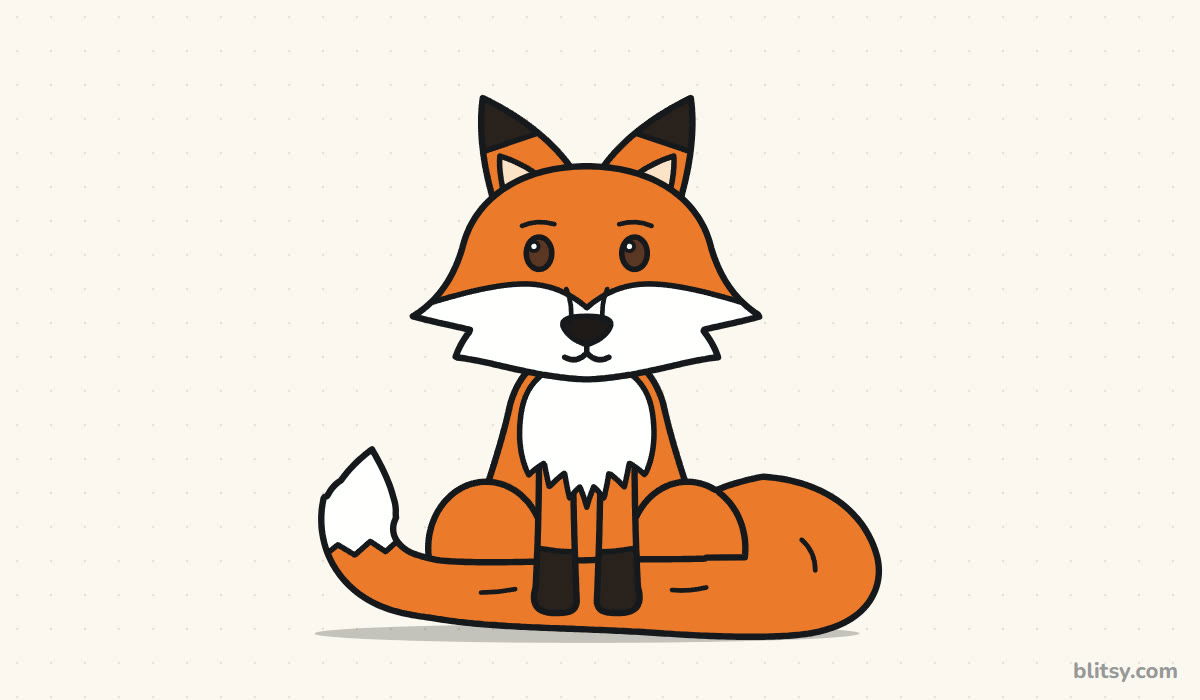
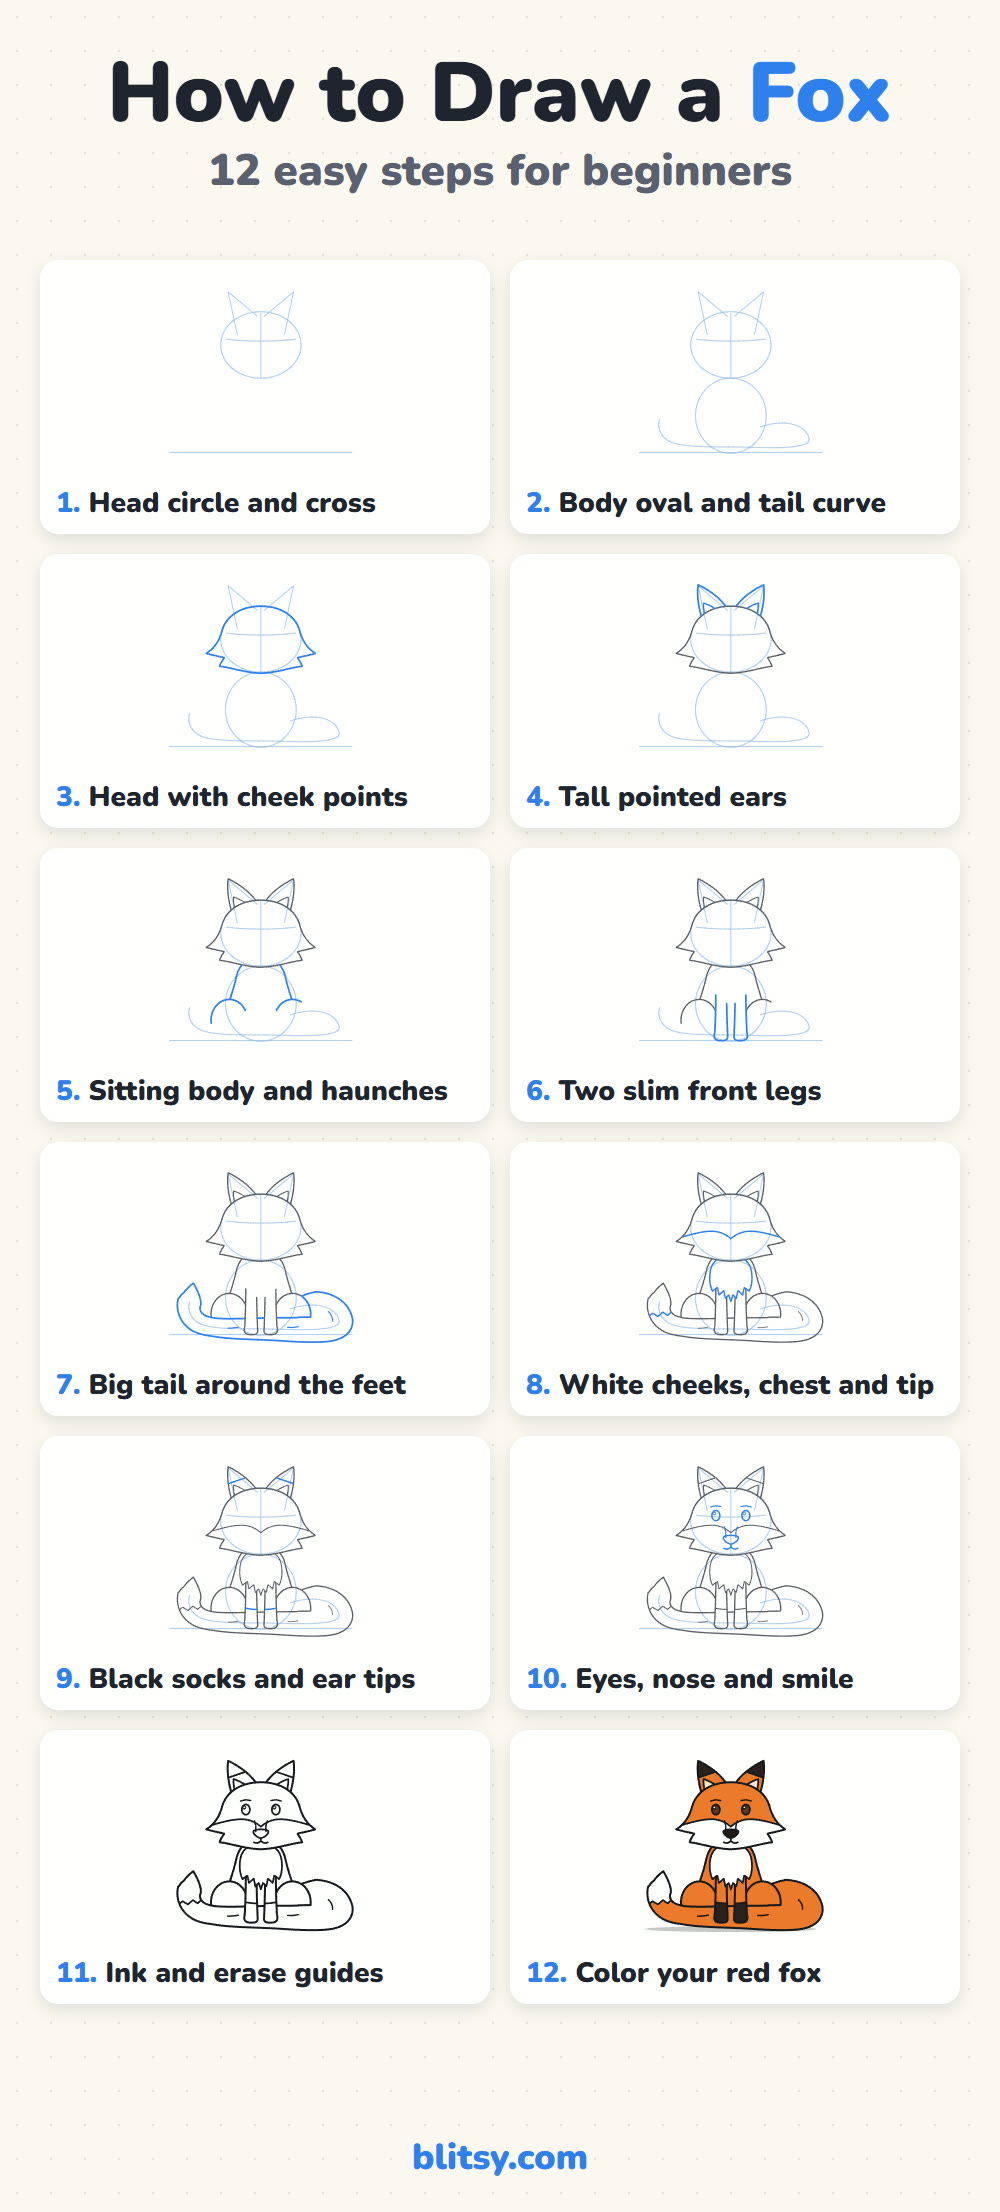
In each step picture the new lines are blue and everything you already drew is gray. Add only the blue part, check it against the picture, then move to the next step.
Quick overview
⏱️ Time: about 30 minutes, coloring included
🎯 Level: easy, fine for kids from about 6 with a little help
✏️ Steps: 12
🦊 You'll draw: a sitting red fox with its tail wrapped around its feet
Fox Drawing Supplies From Your Desk Drawer
- A pencil you can press lightly with (HB or 2B)
- A soft eraser
- A black marker or fineliner for the final lines
- Colored pencils, markers or crayons (orange, black, dark brown, light peach)
- Plain white paper, turned sideways
Leave the white parts of the fox uncolored and the paper does the work for you.
How to Draw a Fox Step by Step
Step 1: Sketch the head circle and the ear guides
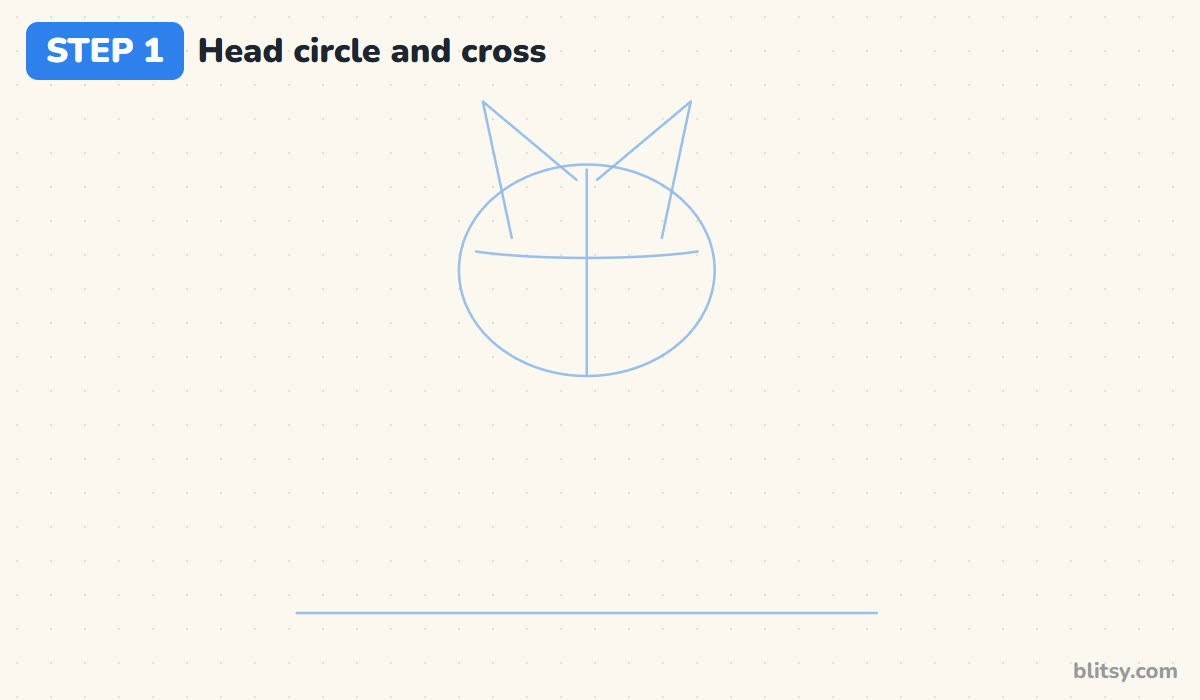
Draw a light ground line low on the page. Well above it, sketch a wide circle for the head, with a line down its center and a soft curve across, a bit above halfway, for the eyes. Two long thin triangles on top show where the ears go.
💡 Tip: Make the head circle slightly wider than it is tall. A fox face is broad at the cheeks.
Step 2: Add a body oval and the tail curve
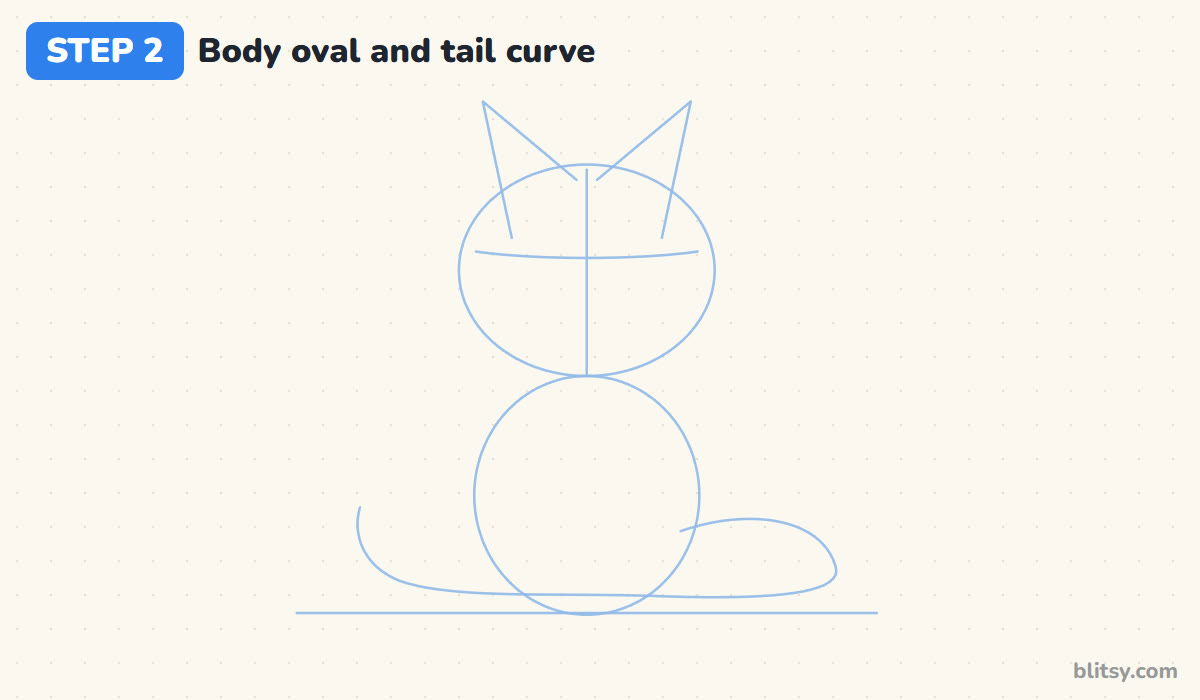
Under the head, draw a round oval that touches the head and sits on the ground line. From its right side, sketch one long loop that swings out right, runs back along the ground in front of the oval and curls up on the left. That loop is the tail path.
💡 Tip: The tail loop should reach almost as far left as it goes right, so the drawing feels balanced.
Step 3: Draw the head with pointed cheek tufts
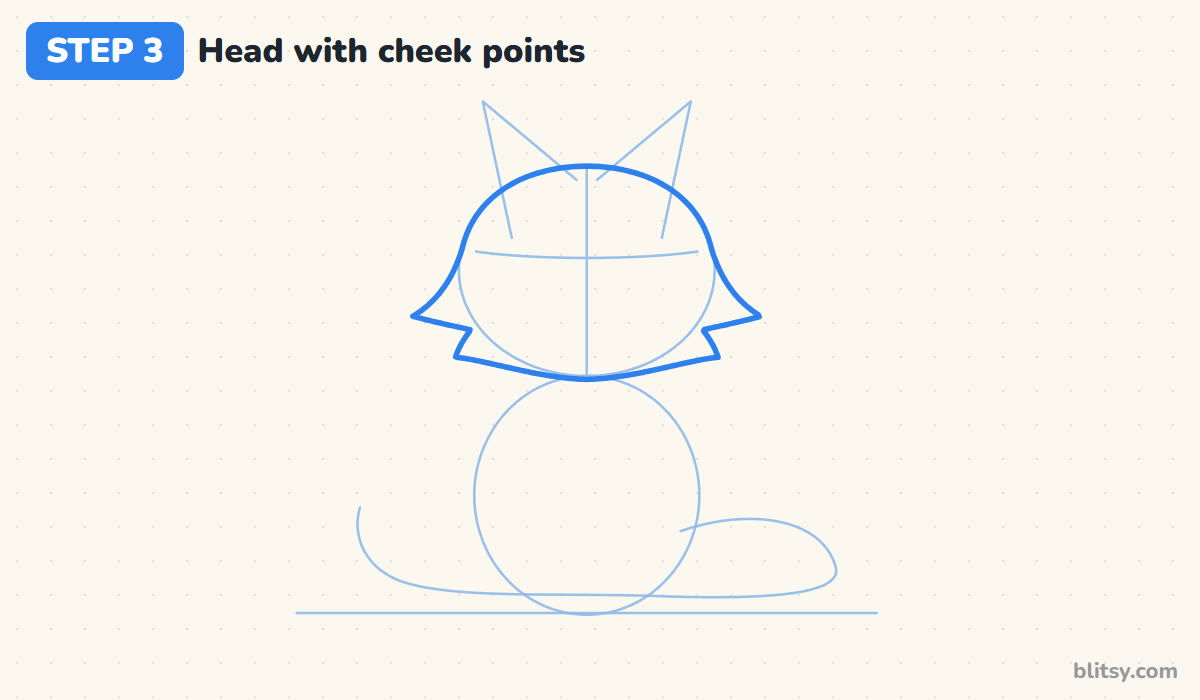
Follow the top of the head circle with a firm line. On each side, let the line flare out into a sharp point below the eyes, tuck back in, make one smaller point, then curve in to a soft chin. I think of those cheek points as the fluffy fur that gives a fox its clever face.
💡 Tip: Draw the left cheek, then copy it on the right before you do anything else. Comparing them side by side keeps the face even.



Step 4: Add two tall pointed ears
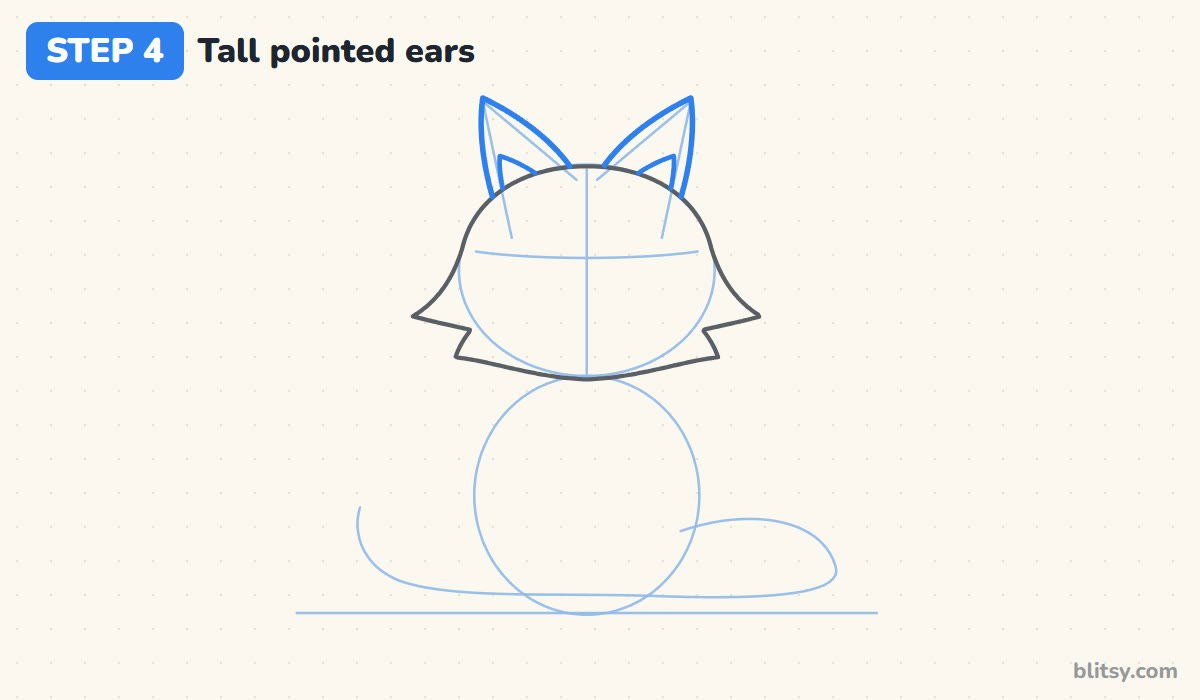
Use the triangle guides to draw two tall ears with slightly curved sides and sharp tips. They should be big, nearly as tall as the top half of the head, because large ears are what separate a red fox from a cat or a dog. Draw a smaller triangle inside each one, and stop every line where it meets the head.
💡 Tip: Tilt the ears out a little. Ears pointing straight up make the fox look surprised.
Step 5: Draw the sitting body and the haunches
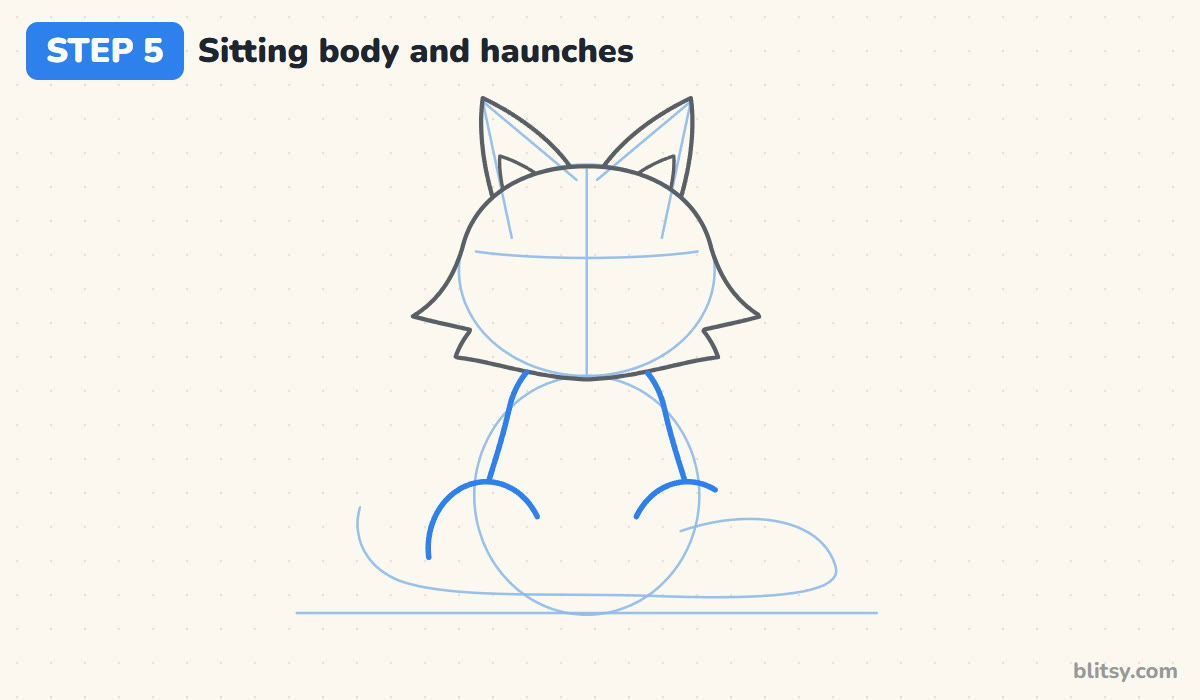
From under each cheek, bring a line down and slightly outward for the sides of the body. Near the bottom, draw a round bump on each side for the folded back legs. Leave the lower parts of those bumps open, because the tail crosses there.
💡 Tip: Keep the body narrower than the head. A slim body under a wide head looks cute instead of heavy.
Step 6: Add two slim front legs
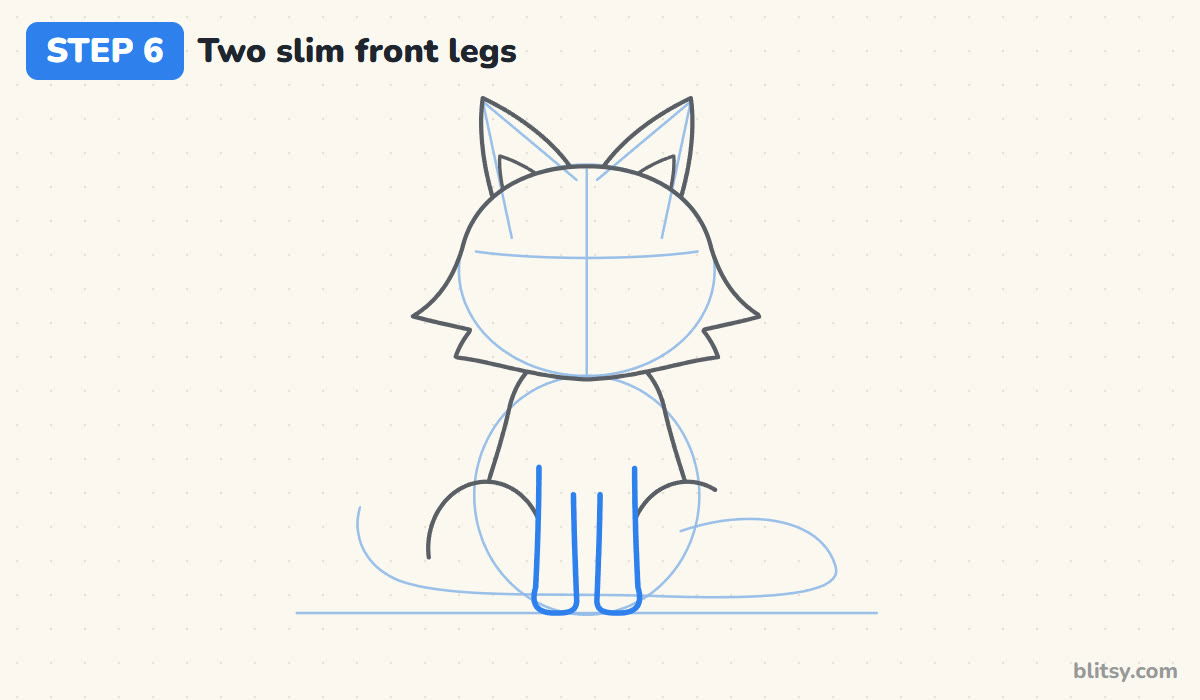
Draw two thin, straight legs down the middle of the body, close together, with a small gap between them. Round off the bottom of each one into a little paw on the ground line. I keep fox legs much thinner than a dog's, since a fox is a light, quick animal.
💡 Tip: Draw both outside edges first and both inside edges second. The legs come out the same width.
Step 7: Wrap the big tail around the feet
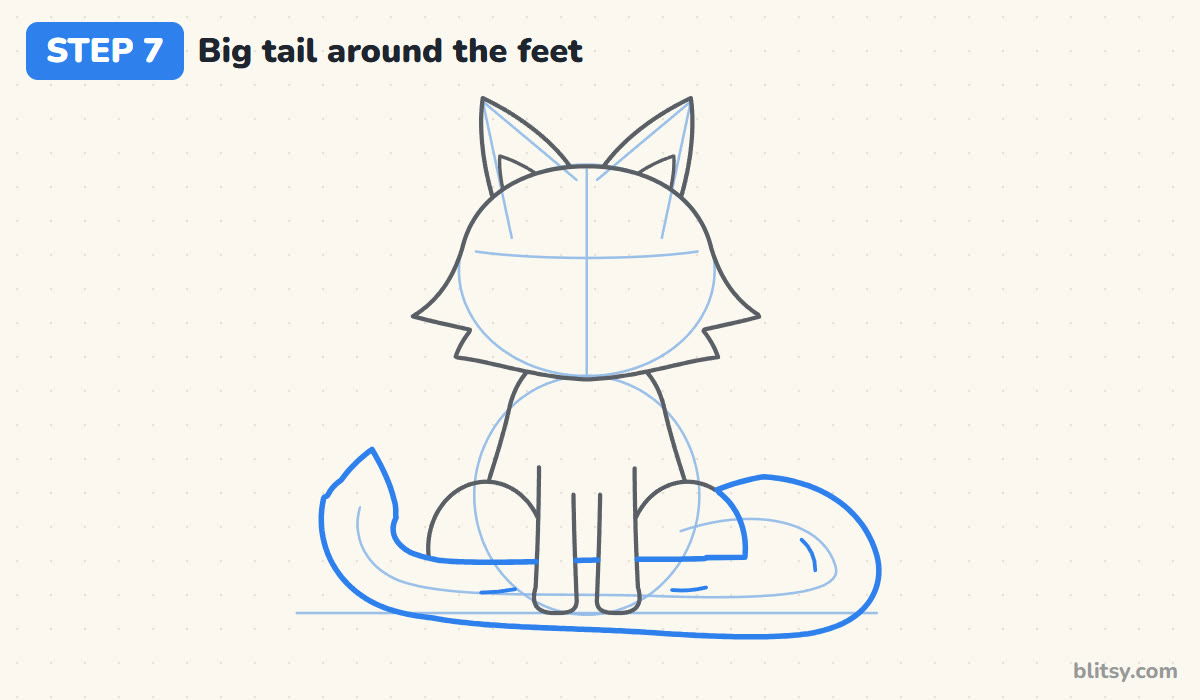
Follow the tail loop with two lines, about as far apart as one haunch is wide. The tail starts behind the right haunch, swells into a big curve, then lies along the ground in front of the haunches. Stop at the paws so they rest on top of it, and end with a rounded, pointed tip on the left. A few short strokes inside add fur.
💡 Tip: Make the tail fatter than you expect. A thin tail turns the fox into a cat right away.



Step 8: Mark the white mask, the bib and the tail tip
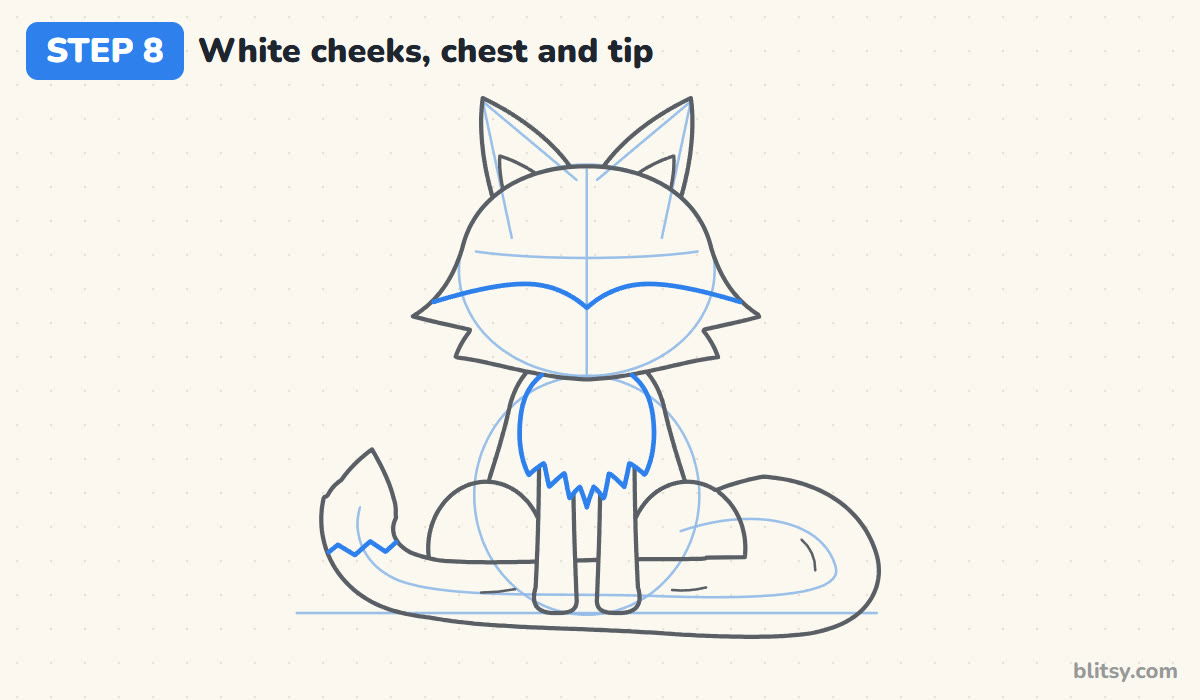
Under the eyes, draw a wavy line from one cheek point to the other that dips into a V at the middle. Everything below it becomes the white mask. On the chest, draw a rounded bib with a zigzag bottom over the tops of the legs, then a zigzag across the tail near its end.
💡 Tip: Make the zigzags small and uneven. Even, sharp teeth look like a saw, not fur.
Step 9: Add black socks and dark ear tips
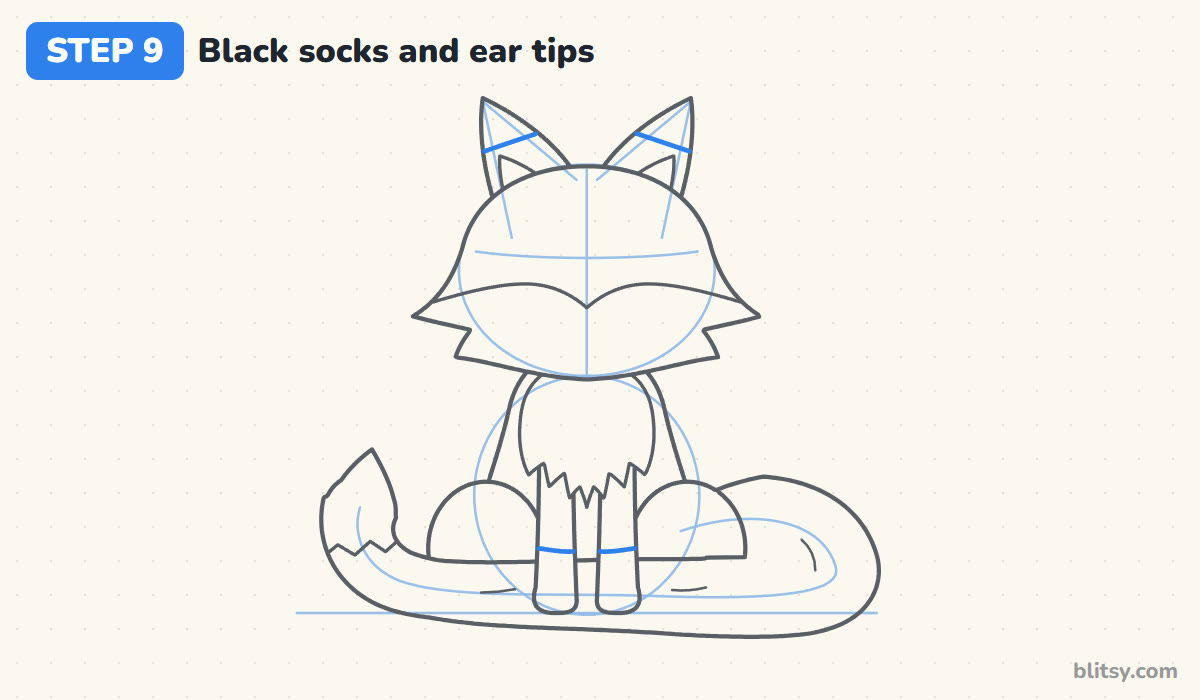
Draw a gently curved line across each front leg, a little above the paw. Below it, the leg turns black, the way a real red fox has dark stockings. Do the same near the top of each ear with a slanted line, so the tips can be colored black too.
💡 Tip: Put both sock lines at the same height, or the fox will look like it is standing on a slope.
Step 10: Draw the eyes, nose and a small smile
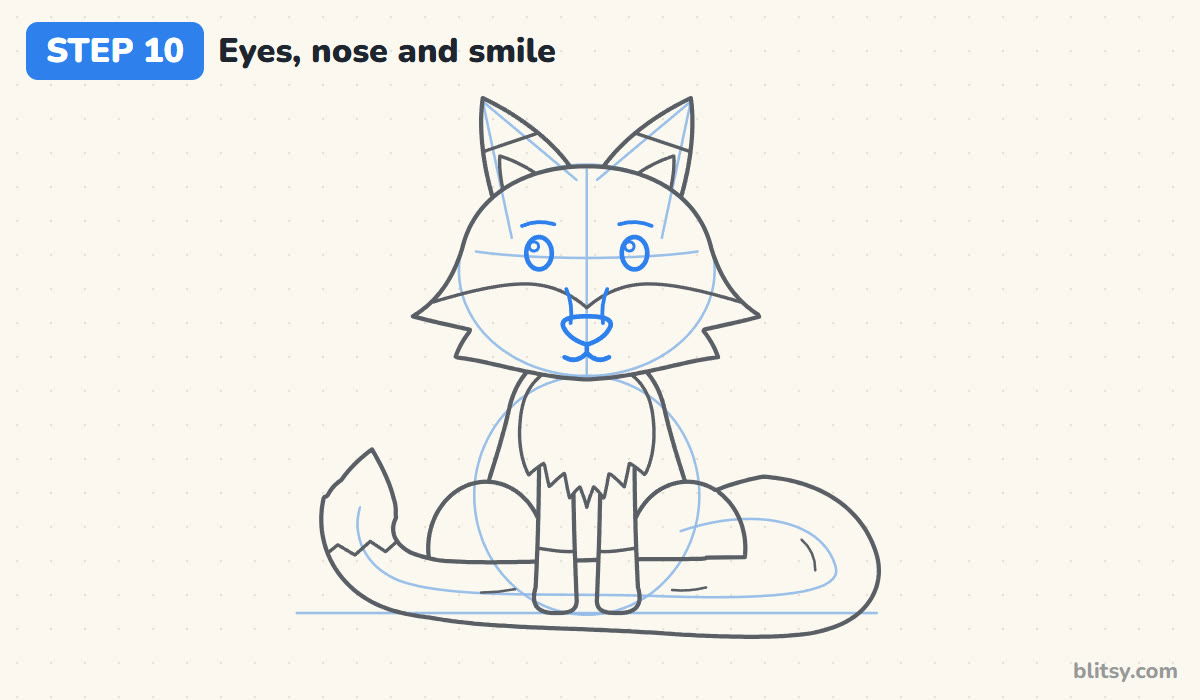
Place two oval eyes on the curved cross line, each about halfway between the center line and the edge of the face, with a shine circle in the same corner of both. Short brows go above. At the bottom of the white V, draw a rounded triangle nose, two light lines rising from it for the narrow snout, and a curved smile below.
💡 Tip: Keep the nose small and pointed downward. A big round nose makes the face read as a puppy.
Step 11: Ink the outline and erase the guides
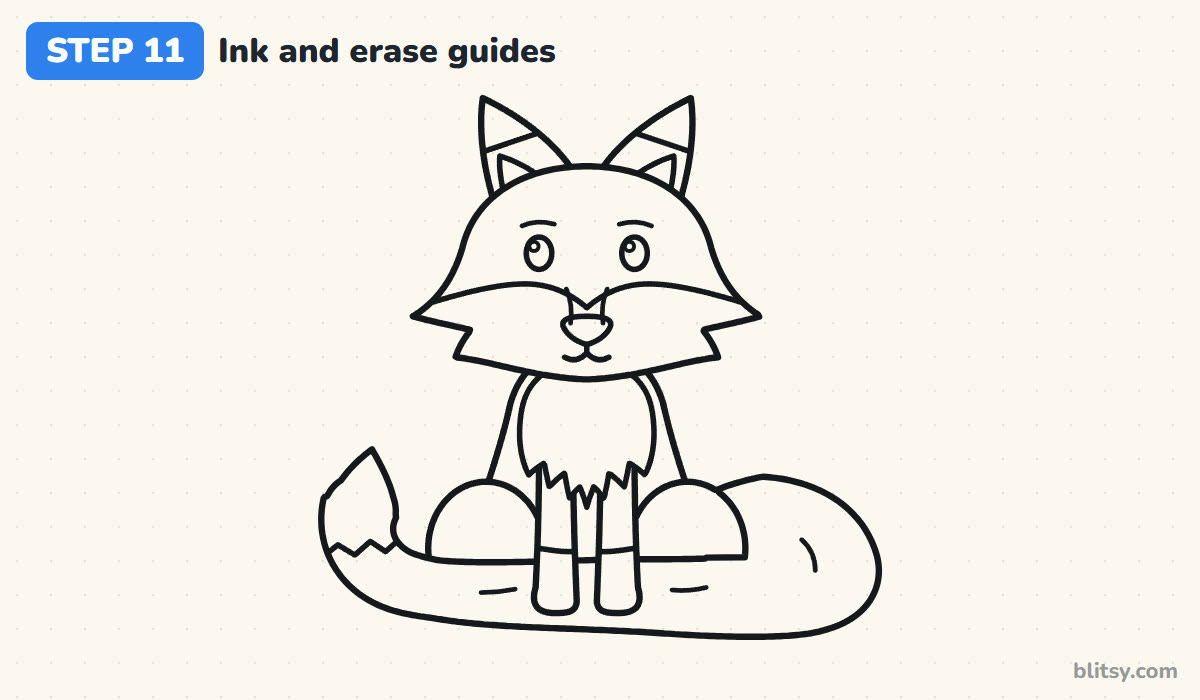
Trace every keeper line with the black marker. I start at the face and work down, so my hand doesn't smudge fresh ink. Skip the guide shapes. When the ink is dry, erase all the pencil and check that the haunch lines still stop at the tail.
💡 Tip: Give the marker a full minute to dry before erasing. Fineliner ink smears more than you'd think.


Step 12: Color your red fox
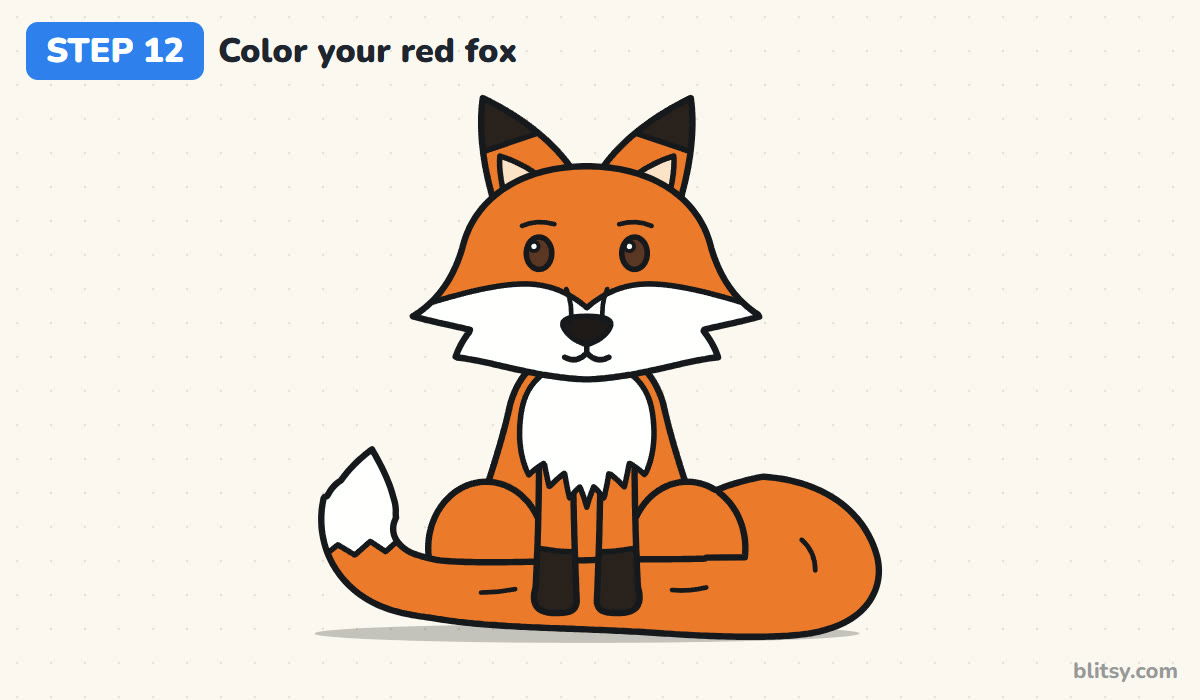
Color most of the fox a warm orange, from the ears down to the legs and most of the tail. Leave the mask, the bib and the tail tip white. Black goes on the ear tips and socks, plus the nose. My eyes get dark brown with a white shine, and the inside of each ear gets light peach. A soft gray shadow under the tail sets the fox on the ground.
💡 Tip: Layer a little red or brown over the orange near the edges of the body. The fox looks rounder right away.
Fox Sketches That Turn into Cats or Dogs
- Ears that are too small. Short ears make the fox look like a kitten. Draw them almost as tall as the top half of the head.
- A skinny tail. The tail is the fox's biggest feature after the face. Make it as thick as a haunch and let it curl.
- Forgetting the white mask. Without white cheeks, an orange fox can pass for a tiger cub. Keep that wavy line under the eyes.
- Thick, heavy legs. Wide legs belong on bears and big dogs. Keep the front legs slim with small paws.
- Coloring the socks too high. Black up to the chest hides the legs. Stop the socks just above the paws.
Swap the Season, Swap the Fox
This tutorial is the classic red fox. For its snowy cousin with small round ears and pale fur, try the arctic fox drawing tutorial and put the two side by side. With the same body I like to draw a gray fox (gray fur, a black stripe down the tail) or a sleeping fox with closed eyes and the nose tucked into the tail. Foxes and wolves are close relatives, so the howling wolf drawing step by step lesson is a natural next try.
Free Red Fox Coloring Page and Step Guide
The free fox coloring page shows a colored red fox at the top as a model, a short key that tells you which color goes where, and a big outline to color below it. The step-by-step PDF guide has all 12 steps with their pictures and tips, so you can draw away from a screen. Both print well on Letter or A4 paper.
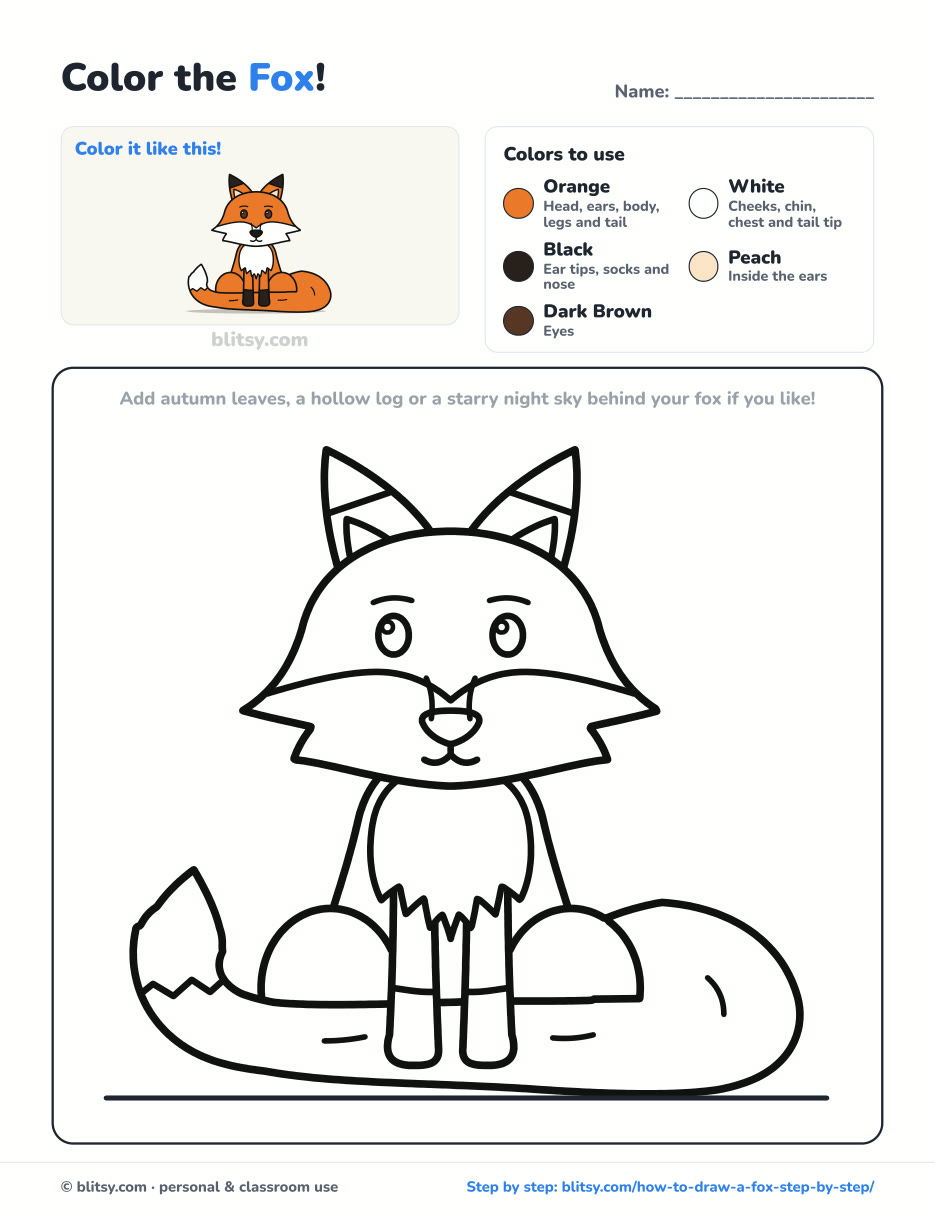
Black outlines with a colored example and the color names at the top. Ready to print and color.
⬇️ Download Coloring PageEvery step picture with its instructions and tips, to keep beside your paper while you draw.
⬇️ Download Drawing Guide📱 On a phone? Tap a download button, then open the file and choose Share → Save to Files or Print. On a computer, the PDF opens or saves straight to your Downloads folder.
Your Fox Steps on One Tall Pin
More Animals to Draw After Your Fox
Every link below is a full step-by-step tutorial with a picture for each stage and its own coloring page.
- Raccoon Drawing: Another masked forest animal, walking on all fours with a striped tail, in this raccoon drawing tutorial.
- Owl Drawing: A round-eyed owl perches on a branch under a crescent moon in this how to draw an owl step by step lesson.
- Bunny Drawing: A sitting side-view bunny with long ears and a carrot to nibble fills this bunny drawing step by step guide.
- Dog Drawing: Compare the fox's slim build with a friendly beagle-style pup in this dog drawing tutorial.
- Bear Drawing: A big brown bear walking through the grass fills this how to draw a bear step by step lesson.
Fox Drawing Questions Kids Ask Me
What is the easiest way to draw a fox?
Start with a wide circle for the head and an oval for the body. Add tall pointed ears, cheek points, a big curled tail and the white mask, and it already reads as a fox.
How do you draw a fox tail?
Draw one long curve first, then go around it with two lines, wide in the middle and rounded at the end. Finish with a zigzag line near the end and leave that tip white.
What colors do you need for a red fox?
Orange covers most of the fur, and white goes on the mask, the chest and the tail tip. Use black on the ear tips, socks and nose, and dark brown for the eyes.
How is a red fox different from an arctic fox in a drawing?
A red fox has taller pointed ears, orange fur, a white mask and black legs. An arctic fox has small rounded ears and pale fur almost everywhere.
Once your fox is colored, give it a name and a little hollow log to sit by. 🦊✏️
Related posts:
 How to Draw an Arctic Fox Step by Step (Easy for Beginners)
 How to Draw an Apple Step by Step (Red and Bitten Green)
 How to Draw a Car Step by Step (Easy Drawing for Beginners)
 How to Draw a Whale Step by Step (Easy for Beginners)
 How to Draw a Shark Step by Step (Easy for Beginners)
 How to Draw a Chicken Step by Step (Easy for Beginners)
 How to Draw a Fish Step by Step (Easy Goldfish for Beginners)
 How to Draw a Snowman Step by Step (Easy for Beginners)
 How to Draw Hands Step by Step (Easy Palm View for Beginners)
 How to Draw an Airplane Step by Step (Easy Jet for Beginners)
 How to Draw a Mouse Step by Step (Easy for Beginners)
 How to Draw a T-Rex Step by Step (Easy for Beginners)

