
Green hair and three swords. That's really all a drawing needs before people recognize the swordsman from One Piece. In this lesson you'll learn how to draw Zoro step by step as a chibi, with a big head, a short body and simple rounded shapes that are easy to copy. This is my own simple fan-art version for practice, so please don't trace the official art; draw along with the steps instead. He's in a calm, confident mood, with his hand resting on his sheathed swords.
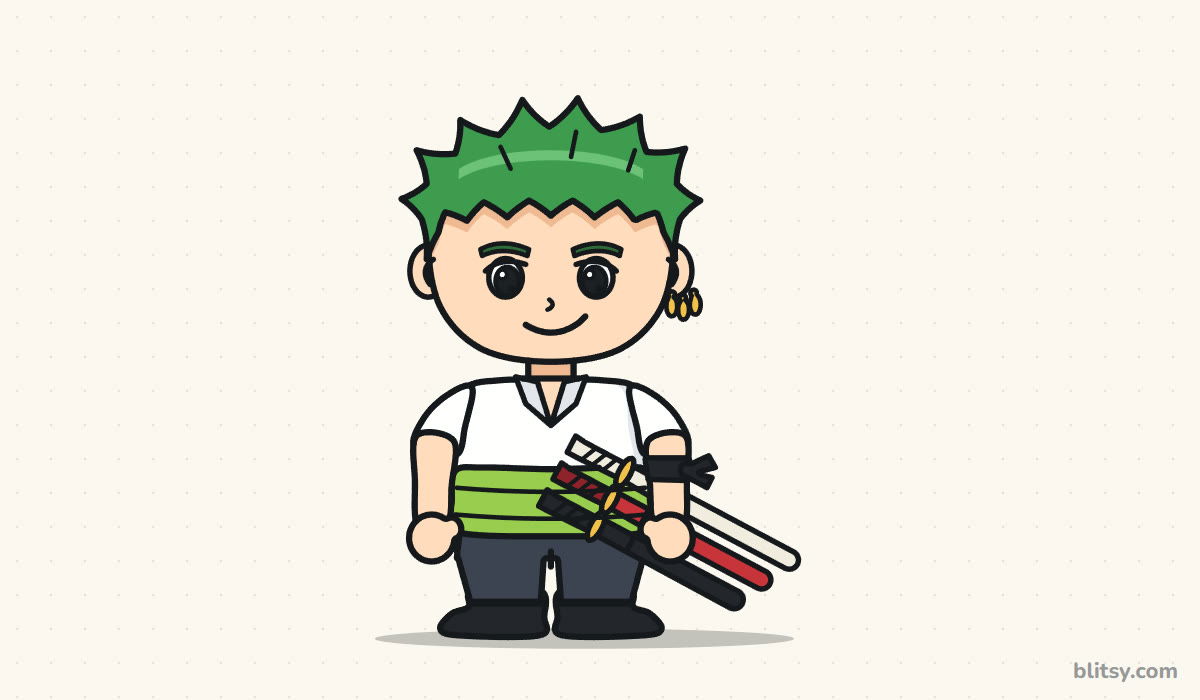
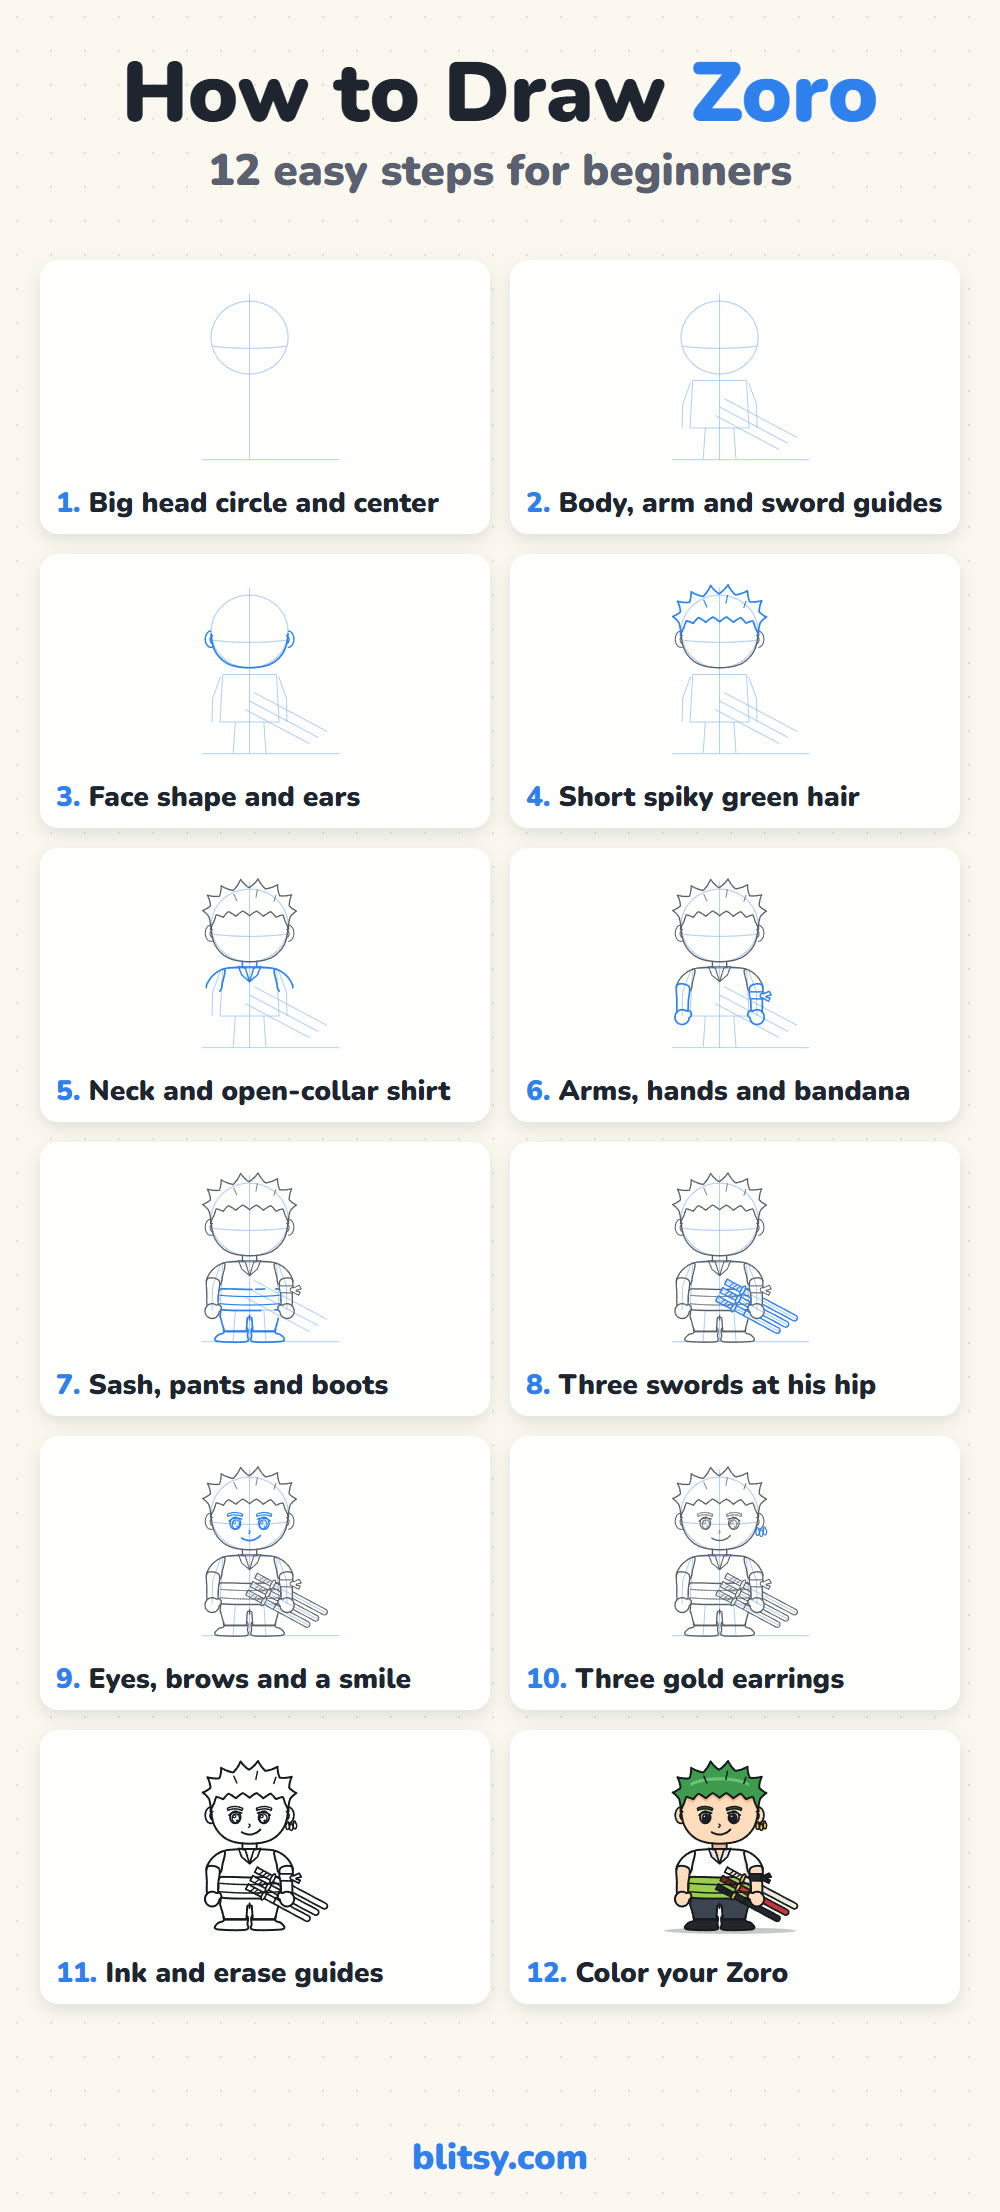
Zoro grows a little in each picture. His newest lines are blue, and the gray ones were already drawn in earlier steps.
Quick overview
⏱️ Time: around 30 to 40 minutes, coloring included
🎯 Level: easy to medium, good for kids about 8 and up
✏️ Steps: 12
⚔️ You'll draw: a standing chibi Zoro with three sheathed swords
Gear for a Three-Sword Sketch
- A pencil (an HB is fine) for the light guides
- A soft eraser
- A black fineliner or marker for the final outline
- Colored pencils or markers in green, light green, peach, dark gray, black, red and gold or yellow
- Plain paper, turned sideways so the swords have room
A ruler helps with the long sheaths, but steady freehand lines look friendlier.
How to Draw Zoro Step by Step
Step 1: Draw a big head circle and a center line
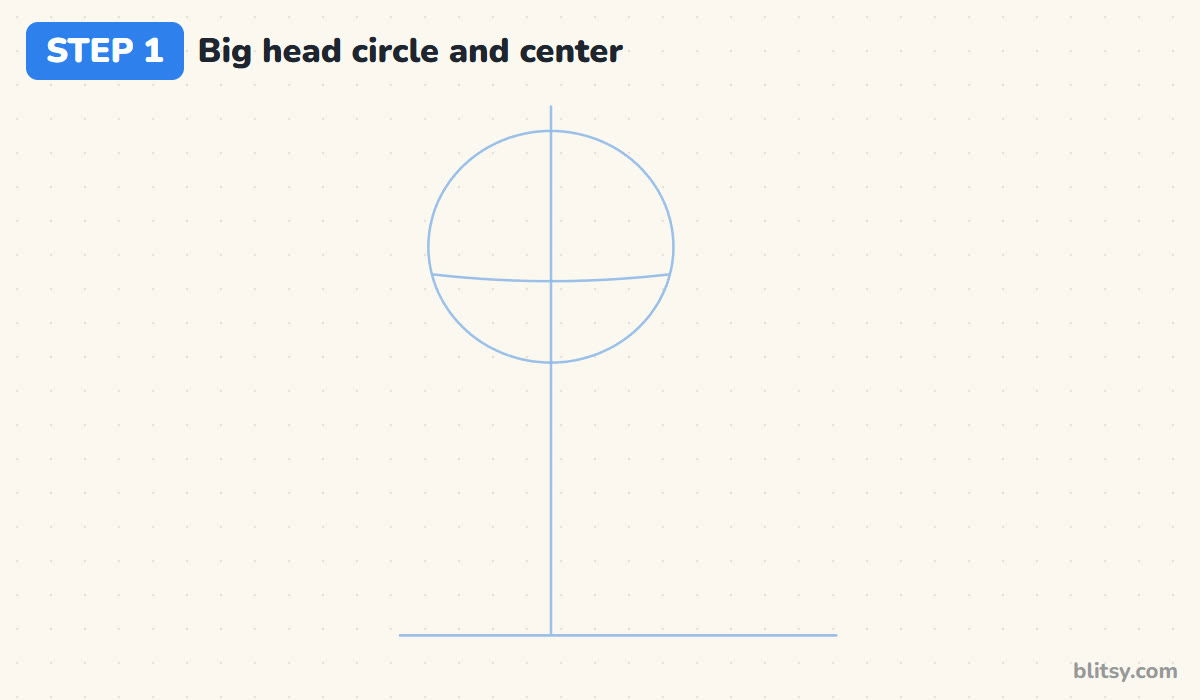
When I teach this, I start with a light ground line near the bottom and a straight line up the middle. Near the top, draw a large circle for the head with a gentle curve across it, a little below the middle, where the eyes will sit. The head takes up almost half of the figure, which is what makes him a chibi.
💡 Tip: Press lightly. Every line in this step gets erased later, so keep it faint.
Step 2: Add the body box, the arm lines and the sword guides
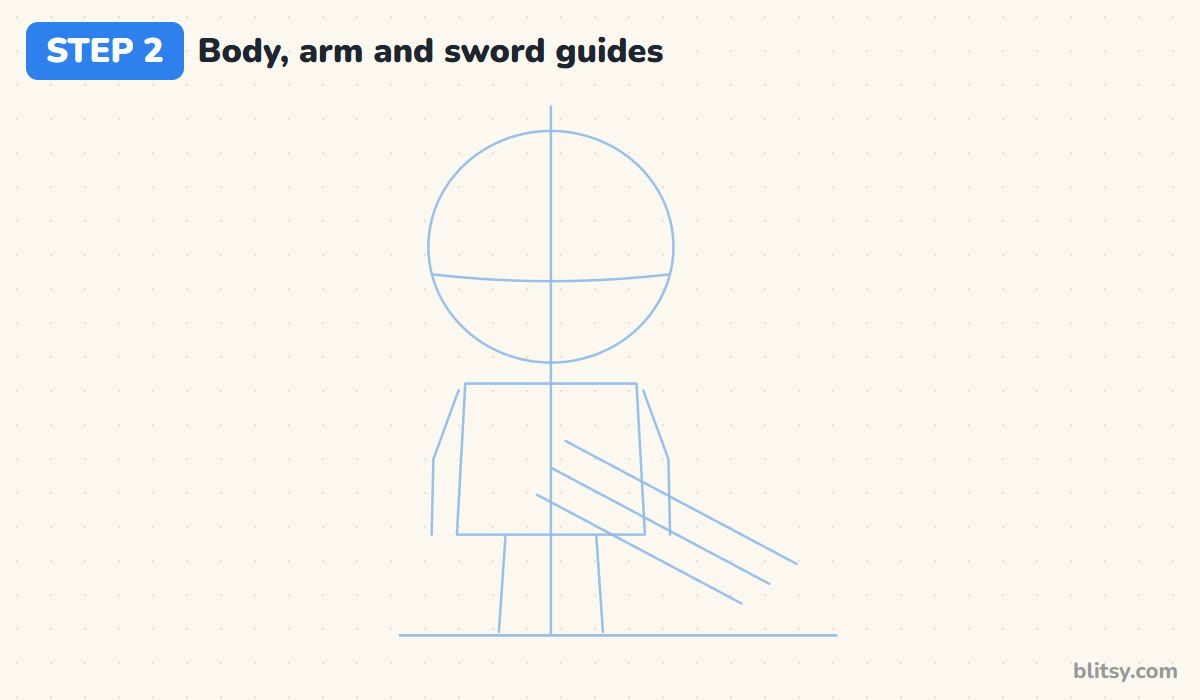
Under the head, sketch a box that's slightly wider at the bottom for the body. Two short lines mark the legs, and two bent lines hang from the shoulders for the arms. Then draw three long slanted lines on the right side of the page, from the waist down past the leg. Those are the swords.
💡 Tip: Keep the three sword lines parallel and evenly spaced. If they fan out or cross, the swords turn into a tangle later.
Step 3: Shape the face and add the ears
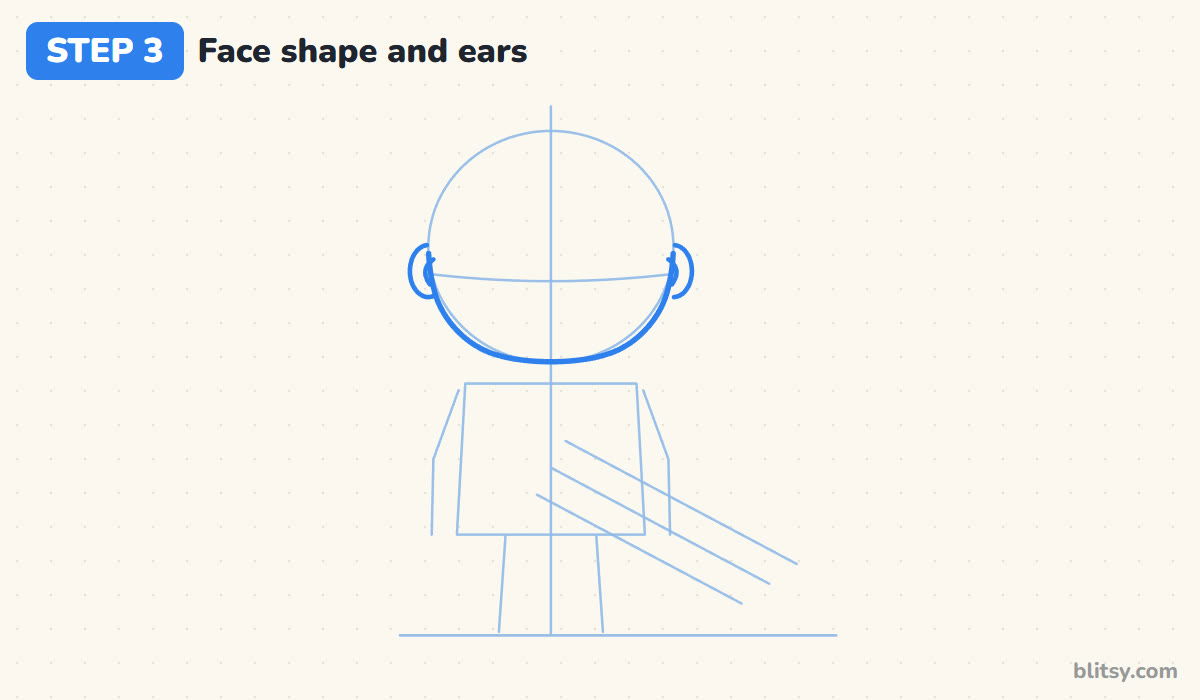
Trace around the lower part of the head circle so the cheeks are round and the chin is soft and wide. The hair will cover the top, so you only need the bottom half. Add a small C-shaped ear on each side, level with the eye line.
💡 Tip: Make the chin wide and gentle. A pointed chin makes a chibi look older and a bit sharp.




Step 4: Draw the short spiky hair
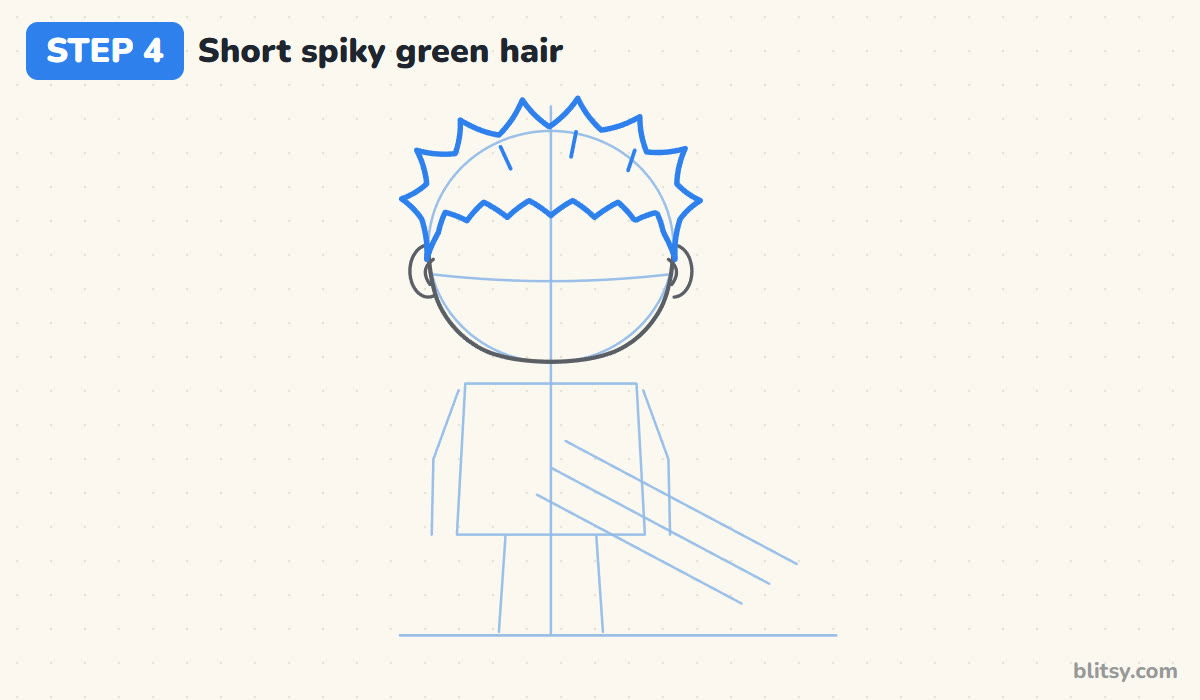
His hair is short, so it sits close to the head. Draw small spikes around the top of the circle, a little outside the guide, and let them stick up and out at the sides. Across the forehead, the hairline is a low zigzag of short points. Add three tiny lines inside the hair for texture.
💡 Tip: I make the spikes slightly different sizes. Perfectly even spikes look like a crown instead of hair.
Step 5: Add the neck and the open-collar shirt
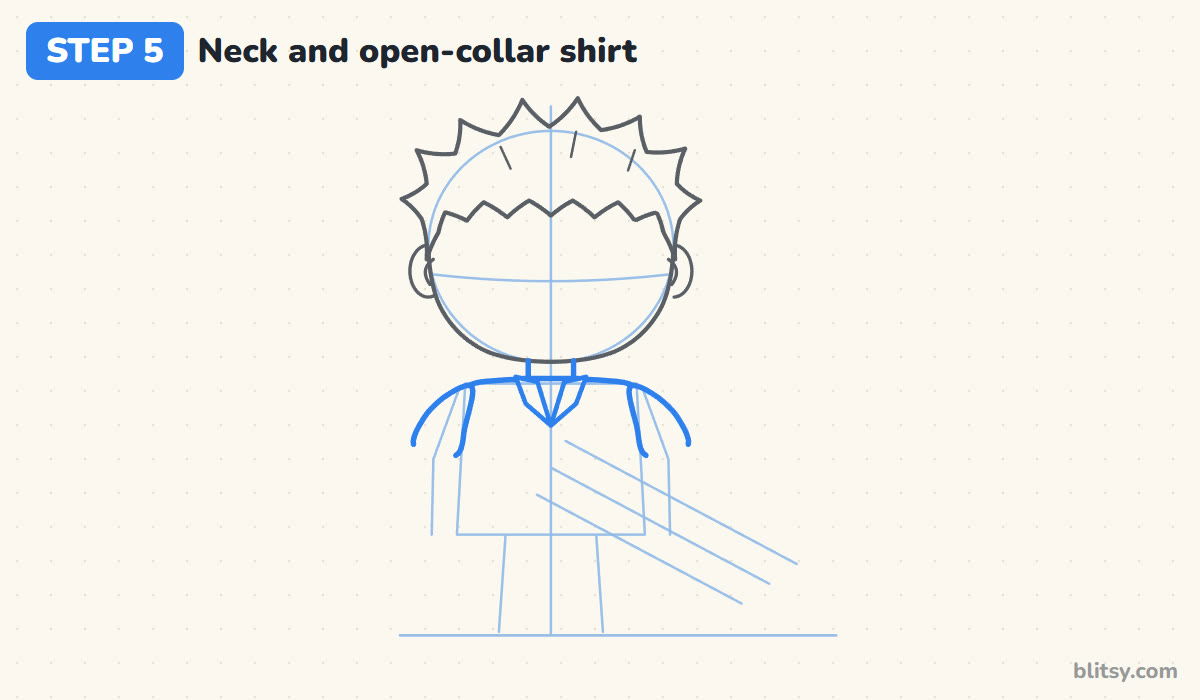
A short, wide neck joins the chin to the body, so the head doesn't look pasted on. Below it, I draw rounded shoulders and a small V where the shirt opens, with two folded collar flaps. The short sleeves puff out from each shoulder.
💡 Tip: Keep the neck almost as wide as the gap between the eyes. A thin neck looks wobbly under a big chibi head.
Step 6: Draw the arms, mitten hands and the bandana
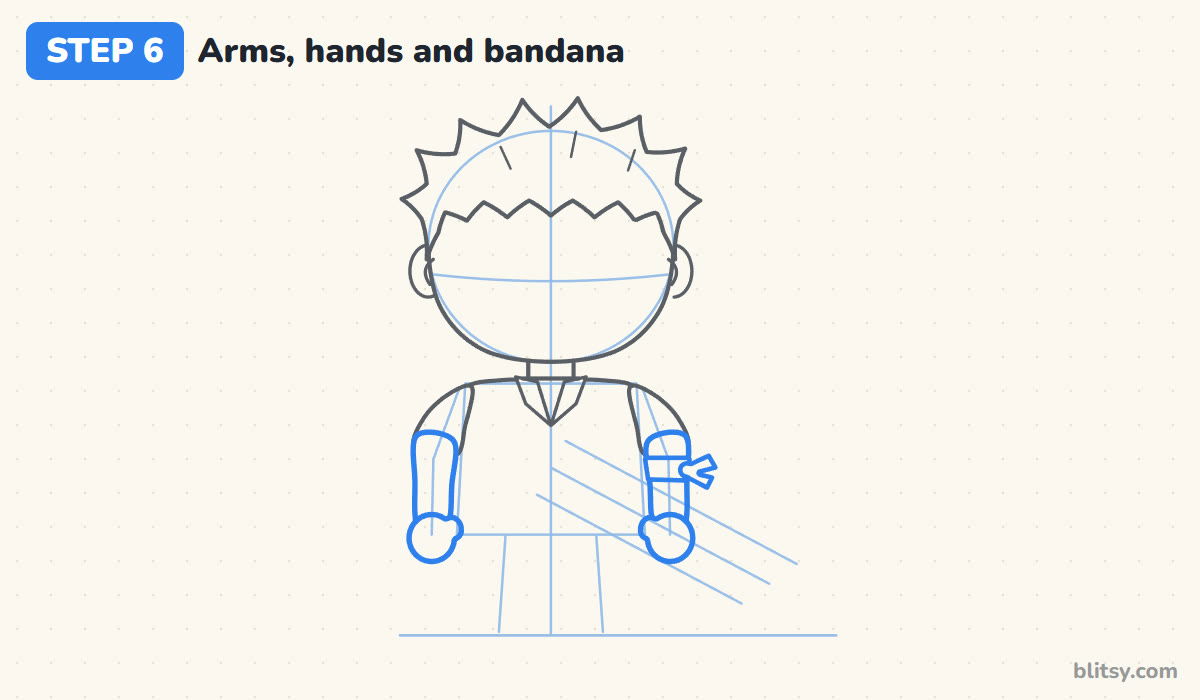
Follow the arm guides with two lines each, so the arms have real width, and finish them with round mitten hands at hip height. On his sword side, the hand sits where the sheaths will pass. Just under that sleeve, draw a band with a tiny knot and two short tails for his black bandana.
💡 Tip: Give the arms about the width of your thumb on the paper. Stick-thin arms make the body look empty.
Step 7: Add the sash, the pants and the boots
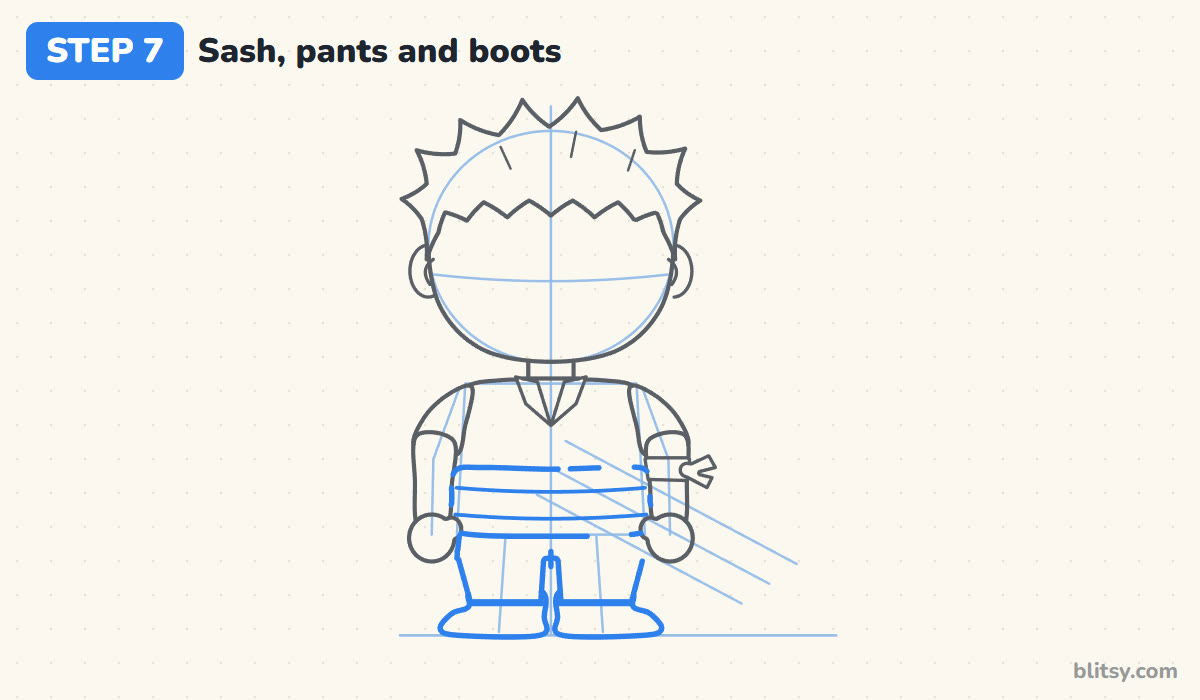
Across the waist, draw a wide band with soft rounded sides for his haramaki, the green belly sash, plus two curved lines for the knit ribs. The dark pants underneath are short and chunky, with a small gap between the legs. Finish with two rounded boots, toes pointing a little outward.
💡 Tip: Turning the boot toes slightly outward makes him look like he's standing firmly, not floating.


Step 8: Draw the three sheathed swords at his hip
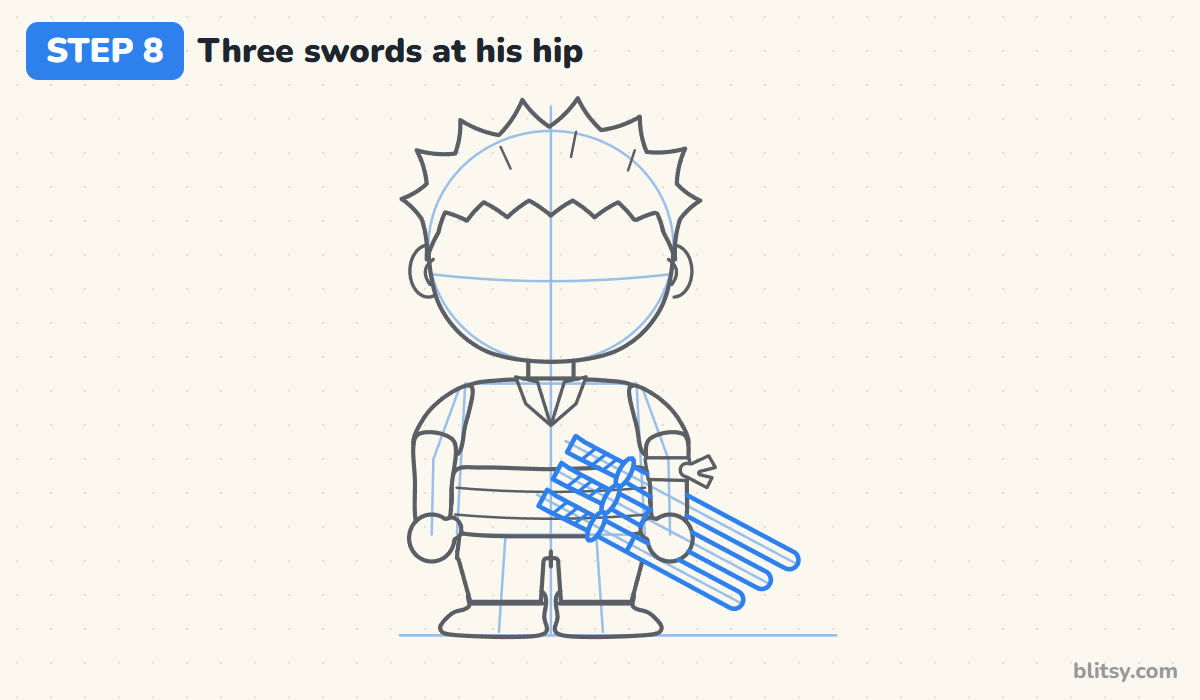
Follow each slanted guide with a long, narrow sheath that has a rounded end. Where each sheath meets the sash, add a small oval guard and a short handle that pokes up toward the middle of his body, with a few slanted lines for the wrapping. I keep all three swords in their sheaths, passing behind his hand.
💡 Tip: Draw the front sword first, then the ones behind it. That way you never draw a line you'll have to erase.
Step 9: Draw the eyes, the brows and a confident smile
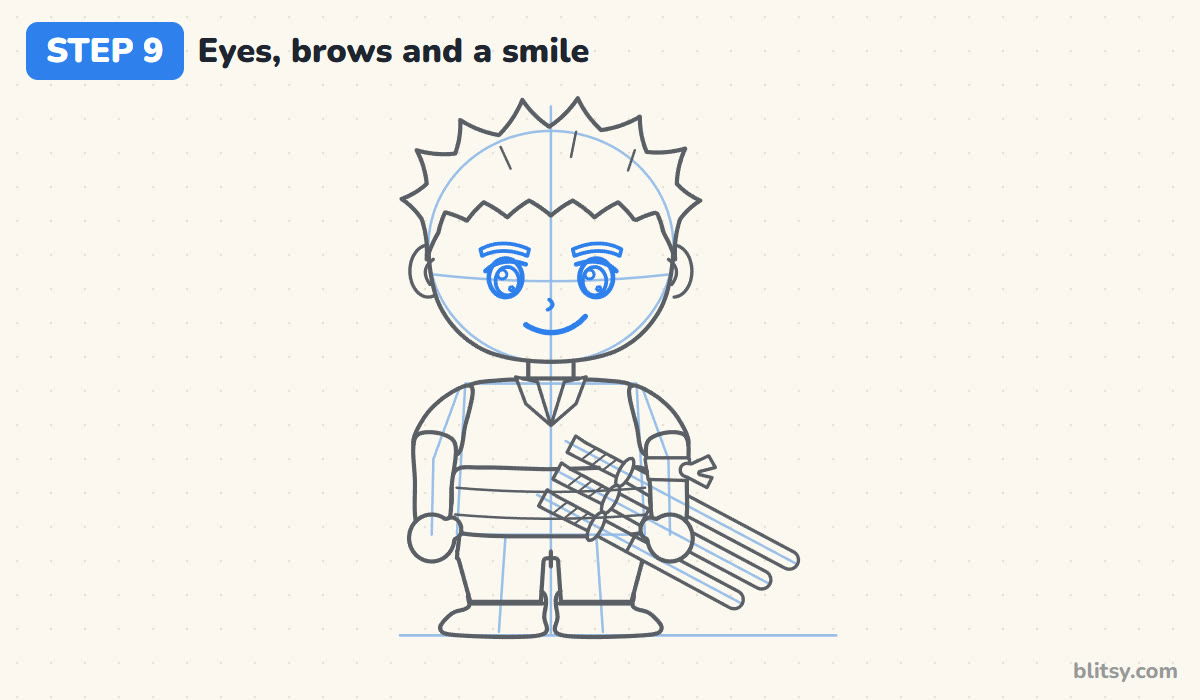
On the eye line, draw two ovals with a darker lid line on top, a big dark iris in each and two white shine dots. Thick, short brows tilt slightly toward the center. A tiny hook for the nose and one curved smile, raised a little at one end, give him that calm, sure look.
💡 Tip: Tilting the brows a little is the whole trick. Flat brows look sleepy, while a slight tilt reads as confident.
Step 10: Add three gold earrings
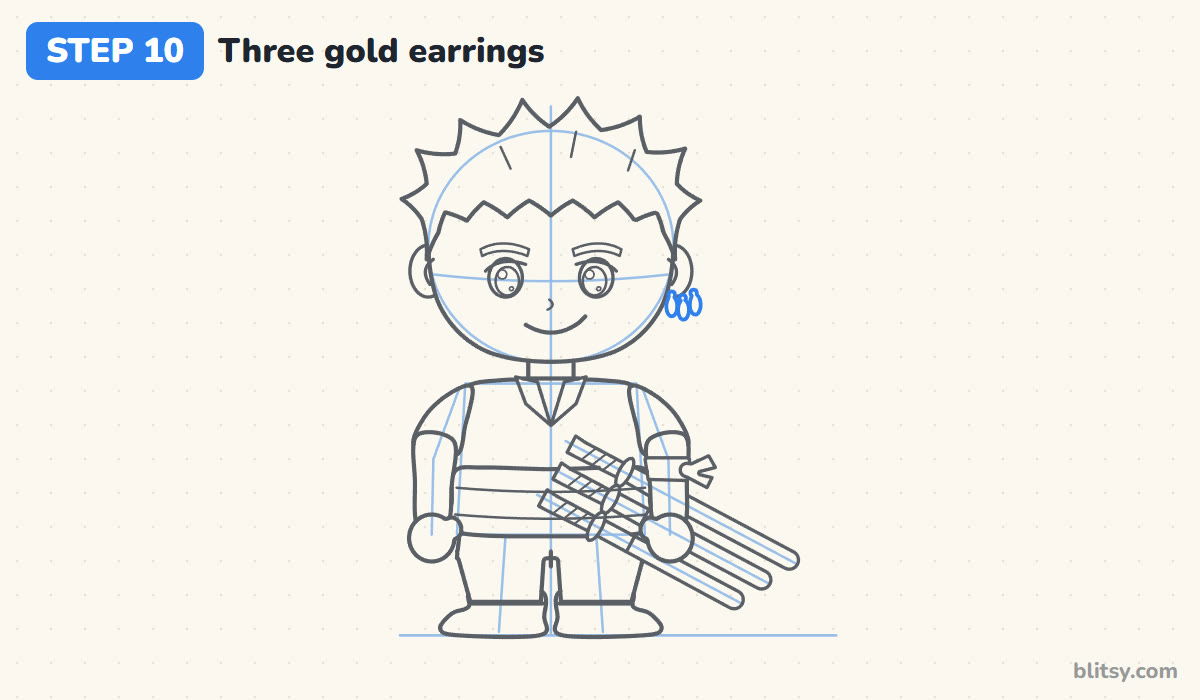
On the ear on his left side (your right), draw three small oval drops hanging side by side from the earlobe, each with a tiny ring on top. Fans look for them right away.
💡 Tip: Keep the earrings the same size and close together. Three different sizes look like a random cluster.
Step 11: Ink the lines and erase the guides
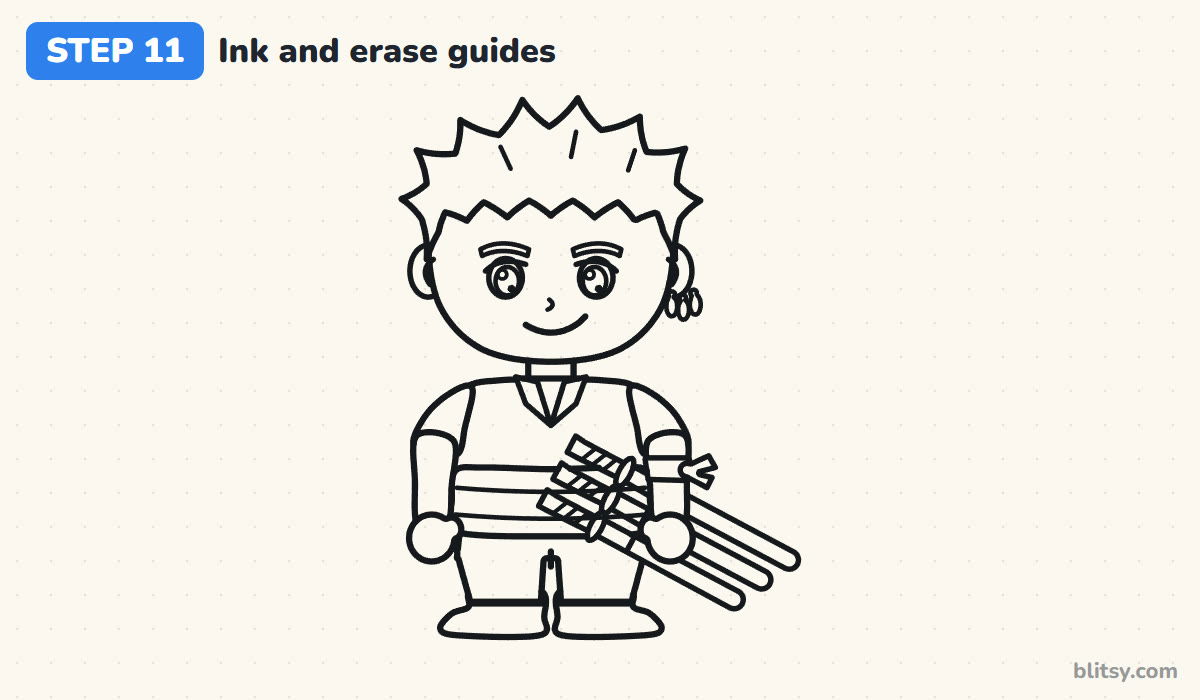
Go over the keeper lines with a black fineliner, wait a minute for the ink to dry, then erase the circle, the box and the guides. I always check around the swords and hands, because that's where stray pencil marks like to hide.
💡 Tip: Ink slowly in short strokes. A quick, long stroke on the spiky hair usually overshoots the points.


Step 12: Color your Zoro
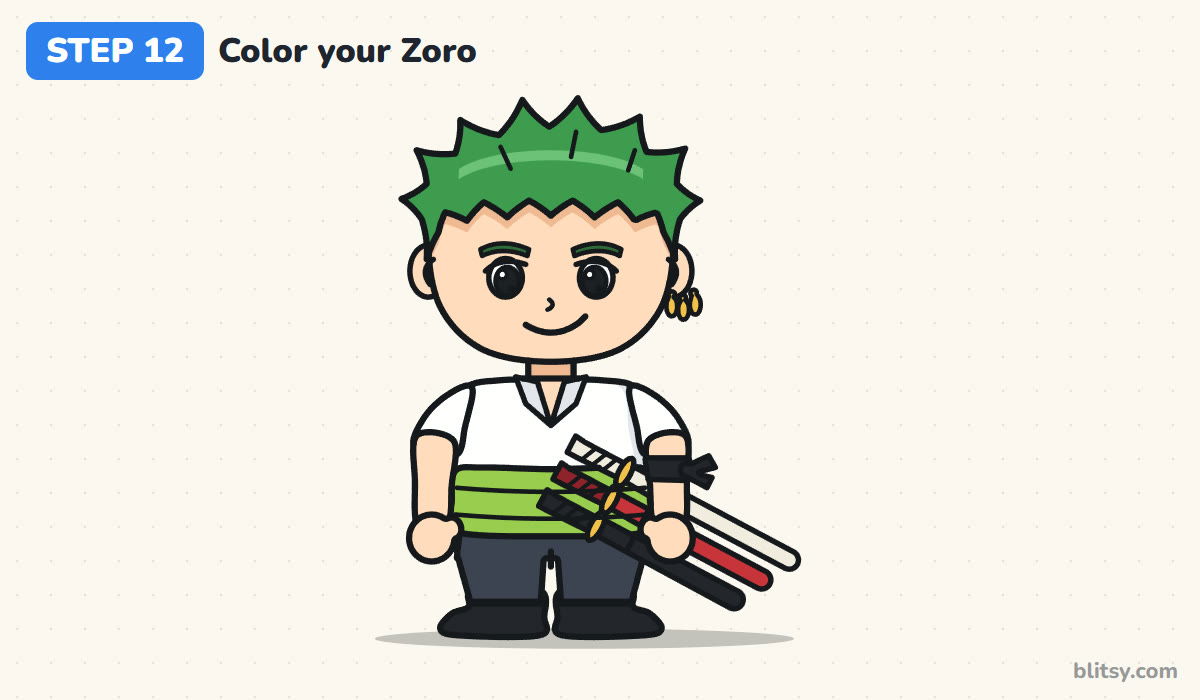
Color the hair a deep green and the sash a lighter green so they don't blend. Use peach for the skin, white or very light gray for the shirt and dark gray for the pants, with black boots and bandana. For the swords, I color one sheath off-white, one red and one black, with gold guards and earrings.
💡 Tip: Leave a thin pale stripe across the hair. That little shine makes the green look glossy and round.
Where Zoro Sketches Usually Slip
- Making the head too small. A chibi needs a head almost as tall as the body. If yours looks like a regular person, redraw the circle bigger.
- Letting the swords cross each other. Three crossing sheaths look like a pile of sticks. Keep them parallel with a small gap between each one.
- Long, floppy hair. His hair is short. Keep the spikes close to the head and the hairline low on the forehead.
- Coloring the hair and the sash the same green. Use a darker green on the hair and a light, yellowish green on the sash so each part stands out.
- Skipping the earrings and the bandana. They're tiny, but they tell people who this is.
Giving Your Swordsman a New Look
Once the chibi body feels easy, play with the outfit. Draw him in a dark green coat, tie the bandana on his head instead of his arm, or give him a crew of friends. Younger artists can skip the handle wrapping and sash ribs. Since he sails with the straw-hat captain, the next natural step is this how to draw Luffy step by step lesson. To practice the short chibi body with a different character, try the chibi drawing tutorial, and for a closer look at blades, the sword drawing tutorial walks through a knight's longsword.
Zoro Coloring Page and a Printable Step Sheet
The free Zoro coloring page shows a colored example at the top and a color key that matches each crayon to a part, with a large outline underneath to fill in. The step-by-step PDF guide puts all 12 steps, pictures and tips on paper, so you can draw at the table without a screen. Both print well on Letter or A4.
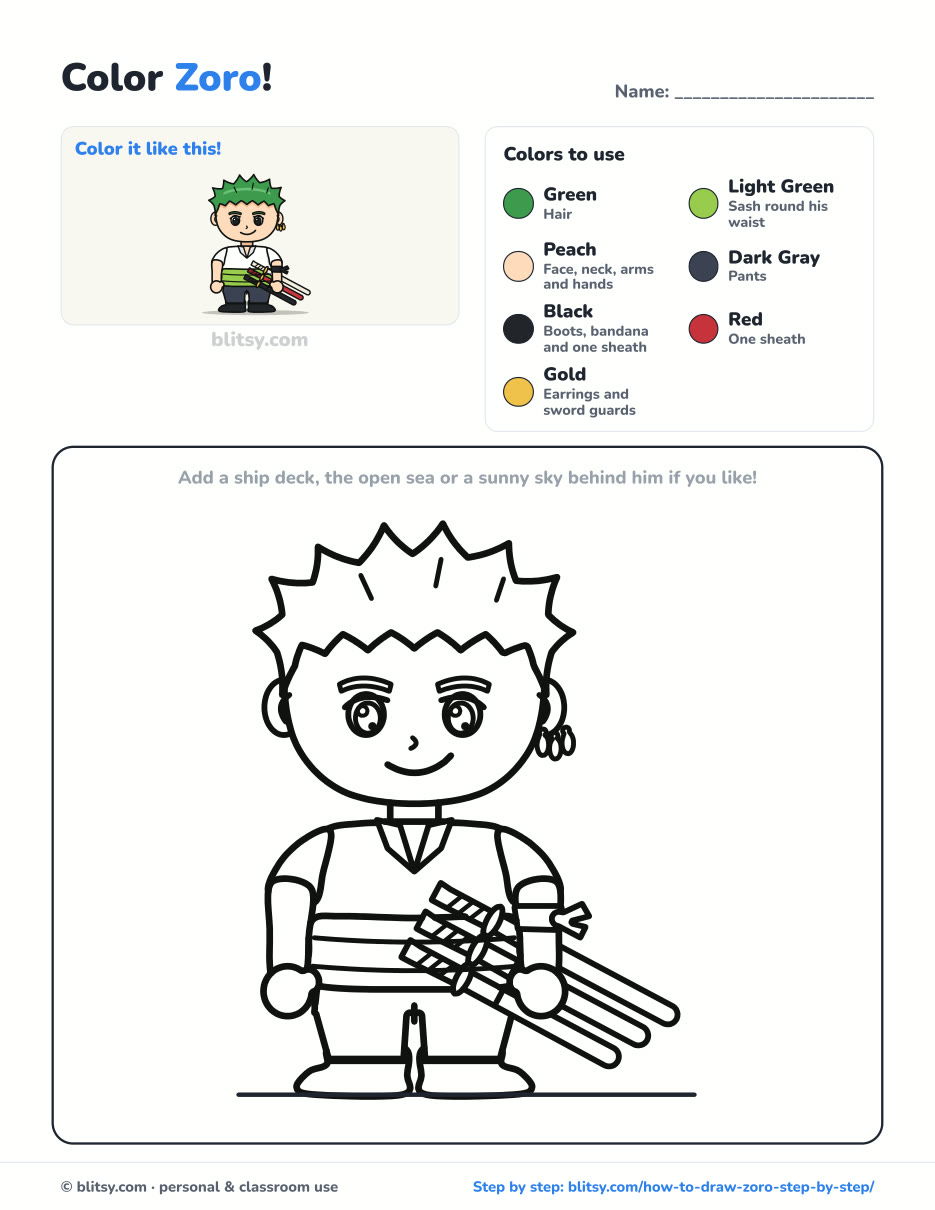
Black outlines with a colored example and the color names at the top. Ready to print and color.
⬇️ Download Coloring PageEvery step picture with its instructions and tips, to keep beside your paper while you draw.
⬇️ Download Drawing Guide📱 On a phone? Tap a download button, then open the file and choose Share → Save to Files or Print. On a computer, the PDF opens or saves straight to your Downloads folder.
Pin the Chibi Zoro Steps for Later
Anime and Chibi Lessons to Draw Next
Every link here is a full step-by-step tutorial with pictures for each stage and its own coloring page.
- Luffy Drawing: Draw Zoro's captain in his straw hat and red vest with this how to draw Luffy step by step guide.
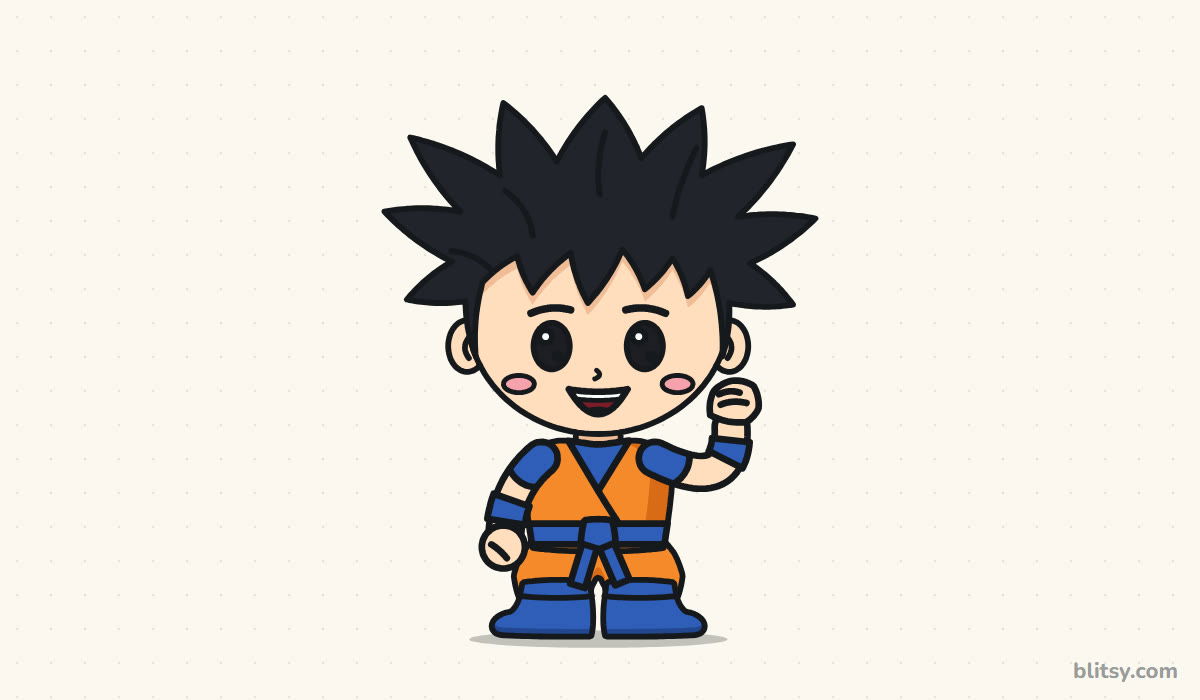
- Goku Drawing: A small chibi Goku with tall spiky hair raises a fist in this Goku drawing tutorial.
- Demon Slayer Drawing: Draw a standing chibi Tanjiro in his checkered haori with this Demon Slayer drawing tutorial.
- Chibi Drawing: Learn the 2-head method with a kid in a cat-ear hoodie in this how to draw a chibi lesson.
- Anime Drawing: Practice the basic anime face rules on a cheerful boy with spiky hair in this anime drawing tutorial.
Green-Haired Swordsman Drawing Questions
How do you draw Zoro easy for beginners?
Draw him as a chibi. Start with a big head circle and a small body box, add short spiky hair, a wide sash and three slanted lines for the swords, then build the details on top of those guides.
How do you draw Zoro's three swords?
Draw three parallel slanted lines at his hip first. Turn each into a long sheath with a rounded end, add an oval guard where it meets the sash, and finish with a short handle pointing toward his body.
What colors do you need for Zoro?
Dark green for the hair, light green for the sash, peach for the skin, white for the shirt, dark gray pants, black boots and bandana, plus red, black and off-white for the sheaths and gold for the guards and earrings.
How long does it take to draw Zoro?
Most beginners need 20 to 30 minutes for the pencil and ink, plus 10 to 15 minutes to color. Kids can stop after inking and color another day.
Put him on a ship deck by the sea and your pirate crew has its first member.
Related posts:
 How to Draw Wonder Woman Step by Step (Chibi for Kids)
 How to Draw the Hulk Step by Step (Easy Chibi for Kids)
 How to Draw Iron Man Step by Step (Easy Chibi for Kids)
 How to Draw Cat Noir Step by Step (Easy Chibi Hero)
 How to Draw Goku Step by Step (Easy Chibi Version)
 How to Draw Freddy Krueger Step by Step (Cute Chibi Version)
 How to Draw Ariana Grande Step by Step (Cute Chibi Fan Art)
 How to Draw Master Chief Step by Step (Easy Chibi Armor)
 How to Draw the Joker Step by Step (Easy Chibi for Beginners)
 How to Draw Tinkerbell Step by Step (Easy Flying Chibi)
 How to Draw a Chibi Step by Step (Easy 2-Head Method)
 How to Draw Gojo Step by Step (Easy Chibi Fan Art)

