
Sneakers trip people up because they start with the laces, the fun part, and end up with a shoe floating in midair. Build the sole first and everything else has something to stand on. That's the method behind this lesson on how to draw shoes step by step: one tall canvas high-top and one short low-top, both in cheerful red with white rubber trim.
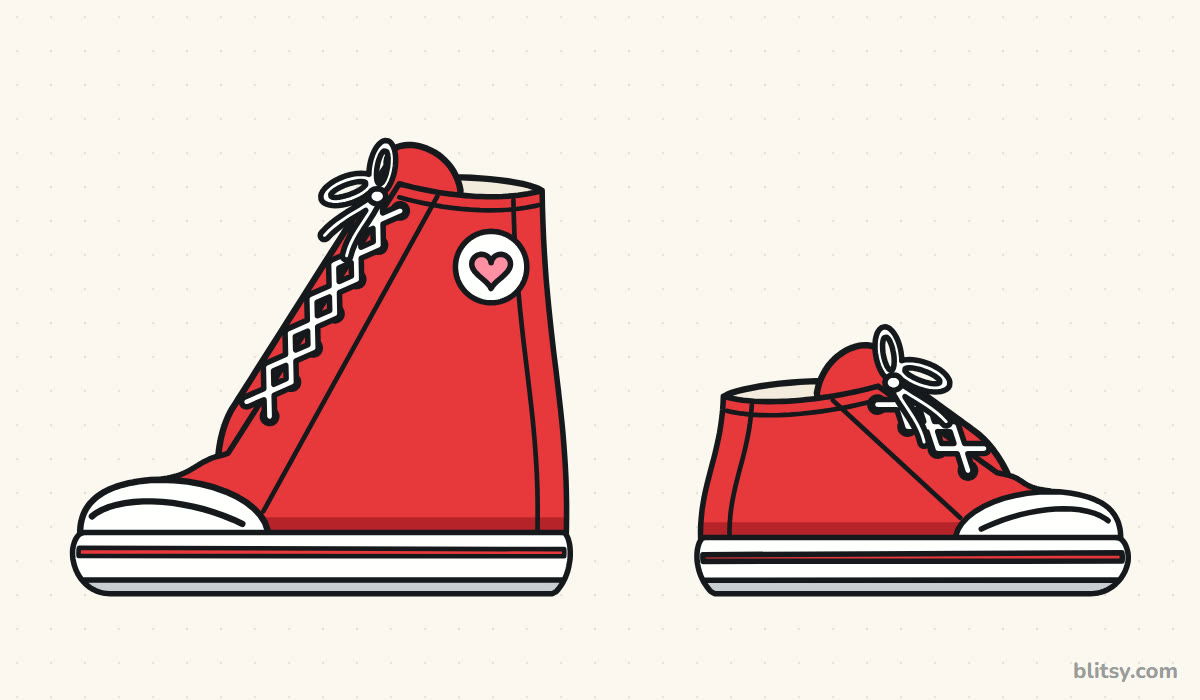
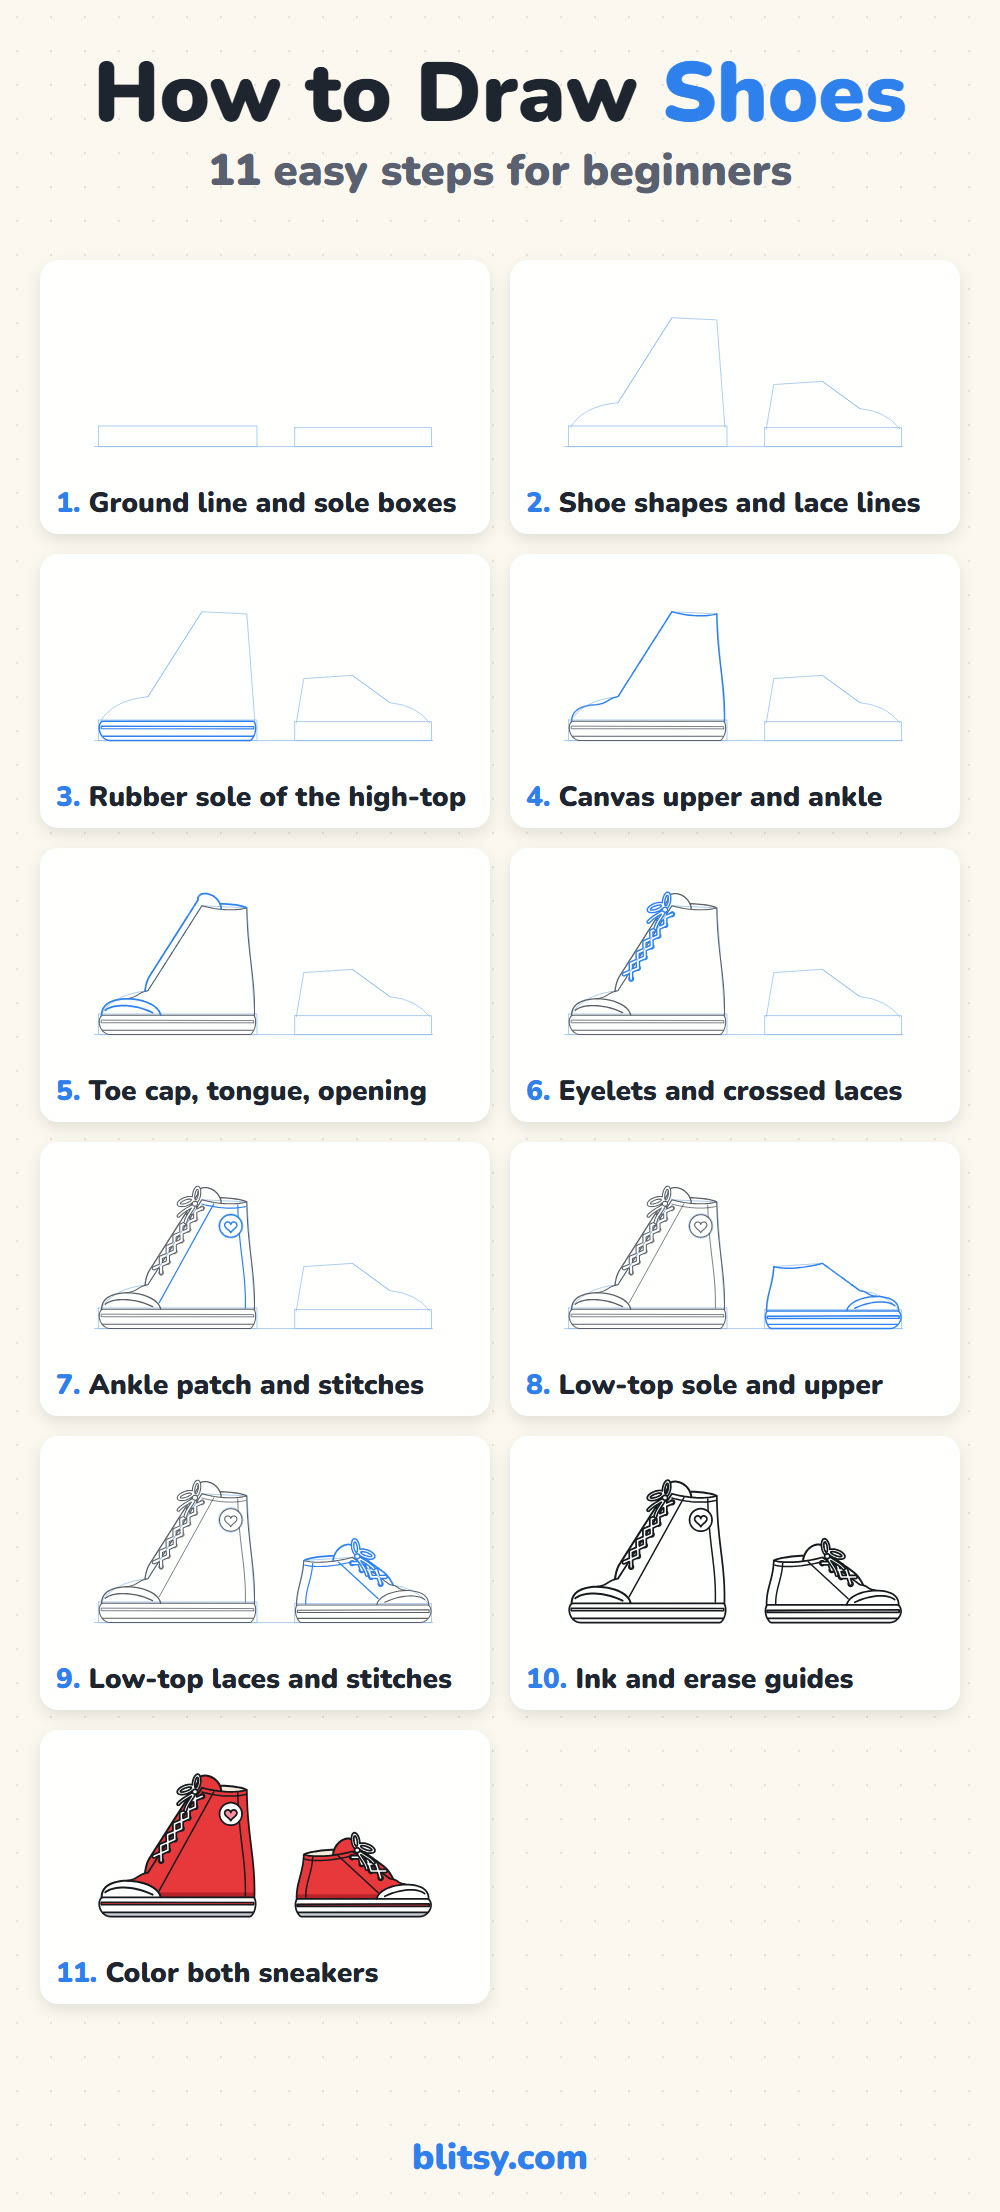
Blue lines in each picture are the ones you add in that step, and gray ones were drawn earlier. The pale blue boxes and slanted lines are light helpers that you erase near the end.
Quick overview
⏱️ Time: about 30 minutes with coloring, 15 for the high-top alone
🎯 Level: easy to medium; kids from about 7 can manage the high-top
✏️ Steps: 11
👟 You'll draw: a canvas high-top sneaker and a low-top sneaker, side by side
Tools for Sketching a Pair of Sneakers
- A pencil you can press lightly with (HB is fine)
- A clean eraser
- A ruler for the ground line and the sole boxes
- A black fineliner or felt-tip pen
- Colored pencils or markers (red, pink and a gray)
- Plain paper turned sideways
White parts of the shoe stay as bare paper, so you don't need a white pencil at all.
How to Draw Shoes Step by Step
Step 1: Rule a ground line and two flat sole boxes
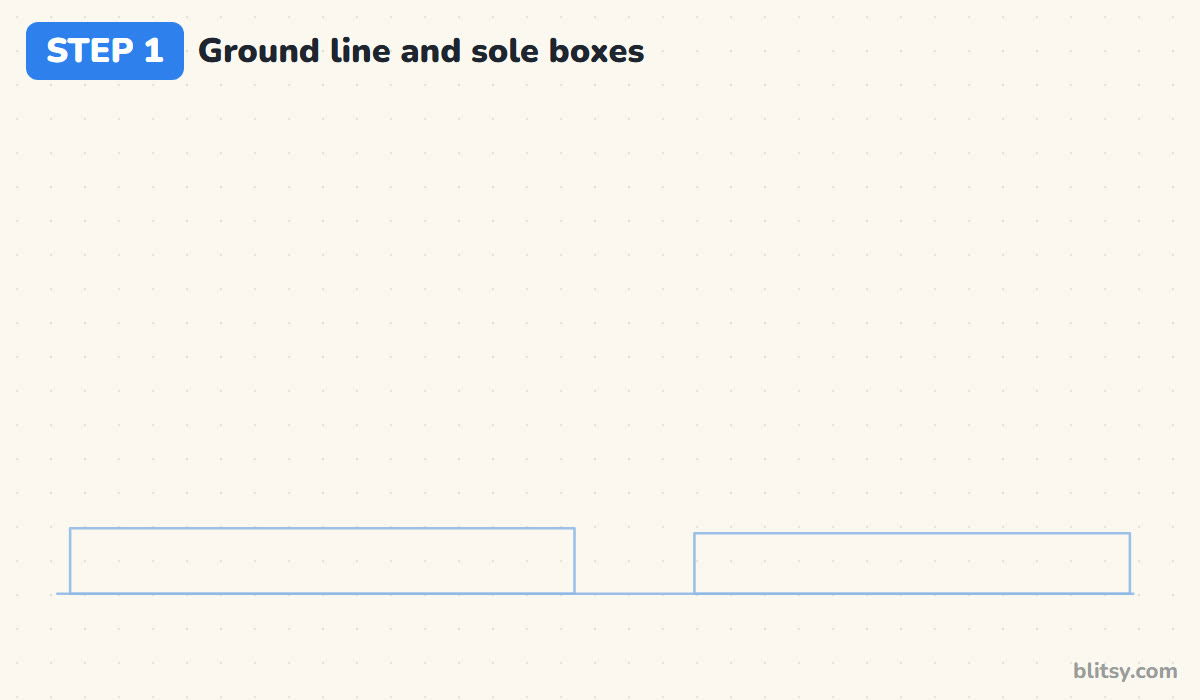
Draw one long, straight line across the lower part of the page. Sitting on it, sketch two thin rectangles: a long one on the left for the high-top and a shorter one on the right. Each box is about eight times longer than it is tall. Leave a gap so the shoes don't bump into each other.
💡 Tip: Use the ruler here; a crooked ground line makes both shoes look like they're sliding downhill.
Step 2: Block in the shoe shapes and the lace lines
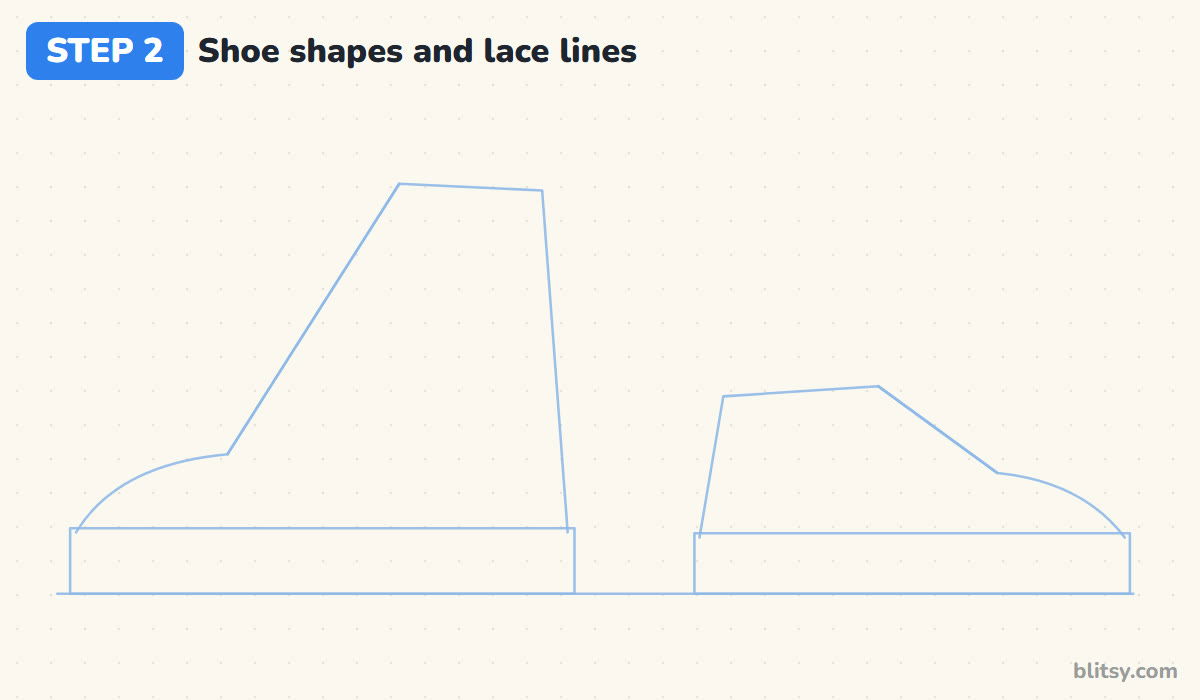
On top of the left box, draw a curve rising from the front corner like a gentle hill, then a long slanted line climbing up and back. Finish with a short top edge and a nearly upright back line. That tall shape is the high-top. The low-top on the right gets the same idea, only mirrored and much lower. I call the slanted lines lace lines, because the laces will sit along them.
💡 Tip: Keep the high-top's back line almost vertical, or the shoe looks like it's tipping over.
Step 3: Draw the rubber sole of the high-top
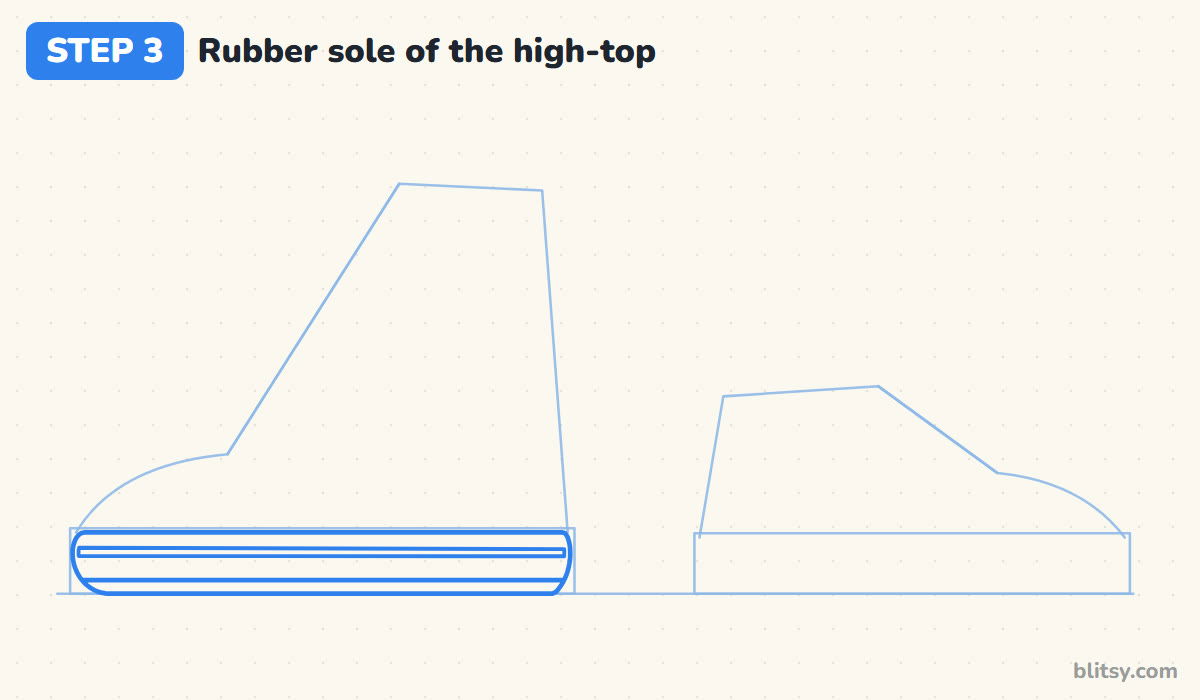
Now the real lines start. Round off the front and back of the left box so the sole looks like a long, soft capsule. Inside it, draw a thin stripe a little below the top edge, plus one more line near the bottom for the tread. I find those two inner lines are what make it read as rubber instead of a plank.




💡 Tip: Make the front of the sole stick out a hair past the toe; real sneaker soles always do.
Step 4: Outline the canvas upper and the ankle
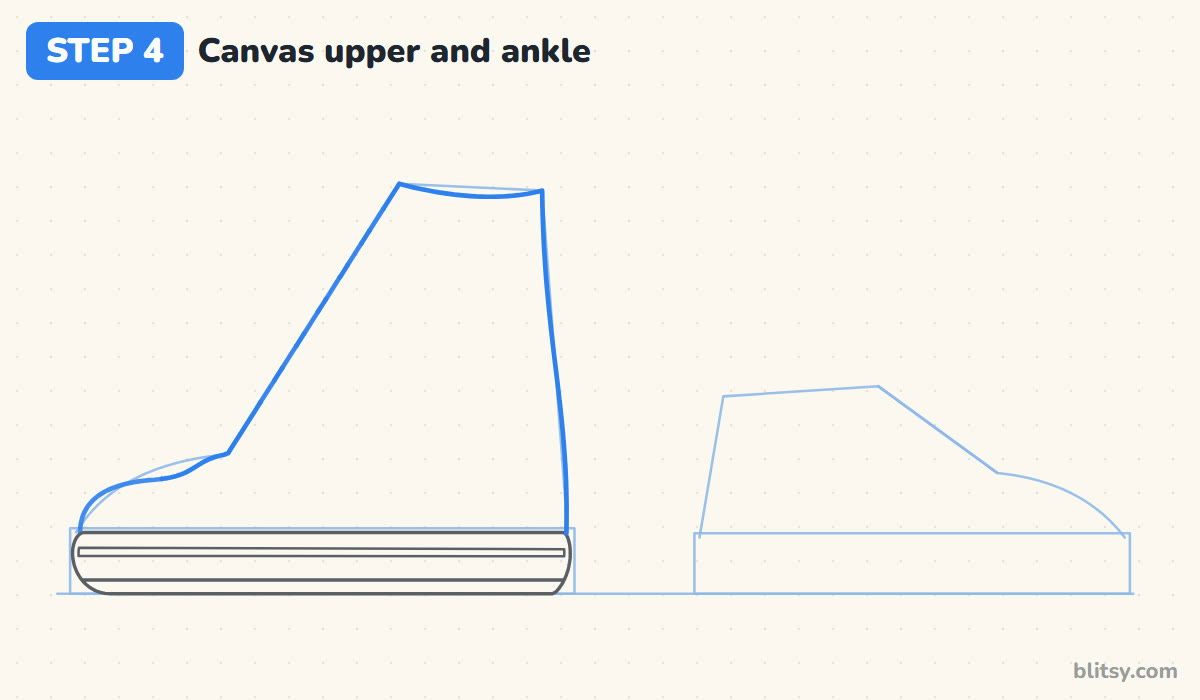
Start at the toe, just above the sole, and curve up over the toe box. At the lace line, follow it straight up to the top. The collar dips slightly in the middle, like a shallow smile. Bring the back down along your guide, bending out a little near the heel, and stop on the sole.
💡 Tip: Stop the canvas line right on top of the sole, never below it, so the two parts don't overlap.
Step 5: Add the toe cap, the tongue and the shoe opening
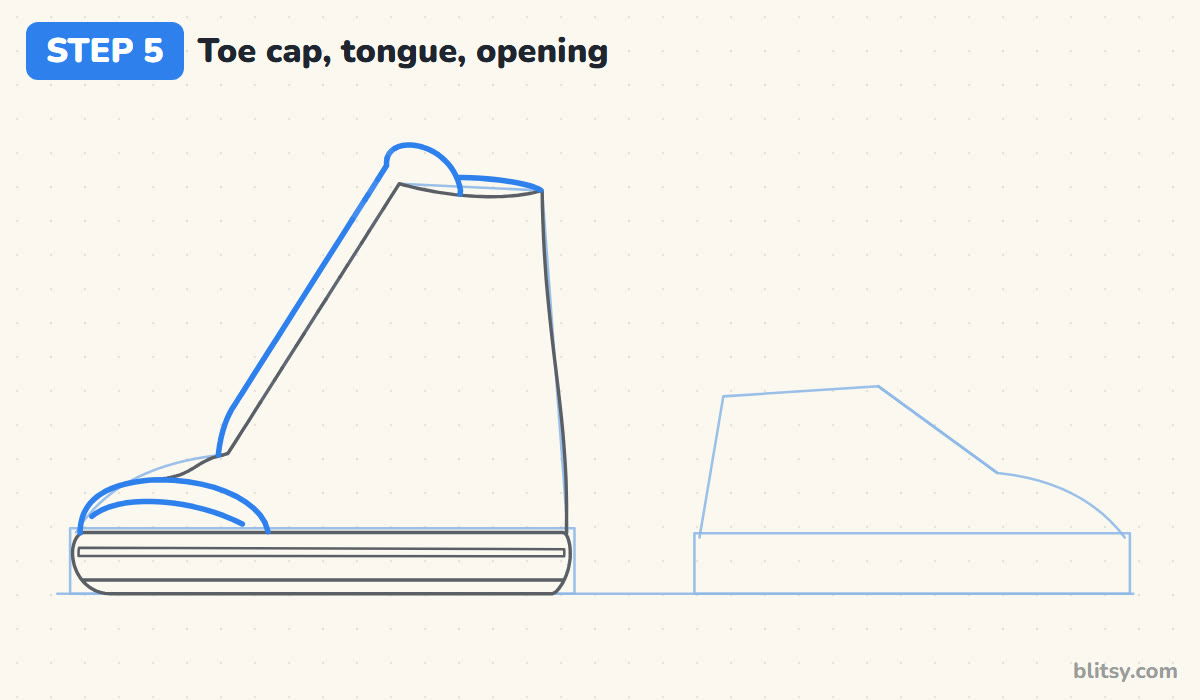
The toe cap is a rounded rubber dome over the front of the foot. Draw its arch from the tip of the toe to about a third of the way along the sole, with a curved ridge line inside. Next comes the tongue: a narrow strip just outside the lace line, poking above the collar in a rounded tab. A thin oval behind the collar shows the inside of the shoe.
💡 Tip: If the toe cap reaches past the middle of the shoe, it starts to look like a clown shoe; keep it short.
Step 6: Draw the eyelets and the crossed laces
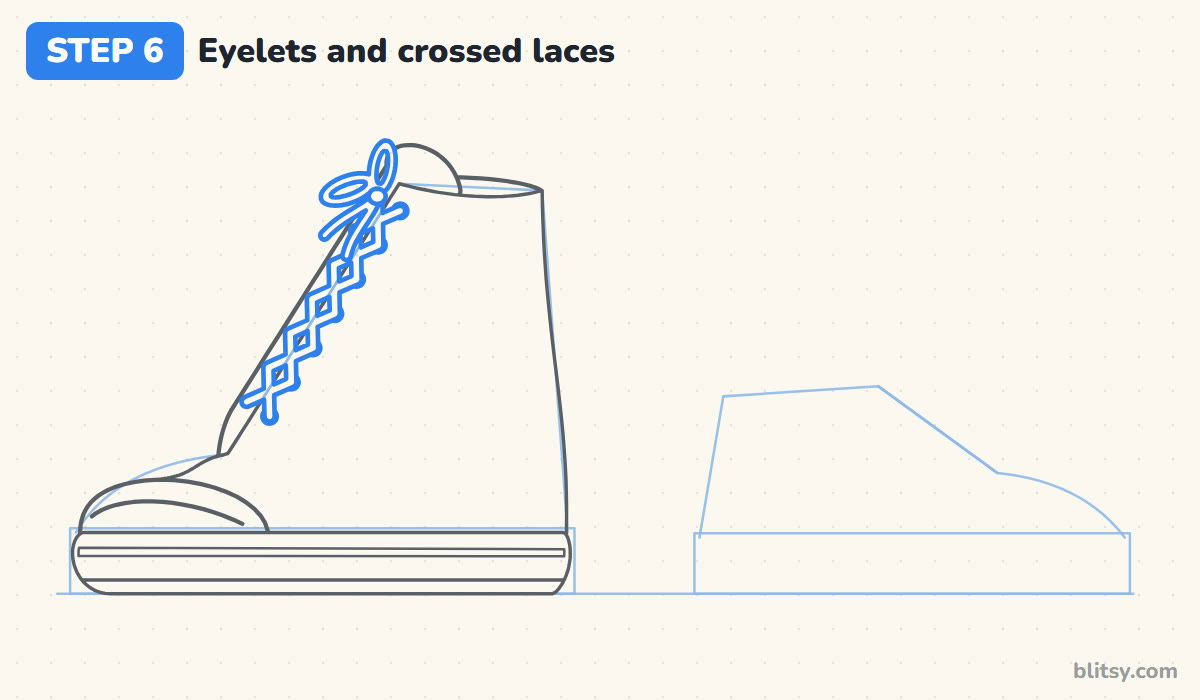
Place seven small circles in a row just inside the lace edge, each with a dot in the middle. From each eyelet, draw a lace band over to the tongue, letting neighboring bands cross in an X. A small bow with two loops and two short ends goes at the top. Most beginners make the laces too long; they only need to reach the tongue.
💡 Tip: Mark all seven eyelet spots with dots before drawing any circles, so the spacing comes out even.
Step 7: Put an ankle patch and stitch lines on the high-top
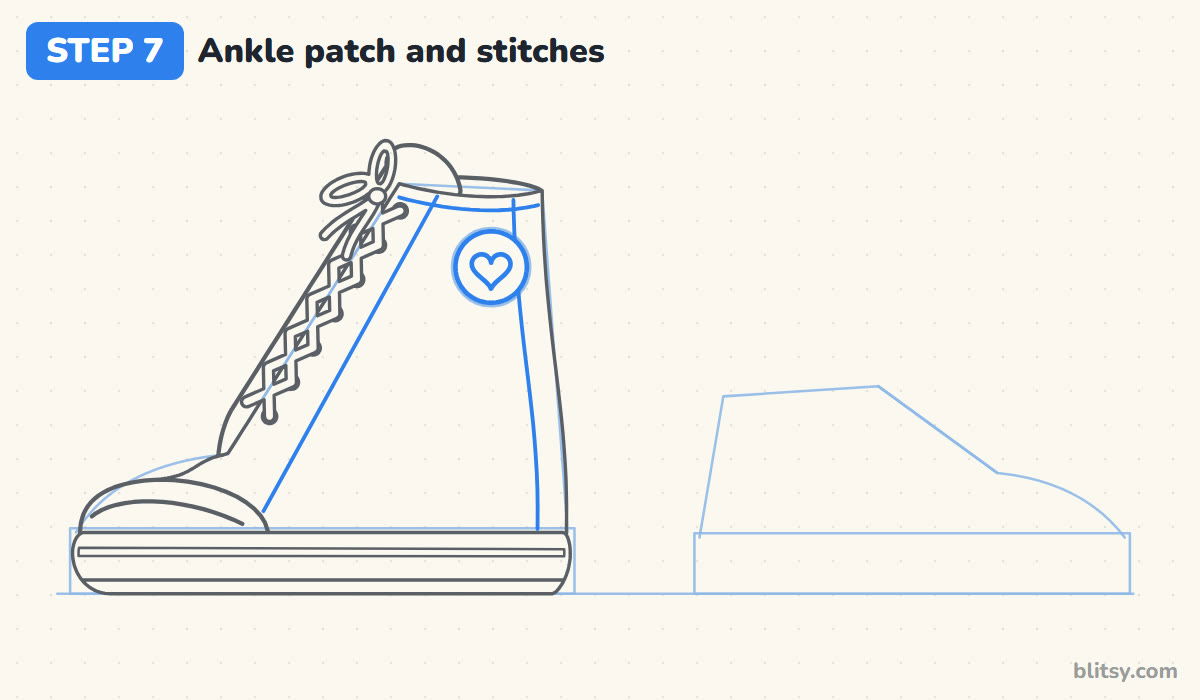
High-tops usually have a round patch on the inner ankle. Sketch a guide circle near the top back of the shoe, trace it, and draw a small heart inside. For stitching, I run one line parallel to the lace edge, one just under the collar and one close to the heel. Those quiet lines make the canvas look sewn.




💡 Tip: Swap the heart for a star, a moon or your initial; this patch is your own design, not a brand logo.
Step 8: Draw the low-top's sole and upper
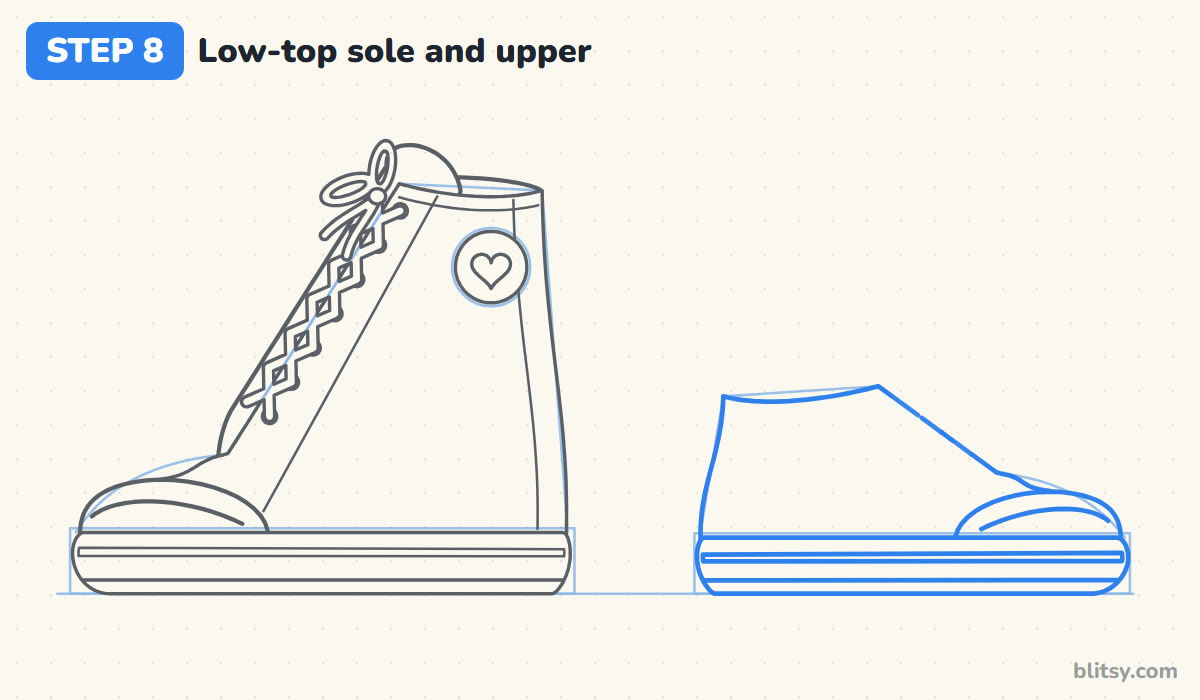
On the right shoe, everything gets shorter and points the other way. Round the ends of the sole box and add the stripe and tread line. Then draw the upper: a low toe box, a short lace edge and a collar just above the ankle bone. The toe cap sits on the right this time. Doing the high-top first pays off now, because the low-top repeats the same moves.
💡 Tip: Check that the low-top's sole is a bit thinner than the high-top's; the smaller shoe should look lighter.
Step 9: Finish the low-top's tongue plus its laces and stitches
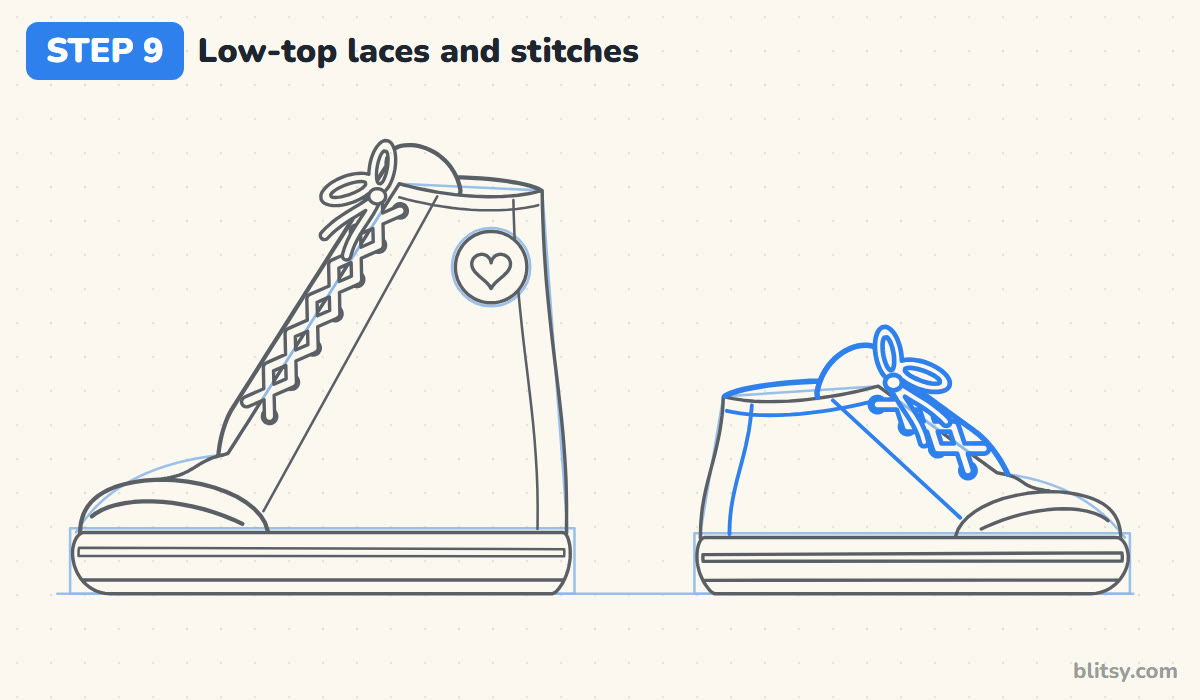
Give the low-top a small tongue tab peeking over the collar and a thin oval for the opening. Four eyelets are plenty on a shoe this short. Cross the laces between them and top them with a little bow. Finish with a stitch line beside the lace edge, another under the collar and a seam near the heel.
💡 Tip: Fewer eyelets on a low-top keeps the laces from turning into a tangled blob.
Step 10: Ink the outlines and erase the guides
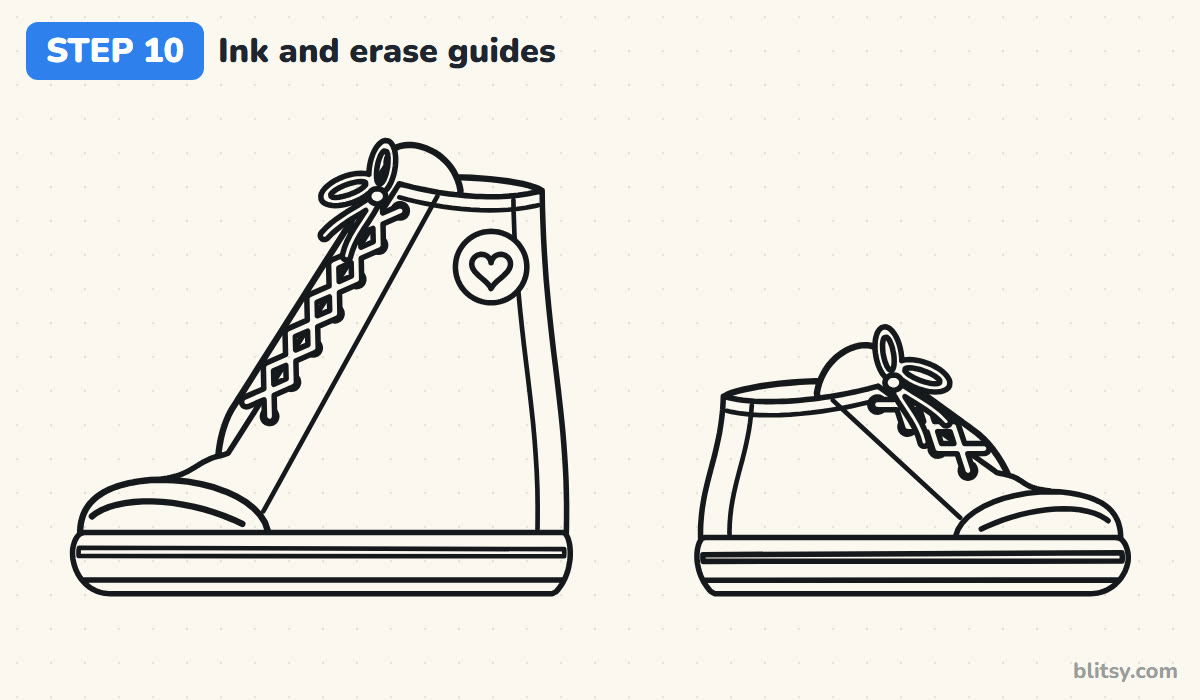
Trace every line you want to keep with the black pen, going slowly around the bows and eyelets. Once the ink is completely dry, erase the ground line, the boxes and the slanted lace lines. Pencil bits hidden under the laces go too, so the laces sit cleanly on top.
💡 Tip: Wait a full minute before erasing; fresh ink smears into gray streaks under the eraser.
Step 11: Color both sneakers
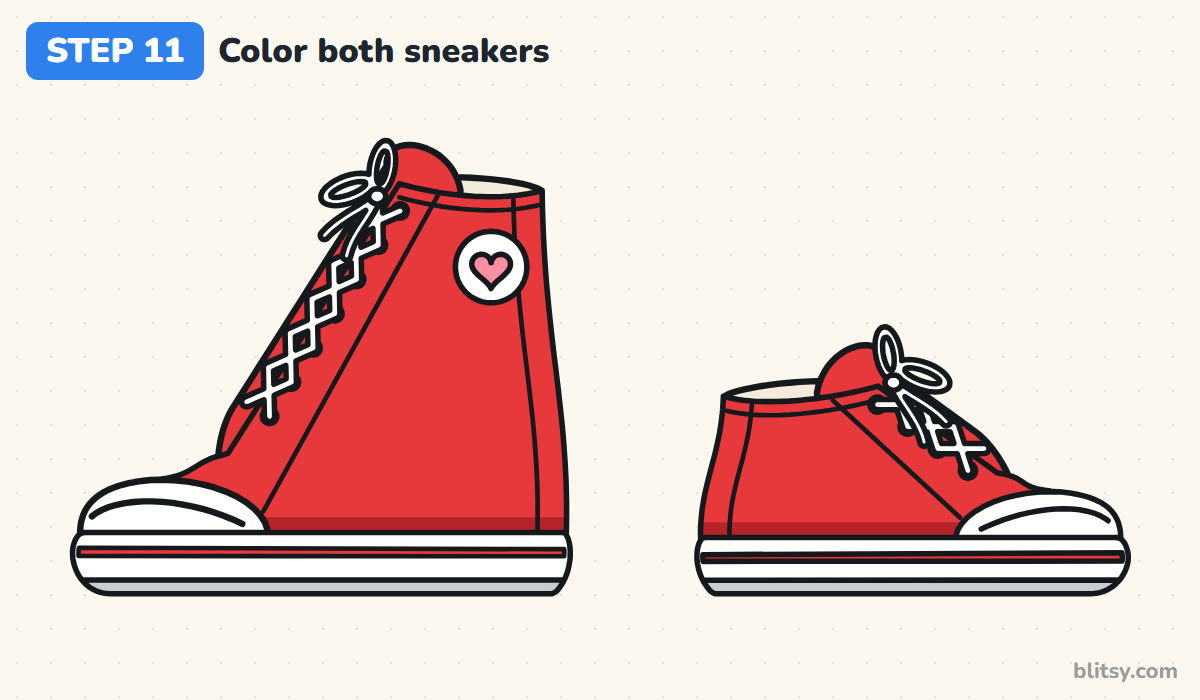
Fill the canvas and tongues with bright red, then press harder, or switch to dark red, along the bottom of each upper just above the sole. I like that band of shadow because it makes the shoes feel grounded. Color the sole stripe red and the tread gray. Eyelets get light gray, the heart turns pink, and the opening gets a warm cream.




💡 Tip: Leave the soles, toe caps and laces as white paper rather than coloring them white.
Where Sneaker Drawings Usually Trip Up
- Starting at the laces. Without a sole underneath, the shoe has nothing to rest on and floats. Always draw the sole box first.
- A sole that's too thin. A pencil-thin sole turns a sneaker into a slipper. Aim for about a sixth of the high-top's height.
- Laces running off the shoe. Long lace bands stick out into the air. Stop each band on the tongue, just past the lace edge.
- A toe cap shaped like a ball. A tall, round cap swallows the front of the foot. Keep it low and stretched, like half a flattened egg.
- Eyelets drifting apart. Uneven gaps look messy. Dot every spot along the lace line first.
Fresh Colors and Styles for Your Sneakers
When my red pair feels easy, I start playing with the design. Try blue canvas with yellow laces, or give each shoe of the pair a different color for a mismatched look. Or stretch the high-top taller into a boot. And if you'd like to draw a whole outfit to go with your sneakers, the hoodie drawing tutorial and the dress drawing step by step lesson pair nicely with them.
Free Sneaker Coloring Page and Step Guide PDF
The shoes coloring page has both sneakers in thick, clean outlines, with a colored example and a small color key at the top for kids who like to copy. The step-by-step guide PDF holds all 11 steps with their tips and prints on Letter or A4 paper.
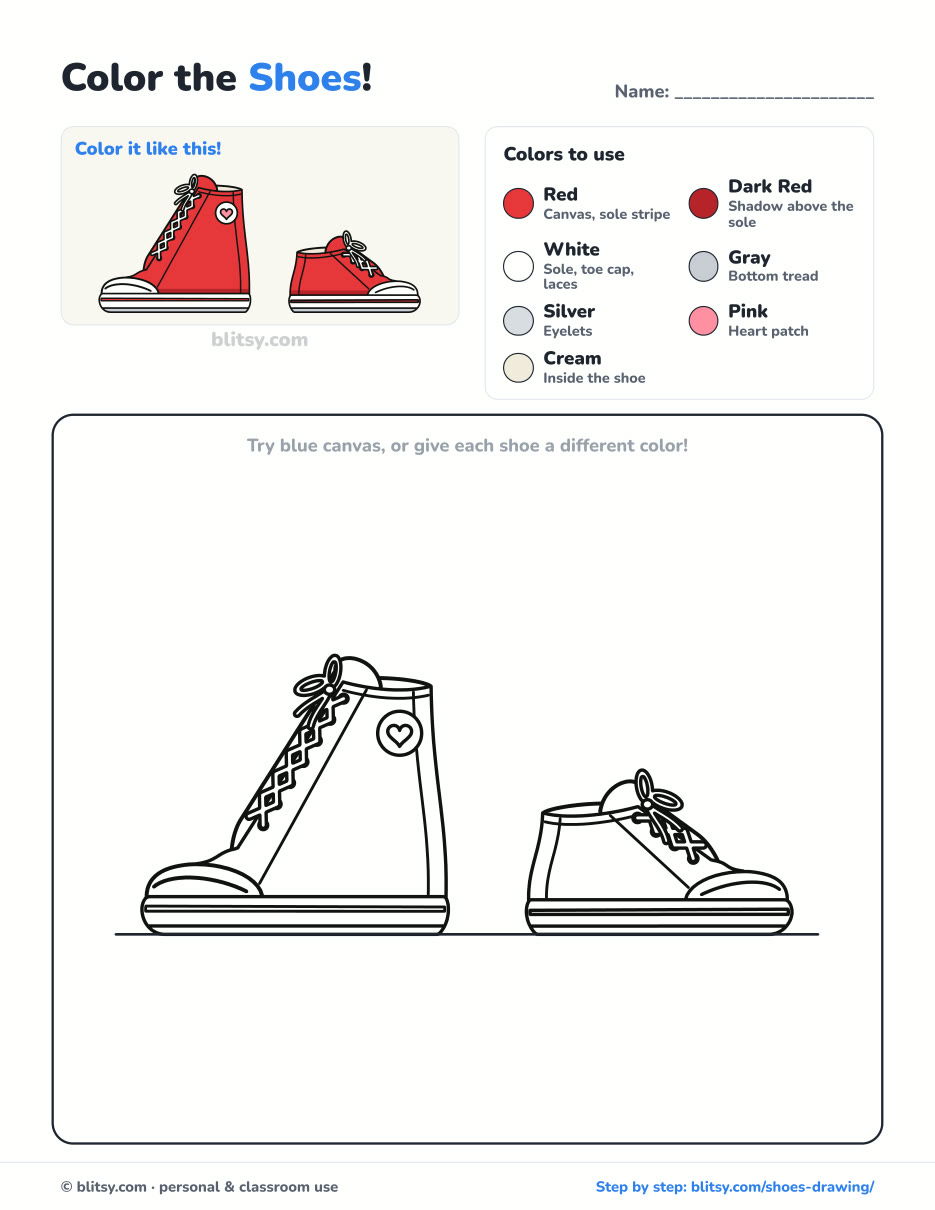
Black outlines with a colored example and the color names at the top. Ready to print and color.
⬇️ Download Coloring PageEvery step picture with its instructions and tips, to keep beside your paper while you draw.
⬇️ Download Drawing Guide📱 On a phone? Tap a download button, then open the file and choose Share → Save to Files or Print. On a computer, the PDF opens or saves straight to your Downloads folder.
All 11 Sneaker Steps on One Pin
Sneakers Drawn? Finish the Outfit Next
These step-by-step tutorials cover clothes, accessories and a few other subjects, each split into short steps with pictures.
- Feather Drawing: A curved line and a leaf shape become two feathers, teal and orange, in this how to draw a feather step by step lesson.
- Mask Drawing: The masquerade mask drawing tutorial trims a purple mask with gold, pearls, three feathers and ribbons.
- Suit Drawing: Draw a navy jacket and trousers with a red striped tie using the suit drawing step by step guide.
- Family Drawing: Four people, a puppy and a balloon are made from the same few shapes in this family drawing tutorial.
- Hoodie Drawing: Learn how to draw a hoodie from the front and the back, sage green with mustard lining.
- Chalk Art: The chalk art tutorial lays out a hopscotch, a rainbow on two clouds and a corner sun.
- Shirt Drawing: A coral tee and a rolled-sleeve plaid shirt sit side by side in the shirt drawing step by step lesson.
- Dress Drawing: Draw a twirly pink party dress and a lavender sundress on a hanger with this dress drawing tutorial.
- Realistic Drawing: For shading practice, the realistic drawing step by step guide lights a shiny apple from one lamp.
Shoe Drawing Questions I Hear Often
What is the easiest way to draw a shoe?
Start with a flat box for the sole on a straight ground line. Draw the upper on top of it as a hill shape, then add the toe cap and the laces last.
How do you draw shoelaces that look right?
Draw a row of evenly spaced eyelets first. Then link them with short bands that cross in an X over the tongue, and finish with a small bow at the top.
Is a high-top or a low-top easier for kids?
The high-top is a little easier, because its big flat side leaves room for the patch and the laces. On the low-top everything is smaller and tighter.
How long does it take to draw a pair of sneakers?
Plan on about 30 minutes for both shoes with coloring. The high-top on its own takes around 15 minutes once you know the steps.
Grab a ruler, set down that ground line and start with the sole. My guess is your second pair will come out even better than the first. 👟✏️
Related posts:
 How to Draw a Whale Step by Step (Easy for Beginners)
 How to Draw Lungs Step by Step (Easy Science Diagram)
 How to Draw a Pineapple Step by Step (Easy Crown and Slice)
 How to Draw Iron Man Step by Step (Easy Chibi for Kids)
 How to Draw a Hoodie Step by Step (Front and Back View)
 How to Draw a Parrot Step by Step (Easy Scarlet Macaw)
 How to Draw a Police Car Step by Step (Easy for Kids)
 How to Draw a Volcano Step by Step (Easy Erupting Volcano)
 How to Draw a Crow Step by Step (Easy for Beginners)
 How to Draw a Tiger Step by Step (Easy Walking Pose)
 How to Draw a Heart Step by Step (Even, Symmetric Shape)
 How to Draw a Jellyfish Step by Step (Cute, Easy Guide)

