
Almost every shirt in the world is a letter T with a few extras added. Here you'll learn how to draw a shirt step by step twice over: a relaxed crew-neck T-shirt first, and then a plaid button-up with a pointed collar. The T-shirt warms up your hand, so the button-up feels much easier when you get to it.
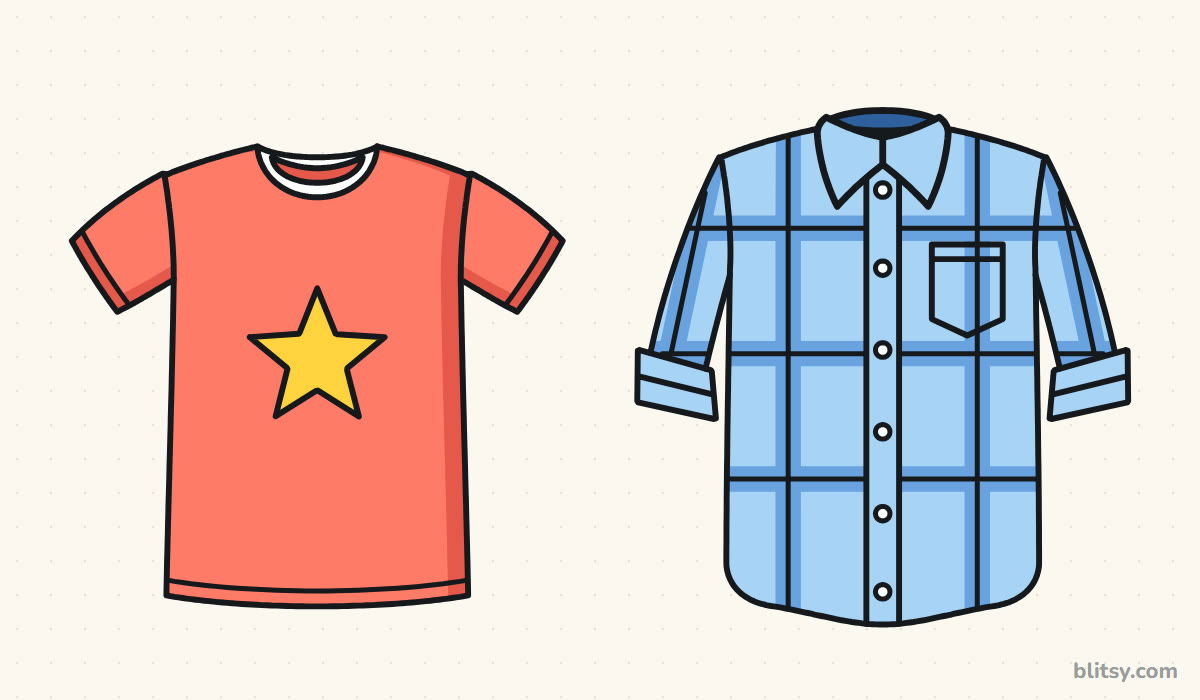
Shirt pictures here follow one simple rule: the new part of each step shows in blue, and gray means finished work. Pale blue shapes like the T outlines and the circle are soft helpers that disappear in step 11.
Quick overview
⏱️ Time: about 25 to 35 minutes, coloring included
🎯 Level: easy; the T-shirt alone suits kids from about 6
✏️ Steps: 12
👕 You'll draw: a crew-neck T-shirt with a star, and a plaid button-up shirt with a chest pocket
Kit for Sketching a Tee and a Button-Up
- A regular pencil for light sketching
- A soft eraser
- A ruler, handy for the center lines and plaid stripes
- A black felt-tip pen or fineliner
- Colored pencils or markers in coral, yellow, light blue and blue
- A sheet of paper turned the long way across
No ruler? Freehand plaid lines with a little wobble look like real fabric anyway.
How to Draw a Shirt Step by Step
Step 1: Sketch the center lines and two T-shapes
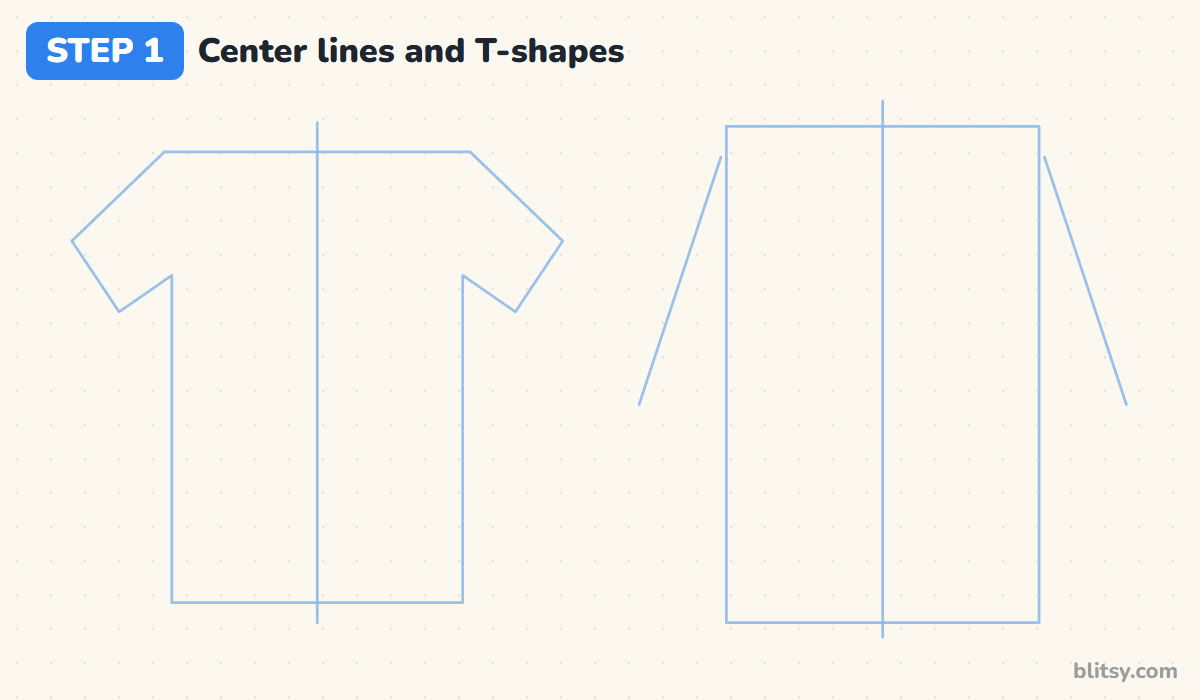
Turn your paper sideways and draw two upright lines, one on the left half and one on the right. Around the left line, sketch a blocky letter T with short arms that slant down: that's the T-shirt. Around the right line, draw a tall rectangle with two long slanted lines falling from its top corners for the button-up's sleeves.
💡 Tip: Press so lightly that you can barely see the guides; they're only scaffolding.
Step 2: Draw the T-shirt body and neckline
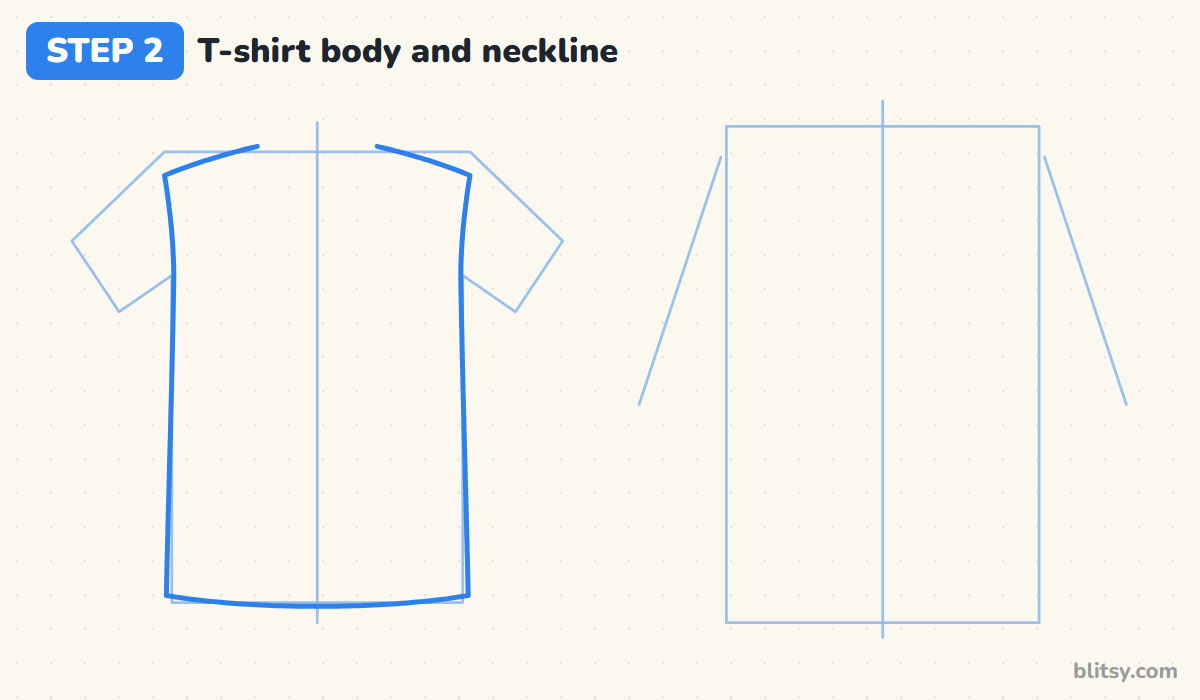
Starting near the top of the center line, draw the shoulders sloping gently down to the corners of the T. From each corner, let the side seam curve in a tiny bit at the armpit, then run almost straight down. I give the hem a slight smile shape, because fabric never hangs perfectly flat.
💡 Tip: Leave a gap at the top of the neck; the collar fills it in step 4.
Step 3: Add the short T-shirt sleeves
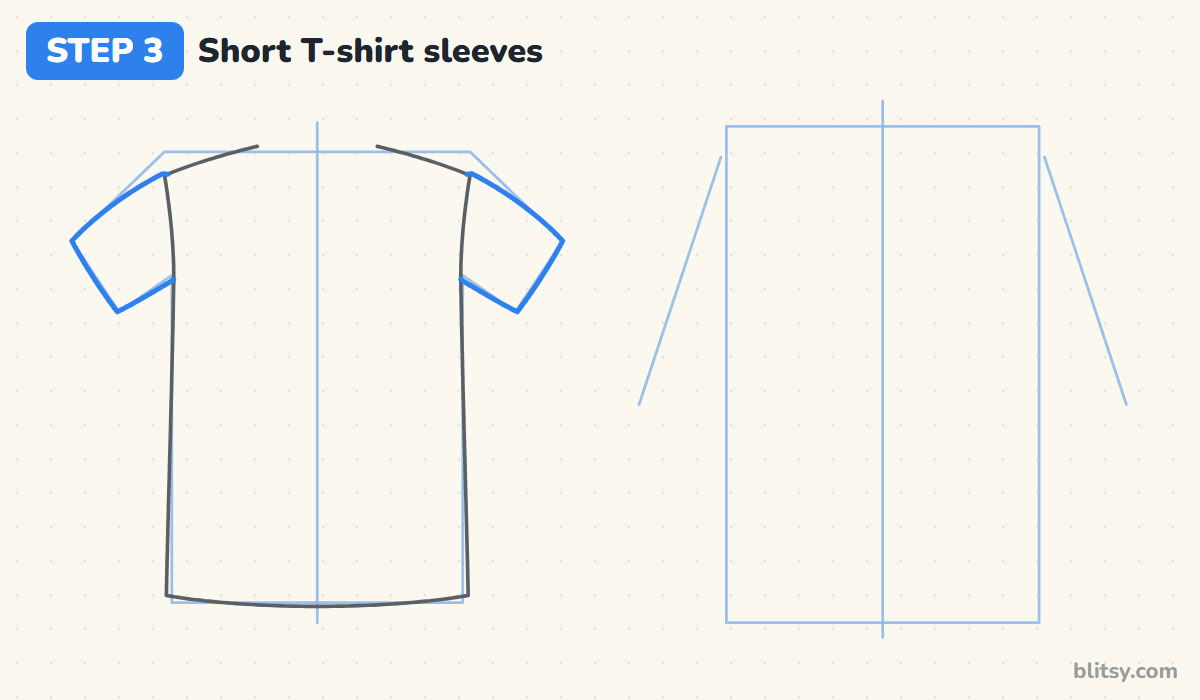
Each sleeve leaves the shoulder at an angle and ends in a slanted opening, like a short wide tube. Follow the arms of your T guide, then bring the underside of the sleeve back to the armpit. Measure where the left sleeve ends and match it on the right, since a tee only looks right when both sides mirror each other.
💡 Tip: Make the sleeve opening wider than the sleeve's join at the body.



Step 4: Draw the crew neck and the hem stitches
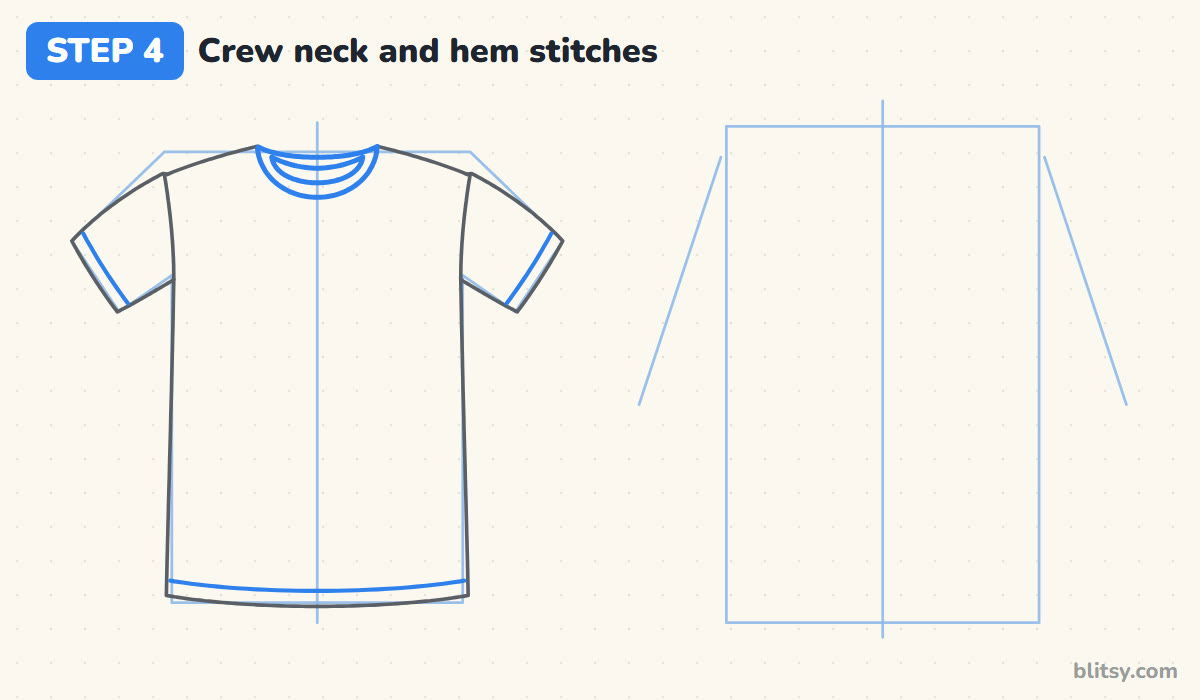
A crew neck is a round scoop with a band around it. Draw a U from one shoulder point to the other, then a second, smaller curve inside it for the band. Across the top, a shallow curve shows the back of the neck. For the stitches, copy the bottom hem a little higher, and repeat the trick just inside each sleeve opening.
💡 Tip: Keep the neck band an even width all the way around, about a fingertip thick.
Step 5: Put a star on the chest
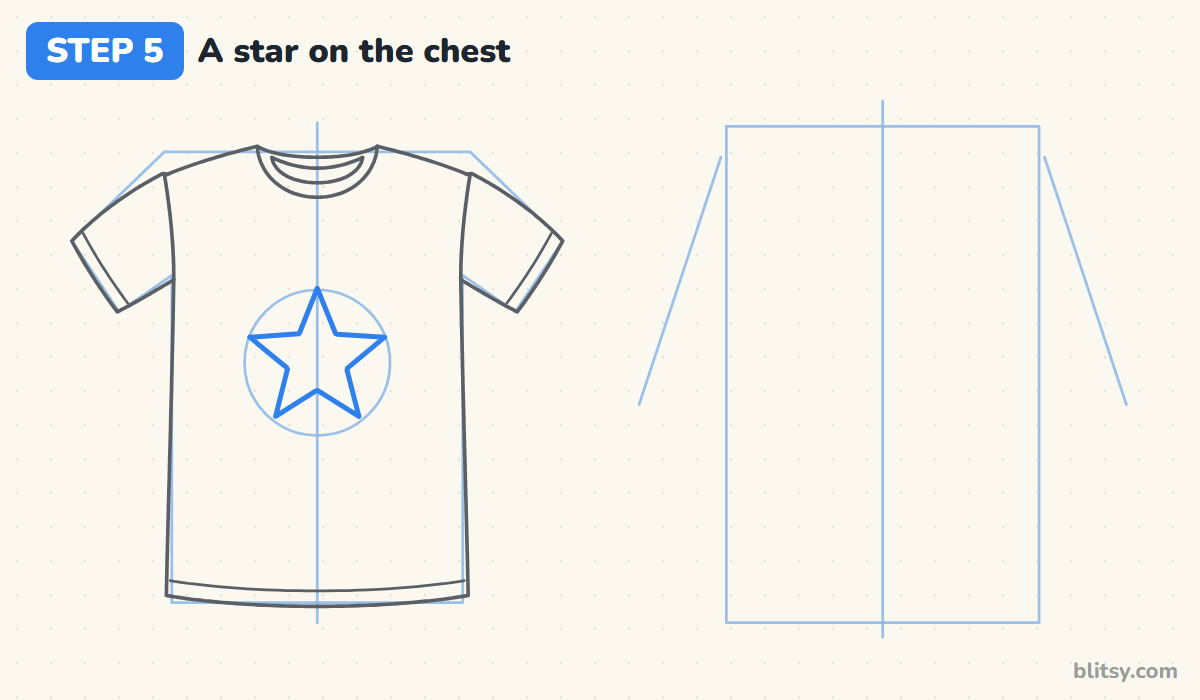
Sketch a circle in the middle of the chest, a little closer to the neck than to the hem. Then place five points evenly around it, starting with one at the very top, and join them by zigzagging inward. The circle keeps the star balanced. A heart or your initial would work in the same spot too.
💡 Tip: Put the top point on the center line, then the rest fall into place.
Step 6: Outline the button-up body with a curved hem
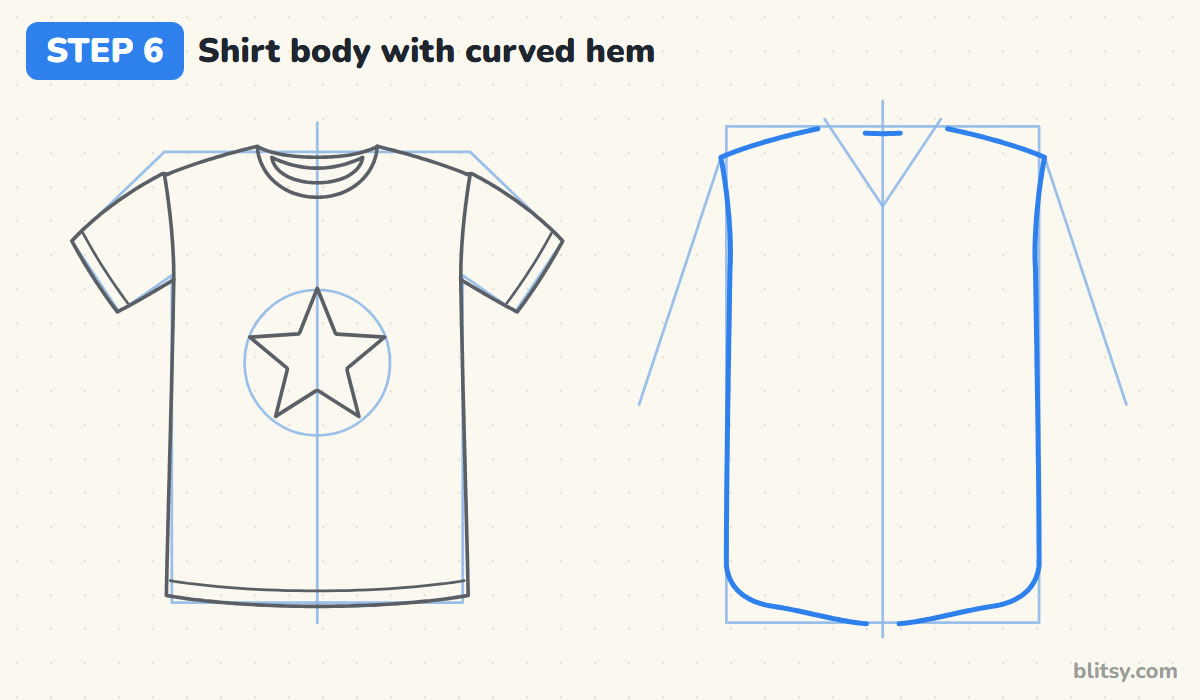
Move to the rectangle on the right and sketch a light V from both sides of the neck down to the center line, to mark where the collar points end. Draw the shoulders, then the sides straight down. The bottom is the fun part: round off both lower corners and let the hem dip lower in the middle. That curved shirttail tells everyone this is a dress shirt.
💡 Tip: Make the button-up's shoulders a touch wider than the tee's, so it looks more tailored.
Step 7: Add the pointed collar
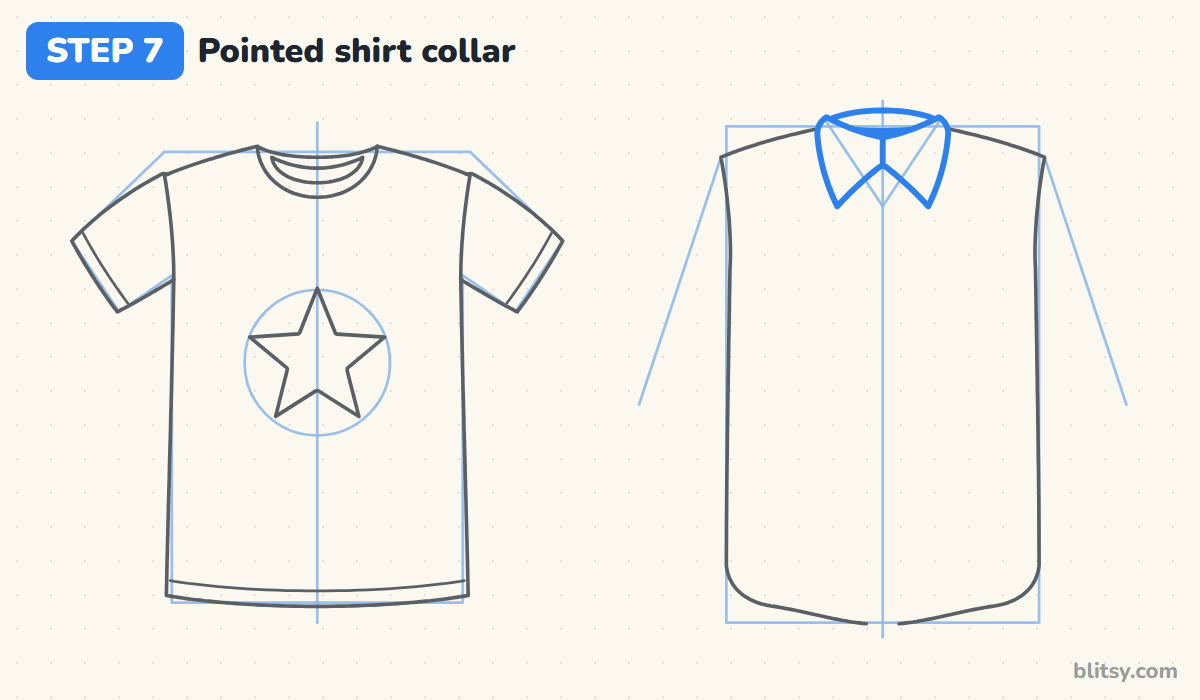
Each half of the collar is a flap with a sharp point that ends on your V guide. Begin at the side of the neck, go down to the point, and come back up to meet the other flap on the center line. Above the flaps, draw a thin curved band for the back of the collar. Small kids can make the flaps simple triangles.
💡 Tip: Check that both collar points finish at exactly the same height.


Step 8: Draw the rolled-up sleeves
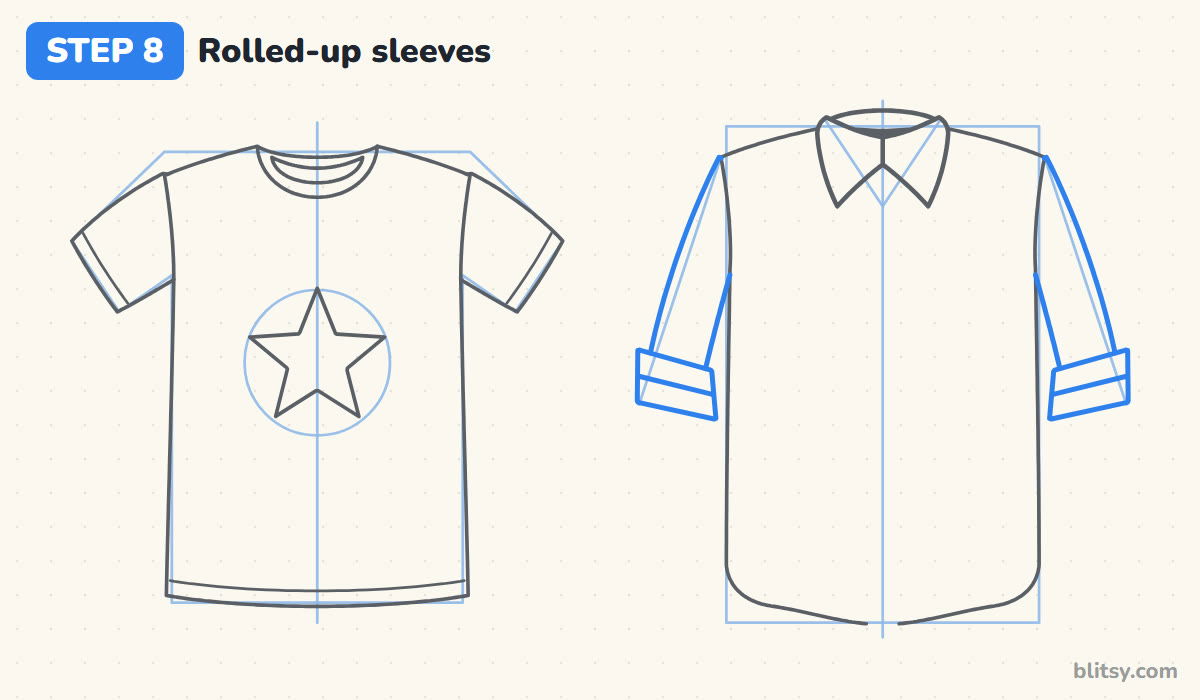
Long sleeves hang down from the shoulders along the slanted guides, but these ones stop around elbow height. At the bottom of each, draw a wide band that's a little thicker than the sleeve, with one line across its middle. That band reads as fabric folded up twice. Most beginners make the roll too thin, so it looks like a cuff.
💡 Tip: Tilt each roll to follow the sleeve, not the edge of the paper.
Step 9: Add the placket, the buttons and the pocket
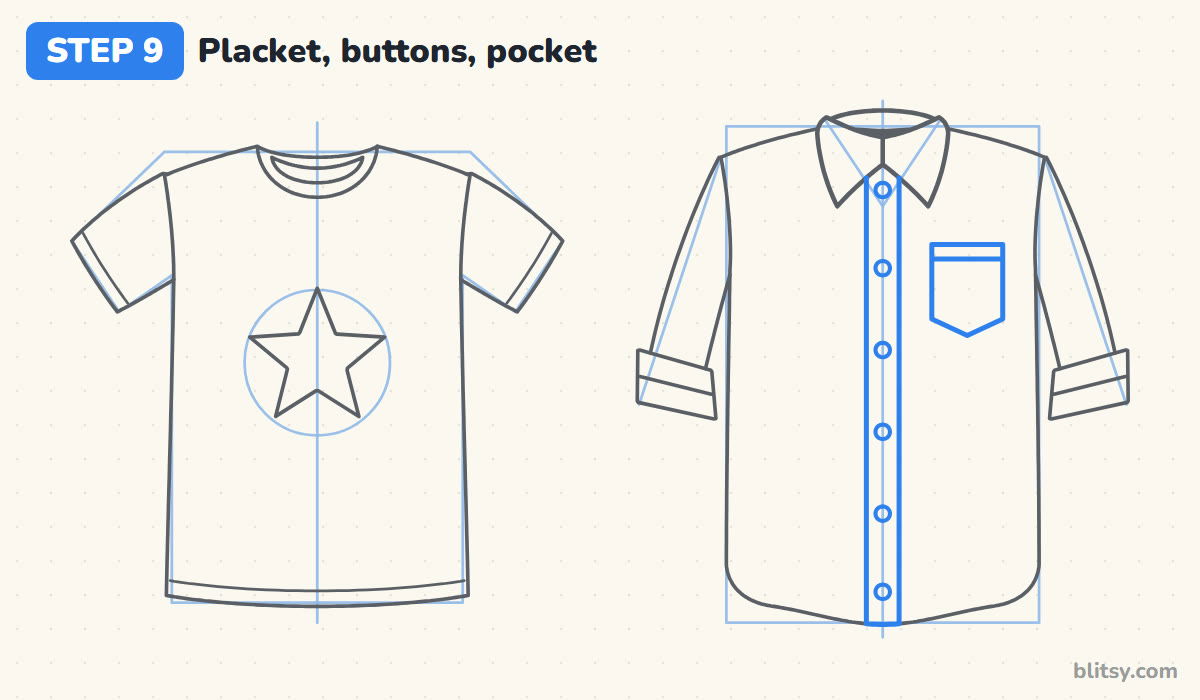
The placket is the narrow strip down the front where the buttons live. Draw two lines close together, from under the collar to the hem. Space six small circles down the strip; I mark the top and bottom button first and then split the gaps evenly. On the wearer's left chest, add a pocket with a pointed bottom and a line across its top.
💡 Tip: Draw the buttons a bit smaller than the placket is wide, so they don't touch its edges.
Step 10: Draw simple plaid stripes
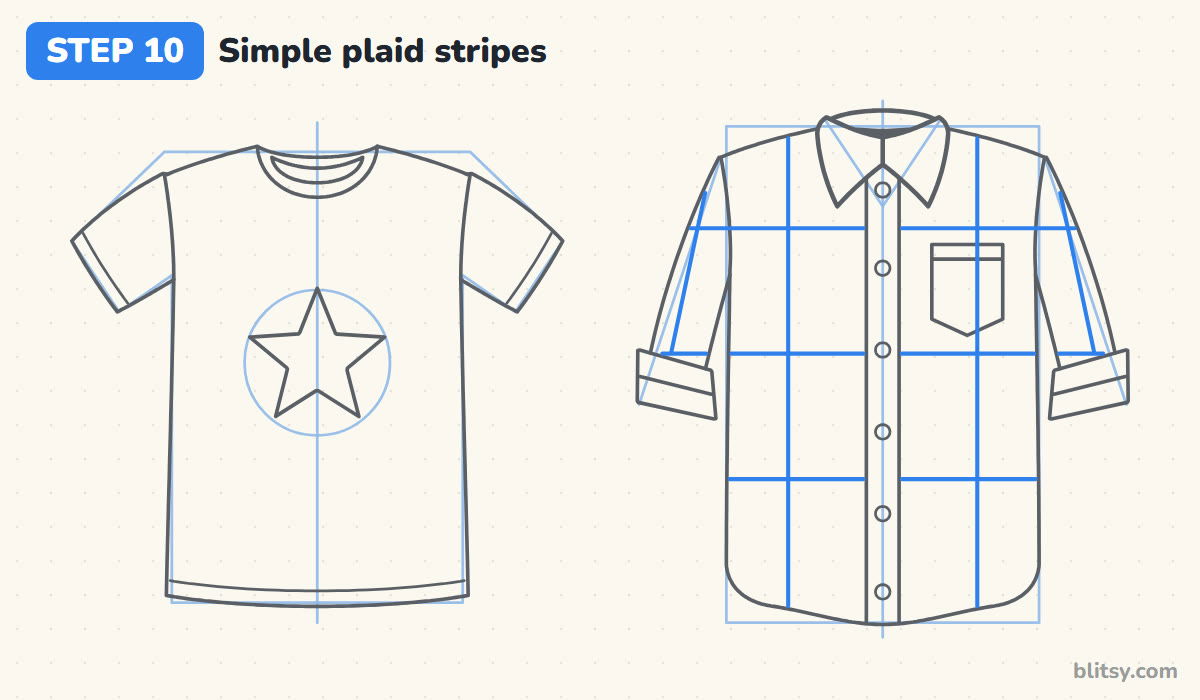
Plaid is just stripes going two ways. Draw two lines down the shirt front, one on each side of the placket, then three lines across the body and both sleeves. Add one slanted stripe down each sleeve. Let the lines stop at the placket and the collar, and run them straight through the pocket so the pattern matches.
💡 Tip: Space your stripes evenly with the ruler, or freehand them for a cozy flannel feel.
Step 11: Ink your lines and erase the guides
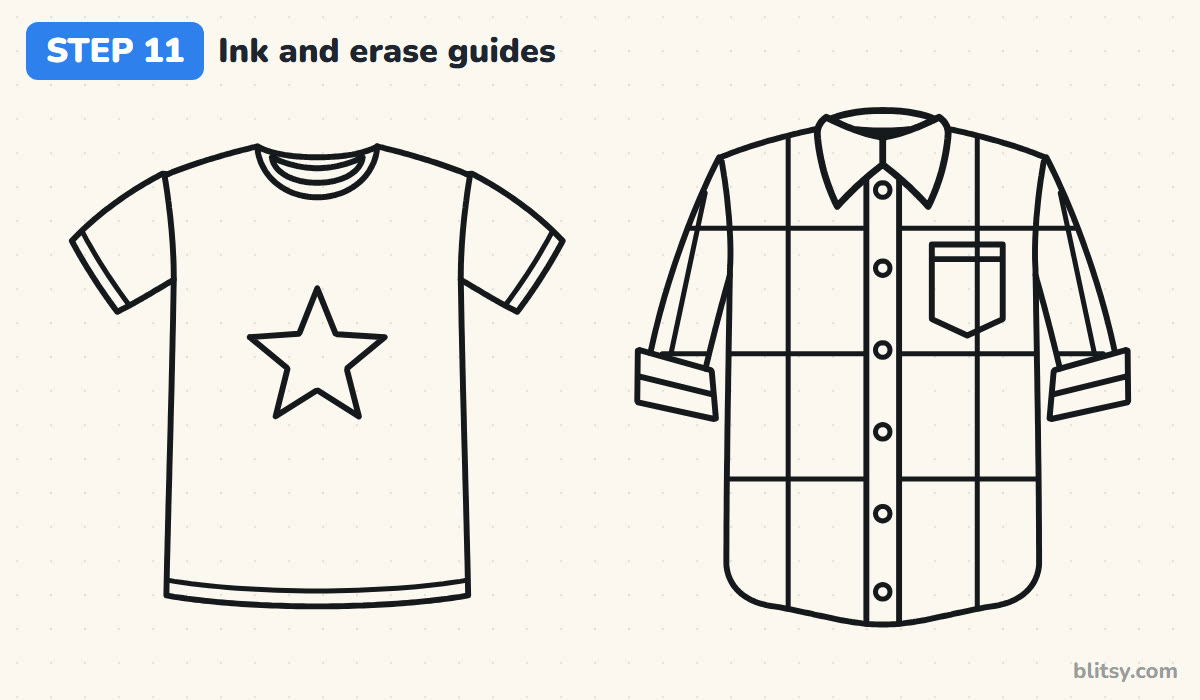
Go over every keeper line with your black pen, outlines first and small things like buttons last. Skip the T guides, the circle around the star and the V. When the ink is completely dry, erase all the pencil. I ink the plaid with a lighter hand, so the shirt shape stays strongest.
💡 Tip: Turn the paper as you ink curves; your hand moves more smoothly that way.




Step 12: Color both shirts
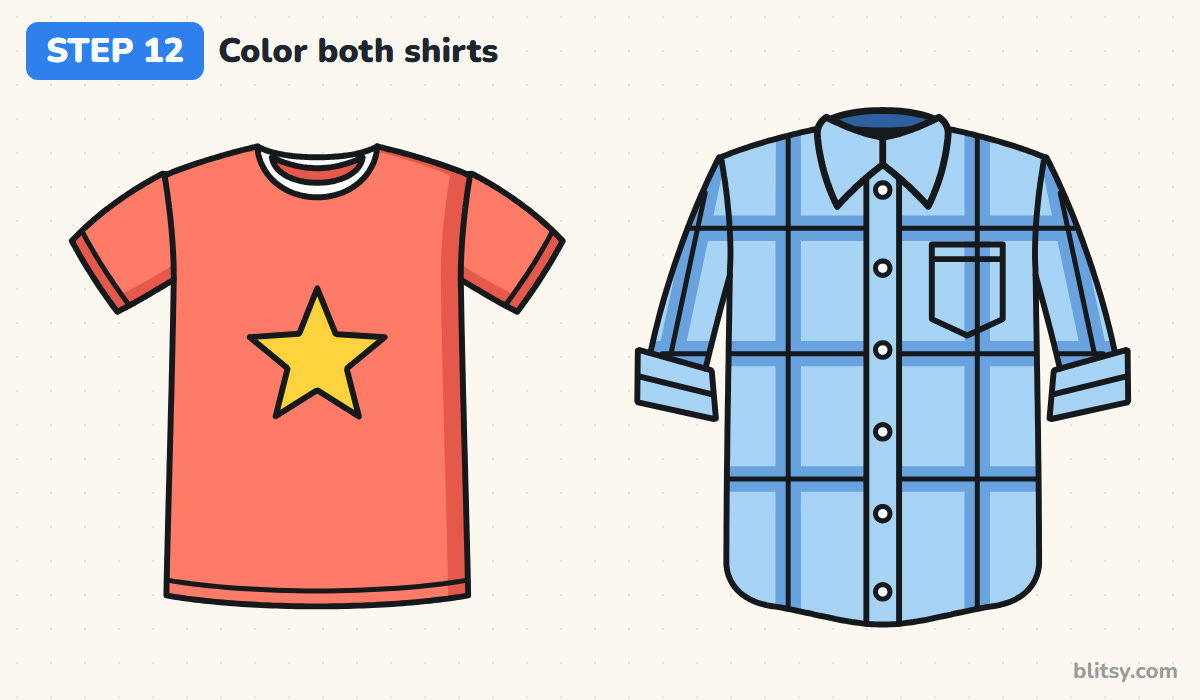
Fill the T-shirt with coral, then add a darker coral along its right side, under the sleeves and inside the neck. Leave the neck band white and make the star sunny yellow. For the button-up, use light blue everywhere, then color a blue band along each plaid line. Dark blue goes inside the collar, and the buttons stay white.
💡 Tip: Color the plaid bands after the light blue, otherwise the blue smears into it.
Shirt Sketch Slip-Ups I See Most
- Sleeves sticking straight out. Horizontal sleeves make the tee look like a scarecrow. Angle them down a little, along the arms of the T.
- A body that's too short. Square-ish bodies turn shirts into crop tops. The body should be clearly taller than it is wide.
- Mismatched collar points. If one flap hangs lower, the shirt looks buttoned wrong. Finish both points on the V guide.
- Buttons drifting off the placket. Even a small wobble shows. Draw the strip first, then keep every button inside it.
- Plaid lines bending around the pocket. Real plaid runs straight. Keep the stripes in line and let the pocket sit on top.
New Prints, Colors and Shirt Styles to Try
After a couple of rounds, start changing things. Give the T-shirt stripes across the chest, or draw a long-sleeved version by stretching the sleeves down to the hem. The button-up looks great in red and black buffalo check, or plain white with a tie. When you want something cozier, the hoodie drawing tutorial uses the same T-shape with a hood, and the suit drawing tutorial shows how a jacket fits over a shirt like yours.
Shirt Coloring Page and Printable Step Guide
The shirt coloring page has thick outlines of both shirts, with a colored example and the color key at the top so kids can copy it or invent their own. The step-by-step guide PDF collects all 12 steps and tips, and prints on Letter or A4 paper.
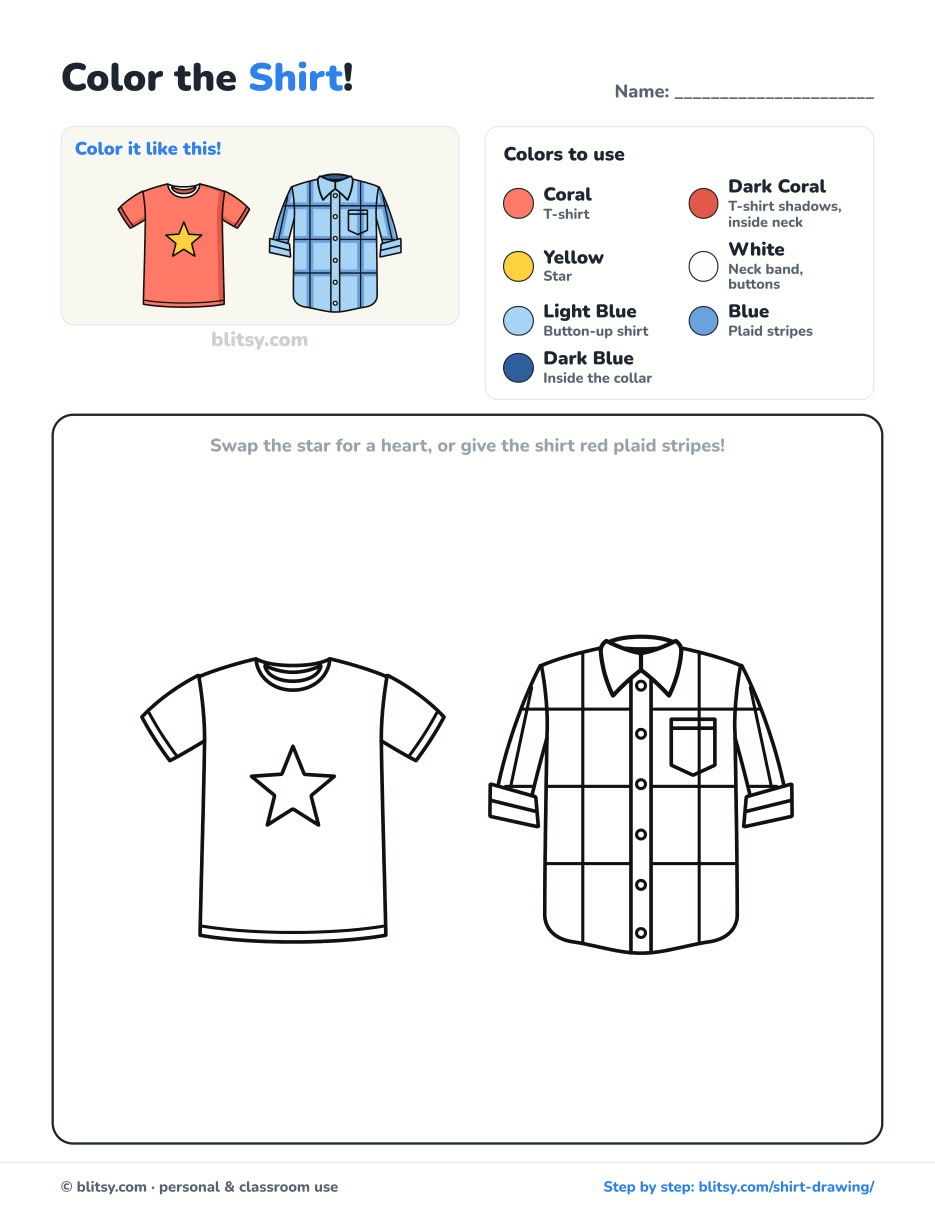
Black outlines with a colored example and the color names at the top. Ready to print and color.
⬇️ Download Coloring PageEvery step picture with its instructions and tips, to keep beside your paper while you draw.
⬇️ Download Drawing Guide📱 On a phone? Tap a download button, then open the file and choose Share → Save to Files or Print. On a computer, the PDF opens or saves straight to your Downloads folder.
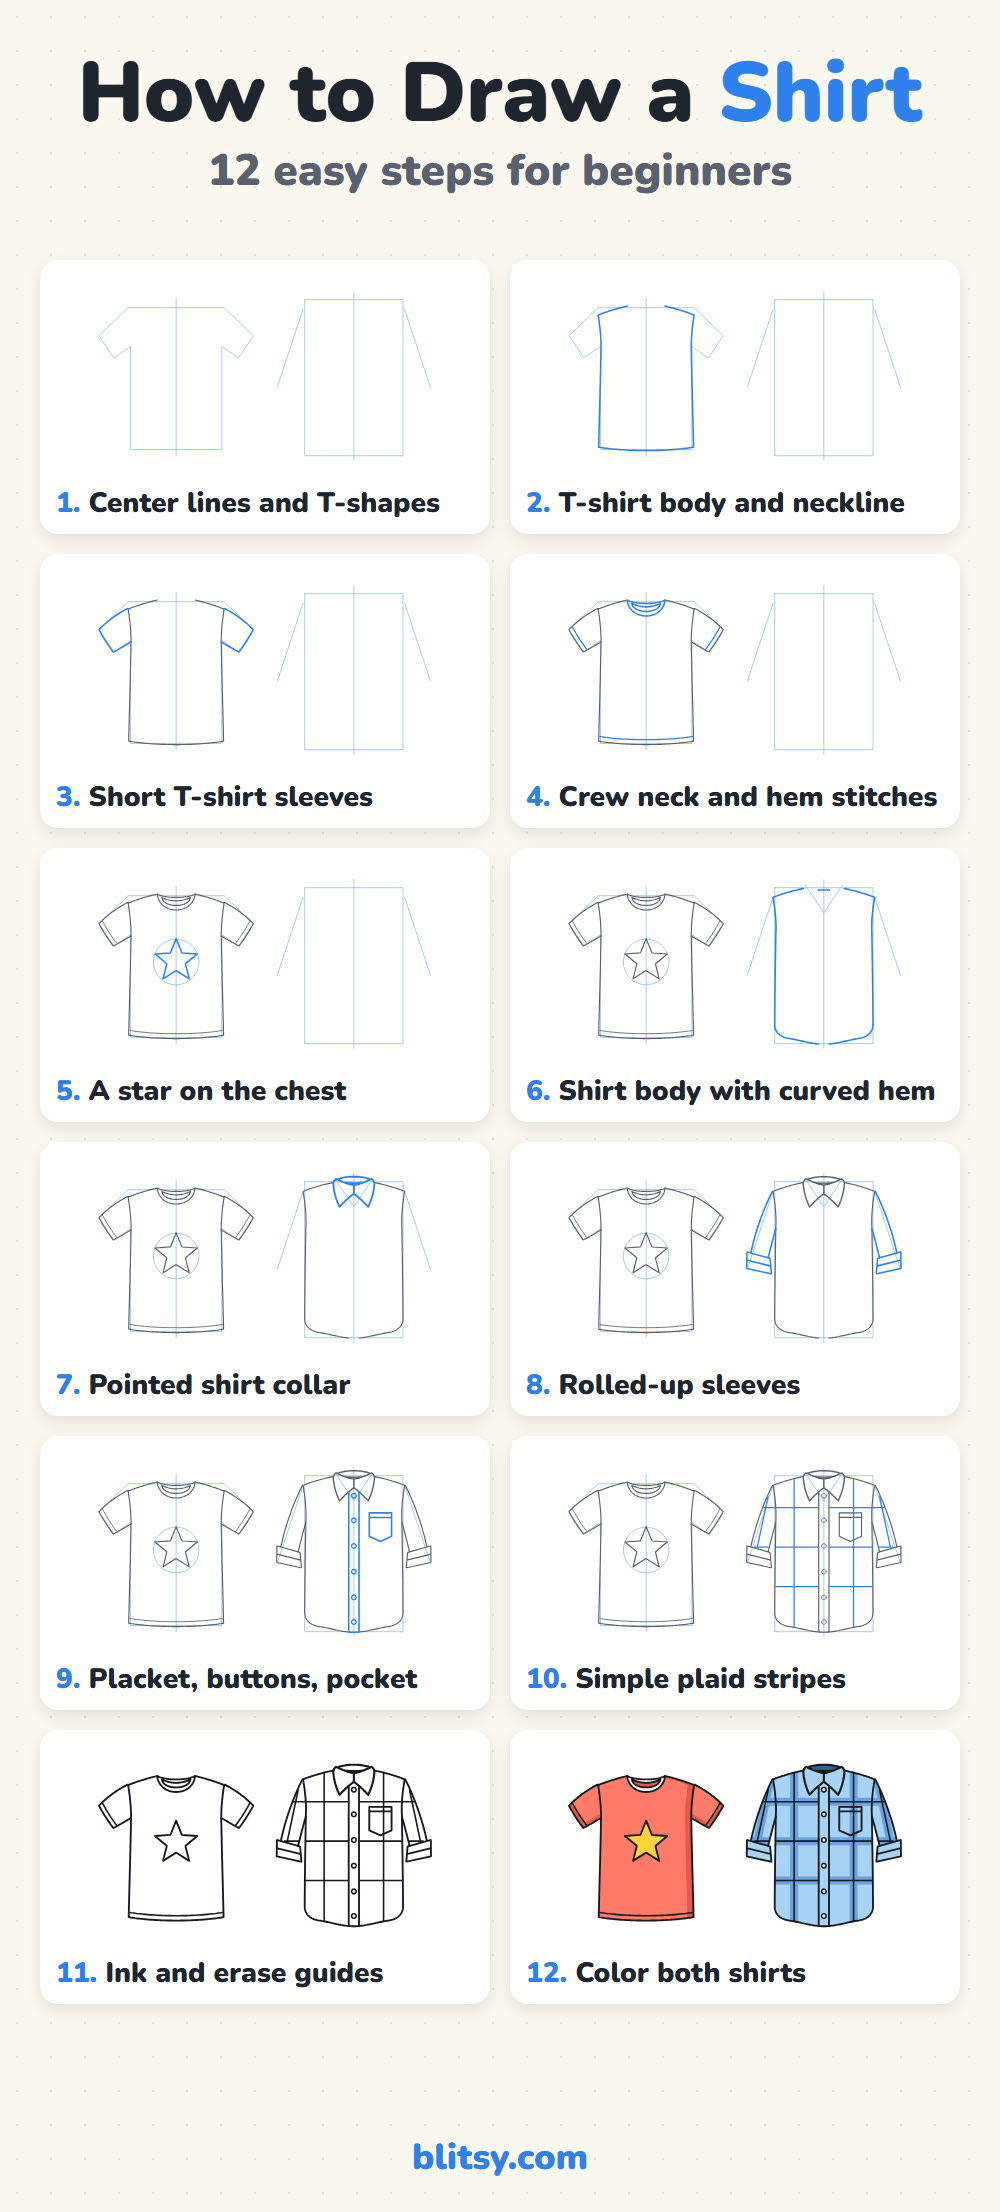
Twelve Shirt Steps in One Tall Image
Clothing and Everyday Things to Draw After the Shirt
These links lead to step-by-step tutorials, several of them about clothes, so the folds and seams you just drew will come in handy.
- Mask Drawing: A purple masquerade mask with gold trim, pearls and three feathers is the goal of the how to draw a mask tutorial.
- Hoodie Drawing: Draw the front and back of one sage green hoodie in the hoodie drawing step by step lesson.
- Dress Drawing: A twirly pink party dress and a lavender sundress on a hanger share the page in the dress drawing tutorial.
- Chalk Art: The chalk art tutorial moves to the sidewalk with a hopscotch grid, a rainbow and a sun.
- Suit Drawing: See how a jacket and tie sit over a shirt with the how to draw a suit step by step guide.
- Shoe Drawing: A red high-top and a low-top sneaker are drawn side by side in this shoes drawing tutorial.
- Family Drawing: Dress a whole cartoon family, puppy included, with the family drawing tutorial.
- Realistic Drawing: For practice with light and shadow, the realistic drawing step by step lesson shades one shiny apple.
- Feather Drawing: A teal feather and a smaller orange one start from a curved line in the easy feather drawing tutorial.
Shirt Drawing Questions From Beginners
What is the easiest way to draw a shirt?
Start with a letter T: a box for the body and two short arms for the sleeves. Draw the outline around it, then add the neck and the hem.
How do you draw a shirt collar?
Draw a V guide from the neck to the center line. Each collar half is a pointed flap that starts at the neck and ends on that V, meeting its partner in the middle.
Can young kids draw a shirt?
Yes. The T-shirt alone works well for kids around 6, and they can decorate the chest however they like. Older kids can go on to the button-up.
How do I draw a plaid pattern on a shirt?
Draw a few evenly spaced lines down the shirt and a few across it. Color a darker band along each line over a lighter base color.
Pick a color for your tee, find that first T-shape and give it a go. I'd love to see what you put on the chest. 👕✏️
Related posts:
 How to Draw a Whale Step by Step (Easy for Beginners)
 How to Draw Lungs Step by Step (Easy Science Diagram)
 How to Draw a Pineapple Step by Step (Easy Crown and Slice)
 How to Draw Iron Man Step by Step (Easy Chibi for Kids)
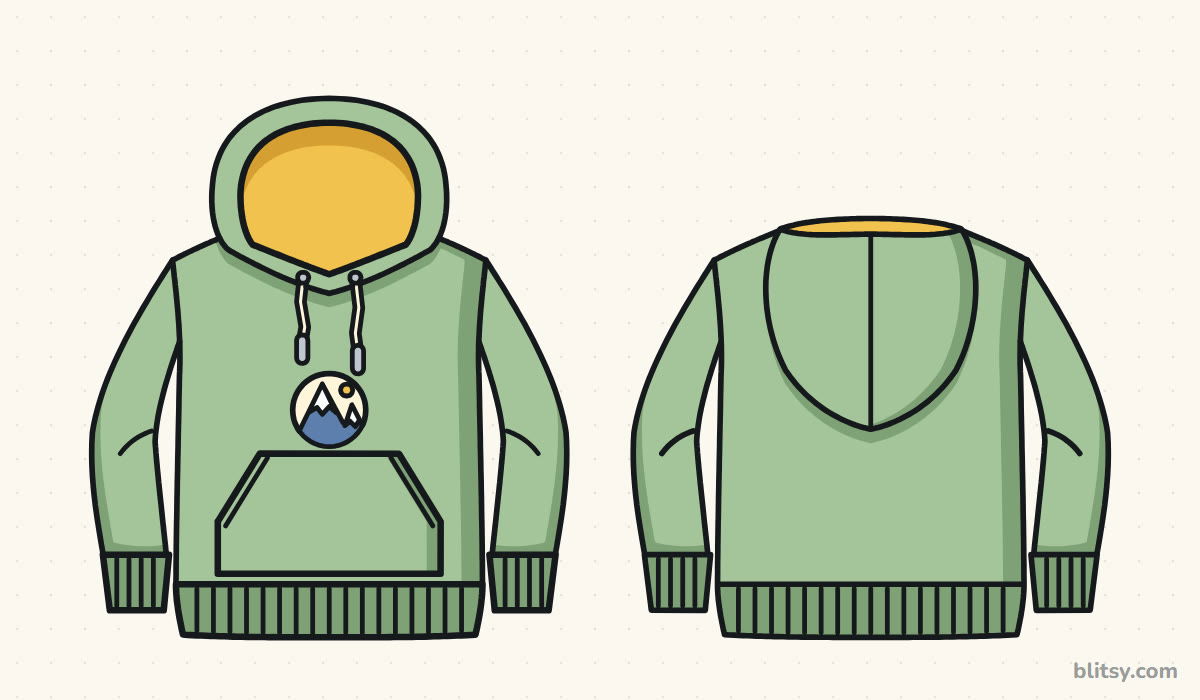 How to Draw a Hoodie Step by Step (Front and Back View)
 How to Draw a Parrot Step by Step (Easy Scarlet Macaw)
 How to Draw a Police Car Step by Step (Easy for Kids)
 How to Draw a Volcano Step by Step (Easy Erupting Volcano)
 How to Draw a Crow Step by Step (Easy for Beginners)
 How to Draw a Tiger Step by Step (Easy Walking Pose)
 How to Draw a Heart Step by Step (Even, Symmetric Shape)
 How to Draw a Jellyfish Step by Step (Cute, Easy Guide)

