
Most mouths that look wrong are the right shape in the wrong place. Put the corners where they belong and the lips almost draw themselves. In this lesson you'll learn how to draw a mouth step by step: a relaxed, slightly parted mouth with a crisp cupid's bow, a fuller lower lip and soft shading, plus the base of the nose so you can check the size. It's a quiet study, not a big grin, and the best way to learn how lips are built.
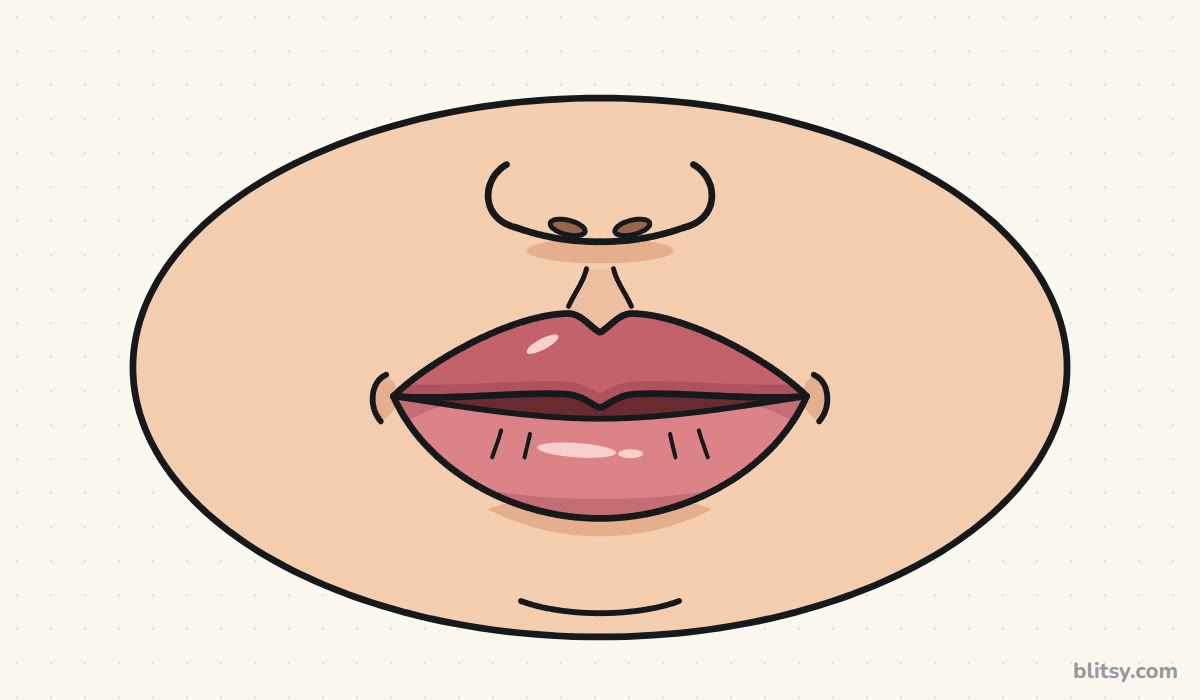
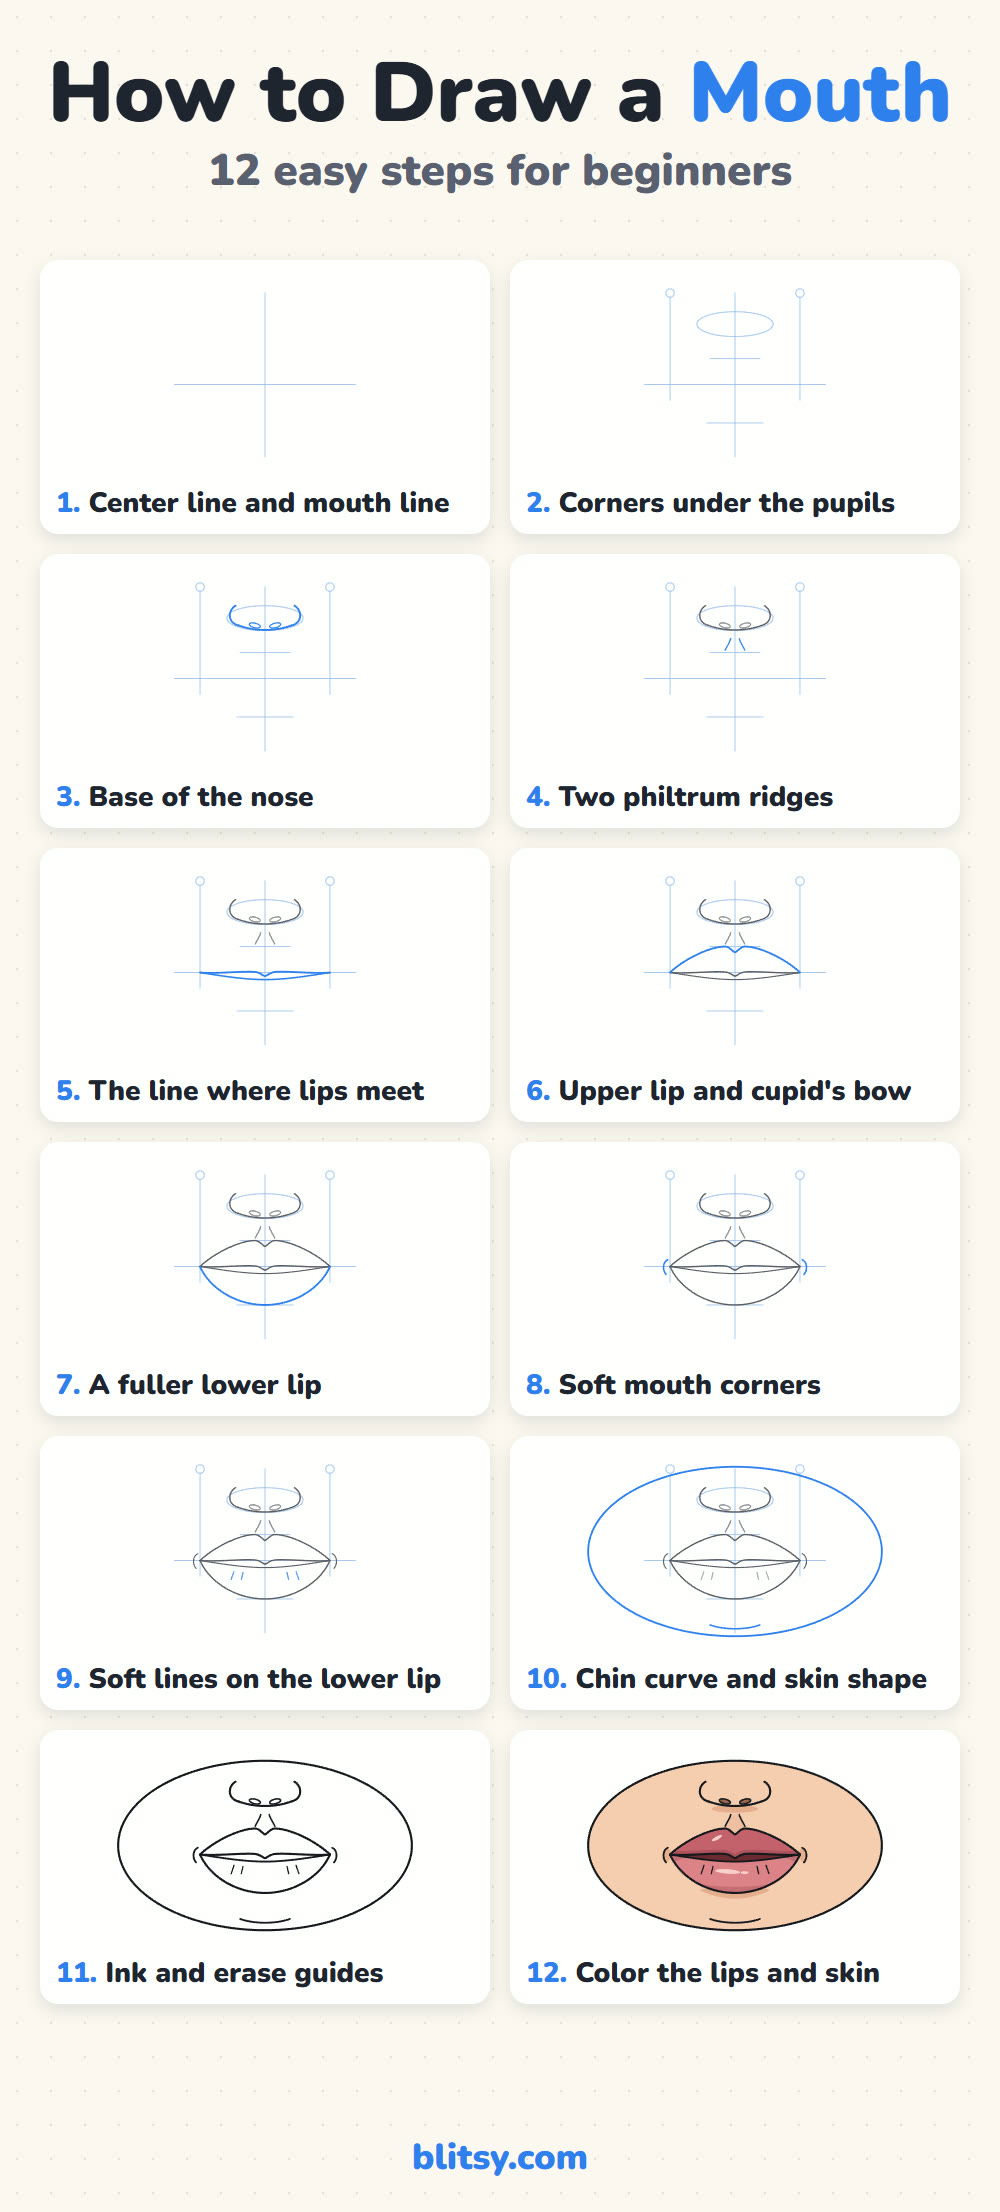
Every new line in a step picture shows up in blue, while older lines turn gray. Copy only the blue part, then compare before you move on.
Quick overview
⏱️ Time: about 25 to 35 minutes with coloring
🎯 Level: easy to medium, good for kids from about 9 and up, teens and adults
✏️ Steps: 12
👄 You'll draw: a front-view mouth with the nose base, philtrum and chin
Gathering Tools for a Lip Study
- A pencil you can keep light (HB or 2B)
- An eraser, ideally a kneaded one that lifts without smudging
- A ruler for the first guide lines (optional)
- A black fineliner or thin marker for the final lines
- Colored pencils: peach, tan, rose, pink, light pink, dark red and brown
- Smooth white paper
You only need the ruler for the first two steps.
How to Draw a Mouth Step by Step
Step 1: Draw a center line and a mouth line
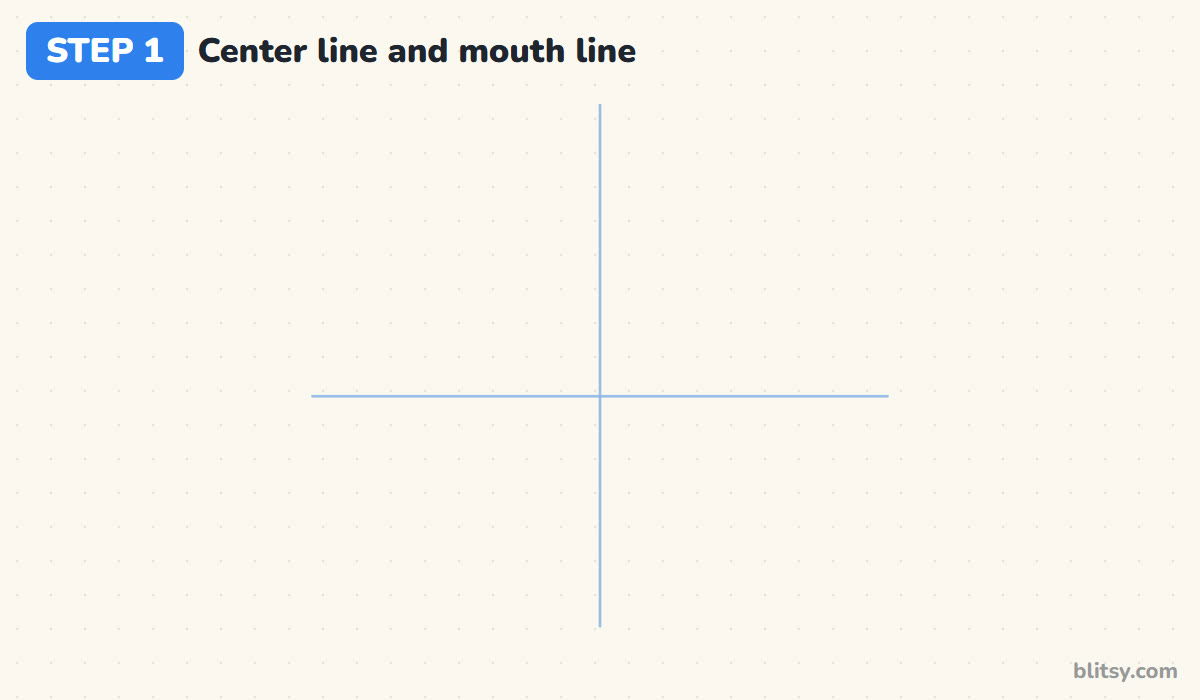
Draw one light vertical line down the middle of your paper and a horizontal line across it, a little below the center. The horizontal one is where the lips will meet. I never skip this cross, because a front-view mouth is a mirror image and the cross keeps both halves even.
💡 Tip: Press so lightly you can barely see it. These lines disappear later.
Step 2: Mark the corners under the pupils
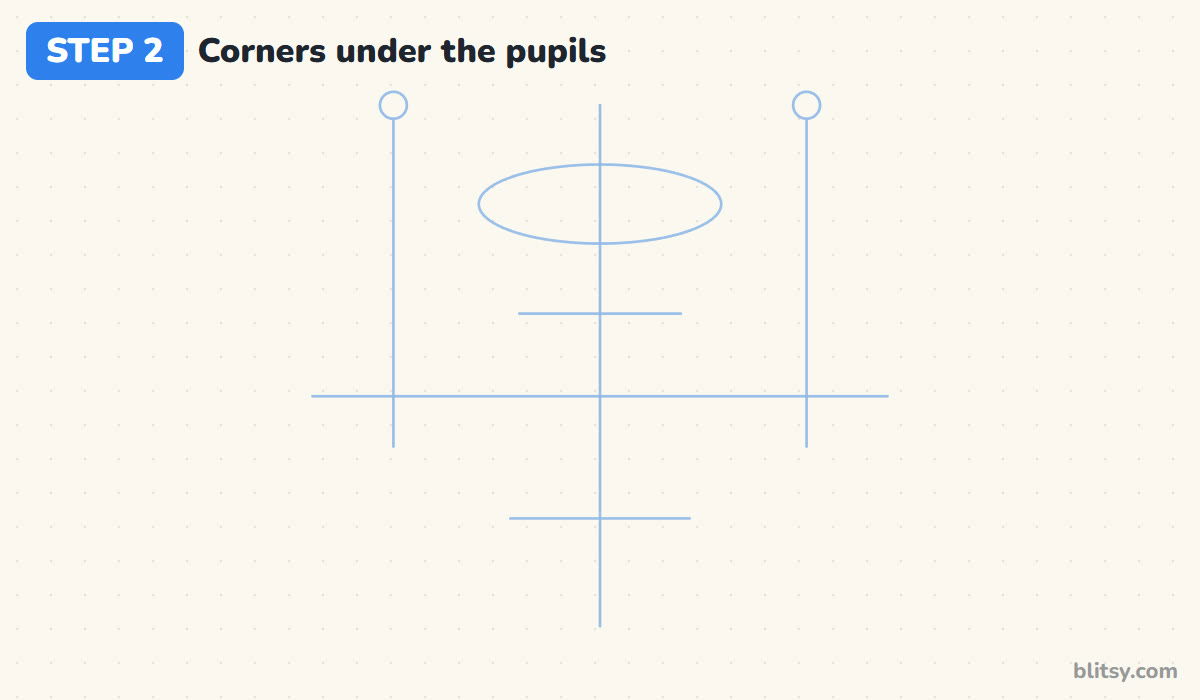
Imagine the eyes above your page. On a real face the corners of a relaxed mouth sit roughly straight under the pupils, so drop two vertical lines and mark the corners where they cross the mouth line. Add a short tick above for the top of the upper lip, a lower one for the bottom of the lower lip, and a flat oval higher up for the nose.
💡 Tip: Leave a little more space below the mouth line than above it. The lower lip is the fuller one.
Step 3: Sketch the base of the nose
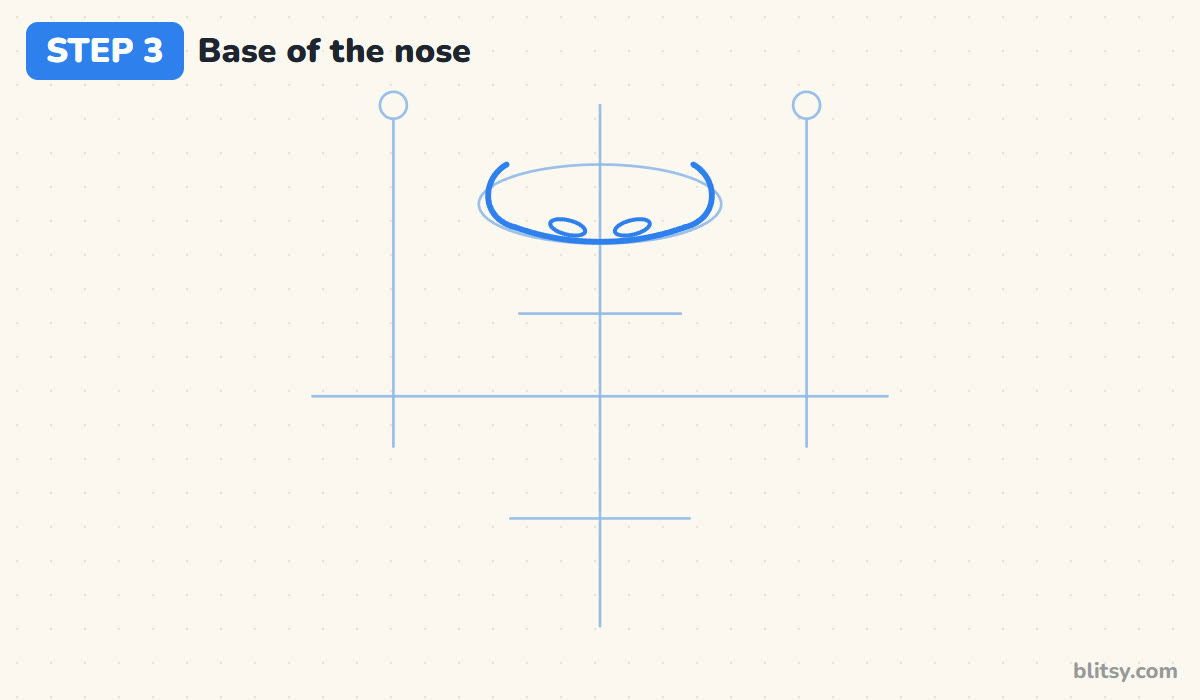
Inside the oval, draw two curved wings like brackets and join them with a soft line along the bottom for the tip. Add two small slanted ovals just above that line for the nostrils. I only draw the bottom of the nose here, as a size check: the mouth should be clearly wider than it.
💡 Tip: If your nose ends up as wide as the mouth, the mouth is too small. Move the corner marks out, not the nose in.



Step 4: Add the two philtrum ridges
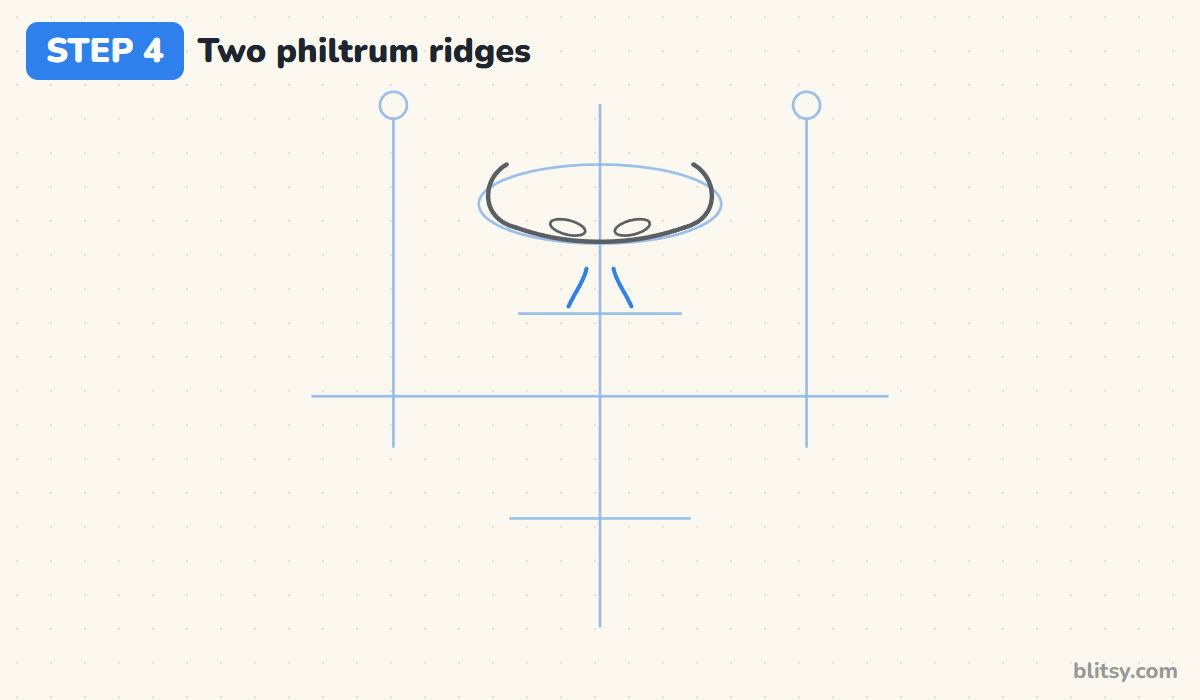
The philtrum is the little groove between the nose and the lip. Draw two short lines that start close together under the nose and spread apart going down. Stop just above the upper lip tick, because where they end is where the two points of the cupid's bow go.
💡 Tip: Keep these lines short and thin. Long, heavy philtrum lines make the face look like it has a mustache.
Step 5: Draw the line where the lips meet
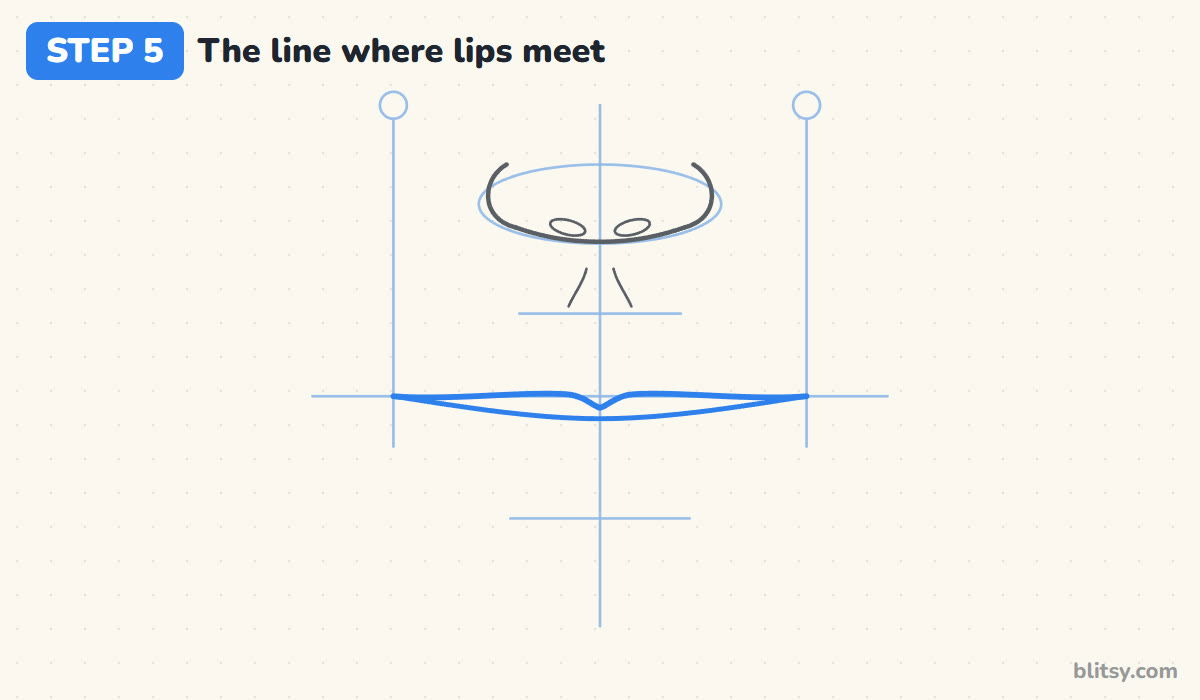
This is the most important line in the drawing, so I always draw it before the outer edges. Start at one corner, run a gentle curve toward the center, dip into a small point in the middle, then mirror it back to the other corner. A second, flatter line just under it opens the lips slightly in the middle.
💡 Tip: That small downward point in the middle is the bump of the upper lip. Without it the mouth looks flat and rubbery.
Step 6: Shape the upper lip and the cupid's bow
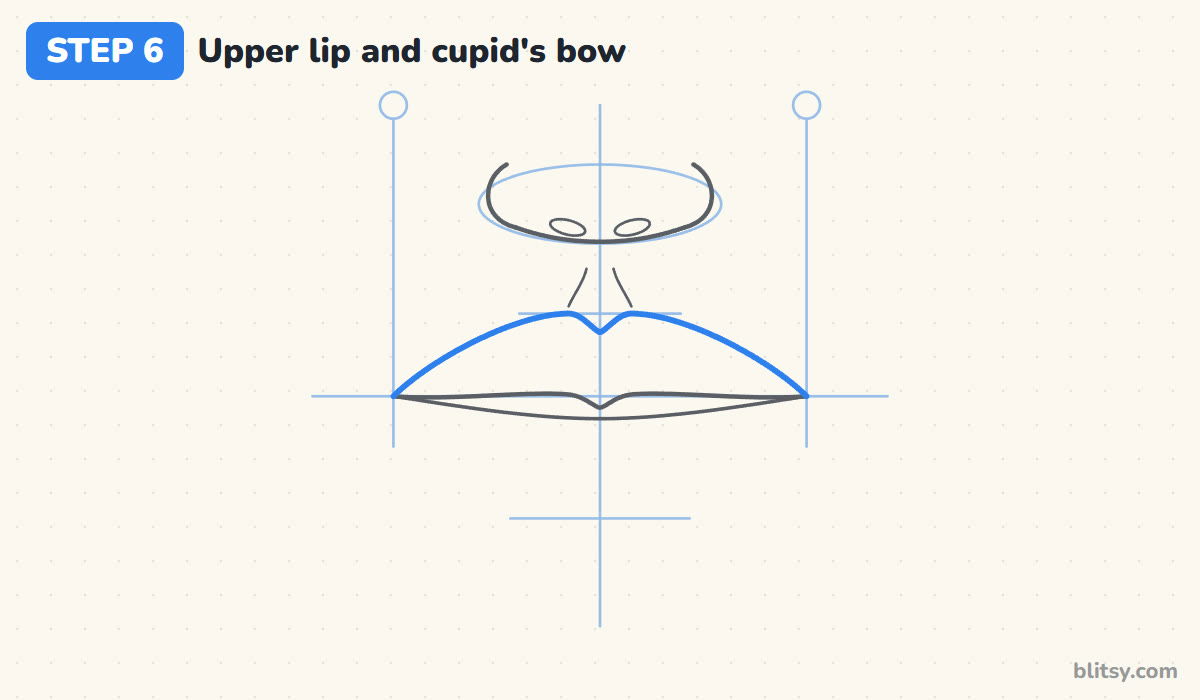
From the left corner, curve up to the first point under the philtrum, dip down to the center line, rise to the second point and curve back down to the right corner. That M shape in the middle is the cupid's bow. The outer parts of the upper lip should slope gently, getting thinner as they reach the corners.
💡 Tip: Round off the two points a little. Sharp peaks look like a cartoon heart.
Step 7: Add a fuller lower lip
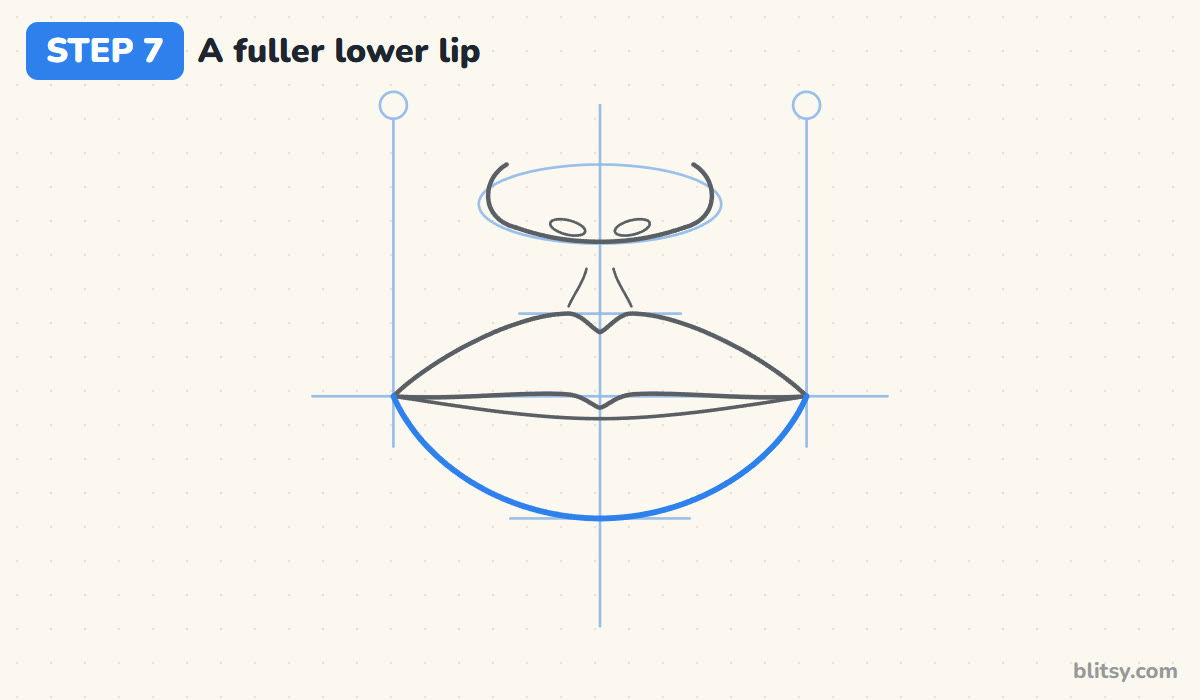
Draw one smooth curve from corner to corner, dipping down to the lower tick. It's wider and rounder than the upper lip, and fairly flat across the bottom. On most faces the lower lip is a bit taller than the upper one, which is what makes it look soft.
💡 Tip: Draw the curve in one confident stroke. Lots of small strokes leave a hairy edge.



Step 8: Soften the mouth corners
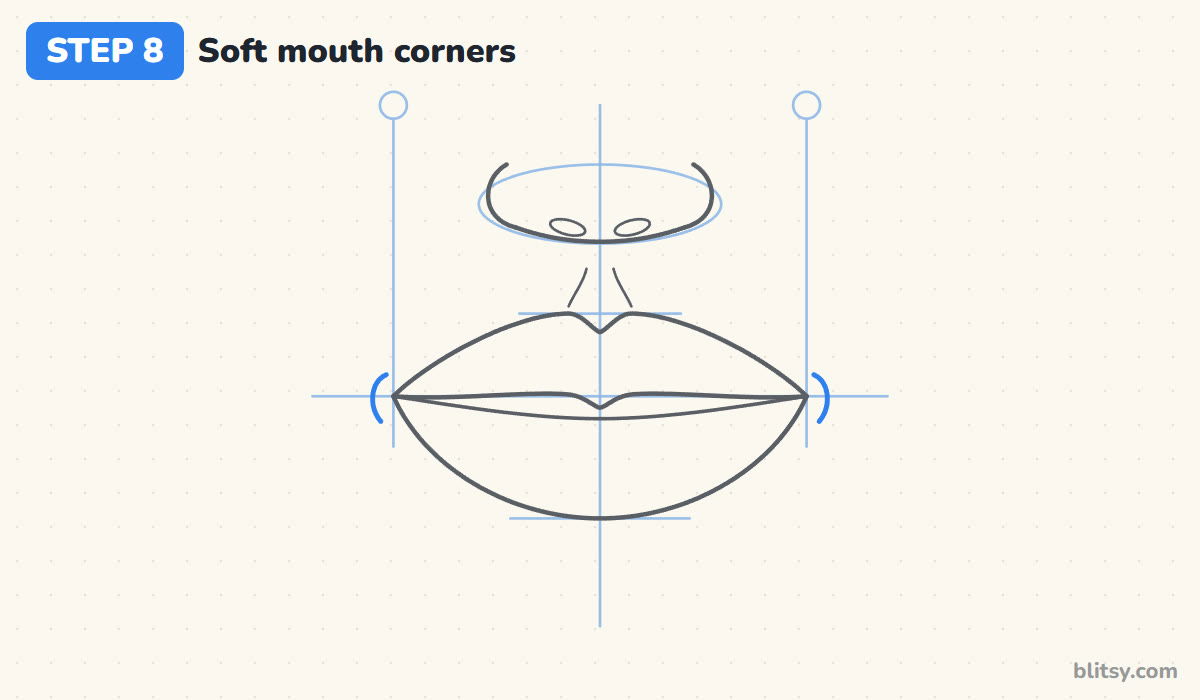
Just outside each corner, draw a tiny curved crease like a small bracket. That's where the cheek folds in, and it makes the mouth sit on a face instead of looking pasted on.
💡 Tip: Keep the creases tiny. Make them long and the mouth starts to smile.
Step 9: Draw soft lines on the lower lip
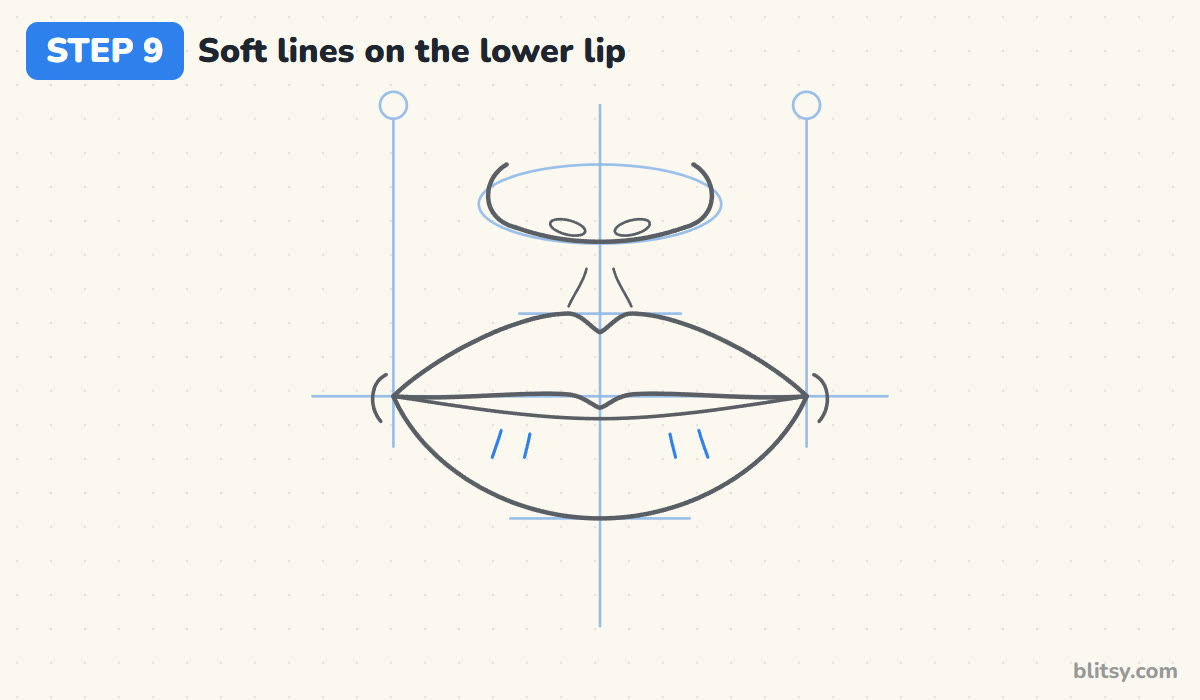
Add two short vertical lines on each side of the lower lip, curving slightly toward the middle. Real lips have fine creases, and a few hints are plenty. I keep them away from the center, where the shine goes later.
💡 Tip: Younger artists can skip this step completely. The mouth still reads well without it.
Step 10: Add the chin curve and the skin shape
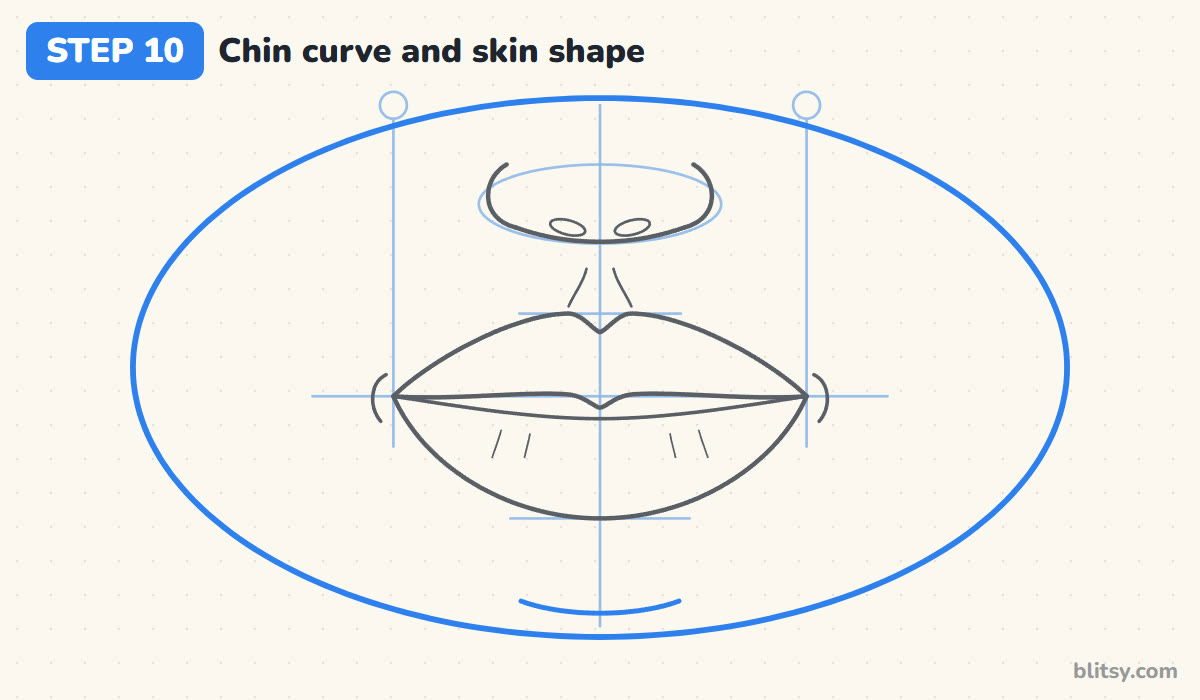
Below the lower lip, draw a short, shallow curve for the bottom of the chin. Then draw a big oval around everything. I like this oval for feature studies because it gives you a patch of skin to color without drawing a whole head.
💡 Tip: Leave a gap between the lip and the chin curve. The space between them is where the shadow goes.
Step 11: Ink the mouth and erase the guides
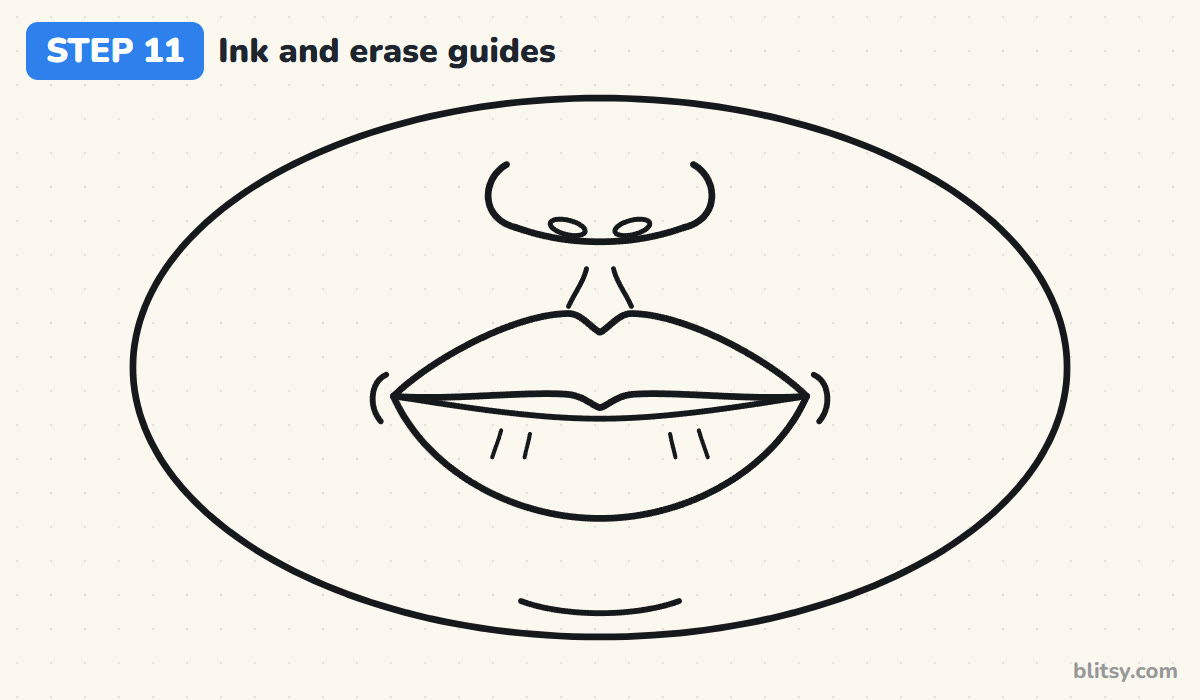
Go over every keeper line with the fineliner. I start with the line where the lips meet, then the lip edges, then the nose and chin. Skip the guides and pupil marks. Let the ink dry, then erase all the pencil.
💡 Tip: Make the line between the lips a little thicker than the rest. It's the darkest part of a real mouth.

Step 12: Color the lips and skin
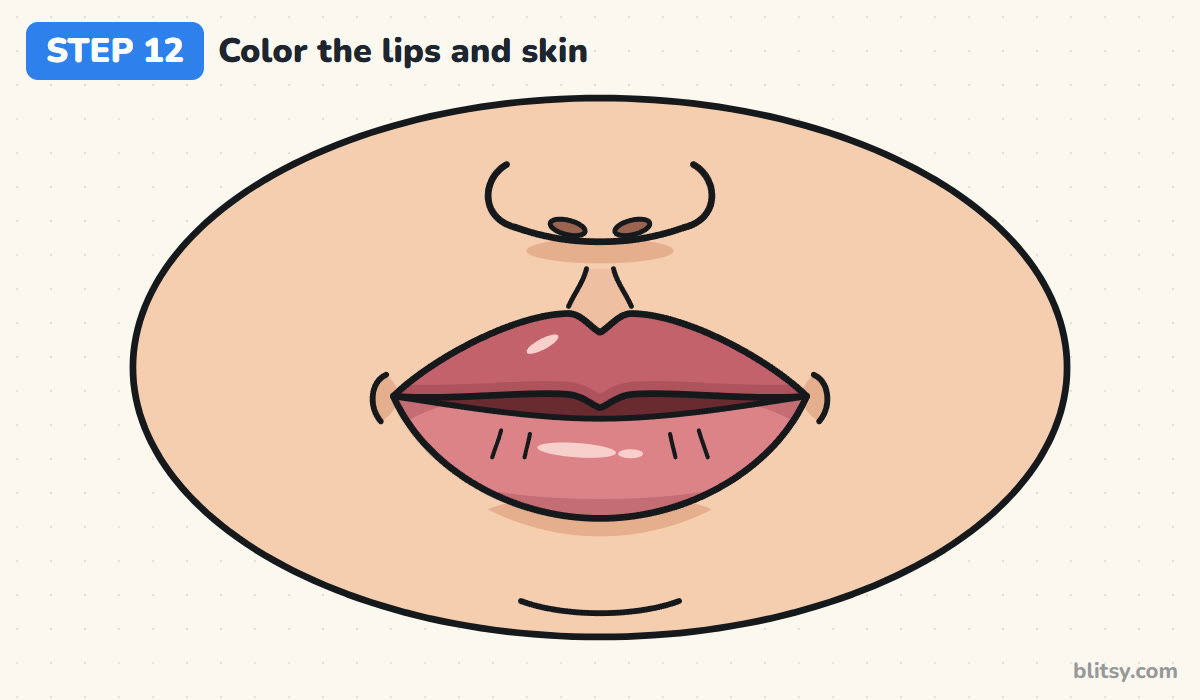
Color the skin peach, then use tan for the shadow under the nose, the philtrum groove, the corners and a soft crescent under the lower lip. The upper lip is rose with a darker band near the middle line. The lower lip is a lighter pink, darker along its bottom edge. Fill the gap with dark red and leave small light pink shines.
💡 Tip: Color the shine areas last and very lightly, or leave the paper white there. You can't easily get light back once it's dark.
Why Drawn Lips Often Look Odd
- Outlining the whole mouth in one heavy loop. Lips look stuck on that way. Make the middle line the darkest and keep the outer edges lighter.
- A mouth that's too narrow. If the corners stop far inside the pupil lines, the face looks pinched. Check the corner marks before you ink.
- Both lips the same size. Twin lips look like a sausage. Keep the upper lip thinner and the lower lip fuller.
- A flat middle line. A ruler-straight line between the lips kills all the shape. Give it the small dip in the center.
- Coloring both lips the same. The upper lip faces down, so it's darker. Swap that and the mouth looks upside down.
Trying Other Lip Shapes and Moods
Once this calm mouth feels easy, open it up into a happy grin with teeth using the smile drawing tutorial, which builds a big smile and three variations from one curve. Small tweaks change this study a lot. I pull the corners down a little for a sad mouth, make the upper lip thicker for full lips, or shrink the cupid's bow for thin lips. Try a berry or coral color on a second copy. When you're ready to put the mouth on a whole head, the face drawing step by step lesson shows where it sits next to the eyes and nose, and the nose drawing tutorial goes deeper into the part you only hinted at here.
Free Mouth Coloring Page and Printable Steps
The free mouth coloring page shows the colored mouth at the top as a model, with a key that matches each color to its part, and a large outline below to color yourself. The step-by-step PDF guide holds all 12 steps with pictures and tips, so you can practise away from the screen. Both print on Letter or A4 paper.
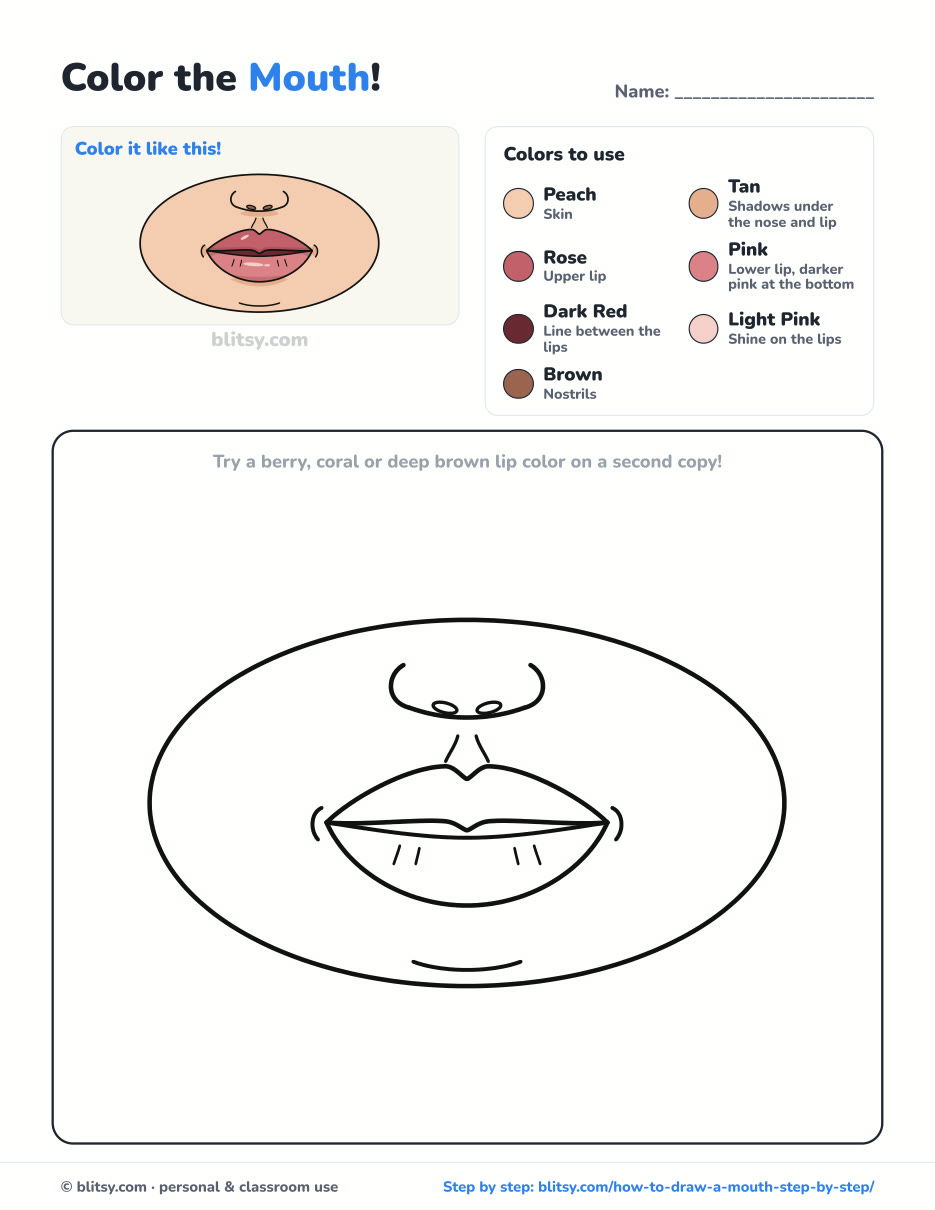
Black outlines with a colored example and the color names at the top. Ready to print and color.
⬇️ Download Coloring PageEvery step picture with its instructions and tips, to keep beside your paper while you draw.
⬇️ Download Drawing Guide📱 On a phone? Tap a download button, then open the file and choose Share → Save to Files or Print. On a computer, the PDF opens or saves straight to your Downloads folder.
Keep the Mouth Steps Handy on Pinterest
More Faces and Features to Practise
Each of these has a picture for every step, so you can keep building a face one feature at a time.
- Smile Drawing: A big smile with teeth, plus a closed smile, a laugh and a lopsided grin, in this smile drawing tutorial.
- Face Drawing: Place the eyes, nose and mouth on a few measured lines with this face drawing step by step guide.
- Nose Drawing: Build a front-view and a side-view nose from one ball and two wings in this how to draw a nose tutorial.
- Male Face Drawing: Use classic proportion lines for a friendly man's face in this male face drawing step by step lesson.
- Woman Drawing: A friendly standing woman with a hair bun, measured with a simple head ruler, in this woman drawing tutorial.
Lip Drawing Questions I Get Most
What is the easiest way to draw a mouth?
Draw the line where the lips meet first, with a small dip in the middle. Then add an M-shaped upper lip above it and one round curve below it for the lower lip.
Where does the mouth go on a face?
On a front-view face, the corners of a relaxed mouth line up roughly under the pupils, and the mouth sits about a third of the way from the nose to the chin.
How do you make drawn lips look realistic?
Color the upper lip darker than the lower lip, keep the line between them the darkest, add a small shine on the lower lip and a soft shadow just under it.
How do you draw a cupid's bow?
Draw two short lines down from the nose for the philtrum. Where they end, make two rounded points and dip down between them to the center. That M shape is the cupid's bow.
Draw this mouth three times this week and by the third one the cupid's bow will come out right on the first try. 👄✏️
Related posts:
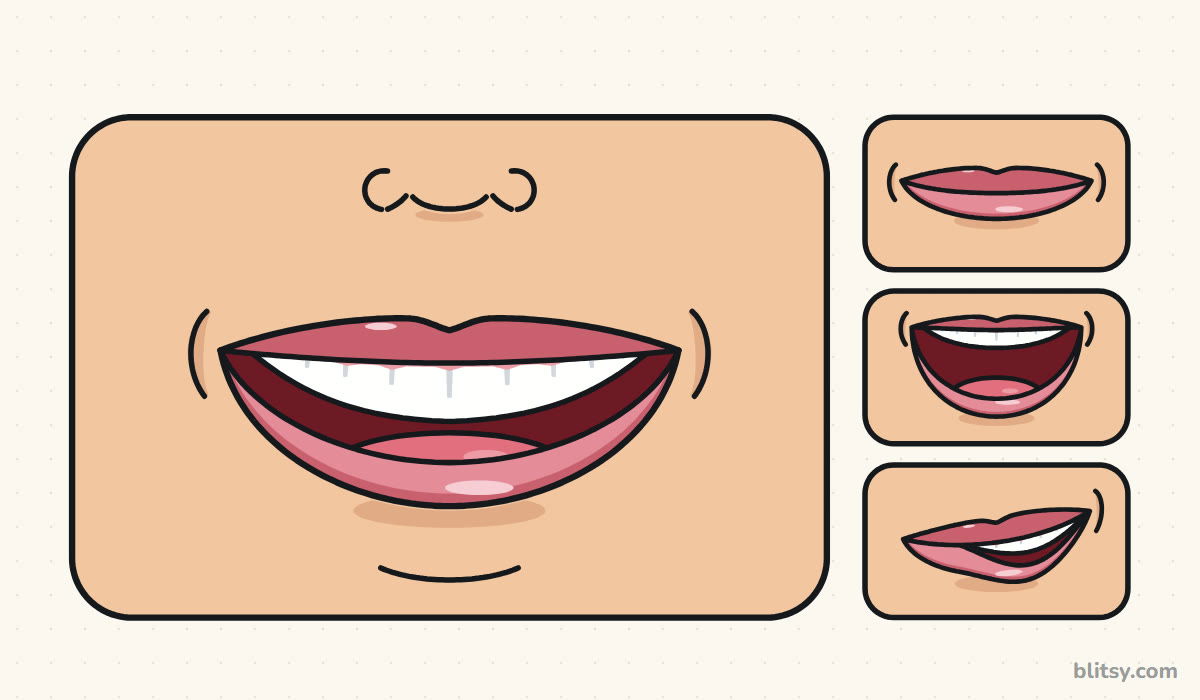 How to Draw a Smile Step by Step (Teeth, Lips + 3 Variations)
 How to Draw a Car Step by Step (Easy Drawing for Beginners)
 How to Draw a Whale Step by Step (Easy for Beginners)
 How to Draw an Arctic Fox Step by Step (Easy for Beginners)
 How to Draw a Shark Step by Step (Easy for Beginners)
 How to Draw a Chicken Step by Step (Easy for Beginners)
 How to Draw a Snowman Step by Step (Easy for Beginners)
 How to Draw an Airplane Step by Step (Easy Jet for Beginners)
 How to Draw a Mouse Step by Step (Easy for Beginners)
 How to Draw a T-Rex Step by Step (Easy for Beginners)
 How to Draw a Pig Step by Step (Easy for Beginners)
 How to Draw a Minion Step by Step (Easy for Beginners)

