
A snake looks like the simplest animal on the page, just one long wiggle, yet it's easy to end up with a body that bulges in one spot and pinches in another. The fix is to forget the outline at first. In this lesson I'll show you how to draw a snake step by step, starting from a single flowing line and ending with a loop that crosses over itself and a happy face with a flicking tongue.
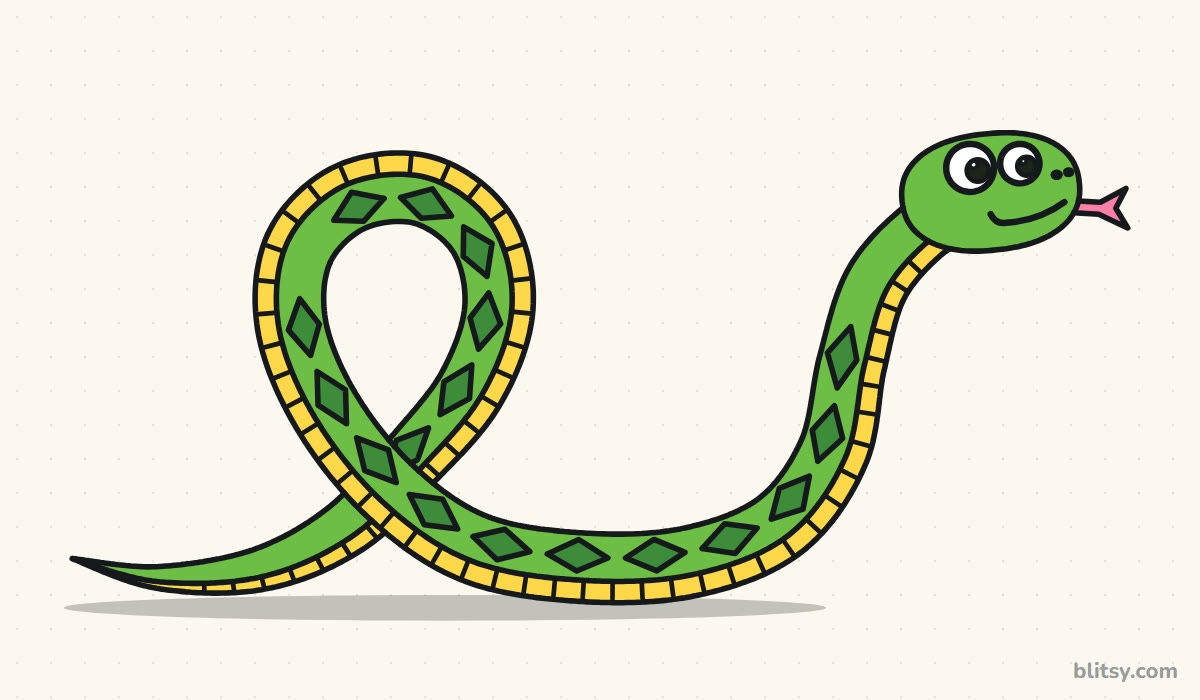
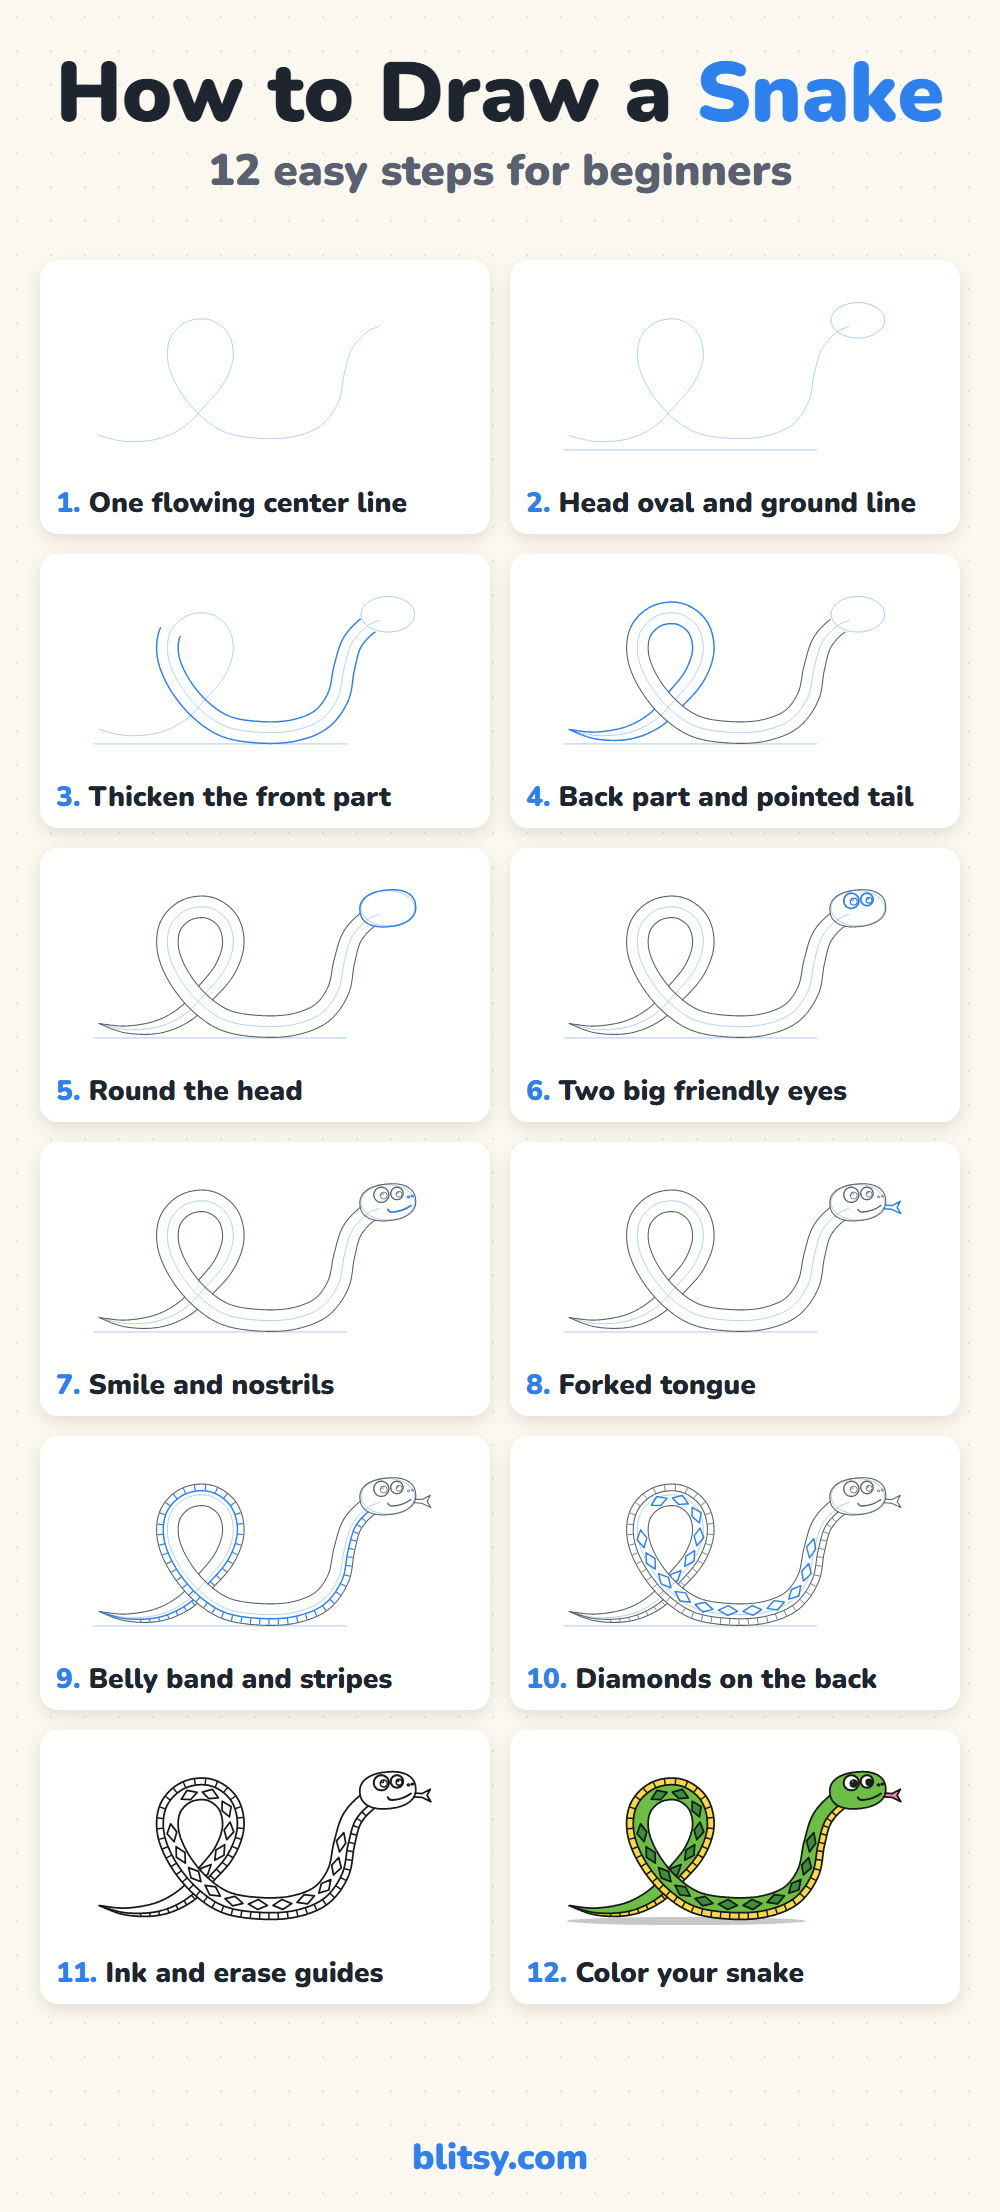
In every picture below, the part you add in that step is drawn in blue and everything from earlier steps is gray. The pale blue center line, head oval and ground line are only helpers, and we erase them once the ink goes on.
Quick overview
⏱️ Time: about 30 minutes, coloring included
🎯 Level: easy, fine for kids from about 6 with a little help on the loop
✏️ Steps: 12
🐍 You'll draw: a smiling green snake with a raised head, a yellow belly and diamond markings
Snake Sketch Supplies for Long, Smooth Curves
- A pencil you can press very lightly with
- A soft eraser that won't smear
- A black felt-tip pen or fineliner
- Colored pencils or markers in bright green, dark green, yellow and pink
- A sheet of paper turned sideways
Turn the paper sideways first, since this snake stretches wide and the tail needs room.
How to Draw a Snake Step by Step
Step 1: Draw one flowing center line
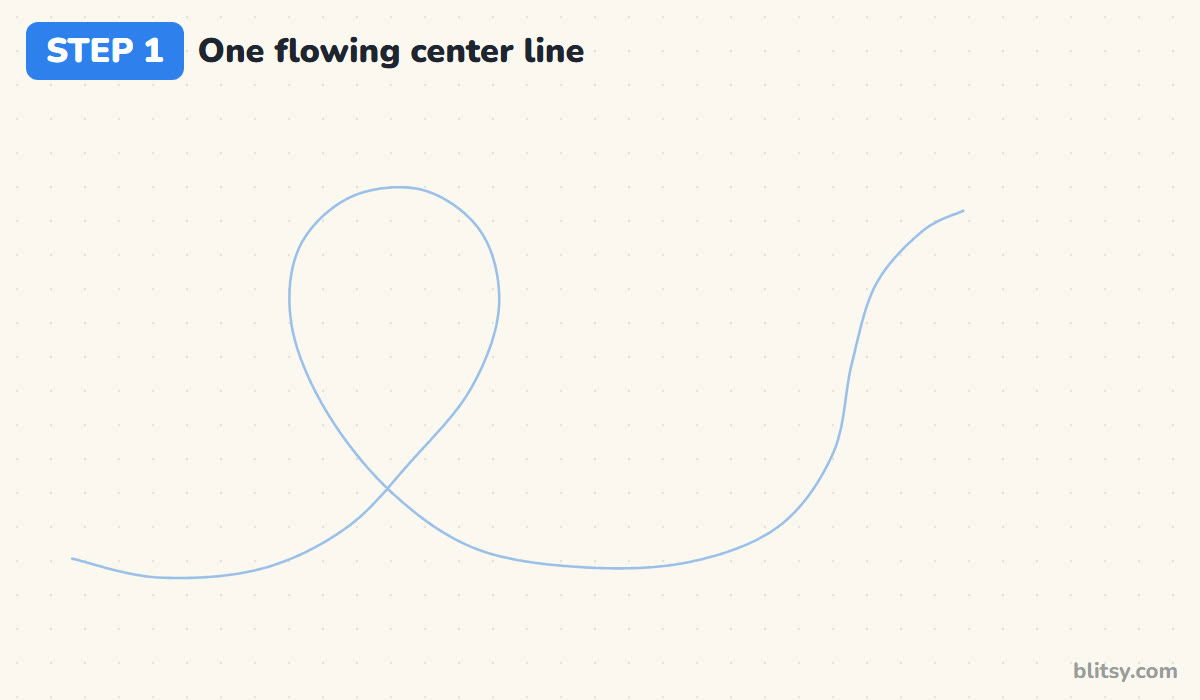
Start near the lower left and draw one long, light line: rise up to the right, curl over the top into a loop, come back down across your own line, run along the bottom and lift up on the right where the head goes. This line is the spine of the whole snake. I draw it in one slow motion, because short scratchy pieces turn into a lumpy body later.
💡 Tip: Practice the loop in the air above the paper once before you touch down.
Step 2: Add a head oval and a ground line
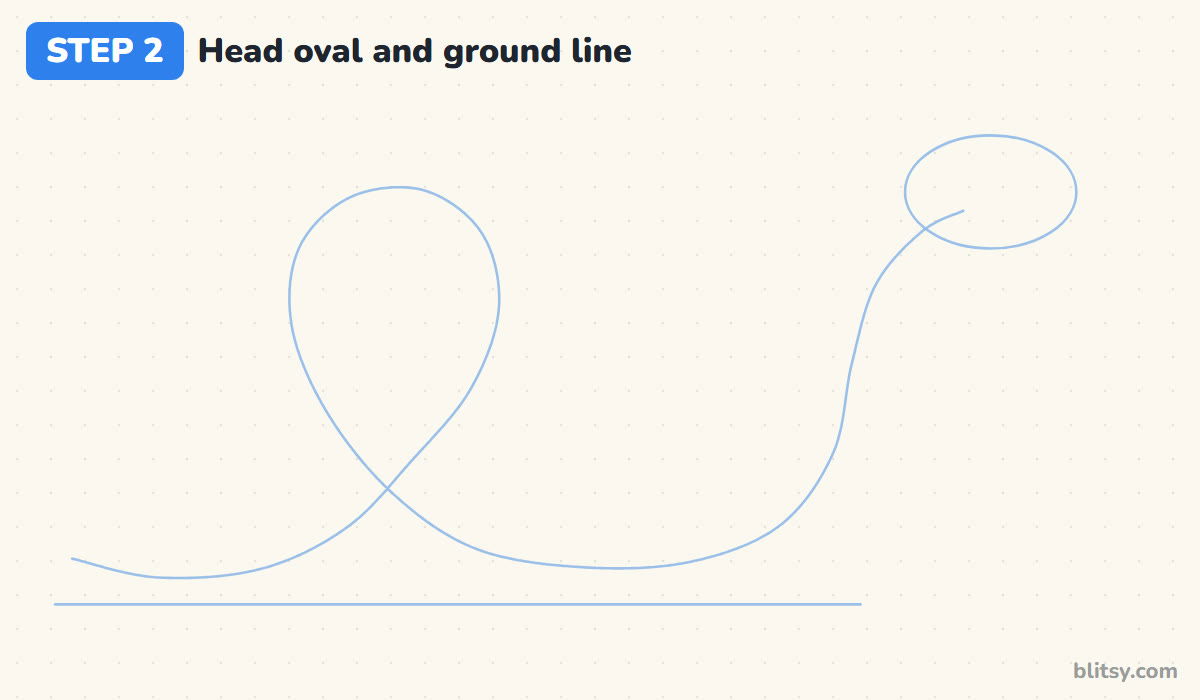
At the top end of the line, sketch a wide oval tilted a little upward on the right, about twice as wide as the body will be thick. Then draw a light, flat line under the lowest part of the curve. Your snake rests on it, so it won't look like it's floating.
💡 Tip: The head oval should overlap the end of the center line, not sit beside it.
Step 3: Thicken the front part of the body
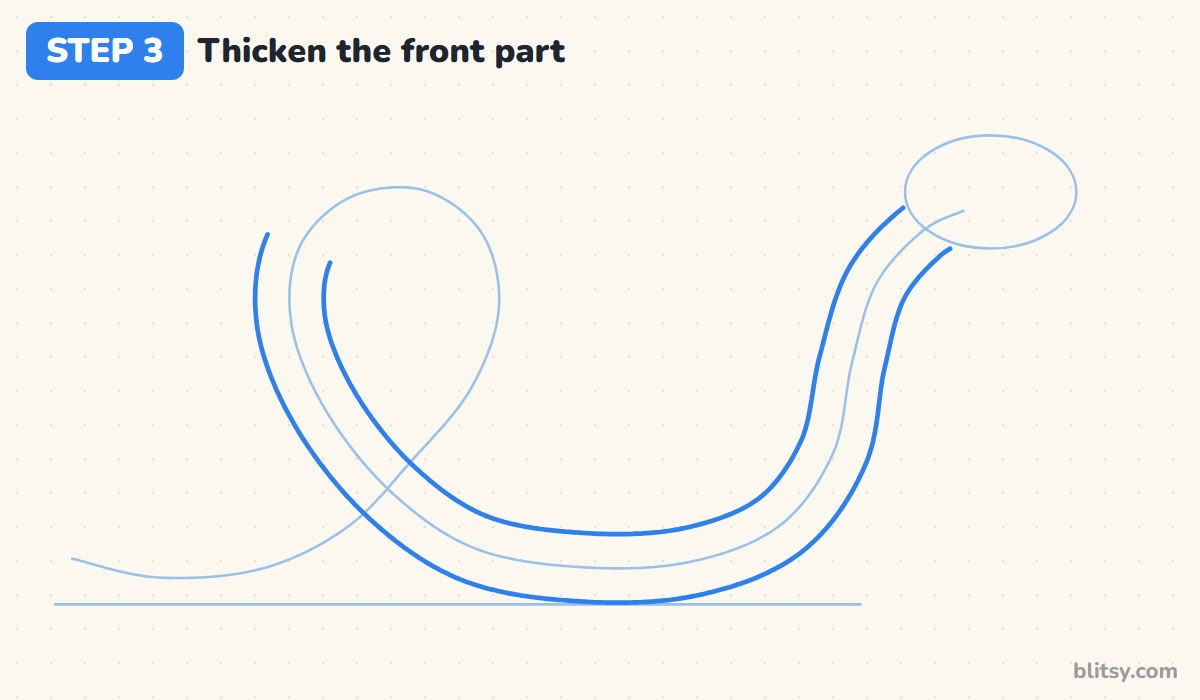
Now give the line some width. Begin where the loop starts coming down on the left and draw two lines, one on each side of the center line, keeping the same gap all along. Follow them across the crossing, along the ground and up into the head oval. This part passes in front, so I draw it whole, with no breaks.




💡 Tip: Glance at the gap every few centimeters. If it widens, pull the next bit back in.
Step 4: Draw the back part and a pointed tail
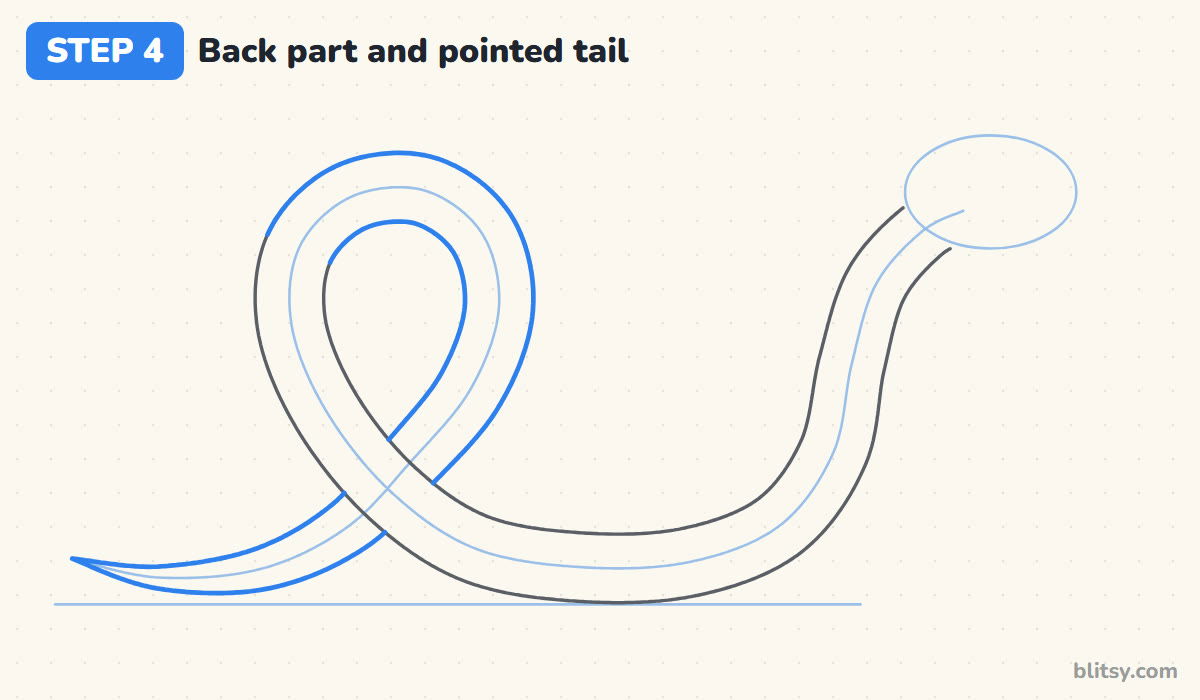
Go back to where the front part began and draw the rest of the body the other way: over the loop, down the rising stroke and out to the tail. Wherever these lines meet the front part, stop, then pick them up again on the other side, as if the body slides underneath. Near the end, bring the two lines together into a sharp point.
💡 Tip: Start narrowing the tail early. A long, slow taper looks much more natural than a sudden point.
Step 5: Round off the head
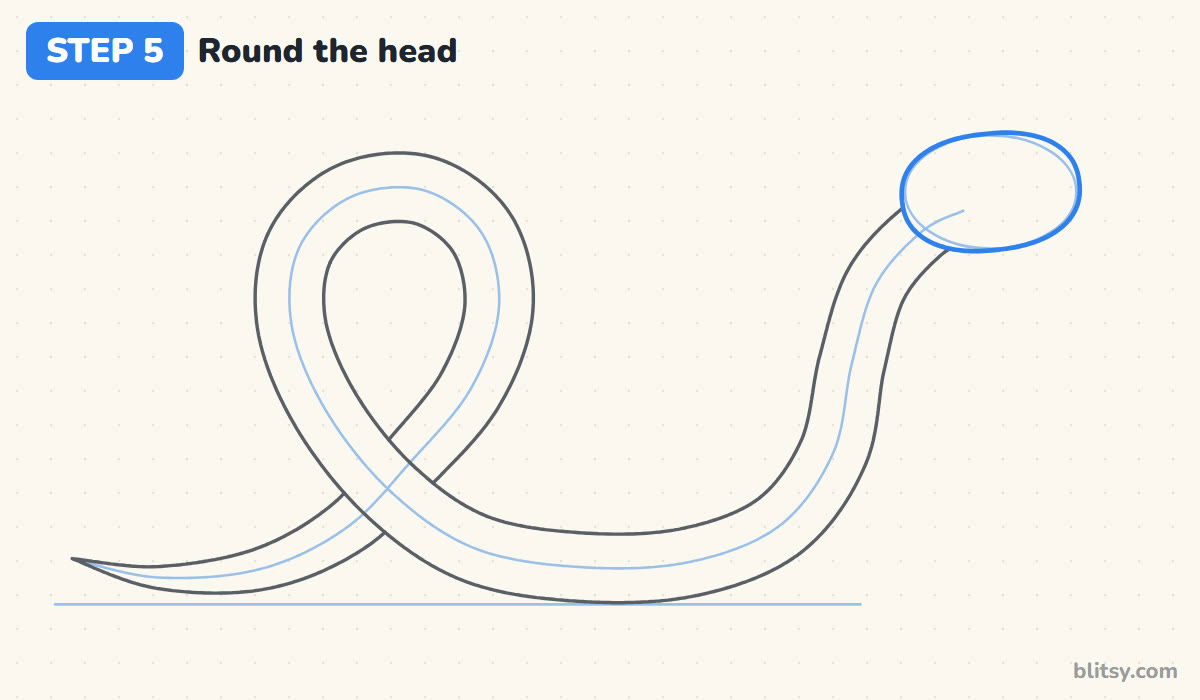
Trace the head oval with a firmer line, letting the front bulge a little so the snout feels full. The neck lines should run right into it. Snakes don't really have a separate neck, but in my cartoon version a head slightly wider than the body is what keeps it from looking like a worm.
💡 Tip: Keep the back of the head round. A flat back makes it look like a sock puppet.
Step 6: Give it two big friendly eyes
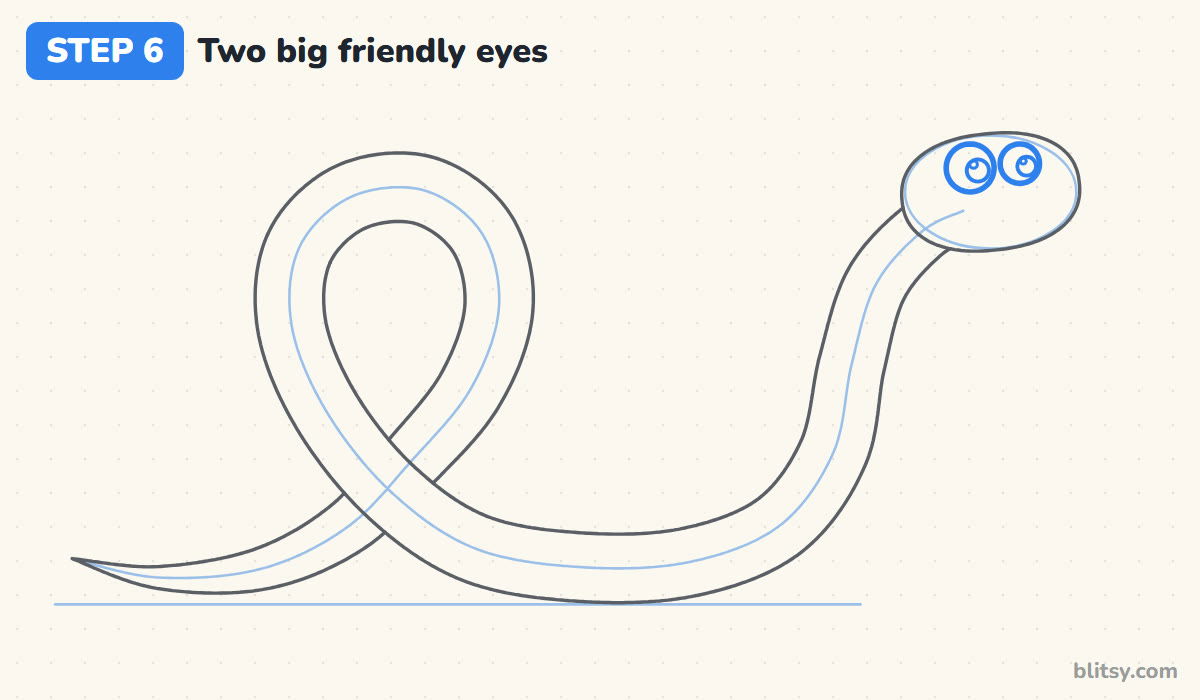
Draw two circles near the top of the head, the near one slightly bigger. Add a dark pupil in each, nudged toward the front so the snake looks where it's going, plus a tiny shine circle. Big round eyes high on the head make this snake friendly. Small slanted ones would make it look sneaky.
💡 Tip: Put both pupils on the same side of their circles, or the snake will look cross-eyed.
Step 7: Add a smile and two nostrils
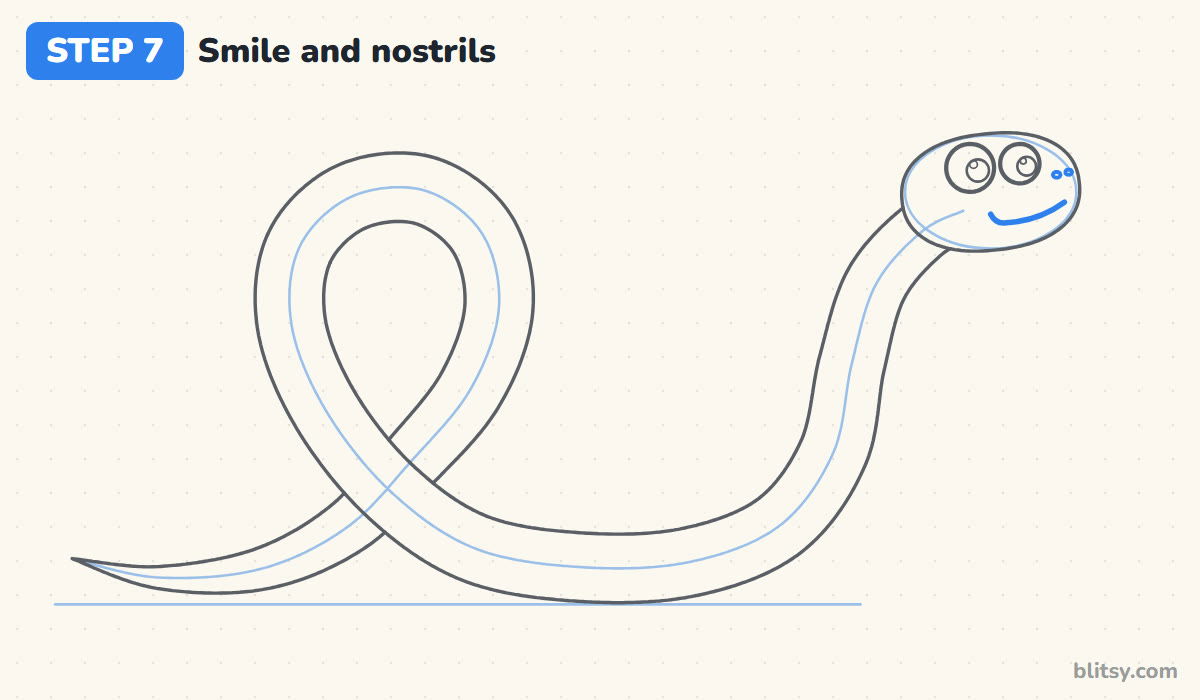
Under the eyes, draw a gentle curve from the front of the snout back toward the middle of the head, ending in a small hook like a dimple. Two tiny ovals near the tip are the nostrils. I keep the smile in the lower half of the head so there's green space between it and the eyes.




💡 Tip: A smile that's too long reaches the neck and looks like the head could pop open.
Step 8: Draw the forked tongue
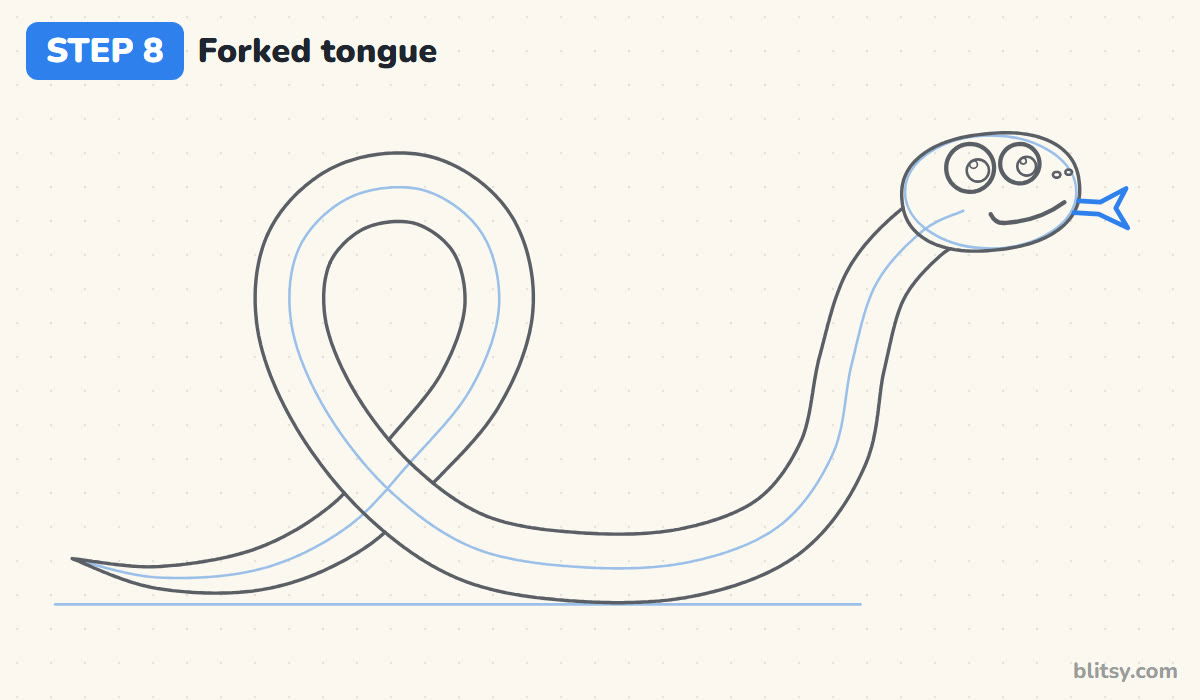
From the front of the mouth, pull out a short, thin strip and split its end into two pointed tips, like a letter Y lying on its side. Real snakes flick their tongues to pick up scent from the air and carry it to a special organ in the roof of the mouth. A snake smells with its tongue.
💡 Tip: Keep the tongue shorter than the head. A long one quickly looks like a ribbon.
Step 9: Mark the belly band and stripes
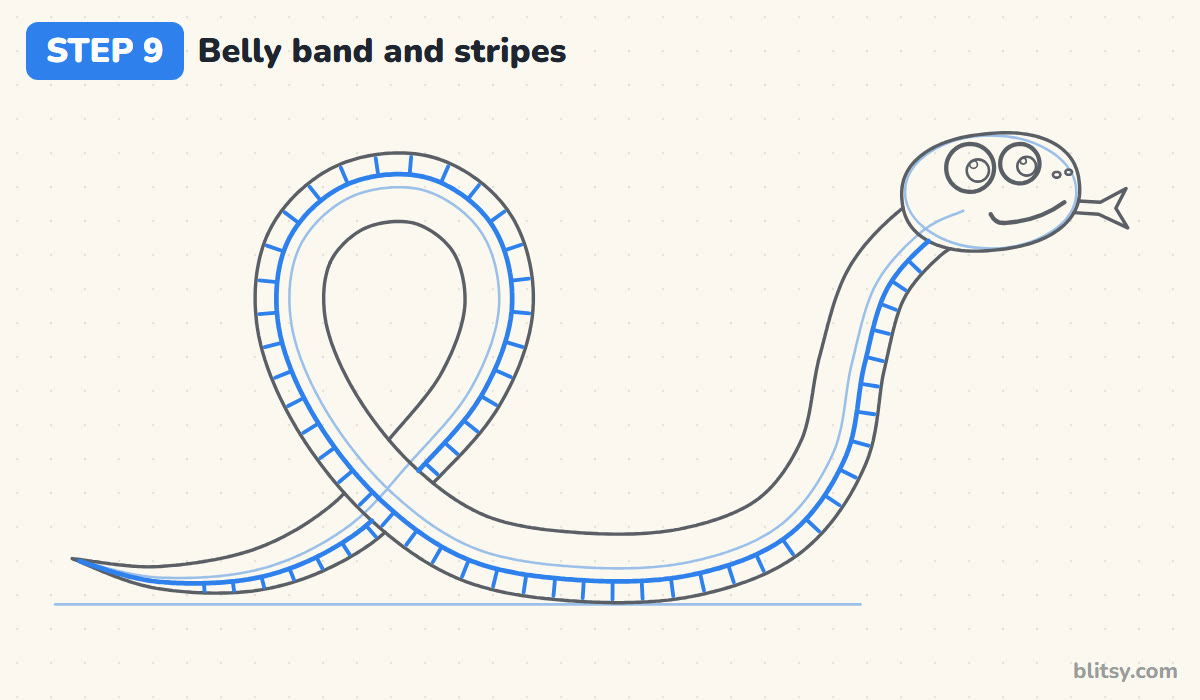
Inside the body, draw a line alongside the lower edge, about a third of the way in. Keep it on the same side all the way: under the tail, around the outside of the loop and up the front of the neck. Then cross the band with short lines. They stand for the wide belly scales that help a real snake grip the ground.
💡 Tip: Space the stripes by eye, not by ruler. Slightly uneven looks more alive.
Step 10: Add diamonds along the back
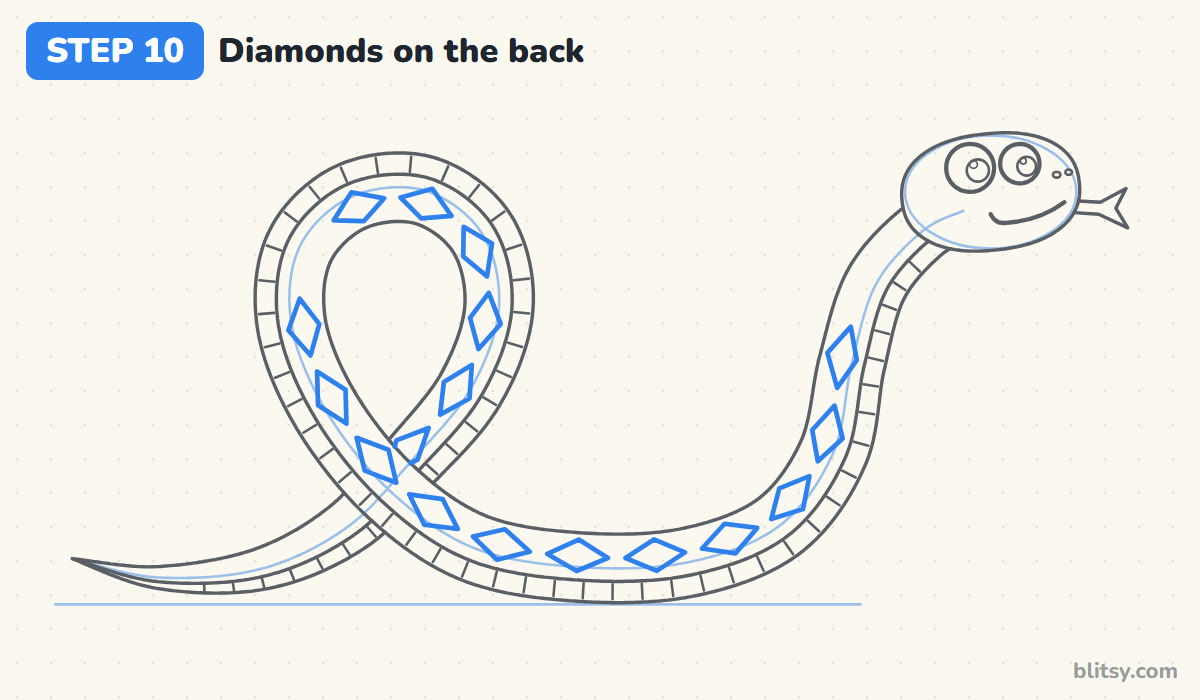
Fill the top half of the body with a row of diamonds, each pointing along the body, with about one diamond's length between them. Around the loop, turn each one to follow the curve. Where the back part slips under the front part, a diamond can be cut in half. Skip the thin end of the tail.
💡 Tip: Draw the diamonds at the bends first, then fill in the straighter stretches.
Step 11: Ink the lines and erase the guides
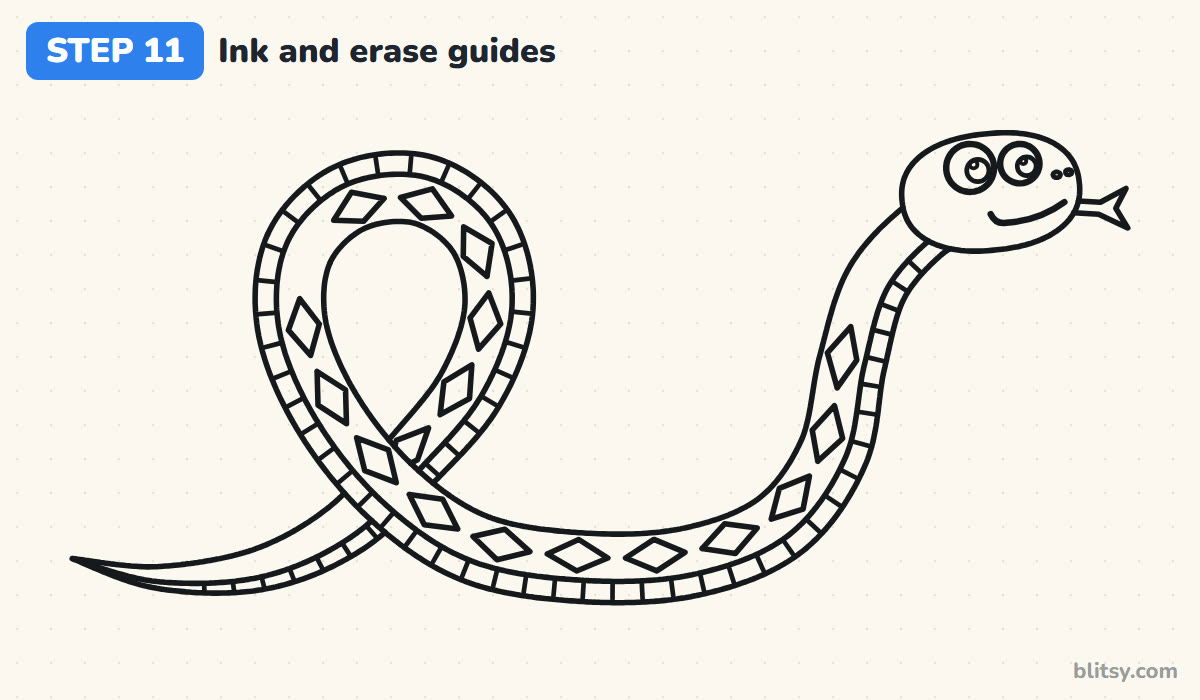
Go over every line you want to keep with the black pen, from the body edges to the stripes and diamonds. Leave the center line, head oval and ground line in pencil. Let the ink dry for a minute, then erase all the pencil, and the snake suddenly looks clean.




💡 Tip: Ink long body curves with your whole arm moving, not just your fingers.
Step 12: Color your snake
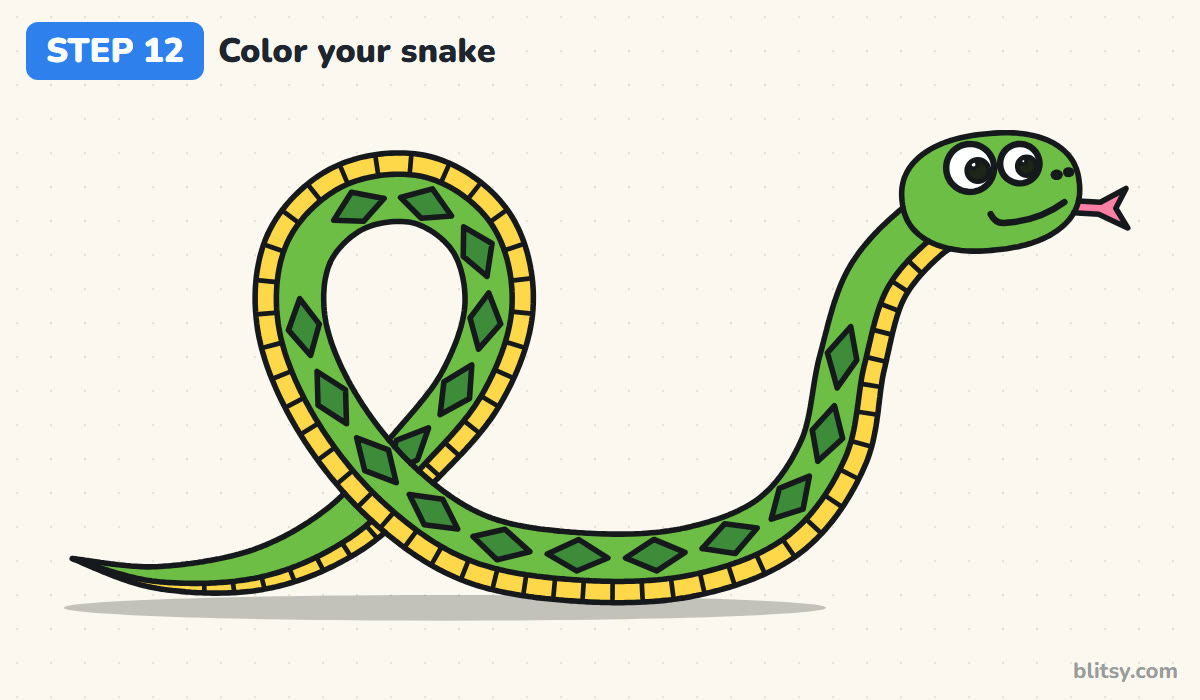
Color the body and head bright green, then use dark green inside each diamond. Fill the belly band yellow and the tongue pink, and leave the eyes white with black pupils. A soft gray shadow under the snake sets it on the ground. Green and yellow is just my pick, so check the ideas below first.
💡 Tip: Color the green in the direction the body flows to avoid streaks across it.
Snake Bodies That Bulge, Pinch or Tangle
- A body that swells and shrinks. It happens when the outline comes first. Draw the center line, then keep both edges the same distance from it.
- A tail that ends like a stump. Begin bringing the two lines together well before the end.
- An overlap you can't read. If both parts are drawn whole, the crossing turns into a knot. Draw the front part complete and break the back part underneath.
- A head as narrow as the body. The snake starts to look like a garden hose. Make the head clearly wider than the neck.
- A belly band that switches sides. Keep the yellow band on one edge the whole way, or the body looks twisted.
New Coils, Colors and Patterns for Your Snake
Once the center line trick feels easy, change the line itself: two loops, a tight spiral or a lazy wave with no crossing. The thickness and overlap steps work the same for any shape. You can swap the pattern too. Orange, black and cream bands look like a milk snake, and a plain green body suits a tree snake. If your snake wants company, add a reptile cousin from the alligator drawing tutorial or a pond neighbor from the easy frog drawing tutorial.
Snake Coloring Page and a 12-Step Printable
The snake coloring page has a colored example and a key naming each color and its part, above a big outline to fill in. The step-by-step PDF guide holds all 12 steps with pictures and tips. Both print on Letter or A4.
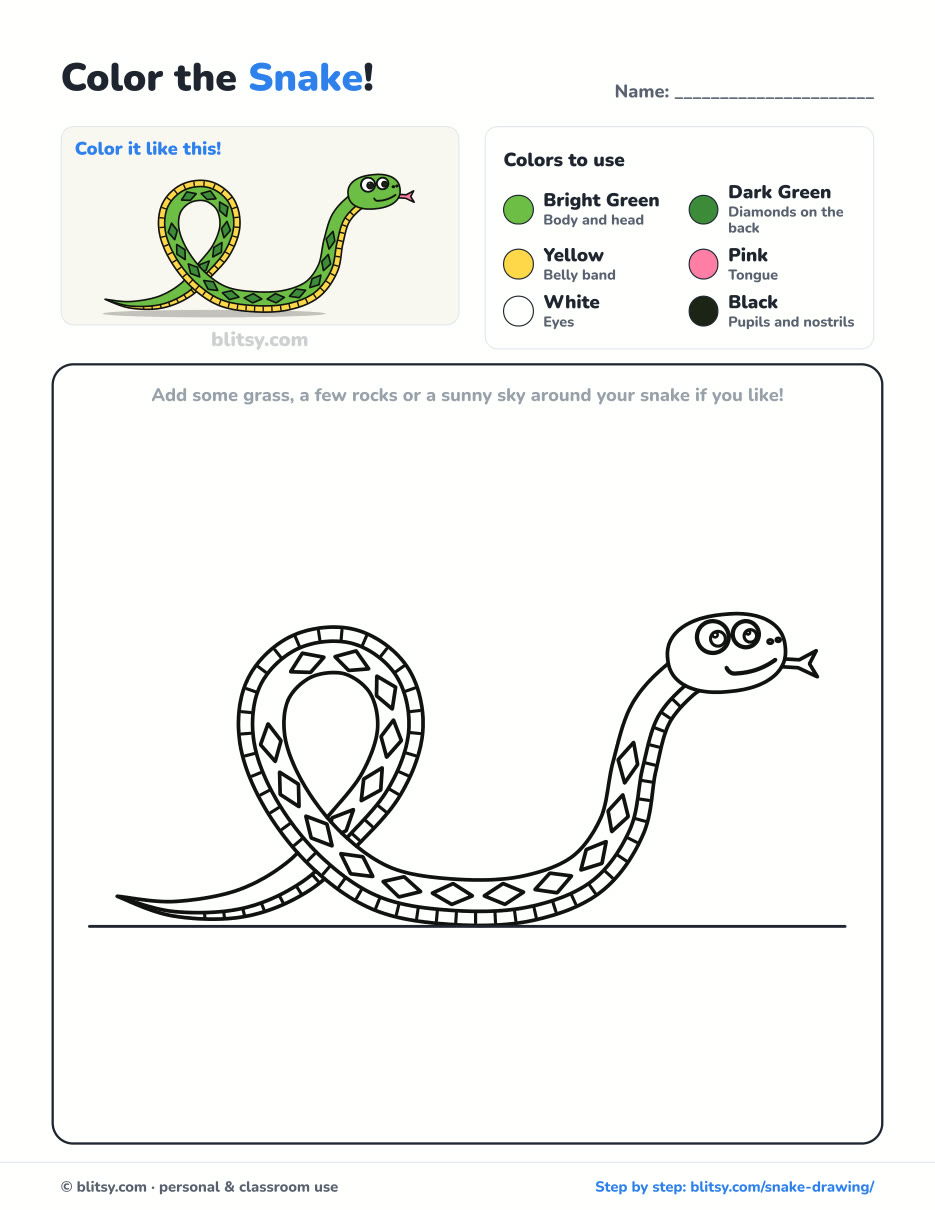
Black outlines with a colored example and the color names at the top. Ready to print and color.
⬇️ Download Coloring PageEvery step picture with its instructions and tips, to keep beside your paper while you draw.
⬇️ Download Drawing Guide📱 On a phone? Tap a download button, then open the file and choose Share → Save to Files or Print. On a computer, the PDF opens or saves straight to your Downloads folder.
Snake Steps Stacked on One Tall Pin
Snake Drawing Questions From Curious Kids
What is the easiest way to draw a snake?
Draw one curvy center line first, then draw two lines that follow it at the same distance and meet at a point for the tail. Add a head that's a bit wider than the body, and you have a snake.
How do you draw a snake that crosses over itself?
Decide which part is in front and draw it completely. Then draw the part behind it, stopping its lines where they reach the front part and starting again on the other side.
Why does a snake stick its tongue out?
It's smelling. The forked tongue collects scent from the air and brings it to an organ in the roof of the mouth.
Can young kids draw this snake?
Yes, kids around 6 can manage it. Younger ones can skip the loop and draw a simple wavy snake, and the diamonds and stripes are optional.
Your snake is ready to slither off the page, so show it to someone and then try a second one in new colors. 🐍✏️
Related posts:
 How to Draw a Whale Step by Step (Easy for Beginners)
 How to Draw Lungs Step by Step (Easy Science Diagram)
 How to Draw a Pineapple Step by Step (Easy Crown and Slice)
 How to Draw Iron Man Step by Step (Easy Chibi for Kids)
 How to Draw a UFO Step by Step (Cute Alien Saucer)
 How to Draw Flames Step by Step (Easy Campfire Drawing)
 How to Draw a Moon Step by Step (Sleepy Crescent + Phases)
 How to Draw a Tiger Step by Step (Easy Walking Pose)
 How to Draw a Heart Step by Step (Even, Symmetric Shape)
 How to Draw a Jellyfish Step by Step (Cute, Easy Guide)
 How to Draw Cerberus Step by Step (Cute and Easy)
 How to Draw a Taco Step by Step (Easy Kawaii Taco)

