
An igloo looks simple until you draw the blocks, and then it suddenly goes flat like a striped beach ball. The trick is all in the curve of the rows. In this lesson I'll show you how to draw an igloo step by step, from one light half-dome to a snug little snow house with a tunnel entrance, a dark doorway and a penguin standing guard outside. If you can draw a rainbow-shaped arch, you can draw this.
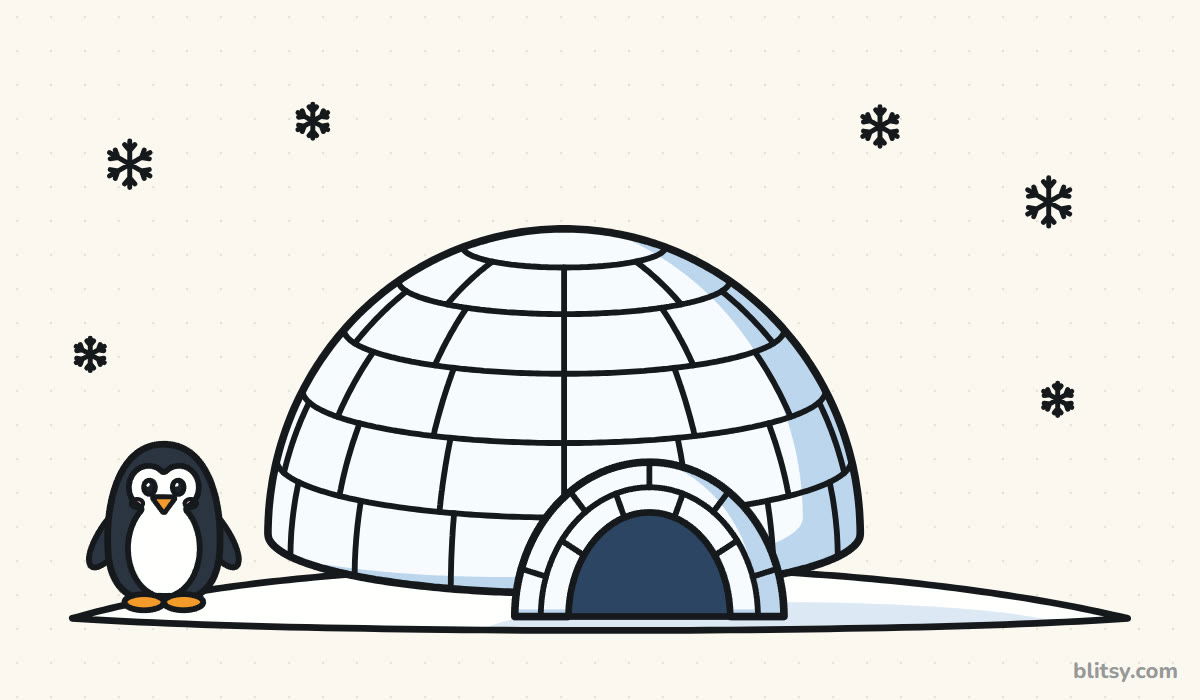
Fresh lines in each picture are drawn in blue; earlier work fades to gray. Copy the blue part only, check it against your page, and carry on.
Quick overview
⏱️ Time: about 30 minutes, a little longer with coloring
🎯 Level: easy, fine for kids around 7 and older
✏️ Steps: 11
🧊 You'll draw: a snow block igloo with a tunnel, a penguin and snowflakes
Igloo Supplies to Gather First
- A pencil you can press softly (HB works well)
- An eraser that doesn't smudge
- A black marker or fineliner for the final lines
- Colored pencils or crayons in light blue, dark blue, black, orange and pink
- Plain white paper, turned sideways
White snow is just the paper itself, so you don't need a white pencil at all.
How to Draw an Igloo Step by Step
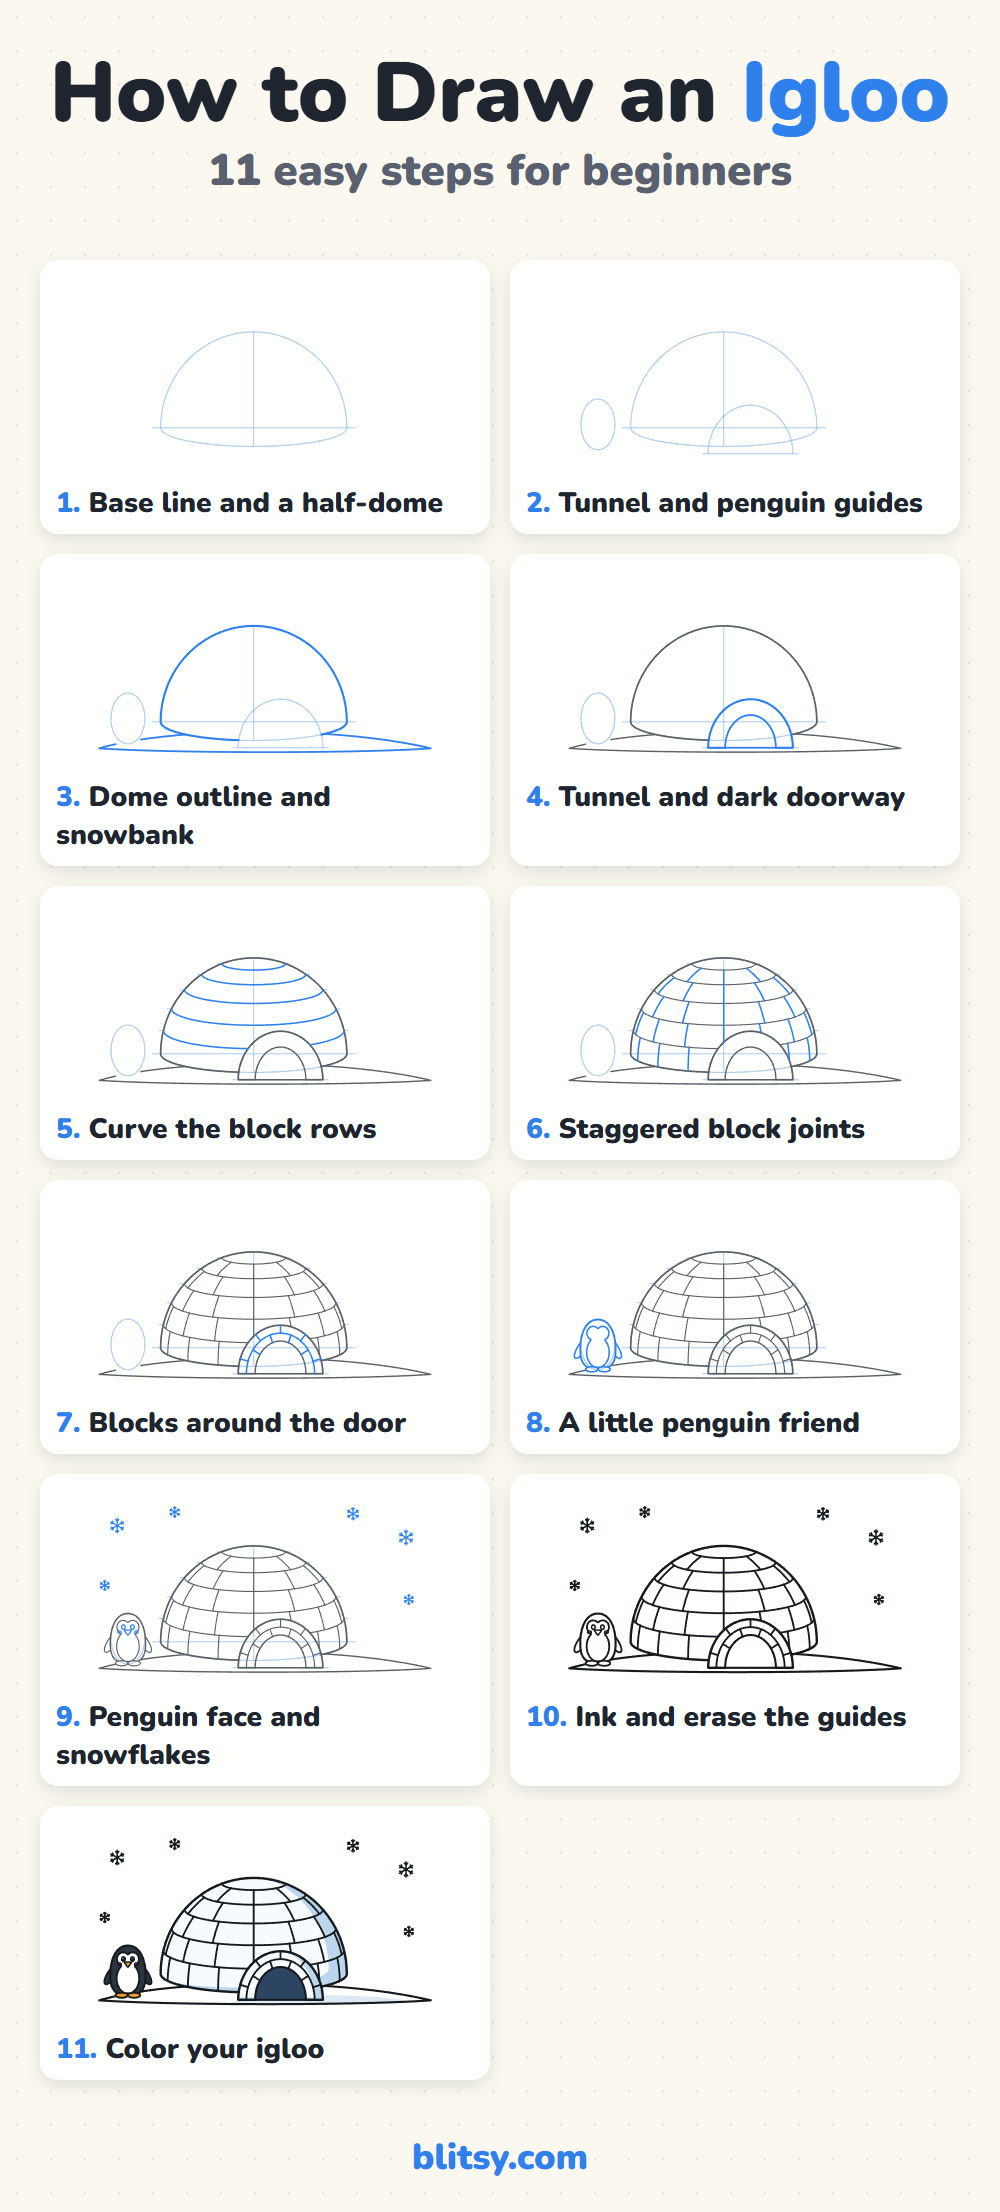
Step 1: Draw a base line and a half-dome
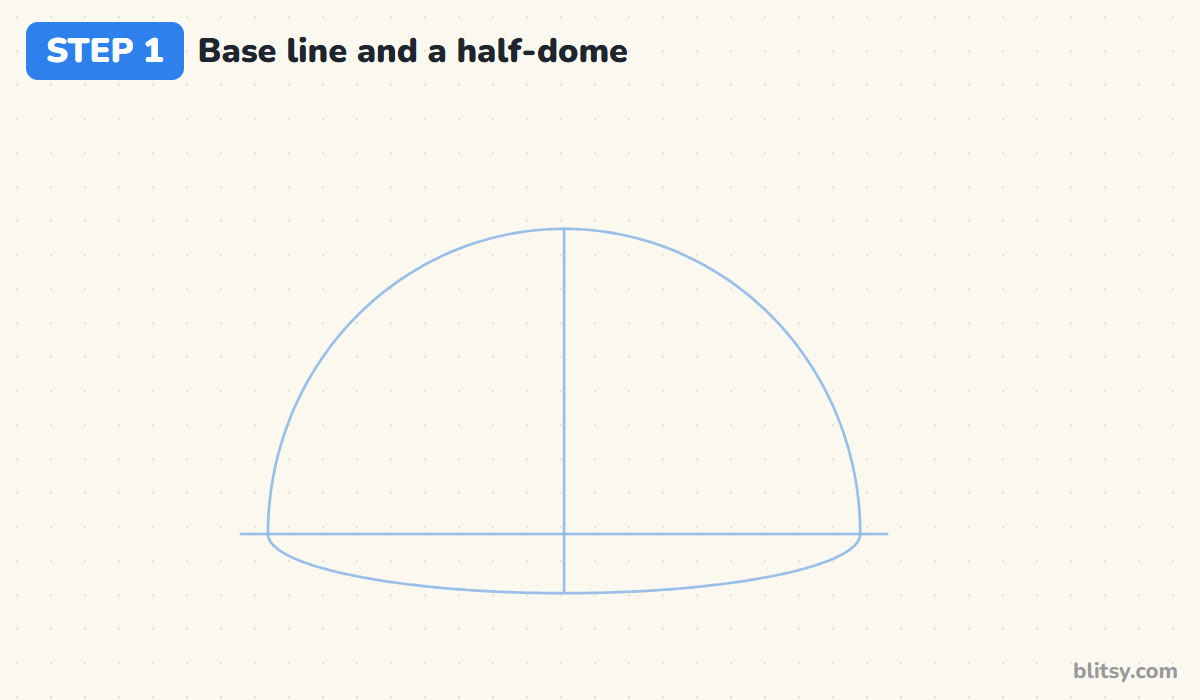
I always start an igloo with a light flat line across the page, a bit below center. On top of it, sketch a big half circle, a little taller than half its width. Then add a shallow curve under the line that dips down like a smile, from one end of the dome to the other, and a straight line down the middle.
💡 Tip: That smile curve under the base is what makes the igloo look round instead of flat, so don't skip it.
Step 2: Sketch the tunnel and penguin guides
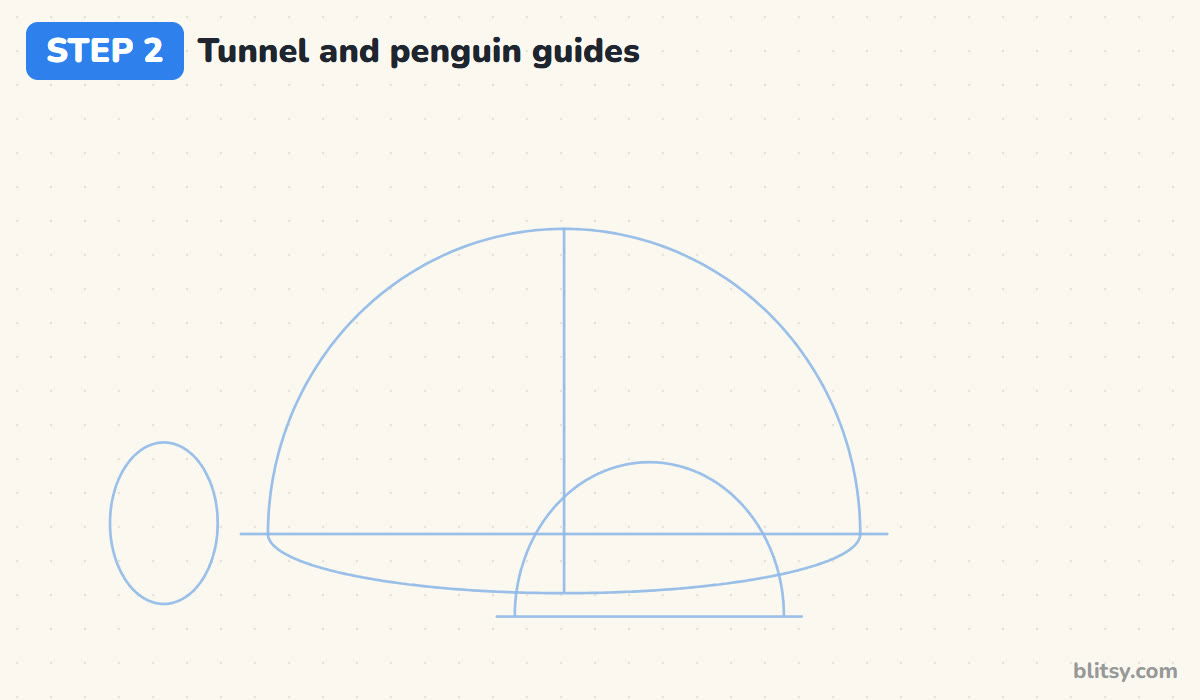
The tunnel sits in front of the dome, a little to the right of the middle line. Draw a smaller arch whose bottom sits lower than the dome's base, because it's closer to you. Close it with a short flat line. Far on the left, outside the dome, sketch a tall oval for the penguin.
💡 Tip: Make the tunnel arch about half as wide as the dome. Any wider and the igloo starts to look like a garage.
Step 3: Outline the dome and the snowbank
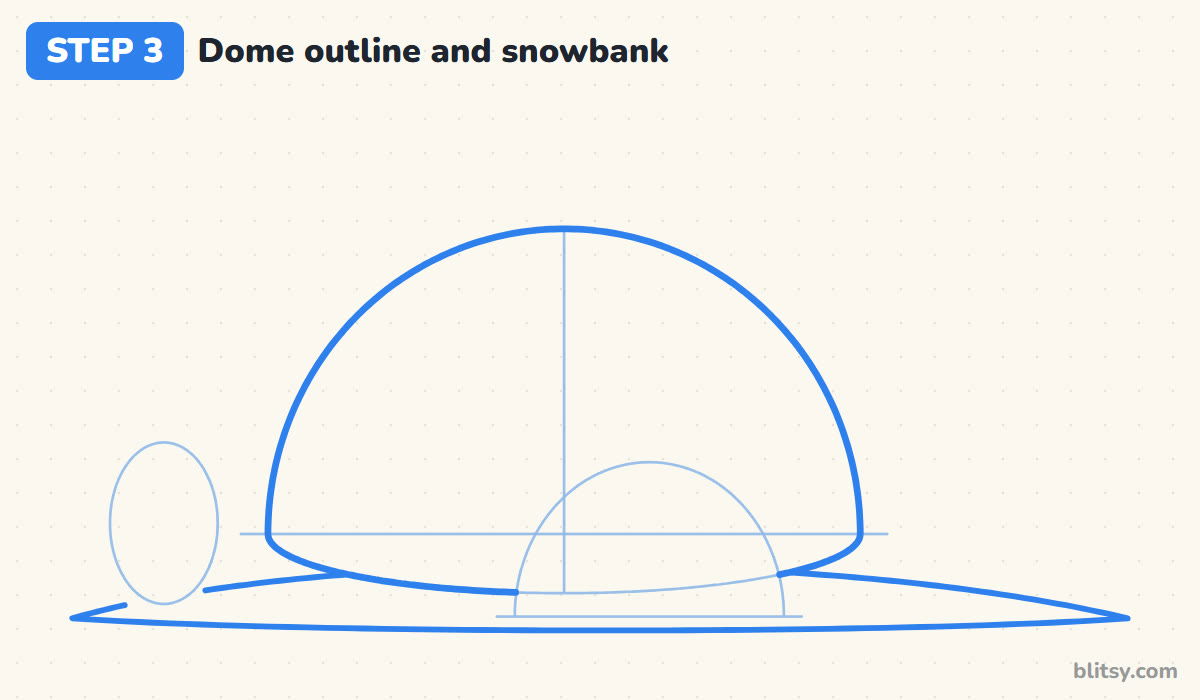
Trace the half-dome with a firmer line, including the smile curve at the bottom, but stop where the tunnel will cover it. Now draw the snowbank: a long, low mound that starts beyond the penguin and ends past the right side of the igloo. I let its top edge rise gently under the dome and keep the bottom almost flat.
💡 Tip: Leave a gap in the snowbank line where the penguin's feet will stand.




Step 4: Draw the tunnel and the dark doorway
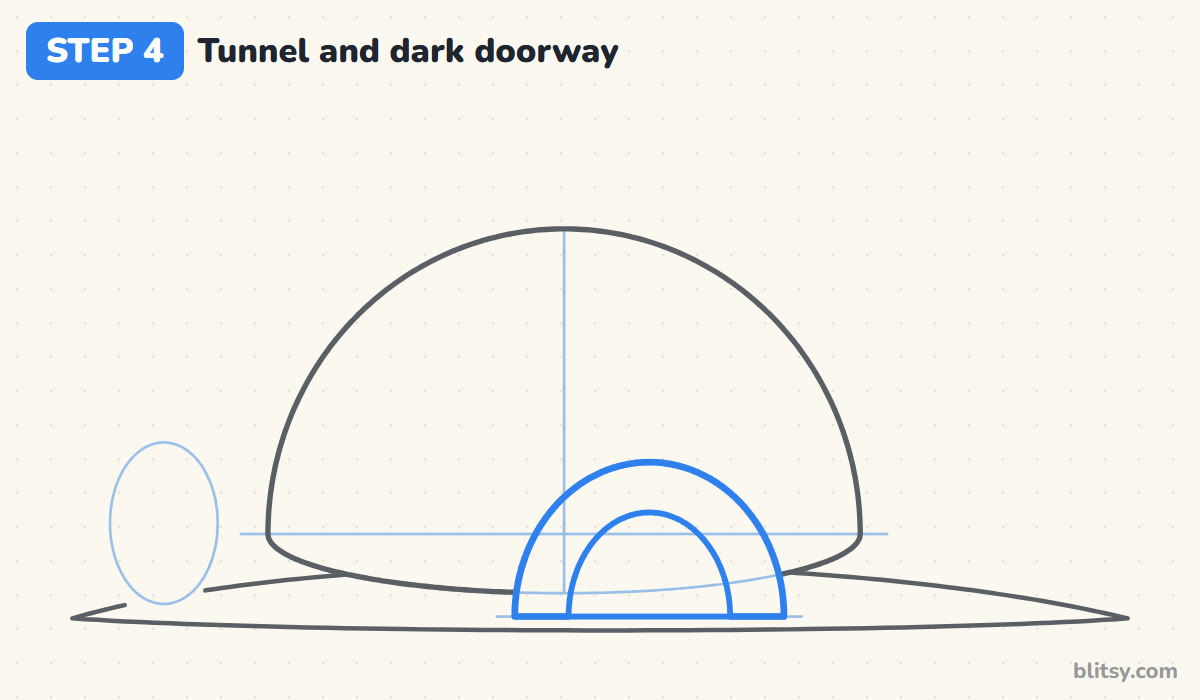
Go over the tunnel arch with a firm line and give it a flat bottom. Inside it, draw a second, smaller arch for the doorway. Leave a band of about a finger's width between the two arches on the sides, a little more at the top. That band is where the tunnel blocks go later.
💡 Tip: Keep both arches the same shape, just different sizes, so the band around the door stays even.
Step 5: Curve the block rows
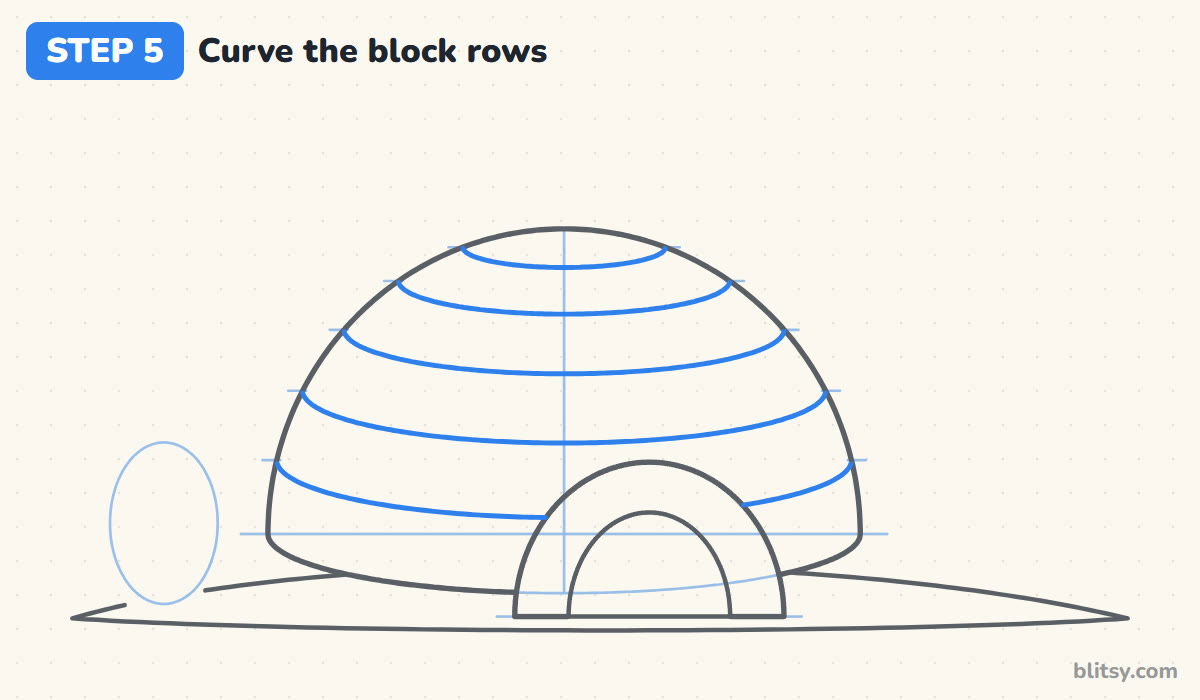
When I teach igloos, this is the step everyone remembers. Put five small tick marks up each side of the dome, with the gaps getting smaller as you go up. Connect each pair of ticks with a curve that dips down in the middle, just like the smile at the base. The low rows dip the most and the top row is a small, shallow oval cap.
💡 Tip: Never draw the rows as straight lines. Straight rows turn the dome into a flat sticker.
Step 6: Add staggered joints between the blocks
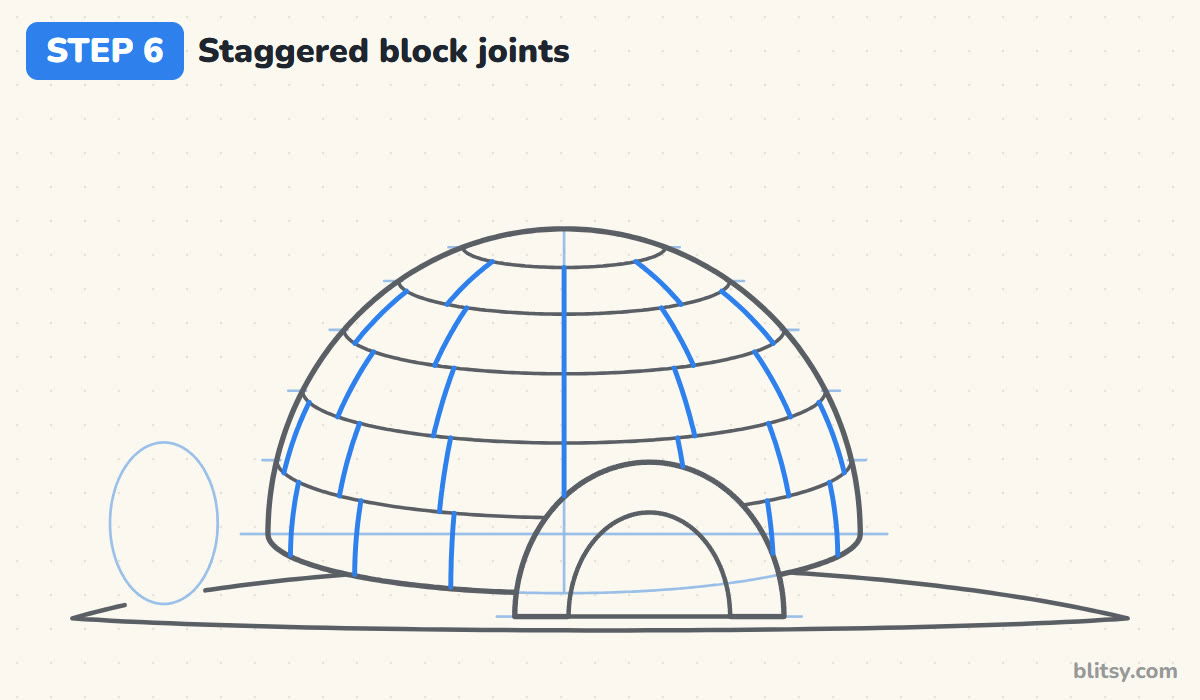
Now split each row into blocks with short lines. They shouldn't stand straight up. Lean each one so it points toward the top of the dome, the same way lines of longitude run on a globe. Shift the joints in each row so they land between the joints of the row below, like bricks in a wall. Use fewer blocks as the rows get shorter.
💡 Tip: I start each row with the joint nearest the middle line, then work outward. It keeps the spacing even on both sides.
Step 7: Add the blocks around the door
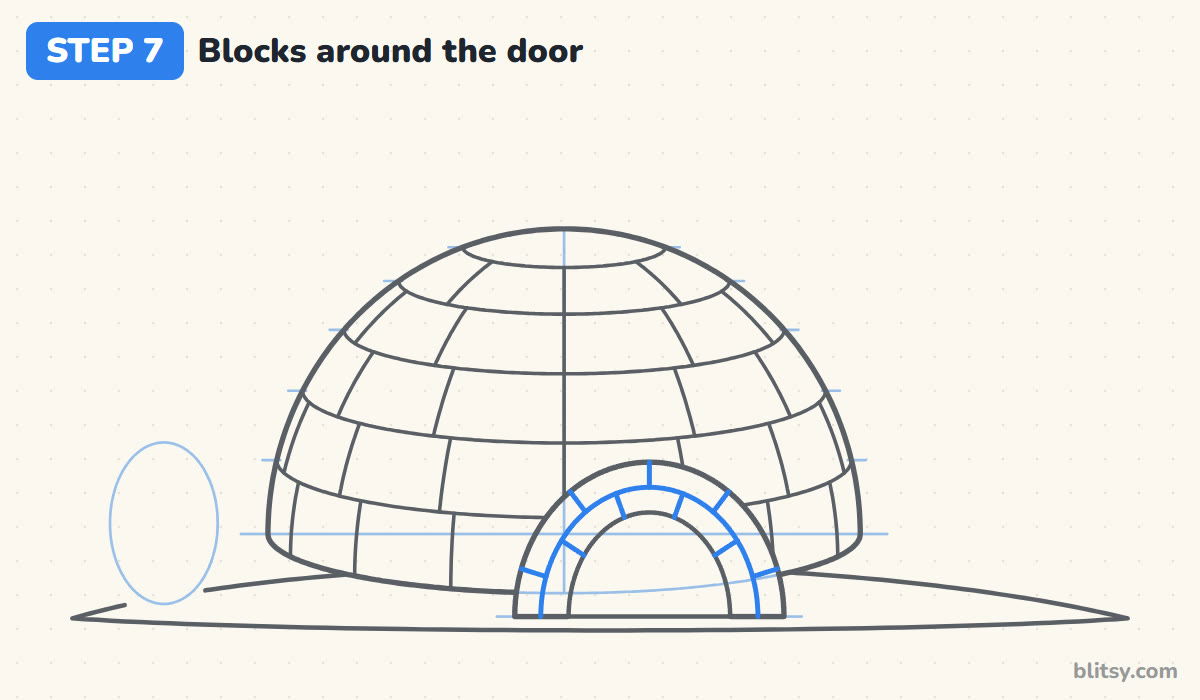
Inside the band around the doorway, draw one more arch halfway between the two you have. That gives you two curved rows. Split them into blocks with short lines that point toward the middle of the doorway, like the spokes of a wheel. Shift the outer row's joints so they sit between the inner ones.
💡 Tip: Four or five blocks per row is plenty. Tiny blocks around the door get messy fast.




Step 8: Draw a little penguin friend
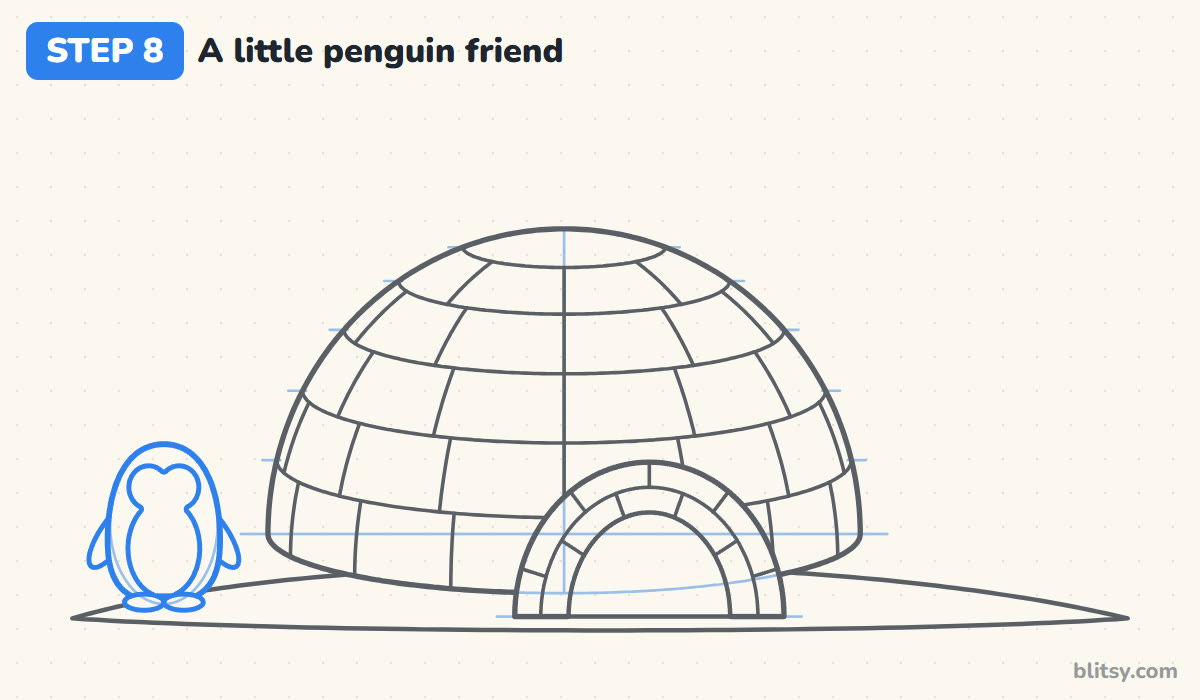
Inside the oval, draw an egg shape for the body, rounder at the bottom. Add a flipper on each side, slanting outward like the penguin is about to wave. Inside the body, draw the white belly: a big oval below, with two round bumps on top that make a heart-shaped face patch. Two flat ovals at the bottom are the feet.
💡 Tip: Most beginners draw the penguin too big. Keep it about half the igloo's height, or it won't look like it fits through the door.
Step 9: Give the penguin a face and add snowflakes
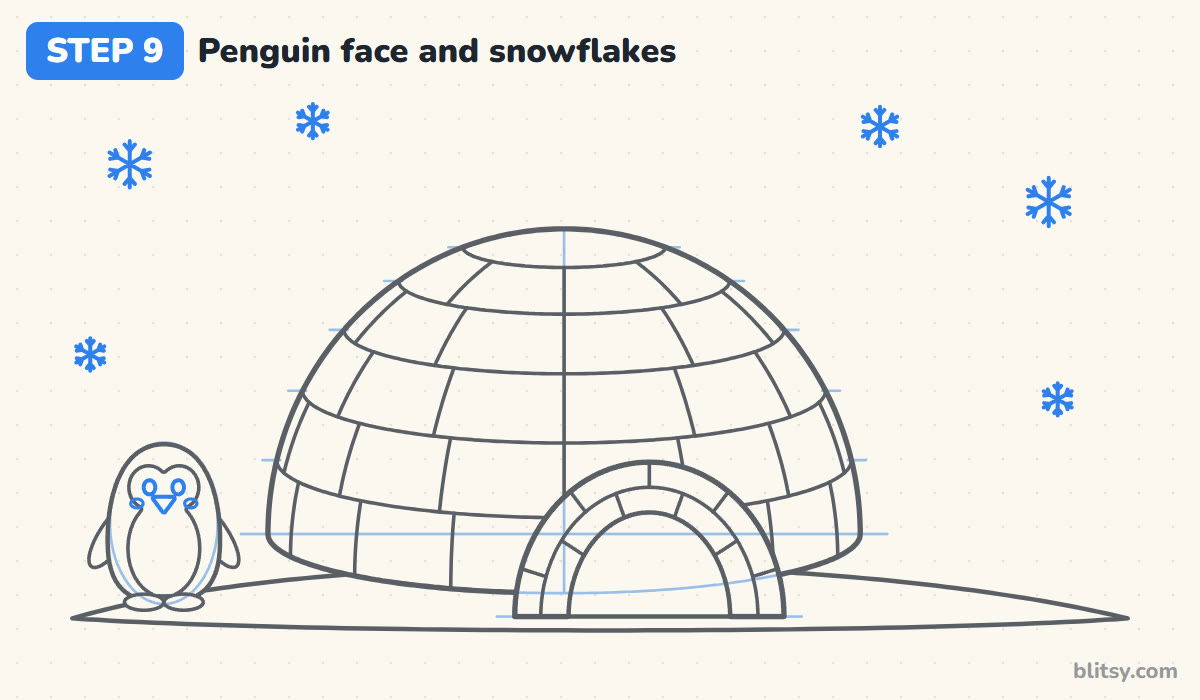
Put two oval eyes on the face patch, one in each bump, and a small triangle beak between them pointing down. Tiny ovals on the cheeks make it look friendly. Then scatter a few snowflakes in the sky: three crossing lines make six arms, and a little V on each arm turns a star into a snowflake.
💡 Tip: Make the snowflakes different sizes and keep them away from the dome's outline so the sky doesn't feel crowded.
Step 10: Ink the igloo and erase the guides
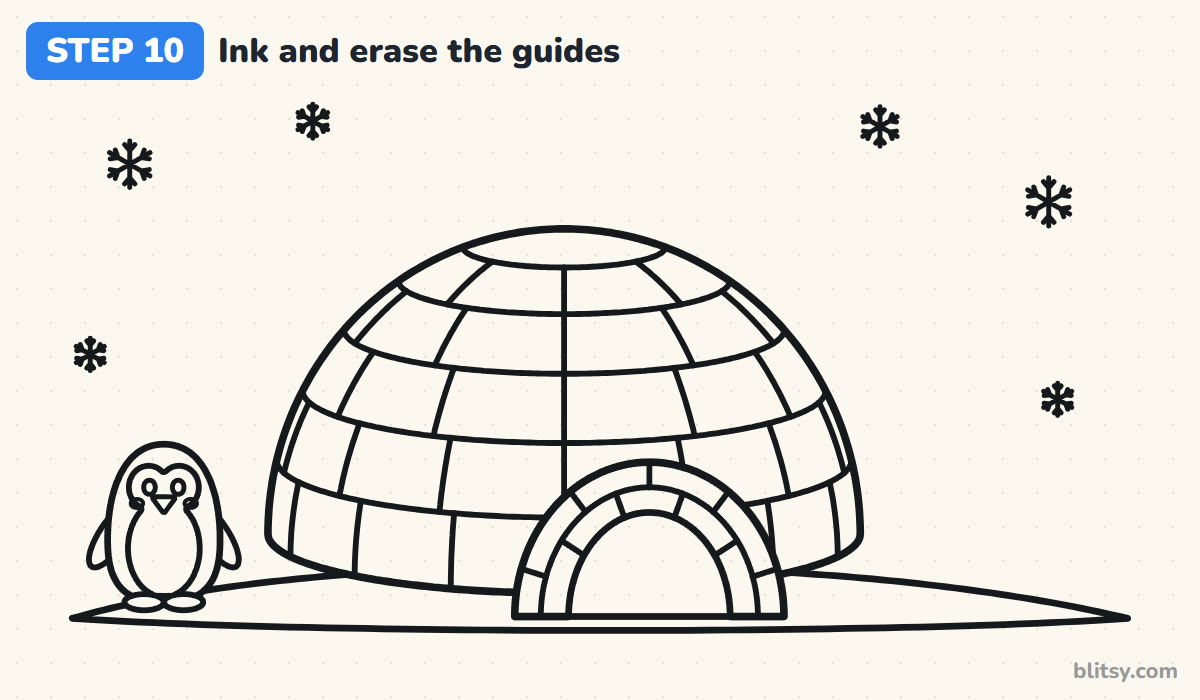
Trace every keeper line with the marker. I do the dome outline and the rows first, then the joints, and leave the snowflakes for last since they're the fiddliest. Skip the tick marks, the middle line and the guide ovals. When the ink is dry, erase all the pencil.
💡 Tip: Turn the paper as you ink the curved rows so your hand always pulls the line toward you.
Step 11: Color your igloo
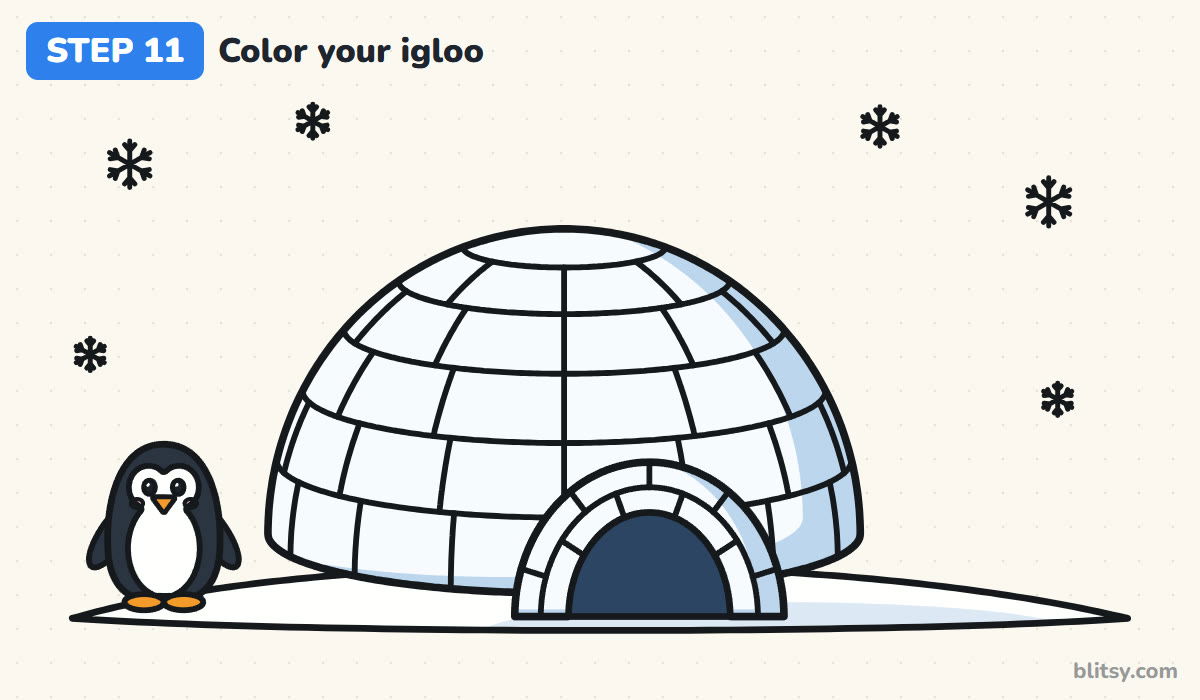
Leave the blocks and the snowbank white. Color a pale blue strip down the right side of the dome and the tunnel, and a soft blue shadow on the snow to the right; that one shaded side is enough to make the igloo look round. Fill the doorway dark blue. The penguin is black with a white belly, orange beak and feet, and pink cheeks.
💡 Tip: Press very lightly with the light blue and build it up. I find snow shading looks best when it's barely there.




Flat Igloo Troubles and Their Fixes
- Straight block rows. Flat rows make the dome look painted on. Bend every row down in the middle, a little more near the bottom.
- Joints that stand straight up. Upright joints fight the round shape. Lean each one toward the top of the dome.
- Joints lined up in columns. That looks like a grid, not a wall. Shift every row so the joints fall between the ones below.
- A tunnel as wide as the dome. The entrance should be small and low. About half the dome's width is right.
- Coloring the whole igloo blue. Then it reads as ice, not snow. Keep most of it white and shade only one side.
Snow House Variations to Try
Light a warm yellow glow inside the doorway so it looks like someone's home, or add a little flag on top. You could draw a sled leaning on the tunnel, a row of icicles, or a night sky with stars and green northern lights. Younger kids can skip the tunnel blocks and the penguin's cheeks and still end up with a proper igloo. A snowman drawing step by step makes a cheerful neighbor for this scene. If you'd like the penguin bigger and with more detail, try the penguin drawing tutorial, and the polar bear drawing lesson adds another snowy visitor.
Free Igloo Coloring Page and Step Guide PDF
The free igloo coloring page has a colored igloo at the top to copy, a key that says which color goes where, and a big outline below with room for a winter sky. The step-by-step PDF guide holds all 11 steps with pictures and tips, so you can practice without a screen. Both print fine on Letter or A4 paper.
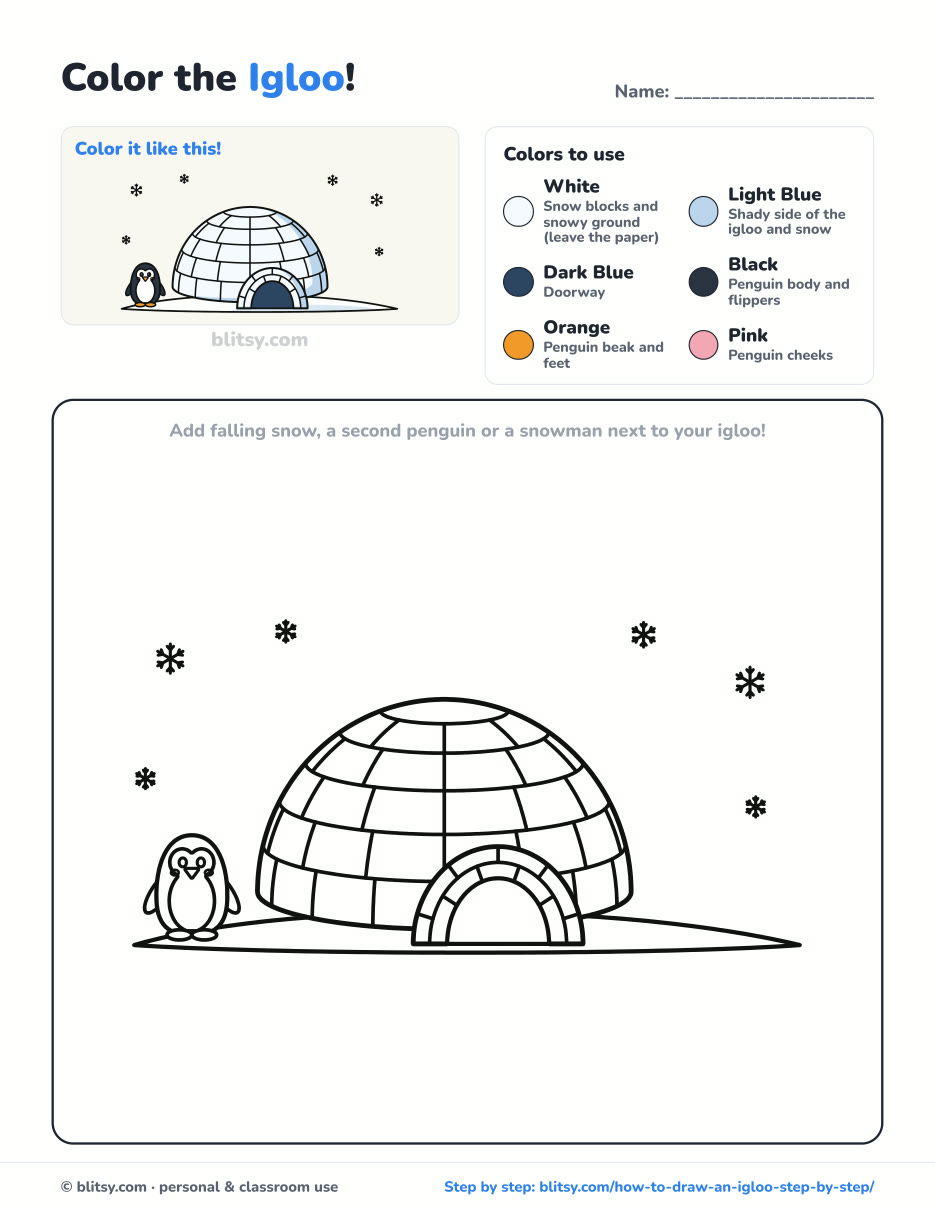
Black outlines with a colored example and the color names at the top. Ready to print and color.
⬇️ Download Coloring PageEvery step picture with its instructions and tips, to keep beside your paper while you draw.
⬇️ Download Drawing Guide📱 On a phone? Tap a download button, then open the file and choose Share → Save to Files or Print. On a computer, the PDF opens or saves straight to your Downloads folder.
Pin the Igloo Steps for a Snow Day
More Snowy Drawings for Cold Days
Each of these is a full step-by-step tutorial with a picture for every stage, so your winter scene can keep growing.
- Snowman Drawing: A snowman in a black top hat and a striped scarf starts as three circles in this snowman drawing tutorial.
- Penguin Drawing: A friendly cartoon penguin grows from one egg shape in this penguin drawing step by step guide.
- Polar Bear Drawing: A chubby polar bear sits on a cracked ice floe in this how to draw a polar bear step by step lesson.
- Arctic Fox Drawing: A fluffy white fox with a bushy tail fits right into a snowy scene in this arctic fox drawing tutorial.
- Mountain Drawing: Snowy peaks make a good backdrop for an igloo, and this mountain drawing step by step guide shows how to layer them.
Igloo Drawing Questions Kids Ask
What is the easiest way to draw an igloo?
Draw a half circle with a curved base, add a small arch for the door, then draw curved rows across the dome and split them into blocks like bricks.
How do you draw igloo blocks so they look round?
Bend each row down in the middle like a smile and lean the short joint lines toward the top of the dome. Shift the joints in every row, the way bricks are laid.
How long does it take to draw an igloo?
Most kids finish in about 30 minutes, plus some extra time for coloring. The block joints take the longest.
What colors do you use for an igloo?
Mostly white, which is just the paper. Add light blue for the shady side, dark blue for the doorway, and black, orange and pink if you draw the penguin.
Grab a pencil, bend those rows and build your own little snow house tonight. 🧊🐧
Related posts:
 How to Draw a Snow Leopard Step by Step (Easy Guide)
 How to Draw a Whale Step by Step (Easy for Beginners)
 How to Draw Lungs Step by Step (Easy Science Diagram)
 How to Draw a Pineapple Step by Step (Easy Crown and Slice)
 How to Draw Iron Man Step by Step (Easy Chibi for Kids)
 How to Draw a Dress Step by Step (Easy Party Dress)
 How to Draw a Chicken Step by Step (Easy for Beginners)
 How to Draw a UFO Step by Step (Cute Alien Saucer)
 How to Draw Flames Step by Step (Easy Campfire Drawing)
 How to Draw a Moon Step by Step (Sleepy Crescent + Phases)
 How to Draw a Sunflower Step by Step (Big and Bright)
 How to Draw a Fall Leaf Step by Step (Maple, Oak and Birch)

