
A candle looks simple until you try to make the top look round instead of flat. The trick is the ellipse, a squashed circle that tells the eye it's looking down at a cylinder. In this lesson I'll show you how to draw a candle step by step, starting with two light ovals and ending with a tall pillar candle, a shorter friend beside it and two warm little flames. Once the ellipses click, you can draw cups, jars and cans the same way.
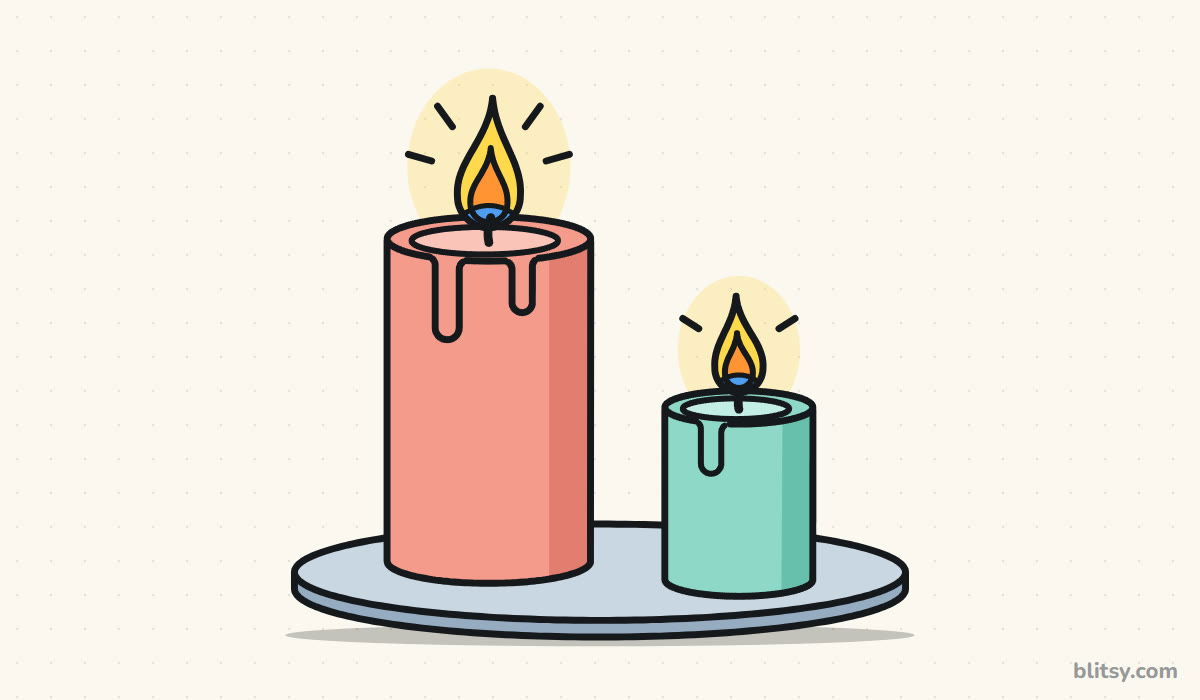
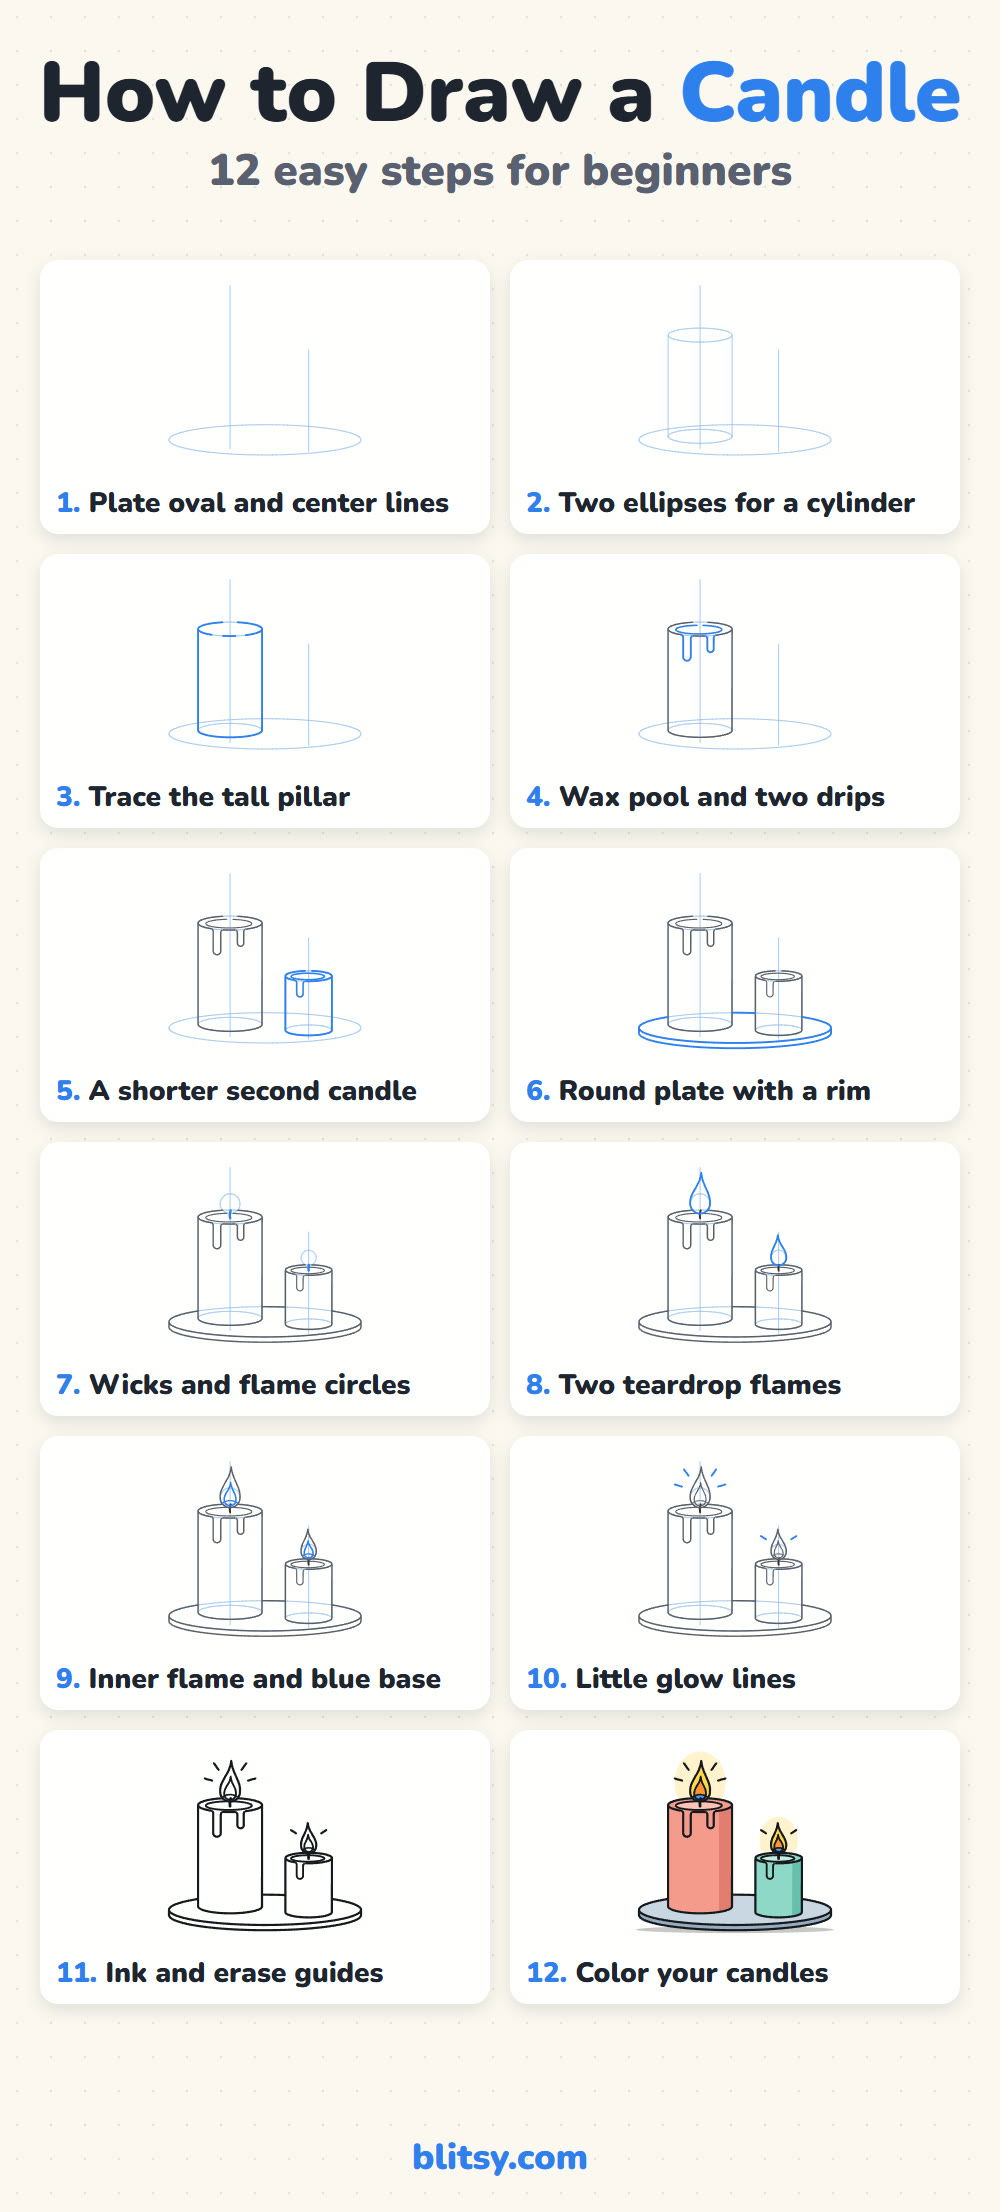
Each step picture paints its fresh lines in blue, while earlier work stays gray. Copy only what is blue, compare with the gray, then continue.
Quick overview
⏱️ Time: about 25 to 30 minutes, coloring included
🎯 Level: easy, fine for kids from about 6 up
✏️ Steps: 12
🕯️ You'll draw: a tall and a short pillar candle with glowing flames
Supplies for Two Pillar Candles
- A pencil you can press lightly with (HB works well)
- An eraser that won't smudge
- A black marker or fineliner for the final outline
- Colored pencils, markers or crayons: yellow, orange, blue, coral pink, mint green and a light gray
- Plain white paper, turned sideways
A ruler helps with the straight sides of the candles, though freehand lines give a softer, handmade look.
How to Draw a Candle Step by Step
Step 1: Draw the plate oval and two center lines
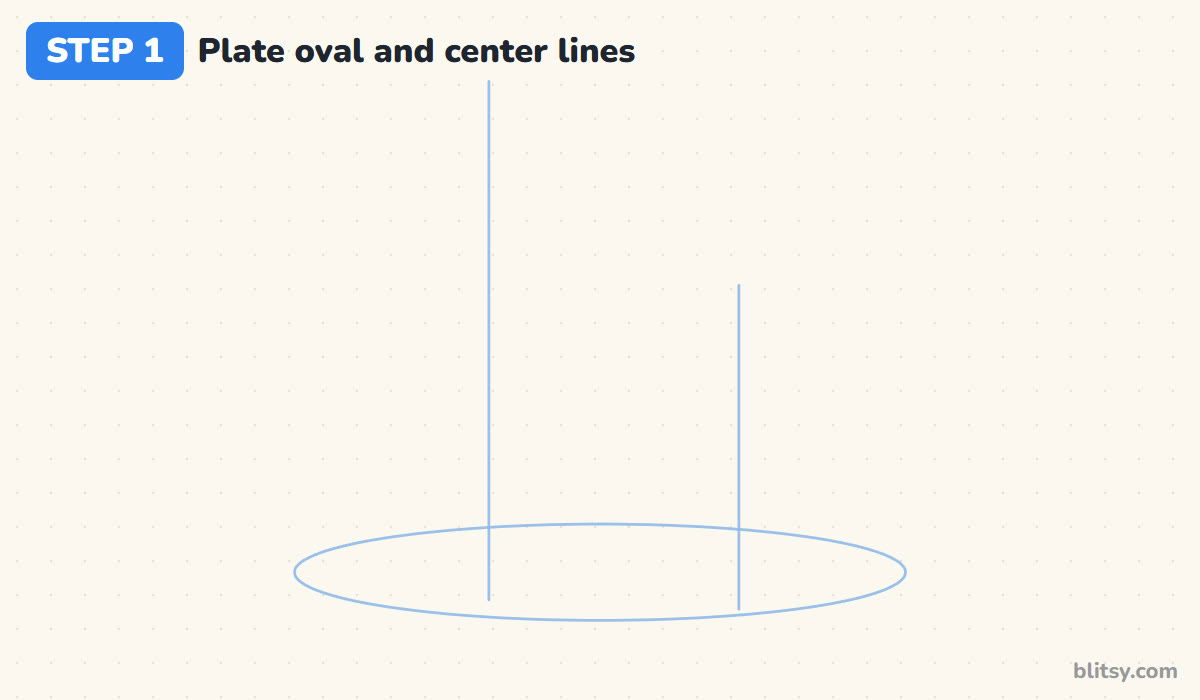
Near the bottom of the page, draw a wide, flat oval for the plate, about three times as wide as it is tall. Add two light vertical lines rising out of it: a long one left of center for the tall candle and a shorter one on the right for the small candle.
💡 Tip: Press so lightly you can barely see the lines. Every one of them gets erased later.
Step 2: Add two ellipses and the sides of a cylinder
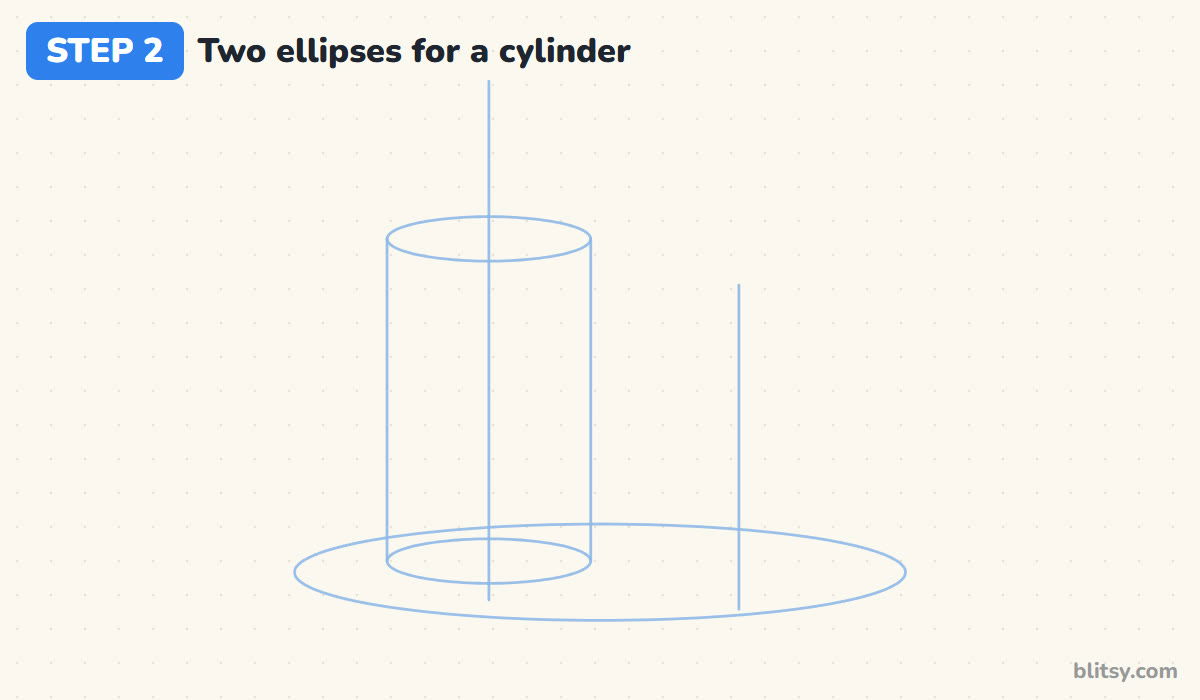
On the left center line, draw a small flat ellipse high up for the top of the tall candle and a matching one just above the plate for its bottom. Join their left and right ends with two straight lines. That's a cylinder. Both ellipses should be the same width, or the candle will look like it leans.
💡 Tip: Draw each ellipse in one smooth, quick motion. Slow ellipses get pointy ends.
Step 3: Trace the tall pillar candle
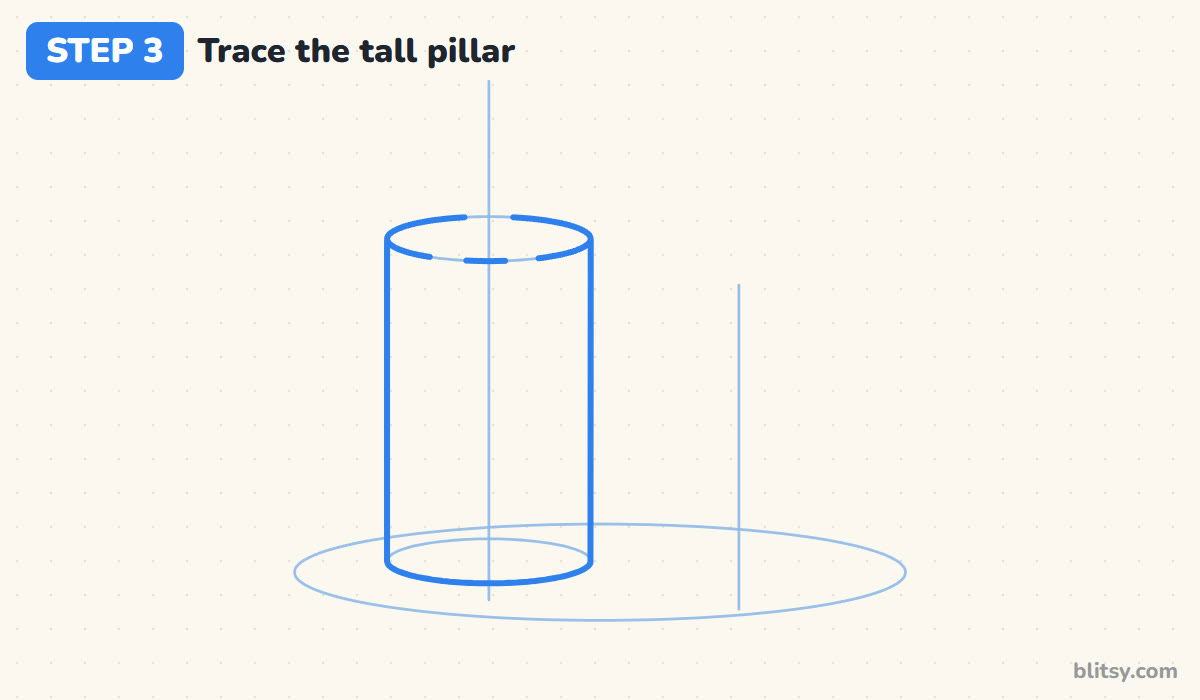
Go over the two side lines and the lower half of the bottom ellipse with a firmer line. The back half of the bottom ellipse is hidden, so skip it. Trace the top ellipse, but leave two small gaps in its front edge. The wax drips will hang from those gaps.
💡 Tip: The bottom curve of a candle always bends downward, like a smile. A flat edge at the bottom makes it look cut off.




Step 4: Draw the wax pool and two drips
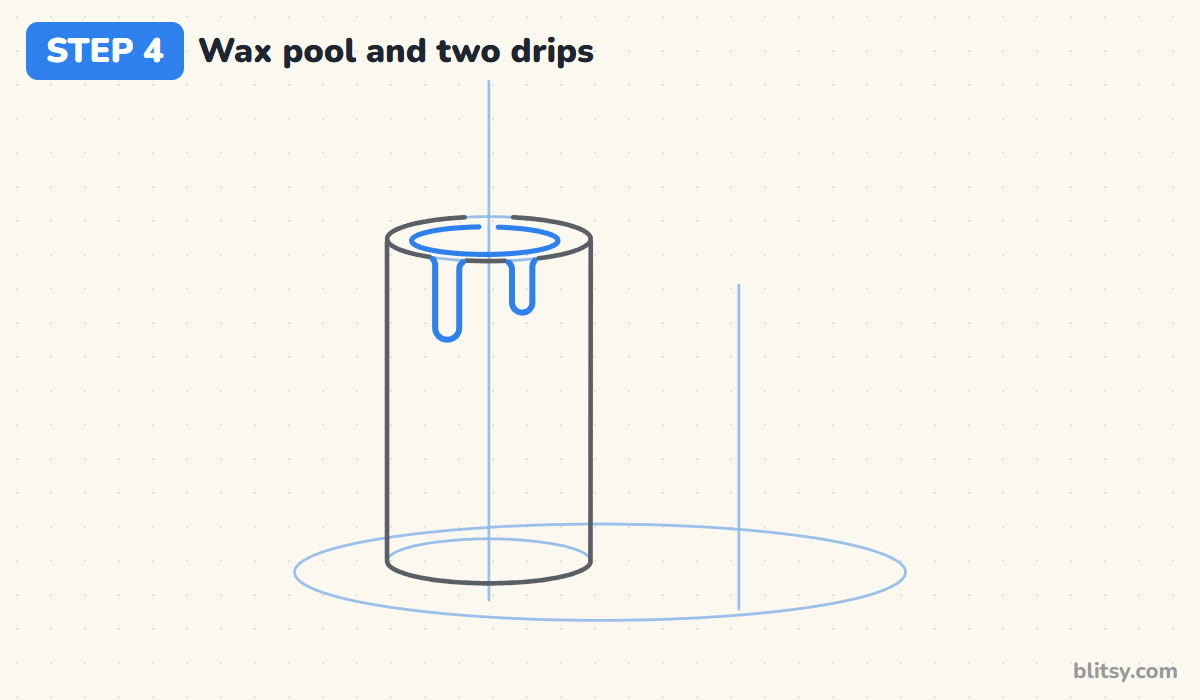
Inside the top ellipse, draw a smaller ellipse for the pool of melted wax, leaving an even ring around it. From each gap in the rim, draw a drip: two lines running down side by side with a round end, like a little finger. I make the left drip longer than the right one, because two equal drips look stiff and planned.
💡 Tip: Widen each drip slightly where it leaves the rim. That small curve makes the wax look soft.
Step 5: Add a shorter second candle
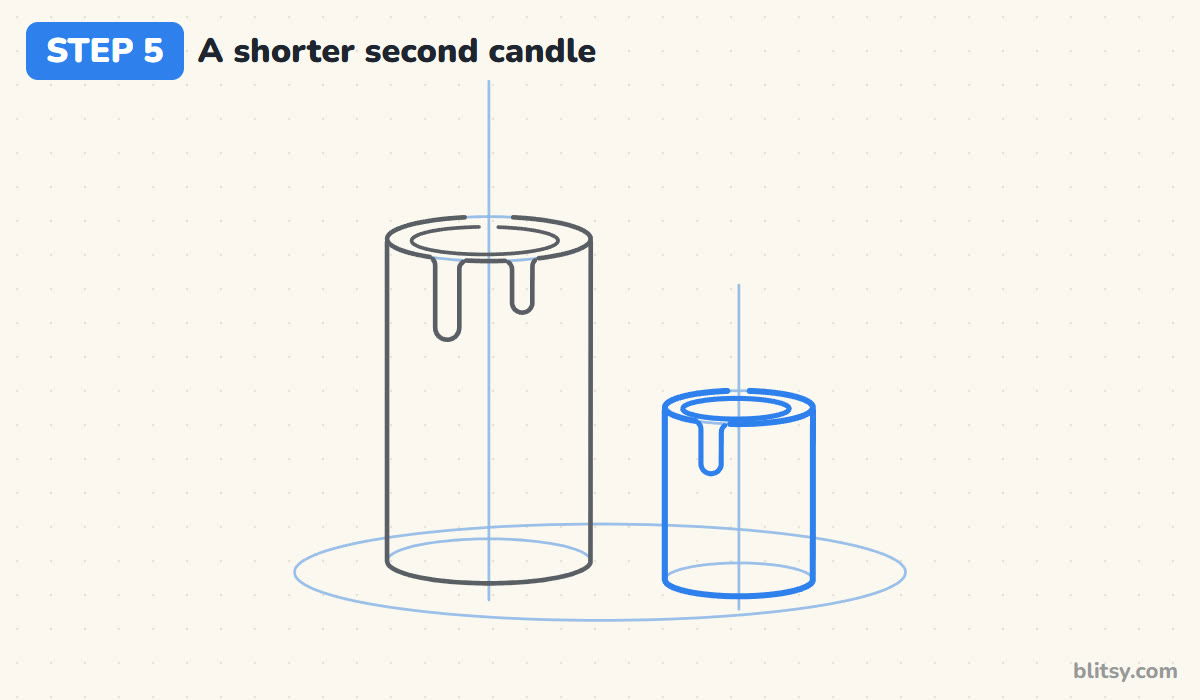
Repeat the cylinder on the right line, but smaller. Its top starts at about half the tall candle's height, and it's a bit narrower. Its bottom sits a little lower on the plate, which puts it slightly closer to you. Add its wax pool and one short drip.
💡 Tip: Keep the small candle's ellipses a touch flatter than the big one's. It looks more natural that way.
Step 6: Outline the round plate with a rim
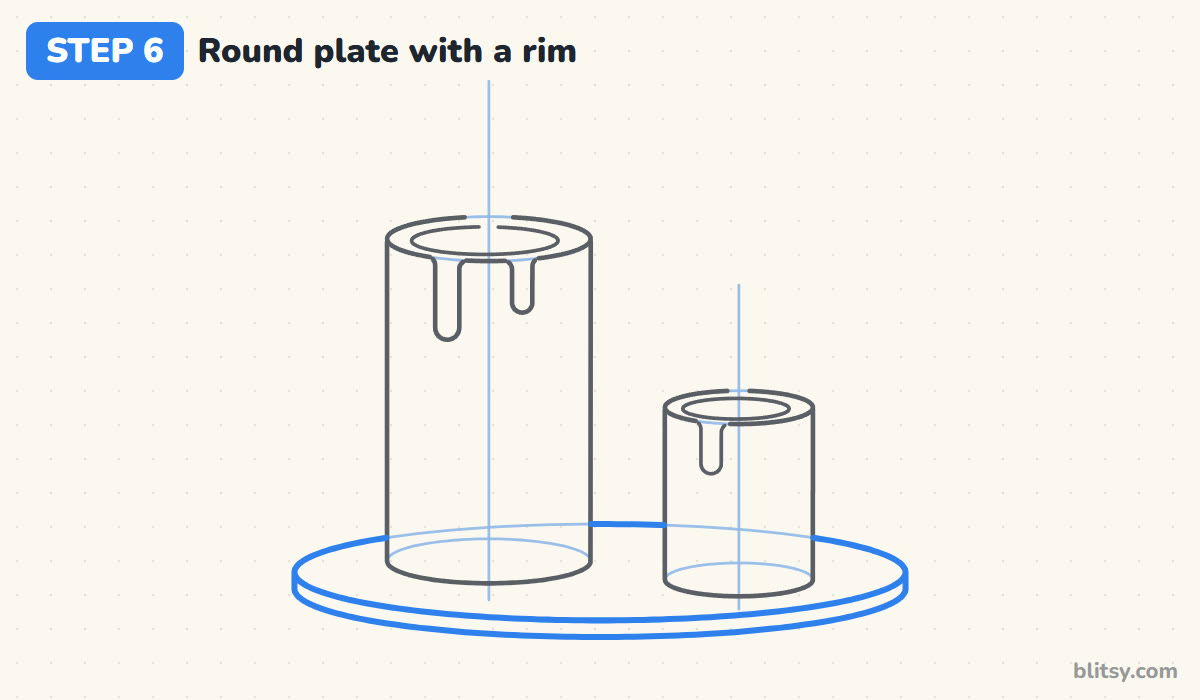
Now trace the plate oval, stopping where it disappears behind each candle. Under its front half, draw a second curve just below it, the same shape, and close the ends. That thin band is the rim, and it's what makes the plate look like a real dish instead of a flat sticker.
💡 Tip: Keep the rim thin. A thick band turns the plate into a cake stand or a drum.
Step 7: Draw the wicks and flame circles
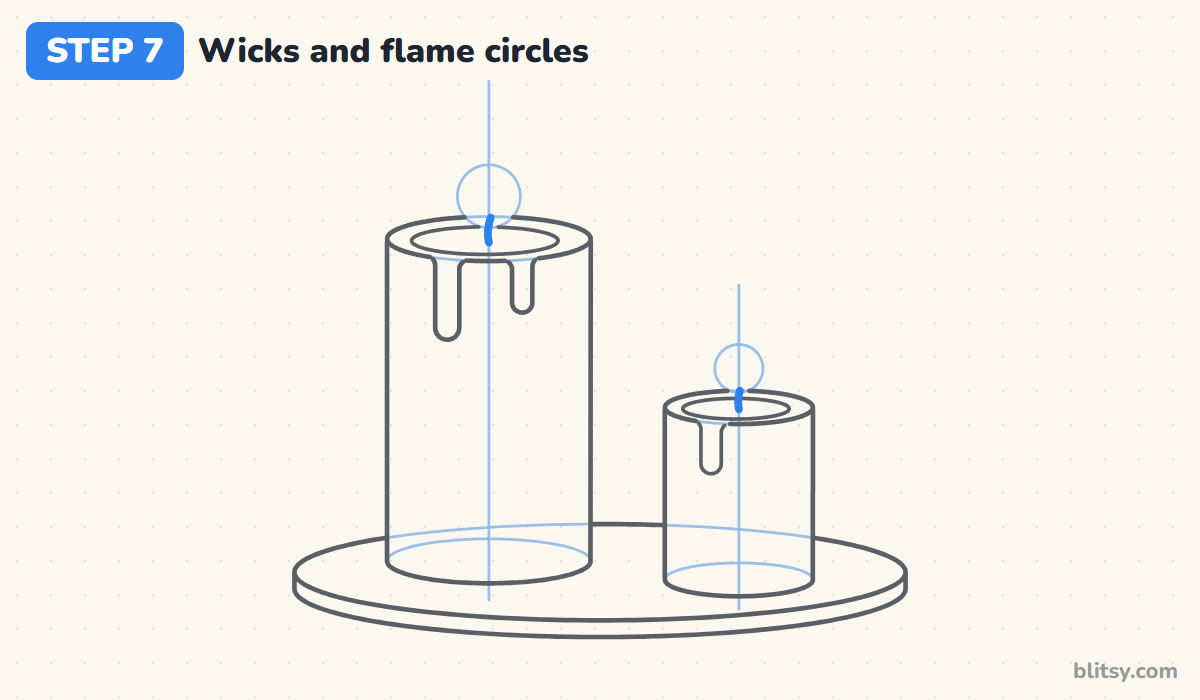
In the center of each wax pool, draw a short, slightly bent wick. Above each wick, sketch a light circle. The circle sets the round bottom of the flame, so its lower edge should sit just above the top of the candle. The tall candle gets the bigger circle.
💡 Tip: Bend the wick a little to one side. A perfectly straight wick looks like a nail.


Step 8: Shape two teardrop flames
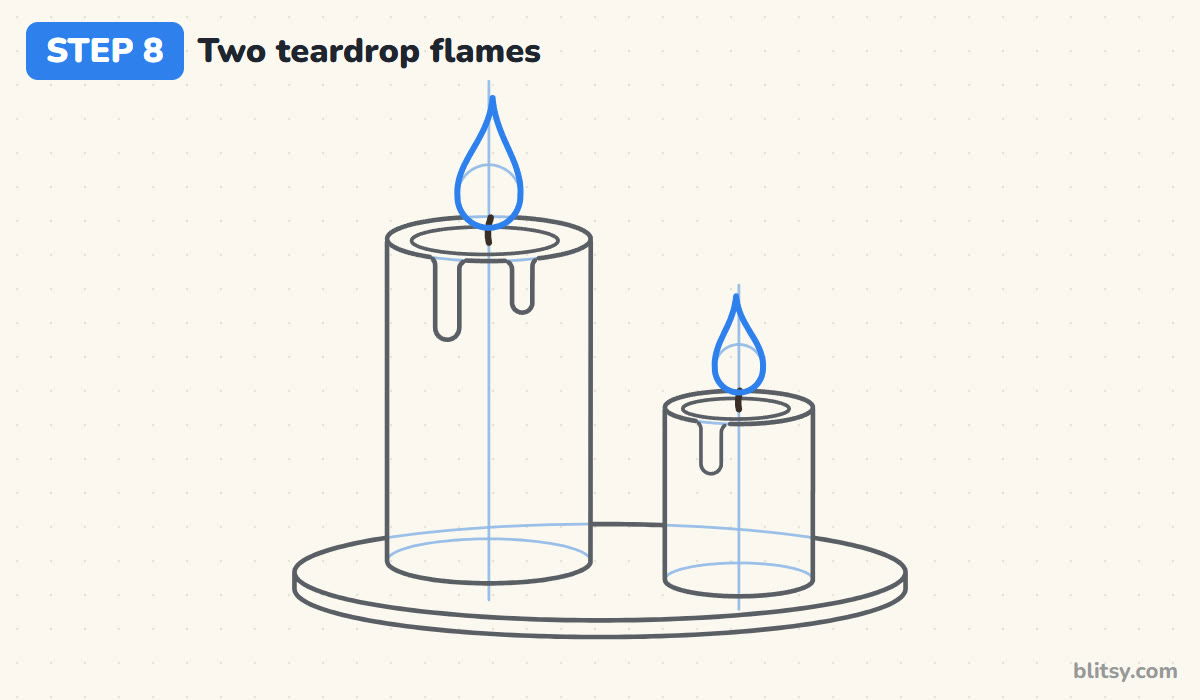
Trace around the bottom of each circle, then let both sides sweep upward and meet in a sharp point well above it, about one circle width higher. That's the teardrop flame. Let the tip lean a hair to one side so it looks like it's flickering.
💡 Tip: Keep the bottom round and only the top pointed. If both ends are pointy, the flame turns into a leaf.
Step 9: Add the inner flame and a blue base
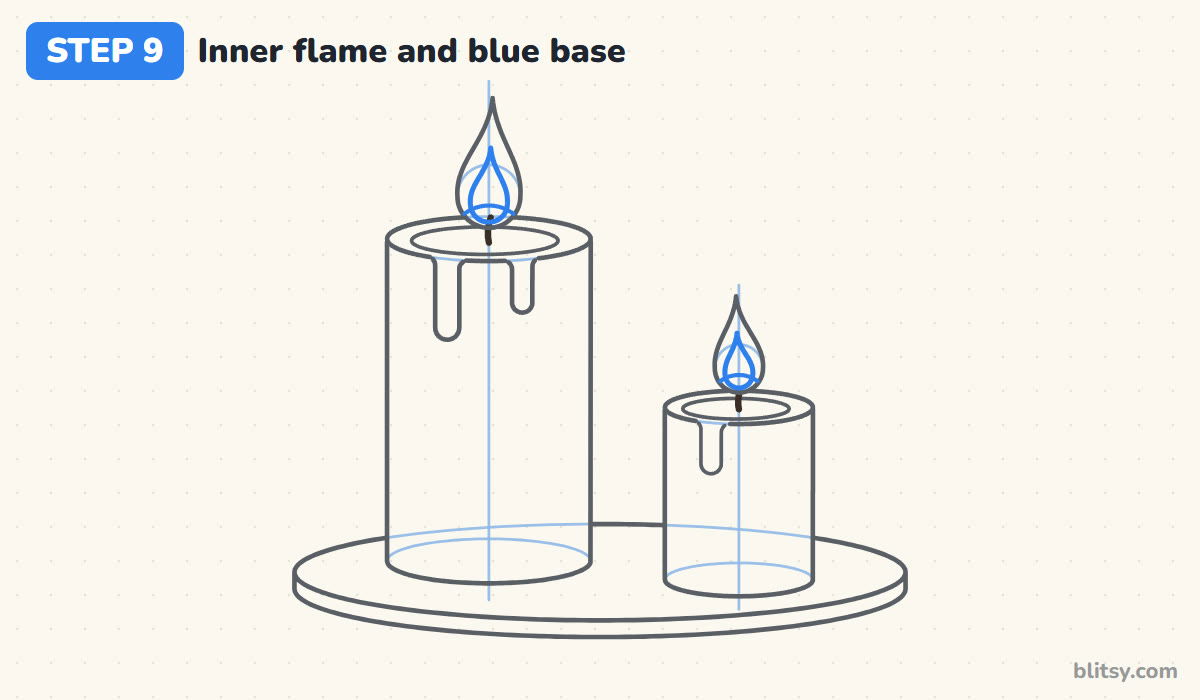
Inside each flame, draw a smaller teardrop that sits low, closer to the wick. This becomes the orange heart of the flame. Then draw one curved line across the very bottom of the flame, bowing upward. The small cup shape under it is the blue part that real candle flames have right above the wick.
💡 Tip: Leave a clear gap between the inner and outer flame. The yellow band needs room to show.
Step 10: Draw little glow lines
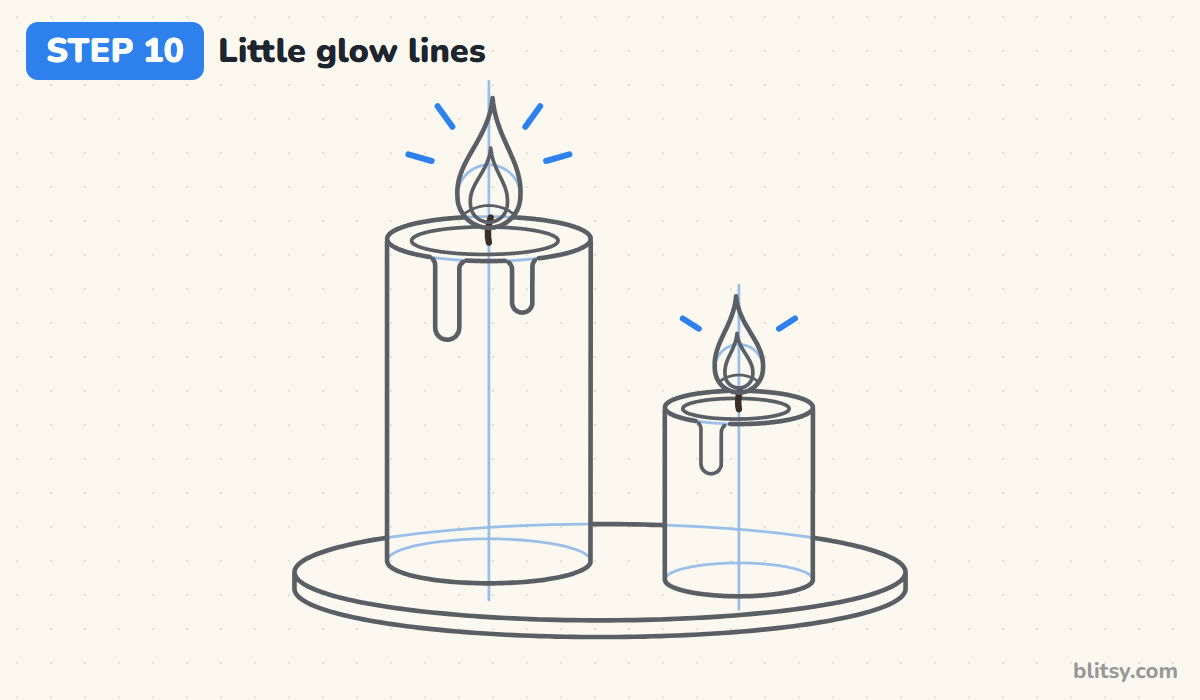
Around the tall flame, add four short straight lines pointing away from it, two on each side, and two more around the small flame. Leave space between the lines and the flame so they float. They show the light without any shading.
💡 Tip: Skip the line straight above the flame tip. It crowds the point and makes it look like an antenna.
Step 11: Ink the candles and erase the guides
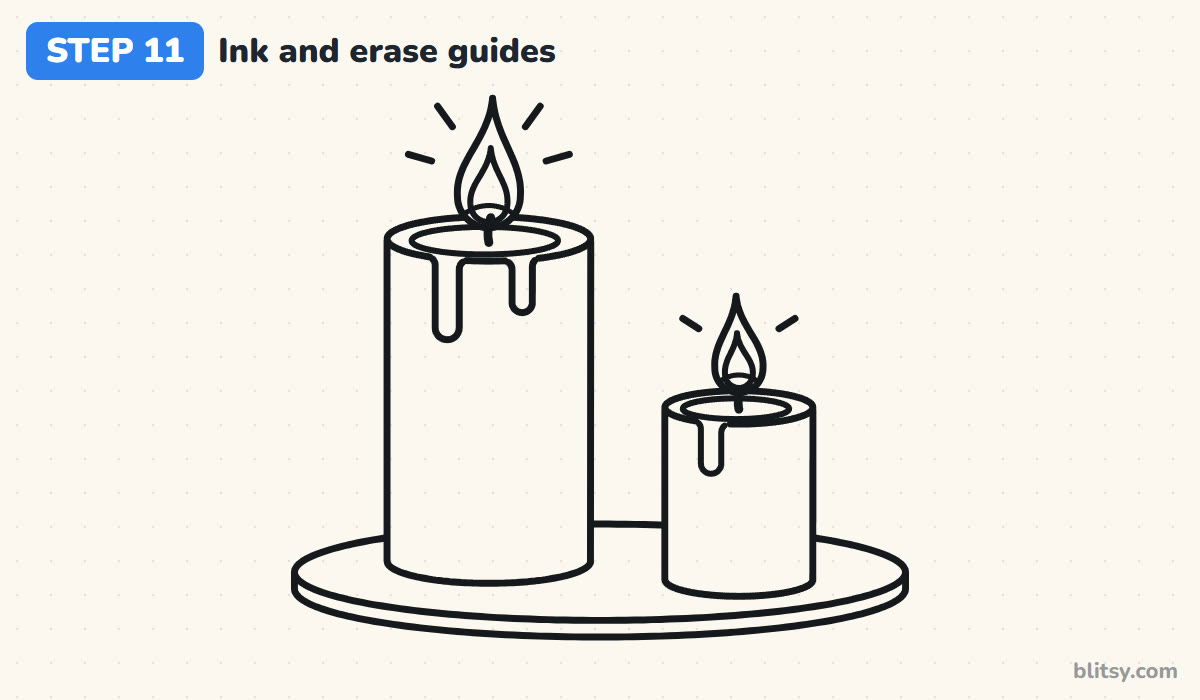
Go over every keeper line with the black marker. I ink the flames first while my hand is steady, since their tips are the hardest part. Let the ink dry fully, then erase the center lines, the guide ellipses and the flame circles.
💡 Tip: Ink the ellipses in two half strokes that meet at the sides. Your hand stays in control and the curve stays even.


Step 12: Color your candles
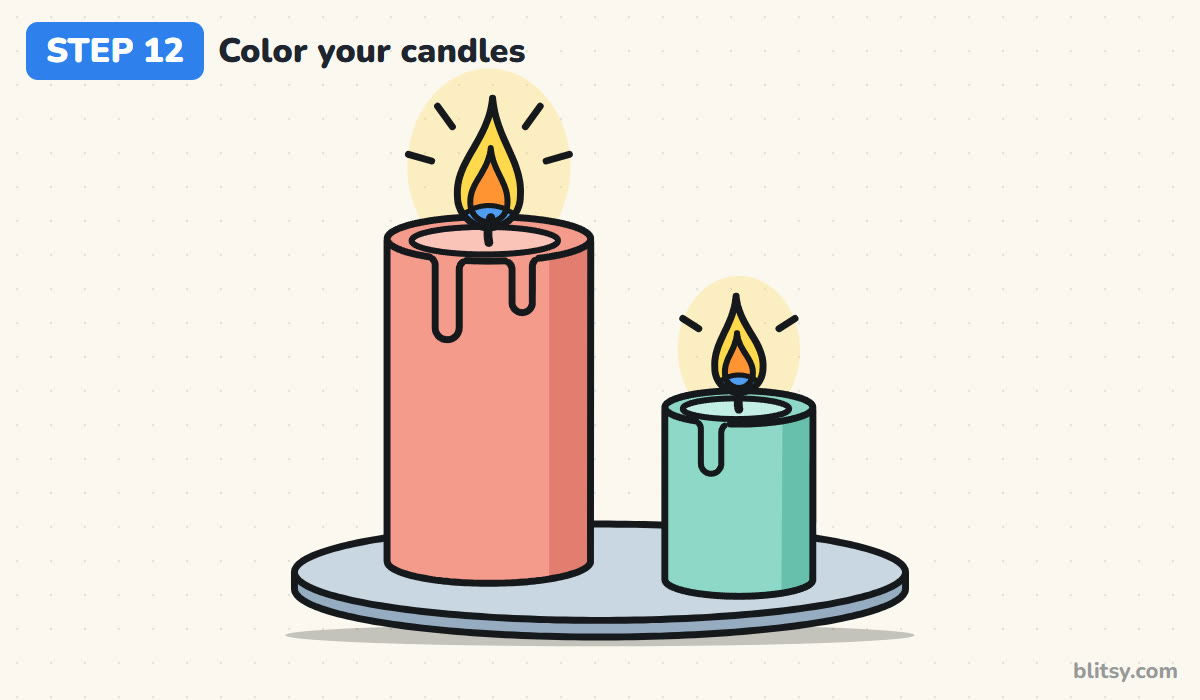
Color the tall candle coral pink and the short one mint green, pressing a little harder on the right side of each for a soft shadow. The wax pools get a lighter shade. Flames are yellow outside, orange inside and blue at the base. Make the plate light blue gray and add a pale yellow glow behind each flame.
💡 Tip: Color the glow very lightly and fade it out at the edges. A dark yellow circle looks like a sticker behind the flame.
Why Candle Drawings Sometimes Look Flat
- A straight line for the top. From above a little, a candle top is an ellipse. Draw the whole oval and the candle turns round at once.
- A flat bottom edge. The bottom of a cylinder curves down like the bottom half of an ellipse. Match it to the top curve.
- Ellipses with pointed ends. An ellipse is round at both sides, like a squashed circle. Draw it quickly and lightly, then fix it.
- A flame shaped like a leaf. Only the top of the flame is pointed. Keep the bottom round and wide.
- Drips that float. Each drip has to start at the rim. If there's a gap above it, it looks like a stripe instead of wax.
From One Pillar to a Candle Shelf
Once the cylinder feels easy, change its size. A row of three candles from tall to short makes a cozy shelf picture, and a thin taper candle in a holder is the same idea with narrow ellipses. Try stripes or a heart painted on the wax, or set a small jar candle next to the pillars. Smaller kids can skip the drips and the glow lines and still end up with a clear candle. To practise bigger, wilder fire, my flames drawing tutorial turns the same teardrop into a whole campfire. The light bulb drawing tutorial uses glow lines just like these, and the birthday cake drawing tutorial puts tiny lit candles on top of a cake.
Free Candle Coloring Page and Printable Steps
The free candle coloring page has a colored model at the top, a color key that matches each part, and a large outline to color underneath. The step-by-step PDF guide has all 12 steps with pictures and tips, so you can draw without a screen. Both print well on Letter or A4 paper.
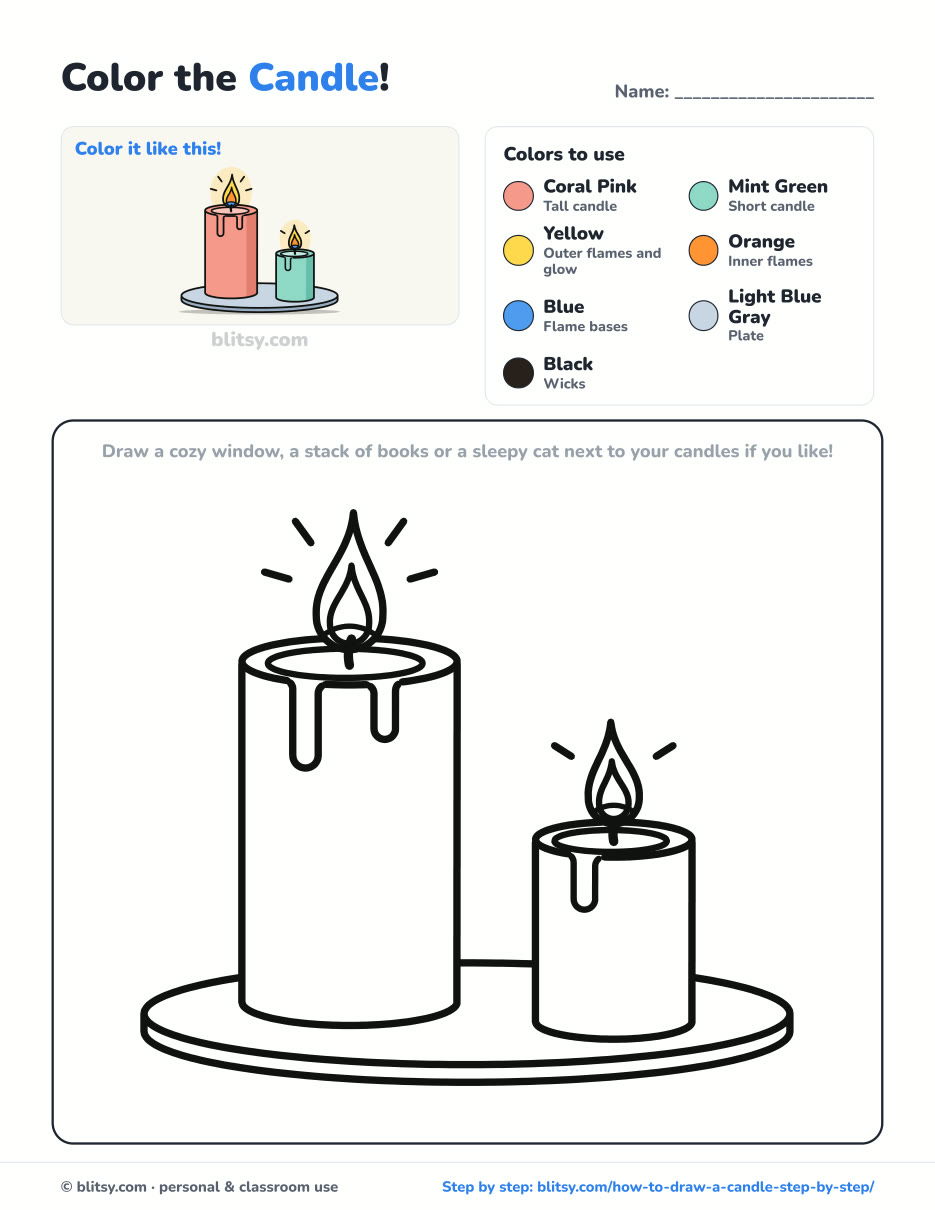
Black outlines with a colored example and the color names at the top. Ready to print and color.
⬇️ Download Coloring PageEvery step picture with its instructions and tips, to keep beside your paper while you draw.
⬇️ Download Drawing Guide📱 On a phone? Tap a download button, then open the file and choose Share → Save to Files or Print. On a computer, the PDF opens or saves straight to your Downloads folder.
Candle Steps on One Tall Picture
More Glowing and Cozy Things to Draw
Each of these is a full step-by-step tutorial with a picture for every stage and a free coloring page.
- Flames Drawing: Turn the teardrop flame into a crackling campfire with logs and stones in this how to draw flames step by step lesson.
- Light Bulb Drawing: Draw an old-style bulb with a curly filament and yellow rays with this light bulb drawing tutorial.
- Birthday Cake Drawing: A two-tier cake with dripping frosting and three lit candles grows from simple ovals in this birthday cake drawing tutorial.
- Cupcake Drawing: Draw a big kawaii cupcake with a swirl of frosting and a cherry using this cupcake drawing step by step guide.
- Jack O Lantern Drawing: Carve a friendly pumpkin face with a warm glow inside in this jack o lantern drawing tutorial.
Candle Drawing Questions Beginners Ask
What is the easiest way to draw a candle?
Draw two same-size ellipses, one above the other, and join their sides with straight lines. Add a small wick on top and a teardrop flame above it.
How do you draw a candle flame?
Start with a small circle above the wick, trace its bottom, then bring both sides up to a sharp point. Add a smaller teardrop inside for the orange center.
What colors is a candle flame?
Yellow on the outside, orange in the middle and a little blue at the very bottom near the wick. A pale yellow glow around it makes it look lit.
How do you draw wax drips on a candle?
Leave a small gap in the front of the top rim, then draw two lines down from it that end in a round tip. Make the drips different lengths so they look natural.
Light up a blank page with your own pair of candles, and don't worry if the first ellipse comes out wobbly. The second one always looks better. 🕯️✏️
Related posts:
 How to Draw a Car Step by Step (Easy Drawing for Beginners)
 How to Draw a Whale Step by Step (Easy for Beginners)
 How to Draw an Arctic Fox Step by Step (Easy for Beginners)
 How to Draw a Chicken Step by Step (Easy for Beginners)
 How to Draw a Snowman Step by Step (Easy for Beginners)
 How to Draw an Airplane Step by Step (Easy Jet for Beginners)
 How to Draw a Mouse Step by Step (Easy for Beginners)
 How to Draw a T-Rex Step by Step (Easy for Beginners)
 How to Draw a Pig Step by Step (Easy for Beginners)
 How to Draw a Minion Step by Step (Easy for Beginners)
 How to Draw a Yorkie Step by Step (Easy for Beginners)
 How to Draw a Notebook Step by Step (Easy for Beginners)

