
An umbrella looks like a simple half circle until you try to draw one and it comes out flat as a slice of pie. This lesson fixes that, and it shows you how to draw an umbrella step by step so the canopy actually looks round and open. We'll make a red and yellow umbrella, tipped a little to one side, with rain bouncing off the top and a puddle waiting underneath.
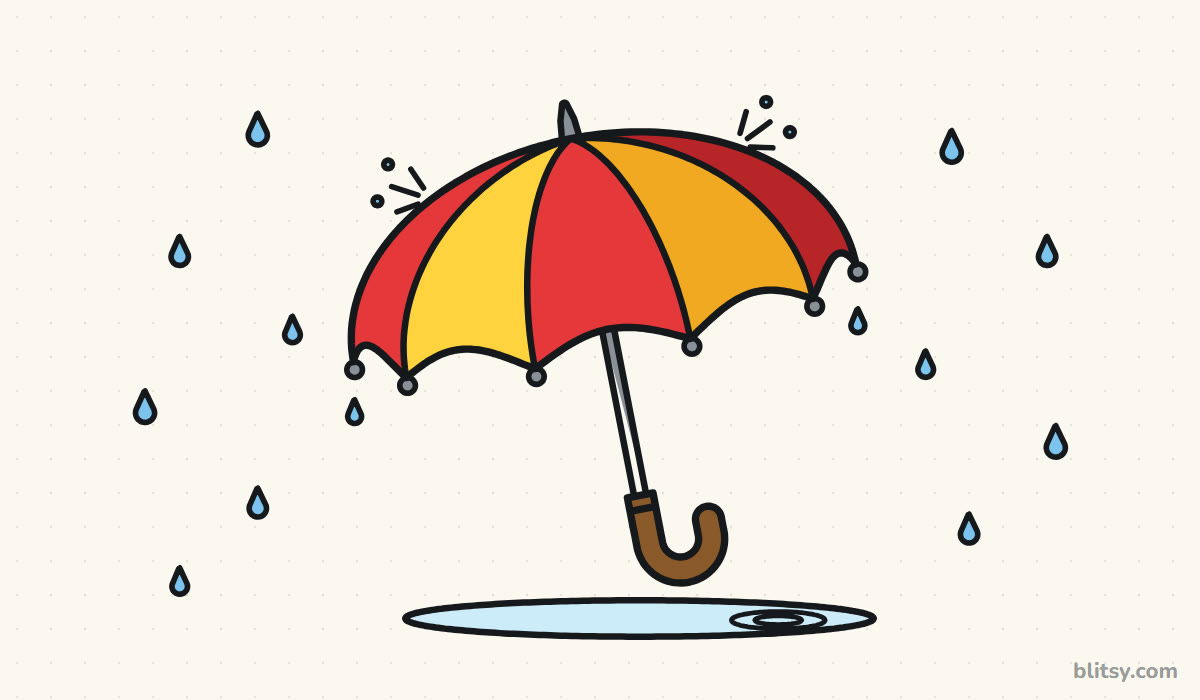
Two colors guide you through the umbrella pictures: blue for the lines to add now, gray for earlier work, and the pale blue helper shapes get erased near the end, so keep them faint.
Quick overview
⏱️ Time: about 25 minutes
🎯 Level: easy, good for kids around 7 and up
✏️ Steps: 11
☂️ You'll draw: an open umbrella in the rain above a puddle
Tools for a Rainy Day Sketch
- A pencil you can press lightly with (HB works well)
- An eraser, ideally a soft white one
- A black marker or fine felt-tip pen for the final lines
- Coloring pencils or markers in red, yellow, dark red, dark yellow, brown, gray, light blue and pale blue
- A sheet of plain paper turned sideways
If you're missing the darker red and yellow, press harder with the normal ones on the two right panels.
How to Draw an Umbrella Step by Step
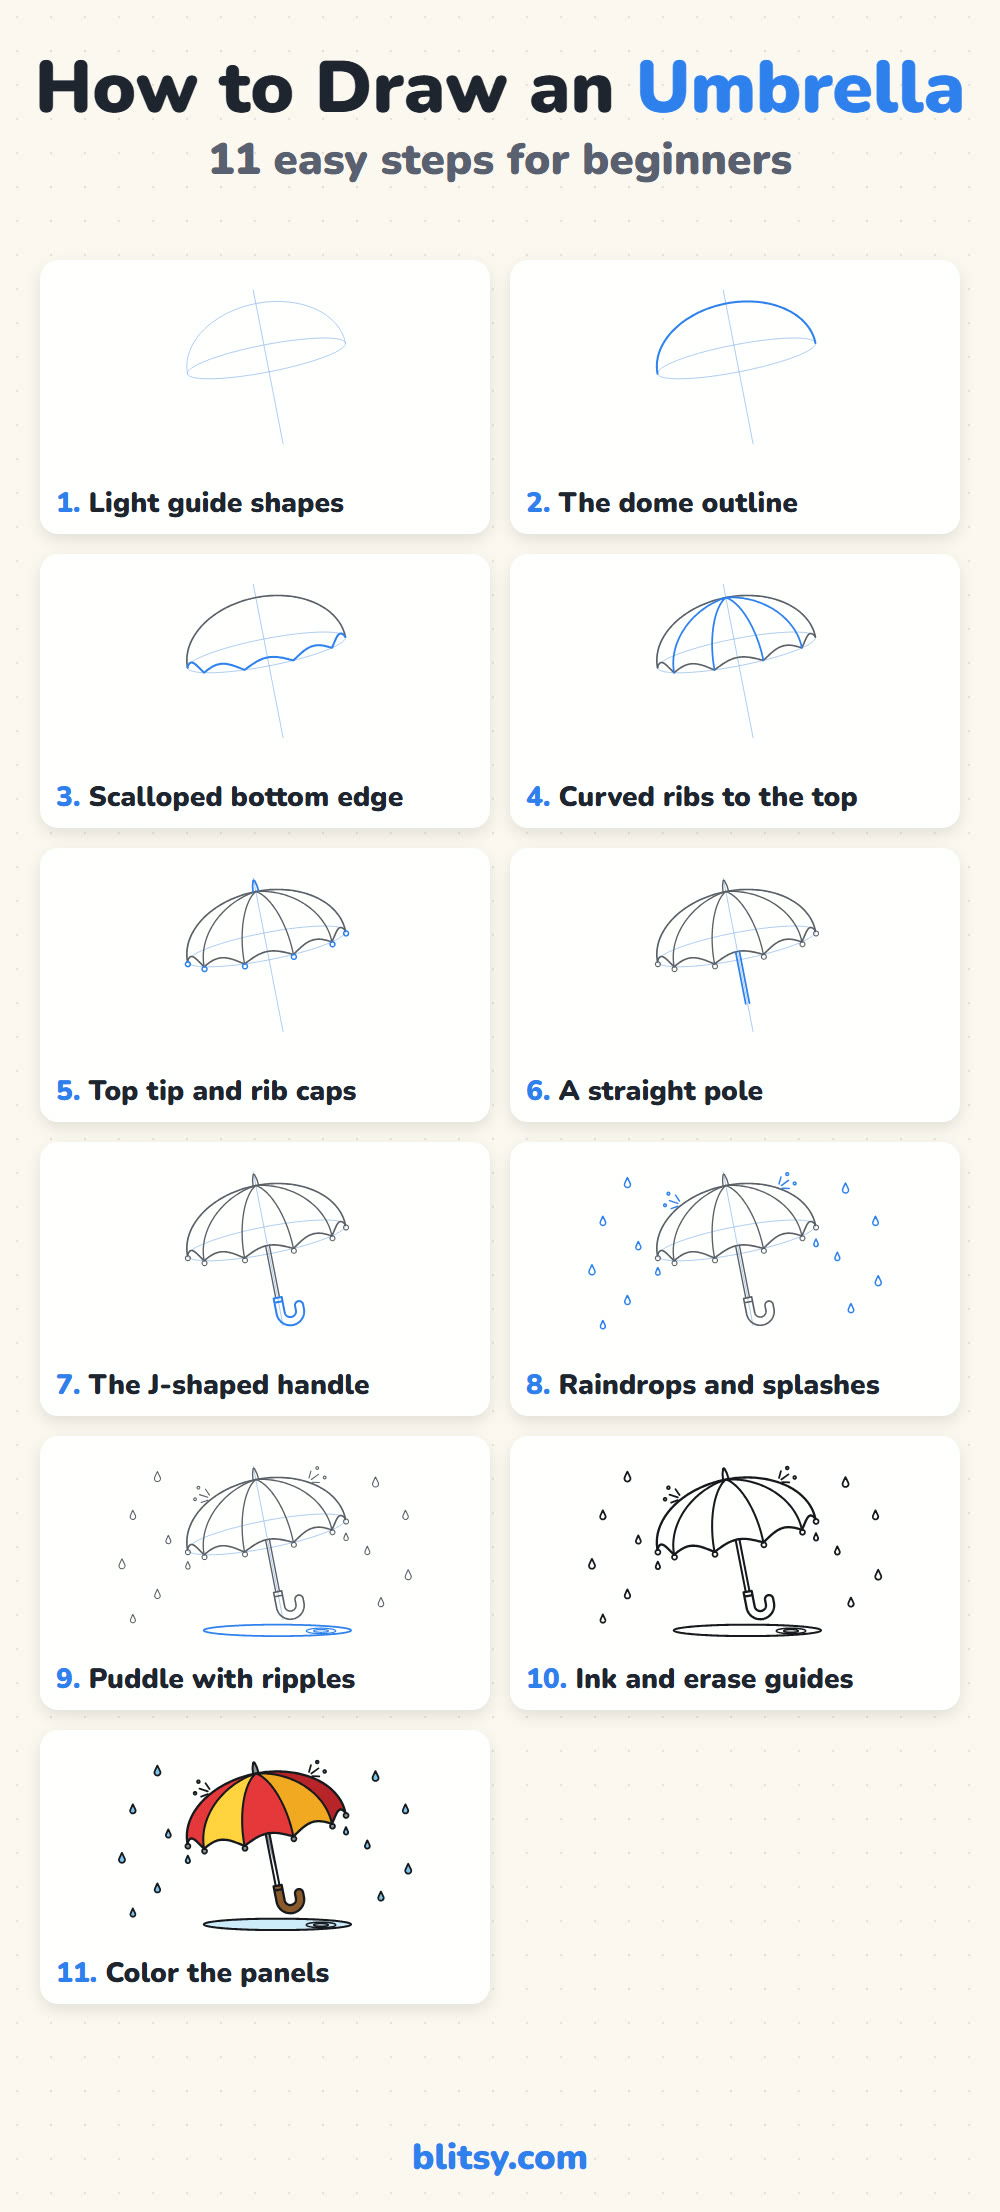
Step 1: Sketch a dome and a flat oval
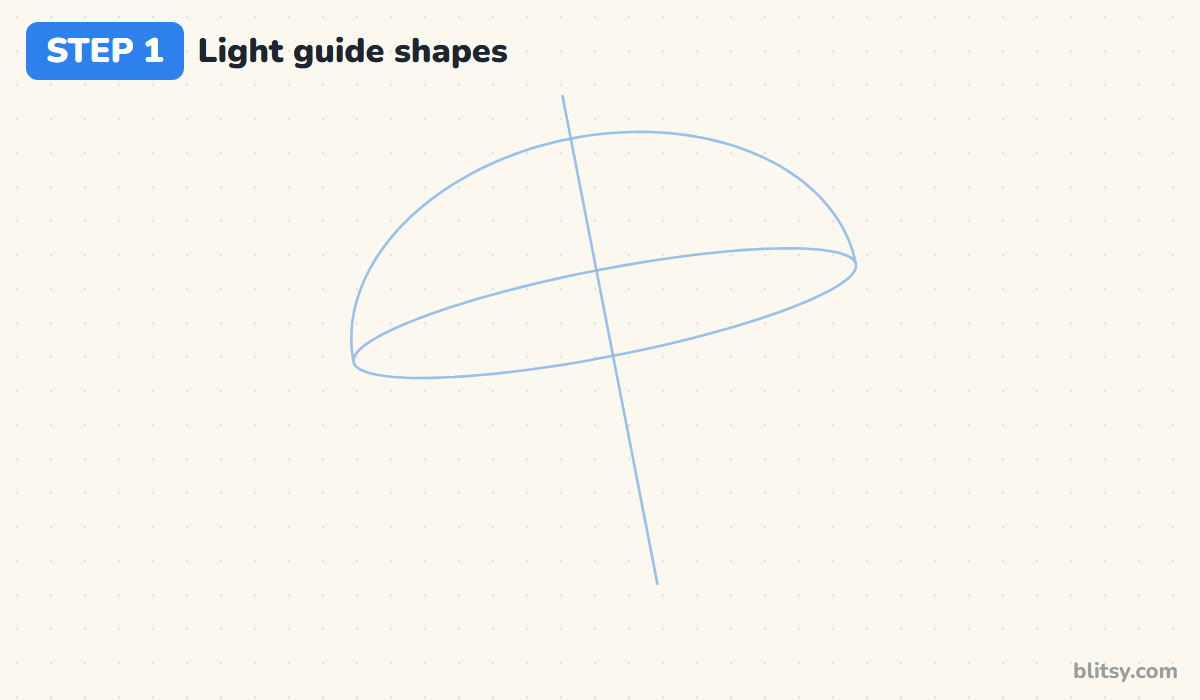
Draw a wide, low dome across the upper middle of your page, a bit like the top half of an egg lying on its side. Its two ends sit on a long, thin oval that marks the bottom rim. Then draw a straight line through the middle of the dome and down past the oval, leaning slightly; this is where the pole will go. I tilt the whole thing a little because a perfectly straight umbrella looks stiff.
💡 Tip: Keep the oval thin. A fat oval makes it look like you're staring up into the umbrella.
Step 2: Trace the outer curve of the canopy
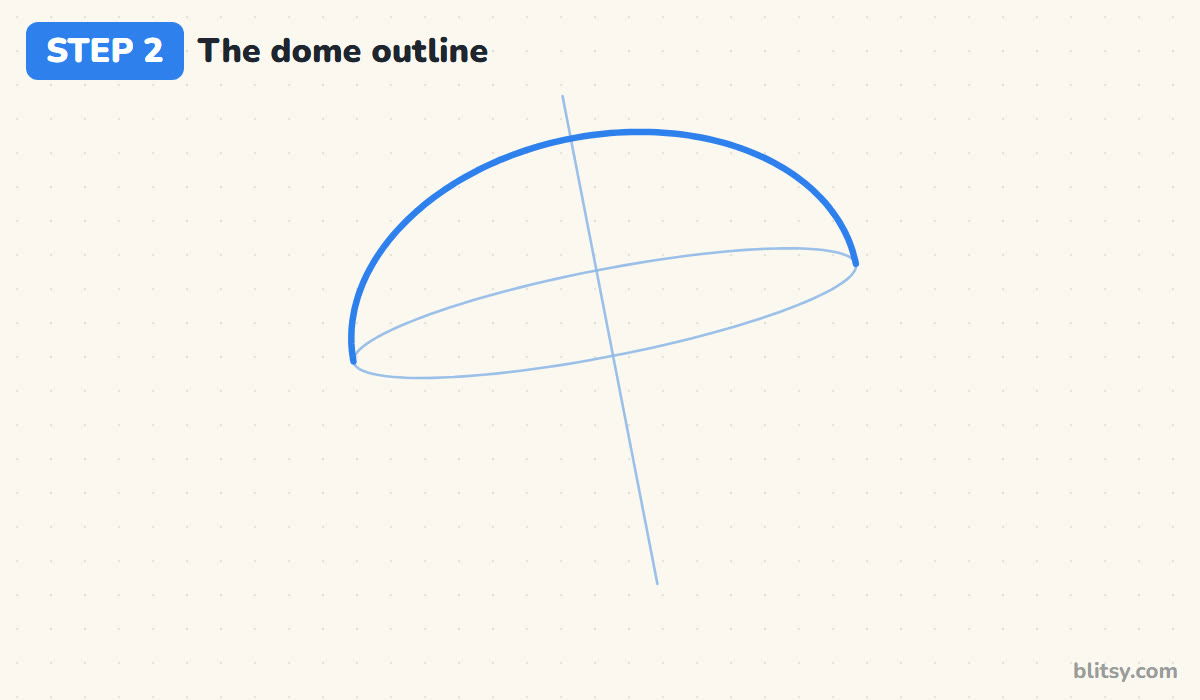
Go over the dome guide with one smooth line, from its left end, over the top, down to its right end. Stop right where it touches the oval on each side. This curve is the outline of the canopy, so take it slowly and turn your paper if your hand starts to bump.
💡 Tip: Draw from your elbow, not your wrist, and the big curve stays rounder.
Step 3: Add the scalloped bottom edge
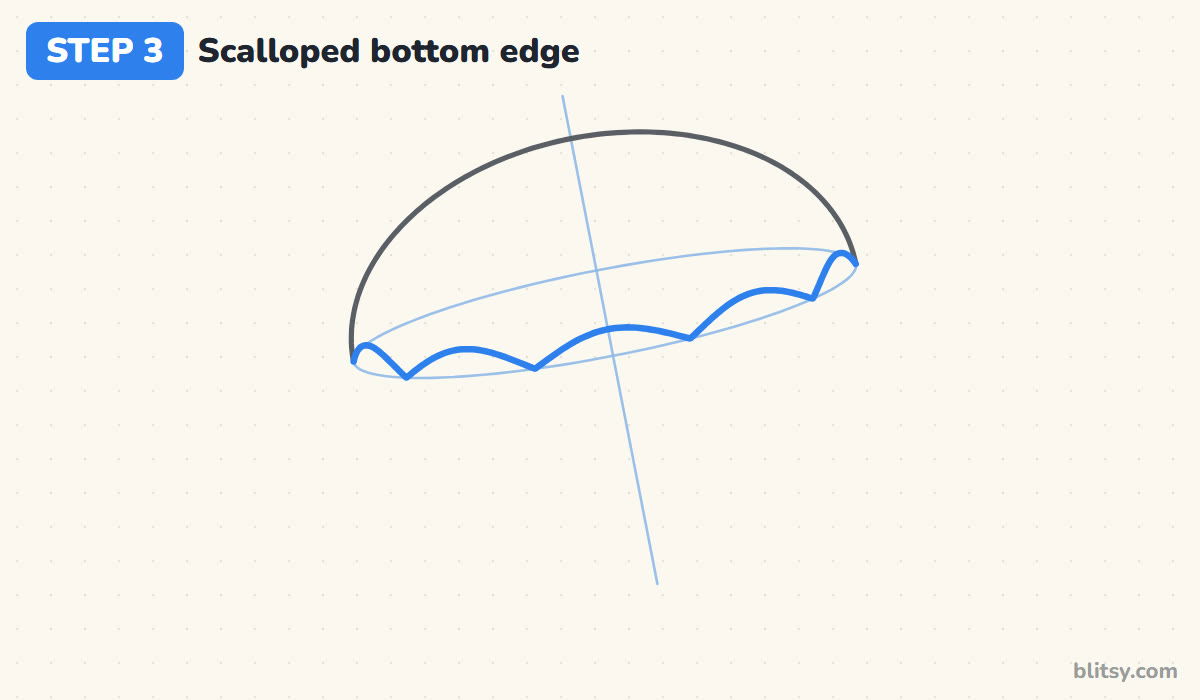
Mark six points along the front half of the oval: one at each end and four spaced between them. Now connect neighboring points with little arches that bend upward, toward the top of the umbrella. These arches are the fabric sagging between the ribs. Notice the arches on the right are narrower than those in front; they're turning away from you, so they get squeezed.


💡 Tip: Put the points down first, then join them; it keeps the arches an even size.
Step 4: Curve the ribs up to the top
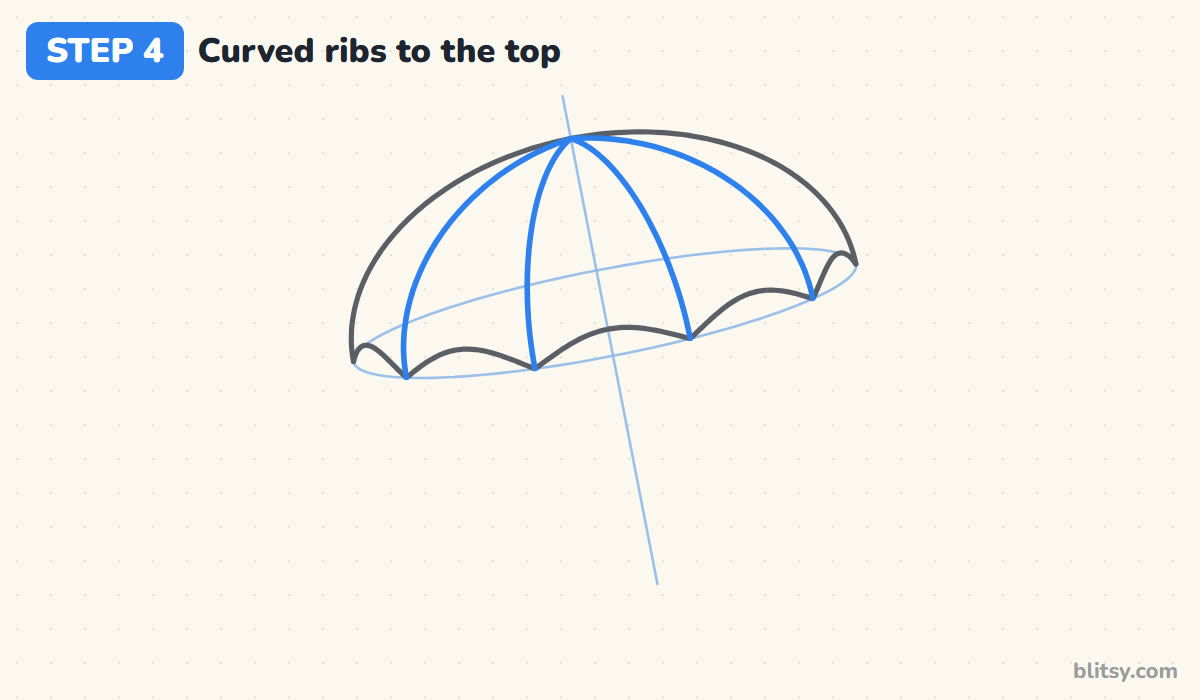
From each of the four middle points, draw a line up to the very top of the dome, where your center line crosses it. I never use a ruler here. Each rib should bow outward, following the round shape of the dome, and the ones near the sides bend the most. The middle ribs stay almost straight. In my experience, this one change is what makes the umbrella look full instead of flat.
💡 Tip: Before drawing a rib, trace its path in the air above the paper once.
Step 5: Put on the top tip and rib caps
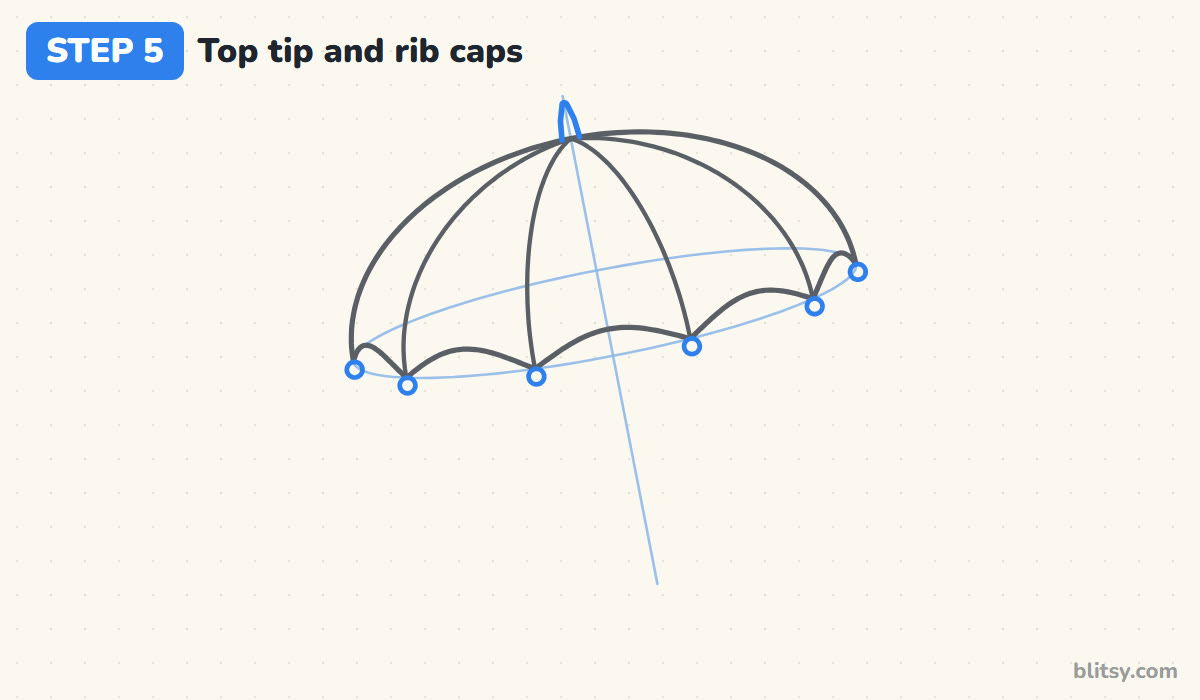
On top, where all the ribs meet, draw a small pointed tip sticking up along the center line. Then add a tiny circle at the end of every rib, just below each point of the scallops. Real umbrellas have these little caps so the metal ends don't poke anyone. I keep them small, about the size of a pea on the page.
💡 Tip: Make every cap the same size; one big cap stands out more than you'd expect.
Step 6: Drop a straight pole
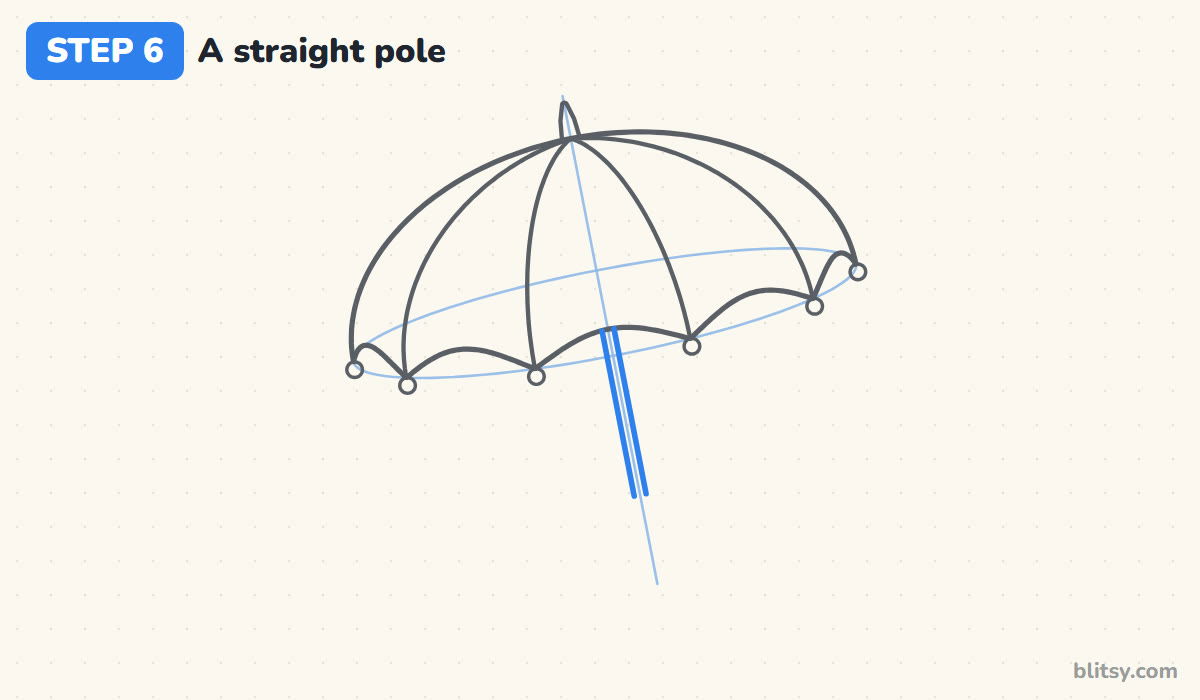
Follow the center guide line down from under the middle arch. Draw two close, parallel lines for a thin pole. The pole starts behind the scalloped edge, so begin your lines right at the arch and not inside the canopy. Stop when the pole is about as long as the dome is tall; a longer pole makes the canopy look small.
💡 Tip: Lay the side of your eraser along the guide if you need a straight edge to follow.
Step 7: Bend the J-shaped handle
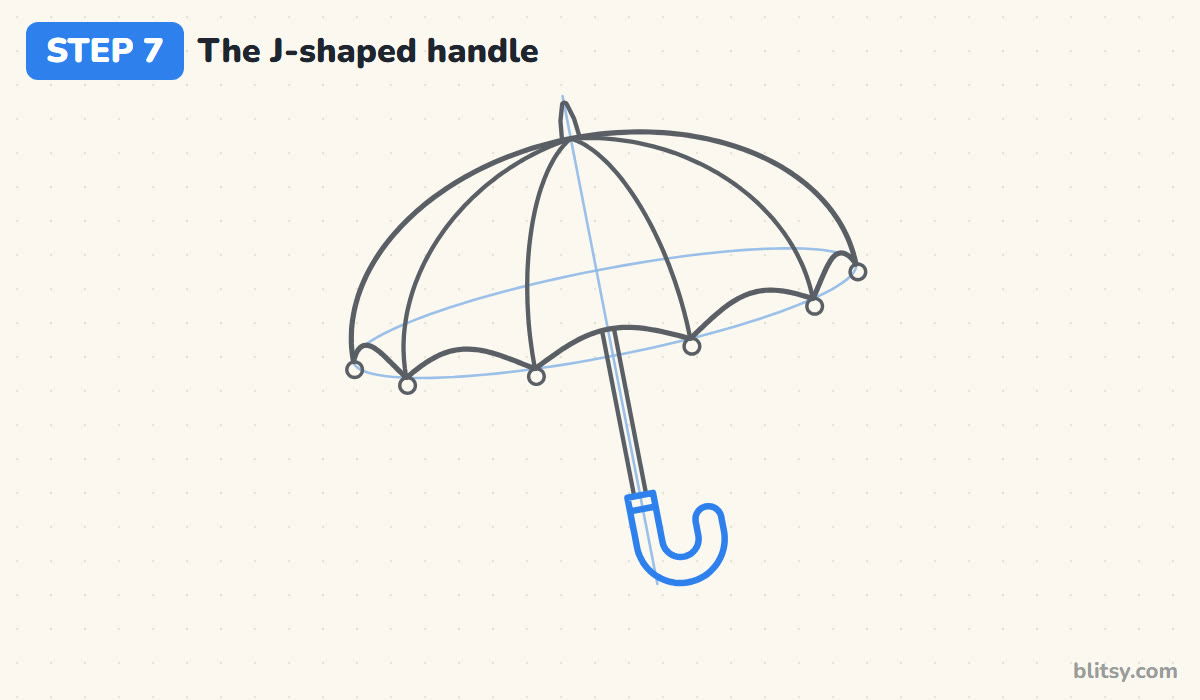
At the bottom of the pole, draw a short, wider tube for the grip, with a line across the top where it joins the pole. Let it continue down, then curve it around in a U and up again on the right, like the letter J. Round off the end of the hook. A handle that's a bit thicker than the pole looks easier to hold.

💡 Tip: Sketch the J as a single curvy line first, then draw its two sides around that line.
Step 8: Scatter raindrops and splashes
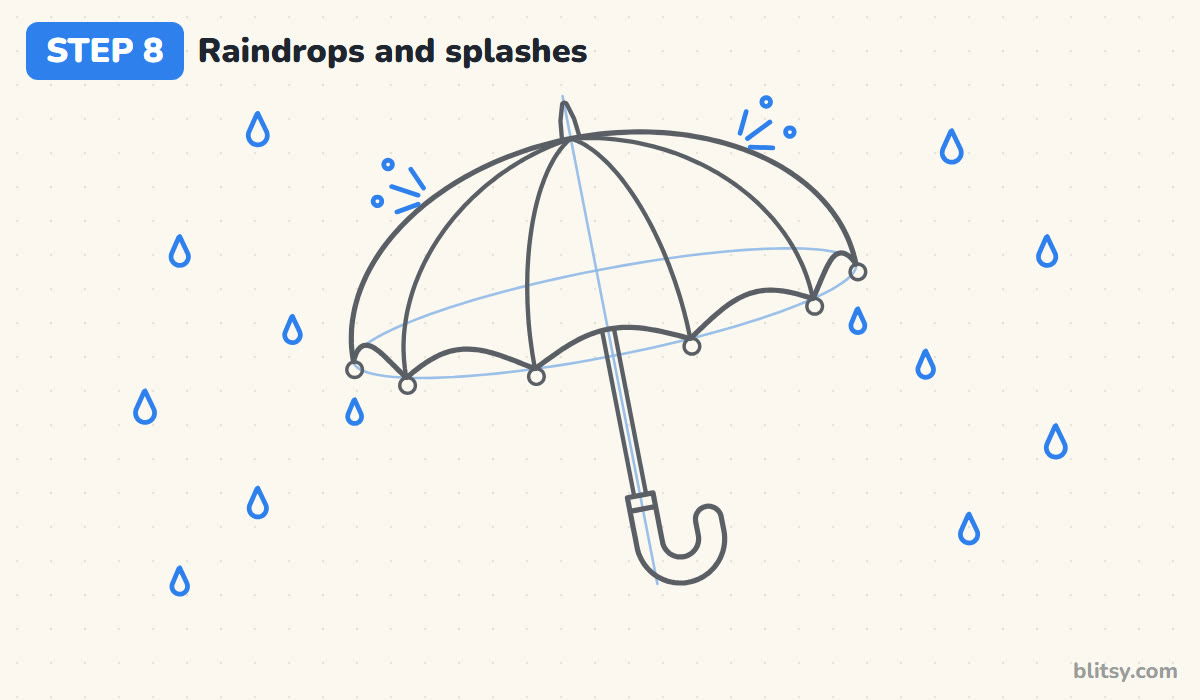
Fill the space on both sides with small teardrops, round at the bottom and pointed at the top. Stagger them so they don't form rows. Where rain hits the canopy, draw three short dashes fanning outward and two tiny dots; that's a drop bursting on the fabric. Then hang one drop just under each end cap, as if water is running off.
💡 Tip: Leave a little air around the umbrella so no drop touches its outline.
Step 9: Add a puddle with ripples
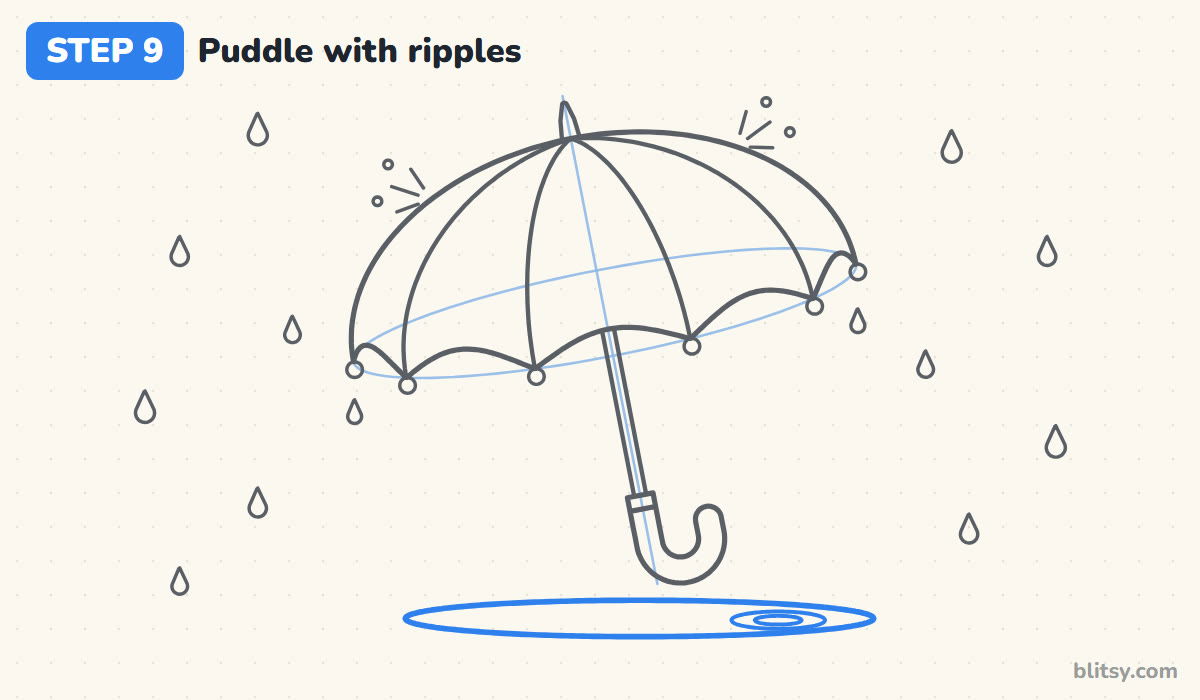
Under the handle, draw a long, very flat oval for the puddle, wider than the umbrella's hook by a lot. Keep a small gap between the hook and the water so the umbrella seems to float. On the right side of the puddle, draw two small ovals, one inside the other, for the ripples from a falling drop.
💡 Tip: Flatter puddles look like they're lying on the ground; taller ones look like holes.
Step 10: Ink the lines, then erase guides
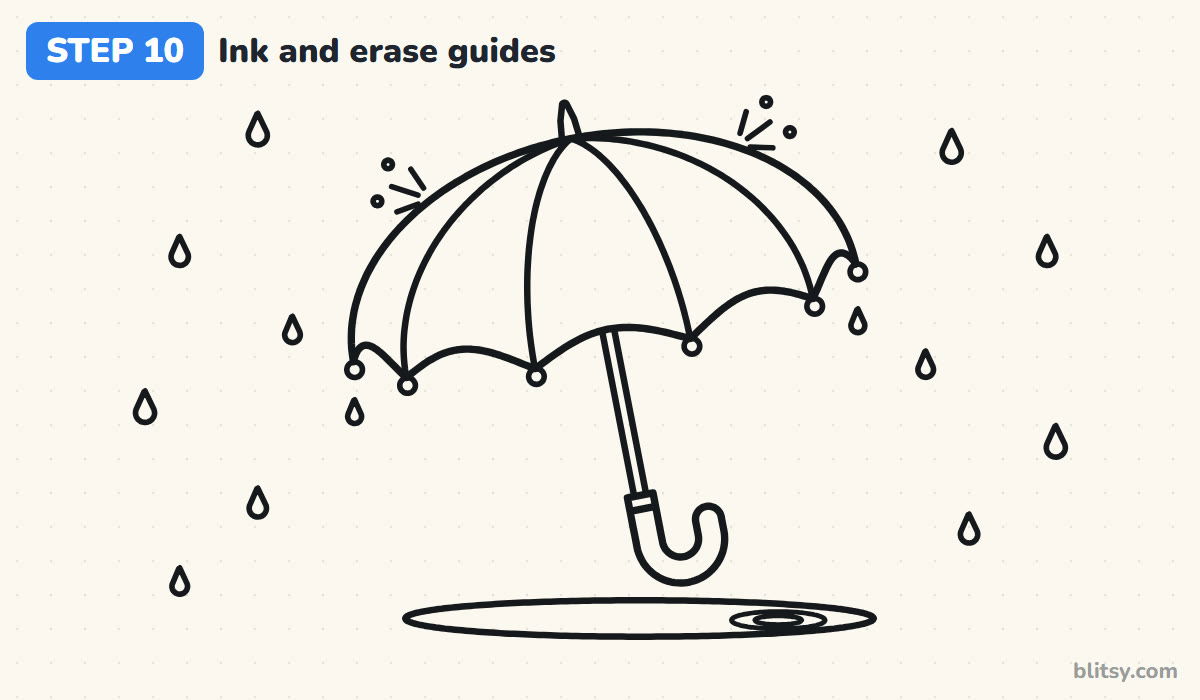
Go over every line you want to keep with a black marker: the canopy, ribs, caps, pole, handle, drops and puddle. Wait a minute for the ink to dry. Then erase the dome guide, the oval and the center line. Most beginners rush this part, and I've smudged plenty of my own drawings that way.
💡 Tip: Ink the long canopy curve first while your hand is fresh, and the tiny dots last.
Step 11: Color the panels red and yellow
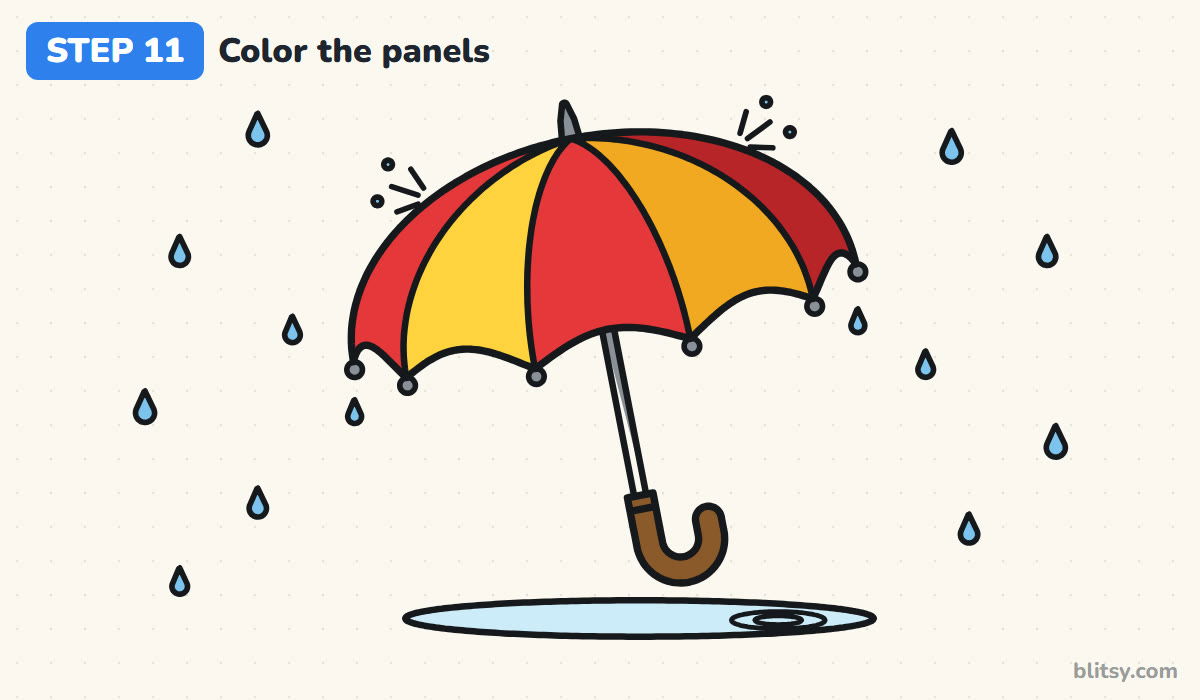
Color the first and middle panels red and the second one yellow. For the two panels on the right, use dark yellow and dark red. They're on the side away from the light, and that small change makes the canopy look curved. Finish with a brown handle, gray pole and caps, light blue drops and a pale blue puddle.

💡 Tip: Color each panel in strokes that follow the ribs, from the top down.
Fixes for a Flat or Wobbly Umbrella
- Drawing the ribs as straight lines. Straight ribs flatten the canopy into a paper fan. Bow each one outward, more near the sides.
- Making the bottom edge a straight line. A flat rim looks like a lampshade. Small upward arches between the rib ends show the stretched fabric.
- Starting the pole at the very top. You can't see the pole through the canopy. Begin it under the middle arch.
- Giving every arch the same width. The arches at the sides turn away from you, so draw them narrower than the front ones.
- Letting the handle touch the puddle. It looks like the umbrella is stuck in the water. Leave a small gap.
Patterns, Colors and Other Umbrella Ideas
Once the shape feels easy, I like to play with the panels. Polka dots on every other panel look cheerful, and a rainbow umbrella with one color per panel is a favorite with younger kids. You can also close the umbrella and draw it as a tall, wrapped point with a strap, or put it in a character's hand. A puffy sky fits right above this picture, so borrow some shapes from the cloud drawing tutorial, and if you want a rainy mood with more feeling, the sad cat drawing tutorial has a gloomy kitty under its own gray cloud.
Free Umbrella Coloring Page and Printable Guide
Print the umbrella coloring page and color it with the key at the top, which shows the red, yellow and shaded panels next to a small finished example. The big outline below leaves room for clouds or a rainbow. The step-by-step guide PDF has all 11 steps with their tips, so you can draw from paper instead of a screen. Both fit Letter and A4.
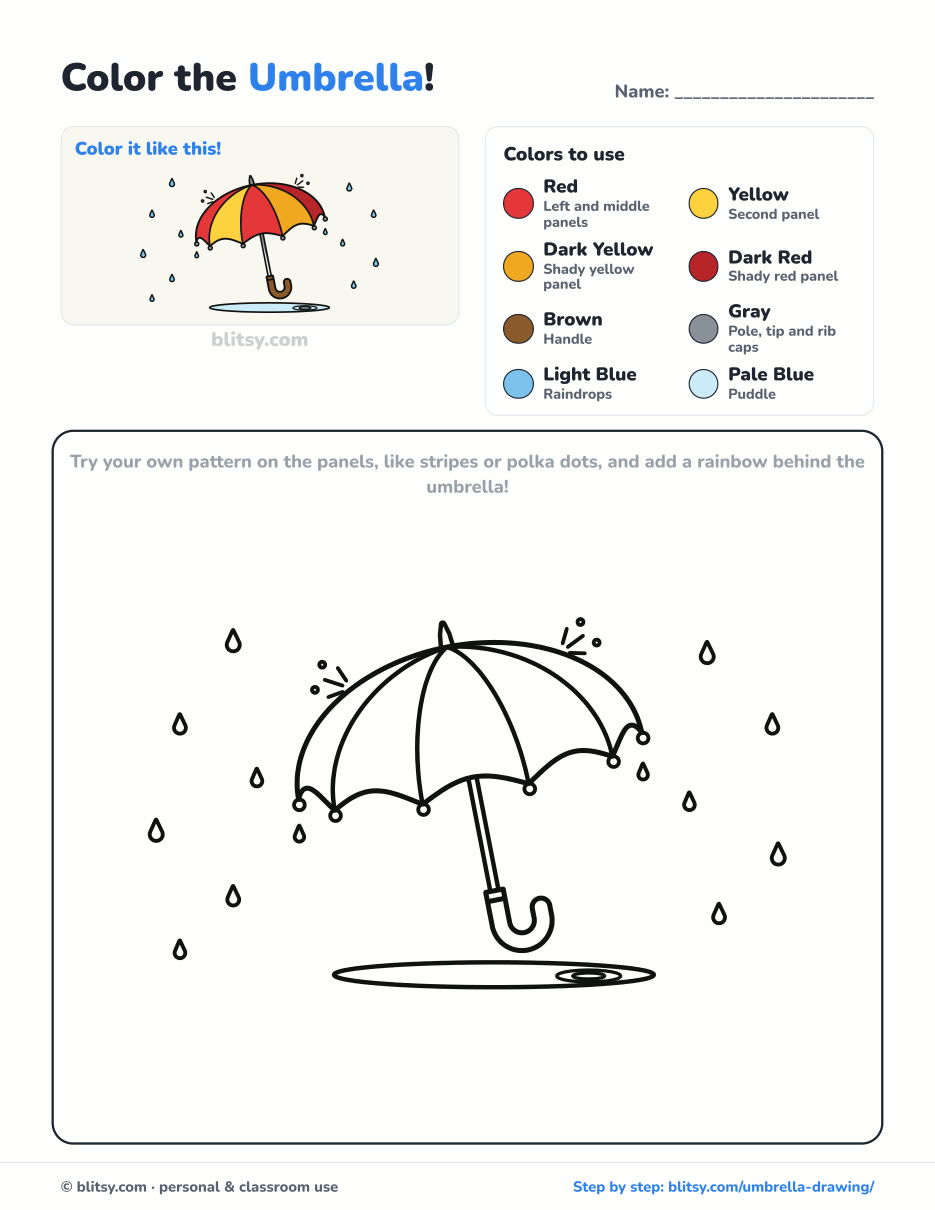
Black outlines with a colored example and the color names at the top. Ready to print and color.
⬇️ Download Coloring PageEvery step picture with its instructions and tips, to keep beside your paper while you draw.
⬇️ Download Drawing Guide📱 On a phone? Tap a download button, then open the file and choose Share → Save to Files or Print. On a computer, the PDF opens or saves straight to your Downloads folder.
Pin the Umbrella Steps for a Rainy Afternoon
Umbrella Drawing Questions Answered
What is the easiest way to draw an umbrella?
Start with a half circle, add wavy arches along the bottom and a J-shaped handle. Curved ribs are the next step up and make it look round.
How do you make an umbrella look 3D?
Curve the ribs with the dome, make the side arches narrower than the front ones, and color the panels on one side a little darker.
How many panels should an umbrella drawing have?
Many real umbrellas have eight panels, but you only see the front half. Four or five visible panels look right in a drawing.
Is this umbrella drawing good for kids?
Yes. Kids around seven can follow it, and younger ones can skip the curved ribs and the splashes and still get a nice result.
Pick your own panel colors next time, and see how a different pair changes the whole mood of the rain. ☔
Related posts:
 How to Draw a Sad Cat Step by Step (Easy Sad Face Lesson)
 How to Draw a Whale Step by Step (Easy for Beginners)
 How to Draw Lungs Step by Step (Easy Science Diagram)
 How to Draw a Pineapple Step by Step (Easy Crown and Slice)
 How to Draw Iron Man Step by Step (Easy Chibi for Kids)
 How to Draw a Dress Step by Step (Easy Party Dress)
 How to Draw a Chicken Step by Step (Easy for Beginners)
 How to Draw a UFO Step by Step (Cute Alien Saucer)
 How to Draw Flames Step by Step (Easy Campfire Drawing)
 How to Draw a Moon Step by Step (Sleepy Crescent + Phases)
 How to Draw a Sunflower Step by Step (Big and Bright)
 How to Draw a Fall Leaf Step by Step (Maple, Oak and Birch)

