
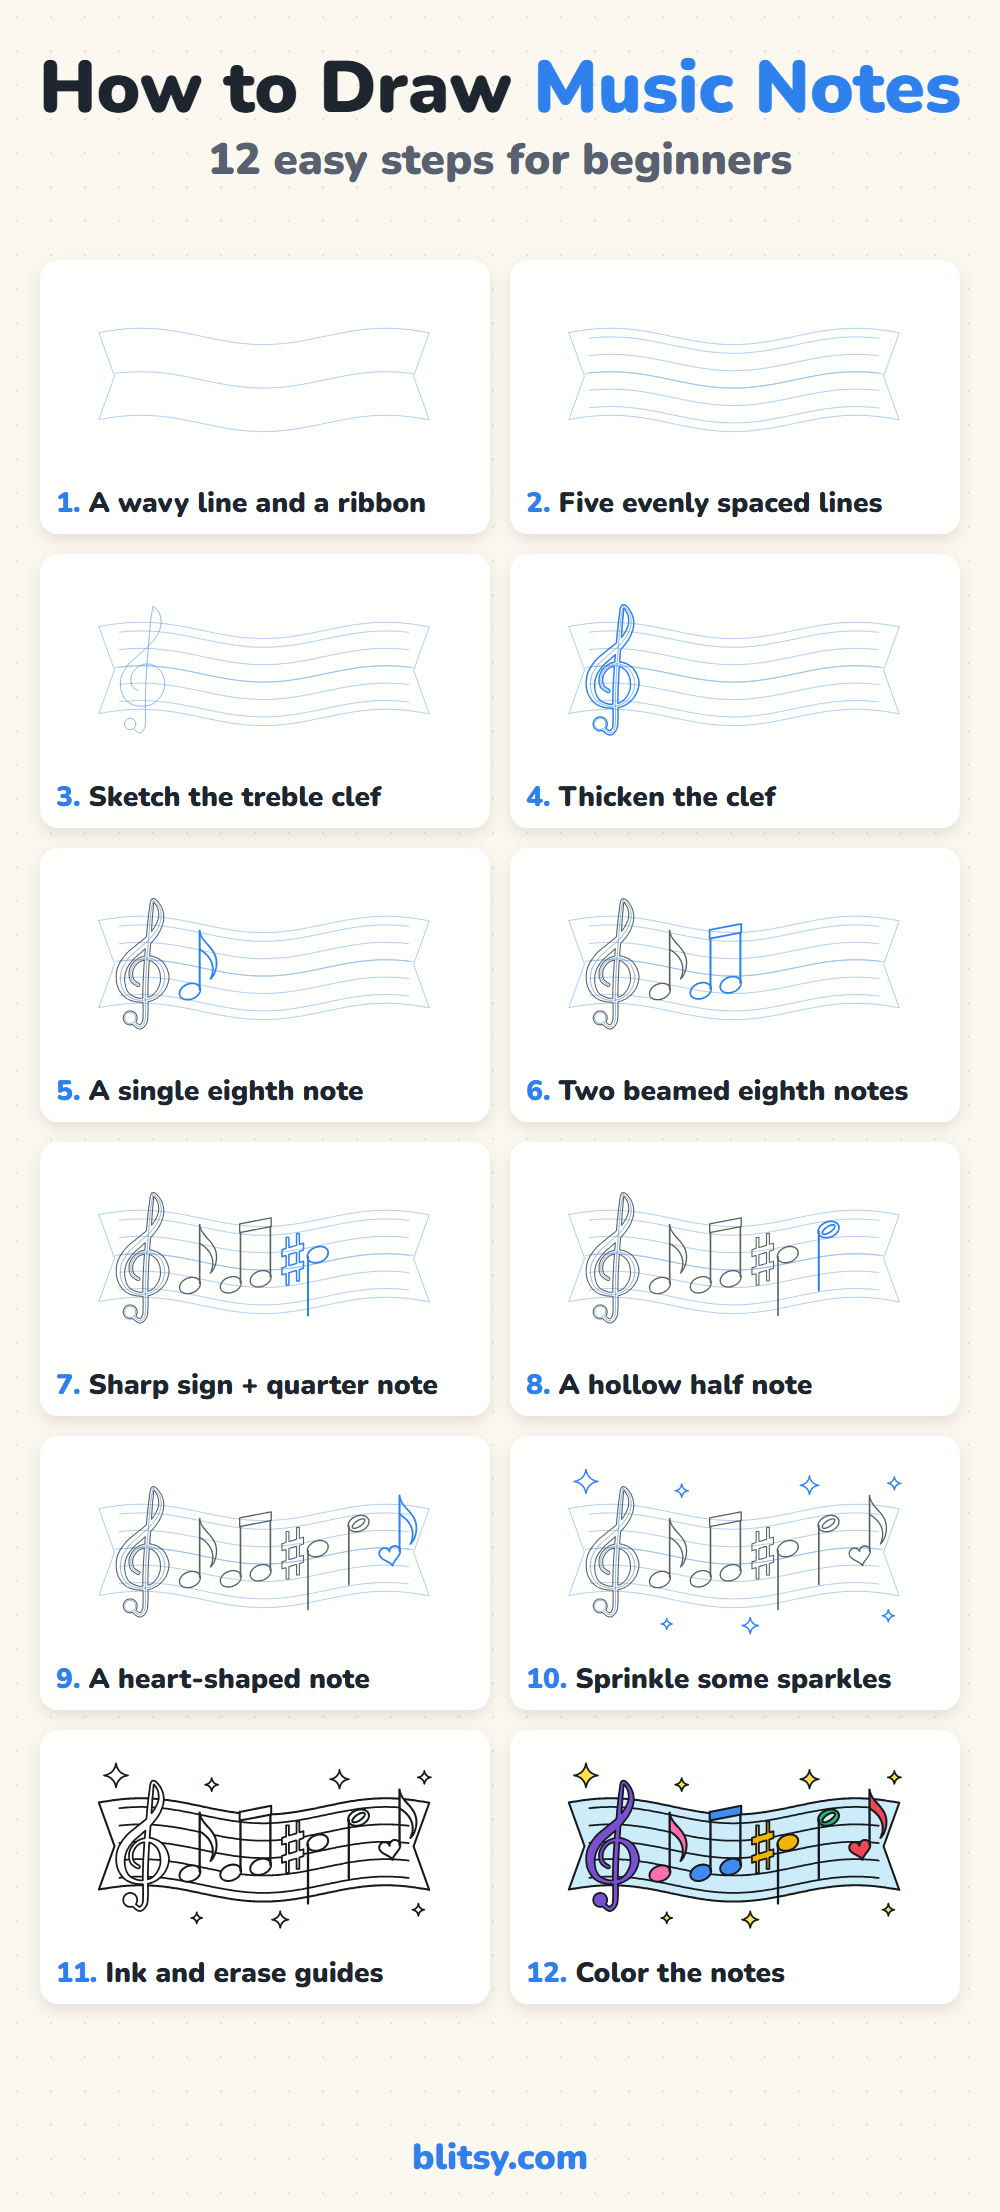
Music notes look simple until the treble clef turns into a pretzel on your page. Every symbol in sheet music is really built from a few plain shapes: tilted ovals, straight stems, curved flags and one long swirl. This lesson shows how to draw music notes step by step on a wavy staff ribbon, with the stems and flags placed where a musician would expect them.

Blue marks the lines you draw in that step and gray shows the earlier ones. The pale blue sketch lines vanish when you erase in step 11.
Quick overview
⏱️ Time: about 25 minutes
🎯 Level: easy, though the treble clef takes a little patience
✏️ Steps: 12
🎵 You'll draw: a treble clef, an eighth note, two beamed notes, a sharp with a quarter note, a half note and a heart note
Tools for a Tidy Music Staff
- A sharp pencil (an HB is fine)
- A soft eraser
- A black fineliner or felt pen
- Colored pencils or markers in eight colors (see step 12)
- Plain paper turned sideways
A ruler won't help with a wavy staff, so a slow, steady hand does the job better here.
How to Draw Music Notes Step by Step
Step 1: Sketch a wavy line and a ribbon
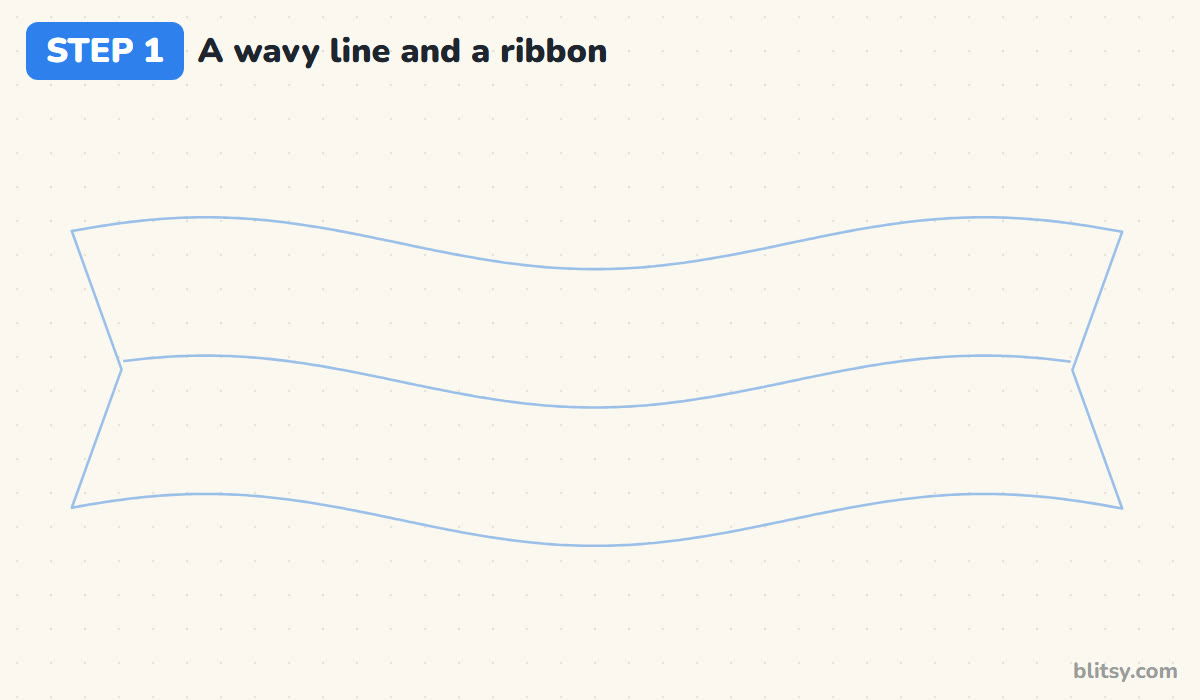
Turn your paper sideways and draw one long, gentle wave across the middle. Draw a matching wave above it and another below it to make a ribbon, then cut both ends with a V-shaped notch. I keep the wave soft on purpose, because steep hills would tip every note sideways later.
💡 Tip: Press lightly enough that one swipe of the eraser would clear it.
Step 2: Add five evenly spaced staff lines
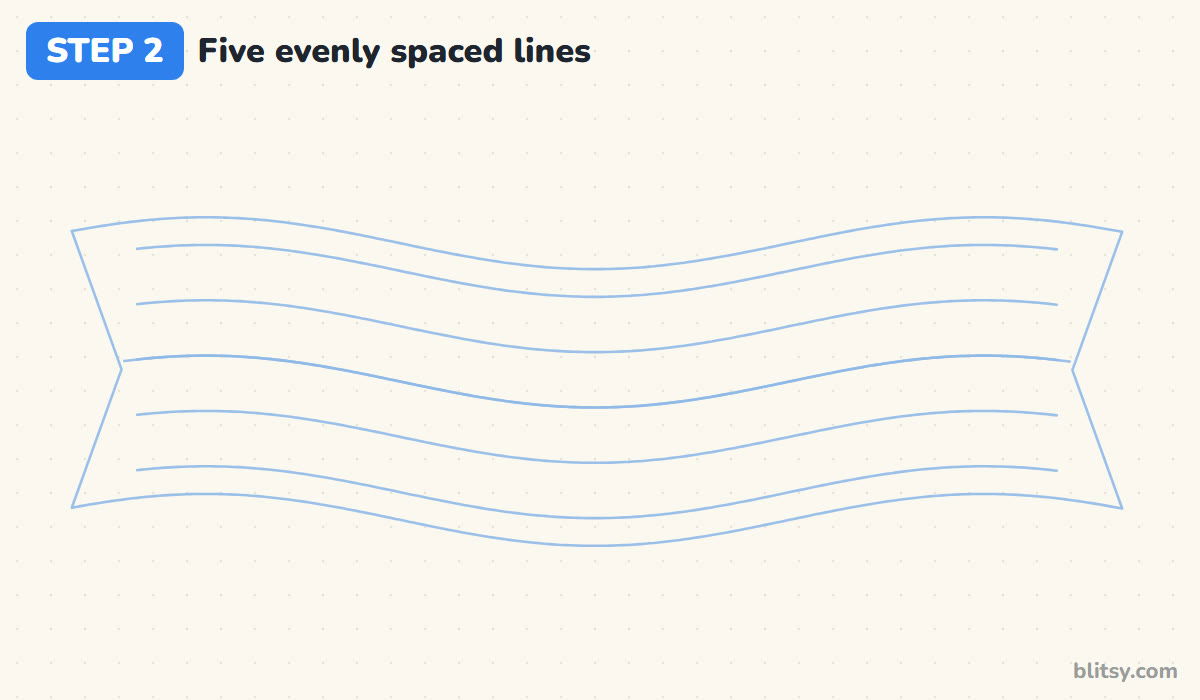
A music staff always has five lines and four spaces. Your first wave becomes the middle line. Add two lines above it and two below, following the same curve, and stop them a little short of the notches. Equal gaps matter most here, since every note head has to fit snugly into one space.
💡 Tip: Mark five spacing dots at the left, the middle and the right, then join them up.
Step 3: Sketch the treble clef in four parts
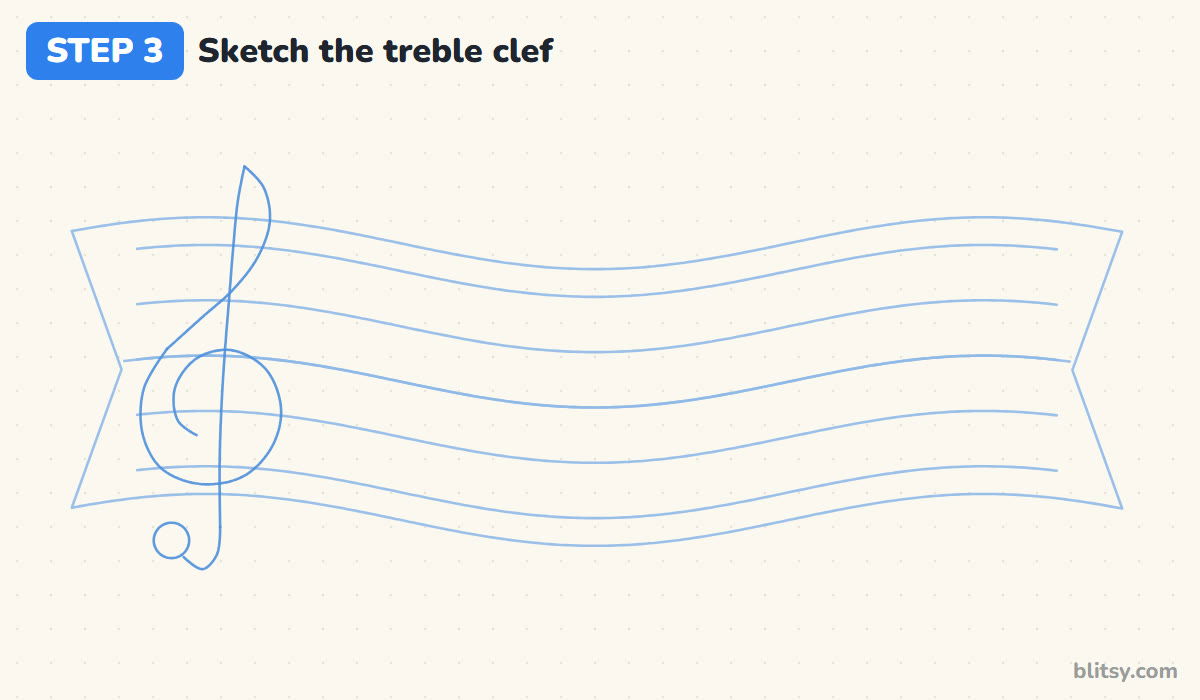
Near the left end, draw a tall, slightly leaning line from above the staff to well below it. From its top, curl a narrow loop down to the right so it crosses the line near the fourth staff line. Keep sweeping left and down into a round spiral that wraps around the second line from the bottom. That line is the note G, which is why this symbol is also called the G clef. Hook the bottom of the tall line to the left and add a small circle.




💡 Tip: Say it out loud as you go: line, loop, spiral, curl.
Step 4: Thicken the clef into one shape
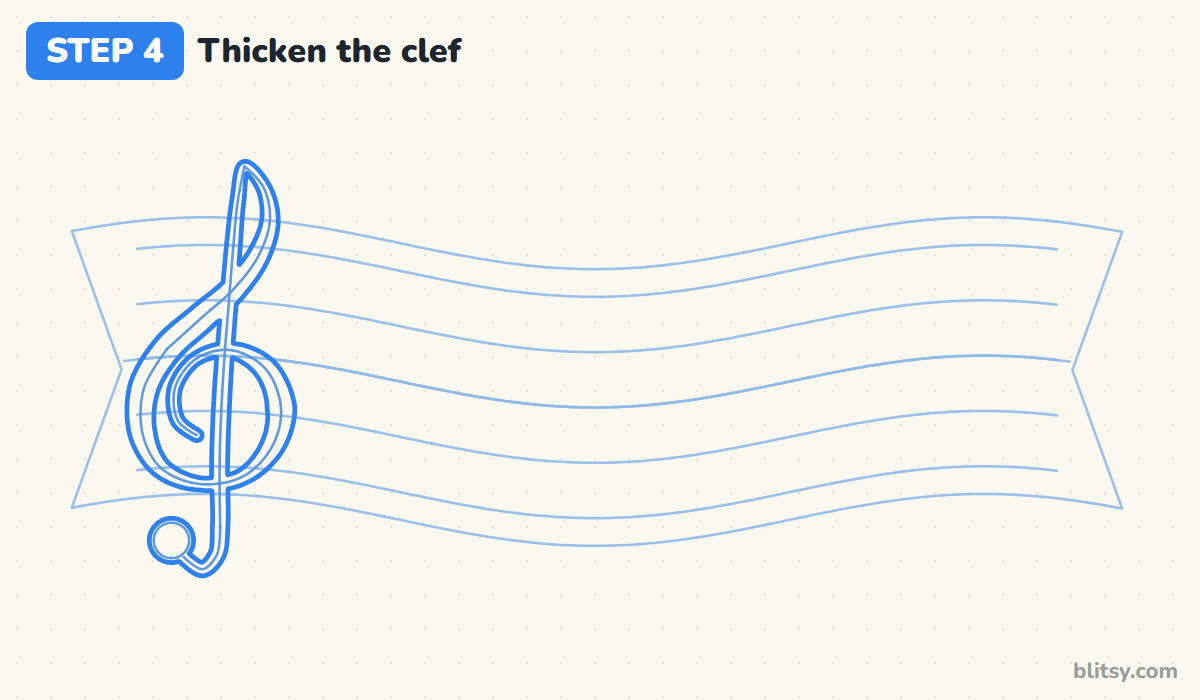
Trace a second line around your sketch to give the clef weight. Make it wide on the curved sides of the spiral and on the stroke that slants down through the staff, and thin at the pointed top and in the inner curl. When I teach this, I tell kids the thick and thin rhythm is what makes a clef look printed. Round the end circle into a solid dot.
💡 Tip: Turn the page as you work so your hand can follow the spiral.
Step 5: Draw a single eighth note
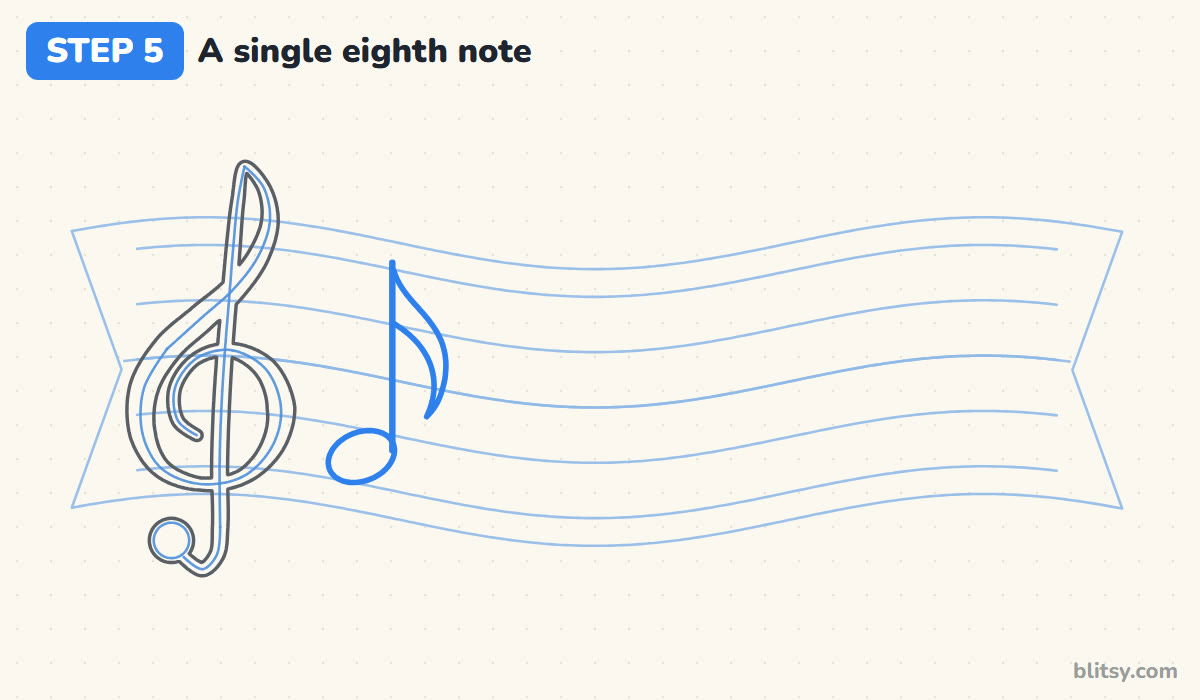
Put a tilted oval in the first space from the bottom; with a treble clef, that space is the note F. Tip it up to the right, like an egg resting on a slope. It sits below the middle line, so its stem rises from the right side of the head, about three and a half spaces tall. Add a flag that curves down to the right.
💡 Tip: Flags always wave to the right, whichever way the stem points.
Step 6: Join two eighth notes with a beam
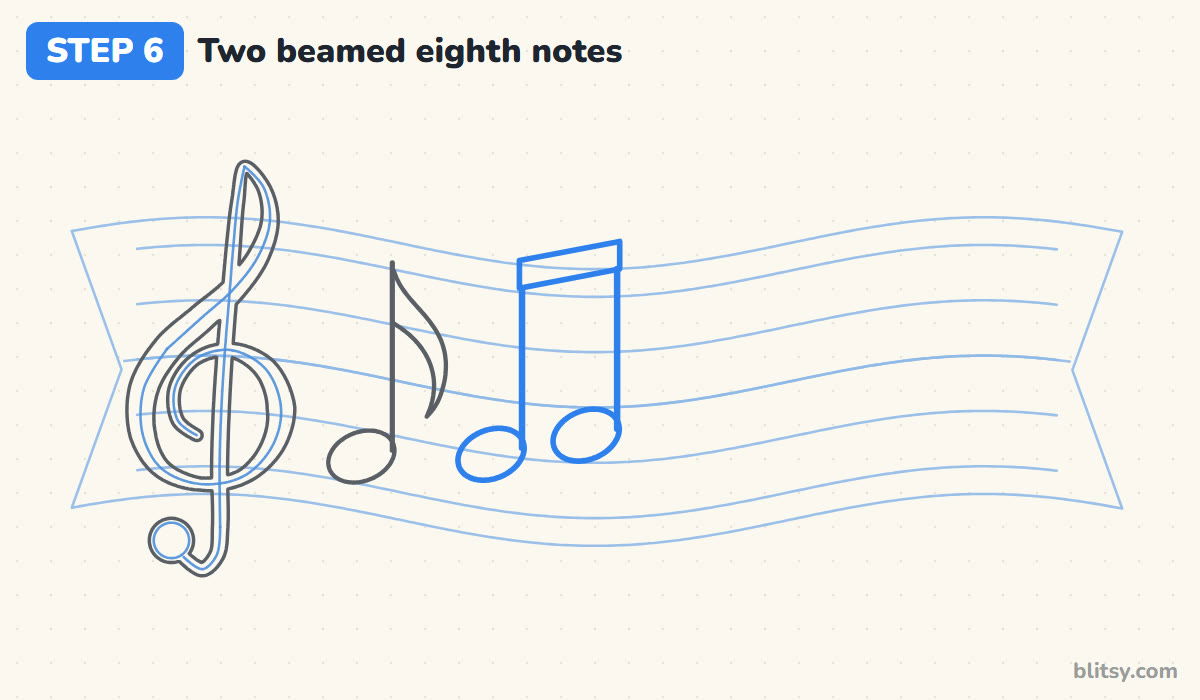
Two eighth notes side by side usually share a beam instead of two flags. Draw one head on the second line and the next one a step higher, in the space above it. Raise both stems from the right side, then connect their tops with a thick, slanted bar that rises with the second note.
💡 Tip: Make the beam about half a space thick so it reads clearly.
Step 7: Add a sharp sign and a quarter note
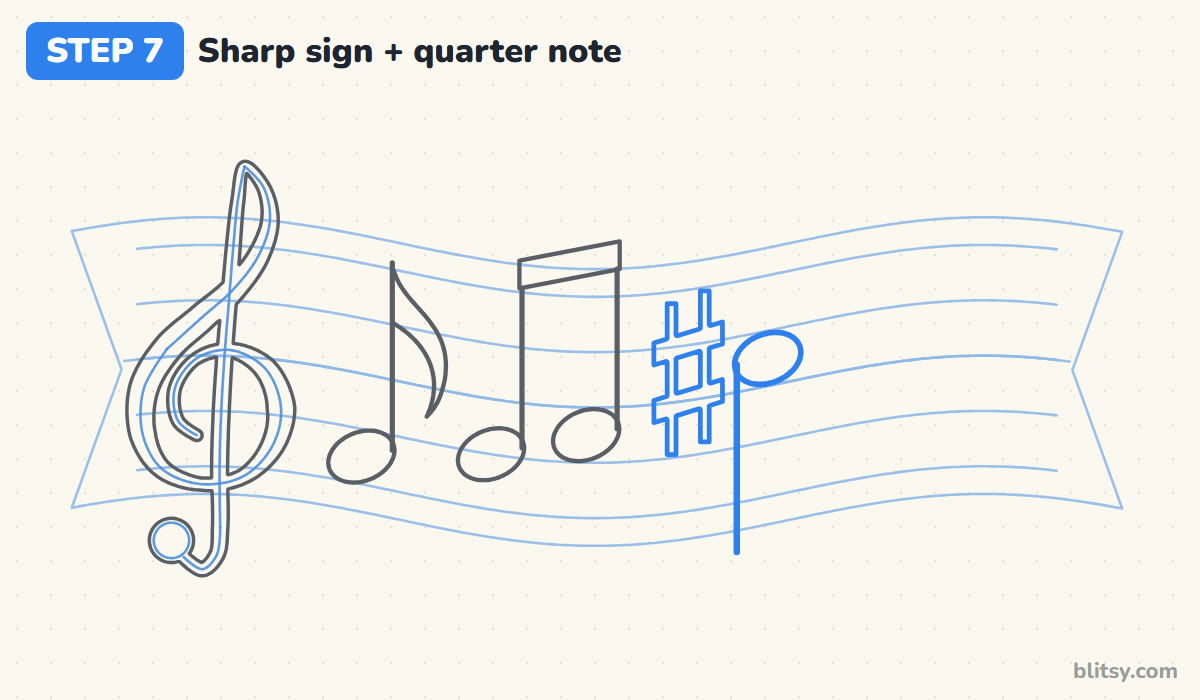
In the third space, just above the middle line, draw a filled oval for a quarter note. Since it sits higher than the middle, the stem flips and hangs down from the left side of the head. Just before it, draw a sharp: two upright lines crossed by two thick bars that climb to the right. The little box in the sharp must sit in the same space as its note.




💡 Tip: Leave a small gap between the sharp and the note so neither one looks crowded.
Step 8: Draw a hollow half note
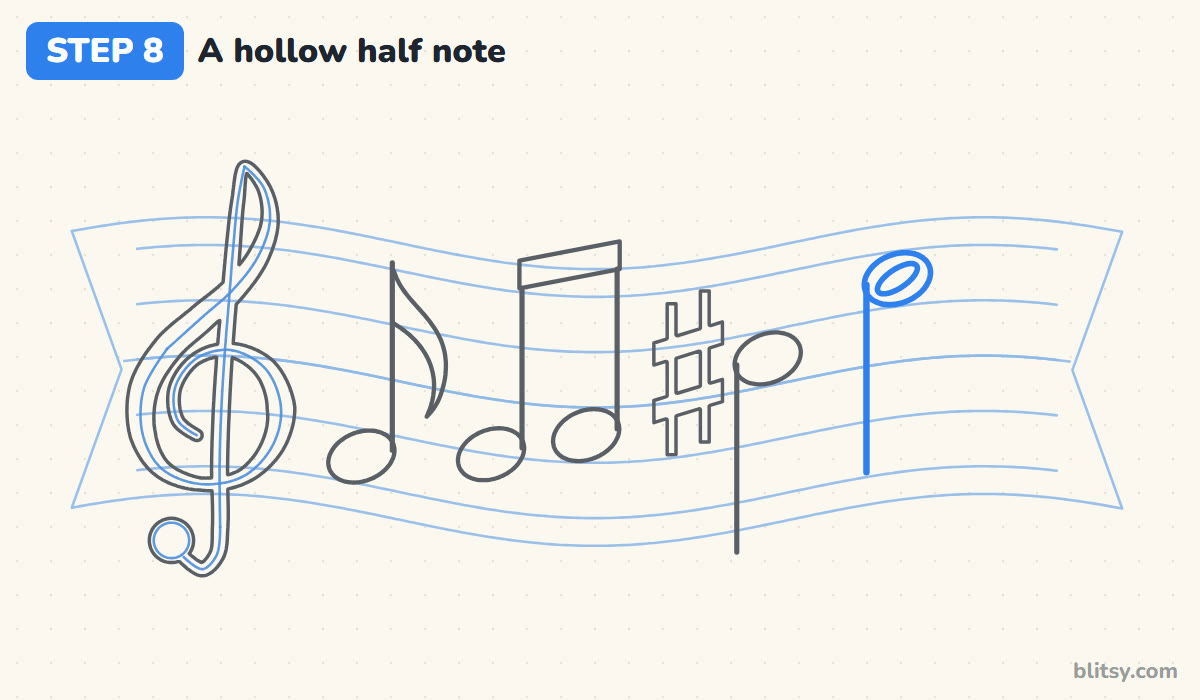
A half note is shaped like a quarter note, but its head stays empty. Draw the tilted oval in the top space, then a slim slanted oval inside it for the hole. It's high on the staff, so the stem goes down on the left again. The open head tells a musician to hold the sound for two beats instead of one.
💡 Tip: Keep the inner hole narrow; a big round hole turns the head into a ring.
Step 9: Add a heart-shaped note for fun
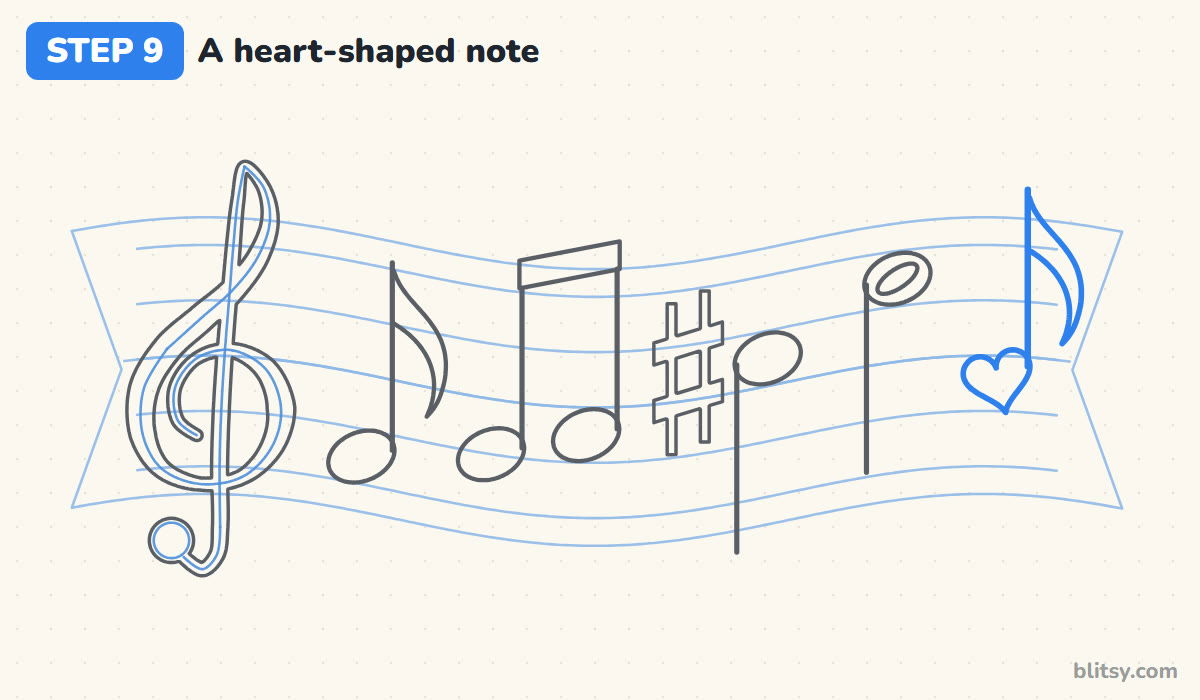
Close to the right end, swap the oval for a small heart in the second space from the bottom. Give it an up stem on the right side and a flag like your first eighth note. Real sheet music never uses hearts, but because the stem and flag follow the usual rules, it still looks at home. Keep the heart about the size of the other heads.
💡 Tip: Draw the two bumps of the heart first, then bring both sides down to the point.
Step 10: Sprinkle some sparkles
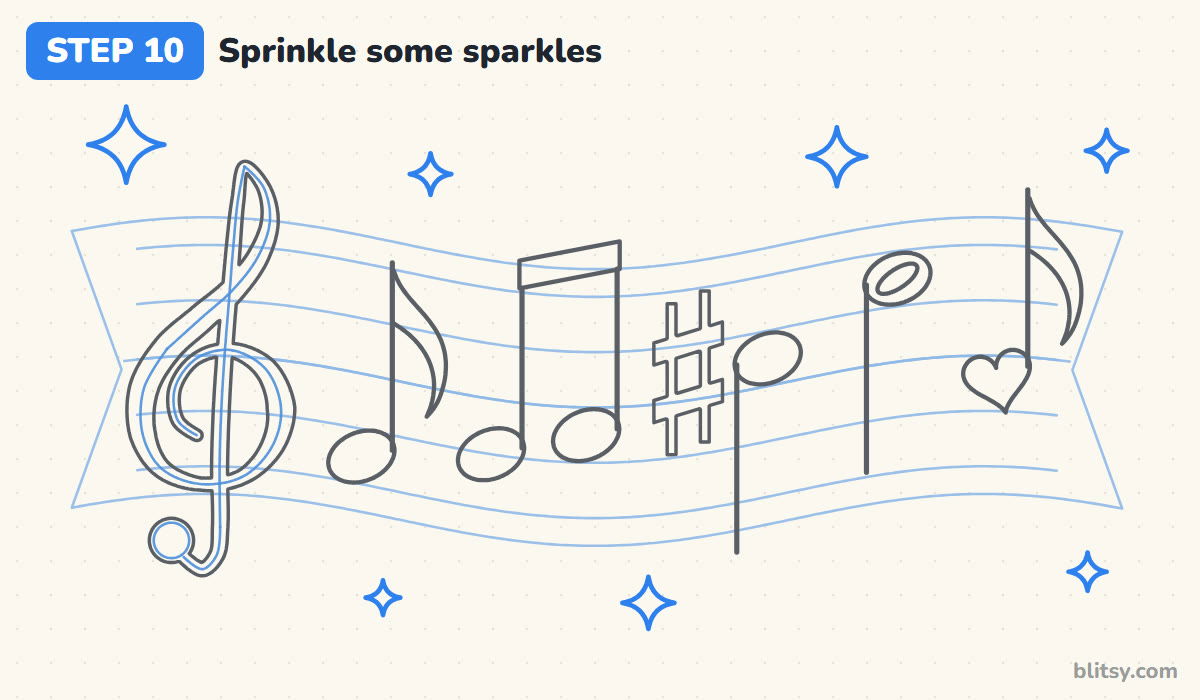
Fill the empty corners above and below the ribbon with four-point twinkles, each one four sharp points joined by inward curves. I mix one big sparkle with several small ones and keep them clear of the stems and flags.
💡 Tip: Scatter them unevenly; a tidy row of sparkles looks like wallpaper.
Step 11: Ink the lines and erase the guides
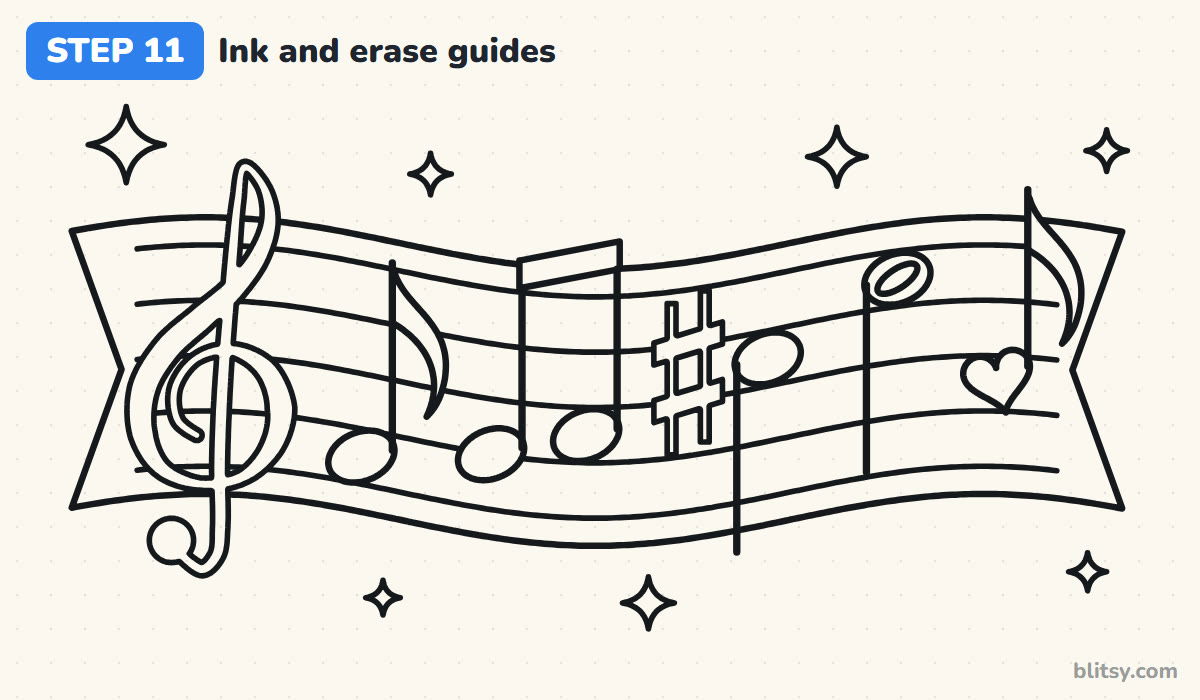
Trace the keeper lines with a black pen: the ribbon edges, the staff lines, the clef and every note. My trick for a clean result is simple. When a staff line reaches a note head, a flag, the beam, the sharp or the outside of the clef, lift the pen and start again on the other side. Stems may cross the lines. Once the ink is dry, erase all the pencil.




💡 Tip: Ink the staff lines last, once you can see exactly where each symbol interrupts them.
Step 12: Color the ribbon and the notes

Shade the ribbon light blue first, since a pale background makes bright notes pop. Then give each symbol its own color: purple clef, pink eighth note, blue beamed pair, gold sharp and quarter note, green half note rim and a red heart. Leave the half note's hole light blue and finish the sparkles in yellow.
💡 Tip: Keep your strokes going one direction on the ribbon for a smooth, streak-free blue.
Where Music Note Drawings Go Off Key
- Perfectly round note heads. Circles look like bubbles. Tilt every oval up to the right.
- Stems on the wrong side. An up stem belongs on the right of the head and a down stem on the left. Check each one before you ink.
- Flags pointing left. A flag always points to the right, even when the stem goes down.
- A clef spiral that misses the G line. If the curl wraps the middle line instead, it stops looking like a treble clef. Aim the spiral at the second line from the bottom.
- Uneven gaps between staff lines. Some heads won't fit their space. Mark spacing dots first and join them slowly.
Ways to Remix Your Music Ribbon
Once the shapes feel easy, change things up. Swap the ribbon for a straight staff. Black notes with silver sparkles give a classic sheet-music look. Older kids can add a bass clef; its two dots sit on either side of the fourth line from the bottom, the F line. Notes look great drifting out of an instrument, so the guitar drawing tutorial makes a natural next lesson, and the heart note leads into this heart drawing tutorial.
Music Notes Coloring Page and Printable PDF Guide
Rather practice on paper? The music notes coloring page has a colored example and the colors to use at the top, with a big outline below. The step-by-step PDF guide holds all 12 steps and tips. Both print on Letter or A4.
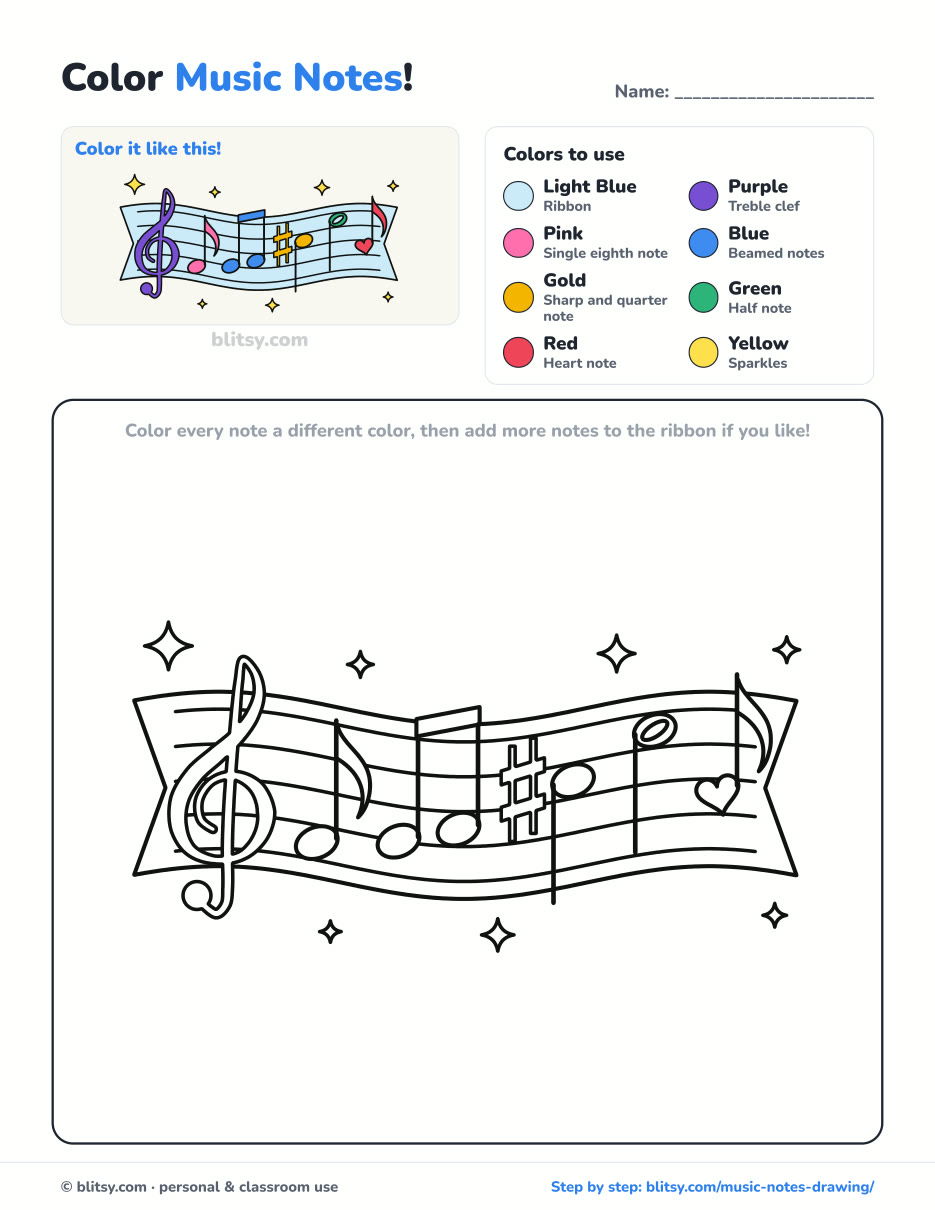
Black outlines with a colored example and the color names at the top. Ready to print and color.
⬇️ Download Coloring PageEvery step picture with its instructions and tips, to keep beside your paper while you draw.
⬇️ Download Drawing Guide📱 On a phone? Tap a download button, then open the file and choose Share → Save to Files or Print. On a computer, the PDF opens or saves straight to your Downloads folder.
Keep the Music Note Steps Handy
Music Notes Done? Draw These Characters and Cards
Each link opens a step-by-step tutorial, from cute characters to a Valentine card your notes could decorate.
- Hello Kitty Drawing: Draw her in blue overalls with a red bow on one ear in this Hello Kitty drawing step by step lesson.
- Love Drawing: Two teddy bears share a hug and a heart balloon in the love drawing tutorial.
- Dragon Head Drawing: One circle and a long box become a green dragon head in the how to draw a dragon head lesson.
- Valentine's Day Drawing: A card, a heart box of chocolates and a rose fill this Valentine's Day drawing tutorial.
- Chibi Drawing: The how to draw a chibi step by step guide uses the two-head method for a kid in a cat-ear hoodie.
- Joker Drawing: A cheerful chibi Joker holds up a playing card in the Joker drawing tutorial.
- Demon Slayer Drawing: Draw Tanjiro in his checkered haori, chibi size, with the Demon Slayer drawing tutorial.
Music Note Drawing Questions From Young Artists
What is the easiest music note to draw?
The quarter note: a filled, tilted oval with one straight stem and no flag. Add a flag and you have an eighth note.
Why is the treble clef called the G clef?
Its spiral curls around the second line from the bottom of the staff, and that line is the note G. The clef shows where G sits.
Which side of the note does the stem go on?
Below the middle line, the stem goes up on the right. Above it, the stem goes down on the left. A note right on the middle line usually takes a down stem.
How long does it take to draw music notes?
About 25 minutes, coloring included. If the clef feels hard, draw only the notes first and add the clef another day.
Next time a song gets stuck in your head, grab a pencil and try drawing its first few notes on a ribbon of your own. 🎶
Related posts:
 How to Draw a Whale Step by Step (Easy for Beginners)
 How to Draw Lungs Step by Step (Easy Science Diagram)
 How to Draw a Pineapple Step by Step (Easy Crown and Slice)
 How to Draw Iron Man Step by Step (Easy Chibi for Kids)
 How to Draw a Dress Step by Step (Easy Party Dress)
 How to Draw a Chicken Step by Step (Easy for Beginners)
 How to Draw a UFO Step by Step (Cute Alien Saucer)
 How to Draw Flames Step by Step (Easy Campfire Drawing)
 How to Draw a Moon Step by Step (Sleepy Crescent + Phases)
 How to Draw a Sunflower Step by Step (Big and Bright)
 How to Draw a Fall Leaf Step by Step (Maple, Oak and Birch)
 How to Draw a Mushroom Step by Step (Easy Storybook Toadstool)

